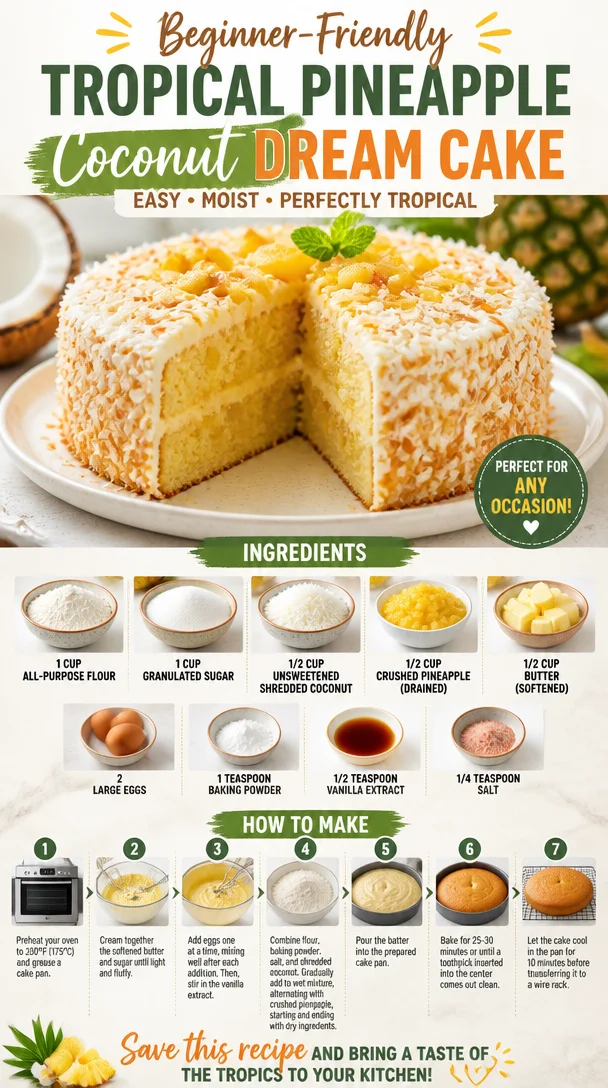
Beginner-Friendly Tropical Pineapple Coconut Dream Cake
Pineapple Coconut Dream Cake: A Slice of Paradise
Welcome to another delicious adventure in the kitchen, foodies! Today, I’m excited to share a recipe that fits right into our mantra at Clean Plate Cravings: vibrant, flavorful, and super approachable. So grab your apron, and let’s dive into making a Pineapple Coconut Dream Cake! This sweet treat is like a tropical holiday you can enjoy every day, perfectly light and oh-so-satisfying.
Imagine sinking your fork into a soft cake bursting with the bright flavors of pineapple and the rich texture of coconut—it’s like summer on a plate! Whether you’re hosting a gathering, indulging on a lazy Sunday, or just in need of some dessert therapy, this cake is here to elevate your day. Trust me, it’s that good!
Let’s get started on this dreamy dessert that will satisfy your sweet tooth while leaving you feeling nourished and energized. Ready? Let’s bake!
A Slice of Nostalgia
Growing up, my grandma had this magical ability to turn the simplest of ingredients into something extraordinary. One of her specialties was a coconut pineapple cake, which she lovingly called “the tropical delight.” I can still recall the intoxicating aroma wafting through her cozy kitchen, tempting all of us grandkids to hang around for a slice—or two!
Every year during family gatherings, that cake would steal the show. We’d eagerly await the moment she’d cut into it, the sound of the knife slicing through the moist cake echoing like sweet music. As kids, we’d rush to grab our plates, hoping for the biggest piece topped with a dollop of whipped cream. Those sunny days spent enjoying that cake became cherished memories, reminding me that food is about so much more than just ingredients—it’s about love, connection, and joy.
With this Pineapple Coconut Dream Cake, I hope to recreate that blissful experience and bring a little piece of my grandma’s kitchen to your home. Let’s stir up some sweet memories together!
Ingredients
To create this delightful cake, you’ll need a few simple ingredients. Here’s what you’ll need:
-
1 cup all-purpose flour
- This is the backbone of your cake. Feel free to swap it for gluten-free flour or whole wheat flour—just keep in mind it might slightly change the cake’s texture.
-
1 cup granulated sugar
- Sweetening up our cake! You could also use coconut sugar or a sugar substitute if you’re looking for a healthier option, but keep in mind the flavor and texture may change.
-
1/2 cup unsweetened shredded coconut
- A little texture and a lot of flavor! If you’re feeling adventurous, swap it for toasted coconut to add a nutty crunch.
-
1/2 cup crushed pineapple (drained)
- This adds moisture and a burst of tropical flavor! Fresh pineapple, finely chopped, can also work; just make sure to drain it well!
-
1/2 cup butter (softened)
- For that rich, buttery flavor. Feel free to use coconut oil or a dairy-free spread for a vegan twist.
-
2 large eggs
- These help to bind everything together! If you prefer an egg-free option, consider using flax eggs (1 tablespoon of flaxseed meal + 2.5 tablespoons of water) per egg.
-
1 teaspoon baking powder
- This is your leavening agent. It helps the cake rise. Make sure it’s fresh for the best results!
-
1/2 teaspoon vanilla extract
- Adds a warm, sweet aroma to our cake. Use pure vanilla extract for the best flavor—instead of imitation vanilla, if you can.
-
1/4 teaspoon salt
- A little salt enhances all the flavors! You can skip this if you’re watching your sodium intake.
Now that we have our ingredients ready, let’s make some cake magic happen!
Step-by-Step Instructions
-
Preheat Your Oven:
- First things first, set your oven to preheat at 350°F (175°C). This simple step is essential for baking! A hot oven helps your cake rise beautifully.
-
Prepare Your Cake Pan:
- Grease and flour a 9-inch round cake pan (you can also line it with parchment paper for easy removal). This can save you the headache of cake sticking, and trust me, you want that soft, fluffy goodness to come out without any fuss!
-
Cream the Butter and Sugar:
- In a large mixing bowl, add your softened butter and granulated sugar. Beat them together with an electric mixer or a sturdy wooden spoon for about 4-5 minutes until the mixture is light and fluffy. This aerates the batter and gives you that super moist cake texture. A little tip: Don’t skip this step!
-
Add the Eggs and Vanilla:
- Crack in the eggs, one at a time, mixing well after each addition. Pour in the vanilla extract and mix until evenly blended. The batter should look creamy and smooth at this point, with a lovely aroma wafting through the air!
-
Mix the Dry Ingredients:
- In a separate bowl, whisk together the flour, baking powder, shredded coconut, and salt. This step helps to combine the leavening agent with the flour and prevents clumps.
-
Combine the Dry and Wet Mixtures:
- Gradually add your dry mixture to the wet mixture, mixing until just combined. Avoid overmixing—this could lead to a dense cake instead of the fluffy delight we’re aiming for!
-
Fold in the Pineapple:
- Gently fold in the crushed pineapple using a spatula. This is where the dreamy flavor comes in! The pineapple adds such incredible moisture and sweetness.
-
Pour the Batter into the Pan:
- Carefully pour the batter into your prepared cake pan. Use a spatula to smooth the top, making sure it’s even so that it bakes uniformly.
-
Bake Away!
- Place your cake in the preheated oven and bake for 30-35 minutes, or until a toothpick inserted into the center comes out clean. Keep an eye on it—baking times can vary based on your oven.
-
Cool and Enjoy:
- Once baked, take the cake out of the oven and let it cool in the pan for about 10 minutes. Then, transfer it to a wire rack to cool completely before frosting or serving. Trust me, it’s going to be hard to wait, but cooling helps the flavors settle and the cake firm up.
Now that your cake is baked to perfection, you’re almost ready to enjoy a slice of paradise!
Serving Suggestions
When it comes to serving this Pineapple Coconut Dream Cake, less is often more! You can simply dust the top with powdered sugar for a classic look or top it with whipped cream to add extra delight. For a tropical touch, consider garnishing with fresh pineapple slices or a sprinkle of toasted coconut flakes. If you’re feeling fancy, a light drizzle of coconut cream or a passion fruit glaze can really take this cake to the next level!
Recipe Variations
Feeling adventurous? Here are some delightful variations to spice things up a bit:
- Lemon Coconut Twist: Add the zest of one lemon into your batter for a zingy flavor that pairs wonderfully with the sweetness.
- Chocolate Lover’s Delight: Incorporate dark chocolate chips into the batter for a delicious contrast that will please chocolate lovers!
- Tropical Fusion: Add in some chopped macadamia nuts or walnuts for a delightful crunch and extra flavor.
- Coconut Whipped Cream: Top your cake with coconut-flavored whipped cream for an added layer of coconut bliss.
Don’t be shy; mix and match to find your own favorite twist!
Chef’s Notes
This Pineapple Coconut Dream Cake has come a long way from my grandma’s original recipe—it has evolved with me over the years. I’ve tinkered and swapped ingredients; experimenting has always been a treat! One time, I added a splash of rum for a beachy vibe and ended up with a cake that felt like a slice of summer vacation.
Every time I make it, I think of those sun-kissed family gatherings and laughter-filled afternoons. My hope is that this cake brings you and your loved ones just as much joy—and maybe even inspires new fond memories in your kitchen!
FAQs and Troubleshooting
-
Why is my cake dense?
- Overmixing the batter can lead to a dense cake. Make sure to mix just until combined!
-
What if my cake sticks to the pan?
- Ensure your pan is well-greased and floured. Lining with parchment paper is also a great backup plan.
-
Can I use fresh pineapple instead of canned?
- Absolutely! Just make sure to finely chop and thoroughly drain the fresh pineapple before adding it to the batter for the right texture.
-
How do I store leftovers?
- Store your cake in an airtight container at room temperature for up to 3 days or in the fridge for up to a week. You can also freeze it for later enjoyment—just make sure to wrap it tightly!
Nutritional Info
(Per slice, approximate values may vary)
- Calories: 220
- Protein: 2g
- Fat: 9g
- Carbohydrates: 36g
- Fiber: 1g
- Sugar: 16g
And there you have it—the recipe for Pineapple Coconut Dream Cake! I hope you love making it as much as I love sharing it with you. Here’s to bringing a bit of sunshine into your kitchen, one slice at a time. Enjoy!
PrintPineapple Coconut Dream Cake
A vibrant, flavorful cake bursting with the tropical flavors of pineapple and coconut.
- Prep Time: 15 minutes
- Cook Time: 35 minutes
- Total Time: 50 minutes
- Yield: 8 servings 1x
- Category: Dessert
- Method: Baking
- Cuisine: Tropical
- Diet: Vegetarian
Ingredients
- 1 cup all-purpose flour
- 1 cup granulated sugar
- 1/2 cup unsweetened shredded coconut
- 1/2 cup crushed pineapple (drained)
- 1/2 cup butter (softened)
- 2 large eggs
- 1 teaspoon baking powder
- 1/2 teaspoon vanilla extract
- 1/4 teaspoon salt
Instructions
- Preheat your oven to 350°F (175°C).
- Prepare a 9-inch round cake pan by greasing and flouring it.
- Cream the softened butter and granulated sugar together until light and fluffy.
- Add the eggs one at a time, mixing well after each addition. Then add the vanilla extract.
- Mix the flour, baking powder, shredded coconut, and salt in a separate bowl.
- Combine the dry mixture with the wet mixture, mixing until just combined.
- Fold in the crushed pineapple gently using a spatula.
- Pour the batter into the prepared cake pan.
- Bake for 30-35 minutes or until a toothpick inserted comes out clean.
- Cool in the pan for 10 minutes, then transfer to a wire rack to cool completely.
Notes
Serve simply with powdered sugar or top with whipped cream for extra delight.
Nutrition
- Serving Size: 1 slice
- Calories: 220
- Sugar: 16g
- Sodium: 200mg
- Fat: 9g
- Saturated Fat: 5g
- Unsaturated Fat: 4g
- Trans Fat: 0g
- Carbohydrates: 36g
- Fiber: 1g
- Protein: 2g
- Cholesterol: 30mg
Keywords: cake, dessert, tropical, pineapple, coconut
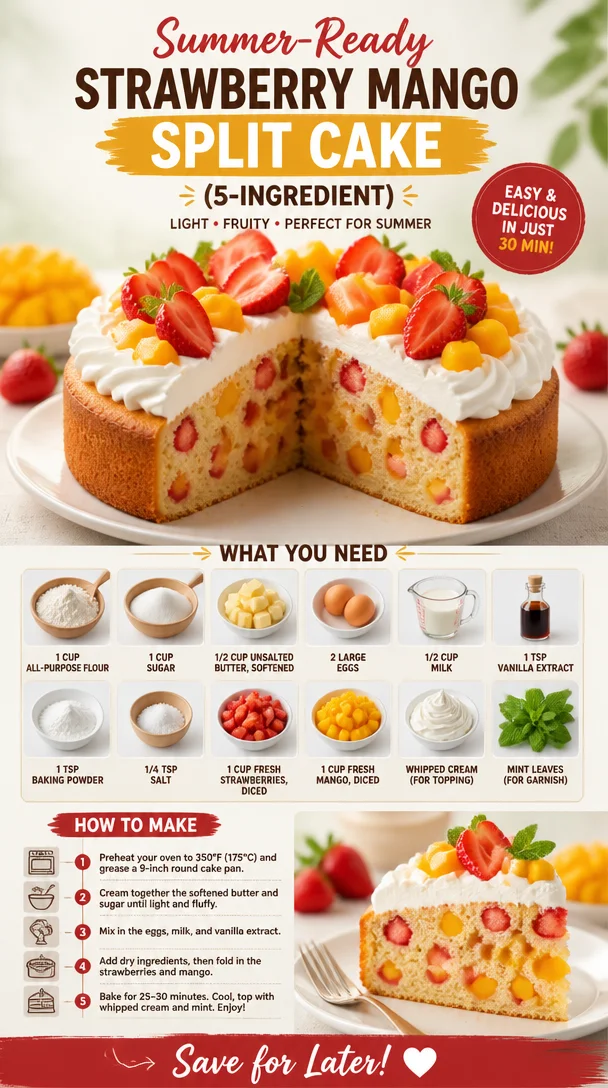
Summer-Ready Strawberry Mango Split Cake (5-Ingredient)
Strawberry Mango Split Cake: A Sweet Slice of Summer
Hello, my fellow food lovers! Grab your apron and let’s get cooking because today, we’re diving into an unforgettable treat that will brighten up your day—the Strawberry Mango Split Cake! With the perfect combo of sweet strawberries and juicy mangoes, this dessert is everything you need to celebrate summer. It’s light, fluffy, and bursting with flavor, promising to whisk you away to sun-soaked days.
This cake is not only a delightful culinary endeavor but also a wonderful way to create memories—either with friends gathered around the kitchen or family sitting together at the dining table, indulging in something truly special. The vibrant colors and fresh fruits will have everyone smiling before the first bite even reaches their lips! Plus, this recipe is incredibly approachable, making it perfect for bakers of any skill level.
Now, let me let you in on a little secret—baking doesn’t have to be a daunting task filled with meticulous measurements and complicated techniques. It should be a joyous, creative expression of love, and that’s exactly what we’re celebrating here. So, whether you’re looking to impress guests at a summer barbecue or simply treat yourself after a long week, this cake is your ticket to flavor town!
Get ready for a delicious journey as we blend together simple ingredients into a cake that’s as easy to make as it is delightful to eat. So, roll up your sleeves, and let’s whip up this Strawberry Mango Split Cake!
Personal Story
Growing up, our family was all about the gatherings—especially during the summertime. My mom would whip up her famous fruit desserts, and nothing took center stage quite like her fruit cakes. The air was always filled with laughter, the clinking of glasses, and, of course, my mom’s cheerful voice guiding us in the kitchen. One summer day, she decided we’d try something new: a cake inspired by the classic banana split, but with a fruity twist. That’s when the Strawberry Mango Split Cake was born!
I remember that day vividly. My little sister and I were tasked with chopping the strawberries and mangoes. While we giggled and argued over who got to use the knife first—safely supervised, of course!—the kitchen filled with the sweet fragrance of the ripe fruits. When the cake emerged from the oven, golden and fluffy, there was no waiting for it to cool.
We slathered on whipped cream and garnished it with mint leaves before taking that first bite. I still taste that moment, the combination of the moist cake melting with the freshness of the fruit—a culinary harmony that felt like summer in every bite. Now, as I’m sharing this recipe with all of you, I hope to spark your own memories in the kitchen, creating delicious moments that stick with you just as this cake has for me!
Ingredients
-
1 cup all-purpose flour
- The backbone of your cake! For a gluten-free option, you can substitute with almond flour or a gluten-free blend.
-
1 cup sugar
- Sweet goodness! If you’re looking to cut back on sugar, use coconut sugar or a sweetener of your choice, but remember to adjust the quantity as needed.
-
1/2 cup unsalted butter, softened
- This adds richness and moisture to our cake. If you prefer, you can swap it for coconut oil, though that might give a slightly different texture.
-
2 large eggs
- Eggs help bind the cake. For a vegan option, you can use flaxseed meal mixed with water (1 tablespoon flaxseed meal + 2.5 tablespoons water = 1 egg).
-
1/2 cup milk
- Whole milk is fantastic for moisture, but feel free to use almond or oat milk for a dairy-free alternative.
-
1 tsp vanilla extract
- Vanilla takes the flavor to another level. Use pure vanilla extract for the best taste, or try almond extract for a unique twist!
-
1 tsp baking powder
- This is your leavening agent, ensuring a lovely rise. Don’t confuse it with baking soda; they’re not interchangeable.
-
1/4 tsp salt
- Balances the sweetness and enhances flavor. A pinch can make all the difference!
-
1 cup fresh strawberries, diced
- The star of our cake! You can swap these with cherries or blueberries if you’re feeling adventurous.
-
1 cup fresh mango, diced
- Adds a tropical zing! If fresh is not available, use frozen mango, but thaw it well first.
-
Whipped cream (for topping)
- Light and fluffy creaminess to crown the cake! You can use store-bought or make your own with heavy cream.
-
Mint leaves (for garnish)
- A refreshing touch! This will elevate the presentation. You can skip this if you don’t have any on hand.
Step-by-Step Instructions
-
Preheat Your Oven: Start by preheating your oven to 350°F (175°C). A good chef always prepares the workspace, and this ensures your cake bakes evenly.
-
Grease the Cake Pan: Grab a round cake pan (9-inch works great) and grease it with butter or non-stick spray. This will prevent sticking and make sure your cake slides right out.
-
Mix the Dry Ingredients: In a mixing bowl, whisk together the flour, baking powder, and salt. This helps ensure that the baking powder is evenly distributed throughout the flour, giving you an even rise.
-
Cream the Butter and Sugar: In another bowl, beat the softened butter and sugar together until it’s light and fluffy. I like using a hand mixer for speed, but a good ol’ wooden spoon works too—it just might take a little longer. The air whipped in here will make your cake nice and fluffy!
-
Add the Eggs: One at a time, add the eggs to the butter mixture, making sure to mix well after each addition. This helps emulsify the mixture; don’t skip this step!
-
Incorporate Vanilla and Milk: Stir in the vanilla extract and milk until well combined. You’ll want this batter to be smooth and creamy, so take your time here.
-
Mix Dry and Wet Ingredients: Gradually add the flour mixture into the wet mixture, folding gently until just combined. Be careful not to overmix; a few lumps are okay!
-
Add the Fruits: Now, fold in the diced strawberries and mangoes, distributing them evenly throughout the batter. You want bites of fruit in every slice!
-
Pour into the Pan: Pour the batter into the greased cake pan, smoothing the top with a spatula.
-
Bake: Pop your cake into the oven for 25-30 minutes, or until the top is golden and a toothpick inserted in the center comes out clean.
-
Cool: Once baked, remove the cake from the oven and let it cool in the pan for about 10 minutes before transferring it to a wire rack to cool completely.
-
Serve: Slice your beautiful cake, and top each slice generously with whipped cream and a sprig of mint for that final touch. Enjoy every bite!
Serving Suggestions
When it comes to serving the Strawberry Mango Split Cake, presentation is key. I love to slice this lovely cake into wedges and arrange them on a vibrant platter for a pop of color. A dollop of whipped cream on top adds an enticing flair, and don’t forget those mint leaves! They not only look gorgeous but also bring a refreshing aroma to every slice. Perfect for picnics, parties, or a simple family dessert night!
Recipe Variations
Here are some fun twists to keep your cake fresh and exciting every time you bake it:
-
Berry Blast: Swap out the strawberries and mango for your favorite berries like blueberries or raspberries. Mix and match for a berry medley!
-
Coconut Dream: Add shredded coconut into the batter for a tropical touch.
-
Chocolate Drizzle: After the cake cools, drizzle melted dark chocolate over the top for an indulgent touch.
-
Spiced Up: Add a teaspoon of cinnamon or cardamom to the batter for a warm, inviting flavor profile.
-
Gluten-Free: Substitute the all-purpose flour for a gluten-free flour blend to accommodate dietary needs.
Chef’s Notes
This recipe has been with me for years, evolving alongside my baking journey. I remember the first time I made it—it was a disaster! I accidentally overmixed the batter, and it came out as a dense brick rather than a fluffy cake. But, like all cooking adventures, lessons were learned. Now, I can whip this up in my sleep, and it always brings joyful reactions from my friends and family. It’s the kind of recipe that invites laughter, stories, and delicious memories—just like those summer days spent in my childhood kitchen!
FAQs and Troubleshooting
1. My cake didn’t rise—what happened?
- This can happen for several reasons! Be sure your baking powder is fresh and that you didn’t overmix the batter. A good tip is to test your baking powder by adding a teaspoon to warm water; it should fizz!
2. Can I make this cake ahead of time?
- Absolutely! You can bake it a day in advance. Just keep it covered with plastic wrap at room temperature. I find that the flavors deepen overnight!
3. My cake is too dense—what can I do?
- A dense cake usually means it was overmixed or there wasn’t enough air incorporated. Remember to mix until just combined, and fold gently when adding in your fruits.
4. How do I store leftovers?
- Store any leftover cake in an airtight container in the refrigerator for up to 3 days. Serve chilled or at room temperature—they’re both delicious!
Nutritional Info
While the nutritional information may vary based on specific ingredient brands and measurements, a serving of this Strawberry Mango Split Cake contains approximately 250 calories, with a good balance of carbohydrates and some fats from the butter. Feel free to adjust ingredients like sugar and cream to fit your dietary goals!
So there you have it, folks! Your guide to crafting a fabulous Strawberry Mango Split Cake that will surely leave you with smiles and satisfied bellies. Enjoy the sweet journey, and remember—cooking is all about exploration, so feel free to experiment and make this cake your own! Happy baking! 🍰
PrintStrawberry Mango Split Cake

A delightful, light, and fluffy cake bursting with the flavors of fresh strawberries and juicy mangoes, perfect for summer celebrations.
- Prep Time: 15 minutes
- Cook Time: 30 minutes
- Total Time: 45 minutes
- Yield: 8 servings 1x
- Category: Dessert
- Method: Baking
- Cuisine: American
- Diet: Vegetarian
Ingredients
- 1 cup all-purpose flour
- 1 cup sugar
- 1/2 cup unsalted butter, softened
- 2 large eggs
- 1/2 cup milk
- 1 tsp vanilla extract
- 1 tsp baking powder
- 1/4 tsp salt
- 1 cup fresh strawberries, diced
- 1 cup fresh mango, diced
- Whipped cream (for topping)
- Mint leaves (for garnish)
Instructions
- Preheat your oven to 350°F (175°C).
- Grease a round cake pan with butter or non-stick spray.
- Mix the flour, baking powder, and salt together in a mixing bowl.
- Cream the softened butter and sugar together until light and fluffy.
- Add the eggs to the butter mixture one at a time, mixing well after each addition.
- Incorporate the vanilla extract and milk until well combined.
- Mix the dry ingredients into the wet ingredients until just combined.
- Add the diced strawberries and mangoes, folding gently into the batter.
- Pour the batter into the greased cake pan.
- Bake for 25-30 minutes or until a toothpick comes out clean.
- Cool the cake for about 10 minutes before transferring it to a wire rack.
- Serve each slice topped with whipped cream and a sprig of mint.
Notes
This recipe can be modified with different fruits or flavors. Try adding shredded coconut or a chocolate drizzle for variations!
Nutrition
- Serving Size: 1 slice
- Calories: 250
- Sugar: 17g
- Sodium: 180mg
- Fat: 10g
- Saturated Fat: 6g
- Unsaturated Fat: 3g
- Trans Fat: 0g
- Carbohydrates: 34g
- Fiber: 1g
- Protein: 3g
- Cholesterol: 55mg
Keywords: Strawberry, Mango, Cake, Summer Dessert, Fruit Cake, Baking
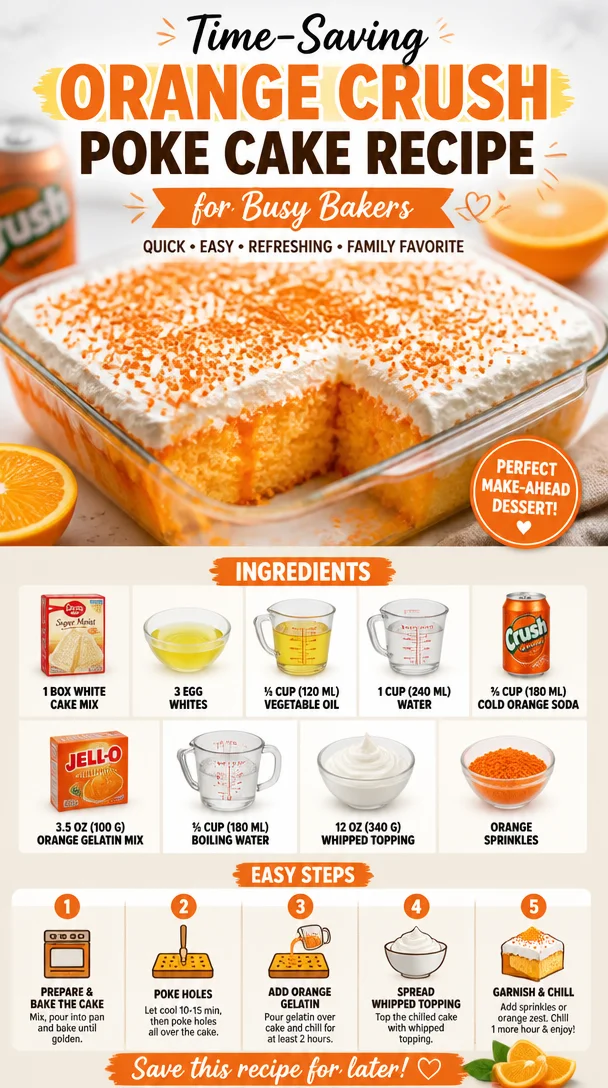
Time-Saving Orange Crush Poke Cake Recipe for Busy Bakers
Orange Crush Poke Cake Recipe: A Sweet and Tangy Delight
Ah, the joy of cake! There’s just something magical about dessert that brings people together, fills the room with warmth, and creates heartwarming memories. If you’re on a quest for a dessert that’s not just delicious but also a little nostalgic, pour yourself a glass of orange soda and get ready to dive into my Orange Crush Poke Cake recipe! This delightful cake combines the lightness of a white cake with the sweet, tangy essence of zesty orange—taking your taste buds on a vibrant journey.
Picture this: It’s a sunny summer afternoon with laughter echoing in the air. Friends and family are gathered for a backyard barbecue, and as the aroma of grilled burgers wafts through the air, the pièce de résistance is revealed—a radiant, orange-hued poke cake topped with fluffy whipped cream and orange sprinkles! The first slice is served, and you can see the excitement in everyone’s eyes as they dig in. This is not just any cake; it’s a celebration of flavors, reminiscent of those carefree summer days filled with laughter and sunshine.
This Orange Crush Poke Cake is not just a dessert; it’s a canvas for creativity and fun. Each poke in the cake is filled with sweet, tangy goodness, soaking through with a burst of citrus flavor that’s guaranteed to revive your spirit. It’s the kind of dessert that sparks conversation, reminiscing about childhood memories of sipping on fizzy orange sodas and enjoying sweet treats at family gatherings. It’s simple yet sophisticated, and it’s perfect for any occasion—from summer BBQs to birthday parties!
Are you ready to create some sweet memories? Let’s roll up our sleeves and get baking this scrumptious Orange Crush Poke Cake!
A Sweet Memory
Before we get into the nitty-gritty of baking, I can’t resist sharing a little story that gives this cake its soul. Growing up, my family had a tradition of hosting summer gatherings in our backyard. The highlight? My grandmother’s dessert table filled with her famous cakes. But the star of the show was always the poke cake—the one everyone swooned over!
Every year, she would make it for my birthday. There was something about that vibrant glaze made from orange soda that transported me back to childhood—innocent laughter, warm sunshine, and the scent of blooming flowers. My cousins and I would gather around the table, compete for the biggest slice, and dive right in, the whipped topping and sprinkles making it all the more exciting.
This Orange Crush Poke Cake is my homage to those blissful days filled with family, laughter, and the sweet anticipation of biting into that first squishy slice. I guarantee it will bring back fond memories of your own!
Ingredients
Here’s what you’ll need to whip up this radiant treat:
-
1 box white cake mix: This is the base of our cake. Opt for a high-quality mix for the best results. You can substitute it with a gluten-free cake mix if you’re catering to dietary restrictions.
-
3 egg whites: Egg whites add structure and volume to the cake. You could use two whole eggs instead, but the cake might be a bit denser. If you prefer a lighter texture, stick to the egg whites!
-
½ cup (120 milliliters) vegetable oil: Oil keeps the cake moist and tender. If you want a healthier option, you can swap it for unsweetened applesauce or Greek yogurt.
-
1 cup (240 milliliters) water: This provides the needed moisture for the cake. If you really want to elevate the orange flavor, you can substitute water with fresh orange juice!
-
¾ cup (180 milliliters) cold orange soda: The star ingredient! The fizz adds an exciting component to the cake. You can use any citrus soda if Orange Crush isn’t available.
-
3.5 ounces (100 grams) orange gelatin mix: This adds extra flavor and a lovely sweetness that seeps into the cake. If you want an alternative, try using lemon or lime gelatin for a twist!
-
¾ cup (180 milliliters) boiling water: This helps dissolve the gelatin perfectly.
-
12 ounces (340 grams) whipped topping: This fluffy topping makes the cake feel indulgent. If you’re feeling adventurous, use whipped cream for a more homemade touch.
-
Orange sprinkles: These are for the perfect finishing touch, adding visual appeal and a hint of fun! You can also use crushed candies or nuts for some extra texture.
Step-by-Step Instructions
Now that we have our ingredients, let’s bake this delicious cake together, step by step!
-
Preheat Your Oven: Set your oven to 350°F (175°C). This is an essential first step—you don’t want your cake to sit in a cold oven!
-
Mix the Cake Batter: In a large mixing bowl, combine the white cake mix, egg whites, vegetable oil, and water. Using a hand mixer or stand mixer, beat on medium speed until everything is well blended, about 2-3 minutes. Here’s a little tip: Scrape the sides of the bowl to ensure no dry mix sticks around!
-
Bake the Cake: Pour the batter into a greased 9×13-inch baking pan. Bake for 25-30 minutes, or until a toothpick inserted in the center comes out clean. Don’t forget to check it at the lower end of the time range—you want it moist, not dry!
-
Prep the Gelatin: While your cake is baking, let’s prepare the orange gelatin mix. In a medium bowl, dissolve the gelatin in the boiling water, stirring until it’s completely dissolved. Let it cool slightly while you wait for the cake to come out of the oven.
-
Poke the Cake: Once the cake has cooled—about 15 minutes—use the handle of a wooden spoon (or a skewer) to poke holes all over the top of the cake. You want enough holes for the gelatin to seep in, but don’t poke too hard—you want the structure to remain!
-
Pour the Gelatin: Slowly pour the prepared gelatin evenly over the poked cake. Let it soak in for about 30 minutes. This is where the magic happens; the gelatin will seep into those holes and create a flavorful filling!
-
Top It Off: After the cake has cooled completely and the gelatin is set, spread the whipped topping over the entire cake. It should be fluffy and light! Here’s a hack: Use a spatula dipped in hot water to smooth the topping easily.
-
Sprinkle It: Finally, sprinkle the orange sprinkles all over for that fun finishing touch!
-
Chill and Serve: Pop the cake into the fridge for at least an hour before serving. This helps all the flavors meld together beautifully!
Serving Suggestions
When it’s time to serve your vibrant Orange Crush Poke Cake, slice it into generous pieces while it’s still cold. You can garnish each slice with some additional orange slices, whipped cream dollops, or even a cherry on top for a retro throwback. Serve it alongside some vanilla ice cream for an extra-special treat. You’ll see the smiles light up on everyone’s faces as they dig in!
Recipe Variations
Bored of the classic Orange Crush? No problem! Here are some fun twists to make this cake your own:
-
Lemon-Lime Poke Cake: Swap out the orange soda and gelatin for lemon-lime soda and gelatin for a refreshing citrus twist.
-
Berry Delight: Add a mixed berry topping instead of whipped cream—strawberries, blueberries, or raspberries can give it a summer flair.
-
Coconut Cream: Incorporate some coconut extract into your whipped topping for a tropical twist. You could also sprinkle some toasted coconut on top!
-
Nutty Indulgence: Add chopped walnuts or almonds to the whipped topping for a crunchy texture that plays beautifully with the soft cake.
-
Chocolate Lover: Drizzle a little chocolate syrup over the whipped topping for a decadent touch—chocolate and orange are surprisingly delightful together!
Chef’s Notes
This recipe holds a special place in my heart, and I love how it continues to evolve! When I first started making poke cakes, I would grab whatever soda was close by. Over time, I discovered the joy of enhancing flavors and making each cake even more vibrant. You might find me experimenting with different gelatins or sodas depending on the season—trust me, a cherry soda version for the holidays is AMAZING!
And let’s not forget about my favorite kitchen blunder! I once mistook salt for sugar while trying to whip up a quick frosting for this cake. The moment my family bit into their slices, I saw their faces turn to pure confusion, followed by uncontrollable laughter. We still tease each other about that one!
FAQs and Troubleshooting
To help you on your baking adventure, here are some common questions and answers:
1. Why did my cake sink in the middle?
This could happen if the oven temperature is too low or if the batter was over-mixed. Ensure your oven is correctly preheated and mix just until combined.
2. How do I know when my cake is done baking?
Stick a toothpick into the center of the cake. If it comes out clean or with a few moist crumbs, it’s done! If not, give it a few more minutes in the oven.
3. Can I make this cake ahead of time?
Absolutely! You can bake the cake a day in advance, poke the holes, and store it covered in the refrigerator. Just add the whipped topping when you’re ready to serve!
4. My gelatin didn’t dissolve properly. What should I do?
If your gelatin didn’t dissolve completely, make sure you’re using boiling water and stirring it vigorously until fully dissolved. If it solidifies again, you may need to reheat gently on the stove—just don’t let it boil!
Nutritional Info (Optional)
While this Orange Crush Poke Cake is a fun treat, it’s always good to be aware of what’s in it! Each slice contains approximately:
- Calories: 250
- Total Fat: 10g
- Saturated Fat: 2g
- Carbohydrates: 37g
- Sugar: 20g
- Protein: 2g
The nutritional information will vary based on portion size and specific ingredient brands, so it’s always good to check!
And there you have it! Your guide to creating a delightful Orange Crush Poke Cake filled with memories, flavors, and smiles. I can’t wait to hear about your baking adventures and the memories you create along the way. So, grab your apron, turn on some music, and let’s get baking! Happy cooking!
PrintOrange Crush Poke Cake

A delightful poke cake combining the lightness of white cake with the zesty essence of orange, perfect for summer gatherings.
- Prep Time: 15 minutes
- Cook Time: 30 minutes
- Total Time: 45 minutes
- Yield: 12 servings 1x
- Category: Dessert
- Method: Baking
- Cuisine: American
- Diet: Vegetarian
Ingredients
- 1 box white cake mix
- 3 egg whites
- ½ cup (120 milliliters) vegetable oil
- 1 cup (240 milliliters) water
- ¾ cup (180 milliliters) cold orange soda
- 3.5 ounces (100 grams) orange gelatin mix
- ¾ cup (180 milliliters) boiling water
- 12 ounces (340 grams) whipped topping
- Orange sprinkles
Instructions
- Preheat your oven to 350°F (175°C).
- Mix the white cake mix, egg whites, vegetable oil, and water in a large bowl until well blended, about 2-3 minutes.
- Bake the cake in a greased 9×13-inch pan for 25-30 minutes, or until a toothpick comes out clean.
- Prep the orange gelatin by dissolving it in boiling water, stirring until fully dissolved.
- Poke holes all over the top of the cooled cake using the handle of a wooden spoon.
- Pour the gelatin evenly over the poked cake and let it soak for about 30 minutes.
- Top the cake with whipped topping once the gelatin has set.
- Sprinkle orange sprinkles on top for the finishing touch.
- Chill the cake in the fridge for at least 1 hour before serving.
Notes
Feel free to experiment with different soda and gelatin flavors or add toppings like mixed berries or coconut for variation.
Nutrition
- Serving Size: 1 slice
- Calories: 250
- Sugar: 20g
- Sodium: 200mg
- Fat: 10g
- Saturated Fat: 2g
- Unsaturated Fat: 8g
- Trans Fat: 0g
- Carbohydrates: 37g
- Fiber: 0g
- Protein: 2g
- Cholesterol: 0mg
Keywords: Orange Poke Cake, Citrus Cake, Summer Dessert, Orange Crush Cake
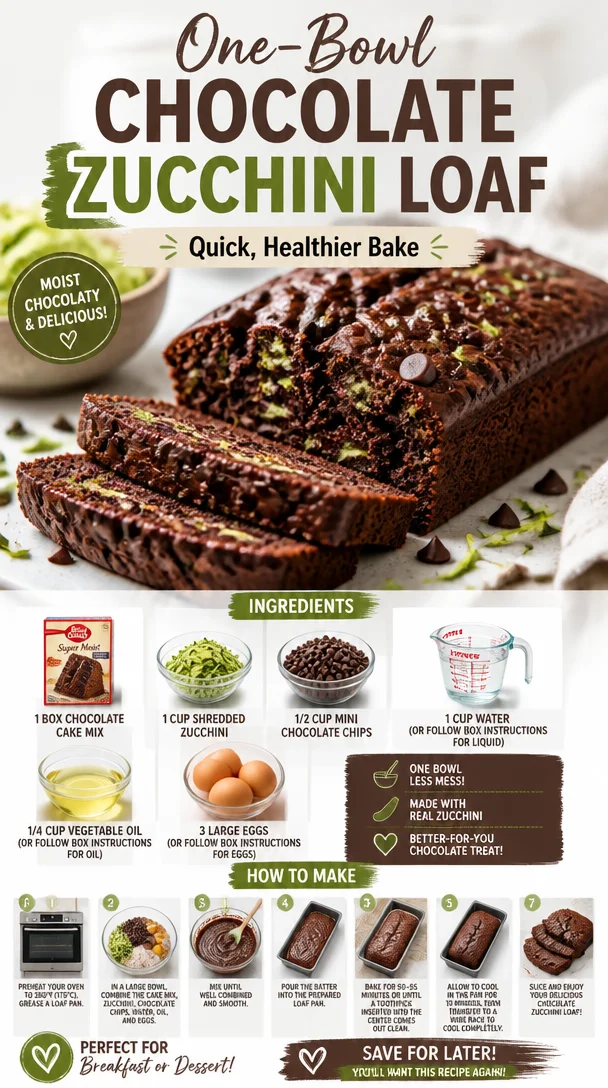
One-Bowl Chocolate Zucchini Loaf (Quick, Healthier Bake)
Dive Into Deliciousness with Chocolate Zucchini Loaf
Welcome back, food lovers! Today, we’re diving into one of my favorite guilty pleasures turned wholesome treat: Chocolate Zucchini Loaf. Yes, you heard me right—zucchini and chocolate in one glorious bite! If you’re wondering how on earth these two ingredients can coexist in a mouthwatering way, then stick around. This delightful loaf not only showcases the rich and decadent flavor of chocolate, but it also sneaks in that wonderful, nutrient-packed green veggie we know as zucchini.
Picture the moment you slice into this beautifully baked loaf and reveal its moist, chocolatey interior, dotted with mini chocolate chips. As the smell wafts through your kitchen, it’s hard to believe you just made something that, at first glance, sounds like a quirky health food hybrid. But trust me, this loaf is anything but dull. You’re going to want to make it over and over, whether it’s for brunch, dessert, or just a midday pick-me-up. Plus, I promise your family and friends will love it—without even realizing they’re getting a boost of veggies!
In today’s post, not only will I walk you through how to whip up this indulgent treat, but I’ll also share a bit of my personal experience with this recipe. You’ll understand why it’s one of my go-to favorites. Let’s get our aprons on, grab some ingredients, and jump into this adventure of flavors and nostalgia. Trust me, you’ll want to join me in this chocolatey escapade!
A Slice of Nostalgia
Ah, chocolate zucchini bread! The first time I tasted this enchanting loaf was years ago at my best friend’s birthday party. Her mom was a baking wizard, always concocting recipes that had us wide-eyed and begging for more. I’ll never forget walking into their kitchen, where the scent of warm chocolate enveloped me like a cozy hug. Little did I know, that delicious aroma was coming from a humble zucchini loaf that her mom insisted I try.
At that moment, my skepticism about veggies in desserts was swept away with one bite of that tender, rich bread. It was moist, not overly sweet, and the chocolate bliss danced on my taste buds, balanced perfectly by the faint earthy flavor of zucchini. I was hooked! Since then, I’ve taken that timeless recipe and infused it with my own twists, but the love for that initial loaf remains firmly etched in my memory. It’s proof that good food can create lasting connections and joyful experiences.
Now, let’s bring this memory to life in our own kitchens!
Gather Your Ingredients
Before we get started, let’s round up our ingredients, shall we? Here’s what you’ll need to make this irresistible Chocolate Zucchini Loaf:
-
1 box chocolate cake mix
This forms the base of our loaf, giving you that rich chocolate flavor easily. You can swap it out for a gluten-free cake mix if you’re looking for a gluten-free version. -
1 cup shredded zucchini
Don’t let this humble vegetable fool you! It adds moisture and nutrients to the loaf. If you’re out of zucchini, you can substitute it with applesauce, but it will change the flavor profile slightly. -
1/2 cup mini chocolate chips
Because, let’s be honest, you can never have too much chocolate! Feel free to use dark chocolate or even white chocolate for a different spin. -
1 cup water (or follow box instructions for liquid)
Check the cake mix instructions here, but water generally gets the job done for extra moisture. -
1/4 cup vegetable oil (or follow box instructions for oil)
Vegetable oil keeps our loaf tender and light, but you can swap it for melted coconut oil for a hint of tropical flavor. -
3 large eggs (or follow box instructions for eggs)
Eggs provide structure and stability to our bake. For a vegan twist, consider using flax eggs or chia eggs as an egg substitute.
Now that we’ve got our ingredients laid out like a picture-perfect grocery ad, let’s get baking!
Step-by-Step Instructions to Chocolate Heaven
Step 1: Prepping the Zucchini
Quick Tip: Before you dive into mixing, take a moment to prep our star player—the zucchini! Wash it thoroughly, and then grate it using the large holes of a box grater. Don’t forget to squeeze out any excess moisture using a clean kitchen towel or cheesecloth. This keeps our loaf from getting too soggy!
Step 2: Preheat and Prepare
Preheat your oven to 350°F (175°C). While the oven warms up, grab a loaf pan and grease it lightly with cooking spray or butter. You could also line it with parchment paper for easy removal—your future self will thank you!
Step 3: Mixing the Ingredients
In a large mixing bowl, combine the box chocolate cake mix, shredded zucchini, and mini chocolate chips. Then, add in the water, vegetable oil, and eggs. Using a spatula or spoon, mix gently until everything is just combined. Be careful not to overmix; we want our loaf to stay light and fluffy!
Pro Chef Hack: If you want a few extra flavor notes, consider adding a splash of vanilla extract or a sprinkle of cinnamon.
Step 4: Pouring and Baking
Pour the batter into your prepped loaf pan, smoothing it out with that trusty spatula. Bake in the preheated oven for 50-60 minutes, or until a toothpick inserted in the center comes out clean. Keep an eye on it as it bakes—nothing better than the smell of chocolate wafting through your house, right?
Step 5: Cooling it Down
Once the loaf is baked to perfection, remove it from the oven and let it cool in the pan for about 10-15 minutes. Then, carefully transfer it to a cooling rack to cool completely. This helps the loaf set and makes slicing a breeze!
Step 6: Slice, Serve, and Enjoy!
Once it’s cooled, slice up your loaf into thick, delicious pieces and serve with a dollop of whipped cream or a scoop of vanilla ice cream for an indulgent dessert. Remember, the beauty of this Chocolate Zucchini Loaf is that it’s perfect for breakfast, snack time—anytime, really!
Serving Suggestions
Ready to impress your friends and family with your beautiful Chocolate Zucchini Loaf? Try plating it alongside fresh berries for a pop of color. A light dusting of powdered sugar on top adds an elegant touch, and don’t forget a drizzle of chocolate sauce for those chocolate lovers!
Recipe Variations
Here are a few creative twists to shake things up with your loaf:
- Nutty Chocolate Zucchini Loaf: Fold in 1/2 cup of walnuts or pecans for a crunchy texture.
- Spicy Kick: Add a pinch of cayenne pepper for a surprising burst of heat that complements the chocolate beautifully.
- Banana Boost: Replace half of the zucchini with mashed ripe bananas for a delightful banana-chocolate combination.
- Herbal Infusion: A tablespoon of fresh mint or even basil can add a unique flavor twist if you’re feeling adventurous!
Chef’s Notes
One of the beautiful things about this recipe is how adaptable it is! Over the years, I’ve tried variations with different cake mixes and spices, and each time it still brings me back to that lovely memory of my best friend’s birthday.
Back in the day, I once tried to sneak in a bit of espresso powder into the batter for a "mocha" spin—and oh boy, was it divine! So don’t hesitate to get experimental; the kitchen is your playground!
FAQs and Troubleshooting
Here are a few common questions you might have as you embark on your baking journey:
Q1: My loaf didn’t rise much; what went wrong?
A: This may happen if your baking mix is expired, or the batter was overmixed. Make sure you gently mix until combined, and check your mix’s expiration date!
Q2: How can I keep my zucchini moist without being soggy?
A: Remember to squeeze out excess moisture. This step is key to achieving the perfect consistency in your loaf!
Q3: Can I freeze this loaf?
A: Absolutely! Once cooled, wrap it tightly in plastic wrap and place it in a freezer-safe bag for up to 3 months. Just thaw before serving!
Q4: Can I use whole-wheat flour instead of cake mix?
A: Yes, but this will alter the texture and moisture level. You may need to adjust the liquid and oil to ensure it’s not too dry.
Nutritional Info (Optional)
While I prefer to savor this Chocolate Zucchini Loaf without counting calories, I know many of you cherish this info. A single slice (based on typical uses for the ingredients) roughly contains:
- Calories: 220
- Total Fat: 7g
- Carbohydrates: 35g
- Protein: 3g
- Fiber: 2g
Just remember that all good things are best enjoyed in moderation!
So there you have it, my friends! A truly sensational Chocolate Zucchini Loaf that brings together comfort, nostalgia, and health in every slice. By sharing this recipe, I hope you create your own memorable moments in the kitchen and find joy in every bite. Happy baking, and as always, stay delicious!
PrintChocolate Zucchini Loaf
A moist and delightful bread blending rich chocolate with nutrient-rich zucchini. Perfect for brunch, dessert, or a fun snack.
- Prep Time: 15 minutes
- Cook Time: 60 minutes
- Total Time: 75 minutes
- Yield: 8 servings 1x
- Category: Dessert
- Method: Baking
- Cuisine: American
- Diet: Vegetarian
Ingredients
- 1 box chocolate cake mix
- 1 cup shredded zucchini
- 1/2 cup mini chocolate chips
- 1 cup water
- 1/4 cup vegetable oil
- 3 large eggs
Instructions
- Prep the zucchini by washing and grating it; squeeze out excess moisture.
- Preheat your oven to 350°F (175°C) and prepare a loaf pan.
- Mix the chocolate cake mix, zucchini, and chocolate chips in a bowl.
- Add water, vegetable oil, and eggs; mix until just combined.
- Pour the batter into the loaf pan and smooth it out.
- Bake for 50-60 minutes, or until a toothpick comes out clean.
- Cool the loaf in the pan for 10-15 minutes before transferring to a cooling rack.
- Slice and serve with whipped cream or ice cream.
Notes
Try adding nuts or spices for variations. Best enjoyed fresh, but you can freeze leftovers for up to 3 months.
Nutrition
- Serving Size: 1 slice
- Calories: 220
- Sugar: 12g
- Sodium: 300mg
- Fat: 7g
- Saturated Fat: 1g
- Unsaturated Fat: 3g
- Trans Fat: 0g
- Carbohydrates: 35g
- Fiber: 2g
- Protein: 3g
- Cholesterol: 30mg
Keywords: chocolate zucchini loaf, chocolate bread, healthy dessert, zucchini recipes
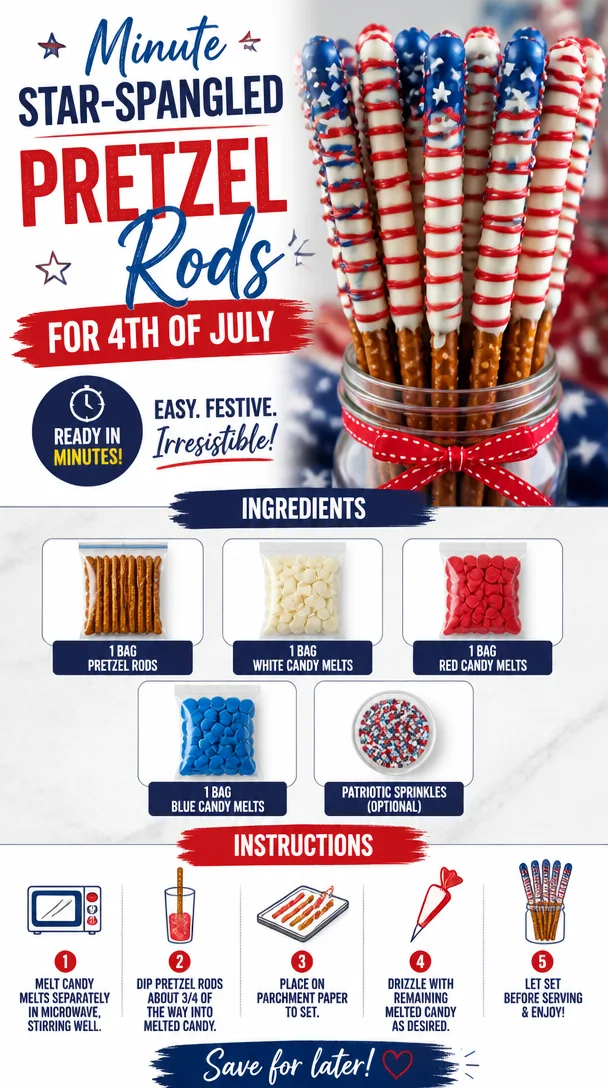
Minute Star-Spangled Pretzel Rods for 4th of July
Patriotic Pretzel Rods: A Fun and Festive Treat
Welcome to another delicious adventure in the kitchen! Today, we’re diving into a super fun treat that’s perfect for all those festive occasions when you want to show off your patriotic spirit. Think about Fourth of July picnics, Memorial Day barbecues, or just a fun snack to munch on while watching fireworks. We’re making Patriotic Pretzel Rods that are as delightful to eat as they are to look at.
These sweet and salty treats are easy to whip up and are guaranteed to impress your friends and family, whether you’re the host or just bringing a dish to share. Plus, they offer the perfect canvas for your creative side! So let’s get our aprons on and get ready to celebrate with style, flavor, and a little bit of color.
A Special Memory in the Kitchen
Thinking back to my childhood, I remember summer days filled with sunshine and laughter. One particular memory stands out: the Fourth of July back when I was around eight years old. My family would gather at my grandmother’s house, where her backyard transformed into a vibrant hub of red, white, and blue decorations.
I was always fascinated by the bustling kitchen where my grandmother made her famous snacks. The smell of fireworks mixed with the scent of her buttery popcorn wafting through the air was pure magic. One year, she surprised us all with chocolate-dipped pretzel sticks, but instead of wrapping them in chocolate, she used colorful candy melts, making them festive and fun!
We all eagerly dipped pretzel rods into those vibrant melts and decorated them with sprinkles. It became a delightful family tradition that I cherished more than the fireworks. And now, I carry that tradition forward, sharing it through these Patriotic Pretzel Rods, making memories and indulging in sweet nostalgia every time!
Ingredients You’ll Need
To make these fabulous Patriotic Pretzel Rods, gather the following ingredients:
-
1 bag pretzel rods
The sturdy base for our treat! You can use traditional pretzel rods or opt for gluten-free ones if you have dietary restrictions. -
1 bag white candy melts
These are perfect for creating a beautiful base layer. If you can’t find candy melts, almond bark or white chocolate can serve as great alternatives. -
1 bag red candy melts
A splash of bold color! You can substitute with dark chocolate dyed with red food coloring for a different flavor profile. -
1 bag blue candy melts
Keep the patriotic theme vibrant! Just like the red, you can swap this for blue chocolate or sprinkles if you’re feeling creative. -
Patriotic sprinkles (optional)
These add the finishing touch! If you don’t have themed sprinkles, feel free to use any festive ones you have on hand—they’ll still look fabulous!
Step-by-Step Instructions
Now that we’ve got our ingredients, let’s dive into this fun process!
-
Prepare Your Workspace
Start by laying down parchment paper on a baking sheet. This will provide a non-stick surface to place your completed pretzel rods on and make cleanup a breeze! -
Melt the Candy
Divide the candy melts into separate microwave-safe bowls (red, white, and blue). Microwave each bowl separately in 30-second intervals, stirring in between until fully melted. Be cautious not to overheat them! If you find the melts too thick, add a teaspoon of coconut oil or shortening—this helps to create a smoother consistency for dipping. -
Dip the Pretzel Rods
Grab a pretzel rod and dip it into the white candy melts, leaving a few inches at the bottom uncoated for a sturdy handle. Let any excess drip off. Place it carefully on the parchment paper. Repeat this with the remaining rods. Dip half in white for a classic look, or do a third to create fun stripes! -
Add Color
While the white chocolate is still wet, gently swirl in the red or blue candy melts. You can also create colorful zigzag patterns with a piping bag if you’re feeling ambitious. The key is to be creative—this is where you can really have fun! -
Sprinkle Away!
Before the candy melts set, sprinkle your patriotic sprinkles over the dipped pretzels. This is where you can go all out! The more, the merrier when it comes to sprinkles. -
Let Them Set
Allow the pretzel rods to sit for about 30 minutes to an hour, or until the chocolate has hardened. You can speed up the process by placing them in the refrigerator for about 10-15 minutes.
Serving Suggestions
When you’re ready to serve these delightful treats, you can arrange them in a glass jar for a festive centerpiece, or place them casually on a large platter. Pair them with sweet fruit dips or serve alongside other Patriotic-themed snacks for a fun-filled celebration. Trust me—these colorful rods look as good as they taste!
Creative Variations
Bring your own twist to these Patriotic Pretzel Rods with these variations:
-
Nutty Delight: After dipping the pretzels in candy melts, roll them in finely chopped nuts, like almonds or peanuts, for an added crunch.
-
Cookie Crumble: Crush some Oreo cookies and sprinkle them over the dipped pretzels for a delightful cookies-and-cream flavor.
-
Spicier Sweet: Add a dash of cayenne or sea salt to the melted chocolate for a sweet and spicy kick.
-
Different Colors: Customize the colors to match your team’s colors for that big game day or a birthday celebration!
-
Doughnut Inspiration: Instead of using sprinkles, use mini doughnuts or cereal (like Fruity Pebbles) to create a unique twist!
Chef’s Notes
Creating these Patriotic Pretzel Rods has been an evolving journey for me. What started as a fun kitchen project with my grandmother has transformed into a joyful tradition I love to share with friends and family. I often experiment by swapping out different flavors of candies or adding unexpected toppings. The laughter and good times shared over these treats remind me that every bite holds a special story.
And let’s not forget—sometimes in the kitchen, things don’t go as planned! I once dipped a rod in green by accident. Guess what? A “Patriotic Alien” rod emerged! It didn’t match the holiday theme, but it sure made for a great snack and a lot of laughs!
Frequently Asked Questions
-
Can I make these ahead of time?
Absolutely! You can make Patriotic Pretzel Rods a day in advance. Just store them in an airtight container at room temperature to keep them fresh. -
What if my candy melts aren’t melting smoothly?
If you notice your melts are clumping, it could be due to overheating. Try adding a bit of coconut oil to re-heat and stir until smooth. It’s an excellent trick to help with consistency! -
Can I use regular chocolate instead of candy melts?
Yes! Chocolate can be a tasty alternative. Just make sure to temper it if you want that glossy finish and snap. -
What if I don’t have sprinkles?
No worries! You can use any colorful toppings you have on hand, like crushed cookies, nuts, or even mini chocolate chips.
Nutritional Info (Optional)
While I don’t typically count the calories during summer celebrations, this treat is certainly on the lighter side compared to many desserts. Here’s a rough estimate per pretzel (assuming 1 pretzel rod with toppings):
- Calories: 100
- Total Fat: 4g
- Carbohydrates: 15g
- Protein: 1g
These numbers depend on how much candy melts and toppings you use, so feel free to adjust according to your preferences!
So there you have it—my love for the kitchen and all things tasty wrapped up in these Patriotic Pretzel Rods. Grab your favorite people, whip up this treat, and make memories that will last a lifetime. It’s all about cooking with joy, sharing, and indulging in the vibrant flavors of summer. Let’s raise our snacks and enjoy the festivities! Happy cooking!
PrintPatriotic Pretzel Rods

Fun and festive pretzel rods decorated with colorful candy melts and sprinkles, perfect for celebrations.
- Prep Time: 15 minutes
- Cook Time: 0 minutes
- Total Time: 45 minutes
- Yield: 12 servings 1x
- Category: Dessert
- Method: No-Cook
- Cuisine: American
- Diet: Vegetarian
Ingredients
- 1 bag pretzel rods
- 1 bag white candy melts
- 1 bag red candy melts
- 1 bag blue candy melts
- Patriotic sprinkles (optional)
Instructions
- Prepare your workspace by laying down parchment paper on a baking sheet.
- Melt the candy melts in separate microwave-safe bowls, heating each in 30-second intervals until fully melted.
- Dip a pretzel rod into the white candy melts, leaving a few inches uncoated at the bottom, and place it on parchment paper.
- Add red or blue candy melts while the white chocolate is still wet, swirling or piping creatively.
- Sprinkle with patriotic sprinkles before the melts set.
- Let the pretzel rods sit for 30 minutes to an hour to harden, or refrigerate for a faster setting.
Notes
These pretzel rods can be made a day in advance and stored in an airtight container. Experiment with different toppings for creativity!
Nutrition
- Serving Size: 1 pretzel rod
- Calories: 100
- Sugar: 10g
- Sodium: 200mg
- Fat: 4g
- Saturated Fat: 2g
- Unsaturated Fat: 2g
- Trans Fat: 0g
- Carbohydrates: 15g
- Fiber: 0g
- Protein: 1g
- Cholesterol: 0mg
Keywords: patriotic, pretzel rods, fourth of july, snack, festive treat
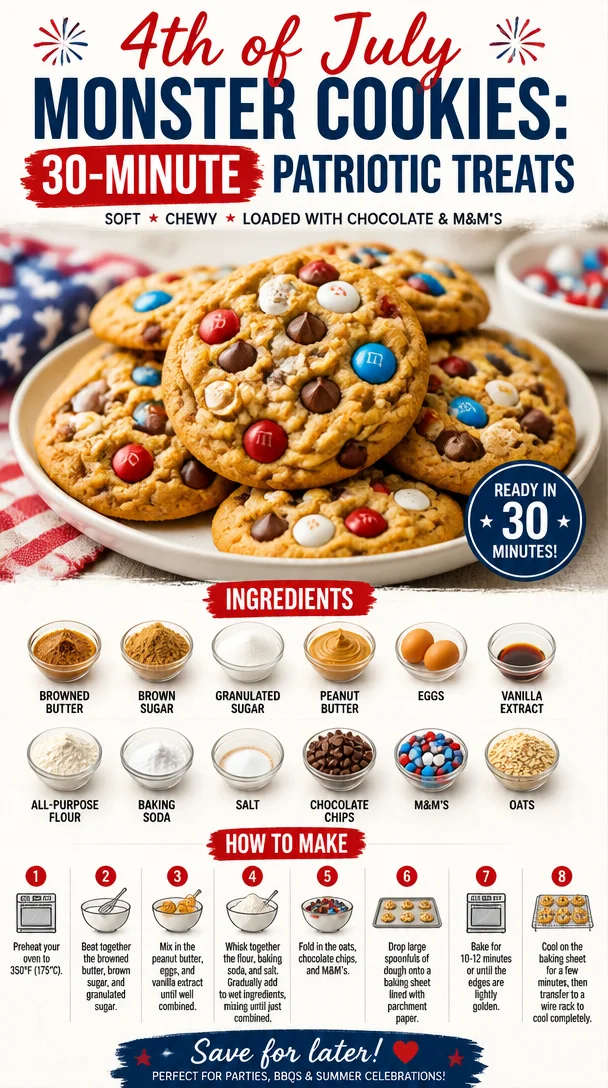
4th of July Monster Cookies: 30-Minute Patriotic Treats
4th of July Monster Cookies: A Sweet Celebration!
Happy 4th of July! It’s that time of year again when we gather with friends and family, fire up the grill, and celebrate our freedom under a sky filled with fireworks. While the hot dogs and burgers might be at the forefront of your July 4th menu, what about dessert? You can’t go wrong with a cookie that packs a punch, not just in flavor but in joy! Today, I’m thrilled to share my recipe for 4th of July Monster Cookies—the perfect sweet treat for your summer festivities.
These cookies are a delightful blend of gooey chocolate chips, vibrant M&M’s, and a hint of nostalgia that will bring you back to childhood days of baking with your parents or grandparents. With each bite, you’ll experience not only the flavors but also the chuckles and sweet memories of past celebrations. They’re easy to make, fun to eat, and visually striking—everything you need for a festive gathering.
Picture this: You and your loved ones lounging outside, the sun setting, laughter ringing through the air, and the aroma of freshly baked cookies wafting from the kitchen. Nothing beats that, right? So, roll up those sleeves, and let’s whip up a batch of these deliciously colorful Monster Cookies that will brighten your holiday and leave everyone asking for seconds.
A Whimsical Cookie Memory
When I think of cookies from my childhood, I am instantly transported to my grandma’s kitchen. Her small, cozy space was filled with the sweet aroma of baked goods, and her kitchen became a haven for creativity. One summer afternoon, I remember her introducing me to the magical world of cookies. Armed with a colorful bowl of sprinkles and a variety of tasty ingredients, we created a cookie explosion that looked like a party itself!
It was on that day—while I illegally snuck handfuls of chocolate chips and M&Ms—that the idea of Monster Cookies was born. Inspired by that spirit of joy, laughter, and indulgence, I developed this recipe that encapsulates all those feelings in one bite. Every time I take a warm cookie out of the oven, I’m flooded with memories of summer fun spent baking and enjoying the company of loved ones. And today, I want to pass that magic along to you!
Ingredients You’ll Need
Here’s what you’ll need to make these hearty, delightful Monster Cookies:
-
1 cup browned butter
- Browning the butter gives a nutty flavor that elevates these cookies. You can substitute with regular unsalted butter, but don’t miss out on that toasty goodness if you can help it!
-
1 cup brown sugar
- This helps create a chewy texture. You can replace it with coconut sugar for a lighter option, but the flavor will vary slightly.
-
1/2 cup granulated sugar
- Adds sweetness and contributes to the crunchy exterior. If you’re looking to cut down on sugar, feel free to reduce the amount but it might affect that crispy edge!
-
1 cup peanut butter
- Creamy or crunchy, it adds richness and flavor. Almond or sun butter can be used for a different taste.
-
2 large eggs
- They bind everything together and provide moisture. You can swap these with a flaxseed mixture if you want to go egg-free.
-
2 teaspoons vanilla extract
- This adds a warm, comforting aroma. Always opt for pure vanilla extract if possible for an authentic flavor.
-
3 cups all-purpose flour
- This forms the base of your cookies. Whole wheat flour can be used for a healthier twist but may affect the consistency a bit.
-
1 teaspoon baking soda
- A crucial ingredient for that pillowy texture. Make sure it’s fresh to achieve the best rise.
-
1/2 teaspoon salt
- Just a pinch balances all the sweetness. Feel free to use sea salt for extra flavor!
-
1 cup chocolate chips
- Semi-sweet or dark, they add a melty chocolatey goodness. Swap with white chocolate or butterscotch chips for a fun variation.
-
1 cup M&Ms
- These colorful candies bring the festive spirit for the 4th of July! To make them healthier, you can use dark chocolate or yogurt-covered variants.
-
1/2 cup oats
- Oats provide texture and a bit of heartiness. You can use quick oats or rolled oats, depending on what you have on hand.
Step-by-Step Instructions
Now let’s roll up our sleeves and get started! Follow these steps to create your own Monster Cookies.
-
Brown the Butter:
- In a saucepan over medium heat, melt the butter. Stir it frequently until it turns golden brown and you can smell that delicious nutty aroma. This will take about 5-7 minutes. Once browned, remove it from the heat and allow it to cool slightly. A little tip: don’t walk away from the stove, or your butter may burn!
-
Mix the Sugars:
- In a large mixing bowl, combine the browned butter, brown sugar, and granulated sugar. Use a mixer or a whisk and blend until it’s well combined and creamy. The mix should be a pale tan color; this is a good sign!
-
Add Peanut Butter & Eggs:
- Stir in the peanut butter until smooth, then add the eggs one at a time. Incorporate the vanilla extract until everything is mixed uniformly. A tip for easier mixing: make sure the peanut butter is at room temperature; it will blend in more easily.
-
Dry Ingredients:
- In a separate bowl, whisk together the flour, baking soda, and salt. Gradually add this mixture to your wet ingredients. Mix until just combined—over-mixing can lead to tough cookies, and we want them soft and chewy!
-
Add the Goodies:
- Fold in the chocolate chips, M&Ms, and oats gently. I love using a spatula for this step because it makes sure everything is evenly distributed without over-mixing. Trust me; every bite should have a bit of everything!
-
Chill the Dough:
- This step is optional but highly recommended! Place your dough in the fridge for at least 30 minutes. This helps the flavors meld together and results in thicker cookies.
-
Preheat the Oven:
- Preheat your oven to 350°F (175°C). Line a baking sheet with parchment paper—this will prevent sticking and make clean-up a breeze.
-
Scoop & Bake:
- Use a large cookie scoop (or a tablespoon) to portion out the dough onto the prepared baking sheet. Leave space between them as they will spread slightly. Bake for 10-12 minutes or until the edges are golden brown but the centers are still soft.
-
Cool & Enjoy:
- Remove from the oven, and let them cool for a few minutes on the baking sheet before transferring them to a wire rack. This allows them to firm up a bit, and you’ll get that perfect texture!
Serving Suggestions
When it comes to serving these Monster Cookies, let your creativity shine! You can stack them high on a decorative platter and place them front and center at your BBQ or picnic. Add in some fresh berries for a pop of color and a little freshness. You can also wrap them in clear cellophane for beautiful party favors that everyone will cherish. Pro tip: Serve them warm with a scoop of vanilla ice cream on top for the ultimate indulgence—think ice cream sandwich meets cookie heaven!
Recipe Variations
Get creative with these Monster Cookies! Here are some fun options:
- Nut Variations: Swap the peanut butter for almond or cashew butter for a unique twist.
- Flavor Additions: Add in some cinnamon or nutmeg for a warm, spiced flavor that contrasts beautifully with the chocolate.
- Dairy-Free Delight: Use dairy-free chocolate chips and nut butter for a tasty vegan option.
- Fruit Zests: Mix in some dried cranberries or chopped nuts to provide a different texture and flavor.
Chef’s Notes
Since I started baking Monster Cookies, they’ve evolved from simply being for the 4th of July to a year-round favorite at parties, picnics, and family gatherings. I’ve played with different flavor profiles, and each time I whip up a batch, it churns out new memories and laughter around the kitchen. Just the other day, my niece took it upon herself to add sprinkles to the cookie dough, turning these cookies into a rainbow celebration! It’s a reminder that baking is not just about the end product but also about the joy and memories we create along the way.
FAQs and Troubleshooting
Why are my cookies flat?
If your cookies spread too much, consider chilling your dough a bit longer or checking that the butter wasn’t too hot when combined with sugars.
Can I freeze these cookies?
Absolutely! You can freeze the cookies after baking. Make sure they’re completely cooled, then place them in an airtight container. They’ll last for up to three months.
How do I know when my cookies are done?
Look for a slightly golden edge but a soft center. Remember, they’ll continue to bake as they cool!
My dough seems too dry. What should I do?
If you find your dough is too dry, add a splash of milk or another egg to bring it together.
Nutritional Info
If you’re watching your calories, keep in mind that these cookies are rich and loaded with goodness! Each cookie (based on the recipe yielding about 24 cookies) contains roughly:
- Calories: 210
- Fat: 10g
- Carbohydrates: 30g
- Protein: 4g
Remember, these are indulgent treats meant to be enjoyed, so savor every bite!
Final Thoughts
I hope you’re as excited as I am to whip up a batch of these 4th of July Monster Cookies and create lasting memories with your loved ones. Baking is a beautiful way to share joy, and there’s nothing quite like that first bite of a warm, gooey cookie fresh from the oven. Whether you’re dressing them up for the holiday or enjoying them any old day, these cookies are sure to please. Happy baking, and remember, every day is worth celebrating—so let’s keep it fresh, simple, and seriously delicious!
Print4th of July Monster Cookies

Delightful cookies packed with chocolate chips and M&Ms, perfect for summer celebrations.
- Prep Time: 15 minutes
- Cook Time: 12 minutes
- Total Time: 45 minutes
- Yield: 24 cookies 1x
- Category: Dessert
- Method: Baking
- Cuisine: American
- Diet: Vegetarian
Ingredients
- 1 cup browned butter
- 1 cup brown sugar
- 1/2 cup granulated sugar
- 1 cup peanut butter
- 2 large eggs
- 2 teaspoons vanilla extract
- 3 cups all-purpose flour
- 1 teaspoon baking soda
- 1/2 teaspoon salt
- 1 cup chocolate chips
- 1 cup M&Ms
- 1/2 cup oats
Instructions
- Brown the butter: In a saucepan over medium heat, melt the butter. Stir it frequently until it turns golden brown and you can smell that delicious nutty aroma. This will take about 5-7 minutes. Once browned, remove it from the heat and allow it to cool slightly.
- Mix the sugars: In a large mixing bowl, combine the browned butter, brown sugar, and granulated sugar. Use a mixer or a whisk and blend until it’s well combined and creamy.
- Add peanut butter & eggs: Stir in the peanut butter until smooth, then add the eggs one at a time. Incorporate the vanilla extract until everything is mixed uniformly.
- Mix dry ingredients: In a separate bowl, whisk together the flour, baking soda, and salt. Gradually add this mixture to your wet ingredients. Mix until just combined.
- Add the goodies: Fold in the chocolate chips, M&Ms, and oats gently.
- Chill the dough: Place your dough in the fridge for at least 30 minutes.
- Preheat the oven: Preheat your oven to 350°F (175°C). Line a baking sheet with parchment paper.
- Scoop & bake: Use a large cookie scoop (or a tablespoon) to portion out the dough onto the prepared baking sheet. Bake for 10-12 minutes or until the edges are golden brown.
- Cool: Remove from the oven, and let them cool for a few minutes on the baking sheet before transferring them to a wire rack.
Notes
Serve with ice cream for an indulgent treat!
Nutrition
- Serving Size: 1 cookie
- Calories: 210
- Sugar: 14g
- Sodium: 150mg
- Fat: 10g
- Saturated Fat: 4g
- Unsaturated Fat: 6g
- Trans Fat: 0g
- Carbohydrates: 30g
- Fiber: 1g
- Protein: 4g
- Cholesterol: 30mg
Keywords: Monster Cookies, 4th of July, Cookies, Dessert, Summer Treat
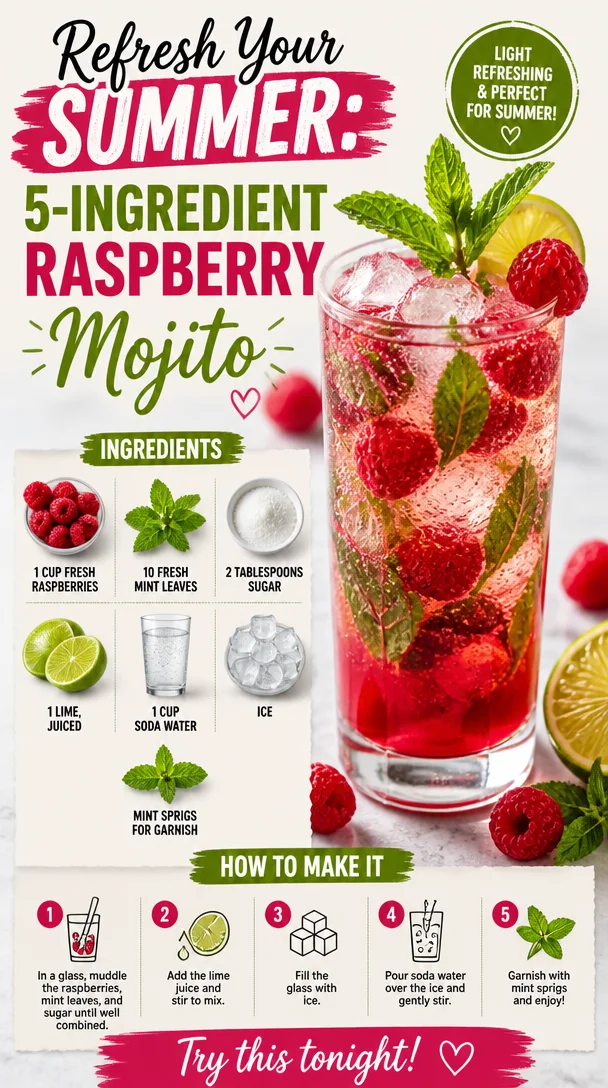
Refresh Your Summer: 5-Ingredient Raspberry Mojito
Refreshing Raspberry Mojito: A Splash of Summer in Every Sip
Welcome back, food lovers! Today, we’re diving into a crowd-pleaser that’s perfect for those sunny afternoons when you want something deliciously refreshing: the Raspberry Mojito. Whether you’re lounging by the pool, hosting a garden party, or simply unwinding after a long day, this drink is your go-to for both hydration and a hint of indulgence. Plus, it’s super easy to whip up, making it a perfect addition to your collection of must-have summer sips.
Now, when I think of mojitos, I can’t help but reminisce about the summer gatherings at my Grandma Lily’s house, where the garden was bursting with color, and laughter was the soundtrack of our afternoons. I remember her mixing up the drinks, with fresh mint sprigs straight from her garden, and the kitchen filled with that irresistible minty aroma. As she muddled the ingredients together, I couldn’t help but feel an air of excitement. Little did I know back then that I’d be crafting my own variations of those delightful summer drinks one day!
So, let’s channel that summer vibe and get started on this Raspberry Mojito! This recipe is not only vibrant and tasty, but it’s also a delightful way to showcase the beauty of fresh ingredients. Trust me; your friends and family will be impressed. Are you ready? Let’s mix it up!
Personal Story
Ah, the Raspberry Mojito. It brings back such cherished memories of summer days spent with my friends at the local park, blankets sprawled out on the grass, laughing and sharing stories over homemade snacks. One particularly unforgettable summer afternoon, my friend Mia showed up with a pitcher of her raspberry mojitos, a recipe she had just perfected. Those drinks were the perfect blend of sweetness and zesty lime, with the fresh mint creating an explosion of flavor. The vibrant color of the raspberries danced in the sunlight, and each sip was more refreshing than the last.
That day marked the beginning of my love affair with mojitos, and it wasn’t long before I found myself experimenting with flavors and ingredients, putting my own twist on this classic beverage. The Raspberry Mojito, however, always holds a special place in my heart and recipe book. It’s more than just a drink; it’s a delicious homage to the joyful times spent with people I love, surrounded by the beauty of nature and good company.
Ingredients
Here’s what you’ll need to create the perfect Raspberry Mojito:
-
1 cup fresh raspberries
These juicy gems not only bring a beautiful color to your drink but also offer a nice tangy sweetness. If you can’t find fresh raspberries, feel free to substitute them with frozen ones—just allow them to thaw before use. -
10 fresh mint leaves
Mint is the star of the show in a mojito! For maximum flavor, use fresh mint. If you’re in a pinch, spearmint or peppermint can be used as alternatives, but always go for the freshest option you can find. -
2 tablespoons sugar
This adds a touch of sweetness to balance the tartness of the raspberries and the brightness of the lime. You can substitute regular granulated sugar with coconut sugar or a sugar alternative like stevia or agave syrup if you prefer a healthier option. -
1 lime, juiced
Fresh lime juice is a must for that zesty kick! If you don’t have lime on hand, lemon juice works as a substitute but will impart a different flavor profile. -
1 cup soda water
This adds fizz and helps balance the sweetness of the sugar and raspberries. Don’t have soda water? You can use tonic water or a lemon-lime soda for a sweeter twist. -
Ice
Essential for keeping your drink chilled and refreshing on those hot summer days! -
Mint sprigs for garnish
A touch of mint on top not only looks beautiful but also enhances the fantastic mint aroma as you sip your drink.
Step-by-Step Instructions
-
Muddle the Raspberries and Mint
In a sturdy glass or cocktail shaker, add the fresh raspberries and mint leaves. Using a muddler or the back of a spoon, gently press down to release the juices from the raspberries and the essential oils from the mint. Be careful not to over-muddle; you want to avoid tearing the mint leaves too much, as this can lead to a bitter taste. Just enough pressure to infuse those delightful flavors will do! -
Add the Sugar and Lime Juice
Now it’s time to sprinkle in the sugar and squeeze your lime juice into the glass. Stir everything together gently until the sugar begins to dissolve. The acidity of the lime will help dissolve the sugar, creating a flavorful base for your mojito. If you’re using an alternative sweetener, add it at this point! -
Mix in Soda Water
Pour in your soda water gradually, allowing the fizzy bubbles to combine with the muddled raspberry and mint mixture. Give it a gentle stir to mix everything together without losing too much carbonation. This is where the magic happens! The lightness of the soda water enhances the fresh flavors and keeps your drink refreshing. -
Add Ice and Serve
Fill your glass with ice! I love using crushed ice for mojitos because it looks beautiful and keeps your drink icy cold. Pour the remaining mojito mixture over the ice. If you find your glass isn’t full enough, don’t hesitate to top it off with a splash more soda water. -
Garnish and Enjoy!
Finally, finish your Raspberry Mojito with a couple of mint sprigs on top. You can also add a raspberry or two for an extra pop of color! Serve it with a fun straw or cocktail umbrella to really bring out those summer vibes. Now sit back, take a sip, and enjoy that refreshing burst of flavor!
Serving Suggestions
When it comes to serving your Raspberry Mojito, presentation is key! Pour the vibrant drink into a tall glass, and don’t be shy with the ice. If you’re feeling fancy, you can even rim the glass with sugar for a sweet touch. Pair it with some crunchy, salty snacks like tortilla chips and fresh guacamole, or serve it alongside a light summer salad for a delightful afternoon feast. This drink is perfect for both casual get-togethers and chic gatherings alike.
Recipe Variations
Feeling adventurous? Here are a few creative twists to elevate your Raspberry Mojito experience:
- Berry Blast: Substitute some of the raspberries with muddled strawberries or blueberries for a mixed berry mojito.
- Coconut Twist: Add a splash of coconut water for a tropical vibe.
- Spicy Kick: Throw in a few slices of jalapeño while muddling to add a hint of spice to your drink.
- Herbal Boost: Experiment with other herbs like basil or even rosemary in place of mint for a unique flavor profile.
- Sparkling Lavender: Infuse your soda water with a touch of lavender syrup for a floral twist!
Chef’s Notes
Over the years, this Raspberry Mojito recipe has seen its fair share of experimentation in my kitchen! I’ve tried various fruits, sweetness levels, and even different types of mint. I have found that while the classic combo is unbeatable, there’s always room for creativity. Just the other day, I made a blueberry-lime mojito that was simply heavenly! Everyone has their own personal preferences, and that’s the beauty of cooking and mixing drinks. The best part? No matter how you customize it, you’re still left with that same refreshing experience.
FAQs and Troubleshooting
-
What if I don’t have fresh raspberries?
If fresh raspberries are out of season or unavailable, frozen raspberries work perfectly fine—just remember to thaw them before muddling. -
How do I make my drink less sweet?
If you’re looking to cut down on the sweetness, reduce the amount of sugar or opt for a natural sweetener that’s less sweet than sugar, like stevia. -
Can I make this a non-alcoholic version?
Absolutely! Simply follow the same recipe but omit any alcohol, and enjoy it as a refreshing mocktail. -
My mint leaves turned brown in the muddling process. What happened?
Over-muddling can bruise mint leaves and make them bitter. Use a gentle touch and apply just enough pressure to release the flavors without breaking them down too much.
Nutritional Info
While I typically focus more on the flavor rather than the numbers, a standard Raspberry Mojito contains roughly:
- Calories: 120-150 per serving (depending on sugar used)
- Sugar: 20-25 grams
- Carbohydrates: 27 grams
- Fat: 0 grams
- Protein: 0 grams
These numbers can vary with alternative sweeteners and portion sizes, so keep that in mind as you make adjustments!
Now that you have all the tools and techniques for crafting a delightful Raspberry Mojito, I can’t wait for you to try it out! Remember, healthy and delicious doesn’t have to be complicated. With fresh ingredients and a bit of love, you can create something that not only tastes incredible but also brings joy to your daily life. Cheers to refreshing summer sips and joyful moments! Enjoy!
PrintRefreshing Raspberry Mojito
A vibrant and refreshing Raspberry Mojito, perfect for summer gatherings and relaxation.
- Prep Time: 10 minutes
- Cook Time: 0 minutes
- Total Time: 10 minutes
- Yield: 2 servings 1x
- Category: Beverage
- Method: Mixing
- Cuisine: Cocktail
- Diet: Vegan
Ingredients
- 1 cup fresh raspberries
- 10 fresh mint leaves
- 2 tablespoons sugar
- 1 lime, juiced
- 1 cup soda water
- Ice
- Mint sprigs for garnish
Instructions
- Muddle the raspberries and mint in a sturdy glass or cocktail shaker.
- Add the sugar and lime juice, stirring gently until the sugar dissolves.
- Mix in soda water gradually, stirring gently.
- Add ice to the glass.
- Pour the mojito mixture over the ice and top with more soda water if desired.
- Garnish with mint sprigs and serve!
Notes
Use fresh mint for the best flavor. Can substitute with frozen raspberries if fresh are unavailable.
Nutrition
- Serving Size: 1 serving
- Calories: 150
- Sugar: 25g
- Sodium: 0mg
- Fat: 0g
- Saturated Fat: 0g
- Unsaturated Fat: 0g
- Trans Fat: 0g
- Carbohydrates: 27g
- Fiber: 2g
- Protein: 1g
- Cholesterol: 0mg
Keywords: Raspberry Mojito, Summer Drinks, Refreshing Cocktail, Non-Alcoholic Drink
Coconut Pineapple Mojito: 5-Ingredient Summer Cocktail
Refreshing Coconut Mojito with Pineapple: A Taste of Paradise
Ah, the coconut mojito with pineapple—this tropical delight is the perfect way to elevate any gathering, or simply treat yourself after a long day. Picture this: you’re lounging in a hammock, the sun is setting, and a gentle breeze cradles you in bliss. While you might not always find yourself in a tropical paradise, you can definitely bring the essence of one to your kitchen with this easy, refreshing cocktail.
Let’s be honest, the traditional mojito is a classic, but what happens when you infuse it with creamy coconut and sweet pineapple? Pure magic! Kind of like a vacation in a glass. This cocktail is bursting with flavor, combining the tangy brightness of lime with the sweetness of fresh pineapple and a cool minty finish.
And here’s the best part—it’s super easy to make! Whether you’re hosting a summer BBQ, celebrating a birthday, or just unwinding at the end of a busy week, this coconut mojito brings all the feels with none of the fuss. So grab your blender, a few fresh ingredients, and let’s create something that’ll have your taste buds dancing!
A Slice of Nostalgia
I can still remember the first time I enjoyed a mojito on a sun-soaked beach in Costa Rica. The salty breeze contrasted perfectly with the sweetness of the drink, making every sip feel like pure bliss. I was there with friends, lounging under swaying palm trees, laughing and sharing stories as the sun dipped below the horizon.
Not long after returning, I found myself in a cozy kitchen experimenting with cocktails, a newfound tradition of mine, trying to replicate that beachside moment. With my love for coconut and pineapple, I decided to create a fruity twist on the classic mojito. The first time I introduced my Coconut Mojito with Pineapple to friends, their eyes lit up with delight, just like mine did on that beach. And honestly? Every sip takes me back to that unforgettable moment. That’s the magic of food, isn’t it? It transports you back to cherished memories while creating new ones.
Ingredients
Let’s gather our ingredients! This recipe is simple, fresh, and made with ingredients you can easily find. Here’s what you’ll need:
-
1 cup fresh pineapple chunks
- Sweet and juicy, fresh pineapple brings the tropical vibe. If fresh isn’t available, you can substitute with unsweetened canned pineapple chunks, but fresh is always better!
-
1/2 cup fresh mint leaves
- Cool and refreshing, mint is essential for that classic mojito flair. If you’re out of fresh mint, feel free to use a mint simple syrup as an alternative, though the fresh leaves are a must for that vibrant fragrance.
-
1 lime, juiced
- Limes add a zesty kick. If you’re in a pinch, lemon juice will work, but limes offer the unbeatable freshness that makes mojitos sing.
-
2 oz white rum
- This is where the party begins! Using white rum keeps the flavor light. If you prefer a non-alcoholic version, you can replace this with extra club soda for a mocktail version.
-
1 oz coconut cream
- Rich and creamy, coconut cream adds a dreamy depth. If you’re looking for a lower-calorie option, try coconut milk or a light coconut cream alternative.
-
Club soda
- Sparkling and bubbly, club soda gives the drink its refreshing effervescence. You can use flavored sparkling water if you want to mix it up!
-
Ice
- Essential for keeping your drink chilled and refreshing. To cut down on dilution, consider using large ice cubes.
-
Mint sprigs for garnish
- Not just for looks, these sprigs add an extra burst of aroma to every sip.
Step-by-Step Instructions
Alright, let’s make this Coconut Mojito with Pineapple! Follow these steps, and you’ll have a fabulous drink ready in no time.
-
Prepare Your Ingredients:
- Start by gathering all your ingredients and tools. You’ll need a blender, a muddler or wooden spoon, and a glass or cocktail shaker.
-
Blend the Pineapple and Mint:
- Toss the pineapple chunks and mint leaves into the blender. Pulse until you have a beautifully smooth mixture. This is where the party starts! If you’re craving more minty goodness, feel free to add a few more leaves.
-
Add Lime Juice and Rum:
- Pour in the fresh lime juice and white rum into the blender. Blend again until mixed well. Just a quick blend here—no need to overdo it!
-
Strain the Mixture (Optional):
- If you prefer a smoother mojito, strain the mixture into a large glass using a fine mesh strainer or cheesecloth. This will remove any bits of mint leaves or pulp, giving you a clean drink.
-
Mix with Coconut Cream:
- In a separate glass, combine the strained mixture with coconut cream. This is where the magic happens! Stir with a spoon until thoroughly mixed. If you’re feeling adventurous, you can use a cocktail shaker to give it a good shake.
-
Add Club Soda:
- Top off your glass with club soda to your liking. Stir gently to combine and keep that effervescence! This step is crucial for that refreshing fizz that we all love.
-
Prepare Your Glass:
- Fill a serving glass or mason jar with ice. Pour the mixture over the ice, allowing it to cascade through the ice cubes.
-
Garnish:
- Finish your drink with fresh mint sprigs for garnish and perhaps a slice of lime or pineapple on the rim. This boosts the presentation and makes your cocktail all the more inviting.
-
Serve:
- Serve immediately and enjoy your delicious Coconut Mojito with Pineapple! Sipping this cocktail is sure to transport you to a beach paradise, no packing required.
Serving Suggestions
To elevate your serving game, try using a fun glass like a mason jar or a classic highball glass. Consider pairing your coconut mojito with tropical appetizers like shrimp tacos, fish ceviche, or even a fresh summer salad. You could also set up a DIY cocktail bar, letting friends mix their own mojitos with different fruits and flavors! The more, the merrier.
Recipe Variations
Here are a few fun twists you can try to keep your coconut mojito exciting:
-
Berry Bliss: Add a handful of muddled strawberries or blueberries to bring in some fruity sweetness.
-
Ginger Zing: Incorporate fresh ginger for an added kick. It complements coconut beautifully!
-
Coconut Lime: Use coconut-flavored rum for an extra coconut punch, substituted for regular white rum.
-
Crystal Clear: For a lighter version, swap coconut cream for coconut water—and you’ve got yourself a revitalizing tropical refresher!
-
Minty Green: Feel free to mix in other herbs like basil or lemon verbena for a unique twist.
Chef’s Notes
As a chef, I love exploring flavors and textures in the kitchen, and this coconut mojito has evolved to become one of my staple cocktails. I often find myself swapping in various fruits depending on the season. I’ll never forget the time I made a watermelon mojito variant using the same technique, and it was an instant hit at a summer grill party.
One of my funniest kitchen moments is when I attempted to make a giant batch of these mojitos for a gathering. In my haste, I accidentally added salt instead of sugar! The reactions were priceless—but oh, what a lesson learned! Always taste as you go.
FAQs and Troubleshooting
Q: Can I make this mojito a day in advance?
A: While it’s recommended to serve this drink fresh, you can prepare the pineapple and mint mixture ahead of time, store it in the refrigerator, and mix in the coconut cream and soda right before serving.
Q: What should I do if it’s too sweet?
A: If your mojito turns out a bit sweeter than you like, add a splash of lime juice to balance it out. You can also increase the club soda to dilute it.
Q: Can I use dried mint instead of fresh?
A: Fresh mint is definitely preferable, but in a pinch, you can use dried mint. Just keep in mind that it may not deliver the same bold flavor—opt for about one-third of the amount of dried mint.
Q: How can I make this a non-alcoholic drink?
A: Simply replace the rum with more club soda or some coconut water for a refreshing mocktail. You won’t miss the alcohol with all the fresh flavors!
Nutritional Info
This Coconut Mojito with Pineapple is not only a treat for your taste buds but can also be enjoyed as a moderate indulgence. While the exact nutritional info can vary depending on your ingredient proportions, here’s a rough estimate per serving:
- Calories: ~220
- Fat: 5g (from coconut cream)
- Carbohydrates: 28g
- Sugar: 19g
- Fiber: 1g
- Protein: 0g
Drink responsibly, and enjoy the refreshing essence of the tropics in every sip!
So there you have it! My ultimate Coconut Mojito with Pineapple recipe, filled with flavor, nostalgia, and a dash of fun. Now, who’s ready to whip some up? Let’s toast to good times and even better memories! Cheers!
PrintCoconut Mojito with Pineapple

A refreshing tropical cocktail that combines the sweetness of pineapple with creamy coconut and the classic minty flavor of mojitos.
- Prep Time: 10 minutes
- Cook Time: 0 minutes
- Total Time: 10 minutes
- Yield: 2 servings 1x
- Category: Cocktail
- Method: Blending
- Cuisine: Tropical
- Diet: Vegetarian
Ingredients
- 1 cup fresh pineapple chunks
- 1/2 cup fresh mint leaves
- 1 lime, juiced
- 2 oz white rum
- 1 oz coconut cream
- Club soda
- Ice
- Mint sprigs for garnish
Instructions
- Prepare your ingredients: Gather all your ingredients and tools such as a blender, a muddler, and a glass.
- Blend the pineapple and mint: Toss the pineapple chunks and mint leaves into the blender and pulse until smooth.
- Add lime juice and rum: Pour the lime juice and white rum into the blender and mix well.
- Strain the mixture (optional): Use a fine mesh strainer to remove bits of mint leaves or pulp.
- Mix with coconut cream: Combine the strained mixture with coconut cream in a separate glass and stir until mixed.
- Add club soda: Top off with club soda and stir gently to combine.
- Prepare your glass: Fill a glass with ice and pour the mixture over the ice.
- Garnish: Decorate with fresh mint sprigs and enjoy your drink!
Notes
For a non-alcoholic version, substitute white rum with extra club soda.
Nutrition
- Serving Size: 1 serving
- Calories: 220
- Sugar: 19g
- Sodium: 10mg
- Fat: 5g
- Saturated Fat: 4g
- Unsaturated Fat: 1g
- Trans Fat: 0g
- Carbohydrates: 28g
- Fiber: 1g
- Protein: 0g
- Cholesterol: 0mg
Keywords: cocktail, coconut mojito, pineapple drink, refreshing drink, tropical cocktail
One-Bowl White Chocolate Raspberry Muffins: Simple & Fluffy
White Chocolate Raspberry Muffins: A Sweet Symphony of Flavor
Welcome back to Clean Plate Cravings, where we whip up delicious dishes that brighten your days! Today, let’s dive into a delightful recipe that’s sure to tickle your taste buds: White Chocolate Raspberry Muffins. These muffins are like a hug in a wrapper, combining the rich sweetness of white chocolate with the tartness of fresh raspberries. Trust me; your morning routine (or snack time) will thank you!
The Perfect Morning Treat
Imagine waking up to the smell of freshly baked muffins wafting through your kitchen—there’s something magical about that scent, isn’t there? These White Chocolate Raspberry Muffins are not just breakfast; they’re an experience that transforms ordinary mornings into something deliciously extraordinary. Whether it’s a lazy Sunday brunch or a quick grab-and-go snack, these muffins bring a splash of joy and tenderness to your day.
I first stumbled upon this combo during a lazy summer afternoon at my grandmother’s house. She would whip up her signature muffins, and I’d help her hunt down the ripe raspberries hidden among the garden vines. After a morning spent picking juicy berries, we would return to the kitchen, where the magic of baking would unfold. The anticipation of blending sweet white chocolate with the more tangy berry made it feel like we were creating a symphony of flavors and memories. I’ve cherished that moment ever since, and I want to share that love and joy through this recipe.
Ingredients
Before we dive into the cooking, let’s get acquainted with our key players—the ingredients that make these muffins sing!
-
2 cups all-purpose flour (250 grams): Flour is the backbone of our muffins! Make sure to fluff it up, spoon it into your measuring cup, and level it off for accuracy. If you’re feeling adventurous, consider swapping half of it for almond flour for a nutty twist.
-
½ teaspoon salt: Just a pinch! This tiny ingredient enhances the flavors and balances the sweetness. Don’t skip it!
-
2 teaspoons baking powder: This little powerhouse ensures your muffins rise beautifully. Make sure it’s fresh to keep your muffins nice and fluffy!
-
¾ cup granulated sugar: Sweetness is key here. Feel free to reduce it slightly if you prefer a less sweet muffin. You can also try using coconut sugar for a more caramel-like flavor.
-
2 large eggs (at room temperature): Eggs act as a binder and provide moisture. Room temperature eggs mix more easily into the batter, so take them out of the fridge ahead of time.
-
½ cup unsalted butter (melted and cooled): Butter adds richness and flavor. It’s essential to let it cool down; otherwise, it can scramble the eggs!
-
½ cup whole milk (room temperature): Milk contributes to a tender crumb. For a healthier version, swap it out for almond or oat milk!
-
1½ teaspoons vanilla extract: This is where the magic happens! Vanilla elevates the entire muffin’s flavor profile. Try using pure vanilla extract for the best taste.
-
6 oz raspberries (approximately 1 1/4 cups): Fresh or frozen raspberries work beautifully. If you’re using frozen, just toss them directly into the batter without thawing, and they’ll delightfully burst as they bake!
-
⅔ cup white chocolate chips: The star of the show! These sweet morsels melt into pockets of creamy goodness. If you’re feeling daring, you could use dark chocolate chips for a flavor contrast.
-
Coarse sugar for topping (optional): A sprinkle of coarse sugar adds a delightful crunch and sweetness on top. It’s all about that first bite!
Step-by-Step Instructions
Now that we have our ingredients ready, let’s get our hands dirty!
-
Preheat your oven: This is a crucial step! Set your oven to preheat at 375°F (190°C) and prepare your muffin tin by lining it with paper liners or gently greasing each cup. It’s time to make your kitchen smell amazing!
-
Mix the dry ingredients: In a medium bowl, whisk together the flour, salt, and baking powder. Whisking aerates the flour, ensuring your muffins will be light and fluffy.
-
Combine the wet ingredients: In a large bowl, combine the granulated sugar and melted butter. Use a whisk to blend them until smooth—this creates a lovely base! Now add the eggs, milk, and vanilla extract, mixing until everything is well incorporated.
Chef’s Hack: If you want to reduce dishes, you can also melt the butter in the same bowl used for the sugar. Just allow it to cool before adding the other wet ingredients!
-
Incorporate the dry ingredients: Gradually fold in the dry mixture into the wet ingredients using a spatula. Be gentle! Overmixing can lead to chewy muffins—yikes!
-
Add the raspberries and white chocolate chips: Gently fold in your beautiful raspberries and white chocolate chips. If you’re using fresh raspberries, toss them with a little flour beforehand to prevent them from sinking to the bottom. It’s all about those tasty bursts in every muffin!
-
Scoop and bake: Using an ice cream scoop or a generous spoon, divide the batter evenly among the muffin cups. Fill each cup about ¾ full for perfect rising. If you like, sprinkle the tops with coarse sugar for that extra sparkle. Slide them in the oven and bake for 18-22 minutes, or until they’re golden brown and a toothpick comes out clean from the center.
-
Cool and enjoy: Once baked, remove the muffins from the oven and allow them to cool in the tin for about 5 minutes before transferring them to a wire rack. Don’t rush this part; the aroma is worth taking a moment to savor!
Serving Suggestions
To serve these muffins, I suggest arranging them on a beautiful platter—maybe dusted with a sprinkle of powdered sugar for an elegant touch. Pair them with a steaming cup of coffee or tea for a cozy breakfast or snack experience. You can also slather a bit of butter or cream cheese on top for an extra indulgence.
Recipe Variations
Ready to jazz things up? Here are a few creative twists:
- Lemon Zest: Add a tablespoon of lemon zest to the batter for a citrusy pop to complement the raspberries.
- Oatmeal Crumble: Top your muffins with an oat crumble before baking for a tasty crunchy texture.
- Nutty Delight: Incorporate ½ cup of chopped nuts (like walnuts or pecans) for extra crunch.
- Peanut Butter Swirl: Create a delightful swirl by adding a spoonful of peanut butter into the batter before baking.
- Coconut Flakes: Toss in some unsweetened shredded coconut for a tropical vibe that pairs wonderfully with the raspberry!
Chef’s Notes
These muffins have evolved over the years in my kitchen! Initially, they were just a simple recipe I picked up from a friend. However, as my baking adventure continued, I started adding my personal touches—like fresh raspberries from my garden and fancy white chocolate chips. Each time I make them, I think of that sunny afternoon in my grandma’s kitchen. They’ve become a cherished recipe in my family and now a staple in yours!
FAQs and Troubleshooting
-
Why are my muffins dense?
- Dense muffins can often result from overmixing or using too much flour. Always spoon flour into your measuring cup and level it off!
-
How do I store my muffins?
- Store in an airtight container at room temperature for up to 3 days. For longer storage, freeze them in a ziplock bag for up to 3 months.
-
Can I use other berries?
- Absolutely! Blueberries, strawberries, or even blackberries work beautifully in this recipe. Just adjust the sweetness if needed!
-
What do I do if my muffins overflow?
- If this happens, it’s likely that your batter was overfilled. In the future, fill each cup about ¾ full to leave room for rising.
Nutritional Info (Optional)
While the nutritional info may vary based on your ingredient choices, each muffin is likely to contain roughly:
- Calories: 200
- Protein: 3g
- Carbohydrates: 28g
- Fat: 9g
- Sugar: 10g
Now that you have the recipe for these drool-worthy White Chocolate Raspberry Muffins, it’s time to gather those ingredients and get baking! I can’t wait for you to experience the joy and nostalgia they bring. Share your muffin-making adventures with me—I love hearing from fellow foodies! Happy baking!
PrintWhite Chocolate Raspberry Muffins
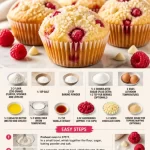
Delightful muffins that combine the rich sweetness of white chocolate with the tartness of fresh raspberries, perfect for breakfast or snack time.
- Prep Time: 15 minutes
- Cook Time: 22 minutes
- Total Time: 37 minutes
- Yield: 12 servings 1x
- Category: Dessert
- Method: Baking
- Cuisine: American
- Diet: Vegetarian
Ingredients
- 2 cups all-purpose flour (250 grams)
- ½ teaspoon salt
- 2 teaspoons baking powder
- ¾ cup granulated sugar
- 2 large eggs (at room temperature)
- ½ cup unsalted butter (melted and cooled)
- ½ cup whole milk (room temperature)
- 1½ teaspoons vanilla extract
- 6 oz raspberries (approximately 1 1/4 cups)
- ⅔ cup white chocolate chips
- Coarse sugar for topping (optional)
Instructions
- Preheat your oven to 375°F (190°C) and prepare your muffin tin by lining it with paper liners or greasing each cup.
- Mix the dry ingredients: In a medium bowl, whisk together the flour, salt, and baking powder.
- Combine the wet ingredients: In a large bowl, whisk the granulated sugar and melted butter until smooth, then add eggs, milk, and vanilla, mixing until incorporated.
- Incorporate the dry ingredients: Gradually fold the dry mixture into the wet ingredients using a spatula, being careful not to overmix.
- Add the raspberries and white chocolate chips, folding them in gently to avoid breaking the berries.
- Scoop the batter into muffin cups, filling each about ¾ full. If desired, sprinkle with coarse sugar.
- Bake for 18-22 minutes or until a toothpick comes out clean from the center.
- Cool in the tin for 5 minutes, then transfer to a wire rack to cool completely.
Notes
These muffins are best enjoyed fresh but can be stored in an airtight container for up to 3 days or frozen for up to 3 months.
Nutrition
- Serving Size: 1 muffin
- Calories: 200
- Sugar: 10g
- Sodium: 200mg
- Fat: 9g
- Saturated Fat: 5g
- Unsaturated Fat: 3g
- Trans Fat: 0g
- Carbohydrates: 28g
- Fiber: 1g
- Protein: 3g
- Cholesterol: 30mg
Keywords: muffins, dessert, raspberries, white chocolate, baking
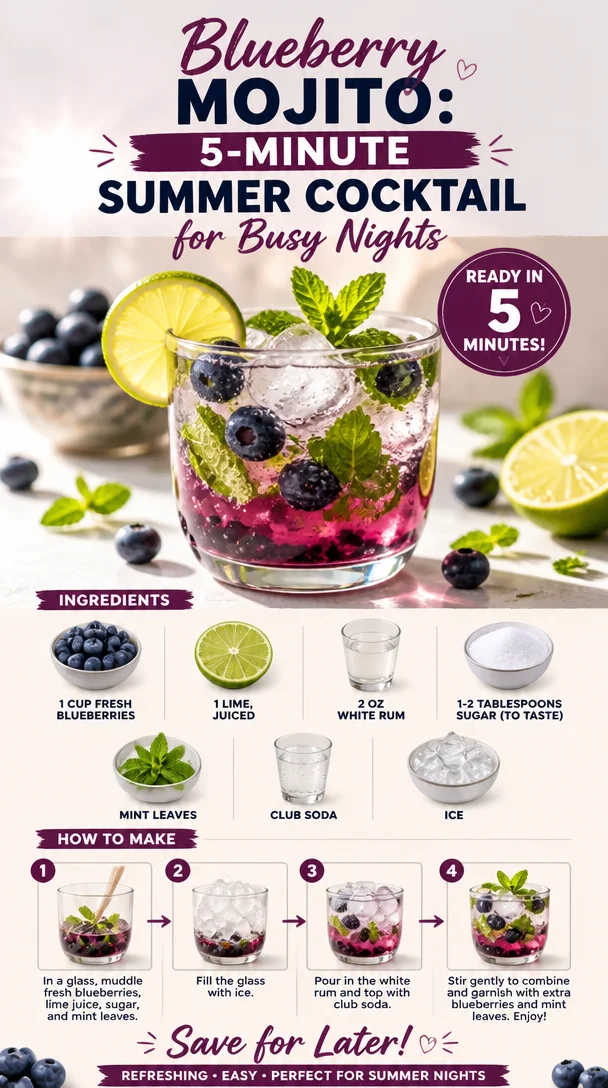
Blueberry Mojito: 5-Minute Summer Cocktail for Busy Nights
Cheers to Summer: The Perfect Blueberry Mojito Recipe
Hey there, fellow food enthusiasts! Today, I’m excited to share a refreshing treat that will brighten up your sunny days and elevate your gatherings: the Blueberry Mojito. This delightful cocktail combines the vibrant sweetness of fresh blueberries, the zesty kick of lime, and the cool aroma of mint. You might even find yourself sipping one while lounging on the patio, feeling like summer never has to end.
I love a good mojito, but there’s something special about this blueberry twist. It’s not just about the flavors; it’s about the memories tied to it—the laughter, the sunshine, the feeling of being carefree. So grab your muddler, and let’s dive into making the best Blueberry Mojito you’ve ever had!
A Taste of Summer: My Blueberry Mojito Story
I’ll never forget that summer afternoon at Grandma’s house, where everything felt alive with excitement. The air was thick with the smell of blooming flowers, and the sound of laughter filled the garden. It was then, surrounded by family and the tantalizing aroma of herb-infused drinks, that I experienced my first mojito. I watched my aunts and uncles as they muddled mint leaves and squeezed limes, creating this magical potion that sparkled in the sunlight.
One day, I decided to join the fun and add a personal touch: blueberries from our garden. I remember plucking the ripest berries, their deep blue hue promising sweetness. When I blended them into the mojitos that day, the flavors exploded! The tangy lime sang harmoniously with the blueberries’ sweetness, and the fresh mint was the icing on the cake. Surrounded by family, with our glasses clinking and laughter spilling into the warm air, that blueberry mojito became the unofficial drink of our summer gatherings. And now? I’m thrilled to share that same joy with you!
Ingredients
Let’s talk about what you’ll need to whip up this refreshing Blueberry Mojito:
-
1 cup fresh blueberries: Fresh berries are the star of this drink! They provide a natural sweetness and a pop of color. If blueberries aren’t in season, you can use frozen ones, but let them thaw beforehand for best results.
-
1 lime, juiced: The lime adds the necessary tartness to balance the sweetness of the blueberries. If you’re not a fan of lime, lemon can be a delightful substitute.
-
2 oz white rum: This is what gives your mojito its kick! Light rum works best, but if you prefer a deeper flavor, a spiced rum can add an interesting twist.
-
1-2 tablespoons sugar (to taste): Sugar enhances the sweetness of the mint and blueberries. You can also use simple syrup, agave, or honey for a different sweetness profile.
-
Mint leaves: Fresh mint is a must here. It brings that cooling refreshing flavor we love in mojitos. If you can’t find fresh mint, you might try a mint syrup for flavor, but it won’t have the same aromatic delight.
-
Club soda: This adds fizz and lightness to the drink. If you like a stronger kick, feel free to cut back the soda a bit.
-
Ice: Essential for serving the drink cold! The more, the merrier, in my opinion.
Step-by-Step Instructions
Let’s get down to the nitty-gritty of making this lovely Blueberry Mojito!
-
Muddle the blueberries and mint: In a sturdy glass or cocktail shaker, combine your blueberries and about 10 mint leaves. Using a muddler (or the back of a wooden spoon), gently crush the blueberries and mint together. The goal here is to release the juices of the berries and the oils from the mint without pulverizing everything into a mush. This will create a beautiful, fragrant base for your mojito.
-
Squeeze in the lime juice: Now, bring some zesty goodness into the mix! Cut your lime in half and squeeze the juice over the muddled blueberries and mint. Give it a slight stir. This will activate the mint even more, allowing it to release its natural oils.
-
Add your sugar: Sprinkle in the sugar to balance the tart lime and tangy blueberry flavors. Start with 1 tablespoon, stir well, and taste! You can always add more if you like it sweeter.
-
Pour in the rum: Measure out your white rum and pour it over the muddled ingredients. This is where the magic begins! The rum will blend beautifully with the sweetness of the blueberries and the refreshing mint. Give it a good stir to combine all those luscious flavors.
-
Fill your glass with ice: Now, grab your favorite glass—whether it’s a mason jar or a cocktail glass—and fill it halfway with ice. Don’t be shy here, ice is your best friend.
-
Top with club soda: Top your ice-filled glass with club soda. Pour it slowly to keep the fizz alive! Stir gently to combine all ingredients without losing the bubbles.
-
Garnish and enjoy: Add a few whole blueberries and a sprig of mint for garnish. Maybe throw in a lime wheel for good measure. There you have it! Your gorgeous Blueberry Mojito is ready to be sipped and savored.
Serving Suggestions
Presentation is key! Serve your Blueberry Mojito in a clear glass to show off those vibrant colors. Garnish with fresh mint leaves, a couple of whole blueberries floating atop the drink, and maybe a slice of lime hanging on the rim. This way, every time your guests take a sip, they’ll be reminded of the refreshing flavors packed into this delightful cocktail.
Recipe Variations
Feeling adventurous? Here are a few twists to make this mojito unique:
-
Berry Blend: Swap out or mix different berries like strawberries or raspberries for a berry medley mojito.
-
Herbal Surprise: Experiment by adding basil or cilantro in place of or with mint for a different herbal note.
-
Coconut Twist: Replace some of the club soda with coconut water for a tropical vibe.
-
Zingy Ginger: Add a slice of fresh ginger while muddling the mint and blueberries for a spicy kick.
-
Mocktail Version: Skip the rum for a refreshing non-alcoholic drink. Just amp up the club soda and perhaps add a bit of extra lime juice.
Chef’s Notes
I’ve made this mojito more times than I can count, and you know what? It’s never the same twice! I often switch it up based on what berries are fresh at the market or what’s in season. Each version is like a new memory waiting to happen. I also like to make a big batch for parties, which can be fun! Just multiply the ingredients and have guests serve themselves. Nothing breaks the ice better than a DIY cocktail bar at a summer gathering!
FAQs and Troubleshooting
Q1: Can I use frozen blueberries instead of fresh?
Absolutely! Frozen blueberries work just fine; just be sure to thaw them beforehand, so they blend well with the mint and lime.
Q2: What if I don’t have a muddler?
No problem! You can use the back of a spoon or a sturdy cup to muddle the ingredients. The goal is to release those wonderful flavors, so any tool that can smash the berries gently will do the trick.
Q3: Is it possible to make this drink ahead of time?
You can prepare the muddled base with blueberries, mint, and lime juice ahead of time and store it in the fridge. Just add the rum, ice, and club soda right before serving for the best taste and fizz.
Q4: How do I make it less sweet?
You can reduce the sugar or even ditch it altogether! If you want some sweetness without sugar, try adding a splash of sparkling flavored water or a bit of agave syrup.
Nutritional Info
(If applicable. You may want to include some estimates on calories, sugar content, etc., based on the ingredients used. For a standard serving: approximately 150 calories if made with sugar, but this can vary widely depending on sweetness and serving size.)
So there you have it—my take on the Blueberry Mojito! Bursting with flavors and unforgettable memories, this drink is bound to bring sunshine into any gathering. I hope you enjoy making and sipping it just as much as I do. Cheers to fresh flavors, vibrant gatherings, and the beautiful taste of summer! 🍹
PrintBlueberry Mojito

A refreshing blueberry twist on the classic mojito, perfect for summer gatherings.
- Prep Time: 10 minutes
- Cook Time: 0 minutes
- Total Time: 10 minutes
- Yield: 1 serving 1x
- Category: Cocktail
- Method: Muddling
- Cuisine: American
- Diet: Vegetarian
Ingredients
- 1 cup fresh blueberries
- 1 lime, juiced
- 2 oz white rum
- 1–2 tablespoons sugar (to taste)
- Fresh mint leaves
- Club soda
- Ice
Instructions
- Muddle the blueberries and mint in a glass or cocktail shaker.
- Squeeze in the lime juice and stir.
- Add the sugar and adjust to taste.
- Pour in the white rum and stir well.
- Fill your glass with ice.
- Top with club soda and stir gently.
- Garnish with whole blueberries and a mint sprig.
Notes
For a non-alcoholic version, skip the rum and add more club soda.
Nutrition
- Serving Size: 1 serving
- Calories: 150
- Sugar: 15g
- Sodium: 10mg
- Fat: 0g
- Saturated Fat: 0g
- Unsaturated Fat: 0g
- Trans Fat: 0g
- Carbohydrates: 38g
- Fiber: 2g
- Protein: 1g
- Cholesterol: 0mg
Keywords: blueberry mojito, summer cocktail, refreshing drinks, easy cocktails