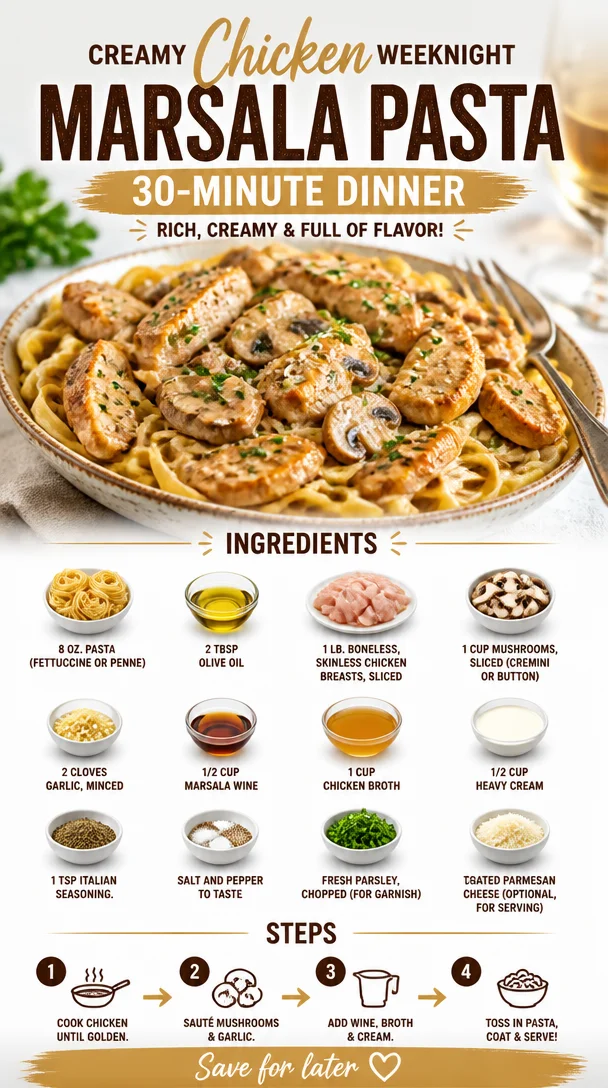
Creamy Weeknight Chicken Marsala Pasta: 30-Minute Dinner
Chicken Marsala Pasta: An Amazing Ultimate Recipe
Welcome back to Clean Plate Cravings, food lovers! Today, we’re diving into a bowl of comfort that will transport your taste buds straight to Italy: Chicken Marsala Pasta. This dish masterfully combines the tender, juicy flavors of chicken with the earthiness of mushrooms, all wrapped in a luscious, creamy Marsala sauce that clings lovingly to each strand of pasta. Trust me, this isn’t just a meal; it’s an experience.
When creating this recipe, I thought about how food has this incredible power to evoke memories and feelings. It’s not just about the ingredients but also about the stories they tell and the moments they create. And let me tell you, this dish has the power to sweep you off your feet and make any night feel special. So, whether you’re looking to impress a significant other or simply want to whip up something delicious for yourself after a long day, this easy Chicken Marsala Pasta is going to become a staple in your kitchen.
Personal Story
I remember my first time making Chicken Marsala. It was a rainy Saturday afternoon, and I was flipping through one of my favorite cookbooks while my partner was lounging on the couch, enthralled by the latest series on Netflix. I was inspired by a recipe on the page, and on a whim, I decided that tonight we’d have an Italian-inspired feast. I ventured to the grocery store and carefully selected each ingredient, feeling like a true chef on a mission.
What stands out to me the most about that day was how simple sounds of chopping, sizzling, and the familiar aroma of garlic wafting through the house created a warmth that transcended the gloomy weather outside. By the time dinner was served, we were both smiling, and as we shared bites of that perfectly creamy, wine-infused pasta, I knew I had discovered something special. Fast forward to today, and I’ve made this dish countless times, refining it each time to get it just right. Each bowl reminds me of that cozy afternoon and the joy of sharing food with someone you love.
Ingredients
To recreate this delightful Chicken Marsala Pasta, gather the following ingredients:
-
8 oz. pasta (fettuccine or penne): Choose your favorite shape! Fettuccine hugs the sauce beautifully, while penne captures it, making each bite delightful. You can also substitute whole wheat or gluten-free pasta if you prefer.
-
2 tablespoons olive oil: This brings richness and flavor to our dish. Extra virgin olive oil is preferred for its robust taste but feel free to use any oil you have on hand!
-
1 lb. boneless, skinless chicken breasts, sliced: Chicken breasts are lean and cook quickly, making them perfect for weeknight dinners. Feel free to swap them for thighs for deeper flavor or even tofu for a vegetarian option.
-
1 cup mushrooms, sliced (preferably cremini or button): These add an earthy undertone that pairs perfectly with the Marsala wine. If you want a twist, try portobello mushrooms for a heartier texture.
-
2 cloves garlic, minced: Garlic is an essential flavor enhancer that brings everything together. If you love garlic (who doesn’t?), feel free to double the amount!
-
1/2 cup Marsala wine: The star of the show! Marsala wine adds a sweet, rich depth to the sauce. If unavailable, a dry sherry or Madeira wine works as a good substitute.
-
1 cup chicken broth: This adds moisture and flavor to our sauce. Low-sodium broth is a great choice to control the saltiness of the dish.
-
1/2 cup heavy cream: This creates a velvety texture that transforms the sauce into a creamy dream. For a lighter option, you could substitute it with half-and-half or a non-dairy alternative.
-
1 teaspoon Italian seasoning: A blend of herbs like oregano, basil, and thyme adds extra flavor. If you have fresh herbs, use them! Just increase the amount to taste.
-
Salt and pepper to taste: A little seasoning goes a long way, enhancing all the flavors in the dish.
-
Fresh parsley, chopped (for garnish): This adds a pop of color and freshness to the finished plate, elevating the presentation.
-
Grated Parmesan cheese (optional, for serving): A touch of cheese always brings a luxurious feel to pasta dishes, but feel free to skip it if you’re looking to keep it lighter.
Step-by-Step Instructions
Now that you’ve gathered your ingredients, let’s dive into the cooking process! Here’s how to whip up this Chicken Marsala Pasta like a pro:
-
Cook the Pasta: In a large pot of boiling salted water, add the pasta. Cook according to the package instructions until al dente. Remember to reserve about 1 cup of the pasta water before draining; it’s liquid gold for our sauce. Set aside the drained pasta.
Chef Note: Stir the pasta occasionally to prevent sticking. Add a drizzle of olive oil to the water for good measure!
-
Sauté the Chicken: In a large skillet, heat the olive oil over medium-high heat. Add the sliced chicken breasts in batches, ensuring not to overcrowd the pan. Season with salt and pepper. Cook for about 4-5 minutes on each side or until cooked through and beautifully golden brown. Remove the chicken from the skillet and set aside.
Chef Hack: If your chicken seems to stick to the pan, allow it to cook a bit longer before flipping. Patience is key for that perfect sear!
-
Cook the Mushrooms: In the same skillet, add the sliced mushrooms. Sauté for about 4 minutes until the mushrooms are soft and lightly browned. Add the minced garlic and cook for an additional minute until fragrant.
Tip: The pan drippings left from the chicken will add fantastic flavor to the mushrooms, so don’t skip this step!
-
Deglaze with Marsala: Pour in the Marsala wine, scraping up any brown bits from the bottom of the pan. Let it simmer for about 2-3 minutes until the wine has reduced slightly.
Chef Insight: This step is crucial as it incorporates all those flavors into your sauce! The wine also adds a unique sweetness that complements the earthiness of the mushrooms.
-
Create the Sauce: Add the chicken broth and bring it to a gentle simmer. Stir in the heavy cream and Italian seasoning. Continue to simmer for 3-5 minutes, allowing the sauce to thicken slightly.
Tip: If you prefer a thinner sauce, feel free to add a splash of chicken broth or that reserved pasta water!
-
Combine Everything: Return the cooked chicken to the skillet, and allow it to warm through in the sauce for about 2 minutes. Add the drained pasta to the skillet, tossing to coat everything in that luscious sauce. If needed, adjust the consistency with more pasta water.
Note: Tossing the pasta in the sauce rather than pouring the sauce over it makes sure every piece is coated with deliciousness!
-
Final Touches and Serve: Remove from heat and serve immediately, garnishing with chopped parsley and a sprinkle of grated Parmesan cheese if desired.
Serving Tip: For a restaurant-quality presentation, twirl the pasta onto the plate with a pair of tongs, and add a few chicken pieces and mushrooms on top. Voilà!
Serving Suggestions
Serve this delightful Chicken Marsala Pasta warm, garnished with fresh parsley and a sprinkle of Parmesan for that extra touch. Pair it with a side salad or some crusty garlic bread to soak up that heavenly sauce. A glass of Chardonnay or Pinot Grigio would complement it beautifully.
Recipe Variations
Here are a few creative twists to shake things up in your kitchen:
-
Mushroom Medley: Use a variety of mushrooms (shiitake, oyster, portobello) for more complex flavors.
-
Add Veggies: Toss in some spinach or cherry tomatoes during the final cooking steps for a pop of color and nutrition.
-
Herb-Infused: Fresh herbs like basil or thyme can be used instead of Italian seasoning for a bright, fresh flavor.
-
Lemon Zest: Adding some lemon zest and juice right before serving can brighten the dish beautifully.
Chef’s Notes
As a passionate home cook, I love experimenting, and this Chicken Marsala Pasta has seen its fair share of tweaks over the years. I remember adding too much wine one time—turns out I made a great sauce, just not enough pasta to go around! But hey, that’s the beauty of cooking! Each mistake leads to new flavors and combinations.
Over time, I’ve discovered that simplicity often reigns supreme in the kitchen. The fewer processed ingredients you use, the more vibrant and fresh your final dish will taste. Trust your palate, and don’t hesitate to adjust flavors and ingredients to fit your preferences.
FAQs and Troubleshooting
-
What if my sauce is too thick?
No problem! Start by adding a splash of reserved pasta water or chicken broth until you reach your desired consistency. -
Can I use frozen chicken?
Absolutely, but make sure to fully thaw it first before cooking. Cooking from frozen can lead to uneven cooking. -
My mushrooms aren’t browning. What should I do?
Make sure not to overcrowd the pan. Give them enough space to release moisture and develop that beautiful caramelization. -
How can I make it dairy-free?
Swap heavy cream for coconut cream or a non-dairy alternative. Just note that it may impart a slight flavor variation.
Nutritional Info
While nutritional information can vary based on specific brands and measurements, here’s a rough estimate for one serving of Chicken Marsala Pasta:
- Calories: 600
- Protein: 35g
- Carbohydrates: 58g
- Fat: 25g
- Fiber: 3g
And there you have it — my ultimate Chicken Marsala Pasta recipe! I hope this dish brings as much joy to your kitchen as it has to mine. Remember, cooking is all about experimenting and enjoying the process, so don’t be afraid to make it your own. Let’s gather around the table, share some laughs, and delight in the miracle of good food. Happy cooking!
PrintChicken Marsala Pasta
A creamy and comforting Chicken Marsala Pasta dish that combines tender chicken, earthy mushrooms, and a luscious Marsala sauce.
- Prep Time: 15 minutes
- Cook Time: 30 minutes
- Total Time: 45 minutes
- Yield: 4 servings 1x
- Category: Main Course
- Method: Sautéing
- Cuisine: Italian
- Diet: Non-Vegetarian
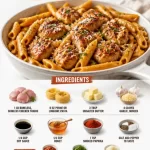
Ingredients
- 8 oz. pasta (fettuccine or penne)
- 2 tablespoons olive oil
- 1 lb. boneless, skinless chicken breasts, sliced
- 1 cup mushrooms, sliced (preferably cremini or button)
- 2 cloves garlic, minced
- 1/2 cup Marsala wine
- 1 cup chicken broth
- 1/2 cup heavy cream
- 1 teaspoon Italian seasoning
- Salt and pepper to taste
- Fresh parsley, chopped (for garnish)
- Grated Parmesan cheese (optional, for serving)
Instructions
- Cook the pasta in a large pot of boiling salted water according to package instructions until al dente. Reserve about 1 cup of the pasta water before draining; set aside.
- Sauté the sliced chicken in a large skillet with olive oil over medium-high heat, seasoning with salt and pepper. Cook for about 4-5 minutes on each side until cooked through. Remove and set aside.
- Cook the sliced mushrooms in the same skillet for about 4 minutes until softened, then add minced garlic for an additional minute.
- Deglaze the skillet with Marsala wine, scraping up any browned bits. Let simmer for 2-3 minutes.
- Create the sauce by adding chicken broth, heavy cream, and Italian seasoning. Simmer for 3-5 minutes to thicken.
- Combine the cooked chicken and drained pasta into the skillet, tossing to coat everything in the sauce.
- Serve immediately, garnished with fresh parsley and grated Parmesan, if desired.
Notes
For a lighter option, substitute heavy cream with half-and-half or a non-dairy alternative. Adjust the sauce consistency with reserved pasta water if necessary.
Nutrition
- Serving Size: 1 serving
- Calories: 600
- Sugar: 4g
- Sodium: 800mg
- Fat: 25g
- Saturated Fat: 12g
- Unsaturated Fat: 10g
- Trans Fat: 0g
- Carbohydrates: 58g
- Fiber: 3g
- Protein: 35g
- Cholesterol: 70mg
Keywords: Chicken Marsala Pasta, Italian dinner, creamy pasta, comfort food
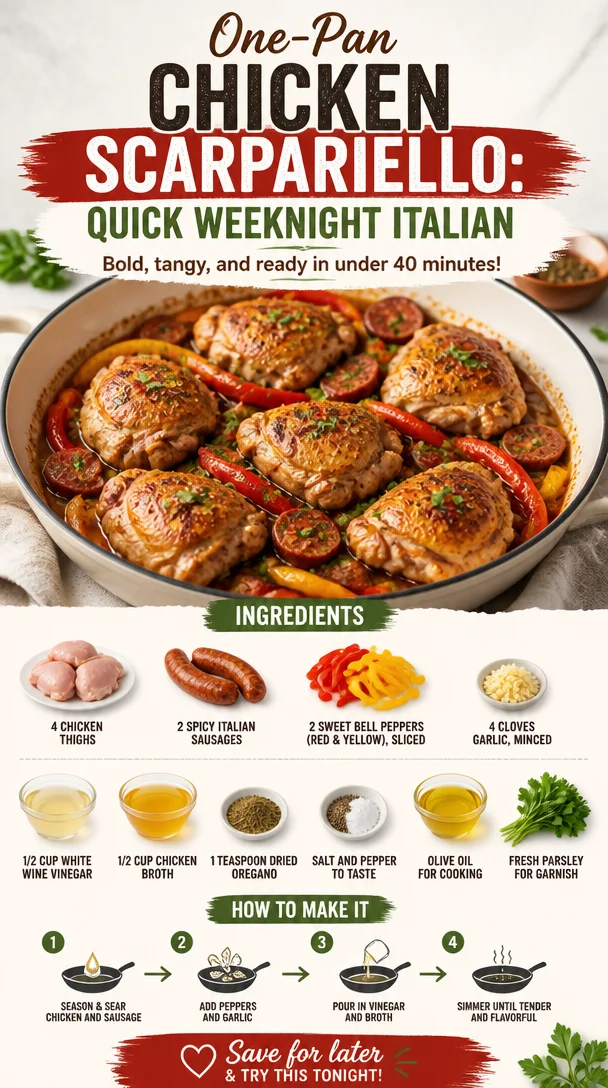
One-Pan Chicken Scarpariello: Quick Weeknight Italian
Chicken Scarpariello: A Flavorful Adventure in Every Bite
Hello, fellow food lovers! Today, I’m bubbling with excitement to share with you a dish that brings a smile to my face and warmth to my heart: Chicken Scarpariello. If you’re looking for a recipe that combines juicy chicken thighs, zesty sausages, vibrant bell peppers, and a delightful white wine vinegar sauce, you’ve landed in the right kitchen! 🥳
This dish is not only packed with flavor; it also holds a special place in my culinary journey. Growing up, I spent countless evenings in the kitchen with my grandmother, a skilled cook from the Old Country. She had this incredible knack for taking humble ingredients and turning them into something magical. One evening, while we were rummaging through her pantry, she whipped up her version of Chicken Scarpariello, and I’ll never forget the intoxicating aroma that filled the air. Every bite was a celebration of flavors and memories. The spicy sausages danced beautifully with the sweet bell peppers and garlic, creating a melody that still plays in my mind.
Today, as I share my rendition of Chicken Scarpariello with you, I hope to instill a sense of nostalgia, joy, and the excitement of cooking right in your own kitchen. So, buckle up your apron and let’s get started on this flavor-packed culinary adventure!
Ingredients
Gather these fantastic ingredients for our Chicken Scarpariello:
-
4 chicken thighs: I love using bone-in, skin-on chicken thighs for their rich flavor and juicy texture. If you prefer, boneless thighs can work too!
-
2 spicy Italian sausages: The seasoning in these sausages adds a delightful kick. If you’re not into heat, feel free to swap them out for sweet Italian sausages instead.
-
2 sweet bell peppers (red and yellow), sliced: They not only add color but also a crunch and sweetness that balances the dish beautifully. Any bell pepper works, so mix it up if you’d like!
-
4 cloves garlic, minced: Garlic is a flavor powerhouse here. Use fresh, but if you’re in a pinch, pre-minced garlic from a jar can save time.
-
1/2 cup white wine vinegar: This ingredient brings acidity and brightness to the dish. If you’re out of white wine vinegar, you can use apple cider vinegar as a substitute.
-
1/2 cup chicken broth: Homemade is best, but store-bought works too. Just make sure it’s low-sodium to control the salt content in your recipe.
-
1 teaspoon dried oregano: This herb adds a lovely earthy flavor to complement the other ingredients. Fresh oregano can elevate the dish even further if you have it on hand.
-
Salt and pepper to taste: A simple seasoning, but don’t skip them; they build the flavor up beautifully.
-
Olive oil for cooking: A splash of good-quality olive oil will make all the difference in sautéing your chicken and veggies to perfection.
-
Fresh parsley for garnish: Nothing brightens up a dish like a sprinkle of fresh herbs. Plus, they add a lovely pop of color!
Step-by-Step Instructions
-
Prep Your Ingredients: Start by gathering all your ingredients and chopping the bell peppers, mincing the garlic, and slicing the sausages. This makes cooking much smoother. Trust me; your future self will thank you!
-
Sear the Chicken: In a large skillet or Dutch oven, heat 2 tablespoons of olive oil over medium-high heat. Season the chicken thighs generously with salt and pepper. Place them skin-side down in the hot pan. Let them cook without moving for about 6-7 minutes, until the skin is golden and crispy. This is where the magic begins—listen for that sizzle!
-
Add the Sausages: Once the chicken is beautifully browned, remove it from the pan and set it aside. In the same skillet, add the sliced spicy Italian sausages and sauté for about 3-4 minutes until they start to brown. This step adds depth to the flavor base.
-
Introduce the Garlic and Peppers: Add minced garlic to the pan with the sausages and stir for about 30 seconds until fragrant. Then, toss in the sliced bell peppers. They should sizzle upon contact! Stir everything together and cook for another 5-6 minutes until the peppers are tender yet still vibrant.
-
Deglaze with Vinegar: It’s time to bring out those flavors! Pour in the white wine vinegar, scraping up any browned bits from the bottom of the pan. These little bits are flavor gold! Allow the vinegar to cook down for about 2 minutes, letting the acidity work its magic.
-
Add Broth and Oregano: Pour in the chicken broth and stir in the dried oregano. Bring the mixture to a gentle simmer. This is where the sauce starts to come together. The aroma fills the kitchen—you can practically taste it!
-
Return Chicken to the Pan: Nestle the chicken thighs back into the skillet, skin-side up. Cover the pan with a lid, reduce the heat to medium-low, and let it simmer for about 30 minutes. This slow cooking allows the flavors to meld. Pro tip: If you want even more flavor, flip the thighs halfway through cooking!
-
Final Seasoning: After 30 minutes, check the chicken for doneness (it should reach an internal temperature of 165°F). Add salt and pepper to taste. The smell should be absolutely irresistible at this point!
-
Garnish and Serve: Remove the pan from heat and sprinkle with freshly chopped parsley. This adds that gorgeous pop of green and freshness.
Serving Suggestions
When it comes to serving Chicken Scarpariello, presentation is key! I recommend serving it family-style right in the pan for a rustic touch, or you can plate it up by resembling an artful splash of sauce under the chicken for a gourmet feel. Pair it with a simple green salad, crusty bread, or over a bed of fluffy rice or polenta to soak up that savory sauce. Your guests will be begging for seconds!
Recipe Variations
Let’s shake things up! Here are a few creative twists you can try with this classic Chicken Scarpariello:
-
Herb Explosion: Add fresh thyme and rosemary to elevate the flavor profile. Just toss them in while the chicken simmers.
-
Veggie Boost: Sneak in more veggies! Carrots, zucchini, or mushrooms would be fantastic additions.
-
Heat it Up: If you want to spice things up even more, add a pinch of red pepper flakes for an additional kick.
-
Citrusy Twist: Drizzle some fresh lemon juice right before serving for a bright, zesty finish.
-
Sweet & Savory Combo: Adding a tablespoon of honey can create a delightful contrast to the vinegar, giving it a unique flavor profile.
Chef’s Notes
Oh, where do I begin? Chicken Scarpariello has evolved quite a bit since my grandmother first introduced me to the concept. I remember her saying, “Food is about love, and love should never be boring.” That mantra stuck with me and inspired the way I cook. Over the years, I’ve played with the ingredients, adding my own twists here and there. It’s amazing how versatile this dish is! You can easily turn it into a one-pan dinner or a cozy weekday meal that feels special. And hey, whenever I make this dish, I’m instantly transported back to those joyful kitchen moments with her. Food truly has a funny way of connecting us to our roots.
FAQs and Troubleshooting
-
Can I use chicken breasts instead of thighs?
Absolutely! Just keep in mind that chicken breasts may dry out more easily, so adjust the cooking time accordingly. They’ll need about 20 minutes if boneless. -
What if I don’t have white wine vinegar?
No problem! Apple cider vinegar or even lemon juice can serve as great substitutes. Just adjust the amount to taste, as they vary in acidity. -
How do I know if my chicken is cooked through?
Use a meat thermometer to check; the internal temperature should read 165°F. Also, the juices should run clear when you cut into it. -
What can I serve this with?
Chicken Scarpariello goes great with rice, polenta, or crusty bread. You could also serve it with a side of roasted vegetables for a well-rounded meal!
In conclusion, I’m thrilled you joined me on this culinary journey through the flavors of Chicken Scarpariello. This dish is more than just a recipe; it’s about traditions, memories, and connection. So get those ingredients ready, invite loved ones into your kitchen, and create your own delicious memories. Happy cooking, friends! 🍽️
PrintChicken Scarpariello

A flavor-packed dish combining juicy chicken thighs, zesty sausages, and vibrant bell peppers in a delightful white wine vinegar sauce.
- Prep Time: 15 minutes
- Cook Time: 40 minutes
- Total Time: 55 minutes
- Yield: 4 servings 1x
- Category: Main Course
- Method: Sautéing
- Cuisine: Italian
- Diet: Omnivore
Ingredients
- 4 chicken thighs, bone-in, skin-on
- 2 spicy Italian sausages, sliced
- 2 sweet bell peppers (red and yellow), sliced
- 4 cloves garlic, minced
- 1/2 cup white wine vinegar
- 1/2 cup chicken broth
- 1 teaspoon dried oregano
- Salt and pepper to taste
- Olive oil for cooking
- Fresh parsley for garnish
Instructions
- Prep your ingredients: Start by gathering and chopping the bell peppers, mincing the garlic, and slicing the sausages.
- Sear the chicken: In a large skillet, heat olive oil over medium-high heat, season chicken with salt and pepper, and cook skin-side down for 6-7 minutes until golden.
- Add the sausages: Remove chicken, add sliced sausages to the skillet, and sauté for 3-4 minutes until browned.
- Introduce the garlic and peppers: Add minced garlic and sauté for 30 seconds, then add bell peppers and cook for another 5-6 minutes.
- Deglaze with vinegar: Pour in white wine vinegar, scraping up browned bits, and cook for about 2 minutes.
- Add broth and oregano: Pour in chicken broth, stir in oregano, and bring to a gentle simmer.
- Return chicken to the pan: Nestle chicken thighs back into the skillet, cover, and simmer for about 30 minutes.
- Final seasoning: Check chicken doneness at 165°F and adjust salt and pepper to taste.
- Garnish and serve: Remove from heat, sprinkle with parsley, and serve your Chicken Scarpariello!
Notes
For extra flavor, flip the chicken halfway through cooking. Serve family-style or plate with sauce underneath the chicken.
Nutrition
- Serving Size: 1 serving
- Calories: 450
- Sugar: 5g
- Sodium: 700mg
- Fat: 20g
- Saturated Fat: 6g
- Unsaturated Fat: 12g
- Trans Fat: 0g
- Carbohydrates: 40g
- Fiber: 4g
- Protein: 30g
- Cholesterol: 100mg
Keywords: Chicken Scarpariello, Italian cuisine, comfort food, easy dinner, family meal
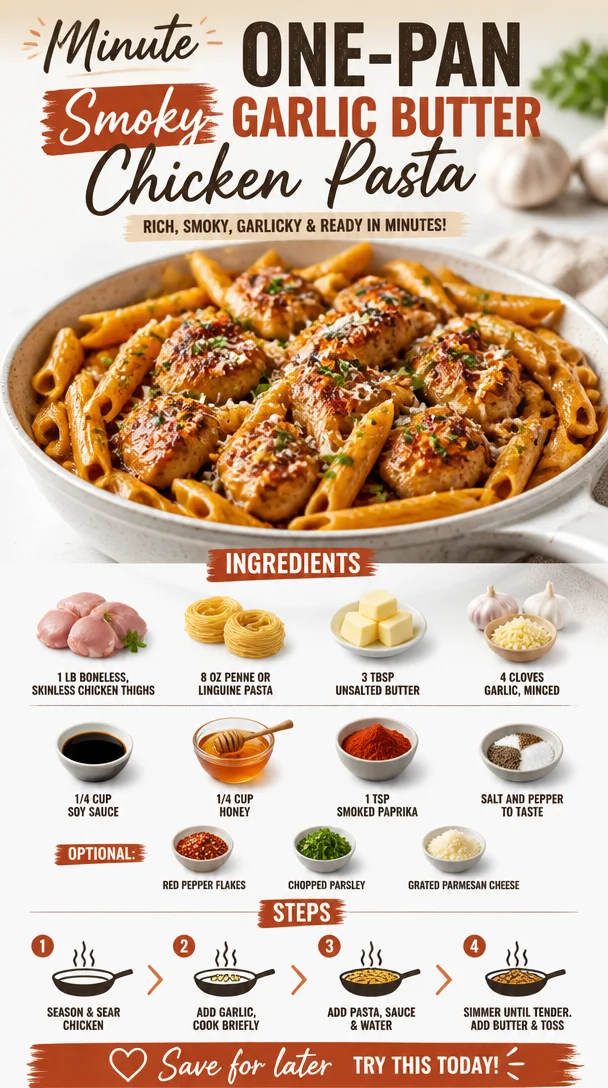
Minute One-Pan Smoky Garlic Butter Chicken Pasta
Sticky Smoky Garlic Butter Chicken Pasta: A Flavor Explosion for Your Dinner Table
Hey food lovers! Welcome to another delicious adventure in the kitchen with me, Ava Carter. Today, I’m absolutely thrilled to share a recipe that not only satisfies those midweek cravings, but also brings a burst of flavor that can transform your dinner into a culinary delight. Say hello to Sticky Smoky Garlic Butter Chicken Pasta!
Imagine golden-brown chicken thighs coated in a rich, sticky garlic buttery sauce that’s so good, you’ll want to lick the plate clean. And let’s not forget the pasta, soaking up all those smokey, garlicky flavors—the perfect vehicle to carry this indulgent goodness straight to your taste buds. If you’re ready to elevate your weeknight dinners and impress your family or guests, then grab your apron and let’s dive in!
Personal Story: A Flavorful Memory
Let me take you back to one of my fondest childhood memories. It was a crisp autumn evening, and my family was gathered in the kitchen, the aroma of garlic and butter wafting through the air. My mom—a powerhouse in the kitchen—was teaching me how to make a simple pasta dish. I vividly recall her laughter, the clinking of pots and pans, and the anticipation of that first bite.
She always said that cooking is an act of love, and I couldn’t agree more. As we stirred the sauce together, she shared stories of her own childhood, showing me how food can transport us to cherished moments. Fast forward years later, I’ve taken that simple dish and given it a sticky, smoky spin, creating this memorable Sticky Smoky Garlic Butter Chicken Pasta recipe. Just like my mom, I want to fill your kitchen with love, laughter, and mouthwatering flavors!
Ingredients
Let’s talk about what you’ll need for this showstopper dish. Here’s a handy checklist:
-
1 lb boneless, skinless chicken thighs: These are juicy and flavorful, perfect for absorbing the sticky sauce. If you’re a fan of leaner cuts, you can substitute with chicken breast, but tender thighs truly shine here.
-
8 oz penne or linguine pasta: Both options work beautifully. Penne holds onto the sauce better with its tubular shape, while linguine adds a delicate touch. Feel free to choose your favorite!
-
3 tbsp unsalted butter: This is what gives our dish that luscious, buttery richness. If you’re wanting a dairy-free option, coconut oil works well too.
-
4 cloves garlic, minced: Garlic is the MVP in this dish, bringing aroma and flavor. Freshly minced garlic is best, though garlic powder in a pinch will do.
-
1/4 cup soy sauce: This brings umami and depth to our sauce. If you need a gluten-free option, use tamari instead.
-
1/4 cup honey: It adds sweetness and balances the saltiness of the soy sauce. Maple syrup or agave can stand in if you prefer a vegan option.
-
1 tsp smoked paprika: It adds a subtle smokiness that really elevates the dish. If you don’t have it, regular paprika will work, although it won’t have that smoky kick.
-
Salt and pepper to taste: Essential for rounding out all the flavors. Always taste as you go!
-
Optional:
- Red pepper flakes: For a spicy kick.
- Chopped parsley: For a fresh touch and color.
- Grated Parmesan cheese: Because who doesn’t love a sprinkle of cheesy goodness?
Step-by-Step Instructions
Okay, are you ready to create some kitchen magic? Let’s get cooking!
-
Cook the Pasta:
In a large pot of boiling salted water, cook your pasta according to package instructions until al dente. Make sure to add salt—this is your chance to flavor the pasta itself! Remember, it’ll keep cooking a bit after you drain it. Once ready, reserve about 1/2 cup of pasta water, then drain and set aside. Little chef tip: toss it with a bit of olive oil to prevent sticking! -
Sear the Chicken:
In a large skillet over medium-high heat, melt 1 tablespoon of the butter. Season the chicken thighs with salt and pepper. Once the butter is sizzling, lay the chicken in the pan and sear until golden brown and cooked through, about 6-7 minutes per side depending on thickness. Here’s a pro chef hack: don’t crowd the pan; work in batches if necessary to get that beautiful sear! -
Create the Sauce:
Once the chicken is done, remove it from the skillet and let it rest for a few minutes. In the same skillet, melt the remaining butter. Add the minced garlic and sauté for about a minute, just until it’s fragrant (but not burned!). Then, pour in the soy sauce and honey, stirring until they blend together. -
Add the Smoky Flavor:
Sprinkle in the smoked paprika and stir. You’ll see the sauce begin to thicken slightly. Lower the heat to medium and return the chicken thighs to the skillet. Let them swim in that glorious sauce for 3-4 minutes, turning them to coat nicely. -
Combine with Pasta:
Now for the exciting part! Toss the cooked pasta into the skillet with the chicken and sauce. Gently mix everything together until the pasta is thoroughly coated. If the sauce seems too thick, add a little reserved pasta water until you reach your desired consistency. Keep tasting and adjusting the seasoning to your liking! -
Serve and Enjoy:
Once everything is well mixed, remove from heat. For the grand presentation, serve it hot right from the skillet or portion it onto individual plates. Top with red pepper flakes (if you like it spicy), a sprinkle of chopped parsley, and freshly grated Parmesan cheese. Each bite is sure to be sticky, smoky, and absolutely scrumptious.
Serving Suggestions
For a beautiful presentation, serve the pasta in wide, shallow bowls for a casual feel, or on a large platter for family-style dining. You can also complement your meal with a fresh green salad or some roasted veggies on the side to balance the richness of the dish. Grab a glass of chilled white wine, and you’ve got yourself a perfect dinner date at home!
Recipe Variations
Feeling adventurous? Here are a few ideas to put a fun twist on this recipe:
-
Vegetarian Delight: Swap the chicken for sautéed mushrooms or chickpeas for a hearty plant-based option.
-
Add More Veggies: Toss in some spinach, cherry tomatoes, or bell peppers for added nutrition and flavor.
-
Different Flavors: Replace soy sauce with teriyaki sauce for a sweeter version, or use a spicy stir-fry sauce for an Asian flair.
-
Nutty Addition: Toss in some toasted sesame seeds before serving for a crunchy surprise.
Chef’s Notes
This recipe has become a family favorite for a reason! I love how simple ingredients can come together to create such a bold, mouthwatering dish. Over the years, I’ve tweaked the recipe here and there—adding more garlic on some days and experimenting with different pasta shapes. But one thing remains constant: the joy it brings to the table. Every time I cook my Sticky Smoky Garlic Butter Chicken Pasta, it reminds me of those cozy family meals from my childhood, and I hope it does the same for you.
FAQs and Troubleshooting
1. Can I use chicken breast instead of thighs?
Absolutely! Chicken breast is a leaner option, but it may dry out if overcooked. Just keep a close eye on it and check for that juicy tenderness.
2. My sauce turned out too salty. What can I do?
If your sauce is too salty, you can balance it out with a pinch of sugar or honey. Another option is to add more pasta or even a splash of cream to tone it down.
3. Can I make this dish in advance?
Yes! You can cook the chicken and sauce ahead of time and just reheat when you’re ready to serve. Just be sure to cook the pasta fresh to avoid it getting mushy.
4. What can I substitute for honey?
If you’re looking for a vegan alternative, agave nectar or maple syrup works wonderfully. If you prefer, you can even try brown sugar for a deeper flavor!
Nutritional Info
While I always suggest enjoying your meals in moderation, here’s a quick nutritional breakdown:
- Calories: Approximately 450-500 per serving (depending on portion size and additional toppings)
- Protein: 30-35g (primarily from chicken)
- Carbohydrates: 50-60g (thanks to the pasta)
- Fats: 20-25g (mainly from butter)
So, there you have it—my Sticky Smoky Garlic Butter Chicken Pasta, a dish that not only delivers on flavor but also evokes sweet memories and warms your heart. I hope you give this recipe a try and create your own kitchen stories! Let me know how it goes, and as always, keep it fresh, simple, and seriously delicious! Happy cooking!
PrintSticky Smoky Garlic Butter Chicken Pasta
A flavor-packed dish featuring tender chicken thighs coated in a rich garlic butter sauce, served with pasta that absorbs all the smokey goodness.
- Prep Time: 15 minutes
- Cook Time: 30 minutes
- Total Time: 45 minutes
- Yield: 4 servings 1x
- Category: Main Course
- Method: Searing
- Cuisine: Italian
- Diet: Non-Vegetarian
Ingredients
- 1 lb boneless, skinless chicken thighs
- 8 oz penne or linguine pasta
- 3 tbsp unsalted butter
- 4 cloves garlic, minced
- 1/4 cup soy sauce
- 1/4 cup honey
- 1 tsp smoked paprika
- Salt and pepper to taste
- Red pepper flakes (optional)
- Chopped parsley (optional)
- Grated Parmesan cheese (optional)
Instructions
- Cook the Pasta: In a large pot of boiling salted water, cook your pasta according to package instructions until al dente. Reserve about 1/2 cup of pasta water, then drain and set aside.
- Sear the Chicken: In a large skillet over medium-high heat, melt 1 tablespoon of the butter. Season the chicken thighs with salt and pepper. Lay the chicken in the pan and sear until golden brown, about 6-7 minutes per side.
- Create the Sauce: Remove the chicken and let it rest. In the same skillet, melt the remaining butter. Add the minced garlic and sauté for about a minute. Pour in the soy sauce and honey, stirring until blended.
- Add the Smoky Flavor: Sprinkle in the smoked paprika and stir. Return the chicken thighs to the skillet and let them coat in the sauce for 3-4 minutes.
- Combine with Pasta: Toss the cooked pasta into the skillet with the chicken and sauce. Mix until the pasta is coated, adding reserved pasta water if needed for consistency.
- Serve and Enjoy: Plate the pasta hot, topped with red pepper flakes, parsley, and Parmesan cheese if desired.
Notes
Feel free to customize with veggies or different sauces to suit your taste preferences!
Nutrition
- Serving Size: 1 serving
- Calories: 475
- Sugar: 15g
- Sodium: 700mg
- Fat: 22g
- Saturated Fat: 10g
- Unsaturated Fat: 8g
- Trans Fat: 0g
- Carbohydrates: 50g
- Fiber: 3g
- Protein: 32g
- Cholesterol: 80mg
Keywords: chicken pasta, garlic butter, smoky flavor, comfort food
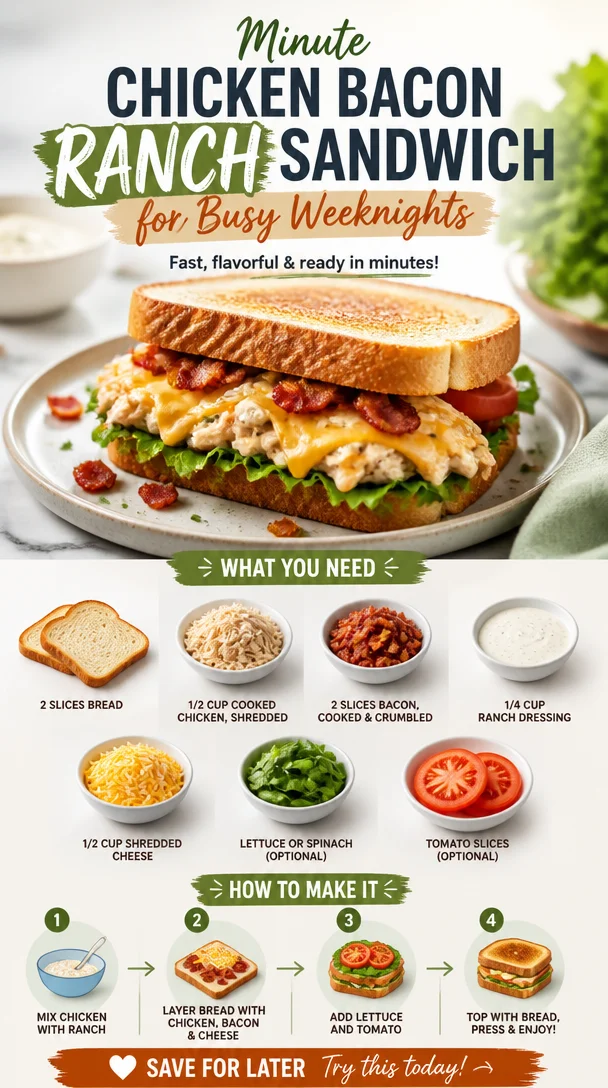
Minute Chicken Bacon Ranch Sandwich for Busy Weeknights
Chicken Bacon Ranch Sandwich: A Flavorful Feast
Welcome to my kitchen, fellow food lovers! Today, we’re diving into a classic favorite that hits all the right notes: the Chicken Bacon Ranch Sandwich. This delightful creation is not just a meal; it’s a celebration of flavors that marries juicy chicken, crispy bacon, and that creamy ranch dressing we all crave. Whether you’re preparing it for a weekday lunch or a relaxed weekend dinner, this sandwich brings a smile to your face and comfort to your belly.
When I think of a Chicken Bacon Ranch Sandwich, I’m transported back to my college days, where late-night cravings often led me to the kitchen rummaging through the fridge. One night, my friends and I were struck with the genius idea to whip up something delicious using whatever we could find. Chicken leftovers from a previous dinner, some ranch dressing that was practically begging to be used, and bacon? Well, let’s just say that it was a no-brainer. As we sat around the table, we shared laughter, stories, and bites of that delectable creation that would go on to become the ultimate crowd-pleaser.
Since then, I’ve perfected this recipe to share with all of you! It’s simple, approachable, and all about making the most out of ingredients you already have on hand. So whether you’re entertaining friends, feeding the family, or just indulging in some self-care, this Chicken Bacon Ranch Sandwich deserves a spot in your recipe book. Let’s get started!
The Ingredients You’ll Need
-
2 slices of bread
You can go classic with white or whole grain, or get adventurous with sourdough or a crusty baguette. Feel free to toast them for an extra crunch! -
1/2 cup cooked chicken, shredded
Almost any cooked chicken will do! You can use rotisserie chicken (my go-to!), grilled chicken, or even leftover baked chicken. Need a faster option? Deli-style chicken works perfectly. -
2 slices of bacon, cooked and crumbled
Crispy bacon adds the perfect crunch! Try turkey bacon for a lighter version or bacon alternatives if you’re vegetarian. -
1/4 cup ranch dressing
The star of our show! But don’t limit yourself to store-bought; a homemade ranch can elevate this sandwich. Mix yogurt, herbs, garlic, and lemon juice for a lighter option. -
1/2 cup shredded cheese (cheddar or mozzarella)
Cheddar brings a sharp flair while mozzarella melts beautifully. Go ahead and mix the two if you can’t decide! -
Lettuce or spinach (optional)
A bit of greens adds freshness! Swap it out for arugula if you prefer a peppery kick or omit it for a more indulgent treat. -
Tomato slices (optional)
Juicy tomatoes give a fresh burst. Heirloom tomatoes can really elevate this sandwich if they’re in season, but standard ones will do just fine.
Step-by-Step Instructions
-
Prepare Your Ingredients
Gather all your ingredients and ensure your chicken is shredded, bacon is crispy, and cheese is finely grated. Trust me, having everything prepped makes cooking much smoother! -
Toast the Bread
In a skillet or toaster, lightly toast your bread slices until they’re golden brown. This adds that satisfying crunch and helps keep the sandwich from getting soggy from the dressing. -
Cook the Bacon
If you’re not already using pre-cooked bacon, cook your strips in a frying pan over medium heat until they are crispy. Don’t forget to drain on a paper towel to absorb that excess oil. Pro tip: reserve a little bacon fat for cooking chicken if you want to add that extra flavor bomb! -
Mix the Filling
In a bowl, combine the shredded chicken, crumbled bacon, and ranch dressing. Mix everything until the chicken is well-coated. You can taste and adjust the dressing based on your preference for creaminess. -
Layer it Up
Place one slice of toasted bread on a plate. Spoon a generous portion of the chicken mixture onto it, spreading it out evenly. Sprinkle a layer of shredded cheese on top for that melty goodness. -
Add Fresh Ingredients
If you’re including lettuce and tomato, now’s the time to layer them on. The crunch of the lettuce and the juiciness of the tomato will elevate your sandwich’s texture. -
Top It Off
Place the second slice of bread on top. You can either leave it as is or grill the whole sandwich in the pan over medium heat for a few minutes to melt the cheese and create a crispy exterior. Flip carefully so it doesn’t fall apart! -
Slice and Serve
Use a sharp knife to slice your sandwich in half. Not only does it make it Instagram-worthy, but it also makes it easier to eat!
Serving Suggestions
For serving your Chicken Bacon Ranch Sandwich, consider pairing it with a side of crispy baked sweet potato fries or a refreshing mixed greens salad. Keep it light and breezy with a hint of lemon juice or balsamic vinegar for extra zing. If you’re really feeling indulgent, a side of potato chips or even nachos can take this meal over the top!
Recipe Variations
-
Buffalo Chicken Twist
Swap out the ranch dressing for buffalo sauce for a spicy kick, and add blue cheese crumbles for that classic buffalo flavor. -
Mediterranean Delight
Use Greek yogurt mixed with herbs instead of ranch, and add some olives, feta cheese, and cucumber slices for a fresh take. -
BBQ Chicken Ranch
Combine ranch dressing with your favorite BBQ sauce for a smoky, tangy taste, and top it with pickled jalapeños for some heat. -
Veggie Lover’s Twist
Substitute shredded chicken with roasted vegetables or a chickpea salad for a delightful vegetarian option. -
Breakfast Sandwich
Add a fried egg on top for a breakfast version that’s packed with protein and flavor.
Chef’s Notes
This Chicken Bacon Ranch Sandwich has been a beloved staple in my kitchen over the years. It’s versatile, quick to whip up, and always a crowd-pleaser. I remember experimenting with different sauces and flavors, but ranch always comes out on top. Sometimes I even mix in some hot sauce for that little kick. Cooking should always be about having fun and being creative!
FAQs and Troubleshooting
Q: Can I make this sandwich ahead of time?
Absolutely! You can prepare the chicken mixture in advance and store it in the refrigerator for up to three days. Just assemble the sandwich when you’re ready to eat!
Q: How do I prevent my sandwich from getting soggy?
Be sure to toast your bread and use less dressing if you prefer a drier sandwich. You can also layer the lettuce directly against the bread to create a barrier.
Q: What if I don’t like ranch dressing?
No worries! Feel free to customize with your favorite dressing or sauce. BBQ, honey mustard, or even a creamy garlic dressing can work wonders.
Q: How can I make this sandwich healthier?
Opt for whole grain bread, lean chicken, and Greek yogurt-based ranch dressing to cut down on calories while still enjoying an amazing flavor.
Nutritional Info
While I love indulging in hearty meals, it’s fun to know a bit about what we’re munching on! Keep in mind that the nutritional info can vary depending on your choice of ingredients and portion sizes, but here’s a rough idea for one Chicken Bacon Ranch Sandwich made with the specified ingredients:
- Calories: ~550-600
- Protein: ~35g
- Carbohydrates: ~40g
- Fats: ~30g
Enjoy the delicious journey of creating your Chicken Bacon Ranch Sandwich! Each bite is a testament to flavorful simplicity that nourishes not just the body, but the heart and soul. So, grab your apron and let’s get cooking!
PrintChicken Bacon Ranch Sandwich

A flavorful feast of juicy chicken, crispy bacon, and creamy ranch dressing in a delightful sandwich.
- Prep Time: 15 minutes
- Cook Time: 15 minutes
- Total Time: 30 minutes
- Yield: 1 serving 1x
- Category: Main Course
- Method: Grilling
- Cuisine: American
- Diet: Non-Vegetarian
Ingredients
- 2 slices of bread (white, whole grain, sourdough, or a crusty baguette)
- 1/2 cup cooked chicken, shredded
- 2 slices of bacon, cooked and crumbled
- 1/4 cup ranch dressing
- 1/2 cup shredded cheese (cheddar or mozzarella)
- Lettuce or spinach (optional)
- Tomato slices (optional)
Instructions
- Prepare your ingredients by shredding chicken, crisping bacon, and grating cheese.
- Toast the bread slices in a skillet or toaster until golden brown.
- Cook the bacon in a frying pan over medium heat until crispy.
- Mix the shredded chicken, crumbled bacon, and ranch dressing until well combined.
- Layer one slice of bread on a plate and spoon the chicken mixture on top.
- Add fresh ingredients like lettuce and tomato if desired.
- Top with the second slice of bread and optionally grill the sandwich.
- Slice in half and serve with your favorite sides.
Notes
This sandwich can be customized with different dressings and toppings for variety.
Nutrition
- Serving Size: 1 sandwich
- Calories: 550
- Sugar: 4g
- Sodium: 800mg
- Fat: 30g
- Saturated Fat: 10g
- Unsaturated Fat: 15g
- Trans Fat: 0g
- Carbohydrates: 40g
- Fiber: 2g
- Protein: 35g
- Cholesterol: 60mg
Keywords: Chicken Sandwich, Bacon Ranch, Easy Recipe, Comfort Food
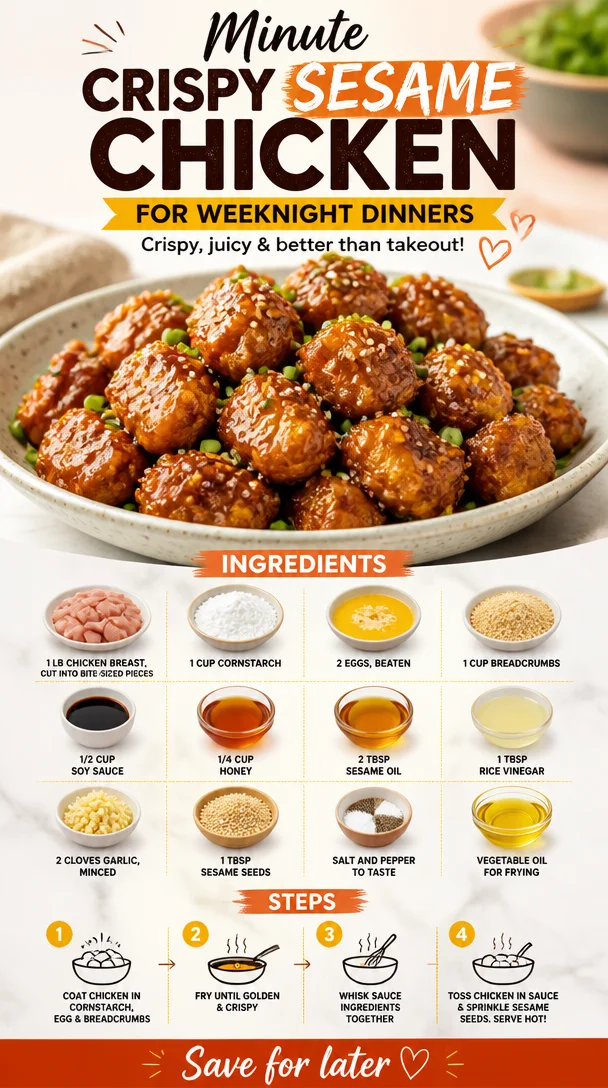
Minute Crispy Sesame Chicken for Weeknight Dinners
Crispy Sesame Chicken: A Flavorful Journey
Welcome to another delightful adventure in the kitchen, where I, Ava Carter, am thrilled to share one of my all-time favorite recipes with you—Crispy Sesame Chicken! 🥢✨ This dish is not only a crowd-pleaser but also a fantastic way to bring the warmth of Asian-inspired cooking right into your home. Whether you’re dining with family or whipping up a feast for friends, this crispy delight is sure to impress.
Introduction
Imagine this: the aroma of fragrant sesame oil and garlic wafts through the air, mingling with the sizzle of chicken in a hot pan. As you take your first bite, the crunchy exterior gives way to tender, juicy chicken, and you can’t help but smile. That’s the magic of Crispy Sesame Chicken!
In my culinary adventures, I believe that every great recipe starts with a story—it’s about flavor, love, and a sprinkle of nostalgia. For me, this dish is reminiscent of cozy evenings spent at local Asian restaurants, where the enticing scent of sesame filled the air, and the ambiance was vibrant with laughter and conversation. Each bite was a celebration, and I wanted to bring that experience into my own home kitchen.
But here’s the best part about this recipe: it’s simple enough for a weeknight dinner yet impressive enough for special occasions. Plus, it’s versatile! You can whip up a dish that’s crispy, savory, and slightly sweet. Are you ready to start cooking? Let’s dive into it!
Personal Story
Growing up, my family had a tradition of going out for Chinese food every Friday night. It was a mini celebration to kick off the weekend, and each restaurant had its own special spin on beloved dishes. One evening, I found myself captivated by a dish of crispy sesame chicken, its glistening sauce and crunchy bits capturing my attention immediately. Dipping my fork into the velvety sauce and indulging in the textures was pure heaven!
That moment always stuck with me. Many years later, during a culinary class, I decided to recreate that magical dish. The first time I perfected it, I couldn’t wait to share it with friends and family. Watching them savor each bite brought back fond memories while creating new ones. This recipe feels like a bridge between my past and present—a celebration of taste and nostalgia in every crispy, sesame-infused bite.
Ingredients
To make your Crispy Sesame Chicken, you’ll need the following ingredients:
-
1 lb chicken breast, cut into bite-sized pieces
A lean protein that cooks quickly and absorbs flavors beautifully. Chicken thighs can also be used for extra juiciness. -
1 cup cornstarch
This is the secret to that irresistible crunch! It creates a light, crispy coating. If you want to keep it gluten-free, use arrowroot powder as a substitute. -
2 eggs, beaten
This adds moisture and helps the cornstarch adhere to the chicken. Flaxseed meal mixed with water can be a great vegan replacement. -
1 cup breadcrumbs
I recommend panko breadcrumbs for an extra crispy texture! You can swap with crushed rice crackers for a gluten-free option or use whole-wheat breadcrumbs for a healthier version. -
1/2 cup soy sauce
A savory backdrop for the dish; it infuses the chicken with deep umami flavor. For a gluten-free version, use tamari. -
1/4 cup honey
This adds a delightful sweetness and balances the saltiness of soy sauce. Maple syrup can be a great plant-based substitute. -
2 tablespoons sesame oil
A key flavor component! It adds a nutty aroma. If you’re sensitive to sesame, consider using a neutral oil like canola instead. -
1 tablespoon rice vinegar
For that tangy kick! Apple cider vinegar can be used if rice vinegar isn’t available. -
2 cloves garlic, minced
Fresh garlic enhances the flavor of the sauce, making it aromatic and robust. You can use garlic powder in a pinch—just adjust the amount to your taste. -
1 tablespoon sesame seeds
These little gems provide a lovely crunch and nutty flavor! Feel free to toast them for an extra depth of flavor. -
Salt and pepper to taste
Simple seasoning that elevates the dish! -
Vegetable oil for frying
A neutral oil is best for frying; canola or peanut oil works wonders!
Step-by-Step Instructions
Let’s get cooking! Follow these steps for making your Crispy Sesame Chicken:
1. Preparing the Chicken
Start by cutting your chicken breasts into bite-sized pieces (approximately 1-inch cubes). This ensures even cooking and makes it easy to eat. Season the chicken lightly with salt and pepper—don’t oversalt, as the soy sauce will add plenty of flavor.
2. Creating the Coating
In one mixing bowl, whisk together the eggs until they’re frothy. In another bowl, put the cornstarch, and in a third bowl, add the breadcrumbs. This three-bowl method may seem like a bit of a hassle, but I promise it’s worth it! This setup prevents clumping and ensures an even coating.
3. Coating the Chicken
Take each piece of chicken and first dip it in the cornstarch, shaking off the excess. Then dip it into the egg mixture, allowing it to coat evenly. Finally, roll it in the breadcrumbs, pressing down slightly to ensure they stick. Repeat until all the chicken pieces are coated.
Pro Tip: If you want an extra layer of crunch, feel free to double-dip in the cornstarch and egg mixture before the breadcrumbs!
4. Heating the Oil
In a large skillet or wok, heat about 1/4 inch of vegetable oil over medium-high heat. You want the oil to be hot enough for frying, but not smoking. A good test is to drop a few breadcrumbs into the oil; they should sizzle immediately.
5. Frying the Chicken
Working in batches to avoid overcrowding the pan (which can lower the oil temperature), carefully add the coated chicken pieces to the hot oil. Fry them for about 4-5 minutes on each side until they are golden brown and crispy. Use tongs to turn them over for even cooking!
Chef Hack: To keep the fried chicken warm while you finish cooking the rest, place the cooked pieces on a wire rack set over a baking sheet. This allows any excess oil to drip off while keeping them crispy!
6. Making the Sauce
Once the chicken is all fried up and golden, it’s time for the best part! In a small bowl, mix together the soy sauce, honey, sesame oil, rice vinegar, and minced garlic. Pour this delightful mixture into a clean skillet over medium heat, bringing it to a simmer.
7. Tossing It All Together
When the sauce is warm, add the crispy chicken pieces into the skillet. Gently toss the chicken in the sauce until entirely coated. Sprinkle the sesame seeds over the top and mix once more to distribute evenly.
8. Final Touches
Remove from heat and let sit for a moment to allow the flavors to meld. It’s now time to serve!
Serving Suggestions
Plate your Crispy Sesame Chicken on a vibrant dish, garnished with additional sesame seeds and a sprinkle of sliced green onions for a pop of color. This dish pairs beautifully with fluffy white rice, steamed broccoli, or a light salad. You could even serve it in lettuce wraps for a fun twist! Don’t forget to drizzle some of that luscious sauce over the top for an extra touch of sweetness.
Recipe Variations
Want to get creative with your Crispy Sesame Chicken? Here are a few delicious twists:
- Spicy Sesame Chicken: Add a touch of sriracha or red pepper flakes to the sauce for a spicy kick!
- Honey Garlic Version: Swap honey for brown sugar in the sauce and add chopped green onions and sesame seeds right before serving for a fresh and zesty flavor.
- Orange Sesame Chicken: Incorporate fresh orange juice and zest into the sauce for a citrusy bright twist.
- Vegetarian Alternative: Use tofu instead of chicken—press it to remove moisture, coat, and fry for a delightful vegetarian dish!
- Crispy Cauliflower: For a vegan option, replace chicken with bite-sized cauliflower florets. Coat and fry in the same way for a beautiful crispy dish!
Chef’s Notes
Cooking this Crispy Sesame Chicken has been a joyous journey! I remember the first time I tried it with my kids; their eyes lit up just like mine once did at that restaurant all those years ago. We dressed up a little for the evening, set the table with chopsticks, and indulged in this crispy wonder. It turned a regular dinner into a celebration!
Over the years, I’ve played with this recipe; sometimes, I add different sauces, and other times, I go lighter on the sugar. Each time, it transforms into something new and exciting, but it always brings back that warm feeling of home and togetherness.
FAQs and Troubleshooting
Q: Why did my chicken turn out soggy?
A: This can happen if the oil isn’t hot enough, or if the chicken pieces are overcrowded in the pan. Make sure your oil is hot, and fry in batches to achieve that perfect crispy texture!
Q: Can I bake this chicken instead of frying?
A: Absolutely! Preheat your oven to 400°F (200°C). Place the breaded chicken on a baking sheet lined with parchment paper. Lightly spray with cooking spray or drizzle with a bit of oil and bake for about 20-25 minutes, turning halfway through.
Q: How can I store leftover chicken?
A: Store leftover Crispy Sesame Chicken in an airtight container in the fridge for up to 3 days. Reheat in the oven or an air fryer to regain its crispy texture!
Q: Can I use other proteins?
A: Yes! Feel free to try shrimp, beef, or even tempeh for a twist. Just adjust cooking times accordingly.
Nutritional Info
While I believe in enjoying good food, here’s a quick overview of the nutritional aspects (per serving, assuming you eat a moderate portion):
- Calories: Approximately 350
- Protein: 24g
- Carbohydrates: 30g
- Fat: 15g
- Fiber: 1g
Crispy Sesame Chicken is not only delicious but also fairly balanced!
Conclusion
I hope you enjoyed this colorful journey through the creation of Crispy Sesame Chicken! Cooking doesn’t have to be intimidating; it should be fun and filled with flavorful experiences. So gather your ingredients, invite some friends over, and enjoy the process of making this delicious recipe as much as savoring each delightful bite!
Here’s to keeping it fresh, simple, and seriously delicious—until next time, happy cooking! 🌟
PrintCrispy Sesame Chicken

A delightful Asian-inspired dish featuring crispy chicken coated in a savory sesame sauce that balances flavors beautifully.
- Prep Time: 15 minutes
- Cook Time: 25 minutes
- Total Time: 40 minutes
- Yield: 4 servings 1x
- Category: Main Course
- Method: Frying
- Cuisine: Asian
- Diet: Paleo
Ingredients
- 1 lb chicken breast, cut into bite-sized pieces
- 1 cup cornstarch
- 2 eggs, beaten
- 1 cup panko breadcrumbs
- 1/2 cup soy sauce
- 1/4 cup honey
- 2 tablespoons sesame oil
- 1 tablespoon rice vinegar
- 2 cloves garlic, minced
- 1 tablespoon sesame seeds
- Salt and pepper to taste
- Vegetable oil for frying
Instructions
- Start by cutting your chicken breasts into bite-sized pieces (approximately 1-inch cubes). Season the chicken lightly with salt and pepper.
- In one mixing bowl, whisk together the eggs until they’re frothy. In another bowl, put the cornstarch, and in a third bowl, add the breadcrumbs.
- Take each piece of chicken and dip it in the cornstarch, then into the egg mixture, and finally roll it in the breadcrumbs.
- Heat about 1/4 inch of vegetable oil over medium-high heat until hot.
- Working in batches, add the coated chicken pieces to the hot oil and fry for about 4-5 minutes each side until golden brown.
- In a small bowl, mix together the soy sauce, honey, sesame oil, rice vinegar, and minced garlic. Pour into a skillet and bring to a simmer.
- Add the crispy chicken pieces into the skillet and toss until coated. Sprinkle sesame seeds over the top.
- Remove from heat and let sit for a moment before serving.
Notes
This dish pairs beautifully with white rice, steamed broccoli, or lettuce wraps. For a twist, try adding sriracha for heat or substituting with tofu for a vegetarian option.
Nutrition
- Serving Size: 1 serving
- Calories: 350
- Sugar: 15g
- Sodium: 800mg
- Fat: 15g
- Saturated Fat: 2g
- Unsaturated Fat: 8g
- Trans Fat: 0g
- Carbohydrates: 30g
- Fiber: 1g
- Protein: 24g
- Cholesterol: 120mg
Keywords: Crispy Chicken, Sesame Chicken, Asian Cuisine, Easy Recipes, Dinner

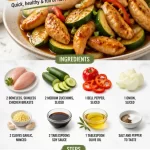
Chicken Zucchini Stir Fry
Delightful Chicken Zucchini Stir Fry: A Colorful and Flavorful Meal
Welcome to Clean Plate Cravings, my kitchen haven where delicious meets nutritious! Today, I’m thrilled to share a vibrant Chicken Zucchini Stir Fry that’s not only packed with flavors but also represents everything I believe about enjoying food. Eating well shouldn’t feel like a chore; it should be a joyful experience where colors, tastes, and even the smell of cooking coax you into a happy dance in the kitchen!
Imagine the sizzle of chicken, the crunch of the bell pepper, and the fresh aroma of garlic filling your home. This stir fry is made with simple, fresh ingredients that are likely hanging out in your fridge right now. It’s the kind of recipe that fits perfectly into a busy weeknight cooking schedule or an everyday meal prepped on a Sunday, ready to be enjoyed all week long.
Stir fry dishes are one of my favorite ways to whip up quick, delicious meals. With minimal cooking time, you can whip together something that not only tastes good but also fuels your body with nutrients. This Chicken Zucchini Stir Fry is certainly one of those dishes that delivers on taste while keeping it light and healthy. So, let’s dive deep into this recipe and stir up some magic together!
A Bite of Nostalgia: Mom’s Kitchen Wisdom
This dish brings back sweet memories from my childhood when my mom would whip up her famous stir fry for dinner. As a busy working mom, she had her ways of making the kitchen her own little sanctuary, producing meals that not only tasted great but were also wholesome. I remember sitting at the kitchen counter, watching her slice vibrant veggies. Every slice was precise and purposeful, and she always emphasized using what’s fresh and in season.
I’d help her wash the vegetables while she’d hum along to our favorite tunes playing in the background. Those moments taught me the importance of bringing joy into cooking and reminded me that food can forge connections, comfort, and perhaps even a little nostalgia. That’s why this Chicken Zucchini Stir Fry is special to me—it embodies what I learned from her: keep it simple, vibrant, and full of love.
Ingredients
Before we jump into the kitchen, let’s gather our ingredients. Here’s what you’ll need to create this colorful stir fry:
-
2 boneless, skinless chicken breasts
Tender chicken is the base of this dish. You can swap it for turkey breast if you prefer. For a plant-based option, try using tofu or tempeh! -
2 medium zucchinis, sliced
Zucchini adds a lovely crunch and absorbs all the flavors beautifully. If zucchini isn’t available, yellow squash works just as well. -
1 bell pepper, sliced
Use any color you have on hand—red, yellow, or green—each brings its own sweetness. If you’re looking for a spicy twist, try a jalapeño instead! -
1 onion, sliced
Onions enhance the overall flavor. I love using red onions, but yellow or sweet onions can be fantastic substitutes too. -
2 cloves garlic, minced
Garlic is the secret flavor booster in this dish! If you love garlic, feel free to add more. If you’re short on fresh, garlic powder can be used, too—just keep it light. -
2 tablespoons soy sauce
This brings the salty umami flavor that stir fry is known for. If you want a gluten-free option, use tamari or coconut aminos instead. -
1 tablespoon olive oil
Olive oil is perfect for cooking due to its light flavor and health benefits. Feel free to use avocado oil or sesame oil for an Asian flair. -
Salt and pepper to taste
Always be generous with seasoning! What matters is it’s to your preference.
Step-by-Step Instructions
Now that we have everything ready, it’s time to cook! Cooking is all about enjoying the process, so grab your favorite playlist, and let’s get started.
-
Prepare Your Ingredients
Start by slicing your chicken, zucchini, bell pepper, and onion into bite-sized pieces. Keep everything uniform so it cooks evenly. Pro-tip: use a sharp knife for quicker and easier cutting. If you struggle with knifework, check out some online tutorials for handy tips! -
Sauté the Chicken
Heat the olive oil in a large skillet or wok over medium-high heat. Once it’s shimmering, add in the chicken pieces. Season with salt and pepper. Sauté the chicken for about 5-7 minutes until it’s fully cooked and golden brown. Make sure not to crowd the pan—this allows for a nice sear. Here’s a hack: if you use a wooden spoon to flip the chicken, you’ll get an even cook on all sides. -
Add the Aromatics
Toss in the minced garlic and sliced onions into the pan. The fragrance will hit you like a wave of comfort! Stir-fry this mix for about 1-2 minutes until fragrant and the onions become translucent. Keep it moving so the garlic doesn’t burn—charred garlic can turn bitter. -
In with the Veggies
Next, add the sliced zucchini and bell pepper to the pan. Stir well and cook for another 3-5 minutes, allowing the vegetables to soften while still being crisp. Remember, we want crunch in our stir fry! If your veggies start wilting too fast, turn down the heat slightly to avoid overcooking. -
Season It Up
Finally, pour in the soy sauce. It’ll add depth and richness! Stir everything together and allow it to cook for another minute to let the flavors meld. If you like a bit of zing, try adding a dash of chili paste or sesame oil at this stage. -
Taste Test and Adjust
Before serving, taste your dish and adjust the seasoning as needed—you might find it needs a little more salt or soy sauce. Cooking is about personal preference, so don’t hesitate to make it yours. -
Serve and Savor
Once everything is cooked, remove it from heat and let it rest for a couple of minutes. This gives the flavors a moment to settle before serving.
Serving Suggestions
Serving this Chicken Zucchini Stir Fry is all about presentation and satisfaction. I love serving it over a fluffy bed of jasmine rice or whole grain quinoa for a wholesome touch. You can also enjoy it wrapped in lettuce leaves for a fresh, low-carb option. Drizzle a little extra soy sauce or a sprinkle of sesame seeds for a finishing touch.
Recipe Variations
Let’s get creative with some variations to keep this dish exciting:
- Spicy Kick: Add sliced red chili peppers or a sprinkle of chili flakes for a bit of heat!
- Coconut Delight: Stir in a splash of coconut milk for a creamy twist.
- Herb Weave: Finish with a handful of fresh basil or cilantro for a zesty lift.
- Noodle Swap: Swap out the chicken for shrimp and toss in some rice noodles for an easy Asian-inspired meal.
- Veggie Load: Add in additional veggies like broccoli, snap peas, or carrots based on what you have.
Chef’s Notes
This Chicken Zucchini Stir Fry is a staple in my kitchen for good reason! The recipe has evolved since those childhood memories; now I play with various ingredients to keep things fresh and in line with the season. I often encourage people to explore their pantry and fridge and let those ingredients dictate the meal. This stir fry has seen everything from leftover veggies to different protein sources, emphasizing its versatility.
And let me tell you a little secret: there’s no wrong way to stir fry. One time, I accidentally spilled in some red wine while cooking, and instead of being upset, I embraced it! That was one of the most delicious flukes I’ve ever created in my kitchen.
FAQs and Troubleshooting
Here are some common questions and potential hiccups you might run into:
-
Why is my stir fry watery?
Make sure you’re cooking on high heat, which helps to evaporate excess moisture. If it’s still watery, you might have added too much sauce—consider using less next time or increasing your cooking time to reduce it. -
Can I make this ahead of time?
Absolutely! This stir fry stores well in an airtight container in the fridge for up to 3 days. Just reheat it in a skillet or microwave when you’re ready to enjoy it again. -
What if my veggies overcook?
If this happens, next time try adding the firmer veggies, like carrots and onion, first, and add the softer ones, like zucchini and peppers, later in the cooking process. -
Can I freeze this dish?
Yes, but I recommend freezing just the chicken and veggies before cooking, as stir-fried vegetables don’t retain their texture well after freezing and reheating.
Nutritional Info
- Calories: 350 per serving (approx.)
- Protein: 30g
- Carbohydrates: 15g
- Fats: 15g
- Fiber: 2g
(Note: Nutritional values can vary based on exact ingredients and portion sizes.)
Thanks for tuning in! I hope this Chicken Zucchini Stir Fry brings warmth to your kitchen and joy to your table. Don’t forget to embrace your creativity and bake with love. Happy cooking, foodies!
PrintChicken Zucchini Stir Fry
A vibrant Chicken Zucchini Stir Fry that’s packed with flavors and perfect for a quick weeknight meal.
- Prep Time: 15 minutes
- Cook Time: 15 minutes
- Total Time: 30 minutes
- Yield: 4 servings 1x
- Category: Main Course
- Method: Stir Fry
- Cuisine: Asian
- Diet: Gluten-Free
Ingredients
- 2 boneless, skinless chicken breasts
- 2 medium zucchinis, sliced
- 1 bell pepper, sliced
- 1 onion, sliced
- 2 cloves garlic, minced
- 2 tablespoons soy sauce
- 1 tablespoon olive oil
- Salt and pepper to taste
Instructions
- Prepare your ingredients by slicing your chicken, zucchini, bell pepper, and onion into bite-sized pieces.
- Sauté the chicken in a large skillet over medium-high heat with olive oil, seasoning with salt and pepper, for 5-7 minutes.
- Add minced garlic and sliced onions, stir-frying for 1-2 minutes until fragrant.
- In with the sliced zucchini and bell pepper, cooking for an additional 3-5 minutes.
- Season it up by pouring in the soy sauce and letting it cook for another minute.
- Taste test and adjust the seasoning before serving.
- Serve the stir fry over jasmine rice or quinoa, and enjoy!
Notes
This stir fry can be customized with different vegetables or proteins like tofu, shrimp, or even a splash of coconut milk for creaminess.
Nutrition
- Serving Size: 1 serving
- Calories: 350
- Sugar: 5g
- Sodium: 700mg
- Fat: 15g
- Saturated Fat: 2g
- Unsaturated Fat: 10g
- Trans Fat: 0g
- Carbohydrates: 15g
- Fiber: 2g
- Protein: 30g
- Cholesterol: 70mg
Keywords: chicken, zucchini, stir fry, quick meal, healthy cooking
One-Pan Honey BBQ Chicken Rice: 20-Min Weeknight Dinner
One-Pan Honey BBQ Chicken Rice: A Deliciously Easy Comfort Meal
Welcome back to Clean Plate Cravings, friends! Today, we’re diving into a dish that truly embodies the joy of simple, satisfying cooking: One-Pan Honey BBQ Chicken Rice. This recipe is not only packed with flavor but also perfect for those busy nights when you want to whip up something delicious without spending hours in the kitchen. If you’re a fellow food lover who craves mouthwatering meals that don’t come with a laundry list of complicated steps, you’re in the right place!
Let’s be real—life can get hectic. Between juggling work, family commitments, and maybe even squeezing in a workout (if we’re lucky!), cooking can sometimes feel like an uphill battle. But who says healthy eating has to be all about takeout or bland microwave meals? My mission here is to show you that wholesome, enticing food can fit right into your daily routine.
So, grab that apron, and let me take you on a flavorful journey with this One-Pan Honey BBQ Chicken Rice. Trust me, this dish will leave your taste buds dancing and your kitchen smelling heavenly. Plus, it’s all made in one pan—how easy is that? Let’s get cooking!
A Nostalgic Twist on a Family Favorite
When I think of the one-pan meals my mom used to whip up on busy weeknights, my heart swells with nostalgia. I can still picture her in our cozy, bustling kitchen, effortlessly tossing together whatever was in the fridge. One of her go-to’s was a variation of BBQ chicken, often paired with rice. The aroma of tangy barbecue sauce mingling with a hint of sweetness from honey was enough to bring the whole family together around the dinner table.
One evening, I remember her calling us in with that irresistible smell wafting through the house, and I couldn’t wait to dig into that sticky, savory goodness. It wasn’t just food; it was love served on a plate. Now, as I recreate that dish in my own kitchen, I like to think I’m passing down the same warmth and joy to my family.
But let me tell you, this One-Pan Honey BBQ Chicken Rice takes those memories and elevates them to a whole new level! It’s all about simplicity, flavor, and bringing everyone together at the table—all while being an absolute breeze to prepare!
Ingredients You’ll Need
Before we jump into the cooking fun, let’s gather our ingredients. Here’s what you’ll need:
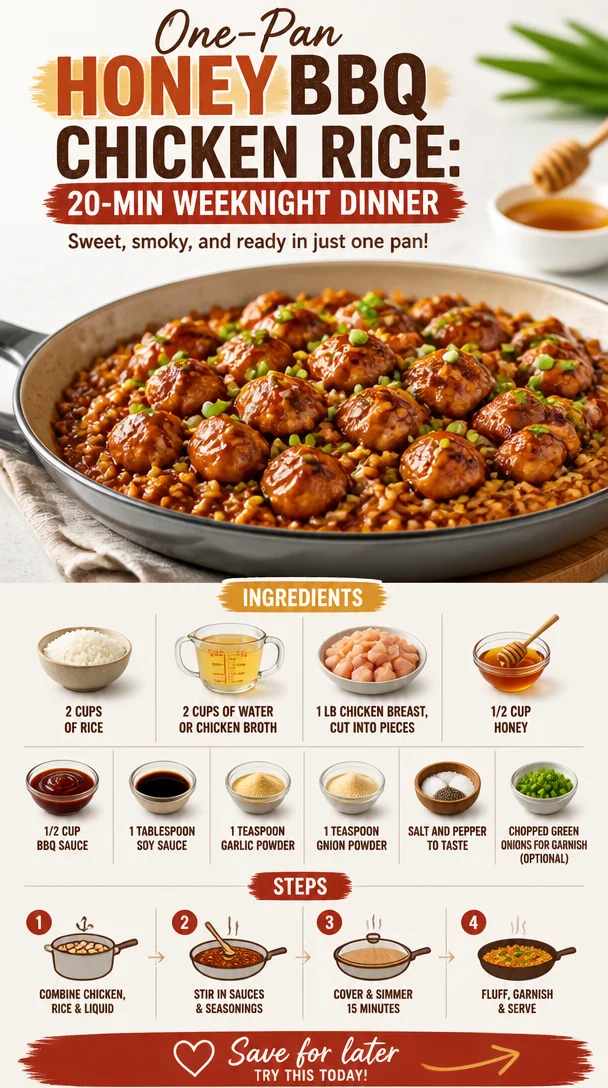
- 2 cups of rice: I recommend long-grain rice for a fluffy texture, but feel free to use basmati or jasmine rice if that’s your jam.
- 2 cups of water or chicken broth: Chicken broth adds extra flavor! If you want a vegetarian option, use vegetable broth instead.
- 1 lb chicken breast, cut into pieces: Boneless, skinless chicken breasts work wonderfully. You can also use thighs for a richer flavor or even tofu for a plant-based twist!
- 1/2 cup honey: This sweet element balances the tanginess of the BBQ sauce. If you’re vegan, agave syrup or maple syrup works perfectly.
- 1/2 cup BBQ sauce: Go for your favorite brand! If you’re feeling adventurous, try making your own—smoky, sweet, and oh-so-good.
- 1 tablespoon soy sauce: This adds a savory depth. For a gluten-free option, use tamari.
- 1 teaspoon garlic powder: A staple in my pantry; it gives an instant flavor boost.
- 1 teaspoon onion powder: This rounds out the flavors. If you prefer fresh, dice a small onion to stir in at the beginning.
- Salt and pepper to taste: Always important for that finishing touch!
- Chopped green onions for garnish (optional): These add a fresh crunch and a pop of color.
Chef’s Insights
Don’t hesitate to switch things up! If you’re not a fan of certain flavors, you can leave ingredients out or replace them. Cooking is all about experimentation, so feel free to adjust to your taste preferences!
Step-by-Step Cooking Instructions
Let’s get into the nitty-gritty of making our delicious One-Pan Honey BBQ Chicken Rice. Trust me, your kitchen is about to smell divine!
-
Prep the Ingredients:
Start by prepping all your ingredients. This will make the cooking process smoother. Cut your chicken breast into bite-sized pieces and chop the green onions if you’re using them for garnish. -
Sauté the Chicken:
In a large, deep skillet or a pan with a lid, heat a drizzle of olive oil over medium heat. Once hot, add the chicken pieces and season with a pinch of salt and pepper. Cook them for about 5-7 minutes, stirring occasionally, until they’re golden brown and no longer pink in the center.Chef’s Tip: Don’t crowd the pan; if needed, cook the chicken in batches. This helps achieve that beautiful caramelization!
-
Mix in the Flavors:
Once the chicken is cooked, reduce the heat to low and pour in the soy sauce, garlic powder, onion powder, honey, and BBQ sauce. Stir everything together evenly, ensuring the chicken is well-coated with that tasty sauce.Chef Hack: If you want a personal touch, feel free to add a splash of your favorite hot sauce for a kick!
-
Add the Rice:
Now, it’s time to incorporate the rice. Sprinkle the rice evenly over the chicken in the pan. Then, pour in the water or chicken broth. Don’t stir it yet! -
Bring to a Simmer:
Increase the heat to medium-high and bring the mixture to a gentle simmer. Let it come together, then reduce the heat to low. Cover the pan with a lid and let it cook for about 20 minutes. This allows the rice to absorb all those amazing flavors while becoming fluffy.Pro Tip: Do not lift the lid! Steam is key for cooking rice perfectly, and you don’t want to let it escape.
-
Final Touches:
After 20 minutes, remove the lid and give everything a gentle stir. You’ll see the rice has soaked up the sauce beautifully! Taste and adjust seasoning, adding a little more salt or pepper if needed. -
Serve it Up:
Scoop generous portions onto plates or into bowls. Garnish with the chopped green onions for that fresh crunch.Serving Suggestion: Consider serving this dish with a side of steamed veggies or a crisp green salad to round out your meal!
Recipe Variations
Looking to mix things up? Here are a few variations to try:
- Spicy BBQ Chicken: Add a tablespoon of sriracha or your favorite hot sauce to the BBQ sauce mixture for a spicy kick.
- Vegetable Boost: Toss in some diced bell peppers, broccoli, or snap peas while the chicken is cooking to add some color and nutrition.
- Pineapple Twist: For a tropical flair, add diced pineapple to the pan when mixing in the honey and BBQ sauce.
- Whole Grains: Substitute white rice with brown rice or quinoa for added fiber and a nuttier flavor.
- Herbed Rice: Add fresh herbs like chopped cilantro or parsley after cooking for a pop of freshness.
Chef’s Notes
As someone who has always loved creating in the kitchen, this One-Pan Honey BBQ Chicken Rice recipe is one I’ve tweaked over the years. What started as a simple family dinner has transformed into a weeknight go-to that my family requests time and again.
I love how it brings someone’s modern-day spin to the nostalgic meals of my childhood. It’s also my secret weapon when I want to impress friends without spending hours prepping—who doesn’t love a one-pan meal?
Remember, cooking is all about exploration and having fun. Do not be afraid to make this dish your own, just as I did!
FAQs and Troubleshooting
1. My rice is too sticky. What did I do wrong?
Usually, overly sticky rice indicates that it’s been overcooked or that it was too wet when cooking. Ensure you measure your liquid accurately and don’t lift the lid during cooking!
2. Can I use frozen chicken?
Absolutely! Just make sure to adjust the cooking time accordingly. Frozen chicken may need a few extra minutes to ensure it cooks through.
3. What if I’m out of honey?
You can substitute with maple syrup or agave syrup. Both will give you that sweet flavor without compromising the dish!
4. How can I reheat leftovers?
Leftovers are best reheated on the stove over medium heat with a splash of water or broth to keep the rice from drying out. Stir often until heated through.
Nutritional Information
While I’ve left the nutritional details out for simplicity, this One-Pan Honey BBQ Chicken Rice is a balanced meal that provides protein from the chicken, carbs from the rice, and a splash of flavor-packed goodness!
And there you have it! A simple, delicious, and nourishing One-Pan Honey BBQ Chicken Rice recipe that embodies everything Clean Plate Cravings stands for. Filling, flexible, and utterly satisfying, this dish is perfect for busy weeknights and relaxing weekends alike. So next time you’re in the mood for something homemade yet effortless, remember this recipe! Happy cooking!
PrintOne-Pan Honey BBQ Chicken Rice

A deliciously easy comfort meal perfect for busy nights, featuring tender chicken, sweet honey, and savory BBQ sauce all cooked in one pan with fluffy rice.
- Prep Time: 10 minutes
- Cook Time: 30 minutes
- Total Time: 40 minutes
- Yield: 4 servings 1x
- Category: Main Course
- Method: Baking
- Cuisine: American
- Diet: None
Ingredients
- 2 cups long-grain rice (or basmati/jasmine)
- 2 cups water or chicken broth
- 1 lb boneless, skinless chicken breast, cut into pieces
- 1/2 cup honey
- 1/2 cup BBQ sauce
- 1 tablespoon soy sauce
- 1 teaspoon garlic powder
- 1 teaspoon onion powder
- Salt and pepper to taste
- Chopped green onions for garnish (optional)
Instructions
- Prep the ingredients by cutting chicken into bite-sized pieces and chopping green onions.
- Sauté the chicken in a skillet with olive oil, seasoning with salt and pepper, until golden brown.
- Mix in soy sauce, garlic powder, onion powder, honey, and BBQ sauce, stirring to coat the chicken.
- Add the rice evenly over the chicken, then pour in water or broth without stirring.
- Bring to a simmer, then cover and reduce heat, cooking for about 20 minutes.
- Remove the lid, stir gently, and adjust seasoning if necessary.
- Serve portions onto plates or bowls, garnished with green onions.
Notes
Feel free to switch up ingredients and add vegetables or spices to suit your taste!
Nutrition
- Serving Size: 1 serving
- Calories: 450
- Sugar: 12g
- Sodium: 700mg
- Fat: 10g
- Saturated Fat: 2g
- Unsaturated Fat: 6g
- Trans Fat: 0g
- Carbohydrates: 54g
- Fiber: 2g
- Protein: 25g
- Cholesterol: 70mg
Keywords: chicken, rice, one-pan meal, BBQ, comfort food
Minute One-Pan Garlic Herb Chicken Dinner
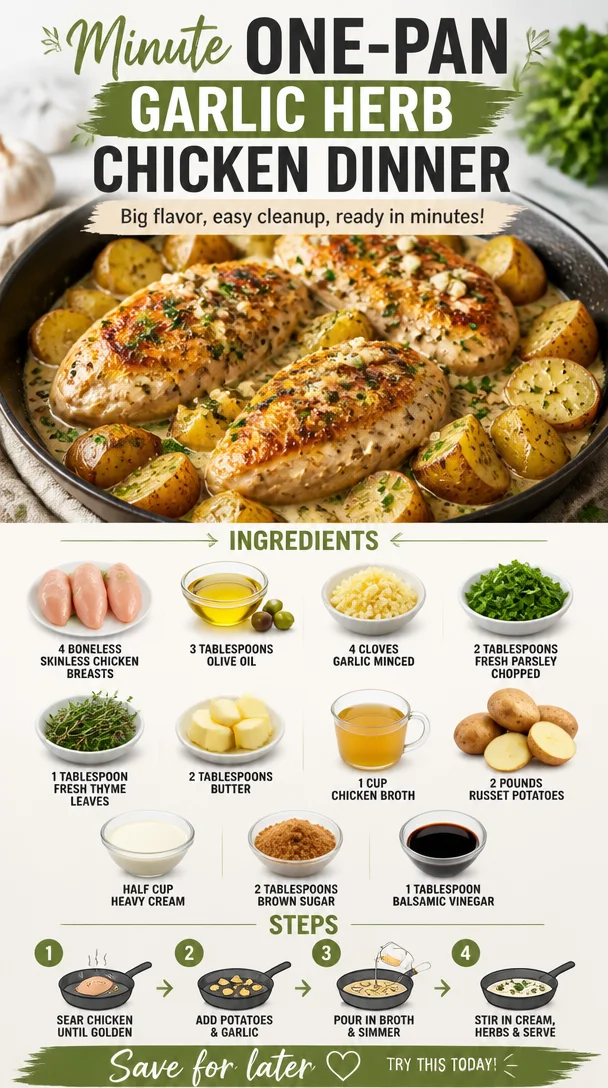
Garlic Herb Chicken: A Wholesome Delight for Every Home Cook
Welcome back to Clean Plate Cravings, food lovers! Today, I am excited to share one of my absolute favorite dishes—Garlic Herb Chicken. This dish is a beautiful celebration of fresh flavors, zesty garlic, and tender chicken that pairs beautifully with a multitude of sides. Picture this: juicy chicken breasts sizzling in a pan, infused with fragrant herbs and rich garlic, all while you’re whisking together some luscious creamy potatoes on the side. Are you drooling yet?
Let’s dive right into this culinary journey that not only tantalizes your taste buds but also fills your home with the warm aroma of a home-cooked meal. Throughout this post, I’ll take you step-by-step through easy-to-follow instructions, sprinkling in some personal anecdotes and chef hacks to elevate your cooking experience. Whether you’re looking to impress dinner guests or just craving a comforting meal after a long day, Garlic Herb Chicken is the way to go!
Personal Story
Ah, Garlic Herb Chicken brings back fond memories of cozy family dinners gathered around the dining table. I can still picture it vividly—my mom whipping up her signature dish while the aroma of garlic wafted through the house. We’d all sit at the table, waiting with growing anticipation as the sizzle from the stovetop made our mouths water. It was more than just a meal; it was a time for connection, laughter, and storytelling. I remember my siblings and I racing to see who could finish their plates first, a not-so-subtle competition that always ended with my mom reminding us to savor our food.
Seeing everyone enjoy a dish that was drenched in love and flavor made cooking feel magical. Inspired by those moments, I started experimenting with recipes in my own kitchen, aiming to recreate that same warmth and joy. Today, I find happiness in sharing this Garlic Herb Chicken recipe with you all, hoping it brings as much joy to your table as it did to mine.
Ingredients
Before we jump into cooking, let’s talk about the vibrant ingredients that make this dish so special. Here’s what you’ll need:
-
4 boneless skinless chicken breasts
The star of the show! Opt for organic or free-range chicken for the best flavor. If you prefer dark meat, substitute with chicken thighs. -
3 tablespoons olive oil
A healthier fat that enhances the dish’s flavor. For a twist, swap it with avocado oil, which has a higher smoke point! -
4 cloves garlic, minced
Garlic adds a punch of flavor. Feel free to use roasted garlic for a sweeter, mellow taste! -
2 tablespoons fresh parsley, chopped
Adds a burst of freshness. If you don’t have fresh parsley, dried parsley can work—use about a teaspoon. -
1 tablespoon fresh thyme leaves
Thyme pairs beautifully with chicken. Substitute with rosemary or oregano for a different twist. -
2 tablespoons butter
Because butter makes everything better! For a dairy-free option, use ghee or a plant-based butter. -
1 cup chicken broth
This is foundational for flavor. You can use vegetable broth if you want to make it vegetarian or choose a low-sodium option for a healthier take. -
2 pounds russet potatoes
Creamy russets are perfect here. Swap them for sweet potatoes for a different flavor profile! -
½ cup heavy cream
Rich, luscious, and creamy. Use coconut cream for a dairy-free alternative. -
2 tablespoons brown sugar
Just a hint of sweetness to balance flavors. Feel free to substitute with honey or maple syrup. -
1 tablespoon balsamic vinegar
This adds depth and brightness. Try red wine vinegar if you need a substitute.
Step-by-Step Instructions
Now that we’ve gathered our ingredients, let’s move on to the fun part—cooking! Follow these step-by-step instructions for a foolproof Garlic Herb Chicken that will delight your senses.
-
Prep the Chicken
Begin by patting the chicken breasts dry with paper towels. This helps get that lovely golden-brown sear on the outside. Season both sides generously with salt and pepper. This is your chance to infuse flavor right at the start! -
Heat the Oil
In a large pan or skillet, heat 3 tablespoons of olive oil over medium-high heat. Watch closely and let it shimmer. You want the oil hot enough to sear without burning! If you’ve got a cast-iron skillet, now’s the time to whip that baby out! -
Sear the Chicken
Carefully place the chicken breasts in the hot oil, leaving space between them. Avoid overcrowding the pan; this ensures a nice sear. Cook for 5-7 minutes on each side—this will create that beautiful browning! Don’t rush—let the chicken do its work. -
Add Aromatics
Once the chicken is nicely browned, add in the minced garlic, fresh parsley, and thyme. Stir it all around until fragrant—about 30 seconds. Keep a close watch because garlic can burn quickly! -
Create the Sauce
Add 2 tablespoons of butter to the pan, letting it melt and mix with the garlic and herbs. Then pour in 1 cup of chicken broth, scraping any delicious bits stuck to the skillet. This is the moment the magic happens—those flavors meld together in perfect harmony. -
Simmer the Chicken
Reduce the heat to low and cover the skillet. Simmer the chicken for 10-15 minutes until it’s cooked through. Use a meat thermometer for precision; the internal temp should reach 165°F (75°C). Juicy chicken awaits! -
Finish with Cream
In the final few minutes of cooking, stir in the heavy cream, brown sugar, and balsamic vinegar. This creamy sauce will give your chicken an incredible richness. Let it simmer uncovered for 2-3 minutes until it thickens slightly. -
Serve It Up
Remove the chicken from the skillet and spoon that luscious sauce over the top. Garnish with extra herbs if you’re feeling fancy!
Serving Suggestions
To plate your Garlic Herb Chicken, serve with a side of roasted or creamy mashed potatoes, drizzling the sauce over both. You can also pair it with your favorite seasonal vegetables like steamed green beans or a light salad for a refreshing touch. Want to make it a feast? Add some warm crusty bread to soak up all that delicious sauce.
Recipe Variations
- Lemon Garlic Chicken: Swap some of the balsamic vinegar with fresh lemon juice for a bright, zesty flavor that dances on your palate.
- Spicy Garlic Chicken: Add red pepper flakes or a minced jalapeño to introduce some heat into your sauce.
- Herb Crusted Chicken: Before searing, coat the chicken in a mixture of breadcrumbs, parmesan, and herbs for a crunchy texture.
- Creamy Sun-Dried Tomato Variation: Toss in some chopped sun-dried tomatoes into the sauce for an Italian flair.
- Low-Carb Option: Serve the chicken on a bed of zoodles (zucchini noodles) instead of potatoes for a lower-carb alternative!
Chef’s Notes
Throughout my cooking journey, Garlic Herb Chicken has evolved into a dish that’s not just about satisfying hunger, but also one that connects hearts. I’ve experimented with different herbs, sauces, and even cooking methods. There was a day I accidentally used smoked paprika instead of brown sugar, and while it turned out surprisingly good, it was a reminder that cooking allows for creativity and spontaneity. Don’t be afraid to tweak this recipe; make it your own!
FAQs and Troubleshooting
Q: My chicken turned out dry. What happened?
A: Overcooking can lead to dry chicken. Be sure to use a meat thermometer and check for an internal temp of 165°F (75°C) to ensure juicy results.
Q: Can I use frozen chicken breasts?
A: Yes, you can! Just be sure to thaw them completely before cooking. You may need to adjust the cooking time slightly.
Q: What if I don’t have chicken broth?
A: No worries! You can use water or a low-sodium vegetable broth. The flavor may be slightly milder, but it will still be delicious!
Q: How can I make this dish dairy-free?
A: Swap the butter with coconut oil and the heavy cream with coconut cream or a dairy-free alternative.
Nutritional Info
(Nutritional info can be provided based on your specific calculations or requirements based on the ingredients you use. Consider providing calories, protein, fats, and carbs per serving if desired.)
In conclusion, I hope you enjoy making this Garlic Herb Chicken as much as I do! It’s all about gathering those around you, sharing good food, and creating lush memories. I’m excited to see how you make this recipe your own. Until next time, keep those cravings clean and delicious!
PrintGarlic Herb Chicken
A delicious and wholesome Garlic Herb Chicken recipe that combines juicy chicken breasts with fragrant herbs and rich garlic, served with creamy potatoes.
- Prep Time: 15 minutes
- Cook Time: 30 minutes
- Total Time: 45 minutes
- Yield: 4 servings 1x
- Category: Main Course
- Method: Searing
- Cuisine: American
- Diet: Gluten-Free
Ingredients
- 4 boneless skinless chicken breasts
- 3 tablespoons olive oil
- 4 cloves garlic, minced
- 2 tablespoons fresh parsley, chopped
- 1 tablespoon fresh thyme leaves
- 2 tablespoons butter
- 1 cup chicken broth
- 2 pounds russet potatoes
- ½ cup heavy cream
- 2 tablespoons brown sugar
- 1 tablespoon balsamic vinegar
Instructions
- Begin by patting the chicken breasts dry with paper towels. Season both sides generously with salt and pepper.
- Heat 3 tablespoons of olive oil in a large pan over medium-high heat until it shimmers.
- Carefully place the chicken breasts in the hot oil, ensuring space between them. Sear for 5-7 minutes on each side.
- Once browned, add minced garlic, parsley, and thyme. Stir until fragrant, about 30 seconds.
- Add 2 tablespoons of butter, allowing it to melt and mix with the herbs.
- Pour in 1 cup of chicken broth, scraping the skillet for flavor bits.
- Reduce heat to low, cover, and simmer for 10-15 minutes until the chicken reaches 165°F (75°C).
- Stir in heavy cream, brown sugar, and balsamic vinegar. Simmer uncovered for 2-3 minutes until slightly thickened.
- Remove the chicken from the skillet and spoon the sauce over the top. Garnish with extra herbs if desired.
Notes
For a dairy-free option, swap butter with coconut oil and heavy cream with coconut cream. Use low-sodium broth for a healthier twist.
Nutrition
- Serving Size: 1 serving
- Calories: 400
- Sugar: 6g
- Sodium: 500mg
- Fat: 20g
- Saturated Fat: 8g
- Unsaturated Fat: 10g
- Trans Fat: 0g
- Carbohydrates: 35g
- Fiber: 4g
- Protein: 30g
- Cholesterol: 75mg
Keywords: chicken, garlic, herbs, easy recipe, dinner
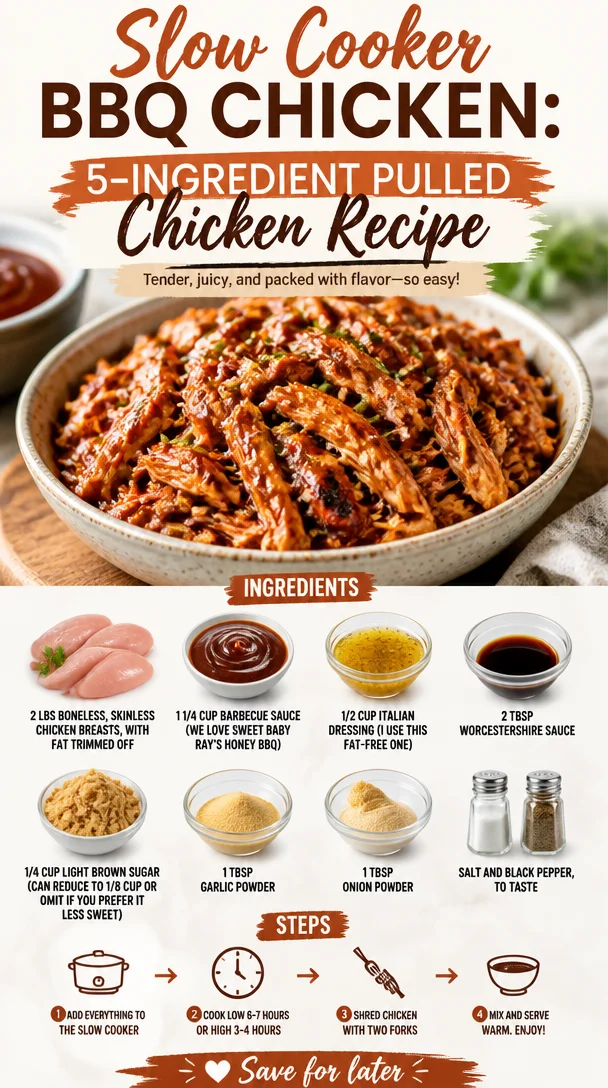
Slow Cooker BBQ Chicken: 5-Ingredient Pulled Chicken Recipe
The Best Crockpot BBQ Chicken: Easy Pulled Chicken Recipe
Welcome back to Clean Plate Cravings, food lovers! Today, we’re diving into a recipe that’s bound to make your taste buds sing: Crockpot BBQ Chicken. There’s something truly magical about the aroma of chicken cooking slowly in a delicious sauce, and the best part? It’s so easy you’ll wonder why you didn’t try it earlier. Grab your favorite brew, get cozy, and let’s get cooking!
Introduction
Picture this: It’s a busy weekday, and you’ve got a million things on your plate. The last thing you want to be doing is stressing over dinner. Enter the Crockpot BBQ Chicken! Not only does it make your life easier, but it also showers you with flavors that’ll have your family gathering around the table without the hard work.
With just a handful of ingredients and a trusty crockpot, you can create a mouth-watering dish that’s perfect for sandwiches, salads, or even tacos. I mean, who doesn’t love a good BBQ flavor, right? This recipe is perfect for anyone looking to whip up a meal without sacrificing time or taste and is an absolute hit at any gathering or family dinner!
The beauty of this dish is its versatility; you can customize it, serve it in many ways, and most importantly, it’s simply delicious. We’re talking tender, juicy pulled chicken that’s slathered in sweet, sticky barbecue sauce. Are you drooling yet? Trust me; this is a recipe you’ll want to bookmark!
So, turn on that slow cooker and let’s embark on this culinary adventure together!
Personal Story
When I think back to my childhood, I have fond memories of summer barbecues in my grandmother’s backyard. Her laughter would mix with the sound of sizzling chicken on the grill, the smell of smoky goodness enveloping the air. Those moments of gathering around the table, sharing stories, and indulging in her homemade BBQ chicken are etched in my heart.
As I grew older and started my culinary journey, I realized that not everyone has the time—or the equipment—to grill outdoors. That’s when I decided to recreate those nostalgic flavors using a slow cooker. Let me tell you, the first time I opened that lid to reveal the tender, delicious pulled chicken, I was transported straight back to my grandma’s backyard. This was my way of keeping her spirit alive in my kitchen, and now it’s your turn to create those cherished memories with your loved ones.
Ingredients
Before we roll up our sleeves and dive into cooking, here’s what you’ll need for this fantastic dish:
-
2 lbs boneless, skinless chicken breasts
These are the star of the show! Use chicken breasts as they stay juicy and shred beautifully. You can substitute with thighs if you want a richer flavor. -
1 1/4 cup barbecue sauce
I’ve got to shout out my favorite: Sweet Baby Ray’s Honey BBQ. It’s sweet, tangy, and seriously delicious. Don’t have any? You can whip up your own or try a homemade version using tomato sauce, vinegar, and spices. -
1/2 cup Italian dressing
This adds a lovely zesty flavor to the chicken. If you’re watching calories, a fat-free dressing works perfectly. No Italian dressing on-hand? Ranch or a honey mustard vinaigrette can also add a different but delightful twist. -
2 tbsp Worcestershire sauce
This sauce provides a savory depth to the BBQ chicken. If you’re vegan, look for a vegan Worcestershire sauce or simply omit it. -
1/4 cup light brown sugar
This balances out the flavors and adds sweetness to your sauce. Prefer your BBQ less sweet? You can cut this down to 1/8 cup or leave it out entirely. -
1 tbsp garlic powder
Adds that wonderful aromatic flavor we all love. Fresh garlic can be used instead; just mince 2-3 cloves. -
1 tbsp onion powder
An effortless way to add sweetness and depth. If you’re feeling ambitious, throw in some freshly chopped onion when cooking. -
Salt and black pepper, to taste
Essential for bringing all the flavors together! Season to your liking.
Step-by-Step Instructions
Now that we have our ingredients lined up, let’s get to the fun part—the cooking! Here’s how to prepare your Crockpot BBQ Chicken step by step.
-
Prepare Your Chicken
Start by trimming any excess fat from your chicken breasts. This step is key to keeping your dish light and flavorful. Once trimmed, place them at the bottom of your crockpot. -
Mix the Sauces
In a mixing bowl, combine the 1 1/4 cup of barbecue sauce, 1/2 cup of Italian dressing, 2 tbsp of Worcestershire sauce, and 1/4 cup of light brown sugar. Stir until well blended; you’ll notice how wonderful the aroma is already! -
Season Your Chicken
Sprinkle the garlic powder, onion powder, salt, and pepper over the chicken—don’t be shy! This step ensures each bite is bursting with flavor. -
Pour the Sauce Over the Chicken
This is where the magic happens! Pour the combined sauce mix evenly over the chicken breasts. Use a spatula to ensure they are well coated. -
Set Your Crockpot
Cover your crockpot and set it on low for 6-8 hours or high for 3-4 hours. The low and slow cook method is fantastic for letting those flavors meld together, so if you can, opt for low. -
Check for Doneness
About 30 minutes before serving, check your chicken. It should shred easily with a fork. If not, give it a little more time. Seriously, the aroma will have you eagerly waiting! -
Shred the Chicken
Once the chicken is cooked through, take two forks and shred the chicken right in the crockpot. Mix it in with the sauce to evenly distribute the flavors. -
Taste and Adjust
Before serving, taste the mixture. If you feel it needs more sweetness or salt, now’s the time to adjust! -
Serve and Enjoy
Your kitchen should smell heavenly right about now. Serve the pulled chicken on a fresh bun, over a salad, or in tacos. You can’t go wrong!
Serving Suggestions
You’ve worked hard for this delicious creation, and now comes the fun part: plating! I love serving this pulled chicken on toasted hamburger buns with a sprinkle of coleslaw for crunch. You can also scoop some onto a plate and pair it with roasted vegetables or a light salad. A drizzle of extra BBQ sauce on top adds a lovely finishing touch.
Recipe Variations
- Spicy BBQ Chicken: Add a teaspoon of cayenne pepper or your favorite hot sauce to the sauce blend for a kick of heat.
- Mexican Twist: Mix in some taco seasoning instead of the garlic and onion powder, and serve in tortillas with avocado.
- Honey Mustard BBQ: Swap the BBQ sauce for a honey mustard dressing for a tangy-sweet flavor.
- Sweet and Sour BBQ: Add pineapple chunks during the last hour of cooking for a sweet and tangy flavor combo.
Chef’s Notes
You know, this recipe has evolved over the years. Initially, I used whatever BBQ sauce I had on hand from the grocery store, but as I got more into cooking, I began experimenting with homemade sauces for that extra zing. Now, every time I whip up a batch, I get a little nostalgic about those barbecues with my grandma. Each bite reminds me of those golden sunny days and the love that went into every dish. Cooking is not just about the food; it’s about sharing moments that stay with you forever.
FAQs and Troubleshooting
-
Can I use frozen chicken?
Yes! You can throw frozen chicken into the crockpot directly. Just be sure to increase the cooking time by about an hour, checking that it’s cooked through before shredding. -
What if my chicken isn’t shredding well?
No worries! Simply give it a little more time in the crockpot. Sometimes, thicker breasts can take longer to cook through. -
How can I make it healthier?
Opt for skinless, boneless chicken thighs instead of breasts. You can also reduce the amount of brown sugar or use a sugar substitute. -
Can I make this in advance?
Absolutely! You can cook it a day ahead and store it in the fridge. Reheat in the microwave or stovetop before serving.
Nutritional Info
- Calories: Approximately 200 per serving
- Protein: 28g
- Fat: 4g
- Carbohydrates: 18g
There you have it! A delicious and easy recipe that not only fills your belly but also warms your heart. That’s the beauty of cooking: it connects us to our past and to each other. So gather your loved ones, serve up some of this delightful Crockpot BBQ Chicken, and let the good times roll! Happy cooking, friends!
PrintCrockpot BBQ Chicken

This Crockpot BBQ Chicken recipe provides tender pulled chicken slathered in a sweet and sticky barbecue sauce, perfect for sandwiches, salads, or tacos.
- Prep Time: 15 minutes
- Cook Time: 360 minutes
- Total Time: 375 minutes
- Yield: 4 servings 1x
- Category: Main Course
- Method: Baking
- Cuisine: American
- Diet: Gluten-Free
Ingredients
- 2 lbs boneless, skinless chicken breasts
- 1 1/4 cup barbecue sauce
- 1/2 cup Italian dressing
- 2 tbsp Worcestershire sauce
- 1/4 cup light brown sugar
- 1 tbsp garlic powder
- 1 tbsp onion powder
- Salt and black pepper, to taste
Instructions
- Prepare your chicken by trimming any excess fat and placing it in the bottom of your crockpot.
- Mix the barbecue sauce, Italian dressing, Worcestershire sauce, and light brown sugar in a bowl until well blended.
- Season the chicken with garlic powder, onion powder, salt, and pepper.
- Pour the sauce over the chicken, ensuring it’s well coated.
- Set your crockpot on low for 6-8 hours or high for 3-4 hours.
- Check for doneness about 30 minutes before serving.
- Shred the chicken in the crockpot using two forks and mix it with the sauce.
- Taste the mixture and adjust seasoning if needed.
- Serve the pulled chicken on buns, over salads, or in tacos.
Notes
Serve with coleslaw, roasted vegetables, or a drizzle of extra BBQ sauce.
Nutrition
- Serving Size: 1 serving
- Calories: 350
- Sugar: 16g
- Sodium: 700mg
- Fat: 10g
- Saturated Fat: 2g
- Unsaturated Fat: 6g
- Trans Fat: 0g
- Carbohydrates: 35g
- Fiber: 1g
- Protein: 28g
- Cholesterol: 75mg
Keywords: Crockpot, BBQ Chicken, Pulled Chicken, Easy Recipe, Slow Cooker
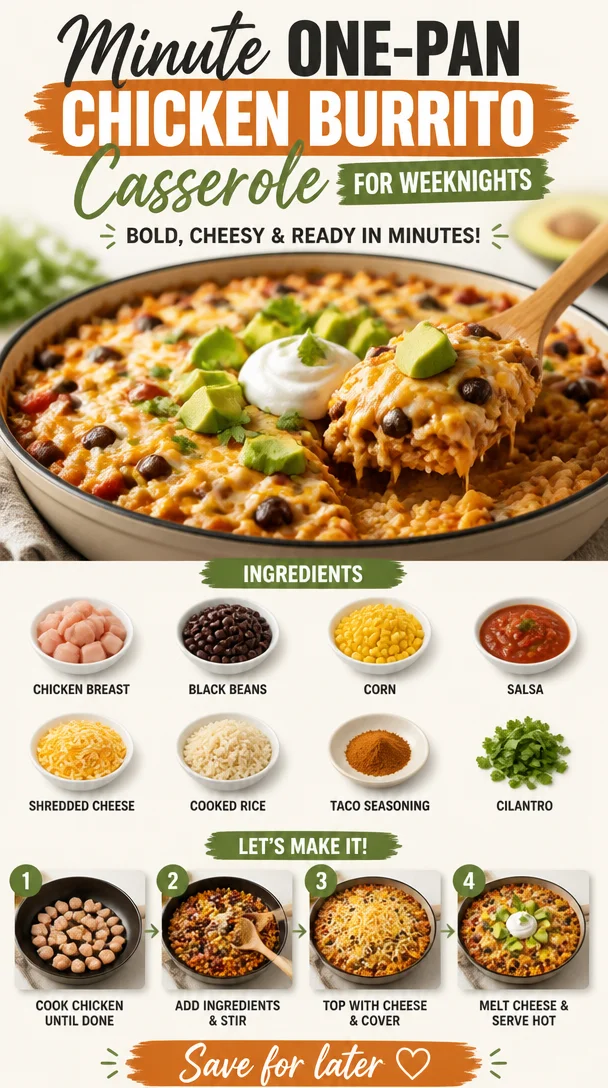
Minute One-Pan Chicken Burrito Casserole for Weeknights
Chicken Burrito Casserole: A Comforting Classic That Delivers Flavor and Warmth
Hello, fellow foodies! Today, we’re diving into one of my absolute favorite recipes that feels like a warm hug: Chicken Burrito Casserole. This dish effortlessly combines the hearty, comforting elements of a casserole with all the spicy, zesty flavors we love in burritos. If you’re looking for a meal that’s easy to prepare, family-friendly, and utterly delicious, you’ve found your winner!
Picture this: a busy weeknight when you want to whip up something that not only fills your belly but also ignites your taste buds with excitement. This Chicken Burrito Casserole checks all the boxes. Imagine layers of tender chicken, colorful veggies, zesty spices, and ooey-gooey cheese—all baked to perfection and served hot from the oven. Sounds dreamy, right?
This dish is perfect for meal prep, easy enough for beginners, and versatile enough for any palate. It embraces everything we love about burritos, minus the fuss of rolling them up. Plus, it’s a hit with friends and family—everyone will be asking for seconds!
So grab your apron, turn up the music, and let’s get ready to create a wholesome dish that brings people together. This Chicken Burrito Casserole isn’t just about the food; it’s about sharing delicious moments around the table.
A Nostalgic Kitchen Memory
Let me take you back to a particularly vivid memory from my childhood. I remember coming home from school, the rich aroma of spices wafting through the air as my mom prepped one of our family favorites—burritos. Those after-school moments were sacred. We would gather around the kitchen island, my siblings and I hunched over a plate, eagerly awaiting our turn to fill our soft tortillas with all the delicious fixings.
But there was one day that stands out vividly in my mind. My mom decided to mix things up and made a burrito casserole instead. We were skeptical at first—where was the fun of rolling our own burritos? But as soon as we took our first bite, oh boy! The gooey melted cheese, the perfectly seasoned chicken, and the burst of flavors conquered our taste buds in an instant. From that moment on, burrito casseroles became our family’s go-to for a fun, flavorful meal.
Fast forward to today, when I find myself sharing this timeless recipe with everyone who needs a little comfort in their life. It’s a beautiful reminder of how food can be a bridge connecting generations, cultures, and memories.
Ingredients
Here’s what you’ll need to create this mouthwatering Chicken Burrito Casserole:
-
Cooked Chicken Breast: (about 3 cups, shredded)
You can use rotisserie chicken for convenience or poach some chicken breast at home. If you’re vegetarian, feel free to substitute with black beans or chickpeas for a protein-packed alternative! -
Tortillas: (10-12 corn or flour tortillas)
I prefer corn for the traditional taste, but flour tortillas work well too! For gluten-free options, you can use corn tortillas or even a grain-free tortilla. -
Black Beans: (1 can, drained and rinsed, or 1.5 cups cooked black beans)
These add protein and fiber! If you’re not a fan of black beans, try pinto beans or kidney beans for a different flavor. -
Corn: (1 cup, frozen or canned)
Sweet, crisp corn enhances the texture! If you can get your hands on fresh corn, it elevates the dish even further. -
Diced Tomatoes: (1 can, with juice)
Tomatoes provide acidity and moisture. Substitute with fresh chopped tomatoes or salsa for an extra kick. -
Onion: (1 medium onion, diced)
Sautéed onions add depth. You can swap out with leeks or shallots if you want to switch things up. -
Red Bell Pepper: (1, diced)
Sweet and colorful, red bell peppers brighten up the dish. Any bell pepper variety can work here! -
Chili Powder: (1 tablespoon)
This is where the flavors really start to pop! Feel free to use other spices like cumin or paprika if you prefer a different spice profile. -
Garlic Powder: (1 teaspoon)
It’s a must for savory dishes! Fresh garlic is a great substitute if you prefer a bold flavor. -
Cumin: (1 teaspoon)
Cumin brings warmth and authenticity. You could replace it with a pinch of taco seasoning if you have it on hand. -
Shredded Cheese: (2 cups, such as cheddar or Monterey Jack)
Creamy and melty, cheese is the finishing touch! For a dairy-free version, try cashew cheese or nutritional yeast. -
Fresh Cilantro: (for garnish)
This adds a refreshing touch. If you’re not a cilantro fan, green onions or parsley can be used instead.
Step-by-Step Instructions
Ready to get cooking? Let’s dive into the steps to create your Chicken Burrito Casserole!
Step 1: Preheat Your Oven
Preheat your oven to 375°F (190°C). Prepping ahead of time will ensure your casserole is perfectly baked without any fuss later on!
Step 2: Dice the Veggies
While the oven heats up, let’s get chopping! Dice the onion and red bell pepper. This is where you can let your creativity shine. Want to throw in some zucchini or mushrooms? Go for it! The more veggies you add, the healthier your casserole becomes.
Step 3: Sauté on the Stovetop
In a large skillet over medium heat, drizzle a little olive oil. Add your diced onion and red bell pepper. Sauté for about 5-7 minutes until they are soft and fragrant. This step is crucial because it brings out the natural sweetness of the veggies and adds a ton of flavor.
Step 4: Add the Chicken and Spices
Now, stir in your shredded chicken, black beans, corn, diced tomatoes, chili powder, garlic powder, and cumin. Give everything a good stir to combine all the ingredients evenly. Let it cook for about 5 minutes, allowing the flavors to meld together. This is also your moment to taste test—don’t be shy!
Step 5: Layer the Dish
Grab a 9×13 inch baking dish and start layering. Begin by spreading a couple of spoonfuls of the chicken mixture evenly at the bottom of the dish. Then, line the tortillas over the mixture, covering the entire surface. Don’t worry too much about gaps; they’ll fill in as the casserole bakes.
Step 6: Add More Goodness
Spread another layer of the chicken mixture over the tortillas, and then sprinkle half of your shredded cheese on top. Repeat this layering process with more tortillas, the remaining chicken mixture, and top it off with the remaining cheese. It’s all about those delicious layers that create that moment of bliss when you dive in!
Step 7: Bake It Up
Cover the dish with aluminum foil (to avoid sticking) and bake in the preheated oven for 20 minutes. After that, remove the foil and bake for an additional 10-15 minutes, or until the edges are bubbly and the cheese is melted and golden. Your kitchen will smell like heaven right about now!
Step 8: Garnish and Serve
Once baked, take the casserole out of the oven and let it sit for about 10 minutes before serving. This will allow everything to settle and make for easier slicing. Garnish with fresh cilantro for that vibrant pop of color and flavor!
Serving Suggestions
Serve your Chicken Burrito Casserole with a side of tangy guacamole or fresh salsa. You could even serve it alongside a light leafy green salad dressed with lime vinaigrette to contrast the rich flavors of the casserole. The beauty of this dish is that it’s a complete meal on its own, but adding a refreshing side balances the richness beautifully.
Recipe Variations
Feel like switching things up? Here are a few creative variations you can try:
- Spicy Kick: Add diced jalapeños to the chicken mixture for an extra kick of heat!
- Vegetarian Delight: Replace the chicken with a mix of your favorite vegetables like zucchini, mushrooms, and more beans.
- Taco Fiesta: Swap out the cilantro for fresh corn salsa for a zesty surprise.
- Cheesy Goodness: Experiment with different cheese blends, like pepper jack for a spicier rendition.
- BBQ Twist: Incorporate BBQ sauce into the chicken mixture for a smoky flavor profile.
Chef’s Notes
This recipe has evolved over the years as I’ve experimented with different ingredients and flavor combinations. I’ve swapped in various beans, added seasonal veggies, and even used leftover barbecue chicken to make it feel fresh and new every time. There’s simply no wrong way to make a burrito casserole, and that’s part of the joy!
Sometimes, I’ll throw on some diced avocados right before serving for a creamy contrast that everyone loves. Also, keep in mind that this recipe freezes beautifully! Prepare a double batch, then freeze one for a rainy day—it’s like an instant meal waiting for you!
FAQs and Troubleshooting
Can I make this dish ahead of time?
Absolutely! You can prepare the casserole up to the baking step, cover it, and store it in the fridge for up to 24 hours. Just pop it in the oven when you’re ready!
Why did my casserole turn out soggy?
If the casserole has too much moisture, it can turn soggy. Make sure to drain the canned ingredients and not to overload with liquid.
Can I substitute the chicken for another protein?
Yes! Feel free to try turkey, beef, or even tofu for a plant-based option. Just make sure to adjust cooking times based on the protein used.
How do I store leftover casserole?
Keep any leftovers in an airtight container and store them in the fridge for up to four days. Reheat in the oven or microwave until warmed through!
Nutritional Info
If you’re tracking nutrition, here’s a quick overview (per serving, assuming 8 servings):
- Calories: 380
- Protein: 25g
- Carbohydrates: 40g
- Fats: 15g
- Fiber: 6g
(Note: Nutritional info may vary based on ingredient brands and portion sizes.)
And there you have it! Your Chicken Burrito Casserole is officially ready to be devoured. Thank you for joining me today, and I can’t wait to hear how your version turns out. Remember: good food is all about connection, exploration, and joy. So keep it fresh, keep it simple, and keep enjoying every delicious bite!
PrintChicken Burrito Casserole

A comforting Chicken Burrito Casserole that delivers flavorful layers of chicken, black beans, corn, and cheese, all baked to perfection.
- Prep Time: 15 minutes
- Cook Time: 30 minutes
- Total Time: 45 minutes
- Yield: 8 servings 1x
- Category: Main Course
- Method: Baking
- Cuisine: Mexican
- Diet: None
Ingredients
- 3 cups cooked chicken breast, shredded
- 10–12 corn or flour tortillas
- 1 can black beans, drained and rinsed
- 1 cup corn, frozen or canned
- 1 can diced tomatoes, with juice
- 1 medium onion, diced
- 1 red bell pepper, diced
- 1 tablespoon chili powder
- 1 teaspoon garlic powder
- 1 teaspoon cumin
- 2 cups shredded cheese (cheddar or Monterey Jack)
- Fresh cilantro, for garnish
Instructions
- Preheat your oven to 375°F (190°C).
- Dice the onion and red bell pepper.
- Sauté in a large skillet over medium heat with olive oil for about 5-7 minutes.
- Add the shredded chicken, black beans, corn, diced tomatoes, chili powder, garlic powder, and cumin.
- Layer the ingredients in a 9×13 inch baking dish starting with the chicken mixture, followed by the tortillas, then more chicken, and finally the cheese.
- Cover with aluminum foil and bake for 20 minutes, then remove the foil and bake for another 10-15 minutes.
- Garnish with fresh cilantro before serving.
Notes
This recipe freezes beautifully, so consider making a double batch!
Nutrition
- Serving Size: 1 serving
- Calories: 380
- Sugar: 4g
- Sodium: 600mg
- Fat: 15g
- Saturated Fat: 7g
- Unsaturated Fat: 5g
- Trans Fat: 0g
- Carbohydrates: 40g
- Fiber: 6g
- Protein: 25g
- Cholesterol: 70mg
Keywords: chicken casserole, burrito casserole, comfort food, Mexican dish, easy recipe