Soft Blueberry Muffins Recipe for Perfect Spring Brunch Delight
Soft Blueberry Muffins Recipe for Perfect Spring Brunch Delight
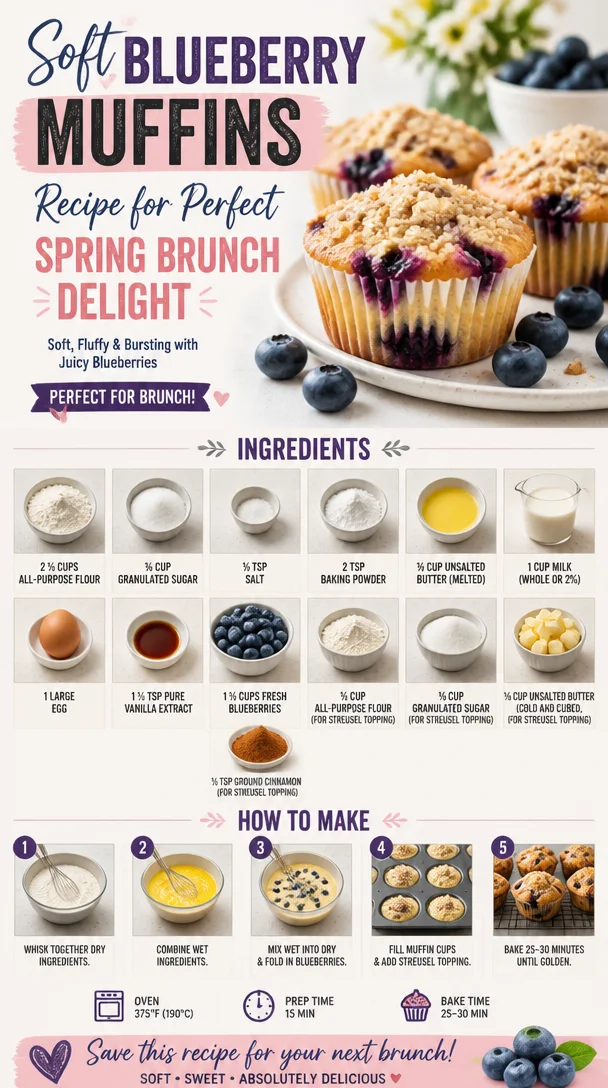
Welcome to Clean Plate Cravings! Today, I’m thrilled to share a recipe that not only celebrates the beauty of spring but also brings a warm, homemade touch to your brunch table. Blueberry muffins are the epitome of comfort food, and nothing says “spring delight” quite like the sweet-tart burst of fresh blueberries nestled in a soft, fluffy muffin. Let’s dive into creating the softest, most delicious blueberry muffins that will have everyone coming back for seconds—and thirds!
A Joyful Kitchen Memory
Growing up, my weekends were filled with the sweet aroma of baking wafting through my home, especially in the springtime. My mom had a magical way of transforming the simplest of ingredients into unforgettable family treats. One spring morning, I remember waking up to the sound of laughter and the clattering of mixing bowls in the kitchen. My mom had decided to whip up her famous blueberry muffins for brunch.
We had just returned from our local farmers’ market with pints of fresh blueberries, their deep hue promising a burst of flavor. As we mixed the batter, I snuck a few blueberries, their juicy sweetness exploding in my mouth. The anticipation was palpable as we brought the muffins out of the oven, golden and fragrant. These muffins became a tradition, a way to celebrate the arrival of spring while gathering around the table with family and friends. Every bite transported me back to those sunny mornings, a delicious reminder of love, laughter, and togetherness.
Ingredients
Let’s gather our ingredients! Here’s what you’ll need to make these delightful blueberry muffins:
-
2 ½ cups all-purpose flour
A must-have for achieving that perfect muffin texture. For a whole-grain twist, try using whole wheat flour, but you may want to adjust the liquid slightly. -
¾ cup granulated sugar
This sweetens our muffins beautifully. If you’re looking to cut back on sugar, feel free to reduce it to ½ cup or use coconut sugar for a different flavor profile. -
½ tsp salt
Salt is crucial; it enhances the flavors in the muffins. Don’t skip it! -
2 tsp baking powder
Our secret to fluffy muffins! Make sure your baking powder is fresh; if it’s been sitting in your pantry for more than six months, it may need replacing. -
⅓ cup unsalted butter (melted)
Adds richness and flavor. If you prefer a dairy-free option, coconut oil works wonders here! -
1 cup milk (whole or 2%)
The moisture in our muffins. Almond milk or oat milk can be excellent substitutes for a nut-free or dairy-free option. -
1 large egg
Acts as a binder. If you’re vegan, you can replace this with ¼ cup unsweetened applesauce. -
1 ½ tsp pure vanilla extract
For that lovely aromatic flavor. Always opt for pure extract over imitation for the best results! -
1 ½ cups fresh blueberries
The star of our show! Be sure to wash and pat them dry before folding them into the batter to prevent streaking. -
½ cup all-purpose flour (for streusel topping)
Adds texture and a lovely crunch. You can substitute it with oats for a heartier topping! -
⅓ cup granulated sugar (for streusel topping)
Just the right amount to sweeten the crunch! -
⅓ cup unsalted butter (cold and cubed, for streusel topping)
Key for making the streusel crumbly and delicious. If you’re dairy-free, try using a vegan butter substitute. -
½ tsp ground cinnamon (for streusel topping)
Adds a warm, cozy layer of flavor. You can also tweak it with nutmeg for a different taste.
Step-by-Step Instructions
Ready to get baking? Let’s whip up these delightful muffins step by step!
-
Preheat Your Oven
Preheat your oven to 375°F (190°C). This is a crucial step to ensure even baking. While your oven is warming up, gather your muffin pans—this recipe makes about 12 muffins, so grab two pans or bake in batches! -
Prepare the Muffin Pan
Grease your muffin pans with non-stick spray, or line them with muffin liners for easy removal. I love using liners; it gives my muffins a polished look and minimizes mess! -
Mix the Dry Ingredients
In a large mixing bowl, whisk together the flour, sugar, salt, and baking powder. This step is essential—mixing the dry ingredients first helps ensure that the baking powder is evenly distributed throughout the batter. -
Combine the Wet Ingredients
In a separate bowl, mix the melted butter, milk, egg, and vanilla extract. Whisk until well combined and smooth. I tend to let my melted butter cool a little before mixing it in; it helps prevent cooking the egg when combined! -
Combine Wet and Dry
Gently fold the wet ingredients into the dry ingredients using a spatula. Be careful not to overmix—this is key for fluffy muffins! It’s okay if there are a few lumps in the batter. -
Fold in the Blueberries
Now for the fun part! Fold in the fresh blueberries, being gentle to keep them intact. This is where those sweet bursts of flavor come in! -
Make the Streusel Topping
In a small bowl, combine the flour, sugar, cinnamon, and cold cubed butter. Use your fingers or a pastry cutter to mix until it resembles coarse crumbs. If you have little ones around, this step is a great way to get them involved—let them squish the butter into the dry ingredients! -
Fill the Muffin Cups
Using a cookie scoop or spoon, fill each muffin cup about 2/3 full with batter. Top each one generously with your streusel mixture—don’t be shy! This adds that perfect crunchy topping. -
Bake to Perfection
Place the muffin pans in the preheated oven and bake for 18-20 minutes or until golden brown and a toothpick inserted in the center comes out clean. The aroma wafting through your home will be absolutely heavenly! -
Cool and Serve
Once baked, remove your muffins from the oven and let them cool in the pans for about 5 minutes before transferring them to a wire rack to cool completely. Enjoy them warm or at room temperature—either way, they’re delicious!
Serving Suggestions
Serve your blueberry muffins warm with a pat of butter or a drizzle of honey. They’re perfect alongside a warm cup of coffee or a refreshing glass of iced tea. For a brunch spread, pair them with fresh fruit and yogurt for a wholesome touch!
Recipe Variations
Want to get creative? Here are some fun twists to this classic recipe:
- Lemon Blueberry Muffins: Add the zest of one lemon to the batter for a zesty flavor that pairs beautifully with blueberries.
- Chocolate Chip Blueberry Muffins: Fold in a handful of dark chocolate chips along with the blueberries for a sweet indulgence.
- Nutty Crunch: Add chopped walnuts or almond slivers to your batter or streusel for an extra crunch.
- Gluten-Free Muffins: Substitute all-purpose flour with a gluten-free blend, and make sure your baking powder is gluten-free as well!
- Vegan Option: Swap the egg for flaxseed meal and water mixture (1 tablespoon of flaxseed meal mixed with 2.5 tablespoons of water) and use plant-based milk and butter.
Chef’s Notes
Every kitchen has a personality, and mine surely loves blueberry muffins! This recipe has evolved over the years, starting from my mom’s classic version to a modern twist that embraces simplicity and fresh ingredients. I can still picture those sunny mornings filled with family chatter and laughter. What I love most about baking is that it brings people together and creates memories—so don’t hesitate to share your creations with loved ones!
FAQs and Troubleshooting
Q: My muffins came out dense. What happened?
A: Dense muffins are often a result of overmixing the batter. Remember to mix until just combined!
Q: Can I use frozen blueberries?
A: Absolutely! If using frozen blueberries, don’t thaw them—instead, fold them in directly from the freezer to help prevent the batter from turning blue.
Q: How do I store leftover muffins?
A: Store muffins in an airtight container at room temperature for up to three days. You can also freeze them for up to three months—just let them cool completely before freezing!
Q: My streusel topping didn’t crumble. What went wrong?
A: Make sure your butter is cold and cubed before mixing. If it’s too soft, the streusel won’t form those lovely crumbs we’re after!
Nutritional Info
While I love indulging in these muffins, they’re also about balance. Each muffin contains roughly:
- Calories: 200
- Protein: 3g
- Fat: 8g
- Carbohydrates: 32g
- Fiber: 1g
- Sugar: 10g
Remember, nutritional content may vary based on ingredients used and proportions, so feel free to adjust according to your needs!
There you have it—your guide to soft blueberry muffins that bring a touch of warmth and sweetness to your spring brunch. I hope this recipe becomes a cherished tradition in your home just like it is in mine! So, put on your apron, turn up your favorite tunes, and let’s bake some love into your kitchen! Happy baking! 🫐💙
PrintSoft Blueberry Muffins
Deliciously soft blueberry muffins perfect for spring brunch, bursting with fresh blueberries and topped with a delightful streusel.
- Prep Time: 15 minutes
- Cook Time: 20 minutes
- Total Time: 35 minutes
- Yield: 12 muffins 1x
- Category: Baked Goods
- Method: Baking
- Cuisine: American
- Diet: Vegetarian
Ingredients
- 2 ½ cups all-purpose flour
- ¾ cup granulated sugar
- ½ tsp salt
- 2 tsp baking powder
- ⅓ cup unsalted butter (melted)
- 1 cup milk (whole or 2%)
- 1 large egg
- 1 ½ tsp pure vanilla extract
- 1 ½ cups fresh blueberries
- ½ cup all-purpose flour (for streusel topping)
- ⅓ cup granulated sugar (for streusel topping)
- ⅓ cup unsalted butter (cold and cubed, for streusel topping)
- ½ tsp ground cinnamon (for streusel topping)
Instructions
- Preheat your oven to 375°F (190°C).
- Prepare your muffin pans by greasing them or using liners.
- Mix the dry ingredients: flour, sugar, salt, and baking powder.
- Combine the wet ingredients: melted butter, milk, egg, and vanilla extract.
- Combine the wet and dry ingredients gently.
- Fold in the fresh blueberries carefully.
- Make the streusel topping by combining flour, sugar, cinnamon, and cold butter.
- Fill each muffin cup about 2/3 full and top with streusel.
- Bake for 18-20 minutes, until golden brown and a toothpick comes out clean.
- Cool in pans for 5 minutes before transferring to a wire rack.
Notes
Serve warm with butter or honey, alongside coffee or iced tea for a delightful brunch experience.
Nutrition
- Serving Size: 1 muffin
- Calories: 200
- Sugar: 10g
- Sodium: 200mg
- Fat: 8g
- Saturated Fat: 5g
- Unsaturated Fat: 3g
- Trans Fat: 0g
- Carbohydrates: 32g
- Fiber: 1g
- Protein: 3g
- Cholesterol: 30mg
Keywords: blueberry muffins, spring baking, brunch recipes, easy muffins, homemade muffins
Minute Summer Mango Salsa: Quick Weeknight Favorite
Summer Mango Salsa: Fresh, Vibrant, and Oh-So-Delicious!
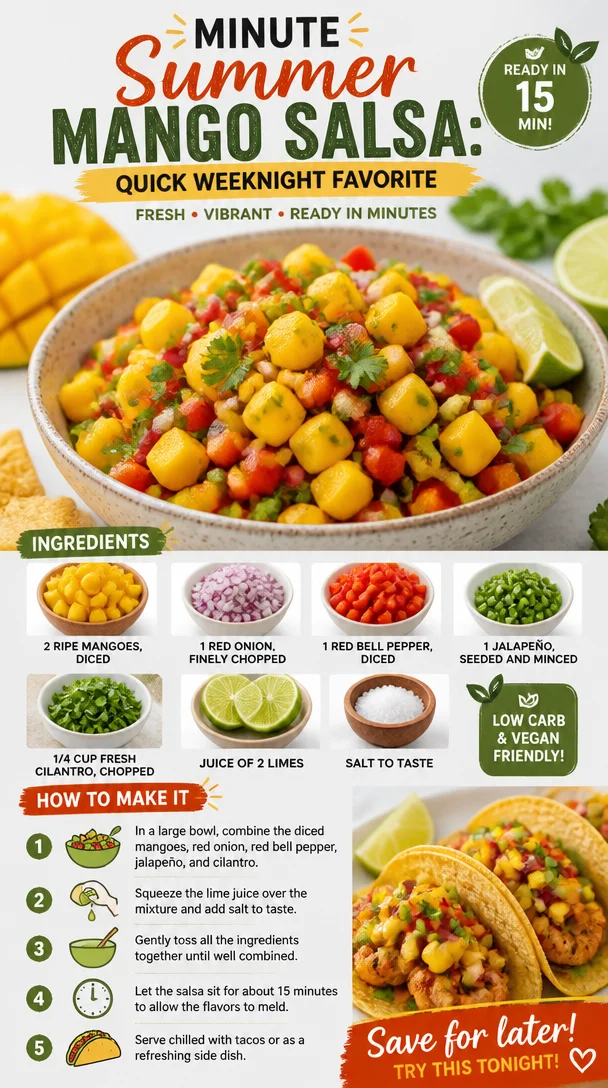
Welcome to another exciting culinary adventure here at Clean Plate Cravings! Today, we’re diving into the world of summer flavors with a dish that’s bound to make your taste buds dance with joy—Summer Mango Salsa! This vibrant, colorful salsa is perfect for those sunny days when you want to feel refreshed and energized. Whether you’re hosting a backyard barbecue, just chilling on the patio, or prepping a week’s worth of clean meals, this salsa is a versatile powerhouse that adds a pop of flavor to just about anything.
Picture this: The sun is shining, the birds are chirping, and you’re surrounded by friends, laughter, and the delicious aroma of grilled goodness wafting through the air. That’s what summer is all about, right? And what better way to complement a summer feast than with a fresh, zesty mango salsa that elevates everything from grilled chicken to fish tacos? Plus, it’s super easy to make, packed with nutrients, and utterly satisfying. Who wouldn’t want a bowl of this brilliant dish at their table?
As I embarked on my cooking journey, salsa was one of those magical creations that stole my heart. Growing up, my family had a tradition of making salsa together during summer gatherings. We would sit around the kitchen counter, chopping and mixing, as laughter and stories were shared. It was more than just a recipe; it was a bonding experience. Each ingredient contributed not just to the flavor but also to the love and joy that enveloped those summer afternoons. So, whether you’re reliving fond memories or creating new ones, this Summer Mango Salsa will become a staple in your kitchen!
Now let’s roll up those sleeves and get to the fun part! Here’s everything you need to whip up this gorgeous salsa.
Ingredients
-
2 ripe mangoes, diced
- The star of the show! Look for mangoes that yield slightly to pressure—this means they’re ripe and ready to be enjoyed. Not enough mangoes? Try substituting with peaches or nectarines for a similar sweetness!
-
1 red onion, finely chopped
- This brings a touch of sharpness that pairs beautifully with the sweetness of the mangoes. If red onion isn’t your thing, you could swap it out with green onions or shallots for a milder flavor.
-
1 red bell pepper, diced
- Adds crunch and a hint of sweetness. Feel free to swap it with yellow or orange bell peppers for a slightly different taste while keeping that vibrant color!
-
1 jalapeño, seeded and minced
- Here’s where you get to play with spice! Don’t be shy, but remove the seeds if you want to dial down the heat. If you prefer, you can use a different pepper like a serrano for a bolder kick, or skip it altogether for a milder salsa.
-
1/4 cup fresh cilantro, chopped
- This herb is essential for that fresh, bright flavor! If you’re not a fan of cilantro (I know, it’s a controversial herb!), feel free to substitute with fresh parsley or basil for a unique twist.
-
Juice of 2 limes
- The acidity brings everything together! The lime juice cuts through the sweetness and adds that zing we all crave. In a pinch, lemon juice can work too.
-
Salt to taste
- A little salt enhances all those beautiful flavors. Don’t skip it! If you’re watching your sodium intake, consider using a pinch of Himalayan pink salt for added mineral content.
Step-by-Step Instructions
-
Prepare your ingredients: Begin by gathering all your ingredients on the countertop. This is the best way to streamline your process and make sure you have everything you need. Organize your cutting board, and don’t forget to put on your favorite tunes to create an uplifting kitchen atmosphere!
-
Dice the mangoes: Grab those ripe mangoes and slice them down the sides of the pit. Extract the flesh and make some crisscross cuts with your knife before scooping it out with a spoon. The result? Perfectly diced mango pieces that are bursting with flavor!
-
Chop the onion and bell pepper: Next, finely chop the red onion and dice the red bell pepper. These colors alone will brighten up any kitchen! When chopping onions, I recommend using a sharp knife to avoid tearing up, but if you do find yourself sniffling, a quick rinse with cold water can help.
-
Mince the jalapeño: Take your jalapeño and carefully slice it open. Use a spoon to scrape out the seeds (unless you like it spicy—then leave some in!). Finely mince the jalapeño to distribute just the right amount of heat throughout your salsa.
-
Chop the cilantro: Give your fresh cilantro a rough chop to release those delightful oils. If you’re using parsley or basil instead, go ahead and do the same. Herb freshness is key!
-
Mix it all together: In a large mixing bowl, combine your diced mangoes, chopped red onion, bell pepper, jalapeño, and cilantro. Now, here’s your chef hack: use a gentle folding motion to combine the ingredients, preserving their texture and avoiding mushiness.
-
Add lime juice and salt: Squeeze the juice of the two limes directly into the bowl, making sure to catch any seeds (those slippery little critters!). Then, sprinkle salt to taste. Give everything a good stir and taste as you go. Adjust the lime and salt until it’s just how you like it.
-
Chill and serve: Allow the mango salsa to chill in the refrigerator for at least 30 minutes to let those flavors meld together. Trust me; it’s worth the wait. Serve it chilled or at room temperature with your favorite chips or as a topping for your grilled recipes!
Serving Suggestions
Ready to impress your guests? Here’s how to serve your delicious Summer Mango Salsa: scoop it into a bright, beautiful serving bowl and unleash its colorful charms. Garnish with a sprig of cilantro on top for that professional touch. Pair it with crispy tortilla chips or spoon it generously over grilled fish, chicken, tacos, or even salads for a refreshing upgrade. The possibilities are truly endless, and the smiles will be contagious!
Recipe Variations
-
Add Avocado: Dice up some ripe avocado to add creaminess—this will make your salsa richer and texturally diverse. Plus, who can resist avocado?
-
Pineapple Twist: Swap out some of the mango for fresh pineapple! This will add a tangy sweetness that pairs perfectly with the savory elements in your meal.
-
Black Beans for Protein: Want to make this salsa a full meal? Toss in some drained canned black beans. This will boost the fiber and protein content, making it even more satisfying.
-
Coconut Flakes: For a fun tropical twist, mix in some unsweetened coconut flakes. This will give that exotic flair and an interesting texture.
-
Spicy Garlic Kick: Add minced garlic for an extra layer of flavor, or toss in some chopped fresh ginger for an unexpected zing!
Chef’s Notes
This Summer Mango Salsa recipe has beautifully evolved over the years as I played with different ingredients based on what was available or in season. I fondly remember making it in my tiny apartment kitchen, with all sorts of concoctions that would sometimes go hilariously wrong (mesquite mango salsa, anyone?). But each error taught me something new, and now I’m thrilled to share this tried-and-true version with you! Salsas can be so personal, really reflective of each person’s palate. It’s an exciting journey where we can all celebrate our unique flavor preferences.
FAQs and Troubleshooting
1. What if my mangoes are too firm?
- If your mangoes aren’t quite ripe, let them sit at room temperature for a few days until they yield slightly to pressure. You can also speed up the ripening process by placing them in a paper bag with an apple or banana!
2. Can I make this salsa ahead of time?
- Absolutely! Just keep in mind that the longer it sits, the softer the ingredients will become. It’s best if consumed within 2-3 days. Just give it a good stir before serving.
3. How can I adjust the spiciness?
- You can control the heat by adjusting the amount of jalapeño based on your taste preference. You can also add a pinch of cayenne pepper for a unique kick if you want more spice without more bulk.
4. Can I freeze the salsa?
- While it’s not recommended to freeze the salsa due to the fresh ingredients losing their texture, you can freeze the mangoes separately and make a fresh batch later!
Nutritional Info
While I won’t overload you with numbers, rest assured this Summer Mango Salsa is packed with vitamins, potassium, and antioxidants—making it a healthy choice for snacking or a side dish. Pair it with whole-grain chips or on top of a bed of leafy greens for a nutritious boost!
So, what do you think? Are you ready to dive into this delightful Summer Mango Salsa recipe? Gather your ingredients, don your apron, and let’s make those summer days even sweeter! Happy cooking, my fellow foodies! 🌟
PrintSummer Mango Salsa
A vibrant and refreshing salsa made with fresh mangoes and colorful veggies, perfect for summer gatherings.
- Prep Time: 15 minutes
- Cook Time: 0 minutes
- Total Time: 15 minutes
- Yield: 4 servings 1x
- Category: Appetizer
- Method: Mixing
- Cuisine: Mexican
- Diet: Vegan
Ingredients
- 2 ripe mangoes, diced
- 1 red onion, finely chopped
- 1 red bell pepper, diced
- 1 jalapeño, seeded and minced
- 1/4 cup fresh cilantro, chopped
- Juice of 2 limes
- Salt to taste
Instructions
- Prepare your ingredients: Begin by gathering all your ingredients on the countertop.
- Dice the mangoes: Grab those ripe mangoes and slice them down the sides of the pit.
- Chop the onion and bell pepper: Next, finely chop the red onion and dice the red bell pepper.
- Mince the jalapeño: Take your jalapeño and carefully slice it open.
- Chop the cilantro: Give your fresh cilantro a rough chop to release those delightful oils.
- Mix it all together: In a large mixing bowl, combine your diced mangoes, chopped red onion, bell pepper, jalapeño, and cilantro.
- Add lime juice and salt: Squeeze the juice of the two limes directly into the bowl.
- Chill and serve: Allow the mango salsa to chill in the refrigerator for at least 30 minutes.
Notes
This salsa can be made ahead of time but is best enjoyed within 2-3 days for optimal freshness.
Nutrition
- Serving Size: 1/4 cup
- Calories: 150
- Sugar: 18g
- Sodium: 50mg
- Fat: 1g
- Saturated Fat: 0g
- Unsaturated Fat: 1g
- Trans Fat: 0g
- Carbohydrates: 37g
- Fiber: 3g
- Protein: 2g
- Cholesterol: 0mg
Keywords: salsa, mango, summer recipes, healthy snacks, fresh salsa
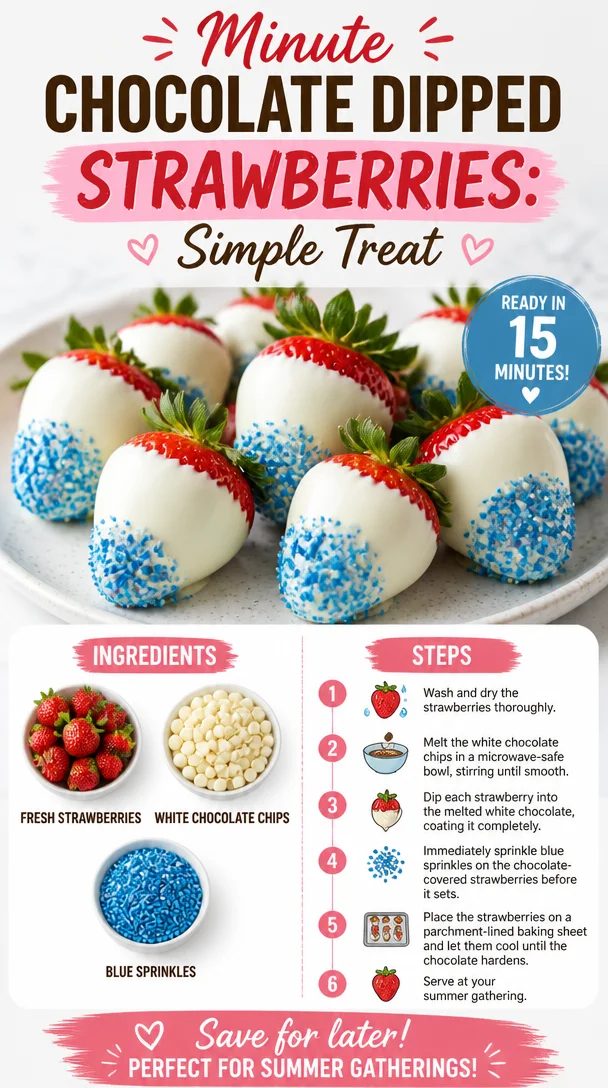
Minute Chocolate Dipped Strawberries: Simple Treat
Indulge in Bliss: The Ultimate Chocolate Dipped Strawberries Recipe
Hey there, fellow food lovers! If you’re looking for a sweet and simple treat that will wow your friends, loved ones, or even just yourself, let me introduce you to the delightful world of Chocolate Dipped Strawberries. These delectable bites are not just a dessert; they’re a moment of joy that can brighten your day, bringing a touch of fancy to any occasion without demanding too much of your precious time in the kitchen.
When I think of chocolate dipped strawberries, memories of summer days and festive gatherings come rushing back. Imagine this: the sun is shining, laughter fills the air, and all around you, friends are enjoying fresh strawberries dipped in creamy chocolate. It’s a scene that feels almost magical, isn’t it? Whether it’s a romantic date night, cozy movie session, or an extravagant dinner party, chocolate dipped strawberries have this incredible ability to bring smiles to faces, making every bite a little celebration.
A Sweet Trip Down Memory Lane
One of my fondest memories linked to this treat is from a small backyard picnic my family hosted a few years ago. My little niece, who was only four at the time, had picked some strawberries from our garden, her face lighting up like a Christmas tree every time she found a juicy one. We decided to dip them in chocolate as a little fun project together. I melted the chocolate while she enthusiastically helped by holding the strawberries and sprinkling blue edible sprinkles like a true artist. The giggles, the sticky fingers, and ecstatic “oooohs” and “aaaahs” she made with every strawberry pulled straight from the bowl to her mouth—those sweet moments are forever etched in my heart.
And while it’s easy to buy chocolate dipped strawberries pre-made, there’s just something so incredibly rewarding about making them yourself. It’s a delightful fusion of flavors that celebrates sweetness in every bite and will make your kitchen smell incredible too!
Gather Your Ingredients!
To embark on making these delightful treats, you’ll need the following simple ingredients:
-
Fresh Strawberries
The star of our show! Choose ripe, juicy strawberries that are firm and blemish-free. These beauties not only taste great but look gorgeous too. If fresh strawberries aren’t available, you can opt for frozen ones, but remember they won’t hold their shape quite as well once dipped. -
White Chocolate Chips
Smooth and creamy, the white chocolate complements the tartness of the strawberries beautifully. If you’re looking for a healthier option, consider using dark chocolate chips instead. And for those who might have a dairy intolerance, there are fantastic dairy-free chocolate chips available in the market! -
Blue Sprinkles
These are optional but add a delightful pop of color and crunch! You can get creative with any colors or shapes of sprinkles; they’ll make your strawberries look festive. Feel free to substitute with chopped nuts, coconut flakes, or even edible glitter if that’s more your style!
Step-by-Step Instructions to Chocolate Heaven
Now that you’ve assembled your ingredients, let’s dive into the process!
-
Prep Your Supplies:
Start by washing your strawberries gently under cold water, then pat them dry with a clean kitchen towel. This step is crucial! Moisture will cause the chocolate to not stick properly later. -
Melt the White Chocolate:
In a microwave-safe bowl, add your white chocolate chips. Microwave the chips in 30-second bursts, stirring in between until smooth and fully melted. Be sure to keep an eye on it to prevent burning. If it looks too thick, you can stir in a tiny bit of vegetable oil for a glossy finish. Pro tip: you can also melt chocolate using a double boiler for a more controlled approach! -
Dip the Strawberries:
Hold the green top (the stem) of each strawberry and dip it into the melted chocolate, swirling it around to ensure it’s fully coated. Let any excess chocolate drip off and place the strawberry upright on a parchment-lined baking tray. -
Add the Sprinkles:
Before the chocolate hardens, sprinkle your blue sprinkles over the dipped strawberries to make them pop! You can get creative here—use rainbow sprinkles, or even drizzle a little dark chocolate on top if you want to mix it up! -
Chill to Set:
Pop your tray into the fridge for about 30 minutes, or until the chocolate is fully set. This waiting period is the hardest part, I promise! -
Serve and Enjoy:
Once the chocolate has hardened, your scrumptious treats are ready to serve! You can arrange them on a beautiful plate or serve them right off the tray for a casual vibe.
Serving Suggestions
To make your presentation even more enchanting, you can arrange your chocolate dipped strawberries on a platter with fresh mint leaves for a touch of vibrant green. If you’re feeling extra fancy, consider drizzling more melted chocolate (maybe even in dark chocolate) in artistic patterns across the platter for a professional touch. These little tricks really elevate the overall look without adding much difficulty.
Recipe Variations to Spark Creativity!
Get creative! Here are a few fun twists on the classic chocolate dipped strawberry:
-
Dark Chocolate Delight: Swap white chocolate for dark chocolate for a richer flavor that pairs fantastically with the strawberries’ sweetness.
-
Nutty Bliss: After dipping, roll the strawberries in crushed nuts (like almonds or hazelnuts) instead of sprinkles for a crunchy texture that adds depth.
-
Zesty Citrus: Add a sprinkle of finely grated lemon or orange zest over the melted chocolate for a refreshing zing that’ll surprise your taste buds!
-
Dipped in Love: Mix some peanut butter into the melted chocolate for a nutty and creamy twist that’s simply to die for!
-
Gourmet Drizzle: After coating the strawberries, drizzle white and dark chocolate on top in a zigzag pattern for a stylish finish!
Chef’s Notes: A Journey of Flavor
These chocolate dipped strawberries have come a long way since their inception! The first time I whipped up a batch, I was so focused on getting the chocolate smooth that I didn’t think to really engage with the process. Now, I’ve learned that treating it as a fun activity—choosing sprinkles, calling friends over to join in, or even hosting a strawberry-dipping party—brings that joyful spark back to my kitchen. They’re not just a dessert… they’re a way to connect with those we love.
I still giggle when I recall my niece trying to sneak in a bite before we were done. And honestly, who could blame her? Just a little taste of that smooth chocolate and juicy strawberry combo can bring out the kid in anyone!
FAQs and Troubleshooting Your Chocolate Dipped Strawberries
1. Why didn’t the chocolate stick to my strawberries?
Make sure your strawberries are completely dry before dipping! Any water will create steam and cause the chocolate to slide right off.
2. Can I make these ahead of time?
Absolutely! Chocolate dipped strawberries can be prepared a few hours in advance and stored in the fridge. However, they are best enjoyed fresh—the texture and flavor shine at their peak!
3. What if my chocolate seizes up while melting?
Don’t panic! This can happen if moisture gets into the bowl. If it looks grainy, try adding a teaspoon of coconut oil and reheat gently while stirring, and it should smooth out.
4. How do I store leftover strawberries?
Store them in an airtight container in the fridge for 1-2 days. Just know they’re best eaten fresh, as the strawberries can release moisture which may affect the chocolate’s crispness over time.
Nutritional Info
While it might be hard to count the calories with how delicious these strawberries are, moderation is key! A single chocolate dipped strawberry typically contains approximately 60-80 calories, depending on the type of chocolate used. Plus, you’re getting in some antioxidants from the strawberries, so treat yourself guilt-free!
And there you have it, my lovely foodies! Chocolate dipped strawberries are more than just a treat; they’re a celebration of flavors and memories. With just a few ingredients and steps, you can create something that not only tastes heavenly but also brings warmth and joy into your kitchen and home. So, roll up those sleeves, get your fresh strawberries, and let the chocolate-dipping magic begin! Happy indulging!
PrintChocolate Dipped Strawberries
Deliciously sweet chocolate dipped strawberries that are perfect for any occasion.
- Prep Time: 15 minutes
- Cook Time: 5 minutes
- Total Time: 20 minutes
- Yield: 12 servings
- Category: Dessert
- Method: Dipping
- Cuisine: American
- Diet: Vegetarian
Ingredients
- Fresh Strawberries
- White Chocolate Chips
- Blue Sprinkles (optional)
Instructions
- Prep your supplies: Wash strawberries and pat them dry.
- Melt the white chocolate in a microwave-safe bowl in 30-second bursts.
- Dip the strawberries into the melted chocolate, swirling to coat.
- Add the sprinkles before the chocolate hardens.
- Chill for about 30 minutes until the chocolate is set.
- Serve and enjoy your treats!
Notes
For a richer flavor, consider using dark chocolate. Store leftovers in an airtight container in the fridge for 1-2 days.
Nutrition
- Serving Size: 1 strawberry
- Calories: 70
- Sugar: 8g
- Sodium: 15mg
- Fat: 4g
- Saturated Fat: 2g
- Unsaturated Fat: 2g
- Trans Fat: 0g
- Carbohydrates: 9g
- Fiber: 1g
- Protein: 1g
- Cholesterol: 0mg
Keywords: chocolate dipped strawberries, dessert, strawberries, chocolate, sweet treats
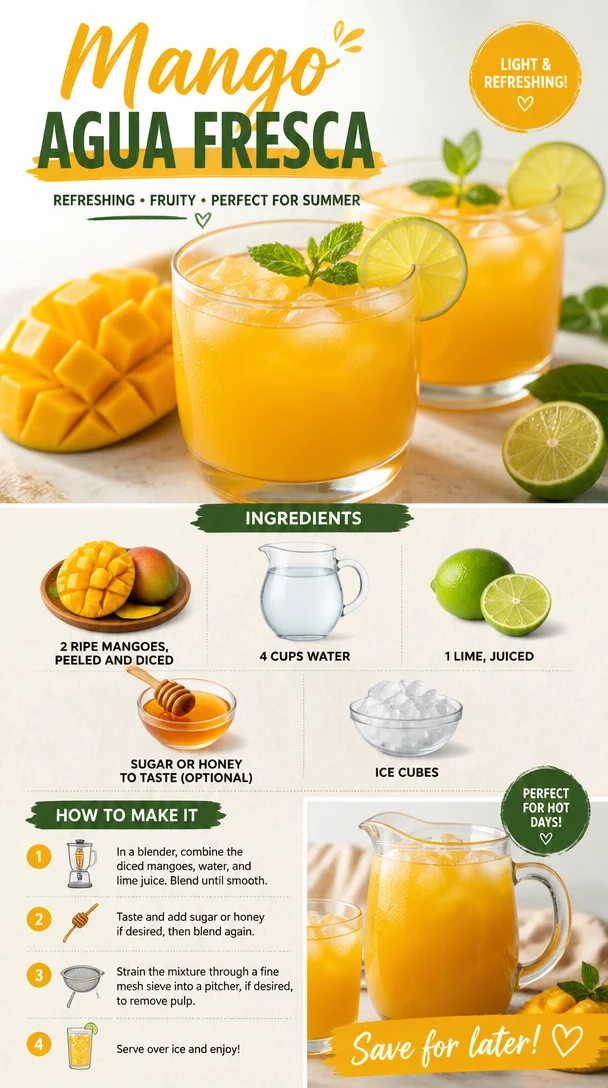
Mango Agua Fresca
Refreshing Mango Agua Fresca: A Sweet Sip of Summer
Welcome, friends! Today, we’re diving into a tropical delight that will transport you straight to sun-soaked beaches and vibrant marketplaces—the oh-so-refreshing Mango Agua Fresca! If you haven’t tried this delightful drink yet, you’re in for a treat! This recipe is perfect for hot summer days, lazy afternoons, or whenever you just want to sip on something deliciously refreshing.
Mango Agua Fresca is not just a drink; it’s a celebration of fresh, ripe mangoes paired with cool water and a splash of zesty lime. It’s light, invigorating, and oh-so-easy to make! Plus, there’s something incredibly satisfying about enjoying a beverage made from just a handful of real, wholesome ingredients. Seriously, it’s like sunshine in a glass!
As you blend this vibrant drink together, you’ll feel the bright flavors spark joy, even on the cloudiest of days. Trust me, each sip will have you dreaming of tropical vacations, backyard barbecues, and long, lazy afternoons spent with friends. And the best part? You can customize it to suit your taste!
So grab your favorite blender, and let’s get ready to blend, sip, and savor this amazing Mango Agua Fresca. It’s not just a drink; it’s a feel-good experience. Are you ready? Let’s get started!
A Sip of Nostalgia
Let me share a little story with you about my first experience with Mango Agua Fresca. I was in Cancun for a family vacation, surrounded by the lively sounds of the market. The scent of fresh fruit filled the air, enticing anyone passing by. My eyes landed on a little stand where a friendly vendor was blending ripe mangoes into a refreshing drink. He poured it into a clear cup, and as soon as I took my first sip, it was pure magic.
The sweet, tropical flavor instantly transported me back to my childhood summers spent on my grandparents’ farm, where we’d feast on fresh fruits right from the trees. That Mango Agua Fresca ignited a love for simplicity and fresh ingredients that I still cherish today. Every time I make this drink, I’m reminded of that joyful whirlwind of colors, sounds, and tastes.
Ingredients
For your refreshing Mango Agua Fresca, you’ll need the following:
-
2 ripe mangoes, peeled and diced
Mangoes are the star of this drink! You want them to be perfectly ripe, as this will ensure maximum sweetness and flavor. If mangoes aren’t in season, you can substitute with frozen mango chunks. -
4 cups water
Water serves as the base for our drink, helping to blend every ingredient harmoniously. If you want to elevate the flavor, consider using coconut water instead for a tropical twist! -
1 lime, juiced
The zesty lime juice balances the sweetness of the mangoes and adds a refreshing tang. If you’re out of limes, you can use lemons or even a splash of orange juice for a sweeter taste. -
Sugar or honey to taste (optional)
Depending on the ripeness of your mangoes, you may want to sweeten your drink. Use agave syrup for a low-glycemic option, or skip the sweetener entirely for a healthier version. -
Ice cubes
To chill your drink to perfection! For a fun twist, you can freeze some mango puree in ice cube trays and use those instead for a fruity burst.
Step-by-Step Instructions
Alright, friends, let’s get blending! Here’s how to whip up this Mango Agua Fresca step by step:
-
Prepare the Mangoes
Begin by peeling and dicing your ripe mangoes. Make sure to remove the pit! I like to slice down both sides of the pit and scoop out the flesh with a spoon. The cleaner the mango, the smoother your drink will be. -
Blend the Ingredients
In a blender, combine the diced mangoes, 4 cups of water, and the juice of one lime. If you’re opting to sweeten your drink, add sugar or honey at this stage. Blend the mixture on high speed until everything is smooth and creamy. This usually takes about 30 seconds. -
Strain for Smoothness (Optional)
If you prefer your drink silky smooth, you can strain the blended mixture through a fine-mesh sieve or cheesecloth into a pitcher. This step removes any fibrous pulp, but I love keeping it rustic with the pulp for the extra fiber! -
Adjust Flavor
After straining, taste your Mango Agua Fresca. Add additional sweetener or more lime juice if needed, and stir well to combine. -
Serve Over Ice
Fill your favorite glass with ice cubes and pour the refreshing mango goodness over the top. I like to garnish it with a lime wedge or a sprig of mint for an elegant touch. -
Enjoy!
Sit back, take a sip, and enjoy the bright flavors of your homemade Mango Agua Fresca! For an extra refreshing experience, serve it poolside or at your next get-together with family and friends.
Serving Suggestions
Serving your Mango Agua Fresca is simple! I suggest pouring it into tall glasses filled with ice for a chilled drink that evokes summer vibes. Consider adding a slice of lime or a sprig of fresh mint as a garnish for a pop of color and aroma. This drink also pairs wonderfully with spicy foods or can be enjoyed as a light addition to a refreshing salad. Feel free to make it a fun brunch drink by adding a splash of sparkling water or a hint of tequila for the adults!
Recipe Variations
Here are a few creative twists to elevate your Mango Agua Fresca game:
- Tropical Twist: Add a handful of pineapple or coconut for a Hawaiian flavor infusion.
- Berry Blend: Throw in some fresh strawberries or raspberries with the mango for a colorful berry mango fusion.
- Minty Freshness: Blend in a handful of fresh mint leaves for a refreshing herbal note.
- Spicy Kick: Add a pinch of cayenne pepper or a slice of jalapeño for a spicy kick that contrasts beautifully with the sweetness.
- Coconut Crazy: Substitute some of the water with coconut milk for a creamy, dreamy version.
Chef’s Notes
Every time I make Mango Agua Fresca, I can’t help but think back to the street vendors in Mexico where I first fell in love with this drink. It’s simple yet rich in flavor, and it’s a great reminder that sometimes the best things in life are easy to make and share. Over the years, I’ve played around with different fruits and flavors, and each iteration brings out something unique and delightful. This recipe is all about flexibility, so don’t hesitate to experiment and find your perfect combination!
FAQs and Troubleshooting
1. My Agua Fresca is too sweet. What should I do?
No worries! If your drink is sweeter than you’d like, try adding a splash of water or additional lime juice to balance it out.
2. Can I make this ahead of time?
Absolutely! You can make your Mango Agua Fresca a few hours ahead of time. Just be sure to stir it well before serving, as the ingredients may settle. It’s best enjoyed chilled!
3. What if I can’t find ripe mangoes?
If fresh mangoes aren’t available, frozen mango chunks are an excellent substitute, especially during off-seasons!
4. How long will it last in the fridge?
Mango Agua Fresca is best enjoyed fresh, but it will keep in the refrigerator for about 2-3 days. Just give it a good stir before serving again!
Nutritional Info (Optional)
While it varies depending on the amount of sweetener and specific ingredients you use, a typical serving of Mango Agua Fresca contains approximately:
- Calories: 80-100
- Carbohydrates: 22g
- Sugars: 18g (natural sugars from mango)
- Fiber: 1g
- Vitamin C: 45% of your daily value
Enjoy this refreshing, tropical drink, and let it invigorate your taste buds and brighten your day. For me, every sip of Mango Agua Fresca tells a story of warmth, laughter, and good vibes! Now, let’s raise our glasses to good food and great memories! Cheers!
PrintRefreshing Mango Agua Fresca

A sweet and refreshing drink made with ripe mangoes, zesty lime, and cool water, perfect for summer days.
- Prep Time: 10 minutes
- Cook Time: 0 minutes
- Total Time: 10 minutes
- Yield: 4 servings 1x
- Category: Beverage
- Method: Blending
- Cuisine: Mexican
- Diet: Vegan
Ingredients
- 2 ripe mangoes, peeled and diced
- 4 cups water
- 1 lime, juiced
- Sugar or honey to taste (optional)
- Ice cubes
Instructions
- Prepare the mangoes by peeling and dicing. Remove the pit carefully.
- Blend the diced mangoes, 4 cups of water, and lime juice in a blender until smooth.
- Strain the mixture through a fine-mesh sieve if you prefer a smoother drink.
- Adjust the flavor by adding more lime juice or sweetener as desired.
- Serve over ice in your favorite glass and enjoy!
Notes
Great served poolside or as a refreshing addition to any summer gathering. Consider garnishing with a lime wedge or mint sprig.
Nutrition
- Serving Size: 1 serving
- Calories: 90
- Sugar: 18g
- Sodium: 5mg
- Fat: 0g
- Saturated Fat: 0g
- Unsaturated Fat: 0g
- Trans Fat: 0g
- Carbohydrates: 22g
- Fiber: 1g
- Protein: 1g
- Cholesterol: 0mg
Keywords: Mango, Agua Fresca, Summer Drink, Refreshing Beverage, Tropical Drink
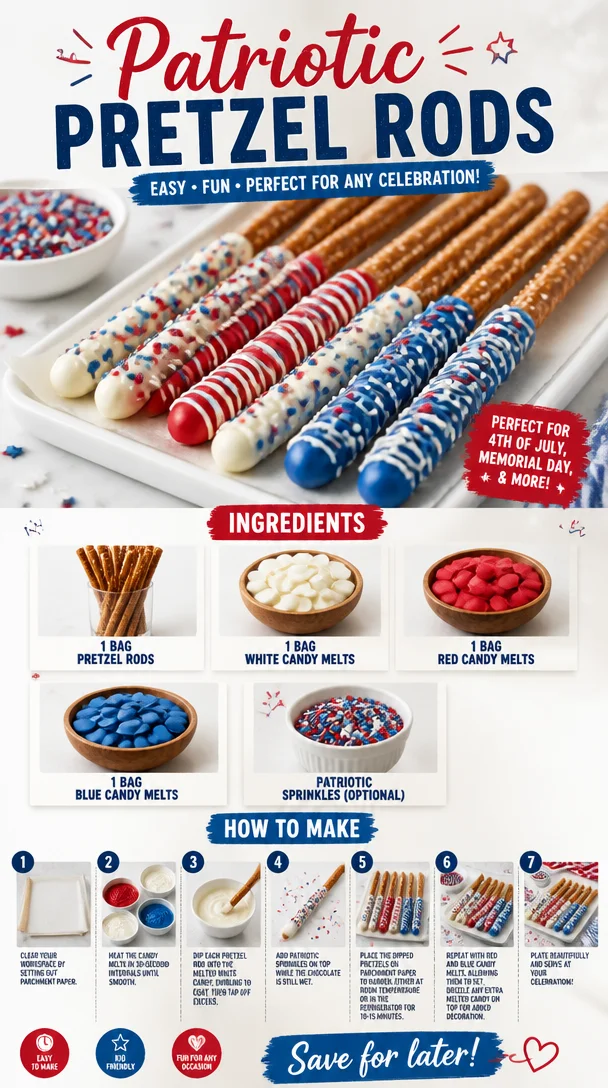
Patriotic Pretzel Rods
Patriotic Pretzel Rods: A Perfect Treat for Any Celebration!
Welcome, foodies! Today, we’re diving into a fun and festive treat that’s not only tasty but also incredibly easy to whip up. If you’re looking to add a splash of color and crunch to your next gathering, look no further than these delightful Patriotic Pretzel Rods! Whether it’s the Fourth of July, Memorial Day, or any day you want to feel that star-spangled spirit, these treats are sure to impress.
So, what makes these pretzel rods so special? First off, let’s talk about texture. You’ve got the satisfying crunch of the pretzel paired with the smooth, creamy coating of candy melts. And then there’s the color! Striking red, white, and blue hues make these treats a visual feast—perfect for snapping a quick photo before they disappear! They’re easy to make, easy to customize, and even the kiddos can join in on the fun.
But wait—let’s not get ahead of ourselves! Before we jump into the kitchen to start dipping and decorating, let me share a little story about how these delightful snacks came to be one of my go-to treats for any Americana-themed celebration.
A Sweet Memory with Patriotic Vibes
I’ll never forget the first time I made these Patriotic Pretzel Rods. It was a warm summer evening, and my family was gearing up for our annual Fourth of July barbecue. My mom was busy grilling and my dad was flipping burgers while I rummaged through our pantry. I wanted to bring something fun to the table, something that would jazz up the dessert spread. That’s when I spotted a bag of pretzel rods peeking out from behind a box of old recipes.
With a flash of inspiration and a little bit of nostalgia, I pulled out the candy melts I had left over from a birthday party last year and decided to play around. I melted the white candy melts first, dipping the pretzel rods in smoothly and letting them cool before using red and blue candy melts to create fun designs. Then came the sprinkles—a must for that adorable festive flair!
As I presented my creation to my family, I felt a wave of excitement as we all gathered around the dessert table. Those crunchy, colorful rods quickly became a hit! Everyone loved the combination of sweet and salty, and the laughter and smiles that filled the air made it a memory I cherish to this day. And ever since then, these Patriotic Pretzel Rods have become a staple at all our summer get-togethers.
Now, it’s your turn to create that same joy! Let’s get our hands a little messy and dive into making these adorable snacks. Ready? Let’s go!
Ingredients
For this delicious and colorful treat, you’ll need just a handful of ingredients. Here’s what you’ll need:
-
1 bag pretzel rods
- These are the star of our show! Their long, crunchy shape makes them perfect for dipping and decorating. If you can’t find pretzel rods, you can use pretzel twists for a fun twist on this recipe.
-
1 bag white candy melts
- These creamy morsels serve as the base for our colorful designs. White chocolate will work in a pinch if you don’t have candy melts. Just be careful not to overheat it when melting!
-
1 bag red candy melts
- Because what’s a celebration without a little red? These sweet candies will give your pretzel rods that festive flair! You can substitute with red icing if you’re in a hurry.
-
1 bag blue candy melts
- The other half of our patriotic color trio! Again, white or dark chocolate tinted with food coloring can be a fun alternative if candy melts are hard to find.
-
Patriotic sprinkles (optional)
- These are the cherry on top—or should I say the sprinkle on the side? They add that extra pop of color and fun! Feel free to use any sprinkles you have on hand; you’re the artist here!
Step-by-Step Instructions
Alright, it’s time to work some kitchen magic! Follow these steps, and you’ll have beautiful Patriotic Pretzel Rods ready in no time.
-
Prep Your Workspace:
- Before you start dipping, I recommend laying out some parchment paper on your kitchen counter or a baking sheet. This will help the chocolate set up nicely without sticking. Get a small bowl of warm, soapy water to wash your utensils and a clean towel nearby—let’s keep things tidy!
-
Melt the Candy Melts:
- Divide your candy melts into microwavable bowls (one for each color). Heat them according to the package instructions—typically 30 seconds at a time, stirring in between until smooth. If you find your candy melts too thick, add a teaspoon of vegetable oil to thin them out. Trust me—this little hack makes all the difference!
-
Dip the Pretzel Rods:
- Take a pretzel rod and dip it into your melted white candy melts, swirling gently to fully coat the lower two-thirds. Let any excess dribble off. Trust your instincts here; you want enough coverage but don’t worry about making it perfect!
-
Let It Set:
- Place the dipped rod on your parchment paper and repeat the process for as many pretzel rods as you like. Once you’ve got a good number ready, let them cool for about 10-15 minutes, or until they’re fully set.
-
Get Colorful:
- Now for the fun part! Melt your red and blue candy melts the same way, then take your cooled white-dipped pretzel rods and dip them halfway into the red and blue melts to create a striped effect. Alternatively, you can drizzle the colored melts on top for a more artistic flair.
-
Add the Sprinkles:
- While the colored candy melts are still wet, generously sprinkle your patriotic sprinkles over the tops. This is where you can really let your creativity shine—mix and match!
-
Let Them Cool (Again!):
- Once all your pretzel rods are decorated, let them cool completely until the candy is hardened. This will only take about 20 minutes if you’re patient!
And there you have it—your completed Patriotic Pretzel Rods! The colors, the textures, the flavors…it’s a treat that’s impossible to resist!
Serving Suggestions
When it comes to serving your Patriotic Pretzel Rods, it’s all about presentation! Arrange them upright in a mason jar, or lay them side by side on a decorative platter. You can even tie a little ribbon around the jar for an extra festive touch. Grab your favorite napkins and watch as your friends and family dive right in!
Recipe Variations
Feel free to get creative with this recipe! Here are a few delightful variations to try:
- Chocolate Drizzle: Instead of using colored candy melts alone, drizzle some dark or milk chocolate over your dipped pretzel rods for an added layer of flavor.
- Nutty Inspiration: Before the candy coating sets, sprinkle chopped nuts, like almonds or peanuts, for a delightful crunch.
- Seasonal Sprinkles: Change up the sprinkles by using seasonal colors—think orange and black for Halloween or green and red for Christmas!
- Spicy Twist: Add a pinch of cayenne or chili powder to your melted white chocolate for a sweet and spicy combo—perfect for those who lean toward unique flavors.
Chef’s Notes
I’ve made these Patriotic Pretzel Rods for countless occasions, and every time they’re gobbled up in no time! One funny incident I remember was when I tried adding edible glitter to the mix and got carried away—let’s just say my kitchen was sparkling for days, but the pretzels turned into glitter bombs! Lesson learned: moderation is key. Over the years, I’ve cherished the evolution of this recipe, from my first attempts with only white chocolate to now creating vibrant hues that reflect the spirit of the occasions we celebrate. The best part? Each batch is made with love, which is the secret ingredient I always say!
FAQs and Troubleshooting
-
Why did my candy melts seize up?
- A common cooking hiccup! Candy melts can seize if they come into contact with water, so make sure your bowls and utensils are completely dry. If your melts get too thick, adding a little vegetable oil can smooth things out.
-
How do I store leftover pretzel rods?
- Store your pretzel rods in an airtight container at room temperature. They’ll stay fresh for about a week, though I’ll be surprised if they last that long!
-
Can I use chocolate instead of candy melts?
- Absolutely! Just be cautious while melting real chocolate to avoid burning it. Use a double boiler or microwave at lower power intervals.
-
The candy coating isn’t sticking well. What did I do wrong?
- This might happen if the pretzels aren’t fully cooled or if they were dipped in the melts when they were too hot. Allow them to cool completely before dipping, and make sure your melts aren’t too thick.
Nutritional Info
While these treats are meant for fun, it’s always good to be mindful of portion sizes! Each pretzel rod, once coated and topped, contains roughly 100 calories (depending on how much candy you use for the coating), along with carbohydrates and sugars. Enjoy in moderation and make them a special treat for your celebrations!
So there you have it, friends—your complete guide to making delicious, colorful, and fun Patriotic Pretzel Rods! I hope you feel inspired to get creative in your kitchen and whip up a batch for your next celebration. Remember, it’s all about joy and connection, and what better way to celebrate than with these delightful treats? Happy cooking!
PrintPatriotic Pretzel Rods

These delightful Patriotic Pretzel Rods are a fun and colorful treat perfect for any celebration, combining the satisfying crunch of pretzels with a creamy candy melt coating.
- Prep Time: 15 minutes
- Cook Time: 30 minutes
- Total Time: 45 minutes
- Yield: 12 pretzel rods 1x
- Category: Dessert
- Method: Dipping
- Cuisine: American
- Diet: Vegetarian
Ingredients
- 1 bag pretzel rods
- 1 bag white candy melts
- 1 bag red candy melts
- 1 bag blue candy melts
- Patriotic sprinkles (optional)
Instructions
- Prep your workspace: Lay out parchment paper and have a bowl of warm, soapy water ready.
- Melt the candy melts: Divide candy melts into bowls and heat according to package instructions.
- Dip the pretzel rods: Dip each rod in white candy melts, covering the lower two-thirds.
- Let it set: Place dipped rods on parchment paper and let cool for about 10-15 minutes.
- Get colorful: Dip the white-dipped rods into red and blue melts to create stripes, or drizzle the melts on top.
- Add the sprinkles: While melts are wet, sprinkle on your patriotic sprinkles.
- Let them cool completely for about 20 minutes until hardened.
Notes
Store leftover pretzel rods in an airtight container at room temperature for about a week. Try adding nuts or chocolate drizzle for variation.
Nutrition
- Serving Size: 1 pretzel rod
- Calories: 100
- Sugar: 10g
- Sodium: 200mg
- Fat: 5g
- Saturated Fat: 3g
- Unsaturated Fat: 2g
- Trans Fat: 0g
- Carbohydrates: 15g
- Fiber: 0g
- Protein: 1g
- Cholesterol: 0mg
Keywords: Patriotic, Pretzel Rods, Celebration, Dessert, Easy Recipe
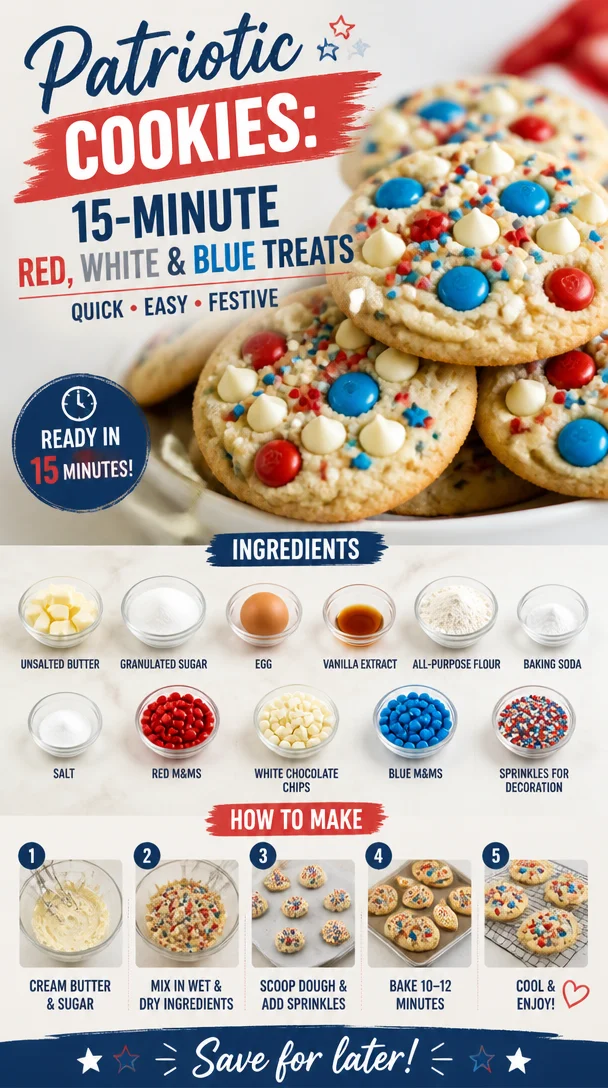
Patriotic Cookies: 15-Minute Red, White & Blue Treats
Red, White, and Blue Cookies: A Delicious Celebration of Flavor
Welcome, food enthusiasts! Today, we’re diving into a vibrant and fun treat that’s perfect for any celebration—Red, White, and Blue Cookies! Whether it’s the Fourth of July, a summer gathering, or simply a day when you want to embrace a little festive spirit, these cookies are sure to bring a smile to your face. You’ll love how easy they are to whip up, and their colorful appearance will definitely impress friends and family alike. So, let’s roll up those sleeves, grab our mixing bowls, and get ready for some cookie magic!
A Flavorful Memory
Growing up, one of my fondest memories was baking with my grandmother in her sunny kitchen. Every holiday, without fail, she would gather us around to create delicious baked goods. The air would fill with sweet aromas, and laughter echoed alongside the clinking of mixing bowls. One summer, she taught me how to make cookies that celebrated America’s colors—red, white, and blue.
We’d use M&Ms, which were a staple in her pantry, always waiting to be transformed into delightful treats. As I remember it, the process was as fun as the eating! We would sneak bites of cookie dough and argue over who got to add the most sprinkles. The sheer joy of baking together made those cookies more than just a treat—they became a symbol of joy, family, and fun. Today, every time I make Red, White, and Blue Cookies, I fondly recall those wonderful moments and the love that went into each batch. Let’s create some memories of our own, shall we?
Ingredients
To whip up these delightful cookies, here’s what you’ll need:
-
1 cup unsalted butter, softened
The foundation of your cookie dough! Using unsalted butter allows you to control the saltiness of your cookies. If you’re in a pinch, use margarine, but I highly recommend sticking with butter for the best flavor. -
1 cup granulated sugar
This adds sweetness and helps create that lovely chewy texture. You could substitute half with brown sugar for a richer taste. -
1 egg
A binding ingredient that also adds moisture. If you’re vegan or allergic, replace it with 1/4 cup of applesauce or a flaxseed egg (1 tbsp flaxseed meal + 2.5 tbsp water, mixed and allowed to sit for a bit). -
1 teaspoon vanilla extract
Vanilla elevates the flavor of your cookies. For an interesting twist, try using almond extract instead! -
2 cups all-purpose flour
The backbone of any cookie dough. For a gluten-free option, substitute with a 1:1 gluten-free flour blend. -
1 teaspoon baking soda
This is your leavening agent, making the cookies puff up slightly. Don’t swap this out for baking powder—stick to baking soda for the best result. -
1/2 teaspoon salt
Just a pinch to enhance all the flavors. If you’re cutting back on salt, you can reduce this or omit it, especially if your butter is salted. -
1 cup red M&Ms
Adding a pop of color and a burst of chocolatey goodness! Feel free to replace with any red candy of your choice, like dried strawberries or red chocolate chips. -
1 cup white chocolate chips
These provide a creamy sweetness that balances the other flavors. You can opt for dairy-free chips if needed. -
1 cup blue M&Ms
Just like the red M&Ms, they enhance the festive look and taste. If you want, you can use blue chocolate chips or skip the candy entirely for a healthier take. -
Sprinkles for decoration
Because who doesn’t love a little extra flair? Use any color you like, but red, white, and blue sprinkles tie in perfectly with our theme.
Step-by-Step Instructions
Alright, let’s get mixing! Follow these straightforward steps to create your colorful cookies:
-
Preheat your oven: First things first, preheat your oven to 350°F (175°C). This is a crucial step to ensure your cookies bake evenly.
-
Cream the butter and sugar: In a large mixing bowl, use an electric mixer to cream together the softened butter and granulated sugar until it’s light and fluffy (about 3-5 minutes). This process incorporates air and helps create a beautifully textured cookie.
-
Add the egg and vanilla: Crack the egg into the bowl and pour in the vanilla extract. Mix until well combined. Make sure to scrape down the sides of your bowl to capture all that buttery goodness!
-
Mix the dry ingredients: In another bowl, whisk together the all-purpose flour, baking soda, and salt. This ensures even distribution of the leavening agent and salt in your cookie dough.
-
Combine wet and dry: Gradually add the dry ingredients to the wet mixture, combining until just mixed. Remember, over-mixing can lead to tough cookies, so stop as soon as you can no longer see dry flour!
-
Fold in the goodies: Gently fold in the red M&Ms, white chocolate chips, and blue M&Ms with a spatula. This is where the fun begins—get ready for a beautiful, colorful dough!
-
Scoop the dough: Using a cookie scoop or a tablespoon, drop rounded balls of dough onto a parchment-lined baking sheet. Leave some space in between, as they will spread while baking!
-
Sprinkle it up: Add some extra sprinkles on top of each cookie for that festive flair! It’s all about that presentation, right?
-
Bake: Pop the baking sheet into your preheated oven and bake for about 10-12 minutes, or until the edges are lightly golden. The centers might look a tiny bit underbaked, but they’ll continue to firm up as they cool.
-
Cool down: Once baked, remove the cookies from the oven and let them cool on the pan for 5 minutes before transferring them to a wire rack to cool completely. Enjoy that wonderful aroma wafting through your kitchen!
Serving Suggestions
These Red, White, and Blue Cookies can be served right from the baking sheet, or you can get creative with your presentation! Stack a few cookies on a colorful platter, add a dollop of whipped cream, or serve them alongside a scoop of vanilla ice cream for an extra treat. If you’re feeling fancy, drizzle some melted white chocolate over the cookies before serving—they’ll look super professional and elegant!
Recipe Variations
Want to switch things up? Here are a few fun variations you can try:
-
Nutty Crunch: Add 1/2 cup of chopped pecans or walnuts for added texture and flavor.
-
Dried Fruit Boost: Replace M&Ms with dried cranberries and blueberries for a chewy, fruity twist.
-
Cocoa Swirl: Incorporate 1/4 cup of cocoa powder into your flour mix for a delicious chocolate version.
-
Spiced Up: Add a teaspoon of cinnamon to your dough for a warm, comforting flavor profile.
-
Vegan Delight: Substitute the butter with coconut oil and use the vegan egg replacement we mentioned earlier!
Chef’s Notes
You know, the best part about baking is how recipes can evolve over time. These Red, White, and Blue Cookies have become a staple in my kitchen, especially during summer celebrations. I have fond memories of making them while hosting backyard barbecues with friends, and every time, there’s a new twist! They remind me that cooking is about creativity, love, and good vibes. Plus, every batch seems to spark its own set of joyful memories—what’s better than that?
FAQs and Troubleshooting
1. Why are my cookies flat?
If your cookies spread too much, it may be that your butter was too warm or you didn’t use enough flour. Make sure to measure accurately, and if your butter feels too soft, throw it in the fridge for a few minutes before mixing.
2. How can I make these cookies thicker?
To make thicker cookies, chill your dough for 30 minutes before baking. Additionally, you can add a bit more flour or a touch of cornstarch to strengthen the dough.
3. Can I freeze these cookies?
Absolutely! You can freeze the dough before baking or the baked cookies themselves. Just make sure they’re in an airtight container, and when you’re ready to enjoy, let them thaw at room temperature.
4. How do I store these cookies?
Store your cookies in an airtight container at room temperature for up to a week. They can be kept in the fridge to prolong freshness, but be sure to let them come to room temperature for the best texture.
Nutritional Info (optional)
While these cookies are definitely a treat, it’s good to be mindful of portions! Each cookie (if you make about 24 cookies from this recipe) has approximately:
- Calories: 160
- Total Fat: 7g
- Saturated Fat: 4g
- Carbohydrates: 23g
- Sugars: 10g
- Protein: 2g
So, there you have it! A delicious recipe for Red, White, and Blue Cookies that will light up any gathering with color and fun. The memories, laughter, and delicious flavors make these cookies a celebration in every bite! I hope you enjoy making and sharing them as much as I do. Happy baking, and keep those cookie cravings alive!
PrintRed, White, and Blue Cookies
A colorful and festive cookie perfect for celebrations, filled with M&Ms and white chocolate chips.
- Prep Time: 15 minutes
- Cook Time: 12 minutes
- Total Time: 27 minutes
- Yield: 24 cookies 1x
- Category: Dessert
- Method: Baking
- Cuisine: American
- Diet: Vegetarian
Ingredients
- 1 cup unsalted butter, softened
- 1 cup granulated sugar
- 1 egg
- 1 teaspoon vanilla extract
- 2 cups all-purpose flour
- 1 teaspoon baking soda
- 1/2 teaspoon salt
- 1 cup red M&Ms
- 1 cup white chocolate chips
- 1 cup blue M&Ms
- Sprinkles for decoration
Instructions
- Preheat your oven to 350°F (175°C).
- Cream together the butter and sugar until light and fluffy (about 3-5 minutes).
- Add the egg and vanilla, mixing until well combined.
- Mix the dry ingredients: flour, baking soda, and salt in another bowl.
- Combine the dry mixture with the wet ingredients until just mixed.
- Fold in the red M&Ms, white chocolate chips, and blue M&Ms.
- Scoop rounded balls of dough onto a parchment-lined baking sheet.
- Sprinkle extra sprinkles on top of each cookie.
- Bake for about 10-12 minutes, or until lightly golden.
- Cool for 5 minutes before transferring to a wire rack.
Notes
These cookies can be served fresh from the baking sheet, or with a scoop of ice cream for an added treat.
Nutrition
- Serving Size: 1 cookie
- Calories: 160
- Sugar: 10g
- Sodium: 200mg
- Fat: 7g
- Saturated Fat: 4g
- Unsaturated Fat: 3g
- Trans Fat: 0g
- Carbohydrates: 23g
- Fiber: 0g
- Protein: 2g
- Cholesterol: 30mg
Keywords: cookies, dessert, festive cookies, red white blue, M&Ms
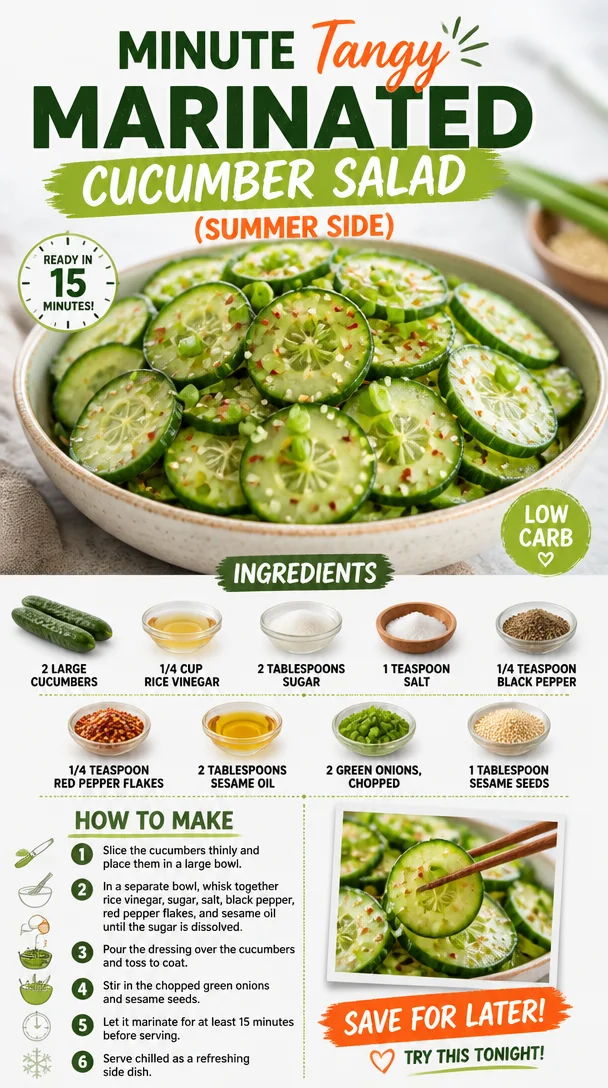
Minute Tangy Marinated Cucumber Salad (Summer Side)
Refreshing Marinated Cucumber Salad: A Crisp and Zesty Delight
Welcome back, food lovers! Today, we’re diving into a dish that will bring a burst of freshness to your table: Marinated Cucumber Salad. If there was ever a dish that embodies the essence of summer, this is it! Crisp, cooling, and oh-so-delicious, this salad is perfect for warm days, barbecues, or even as a refreshing side to your weeknight dinners.
Oh, and did I mention it’s super simple? You can whip it up in a flash, and it’s packed with vibrant flavors that will make you feel like a kitchen rock star. As we embark on this culinary adventure, let’s celebrate the humble cucumber—this miraculous veggie that just might be the MVP of summer salads.
A Slice of Nostalgia
Growing up, summer meant countless days spent in my grandmother’s garden, playing hide and seek among the rows of vegetables while she tended to her precious plants. Cucumbers were always among her favorites; I can still see her harvesting them, their cool skin glistening with morning dew. Often, she would call me into the kitchen where the air was filled with tangy notes of vinegar and the sweetness of sugar, blended beautifully with the crunch of freshly sliced cucumbers.
We would diligently prepare her famous marinated cucumber salad together, our laughter mingling with the sound of the chopping board. Her recipe was simple yet packed with flavor, a testament to her belief that fresh ingredients were all you needed. Making this salad became our summer tradition, a ritual that drew us closer and filled our bellies with light, wholesome food. I can still hear her voice guiding me through the steps, and today, I can’t wait to share her legacy with you!
Ingredients
Now, let’s gather our ingredients! Here’s what you’ll need for this vibrant and zesty Marinated Cucumber Salad:
-
2 large cucumbers: The star of the show! Choose firm cucumbers for the best crunch. For a twist, try Persian cucumbers, which are smaller and sweeter, or even pickling cucumbers if you want an extra crunch.
-
1/4 cup rice vinegar: This vinegar adds a mild, tangy flavor. If you don’t have rice vinegar, you can substitute it with apple cider vinegar or white wine vinegar for a slightly different taste.
-
2 tablespoons sugar: This balances the tang from the vinegar. For a healthier option, you can swap it with honey or agave syrup.
-
1 teaspoon salt: Essential for seasoning. Sea salt or kosher salt works perfectly, but you can use table salt in a pinch.
-
1/4 teaspoon black pepper: Adds just the right amount of kick. If you like it spicy, feel free to amp it up!
-
1/4 teaspoon red pepper flakes: For those who enjoy a bit of heat. Adjust the quantity based on your spice tolerance, or omit if you’d prefer a milder flavor.
-
2 tablespoons sesame oil: This adds a lovely nuttiness and richness. If you need a substitute, you can use olive oil, but it will change the flavor profile a bit.
-
2 green onions, chopped: Fresh and vibrant, they add a burst of flavor. If you don’t have green onions, finely chopped red onion works well too.
-
1 tablespoon sesame seeds: These add a delightful crunch and nutty essence. You can toast them lightly for deeper flavor or use sunflower seeds as a nut-free alternative.
Step-by-Step Instructions
Ready to create your masterpiece? Let’s get cooking!
-
Prep the Cucumbers: Start by washing your cucumbers under cool water to remove any dirt or residue. Trim both ends and then slice them thinly—about 1/4 inch thick works perfectly. If you prefer a fancier presentation, try cutting them into half-moons or even dicing them!
-
Make The Dressing: In a medium-sized bowl, whisk together the rice vinegar, sugar, salt, black pepper, red pepper flakes, and sesame oil. This dressing should be a delightful balance of sweet, tangy, and a hint of spice, so feel free to taste and adjust according to your preferences. A little extra sugar or vinegar can go a long way!
-
Combine: Now, it’s time to bring it all together! Place the sliced cucumbers into a large mixing bowl and pour the dressing over them. Gently toss everything together until the cucumbers are well-coated. Ah, that fresh aroma!
-
Add Green Onions & Sesame Seeds: Toss in the chopped green onions and sesame seeds, mixing them gently. This is where the salad truly transforms into a flavor explosion!
-
Marinate: For the best results, let your salad sit for at least 30 minutes in the refrigerator. This allows the cucumbers to absorb all that delicious dressing and become even more flavorful. If you’re in a hurry, you can serve it right away, but the marination makes a world of difference.
-
Serve It Up: Just before serving, give the salad another quick toss to redistribute the dressing. You’ll want to make sure each slice of cucumber is glistening and flavorful!
Serving Suggestions
Serving your Marinated Cucumber Salad is as easy as pie. Use a large, vibrant bowl to showcase all those beautiful green hues. You can also individualize the portions by plating them in small bowls or on crisp romaine leaves for a fantastic presentation. Drizzle a little extra sesame oil or a sprinkle of sesame seeds on top for that perfect finishing touch!
Recipe Variations
Now that you’ve mastered the classic version, let’s have some fun with variations! Here are a few creative twists to try with your Marinated Cucumber Salad:
-
Asian-Inspired Twist: Add julienned carrots and sliced radishes for a colorful crunch. Toss in some fresh cilantro for an extra layer of flavor.
-
Mediterranean Vibe: Swap the sesame oil for olive oil and sprinkle in some chopped Kalamata olives and crumbled feta cheese.
-
Tropical Kick: Add diced mango or pineapple for a sweet and tangy tropical flair. Lime juice can replace rice vinegar for an authentic taste.
-
Herbed Delight: Incorporate fresh herbs like dill or mint for a refreshing twist. These herbs will add a whole new depth of flavor.
-
Spicy Option: For those who love heat, incorporate sliced jalapeños or a dash of sriracha into the dressing for a fiery kick.
Chef’s Notes
Ah, the joys of cooking—it’s all about experimenting and evolving! When I first made this salad, I simply followed my grandmother’s recipe to the letter. But as I dabbled in flavors, I discovered exciting new twists that kept it fresh, just like those summer afternoons in her garden.
Like any beloved family recipe, there’s always room for creativity. I once made this delicious using pickled ginger tossed into the mix after a particularly inspiring sushi night! Just goes to show, don’t be afraid to try new things.
FAQs and Troubleshooting
1. My cucumbers are too watery—what did I do wrong?
Cucumbers naturally contain a lot of water, especially when they’re fresh. If they’re too watery, you can lightly salt and let them sit for 10-15 minutes before proceeding. Drain any excess liquid, then add them to the dressing.
2. How long can I store leftovers?
This salad is best enjoyed fresh, but you can store leftovers in an airtight container in the fridge for up to 2 days. Note that the cucumbers may become softer over time, but the flavors will still be delicious!
3. Can I make this salad ahead of time?
Absolutely! This salad is a great make-ahead dish. Just prepare it up to 24 hours in advance for the best flavor as it melds together. However, I recommend adding the sesame seeds and green onions just before serving to ensure they stay crispy.
4. What if I don’t like sesame?
No worries! While sesame oil adds depth of flavor, you can easily substitute it with olive oil or a mild vegetable oil.
Nutritional Info
While specifics may vary based on proportions and ingredient brands, here’s a basic rundown per serving:
- Calories: Approximately 80
- Fat: 5g
- Carbohydrates: 10g
- Fiber: 1g
- Sugar: 3g
- Protein: 1g
And there you have it—a refreshing, vibrant Marinated Cucumber Salad that is bound to become a favorite at your table! As you take the first bite, let the memories of summer, laughter, and family fill your heart. Whether you’re hosting a barbecue or enjoying a quiet dinner, this salad is a reminder that simple ingredients can create something truly magical. Enjoy the crunch, savor the flavors, and happy cooking!
PrintRefreshing Marinated Cucumber Salad
A crisp and zesty cucumber salad, perfect for warm days and barbecues.
- Prep Time: 15 minutes
- Cook Time: 0 minutes
- Total Time: 45 minutes
- Yield: 4 servings 1x
- Category: Salad
- Method: No cooking required
- Cuisine: Asian
- Diet: Vegan
Ingredients
- 2 large cucumbers, thinly sliced
- 1/4 cup rice vinegar
- 2 tablespoons sugar
- 1 teaspoon salt
- 1/4 teaspoon black pepper
- 1/4 teaspoon red pepper flakes
- 2 tablespoons sesame oil
- 2 green onions, chopped
- 1 tablespoon sesame seeds
Instructions
- Wash the cucumbers under cool water and slice them thinly.
- Whisk together the rice vinegar, sugar, salt, black pepper, red pepper flakes, and sesame oil in a bowl.
- Combine the sliced cucumbers with the dressing in a large mixing bowl.
- Toss in the green onions and sesame seeds.
- Marinate in the refrigerator for at least 30 minutes.
- Serve and enjoy!
Notes
This salad is great served fresh, but can be made a day in advance. Add sesame seeds and green onions right before serving.
Nutrition
- Serving Size: 1 serving
- Calories: 80
- Sugar: 3g
- Sodium: 600mg
- Fat: 5g
- Saturated Fat: 0.5g
- Unsaturated Fat: 4g
- Trans Fat: 0g
- Carbohydrates: 10g
- Fiber: 1g
- Protein: 1g
- Cholesterol: 0mg
Keywords: cucumber salad, refreshing salad, summer salad, vegan salad, quick salad
No-Bake 4th of July Swirl Pie
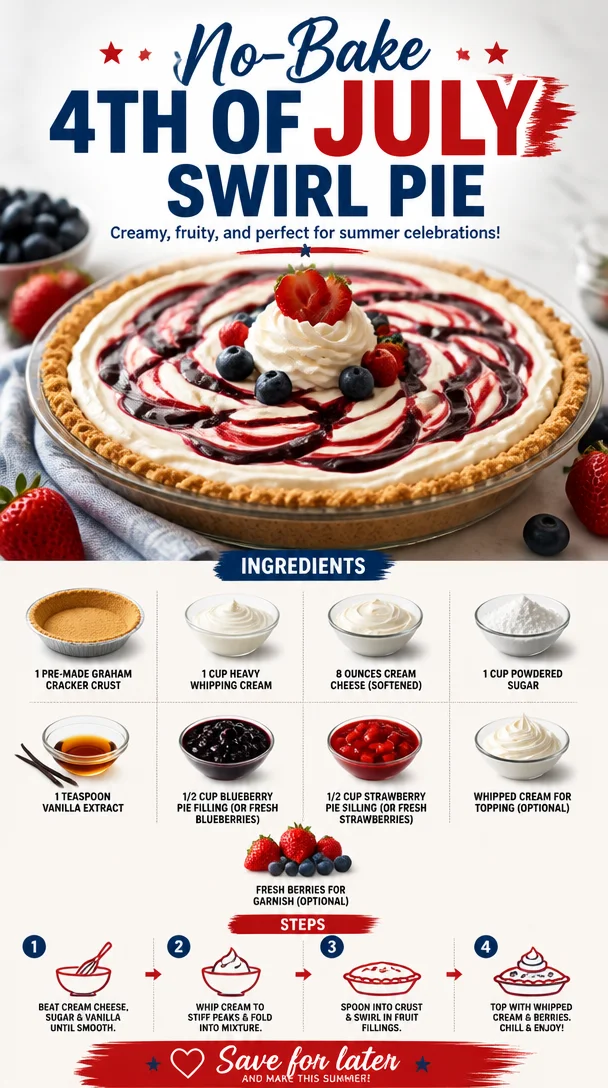
No-Bake 4th of July Swirl Pie: A Fresh, Festive Sweet Treat
Introduction
Hey there, fellow food enthusiasts! With Independence Day just around the corner, it’s time to kick off those summer celebrations with some absolutely delicious—and oh-so-festive—food! And what better way to sweeten up your celebrations than with a delightful No-Bake 4th of July Swirl Pie? This dessert is not only a breeze to whip up; it also proudly showcases the gorgeous red, white, and blue that we all know and love!
Imagine this: you’re lounging outside with friends, the smell of burgers sizzling on the grill wafting through the air, and laughter filling the yard. You bring out this show-stopping pie, and everyone’s eyes light up. The beauty of this No-Bake Swirl Pie is in its vibrant colors and creamy, dreamy texture—whether you’re watching fireworks or hosting a backyard BBQ, it’s guaranteed to steal the spotlight!
This pie combines a rich, creamy filling with sweet blueberry and strawberry swirls, all nestled in a crunchy graham cracker crust. Better yet, it requires no baking! Yes, you heard that right. With just a handful of ingredients and a little bit of love, you can create a celebratory dessert that everyone will adore.
As we dive into the flavors and techniques of this fun dessert, I’ll also sprinkle in some stories, tips, and tricks from my own kitchen. So, roll up those sleeves, and let’s create a No-Bake 4th of July Swirl Pie that’s sure to be the highlight of your festive gathering!
Personal Story
Oh, how I cherish the summertime memories of my childhood! One beautiful July 4th, my family decided to host a backyard party that brought together friends, neighbors, and an impressive array of dishes. While there were classic BBQ favorites on the grill—juicy burgers, smoky ribs, and grilled corn—I can still vividly recall the star of the dessert table: a colorful pie that my mom lovingly prepared. I remember the excitement as she swirled the vibrant strawberry and blueberry fillings into the creamy base.
As a kid, I didn’t fully appreciate the culinary artistry that went into that dessert, but I sure knew how much I loved the flavors! With each bite, the freshness of the berries paired with the sweetness of the cream cheese filling transported me to a happy place. That pie became a staple of our 4th of July celebrations, an annual tradition that made the day feel extra special.
Fast forward to today, and I’m excited to share my take on this nostalgic dessert with all of you. My No-Bake 4th of July Swirl Pie captures all those flavors and memories while making it easy for anyone to create their own sweet traditions. You’ll be amazed at how simple and satisfying it is to bring this slice of happiness to your own holiday gatherings!
Ingredients
Let’s gather our ingredients for this delightful No-Bake 4th of July Swirl Pie. Here’s what you’ll need:
-
1 pre-made graham cracker crust: You can use store-bought for convenience or make your own at home if you’re feeling adventurous! A homemade crust will elevate the flavor, but either option works beautifully.
-
1 cup heavy whipping cream (for whipping): The heavy cream is key for creating a light, fluffy texture. If you want a lighter option, you can swap half of the heavy cream with Greek yogurt for a tangy twist.
-
8 ounces cream cheese (softened): Softened cream cheese provides rich creaminess. Make sure it’s at room temperature for easy mixing; otherwise, you’ll end up with lumps. An alternative could be using mascarpone cheese for an upscale touch!
-
1 cup powdered sugar: This sweetens the filling and gives it that melt-in-your-mouth quality. If you prefer a less sweet version, feel free to adjust the sugar to taste.
-
1 teaspoon vanilla extract: Vanilla adds a warm, aromatic touch to the filling that balances out the sweetness. Don’t skip it!
-
1/2 cup blueberry pie filling (or fresh blueberries): If using filling, opt for a high-quality brand for the best flavor. Fresh blueberries are a great alternative, adding a delightful pop of freshness!
-
1/2 cup strawberry pie filling (or fresh strawberries): As with the blueberries, feel free to use your favorite brand of filling or, if in season, fresh strawberries for an extra natural sweetness.
-
Whipped cream for topping (optional): Because who doesn’t love a little extra whipped cream? You can make it from scratch using heavy cream or use store-bought.
-
Fresh berries for garnish (optional): Not only does this make the pie look stunning, but it also adds extra fruity flair!
Step-by-Step Instructions
Now that we have our gorgeous array of ingredients laid out, let’s get started on making this incredible No-Bake 4th of July Swirl Pie! Follow these simple steps:
-
Prepare your crust: If you’re using a store-bought graham cracker crust, go ahead and take it out of the packaging. If you’re making your own (which I highly recommend for that homemade touch) combine crushed graham crackers with melted butter and a little sugar to bind it, then press it firmly into a pie dish. Allow it to chill in the fridge while you make the filling. This step is crucial as it helps the crust set properly.
-
Whip that cream: In a large mixing bowl, pour in 1 cup of heavy whipping cream. Using a hand mixer or a stand mixer on medium to high speed, whip the cream until soft peaks form—this usually takes about 3-4 minutes. Keeping the bowl chilled beforehand can help the cream whip up faster. Once ready, set it aside. This step builds the light, airy texture that we’re aiming for!
-
Mix the cream cheese: In another mixing bowl, add the softened cream cheese. Beat it with a mixer until it’s completely smooth and creamy—about 2 minutes. Make sure there are no lumps, as they will carry over to the filling.
-
Sweeten the filling: Gradually add the powdered sugar and vanilla extract to the cream cheese, beating well until everything is thoroughly incorporated. You should have a lovely, creamy mixture at this point!
-
Fold in the whipped cream: Now, gently fold in your whipped cream into the cream cheese mixture. Be cautious not to deflate the whipped cream; use a spatula to incorporate it until you see no more streaks. This gives you that heavenly, fluffy filling we’re after!
-
Create the pie layers: Pour half of the creamy filling into the prepared graham cracker crust and spread it evenly across the bottom. Now, you’ll want to drop spoonfuls of blueberry pie filling (or fresh blueberries) and strawberry pie filling (or fresh strawberries) onto the filling. Use a knife or a skewer to gently swirl them in without fully mixing, creating that beautiful, marbled effect on top.
-
Add the remaining filling: Pour the rest of the cream filling over the top, smoothing it out carefully. You can add a few more dollops of the berry fillings and swirl again! The goal is to create an eye-catching swirl that will wow your guests.
-
Chill out: Cover the pie with plastic wrap and place it in the refrigerator for at least 4 hours or overnight to set. This waiting period is key for the flavors to meld beautifully.
-
Garnish and serve: Once ready to serve, top the pie with a generous dollop of whipped cream, and scatter some fresh berries on top for a vibrant finish. Trust me, everyone will be clamoring for a slice!
Serving Suggestions
To make your No-Bake 4th of July Swirl Pie shine, serve it chilled straight from the fridge. A bright, sunny plate is always ideal to showcase those festive colors. If you want to be extra fancy, you can layer additional fresh berries around the pie, creating a beautiful border as a salute to summer. And if you’re feeling fun, slice the pie into wedges, and use a small flag or toothpick decor to play up that Independence Day spirit!
Recipe Variations
Now that you’ve mastered the classic version, why not try some fun twists on this No-Bake Pie? Here are a few ideas:
-
Chocolate Lover’s Dream: Swap the graham cracker crust for an Oreo crust, and add a layer of chocolate pudding between the cream cheese filling and the fruit.
-
Tropical Twist: Swap out strawberries and blueberries for fresh mango and pineapple. Add a hint of coconut extract to your filling for a tropical vibe.
-
Nutty Crunch: Add chopped nuts like pecans or walnuts into the crust for a delightful crunch or sprinkle them atop the whipped cream before serving.
-
Dairy-Free Version: Use coconut cream instead of heavy whipping cream and cashew cream in place of cream cheese for a tasty dairy-free alternative.
Chef’s Notes
This No-Bake 4th of July Swirl Pie has certainly evolved over the years from my family’s original recipe. While it used to be a bit daunting, I’ve simplified it down to its most delightful components—one that maintains that irresistible flavor but with much less fuss! One funny memory that comes to mind is when my cousin attempted to add even more fruit on top without consideration for proportionality. Let’s just say, we ended up having to sample a lot of “delicious mistakes” that day! But hey, as I always say, sometimes the best recipes come from the creative moments in the kitchen.
FAQs and Troubleshooting
Q: Can I make this pie ahead of time?
Absolutely! This pie is perfect for prepping a day in advance. Just keep it wrapped tightly in the fridge to ensure freshness.
Q: What if my filling isn’t firm enough?
If you find your filling isn’t setting properly, it could be due to over-adding the whipped cream or under-whipping it. Always aim for those soft peaks and fold gently into your cream cheese mixture.
Q: How do I store leftovers?
You can keep leftover pie tightly covered in the refrigerator for up to 3 days. Just be warned, it might not last that long—it’s that good!
Q: Is there a gluten-free option for the crust?
Absolutely! Simply use gluten-free graham crackers or a nut-based crust for a delicious alternative.
Nutritional Info
This festive pie offers a balance of sweetness and creaminess while being relatively light compared to traditional baked pies. Each slice provides a satisfying treat for your cravings while still allowing you to indulge guilt-free.
So there you have it—your guide to creating a stunning No-Bake 4th of July Swirl Pie! With fresh flavors and a no-fuss method, this dessert will surely be a highlight of your summer celebrations. Embrace the joy of cooking, enjoy the beautiful moments with friends and family, and keep the kitchen filled with laughter and love! Happy Independence Day, and happy eating!
PrintNo-Bake 4th of July Swirl Pie
A festive and delicious no-bake pie featuring creamy swirls of blueberry and strawberry in a graham cracker crust, perfect for summer celebrations.
- Prep Time: 15 minutes
- Cook Time: 0 minutes
- Total Time: 240 minutes
- Yield: 8 servings 1x
- Category: Dessert
- Method: No-Bake
- Cuisine: American
- Diet: Vegetarian
Ingredients
- 1 pre-made graham cracker crust
- 1 cup heavy whipping cream
- 8 ounces cream cheese (softened)
- 1 cup powdered sugar
- 1 teaspoon vanilla extract
- 1/2 cup blueberry pie filling (or fresh blueberries)
- 1/2 cup strawberry pie filling (or fresh strawberries)
- Whipped cream for topping (optional)
- Fresh berries for garnish (optional)
Instructions
- Prepare your crust: If you’re using a store-bought graham cracker crust, take it out of the packaging. If making your own, combine crushed graham crackers with melted butter and a little sugar, then press into a pie dish and chill.
- Whip that cream: In a large bowl, pour in 1 cup of heavy whipping cream and whip until soft peaks form, about 3-4 minutes.
- Mix the cream cheese: In another mixing bowl, beat softened cream cheese until smooth, about 2 minutes.
- Sweeten the filling: Gradually add powdered sugar and vanilla to cream cheese, mixing until combined.
- Fold in the whipped cream: Gently fold the whipped cream into the cream cheese mixture until no streaks remain.
- Create the pie layers: Pour half of the filling into the crust, then drop spoonfuls of blueberry and strawberry fillings and gently swirl them in.
- Add the remaining filling and swirl more if desired.
- Chill the pie: Cover and refrigerate for at least 4 hours or overnight to set.
- Garnish and serve: Top with whipped cream and fresh berries before serving.
Notes
This pie can be made a day ahead and stored in the fridge. For gluten-free options, use gluten-free graham crackers or a nut-based crust.
Nutrition
- Serving Size: 1 slice
- Calories: 280
- Sugar: 24g
- Sodium: 150mg
- Fat: 18g
- Saturated Fat: 10g
- Unsaturated Fat: 6g
- Trans Fat: 0g
- Carbohydrates: 32g
- Fiber: 1g
- Protein: 3g
- Cholesterol: 40mg
Keywords: no-bake pie, 4th of July dessert, summer dessert, festive pie
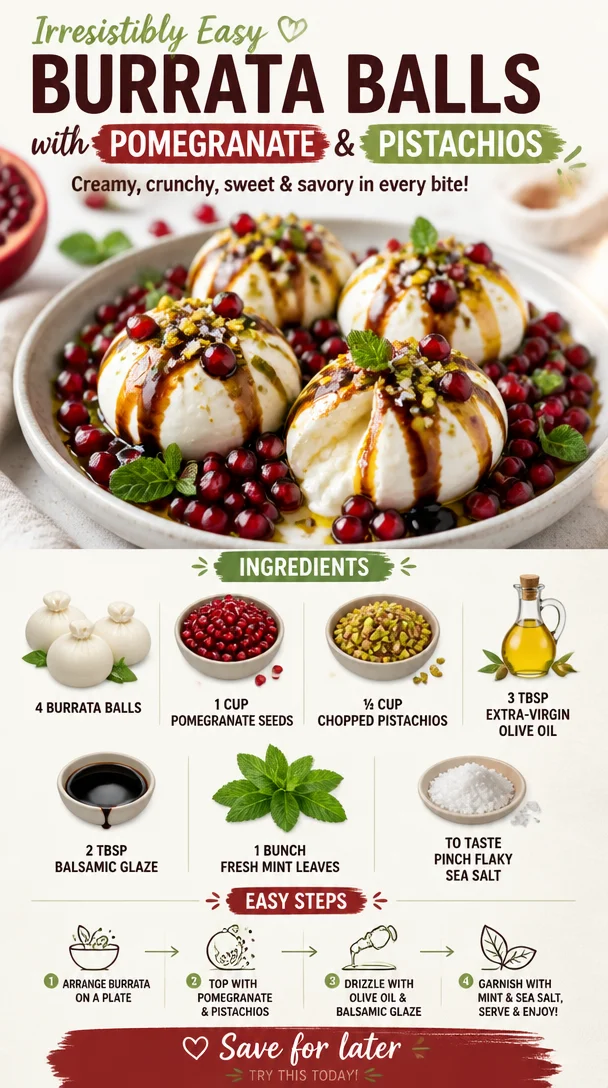
Irresistibly Easy Burrata Balls with Pomegranate & Pistachios
Irresistibly Easy Burrata Balls with Pomegranate & Pistachios
Welcome to a delightful journey of flavor! Today, I’m thrilled to share a recipe that has captured my heart (and my taste buds) like no other: Irresistibly Easy Burrata Balls with Pomegranate & Pistachios. If you’re looking for a dish that’s fresh, full of contrast, and oh-so-indulgent without the guilt, you’re in for a treat!
Picture this: You’ve just come home from a long day, and your thoughts drift to what’s for dinner. You want something quick but special, something to impress without a mountain of effort on your plate. That’s where these burrata balls come into play! Creamy, dreamy burrata cradling a sweet explosion of pomegranate seeds, paired with the rich crunch of pistachios and drizzled with fragrant olive oil—it’s the kind of dish that not only looks stunning but feels like a dream when you dive in.
This dish embodies simplicity and elegance—it’s perfect for setting the mood for a cozy dinner at home or dazzling guests at your next gathering. Plus, this combination of flavors is a crowd-pleaser, and you can whip it up in no time. Gather your ingredients, and let’s dive into this culinary adventure together!
A Personal Story
This recipe holds a special place in my heart, and it all began with a family celebration. I remember the summer of my childhood, bustling with laughter and family gatherings in the backyard. We’d gather around the grill, the scent of fresh herbs and grilled vegetables wafting through the air as we set up the picnic table. It became a tradition to have a casual yet remarkable cheese platter, and that’s where I first met burrata.
One summer evening, my cousin brought over some fresh burrata from an artisanal cheese shop. It was love at first bite! The creamy interior spilled out like liquid gold, and we paired it with whatever we could find—the sweetness of summertime fruits, fresh herbs from the garden, and crunchy nuts. Fast forward to the present day, and I’ve adapted that simple joy into this elegant dish. Each bite of these burrata balls conjures memories of laughter, warmth, and love shared over food. Trust me; once you try it, you’ll want to make it your go-to dish!
Ingredients
Let’s get ready to create some magic in the kitchen! Here’s what you’ll need for these Irresistibly Easy Burrata Balls:
-
4 pieces burrata balls
- The star of the dish! These creamy treasures melt in your mouth and do an incredible job of savoring all the surrounding flavors.
-
1 cup pomegranate seeds
- These juicy gems are like little bursts of sweetness! They not only add elegance but are packed with antioxidants. If you can’t find fresh pomegranates, you can swap with dried cranberries for a similar effect.
-
0.5 cup chopped pistachios
- The delightful crunch in this dish comes from these lovely green nuts. Not only do they impart a nutty flavor, but they also bring vibrant color. For a nut-free alternative, try sunflower seeds.
-
3 tablespoons extra-virgin olive oil
- A drizzle of high-quality olive oil enhances the richness and adds a lovely fruity note. Using a flavored olive oil, such as lemon or garlic, could be a great twist!
-
2 tablespoons balsamic glaze
- This sweet and tangy syrup elevates the entire dish. If you can’t find glaze, a drizzle of traditional balsamic vinegar adds a lovely touch—just let it reduce slightly on the stove for a richer flavor.
-
1 bunch fresh mint leaves
- They provide a refreshing contrast to the richness of the burrata. If mint isn’t your style, fresh basil or arugula makes a fantastic substitute!
-
To taste pinch flaky sea salt
- A sprinkle at the end elevates every single flavor—don’t skip this step!
Step-by-Step Instructions
Ready to whip up this masterpiece? Let’s do it together! Here’s how to bring these Irresistibly Easy Burrata Balls to life:
-
Gather Your Ingredients: First, set your kitchen up for success. Gather all your ingredients and get those pomegranate seeds ready. You can either buy them pre-packaged or cut open a fresh pomegranate; just be warned—things might get a bit messy!
-
Prep the Burrata: Gently place the burrata balls on a serving platter. Using a sharp knife (or even your hands!), make a few slits on the top of each ball. This will allow them to ooze out that luscious, creamy goodness when served.
-
Sprinkle on the Pomegranate Seeds: Next, generously scatter the pomegranate seeds over the burrata. The sweet, jewel-like seeds create a stunning contrast against the white cheese.
-
Add the Chopped Pistachios: Now, take those gorgeous green pistachios and sprinkle them on top. This adds a lovely crunch and pops of color that make the dish irresistible!
-
Drizzle with Olive Oil: Time for a lavish drizzle! Pour the extra-virgin olive oil over the top, allowing it to cascade over all those delightful ingredients. This step is crucial as it creates a silky sauce that ties everything together.
-
Top it with Balsamic Glaze: Next, take that balsamic glaze and drizzle it over the entire platter. You’ll want to be generous but not overwhelming. The glaze’s tangy sweetness perfectly balances the dish’s creaminess.
-
Finish with Mint and Salt: Finally, tear the fresh mint leaves and scatter them atop the burrata, adding a bright pop of color and freshness. Don’t forget that pinch of flaky sea salt to bring forth all the flavors!
-
Serve Immediately: This dish is best served fresh. Grab some crispy crostini, chips, or sliced baguette to pair alongside—it’s the perfect vehicle for carrying that creamy burrata and those delightful toppings!
Serving Suggestions
When it comes to serving these burrata balls, presentation is key! Plate the dish on a large, beautiful platter to showcase the vibrant colors. Surround the burrata with your favorite toasted bread or crostini, so it’s easy for guests to dig in. You can even tuck a few sprigs of mint around the platter for an extra touch of elegance. This dish is all about inviting everyone to share, so let it be the centerpiece of your table, sparking smiles and conversations over each delightful bite.
Recipe Variations
Now, let’s spice things up with a few variations to keep this dish fresh and exciting:
-
Mediterranean Twist: Add slices of ripe tomatoes and Kalamata olives for a classic Mediterranean flair!
-
Spicy Kick: Sprinkle a dash of red pepper flakes over the top for some zing that balances the creaminess of burrata.
-
Fruit Fusion: Switch things up by incorporating seasonal fruits like figs or peaches, which complement the burrata beautifully.
-
Herbed Delight: Mix up the herbs! Instead of mint, try fresh basil or even some zesty thyme for a different flavor profile.
-
Nut-Free Version: Swap out the pistachios for crunchy seeds like pumpkin or sunflower seeds to cater to nut allergies!
Chef’s Notes
This recipe has evolved with my seasonal inspirations and the ingredients I have on hand. A funny kitchen story that comes to mind—one time, I decided to host a last-minute gathering, and I completely forgot to buy pomegranate seeds! I dashed to the store only to discover they had run out of fresh ones but had frozen ones available. I thought, “Why not?” They added a different texture but tasted great! The moral of the story? Don’t be afraid to improvise, and remember that cooking is about exploration and fun.
FAQs and Troubleshooting
1. What if I can’t find burrata?
- Don’t worry! You can substitute it with fresh mozzarella for a similar taste experience, though it won’t be quite as creamy.
2. Can I prepare this dish in advance?
- While I recommend serving burrata fresh for the best flavor, you can prep the ingredients in advance. Just leave the assembly until right before serving.
3. How can I make this dish vegan?
- For a creamy vegan alternative, try using cashew cheese or a thick, herbed vegan cheese spread.
4. My balsamic glaze is too thick; how can I fix it?
- If the glaze has thickened too much, you can gently heat it with a splash of water to loosen it up, bringing it back to a drizzling consistency.
Nutritional Info
While this dish is undeniably delicious, it’s also packed with nutrients! The pomegranate seeds provide antioxidants, and pistachios offer healthy fats. This dish is a balanced blend of good-for-you ingredients and is perfect for a light snack or as part of a larger meal.
Now you’re ready to dive into the magic of these Irresistibly Easy Burrata Balls with Pomegranate & Pistachios. Enjoy, share with friends, and relish the joy that great food can bring. Happy cooking, foodies!
PrintIrresistibly Easy Burrata Balls with Pomegranate & Pistachios

A fresh and indulgent dish featuring creamy burrata balls with sweet pomegranate seeds, crunchy pistachios, and a drizzle of olive oil.
- Prep Time: 10 minutes
- Cook Time: 0 minutes
- Total Time: 10 minutes
- Yield: 4 servings 1x
- Category: Appetizer
- Method: No-cook
- Cuisine: Mediterranean
- Diet: Vegetarian
Ingredients
- 4 pieces burrata balls
- 1 cup pomegranate seeds
- 0.5 cup chopped pistachios
- 3 tablespoons extra-virgin olive oil
- 2 tablespoons balsamic glaze
- 1 bunch fresh mint leaves
- To taste pinch flaky sea salt
Instructions
- Gather your ingredients: First, set your kitchen up for success. Gather all your ingredients and get those pomegranate seeds ready.
- Prep the burrata: Gently place the burrata balls on a serving platter. Make a few slits on the top of each ball.
- Sprinkle on the pomegranate seeds: Generously scatter the pomegranate seeds over the burrata.
- Add the chopped pistachios: Sprinkle them on top for a lovely crunch and color.
- Drizzle with olive oil: Pour the extra-virgin olive oil over the top.
- Top it with balsamic glaze: Drizzle the balsamic glaze over the entire platter.
- Finish with mint and salt: Tear the fresh mint leaves and scatter them atop the burrata, then add a pinch of flaky sea salt.
- Serve immediately: Plate the dish with crispy crostini or sliced baguette.
Notes
This dish is best served fresh, and it pairs well with crispy bread for dipping.
Nutrition
- Serving Size: 1 serving
- Calories: 300
- Sugar: 10g
- Sodium: 150mg
- Fat: 20g
- Saturated Fat: 5g
- Unsaturated Fat: 15g
- Trans Fat: 0g
- Carbohydrates: 25g
- Fiber: 4g
- Protein: 9g
- Cholesterol: 20mg
Keywords: burrata, appetizer, Mediterranean, pomegranate, pistachios, easy recipe

Quick 1-Pan Cherry Amaretto Upside-Down Cake for Weeknights
Flavorful Cherry Amaretto Upside-Down Cake: Your New Go-To Dessert
Hello, my dear food lovers! Today, we’re diving into a delightful dessert that will surely make your tastebuds dance with joy: Cherry Amaretto Upside-Down Cake. This cake is not just a dessert; it’s a celebration of flavor, nostalgia, and pure joy. Trust me, once you sink your fork into this beauty, you’ll be craving it again and again.
There’s something inherently magical about the combination of cherries and amaretto. Each bite is like a sweet hug that warms your heart! Whether you’re whipping this up for a casual weeknight treat or impressing guests at your next gathering, this cake promises to bring smiles all around. So, put on your favorite apron, and let’s make some kitchen magic!
A Slice of Nostalgia
This recipe brings back wonderful memories for me, and I’m excited to share them with you! Growing up, my grandmother had a special way of celebrating life’s little moments, and her Cherry Amaretto Upside-Down Cake was a recurring star at family get-togethers. I can vividly remember the aroma wafting through her cozy kitchen as it baked.
It always felt like a festive occasion, and we would gather around the table, excitedly waiting for her to flip the cake over. The joy on her face as she unveiled the golden crust dotted with glistening cherries and a luscious caramelized topping was priceless. It was a cake that spoke of love, family, and the simple pleasure of sharing a treat with one another.
Now, as I recreate this dish in my own kitchen, I’m not just baking; I’m weaving a tapestry of cherished memories and flavors. And the best part? I get to share this deliciousness with all of you! Get ready to experience that same joy in your own home!
Ingredients
Here’s the star-studded cast of ingredients that will join forces to create this delicious Cherry Amaretto Upside-Down Cake.
-
2 cups maraschino cherries, drained: These juicy cherries are the highlight of our cake! They’ll bring sweetness and a pop of color. If you want a more natural flavor, you can substitute with fresh or frozen cherries (just pit them first!).
-
1/4 cup unsalted butter (for browning and richness): Butter adds a creamy, rich flavor that balances the sweetness. Feel free to use vegan butter if you’re looking for a dairy-free option.
-
1/2 cup brown sugar, packed: Brown sugar brings moisture and a touch of caramel flavor, which complements the cherries beautifully. If you’re out of brown sugar, you can make your own by mixing white sugar with a bit of molasses!
-
2 tbsp amaretto liqueur: The secret ingredient that adds a lovely almond flavor to your cake! If you prefer not to use alcohol, you can substitute with a bit of almond extract (1 tsp) and increase the sugar by a tablespoon or two.
-
1/2 cup unsalted butter (for cake batter): Just like before, this butter gives our cake a tender crumb. Use ghee or coconut oil for a dairy-free twist!
-
1 cup granulated sugar: This is our main sweetener. You can use coconut sugar for a lower glycemic alternative.
-
2 large eggs, room temperature: Eggs are crucial in binding the ingredients and providing structure to the cake. For a vegan option, you can use flax eggs (1 tbsp flaxseed meal + 3 tbsp water = 1 egg).
-
1 1/2 cups all-purpose flour: The foundation of our cake! For those with gluten sensitivities, a 1:1 gluten-free blend will work wonderfully.
-
1 1/2 tsp baking powder: This is what makes our cake rise and gives it that fluffy texture. Ensure your baking powder is fresh!
-
1/4 tsp salt: A little pinch of salt enhances all the flavors, making the cake even more delicious!
-
1/2 cup whole milk (or dairy-free milk like oat milk): This add moisture to our cake. Almond milk or soy milk are excellent dairy-free alternatives that will work well.
-
1 tsp pure vanilla extract: Vanilla adds warmth and depth. For a more robust flavor, you can use vanilla beans!
-
1 tbsp amaretto liqueur (optional): This adds an additional layer of amaretto goodness to your cake batter. Your choice, but trust me, you won’t regret adding it!
Each ingredient plays a special role in the symphony of flavors that make this cake unforgettable. Now that we’ve gathered our ingredients, let’s start baking!
Step-by-Step Instructions
-
Preheat Your Oven: Preheat your oven to 350°F (175°C). This ensures that your cake bakes evenly once we pop it in. While your oven warms up, grease a 9-inch round cake pan so the cake can slide right out once it’s done!
-
Prepare the Cherry Layer: In a medium saucepan, melt 1/4 cup of butter over medium heat. Once melted, stir in 1/2 cup of brown sugar until it’s completely dissolved and slightly bubbly. Add your cherries and the 2 tablespoons of amaretto liqueur, stirring gently to coat them in that heavenly caramel. Allow the mixture to simmer for just a couple of minutes. This step enhances the flavor and makes those cherries ultra luscious! Pour this mix into your prepared cake pan, spreading it evenly.
-
Make the Cake Batter: In a large mixing bowl, cream together 1/2 cup of softened butter and 1 cup of granulated sugar until it’s light and fluffy. This step brings air into the mixture, leading to a tender cake. Next, add in the eggs, one at a time, mixing well after each addition. Then, pour in the milk, 1 tablespoon of amaretto (if using), and 1 teaspoon of vanilla extract. Mix until smooth!
-
Combine Dry Ingredients: In a separate bowl, whisk together your all-purpose flour, baking powder, and salt. Gradually add the dry ingredients to the wet mixture, folding gently with a spatula until just combined. Be careful not to overmix; a little lumps will keep your cake fluffy and light!
-
Pour Batter Over Cherries: Carefully pour the batter over the cherry topping in your cake pan. Use the spatula to ensure it’s evenly spread. At this point, your kitchen should be smelling divine!
-
Bake: Slide your cake into the preheated oven and bake for about 35-40 minutes, or until a toothpick inserted into the center comes out clean. Keep an eye on it towards the end—overbaking can lead to a dry cake!
-
Cool and Flip: Once baked, remove the cake from the oven and allow it to cool in the pan for about 10 minutes. This step is crucial—if you flip it too soon, the cherries might stick! Carefully place a plate over the pan and flip it over. The cherry topping will now be on top, glistening and gorgeous.
-
Serve and Enjoy: Let the cake cool slightly before slicing. You can serve it warm or at room temperature, and it pairs beautifully with a scoop of vanilla ice cream or a dollop of whipped cream!
Serving Suggestions
When it comes to serving this Cherry Amaretto Upside-Down Cake, presentation is key! You want your cake to be as stunning as it is delicious. Serve slices on elegant plates, and don’t forget to drizzle a bit of the caramel from the pan over each piece for an extra touch of decadence. For added flair, garnish with a light dusting of powdered sugar or a sprinkle of chopped almonds—it adds a delightful crunch!
Recipe Variations
Ready to put your own spin on this classic? Here are some fun variations to try:
-
Berry Medley: Swap out the cherries for a mix of berries like raspberries, blueberries, and strawberries for a vibrant summer twist!
-
Chocolate Cherry: Add cocoa powder (1/4 cup) to the batter for a chocolatey flair. Who doesn’t love chocolate and cherry together?
-
Nutty Crunch: Mix chopped pecans or walnuts into the cake batter for a delightful crunch and added flavor.
-
Citrus Zing: Add some grated lemon or orange zest to the batter for a refreshing citrus twist that brightens the flavor profile.
-
Vegan Delight: Substitute cherries with a mix of bananas and nuts, use flax eggs, and dairy-free milk for a fantastic vegan version that won’t disappoint!
Chef’s Notes
This recipe is one that has evolved over time, much like any good relationship in the kitchen! I still remember the first attempt—I may have used twice the sugar, and let’s just say the result was a sugar bomb! However, through practice and a lot of delicious taste testing, I’ve perfected this version. Each time I make it, it brings a wave of nostalgia and sweetness, reminding me of those cherished family moments.
One of my funniest kitchen stories involves the time I forgot to add the baking powder completely. Picture me frantically watching it bake, only to realize that I’d essentially made a dense cherry pancake! But hey, while that cake was a flop, the memories it created were worth every lesson learned.
FAQs and Troubleshooting
1. My cake stuck to the pan! What went wrong?
Make sure you thoroughly grease your cake pan. You can also use parchment paper to line the bottom, which will make it super easy to lift the cake out once it cools.
2. Why did my cake turn out dense?
Dense cakes are often a result of overmixing or not adding enough leavening agent. Remember to mix until just combined and check your baking powder for freshness.
3. Can I make this ahead of time?
Absolutely! This cake actually tastes better the next day as the flavors meld together. Just store it in an airtight container at room temperature.
4. Can I freeze this cake?
Yes, you can freeze the cake! Just make sure to wrap it well in plastic wrap and store it in an airtight container. Thaw in the fridge overnight before serving.
Nutritional Info
If you’re keeping an eye on nutrition, here’s a rough breakdown (per slice based on 12 servings):
- Calories: 250
- Protein: 3g
- Fat: 10g
- Carbohydrates: 38g
- Fiber: 1g
Keep in mind that nutritional values may vary based on ingredient substitutions!
And there you have it, my friend! A delicious Cherry Amaretto Upside-Down Cake full of flavor and rich in memories. Make this dessert your own, and don’t be afraid to experiment in the kitchen. After all, cooking is about joy and creativity. Happy baking, and I can’t wait to hear about your culinary adventures!
PrintCherry Amaretto Upside-Down Cake
A delightful dessert that combines juicy cherries and amaretto for a nostalgic and flavorful experience.
- Prep Time: 20 minutes
- Cook Time: 40 minutes
- Total Time: 60 minutes
- Yield: 12 servings 1x
- Category: Dessert
- Method: Baking
- Cuisine: American
- Diet: Vegetarian
Ingredients
- 2 cups maraschino cherries, drained
- 1/4 cup unsalted butter (for browning)
- 1/2 cup brown sugar, packed
- 2 tbsp amaretto liqueur
- 1/2 cup unsalted butter (for cake batter)
- 1 cup granulated sugar
- 2 large eggs, room temperature
- 1 1/2 cups all-purpose flour
- 1 1/2 tsp baking powder
- 1/4 tsp salt
- 1/2 cup whole milk (or dairy-free alternative)
- 1 tsp pure vanilla extract
- 1 tbsp amaretto liqueur (optional)
Instructions
- Preheat your oven to 350°F (175°C) and grease a 9-inch round cake pan.
- Prepare the cherry layer by melting 1/4 cup of butter, then stirring in 1/2 cup of brown sugar. Add cherries and amaretto, simmer, and pour into the cake pan.
- Make the cake batter by creaming together 1/2 cup softened butter and 1 cup sugar, then adding eggs, milk, amaretto, and vanilla extract.
- Combine the dry ingredients in a separate bowl and gradually fold them into the wet mixture.
- Pour the cake batter over the cherry topping in the pan.
- Bake for 35-40 minutes or until a toothpick comes out clean.
- Cool the cake in the pan for 10 minutes, then flip it onto a plate.
- Serve warm or at room temperature, optionally with ice cream or whipped cream.
Notes
Store leftovers in an airtight container at room temperature or freeze for later enjoyment.
Nutrition
- Serving Size: 1 slice
- Calories: 250
- Sugar: 20g
- Sodium: 150mg
- Fat: 10g
- Saturated Fat: 6g
- Unsaturated Fat: 4g
- Trans Fat: 0g
- Carbohydrates: 38g
- Fiber: 1g
- Protein: 3g
- Cholesterol: 30mg
Keywords: cake, dessert, cherry, amaretto, upside-down cake