Minute Spinach Blueberry Salad for Busy Weeknights
20-Minute Spinach Blueberry Salad: A Fresh Take on a Classic Delight
Hey there, food lovers! Welcome to my kitchen, where the aromas are mouthwatering, the colors are vibrant, and the stories are just as delicious as the dishes we whip up. Today, we’re diving into the wonderful world of salads, specifically my quick and fabulous Spinach Blueberry Salad. It’s that delightful blend of sweet and savory, and trust me when I say it’s bursting with flavor!
Picture this: You’ve had a long day, and you’re craving something fresh and vibrant that won’t take ages to prepare. Enter this salad! With just 20 minutes of your time, you’ll create a dish that not only tastes like sunshine but also nourishes your body. The combination of baby spinach, juicy blueberries, creamy avocado, and crunchy walnuts makes this salad a feast for your taste buds—and don’t even get me started on the dressing! It’s a heavenly concoction of olive oil, balsamic vinegar, and a hint of garlic that pulls everything together beautifully.
Salads often get a bad rap, right? People think they’re bland or boring, but I’m here to change that perception. This Spinach Blueberry Salad will have you doing a happy dance in the kitchen! Plus, it’s easily customizable, meaning you can tweak it based on what you have on hand. Whether you’re having it as a light lunch, a side dish at dinner, or prepping for meal prep for the week, this salad is super versatile. So grab your apron and let’s get cooking!
Personal Story
I’ll never forget the first time I whipped up a blueberry salad. It was a sunny afternoon at my grandmother’s house—she had a garden brimming with fresh produce, and blueberries were in peak season. I remember her handing me a basket and sending me into the garden to gather the ripest fruit. The excitement of plucking those plump, sweet berries off the bush had me feeling like a treasure hunter.
Later, we tossed them with some spinach from her garden and a simple dressing she taught me. The first bite was like the sun bursting through the clouds. The sweetness of the blueberries perfectly contrasted the earthiness of the spinach. It became our little tradition to make that salad together every summer, sharing stories about our days while enjoying the simple yet unforgettable flavors. This recipe takes me back to that joyful time, reminding me of the importance of fresh ingredients and good company.
Ingredients
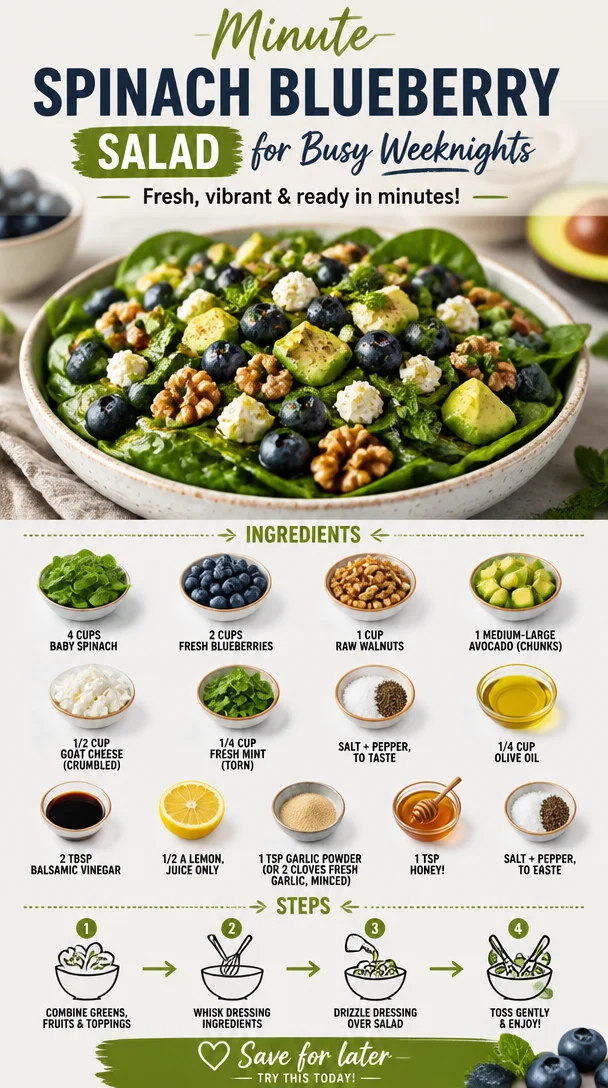
Here’s what you’ll need for this vibrant spinach blueberry salad:
-
4 cups baby spinach: Fresh, tender, and just the right base for our salad. Baby spinach is packed with nutrients and has a mild flavor. If you can’t find baby spinach, regular spinach works, too—just be sure to chop it into smaller pieces.
-
2 cups fresh blueberries: Sweet and juicy, these little gems bring a burst of flavor. Blueberries are also packed with antioxidants! Don’t have fresh? Frozen blueberries can work in a pinch; just be sure to thaw and drain them first.
-
1 cup raw walnuts: They add a delightful crunch and a dose of healthy fats. If walnuts aren’t your favorite, try pecans or almonds instead. Toast them lightly in a pan for extra flavor!
-
1 medium-large avocado: Creamy and nourishing, avocado brings richness to this salad. You can substitute with diced cucumber if you want a lighter crunch.
-
1/2 cup goat cheese: Adding a tangy note to the salad, goat cheese takes it to the next level! If you’re not a fan, feta can work beautifully, or you can skip the cheese for a dairy-free option.
-
1/4 cup fresh mint: Slightly sweet and refreshing, mint adds a delightful twist. Feel free to switch it up with basil or even parsley if you prefer.
-
Salt + pepper, to taste: Always a must for seasoning!
For the Dressing:
-
1/4 cup olive oil: A staple in any kitchen. It provides a rich base. If you need a lighter option, avocado oil is a great substitute.
-
2 Tbsp balsamic vinegar: Adds depth and sweetness to the dressing. Apple cider vinegar can be a delicious alternative if that’s what you have on hand.
-
1/2 a lemon, juice only: A splash of acidity brightens everything up. Lime juice works, too, if you’re feeling adventurous.
-
1 tsp garlic powder: A hint of garlic elevates the flavor. If you prefer fresh, minced garlic is fabulous—just use about 2 cloves.
-
1 tsp honey: A touch of sweetness to balance out the acidity and bitterness. Agave syrup can be used for a vegan alternative.
-
Salt + pepper, to taste: Always essential for bringing flavors together!
Step-by-Step Instructions
Now, let’s get our hands a little dirty and bring this beautiful salad to life! The steps are simple and quick, so follow along:
-
Prep Your Ingredients: First things first, wash and dry your baby spinach and blueberries. Dry spinach helps the dressing stick, and we want all that tasty goodness in every bite.
-
Chop and Slice: Next, it’s time to dice your avocado and crumble your goat cheese. To easily cut an avocado, slice it in half, remove the pit, and use a spoon to scoop out chunks—or you can slice it while it’s still in the skin and then scoop it out!
-
Toast the Walnuts (Optional): If you like extra flavor, this is the perfect time to toast your walnuts! Place them in a dry skillet over medium heat, tossing frequently for about 3–5 minutes until they’re golden and fragrant. Watch closely; they can burn quickly!
-
Make the Dressing: In a small bowl or a jar with a lid, whisk together the olive oil, balsamic vinegar, lemon juice, garlic powder, honey, salt, and pepper. If you’re using jar, just shake it until everything is combined. Easy peasy!
-
Assemble the Salad: In a large bowl, add the baby spinach, followed by the blueberries, walnuts, avocado, and goat cheese. Drizzle about half of the dressing over the salad so it’s not swimming, and give it a gentle toss to combine—be careful not to mash the avocado!
-
Adjust and Serve: Taste your salad. If it needs more salt, pepper, or dressing, now’s the time to adjust. Once you’re happy, it’s ready to serve!
-
Garnish with Fresh Mint: Sprinkle the torn mint leaves right before serving for a fresh burst of flavor.
And voilà, you’ve got yourself a gorgeous Spinach Blueberry Salad that’s ready to impress!
Serving Suggestions
To serve this dish beautifully, plate it in a large bowl to showcase the colorful ingredients or portion it into smaller bowls for individual servings. Drizzle a little extra dressing over the top and garnish with a few additional blueberries and mint leaves. This salad is fantastic on its own, but you can pair it with grilled chicken or shrimp for a heartier meal, or enjoy it as a side dish alongside your favorite protein.
Recipe Variations
Feeling adventurous? Here are some fun variations to shake things up!
-
Add Protein: Toss in grilled chicken, shrimp, or chickpeas for a protein boost. This makes it a more filling option!
-
Swap the Cheese: If you’re looking for different flavors, try crumbled feta or even sliced strawberries for a sweet twist.
-
Change the Nuts: Use pumpkin seeds instead if you have a nut allergy or want a different crunch.
-
Go Tropical: Add in diced mango or papaya for a vibrant fruit salad twist!
-
Vegan Version: Skip the cheese and swap honey with maple syrup for a completely plant-based dish.
Chef’s Notes
This salad is close to my heart, but it’s also a blank canvas! I love that I can swap in whatever ingredients I have on hand, often leading to delicious surprises. One time, I ended up tossing in leftover grilled chicken from dinner, and it transformed the salad into a satisfying meal.
An embarrassing kitchen moment? Let’s just say I mistook garlic powder for cinnamon once—yikes! But that mistake taught me always to double-check my spices, and the learning continues every day in the kitchen!
FAQs and Troubleshooting
-
Can I make this salad ahead of time?
While the salad is best fresh, you can prep the ingredients in advance. Keep the dressing separate until you’re ready to serve to prevent the spinach from wilting. -
What if I don’t like blueberries?
No worries! You can substitute with any seasonal fruit such as strawberries, raspberries, or even sliced apples. -
What should I do if the salad feels too bland?
Always taste as you go! You can add more dressing, a sprinkle of lemon juice, or more seasoning. A pinch of sea salt can elevate everything! -
How do I store leftovers?
Store any leftover salad in an airtight container for up to 2 days, but be aware that the spinach will wilt. If possible, keep the dressing separate until serving.
Nutritional Info
This Spinach Blueberry Salad not only packs a punch of flavor but is also nutrient-dense. A rough estimate for one serving includes:
- Calories: ~280
- Protein: ~6g
- Fat: ~20g (mostly from healthy sources)
- Carbohydrates: ~24g
It’s a delightful dish that provides a well-rounded meal or side full of vitamins and minerals!
Let’s wrap it up here, friends—this Spinach Blueberry Salad is all about fresh ingredients coming together to create a beautiful dish that can brighten any meal. So gather your ingredients, roll up your sleeves, and let’s get cooking! Enjoy the flavors, and remember to share your creations! Happy eating!
Print20-Minute Spinach Blueberry Salad

A fresh and vibrant salad combining baby spinach, juicy blueberries, creamy avocado, and crunchy walnuts, drizzled with a delicious homemade dressing.
- Prep Time: 10 minutes
- Cook Time: 10 minutes
- Total Time: 20 minutes
- Yield: 4 servings 1x
- Category: Salad
- Method: No cooking required
- Cuisine: American
- Diet: Vegetarian
Ingredients
- 4 cups baby spinach
- 2 cups fresh blueberries
- 1 cup raw walnuts
- 1 medium-large avocado
- 1/2 cup goat cheese
- 1/4 cup fresh mint
- Salt and pepper, to taste
- 1/4 cup olive oil
- 2 Tbsp balsamic vinegar
- 1/2 a lemon, juice only
- 1 tsp garlic powder
- 1 tsp honey
- Salt and pepper, to taste
Instructions
- Prep your ingredients: Wash and dry spinach and blueberries.
- Chop and slice the avocado and crumble the goat cheese.
- Toast the walnuts in a dry skillet over medium heat for 3–5 minutes (optional).
- Make the dressing by whisking together olive oil, balsamic vinegar, lemon juice, garlic powder, honey, salt, and pepper.
- Assemble the salad in a large bowl and drizzle with half the dressing.
- Adjust the seasoning with more salt, pepper, or dressing to taste.
- Garnish with torn mint leaves before serving.
Notes
This salad is quick to prepare and can be customized with various proteins or fruits.
Nutrition
- Serving Size: 1 serving
- Calories: 280
- Sugar: 10g
- Sodium: 200mg
- Fat: 20g
- Saturated Fat: 3g
- Unsaturated Fat: 17g
- Trans Fat: 0g
- Carbohydrates: 24g
- Fiber: 4g
- Protein: 6g
- Cholesterol: 10mg
Keywords: salad, spinach, blueberry, healthy, quick, fresh, vegetarian
Minute Creamy Burrata Bruschetta: Fresh, Crispy Appetizer
Burrata Bruschetta: A Fresh and Flavorful Delight
Welcome, fellow foodies! Today, we’re diving into a dish that has it all—flavor, freshness, and a healthy dose of nostalgia! Say hello to Burrata Bruschetta, a heartwarming dish that brings together creamy burrata cheese, juicy tomatoes, fragrant basil, and toasted bread into a heavenly bite that’s sure to impress anyone at your table.
I’ll never forget the first time I made this dish for my friends. It was a sunny summer afternoon, and we gathered around my little kitchen, excited to enjoy good food and great company. I had just discovered burrata cheese, and the thought of showcasing its creamy goodness made my heart race! As I set out to assemble my bruschetta, I couldn’t help but reminisce about my Italian grandmother’s kitchen, where the aromas of ripe tomatoes and fresh herbs would mingle in the air. Cooking was always a family affair for us, with laughter echoing off the walls and everyone pitching in.
Now, I’m thrilled to share this delightful recipe that easily transports you to those sun-kissed summer days, no matter where you are. Whether you’re hosting a gathering, enjoying a cozy dinner, or just indulging in a quiet evening on your own, this Burrata Bruschetta is a wonderful way to elevate your meal and celebrate fresh, nourishing ingredients. So, let’s roll up our sleeves and start cooking something fabulous!
A Personal Story: Reliving the Magic
The first time I tasted burrata was at a charming little bistro in Florence. I was on a culinary adventure, soaking up the rich flavors of Italian cuisine. My friends and I ordered an array of tapas-style dishes, but nothing prepared us for the arrival of the burrata. Its round, delicate exterior housed a luxurious creamy center that simply melted in my mouth. I distinctly remember the mix of excitement and curiosity as I spread it on crispy bread and topped it off with the ripest tomatoes and fragrant basil. That day was a revelation for me, as I learned that food isn’t just about sustenance; it’s about creating moments that linger in your memory.
When I returned home, brimming with inspiration, I decided to recreate that magic in my own kitchen. After some trial and error, I landed on a recipe that embodies that warm, sunny day in Florence, infused with my personal touch. Now I want to share this delightful dish so that you can also experience a little bit of that Italian charm, right in your kitchen.
Ingredients
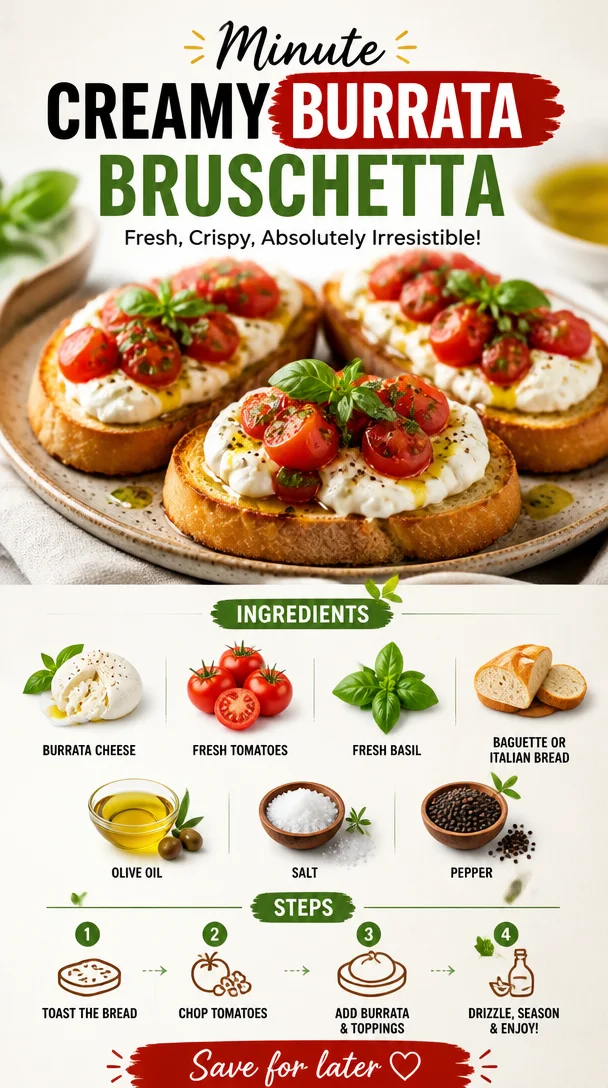
Here’s what you’ll need for a delicious Burrata Bruschetta:
-
Burrata Cheese: The star of the show! This creamy, luscious cheese is a combination of mozzarella and cream, bringing richness to each bite. If you can’t find burrata, a fresh mozzarella will work in a pinch, but it won’t have the same creamy texture.
-
Fresh Tomatoes: Opt for the ripest, juiciest tomatoes you can find! Heirloom tomatoes are a fantastic choice for their vibrant flavor. If it’s off-season, cherry or grape tomatoes can be a great alternative.
-
Fresh Basil: The aromatic touch that brightens the dish! Fresh basil leaves add a refreshing note. If you’re out of basil, try fresh arugula, cilantro, or even mint for a unique twist.
-
Baguette or Italian Bread: A crisp, hearty base for our toppings! A nice crusty baguette holds up beautifully under the weight of the toppings. If gluten is a concern, you can use gluten-free bread or even slices of zucchini that have been grilled.
-
Olive Oil: A high-quality extra virgin olive oil elevates the flavors of this dish. If you’re in the mood for something different, consider infused oils like garlic or chili oil for an extra kick.
-
Salt & Pepper: Simple seasonings that should never be overlooked! A sprinkle of flaky sea salt can make the flavors pop. Feel free to experiment with flavored salts or fresh cracked pepper for added complexity.
Step-by-Step Instructions
Ready to get cooking? Let’s make that Burrata Bruschetta shine!
-
Prep the Ingredients: Start by washing your tomatoes and basil. If you’re using heirlooms or larger tomatoes, dice them into small chunks—think bite-sized pieces. If you opted for cherry tomatoes, halving them works perfectly. Stack the basil leaves, roll, and slice them thinly to create a beautiful chiffonade.
-
Make the Tomato Mixture: In a bowl, combine the diced tomatoes, a drizzle of olive oil, salt, and pepper. Give it a gentle toss and let it sit for about 15-20 minutes. This allows the flavors to mingle and the juices to start flowing, which is crucial for that delicious summery flavor.
-
Toast the Bread: While your tomatoes are getting cozy, it’s time to toast the bread. Preheat your oven to 400°F (200°C). Optionally, you can brush the sliced baguette with olive oil for extra flavor. Place the slices on a baking sheet and toast them for about 5-7 minutes until they are golden brown and crispy. Keep an eye on them so they don’t burn. If you want a smoky flavor, consider grilling the bread instead!
-
Assemble the Bruschetta: Now, the moment we’ve all been waiting for! Take those crispy, golden slices of bread and add generous dollops of the tomato mixture on each piece. Next, gently pull apart the burrata, revealing its creamy insides, and place a portion on top of the tomatoes. Don’t be shy—go for that lavish presentation!
-
Garnish & Serve: Finish it off with a sprinkle of fresh basil and a light drizzle of olive oil. If you’re feeling fancy, a pinch of balsamic glaze can add a beautiful touch. Serve your Burrata Bruschetta on a wooden board for a rustic vibe or arrange it on a lovely platter. Dig in immediately while the bread is still warm and the burrata is at its creaminess!
Serving Suggestions
For a magnificent presentation, consider serving your Burrata Bruschetta on a large wooden board with fresh arugula sprinkled around, colorful cherry tomatoes, and perhaps even a bowl of extra burrata for sharing! Pair it with a chilled glass of white wine or sparkling water infused with lemon slices for a truly refreshing meal.
Recipe Variations
While this classic Burrata Bruschetta is a showstopper on its own, here are some fun variations to take your dish to the next level:
-
Roasted Garlic: Add a layer of roasted garlic on the bread before the tomato mixture for a rich, savory experience.
-
Fruit Twist: Swap out the tomatoes for peaches or strawberries in the summer for a sweet touch. Drizzle with a balsamic reduction for extra oomph.
-
Pesto Swirl: Add a dollop of basil pesto along with the tomatoes for an extra herby kick.
-
Spicy Kick: Incorporate finely diced jalapeños or red pepper flakes into the tomato mixture to enhance that flavor profile.
-
Mediterranean Vibe: Toss in some olives and serve the burrata atop a bed of cooked quinoa or farro for a delightful grain bowl twist.
Chef’s Notes
I can’t help but smile every time I make this dish! Over the years, this recipe has evolved, and what began as a simple snack turned into a beloved centerpiece at dinner gatherings. I’ve tried countless variations, and each time, I find something new that excites my palate. Whether it’s experimenting with different cheeses or adding unexpected toppings, the creativity behind burrata never ceases to amaze me. Embrace this recipe as your own canvas, and feel free to add your personality to it!
FAQs and Troubleshooting
Q: What’s the best way to store leftovers?
A: Although I doubt there will be many leftovers, store any uneaten bruschetta components separately. The bread will lose its crispiness if it’s stored with the toppings. Keep the tomatoes and burrata in airtight containers, and assemble fresh when ready to enjoy.
Q: Can I prepare this dish ahead of time?
A: To ensure maximum freshness, prep the tomatoes ahead but avoid assembling until you’re ready to serve. The toasted bread can be made in advance, just store it in a cool, dry place.
Q: My burrata didn’t have that creamy center—what went wrong?
A: Burrata should be soft and creamy, if it’s too firm, it may not have been fresh. Always check the expiration date and seek good quality cheeses from specialty stores.
Q: Can I use dried basil instead of fresh?
A: While dried basil has its place in cooking, nothing beats the vibrant flavor of fresh basil in this dish. If you must use dried, only dial it down to a pinch, as it’s more concentrated.
Nutritional Info (Optional)
Estimated per serving (for 2 Bruschetta):
- Calories: 250
- Protein: 10g
- Carbohydrates: 30g
- Fats: 12g
Indulge while enjoying the freshness of this Burrata Bruschetta that delights not just the taste buds but also the soul. This classic dish is all about balance and simplicity, and I hope you love making it as much as I do! Happy cooking!
PrintBurrata Bruschetta

A fresh and flavorful dish combining creamy burrata cheese, juicy tomatoes, fragrant basil, and toasted bread.
- Prep Time: 15 minutes
- Cook Time: 10 minutes
- Total Time: 25 minutes
- Yield: 4 servings
- Category: Appetizer
- Method: Toasting
- Cuisine: Italian
- Diet: Vegetarian
Ingredients
- Burrata Cheese
- Fresh Tomatoes
- Fresh Basil
- Baguette or Italian Bread
- Olive Oil
- Salt
- Pepper
Instructions
- Prep the ingredients by washing the tomatoes and basil. Dice the tomatoes into bite-sized pieces and chiffonade the basil.
- Make the tomato mixture by combining the diced tomatoes, olive oil, salt, and pepper. Let it sit for 15-20 minutes.
- Toast the bread in an oven preheated to 400°F (200°C) for 5-7 minutes until golden brown.
- Assemble the bruschetta by placing the tomato mixture on the toasted bread and topping it with burrata.
- Garnish with fresh basil and a drizzle of olive oil before serving.
Notes
For a unique twist, consider adding roasted garlic, swapping tomatoes for fruits, or incorporating pesto.
Nutrition
- Serving Size: 2 pieces
- Calories: 250
- Sugar: 4g
- Sodium: 200mg
- Fat: 12g
- Saturated Fat: 4g
- Unsaturated Fat: 6g
- Trans Fat: 0g
- Carbohydrates: 30g
- Fiber: 2g
- Protein: 10g
- Cholesterol: 30mg
Keywords: burrata, bruschetta, appetizer, Italian, vegetarian

Mango Sticky Rice Rolls: The Ultimate Handheld Thai Dessert Recipe
Mango Sticky Rice Rolls: The Ultimate Handheld Thai Dessert Recipe
Introduction
Welcome, fellow food lovers! Today, we’re diving into a delightful corner of Thai cuisine with a twist: Mango Sticky Rice Rolls. If you’re anything like me, the combination of sweet mango and creamy coconut rice has you dreaming of tropical beaches and sun-soaked afternoons. These rolls are not just a dessert; they’re a celebration of flavor, texture, and the joy that comes from sharing delicious food with those you love.
I remember the first time I tasted mango sticky rice in a cozy street market in Bangkok. The vendor, with a smile as warm as the sun, handed me a beautiful plate of glistening sticky rice topped with ripe, juicy mango. As I took my first bite, a symphony of flavors burst in my mouth—the creamy coconut milk mingling perfectly with the sweetness of the mango. It was an unforgettable experience, and one that inspired me to recreate it in new, fun ways right in my kitchen.
Today, we’re transforming that classic dessert into adorable handheld rolls that are perfect for sharing (or keep them all to yourself—I won’t judge!). With just a few simple ingredients and easy steps, you’ll have a delicious treat that’s sure to impress anyone lucky enough to try them. Grab your apron, and let’s get rolling!
Personal Story
Growing up in a family that adored food, my parents often cooked recipes inspired by their travels. One summer, they decided to take us on a culinary journey through Asia, which included a stop in Thailand. I’ll never forget the night we stumbled upon a bustling night market. Our senses were overwhelmed by the vibrant colors and intoxicating aromas of the various stalls. My mom, ever the adventurous eater, insisted we try everything!
When we reached the dessert stand, I was a little hesitant—it was new, unfamiliar, and I was a picky eater at the time. But my mom nudged me to try the mango sticky rice, and oh boy, was I glad she did! The moment that silky rice, sweet mango, and creamy sauce touched my lips, I was transported. It was pure magic! Now, I find joy in recreating that memory and sharing it with others by turning this traditional dish into an exciting snack.
Ingredients
Before we dig into crafting these delightful Mango Sticky Rice Rolls, let’s take a look at what you’ll need:
-
2 cups Long-grain glutinous rice
Also known as Thai sweet rice, this key ingredient has a unique ability to turn creamy and sticky when cooked. If you can’t find it, you can substitute with short-grain rice, but the texture won’t be as authentic! -
13.5 oz Full-fat coconut milk (Divided use)
This luscious milk adds creaminess and a beautiful coconut flavor. If you prefer a lighter option, you can use light coconut milk, but the texture and richness will differ. -
1/2 cup Granulated sugar
Sweetness is essential here. You can use coconut sugar for a more natural flavor, or even agave syrup if you’re looking to keep it refined sugar-free. -
1/2 tsp Sea salt
Just a dash to balance out the sweetness and enhance all those beautiful flavors. -
2 large Fresh mangoes (Sliced into 1/2 inch spears)
Sweet, ripe mangoes are the star of this dish! Choose mangoes that are soft to the touch but not overly mushy. If mango isn’t in season, you can substitute with ripe peaches or even berries. -
1 cup Unsweetened shredded coconut (Toasted golden-brown)
Toasting the coconut adds a lovely crunch and nutty flavor. If you’re short on time, you can skip the toasting, but trust me, this extra step is worth it! -
1 tsp Cornstarch (For thickening the drizzle)
This helps to create a luscious sauce for drizzling over your rolls. If you’re looking for a gluten-free option, arrowroot powder is a fantastic substitute.
Step-by-Step Instructions
Let’s get down to the fun part! Here’s how we’ll create your mango sticky rice rolls:
-
Cook the Glutinous Rice
Begin by rinsing the sticky rice under cold water until the water runs clear. This removes excess starch, ensuring a perfect texture after cooking. Soak the rice in water for about 4-6 hours, or overnight if possible. This step is crucial for achieving that deliciously sticky consistency! -
Steam the Rice
After soaking, drain and transfer the rice into a steamer lined with cheesecloth. Steam the rice on medium heat for 30-40 minutes until the grains are tender. If you don’t have a steamer, a bamboo steamer or a heat-proof plate set over a pot of boiling water will do the trick. -
Prepare the Coconut Milk Mix
While the rice is steaming, in a small saucepan, combine 1 cup of coconut milk, sugar, and sea salt. Over medium heat, whisk until the sugar dissolves but avoid bringing it to a boil. This mix is pure magic—it’s the creamy drizzle that will bring your rolls to the next level! -
Combine Rice and Coconut Milk
Once the rice is cooked, transfer it to a large bowl and pour the coconut milk mixture over the rice. Mix it well, ensuring each grain is coated and letting it sit for about 30 minutes. This step helps the rice absorb all that coconut goodness! -
Assemble the Rolls
Grab a large, flat plate and place a small amount of rice in your palm; gently shape it to a rectangle before laying a mango spear in the center. Roll it up like a burrito, enclosing the mango in the sticky rice. Repeat until all rolls are made—this part is fun, so channel your inner sushi chef! -
Prepare the Coconut Drizzle
In a small saucepan, combine the remaining coconut milk and cornstarch. Whisk over low heat until it thickens into a drizzleable consistency. This will give your rolls that extra layer of creamy coconut flavor! -
Toast the Coconut
While the drizzle is thickening, toast the shredded coconut in a dry skillet over medium heat until golden brown. Stir frequently to avoid burning it; this will only take a few minutes! -
Serve
Place your mango sticky rice rolls on a serving platter. Drizzle your coconut sauce over the top and finish with a sprinkle of toasted coconut for a beautiful presentation!
Serving Suggestions
To serve your Mango Sticky Rice Rolls, plate them up neatly, drizzling a generous amount of the creamy coconut sauce on top. For an extra touch of elegance, you can also garnish with a few mint leaves for a pop of color! These rolls are perfect for parties, a fun dessert for family dinners, or a sweet snack whenever you crave a taste of Thailand.
Recipe Variations
Feeling adventurous? Here are a few creative twists and dietary swaps to consider:
- Tropical Fusion: Add a sprinkle of chopped pineapple or kiwi for an exciting fruit contrast.
- Nutty Crunch: Mix in some crushed peanuts for an extra layer of flavor and texture.
- Chocolate Lovers: Drizzle with a chocolate sauce instead of coconut for a decadent treat!
- Vegan Version: All ingredients are naturally vegan, but make sure to use plant-based sugar, as some sugar is processed with bone char.
- Flavor Infusion: Add a couple of drops of vanilla or almond extract to your coconut milk for a unique flavor profile.
Chef’s Notes
This recipe has been a favorite of mine for years! I remember a time I tried to make it for my friends during a casual dinner party. Let’s just say that my first attempt didn’t go as smoothly as planned—my rice was a little too firm, and the rolls looked more like very cute, but very sad blobs. Luckily, my friends were gracious and found a way to enjoy them anyway! Through trial and error (and many batches), I perfected this recipe, and now it’s a guaranteed crowd-pleaser every time!
FAQs and Troubleshooting
1. Why didn’t my sticky rice become sticky?
It’s essential to soak the glutinous rice before cooking! This allows it to fully absorb water, creating that perfect sticky texture after steaming. If you forget to soak it, you can still use the same rice; just increase the steaming time a bit.
2. Can I use a different type of rice?
While it’s best to stick to glutinous rice for authenticity, you can try short-grain rice in a pinch. Just know that the texture will be different—less sticky and more firm.
3. How long do these rolls last?
These rolls are best consumed fresh but can be stored in the fridge for up to 2 days in an airtight container. Just be aware that they may lose some of their original texture.
4. Can I make these ahead of time?
Absolutely! Prepare the rice and mango ahead, assemble just before serving, and drizzle with coconut sauce. This way, the freshness remains intact!
Nutritional Info
While I recommend enjoying these Mango Sticky Rice Rolls in moderation due to their sweetness, they are a delightful source of carbohydrates from the rice and healthy fats from the coconut. A serving (2 rolls) comes in at roughly:
- Calories: 250
- Protein: 3g
- Fat: 12g
- Carbohydrates: 35g
- Fiber: 2g
Conclusion
And there you have it! A delightful recipe that marries the sweetness of mango with the creamy texture of coconut sticky rice, all wrapped in a fun roll format. Perfect for parties, dessert gatherings, or simply treating yourself on a cozy afternoon. Remember, cooking should be a celebration, full of joy and creativity. I can’t wait to hear your story as you try out Mango Sticky Rice Rolls—so grab your ingredients, roll them up, and let your taste buds take a trip to Thailand! Enjoy, fellow foodies!
PrintMango Sticky Rice Rolls

Delightful handheld rolls combining sweet mango with creamy coconut sticky rice, perfect for parties or a tropical treat.
- Prep Time: 15 minutes
- Cook Time: 40 minutes
- Total Time: 55 minutes
- Yield: 4 servings 1x
- Category: Dessert
- Method: Steaming
- Cuisine: Thai
- Diet: Vegetarian
Ingredients
- 2 cups Long-grain glutinous rice
- 13.5 oz Full-fat coconut milk (Divided use)
- 1/2 cup Granulated sugar
- 1/2 tsp Sea salt
- 2 large Fresh mangoes (Sliced into 1/2 inch spears)
- 1 cup Unsweetened shredded coconut (Toasted golden-brown)
- 1 tsp Cornstarch (For thickening the drizzle)
Instructions
- Begin by rinsing the sticky rice under cold water until the water runs clear.
- Soak the rice in water for about 4-6 hours, or overnight if possible.
- After soaking, drain and transfer the rice into a steamer lined with cheesecloth.
- Steam the rice on medium heat for 30-40 minutes until the grains are tender.
- While the rice is steaming, in a small saucepan, combine 1 cup of coconut milk, sugar, and sea salt.
- Whisk until the sugar dissolves but avoid bringing it to a boil.
- Once the rice is cooked, transfer it to a large bowl and pour the coconut milk mixture over the rice.
- Mix it well, ensuring each grain is coated and letting it sit for about 30 minutes.
- Grab a large, flat plate and place a small amount of rice in your palm; gently shape it to a rectangle.
- Lay a mango spear in the center and roll it up like a burrito.
- In a small saucepan, combine the remaining coconut milk and cornstarch.
- Whisk over low heat until it thickens into a drizzleable consistency.
- Toast the shredded coconut in a dry skillet over medium heat until golden brown.
- Serve your mango sticky rice rolls on a platter, drizzled with sauce and topped with toasted coconut.
Notes
For an extra touch of elegance, garnish with mint leaves.
Nutrition
- Serving Size: 2 rolls
- Calories: 250
- Sugar: 15g
- Sodium: 120mg
- Fat: 12g
- Saturated Fat: 10g
- Unsaturated Fat: 2g
- Trans Fat: 0g
- Carbohydrates: 35g
- Fiber: 2g
- Protein: 3g
- Cholesterol: 0mg
Keywords: Mango, Sticky Rice, Thai Dessert, Vegetarian, Coconut, Rolls, Summer Treat
Sautéed Spinach
Sautéed Spinach: Your New Go-To Side Dish
Welcome to Clean Plate Cravings! Today, we’re diving into the world of greens with one of the simplest and yet most flavorful dishes you can whip up in a matter of minutes: sautéed spinach! If you’re looking for a dish that’s quick to prepare, packed with nutrients, and bursting with flavor, then this one is sure to steal the show.
Spinach is the unsung hero of the vegetable world. Its versatility is unmatched, and today, we’ll explore how a handful of ingredients can turn this leafy green into an irresistible side that pairs beautifully with just about anything. Whether you’re a seasoned chef or a kitchen newbie, sautéing spinach is an essential skill that will elevate your home cooking and keep your meals fresh and exciting.
But let me ask you this: How often do you find yourself racing against the clock and resorting to frozen sides or takeout because preparing a vegetable dish feels too complicated? Spoiler alert: It doesn’t have to be. With just a few fresh ingredients and a dash of culinary intuition, we can create something that’s not only nutritious but also downright delicious! So roll up your sleeves, grab your pan, and let’s sauté our way to a tastier plate!
A Trip Down Memory Lane
Growing up, my grandmother had this magical way of making simple ingredients shine. I’ll never forget the summer afternoons spent in her cozy kitchen, the warm sunlight streaming through the window as the tantalizing aroma of garlic filled the air. My grandmother’s sautéed spinach was our go-to side dish at every family gathering, and it was like no other. She always joked that it was "green goodness" that made us strong like Popeye!
One particular memory stands out. It was my little cousin’s birthday, and our family gathered in her kitchen, buzzing with laughter and excitement. As she gracefully tossed the spinach in her cast iron skillet, she playfully sparked a mini spinach fight, inviting giggles from the little ones while the older folks rolled their eyes. But as the greens wilted in the pan and mingled with the warm scent of garlic and olive oil, everyone’s attention shifted back to her crafting this beloved dish. I think that’s when I realized that cooking truly has a way of bringing joy and connection into our lives. Today, whenever I make sautéed spinach, it’s like I’m sharing a piece of my grandmother’s legacy—and a pinch of that magical kitchen atmosphere with my loved ones too.
Ingredients
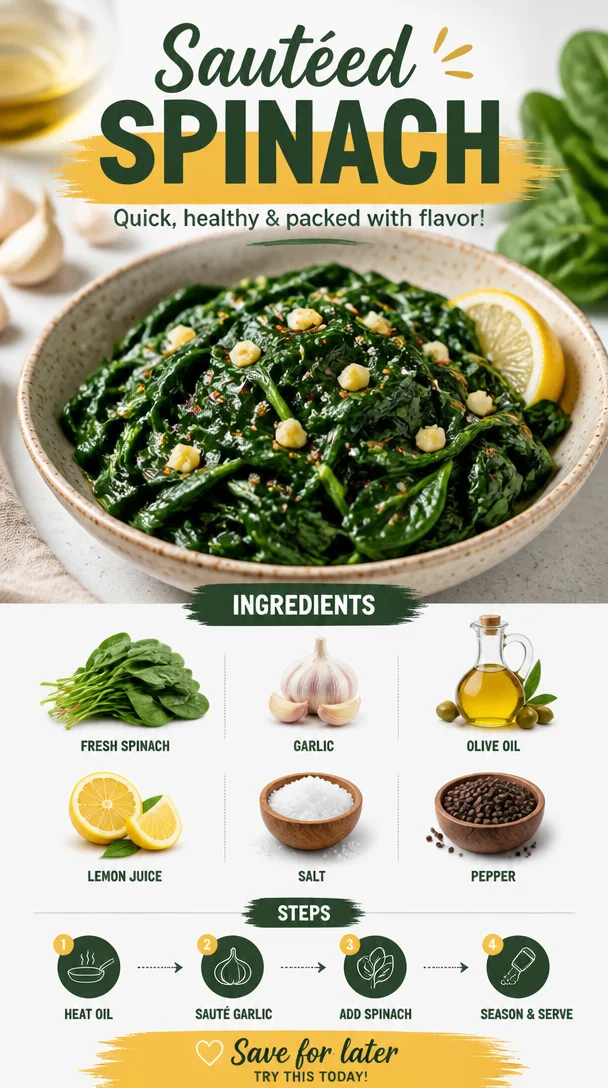
For this delectable sautéed spinach, you’ll need:
-
Fresh Spinach: The star of the show! Look for vibrant, crisp leaves. If fresh isn’t available, you can use frozen spinach. Just make sure to thaw and drain it well.
-
Garlic: Freshly minced garlic adds an aromatic depth that elevates the dish. If you’re out of fresh garlic, you can use garlic powder (about 1/4 teaspoon will do).
-
Olive Oil: A high-quality extra virgin olive oil brings a fruity richness to the dish. If olive oil isn’t your preference, feel free to use avocado oil or another light oil.
-
Lemon Juice: A squeeze of fresh lemon juice adds a bright zing that perfectly balances the earthiness of the spinach. If you’re out of lemons, you can substitute with a splash of apple cider vinegar for a different tangy flavor.
-
Salt: Enhances all the flavors. You can adjust this to taste or use sea salt for a more gourmet touch.
-
Pepper: Freshly cracked black pepper brings a gentle kick. You can use red pepper flakes if you enjoy a bit of spice instead.
These ingredients come together like a symphony, each playing its part in creating a harmonious dish that is as healthy as it is satisfying!
Step-by-Step Instructions
Let’s get cooking! Follow these steps to master the art of sautéing spinach.
-
Prep Your Ingredients:
Start by thoroughly washing the fresh spinach under cold water to remove any dirt or grit. Spin dry in a salad spinner or pat gently with a clean towel. Mince your garlic (aim for about 3-4 cloves) and have your lemon juice ready to go. -
Heat the Pan:
Grab a large skillet (preferably a non-stick or cast iron pan) and heat it over medium heat. Add about 1 tablespoon of olive oil to the pan. A good tip here: Allow the oil to warm up but avoid overheating it, which can cause the oil to burn and affect the flavor. -
Add Garlic:
Once the oil is shimmering, toss in the minced garlic. Sauté the garlic for about 30 seconds until fragrant—that golden aroma will dance around your kitchen and entice anyone nearby! -
Add Spinach:
Now it’s time for the main attraction. Add the fresh spinach to the skillet, a large handful at a time, allowing it to wilt down. Don’t be surprised at how much it shrinks! Stir constantly for about 2-3 minutes. Pro tip: If you like your spinach less wilted, you can remove it from the pan once it’s just tender. -
Season the Spinach:
Once the spinach is vibrant green and wilted, sprinkle in salt and freshly cracked black pepper to taste. The perfect seasoning can take this dish from good to irresistible. -
Finish with Lemon Juice:
Remove the skillet from heat and drizzle fresh lemon juice over the sautéed spinach. Give it a good toss to ensure all the flavors are well combined and to let that citrusy brightness shine through. -
Serve Immediately:
Serve your sautéed spinach while it’s warm, either as a side or as a topping for your favorite protein. Trust me; you’ll want to dig in right away!
Serving Suggestions
Sautéed spinach makes an excellent complement to grilled chicken, roasted salmon, or a hearty grain bowl. When plating, pile a generous serving on the plate and squeeze a little extra lemon over the top for visual appeal. Pair it with some toasted pine nuts or a sprinkle of feta for an upscale touch!
Recipe Variations
Feel free to get creative! Here are a few fun variations you can try:
-
Nutty Spinach: Add a handful of toasted walnuts or pecans for a crunchy twist.
-
Spicy Spinach: Incorporate red pepper flakes or a dash of cayenne pepper for some heat.
-
Creamy Spinach: Stir in a splash of heavy cream or vegan cream alternative to create a rich, creamy sauce.
-
Herbed Spinach: Toss in fresh herbs like basil, parsley, or thyme at the end for an aromatic boost.
-
Spinach & Cheese: Mix in some grated Parmesan or crumbled goat cheese right before serving for a decadent finish.
Chef’s Notes
Every time I make sautéed spinach, I can’t help but chuckle at my early kitchen disasters. There was one time when I accidentally set off the smoke alarm while trying to sauté garlic, thinking it’d infuse quicker! Lesson learned: patience is key in the kitchen! Over the years, my sautéed spinach technique has evolved into the delightful recipe I’m sharing today, and I’m proud to say it’s become a staple in my household.
Each plate of sautéed spinach brings a comforting reminder of how simple ingredients can create something magical, connecting me back to those cherished moments in my grandmother’s kitchen.
FAQs and Troubleshooting
-
Can I use frozen spinach?
Absolutely! Just make sure to thaw and drain it well to remove excess moisture before sautéing. -
What if my spinach is too watery?
If excess water is released from the spinach, simply increase the heat to evaporate the liquid. This will enhance the flavor, too! -
How do I prevent burning garlic?
Keep a close watch on the garlic while it’s sautéing and reduce the heat if it browns too fast. You want it golden but not too dark. -
Can I prepare this dish in advance?
While it’s best fresh, you can prepare sautéed spinach ahead of time. Just store it in an airtight container in the fridge for up to 3 days and reheat gently on the stovetop.
Nutritional Info
Sautéed spinach is not only delicious—it’s also packed with nutrients! A standard serving (approximately one cup) contains:
- Calories: 40
- Protein: 5 grams
- Fat: 3 grams
- Carbohydrates: 7 grams
- Fiber: 4 grams
- Vitamin A: 370% DV
- Vitamin C: 25% DV
- Iron: 15% DV
This nutrient powerhouse fits perfectly within a balanced eating plan, making it an ideal side dish whether you’re cooking for yourself or entertaining guests.
So there you have it—your guide to making the perfect sautéed spinach! I hope you give it a try and make it a part of your regular rotation. It’s quick, easy, and undeniably delicious. Happy cooking! 🍽️
PrintSautéed Spinach

A quick, nutritious, and flavorful side dish that transforms fresh spinach with garlic and lemon.
- Prep Time: 10 minutes
- Cook Time: 5 minutes
- Total Time: 15 minutes
- Yield: 4 servings
- Category: Side Dish
- Method: Sautéing
- Cuisine: Mediterranean
- Diet: Vegetarian
Ingredients
- Fresh Spinach
- Garlic (3-4 cloves, minced)
- Olive Oil (1 tablespoon)
- Lemon Juice (to taste)
- Salt (to taste)
- Freshly Cracked Black Pepper (to taste)
Instructions
- Prep your ingredients: Wash the spinach and mince the garlic.
- Heat the pan: Warm olive oil in a large skillet over medium heat.
- Add garlic: Sauté minced garlic for about 30 seconds until fragrant.
- Add spinach: Toss in spinach and stir for about 2-3 minutes until wilted.
- Season: Sprinkle with salt and pepper to taste.
- Finish with lemon juice: Drizzle lemon juice over the spinach and toss to combine.
- Serve immediately: Enjoy warm as a side dish or topping.
Notes
Feel free to experiment with variations like adding nuts, spices, cream, herbs, or cheese.
Nutrition
- Serving Size: 1 serving
- Calories: 40
- Sugar: 0g
- Sodium: 200mg
- Fat: 3g
- Saturated Fat: 0.5g
- Unsaturated Fat: 2.5g
- Trans Fat: 0g
- Carbohydrates: 7g
- Fiber: 4g
- Protein: 5g
- Cholesterol: 0mg
Keywords: sautéed spinach, easy side dish, vegetarian recipes, healthy cooking
Roasted Tomatoes With Burrata
Roasted Tomatoes with Burrata: A Burst of Flavor
Welcome, fellow food lovers! Today, I’m excited to share a delightful dish that sings with seasonal flavors and makes any meal feel like a special occasion: Roasted Tomatoes with Burrata. This vibrant dish is not only visually stunning but also incredibly simple to whip up, making it perfect for those busy weeknights or casual weekend gatherings. So grab your apron, and let’s dive into the world of juicy tomatoes, creamy burrata, and aromatic herbs!
A Flavorful Journey: Personal Story
As I look back on my culinary journey, one memory that always brings a smile to my face is that summer evening at my grandma’s house. The sun was setting, casting a golden glow over her small garden where she grew the juiciest tomatoes you could ever imagine. We’d pick them together, laughing and chatting, and then head inside to make her famous roasted tomato dish.
I can still hear her voice, so enthusiastic, as she explained how roasting tomatoes brought out their natural sweetness and flavor. She would pair them with all sorts of delicious cheese, but burrata was her favorite choice! We’d enjoy them fresh with crunchy bread, straight from the oven. This dish is more than just a recipe for me; it’s a representation of love, laughter, and the joy of making food with family. Whenever I roast tomatoes, I feel that same warmth and happiness spill back into my kitchen, and I can’t wait for you to experience it too!
Ingredients
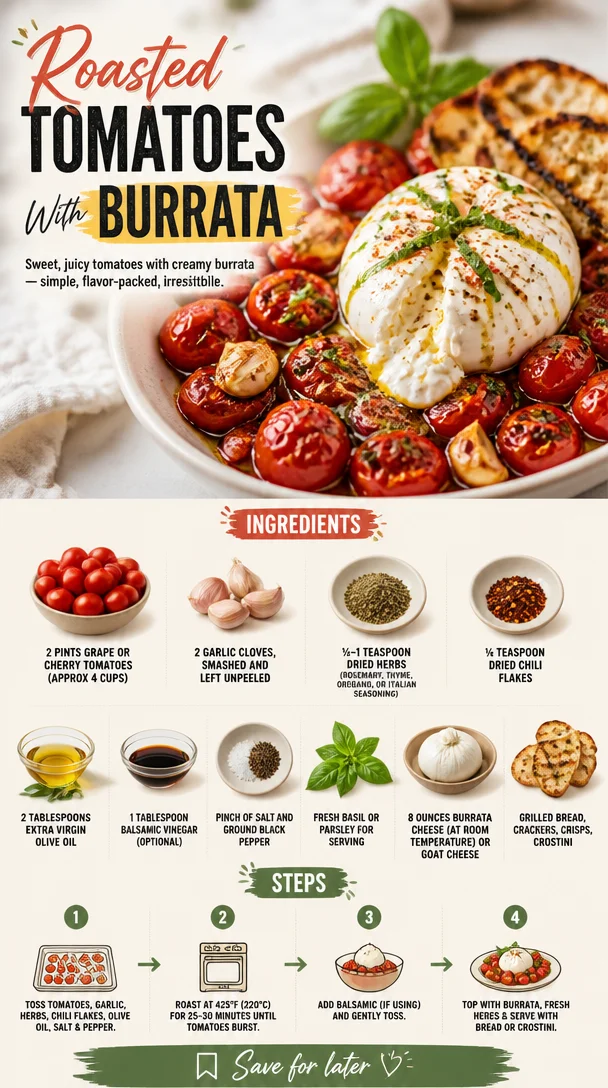
Here’s what you’ll need to create this delightful dish:
-
2 pints grape or cherry tomatoes (approx 4 cups)
These bite-sized beauties are sweet and juicy. Look for vibrant, plump ones for the best flavor! If you can’t find grape or cherry, any ripe medium-sized tomatoes will do in a pinch. -
2 garlic cloves, smashed and left unpeeled
Garlic adds a lovely depth of flavor. Leaving the skin on while roasting mellows its intensity. Feel free to swap with shallots for a sweeter taste. -
½-1 teaspoon dried herbs (rosemary, thyme, oregano, or Italian seasoning)
Herbs bring character! Choose your favorite or a mix. If you’re feeling adventurous, fresh herbs can add even more brightness. -
¼ teaspoon dried chili flakes
Just a pinch will do, but feel free to adjust based on your heat preference! Substitute with black pepper for a milder kick. -
2 tablespoons extra virgin olive oil
Quality olive oil enhances the dish immensely. Opt for cold-pressed varieties for more flavor, or use avocado oil for a different taste. -
1 tablespoon balsamic vinegar (optional)
Adds a lovely tang! If you’re looking for sweetness, try a drizzle of honey instead. -
Pinch of salt and ground black pepper
Essential for balancing flavors; don’t skip these! -
Fresh basil or parsley for serving
Adding freshness right before serving elevates the flavors. Use your favorite soft herb here! -
8 ounces burrata cheese (at room temperature) or goat cheese
Burrata provides a creamy, luxurious touch; goat cheese is a great tangy alternative! -
Grilled bread, crackers, crisps, or crostini
This is what you’ll use for scooping up all the deliciousness. Make sure it’s crispy enough to handle those juicy tomatoes!
Step-by-Step Instructions
Alright! Let’s get cooking! Follow these steps for perfectly roasted tomatoes with creamy burrata.
-
Preheat your oven to 400°F (200°C).
This is crucial! The right temperature will caramelize the sugars in those tomatoes, creating a flavor explosion. -
Prep your baking dish.
Take a large baking dish and line it with parchment paper for easy cleanup (and trust me, your future self will thank you!). -
Toss the tomatoes and garlic together.
In a large bowl, combine the grape or cherry tomatoes and garlic cloves. Drizzle with olive oil, and sprinkle in your herbs, chili flakes, salt, and pepper. Toss everything together until the tomatoes are well-coated. Chef’s Hack: Use your hands here; it’s messy but way more fun! -
Spread them out on the baking dish.
Pour the tomato mixture onto your prepared baking dish, ensuring they’re in a single layer for even roasting. We want all those tomatoes to get direct access to the heat! -
Roast those little gems!
Pop your baking dish in the oven and roast for about 25–30 minutes, or until the tomatoes are blistered and beginning to burst. Tip: Give the dish a gentle shake halfway through roasting to help everything cook evenly. -
Add balsamic vinegar (if using).
In the last 5 minutes of roasting, drizzle your balsamic vinegar over the tomatoes for an extra layer of flavor. This sweetness pairs beautifully with the savory notes! -
Plate it up!
Once roasted, remove the dish from the oven and let it cool slightly. Nestle the burrata in the center of the tomatoes and drizzle with a touch of olive oil. Finish with a sprinkle of fresh herbs for color. -
Serve it warm!
This dish is best enjoyed fresh from the oven. Serve it with your favorite crispy bread, allowing everyone to enjoy the creamy burrata and burst of flavors in every bite.
Serving Suggestions
Serve your roasted tomatoes with burrata warm, in the middle of a beautiful table spread. Arrange slices of grilled bread or crostini next to the dish, allowing everyone to dig in! You can also accompany this dish with a fresh green salad drizzled with lemon vinaigrette for a complete meal. The colorful contrast of the roasted tomatoes and creamy cheese paired with vibrant greens just makes for an irresistible presentation!
Recipe Variations
-
Herb-Infused Burrata: Marinate your burrata in olive oil with fresh herbs like basil and parsley before serving for extra flavor!
-
Spicy Kick: Mix in some chopped fresh chili or a dash of sriracha before roasting for a fiery version.
-
Mediterranean Flair: Add olives or artichokes to the mix to give your dish an exciting Mediterranean twist.
-
Cheesy Overload: Swap out burrata for a mixture of feta and ricotta to create a different creamy texture!
-
Vegan Delight: Use tofu feta or cashew cheese in place of burrata, and make it plant-based!
Chef’s Notes
It’s funny how a simple dish can evoke such fond memories. I’ve made this roasted tomatoes with burrata for everything from casual hangouts to festive gatherings, and the response is always the same: pure delight! Over the years, I’ve evolved this recipe, opting for whatever fresh herbs I can find or experimenting with different cheeses based on the season. This dish is a true reflection of kitchen creativity—feel free to mix and match ingredients to your heart’s content!
FAQs and Troubleshooting
1. What if my tomatoes are not sweet enough?
If your tomatoes lack sweetness, a sprinkle of sugar before roasting can help enhance their natural sugars.
2. Can I prepare the tomatoes ahead of time?
Certainly! You can roast the tomatoes earlier in the day and simply reheat before serving. Just be mindful that the cheese will need to be added fresh!
3. Why did my burrata melt instead of stay creamy?
This can happen if the burrata is too warm before serving. Make sure it’s at room temperature and not directly exposed to the oven’s heat!
4. Can I use different types of tomatoes?
Absolutely! Use whatever is fresh and looks good—heirloom tomatoes, even larger beefsteak varieties, are also delicious. Just adjust your roasting time accordingly.
Nutritional Info
While precise nutritional information can vary, this dish is a delightful source of vitamins A and C, fiber, and good fats, thanks to the olive oil and cheese. Pairing it with whole-grain bread can further enhance the nutrient profile!
So, there you have it! Your new favorite dish that combines nostalgia, flavor, and simplicity—Roasted Tomatoes with Burrata. I hope this recipe brings as much joy to your kitchen as it does to mine. Happy cooking, and let’s keep it fresh, simple, and oh-so-delicious!
PrintRoasted Tomatoes with Burrata

A vibrant dish featuring sweet roasted tomatoes and creamy burrata, perfect for any meal.
- Prep Time: 10 minutes
- Cook Time: 30 minutes
- Total Time: 40 minutes
- Yield: 4 servings 1x
- Category: Appetizer
- Method: Roasting
- Cuisine: Italian
- Diet: Vegetarian
Ingredients
- 2 pints grape or cherry tomatoes (approx 4 cups)
- 2 garlic cloves, smashed and left unpeeled
- ½–1 teaspoon dried herbs (rosemary, thyme, oregano, or Italian seasoning)
- ¼ teaspoon dried chili flakes
- 2 tablespoons extra virgin olive oil
- 1 tablespoon balsamic vinegar (optional)
- Pinch of salt and ground black pepper
- Fresh basil or parsley for serving
- 8 ounces burrata cheese (at room temperature) or goat cheese
- Grilled bread, crackers, crisps, or crostini
Instructions
- Preheat your oven to 400°F (200°C).
- Prep your baking dish by lining it with parchment paper.
- Toss the tomatoes and garlic together in a large bowl with olive oil, herbs, chili flakes, salt, and pepper.
- Spread them out on the prepared baking dish in a single layer.
- Roast for about 25–30 minutes, or until the tomatoes are blistered and bursting.
- Add balsamic vinegar in the last 5 minutes of roasting, if using.
- Plate it up by nesting burrata in the center and drizzling with olive oil.
- Serve it warm with crispy bread for scooping.
Notes
Feel free to mix and match herbs or cheeses based on your preference! The dish can be prepared in advance and reheated, but add cheese fresh for best results.
Nutrition
- Serving Size: 1 serving
- Calories: 320
- Sugar: 6g
- Sodium: 350mg
- Fat: 18g
- Saturated Fat: 10g
- Unsaturated Fat: 8g
- Trans Fat: 0g
- Carbohydrates: 30g
- Fiber: 3g
- Protein: 12g
- Cholesterol: 30mg
Keywords: roasted tomatoes, burrata, Italian appetizer, easy recipe, vegetarian dish
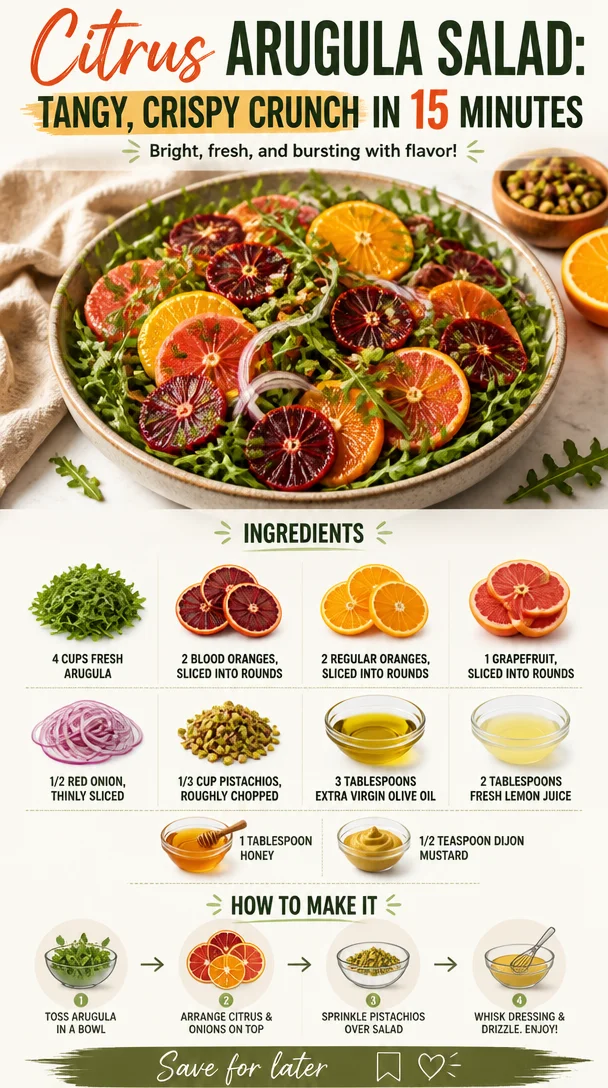
Citrus Arugula Salad: Tangy, Crispy Crunch in 15 Minutes
Citrus Arugula Salad: A Burst of Flavor in Every Bite
Welcome to Clean Plate Cravings! Today, we’re diving into a refreshing dish that is perfect for brightening up your meals: Citrus Arugula Salad. With vibrant colors, an uplifting flavor profile, and a medley of textures, this salad is everything you need to recharge your culinary spirit. Whether you’re hosting a special brunch, prepping for a family dinner, or just craving something zesty and light, this salad packs a punch!
Picture this: it’s a sunny afternoon, and I’m wandering through my local farmers’ market—my happy place. The air is filled with the sweet scent of fresh produce, and my eyes are drawn to the stalls overflowing with colorful citrus fruits. Oranges, grapefruits, and those striking blood oranges glisten like little gems. I can’t resist grabbing them. The idea of a luscious citrus salad forms in my mind, effortlessly combining tartness and sweetness that only citrus can deliver, paired with peppery arugula and a crunch from nuts. And just like that, Citrus Arugula Salad becomes my go-to for those sun-kissed afternoons and beyond!
Personal Story
Ah, one of my fondest food memories! This salad takes me back to a family gathering a few summers ago. We were all gathered in the backyard, laughter bouncing around as they flipped burgers and prepped sides. I decided to whip up my Citrus Arugula Salad, bringing together all the flavors I had fallen in love with at the market. As I layered the vibrant greens with slices of blood oranges and grapefruit, my family gathered around, curious about the colors and enticing aromas.
With every bite, I saw them light up with surprise and delight. The balance of flavors was just perfect—the peppery bite of arugula mingling beautifully with the sweet, tangy citrus, all enhanced by a splash of homemade dressing. It wasn’t just a salad; it was the laughter and conversations around the table that made the moment truly special. That day reinforced my love for this dish—food has an incredible way of bringing people together.
Ingredients
Here’s what you’ll need to create this delightful Citrus Arugula Salad:
-
4 cups fresh arugula
This peppery green is the star of our show, bringing that zing. If arugula isn’t available, feel free to swap it with baby spinach or mixed greens. -
2 blood oranges, peeled and sliced into rounds
These gorgeous oranges add not only a beautiful color but also a slight sweetness. If you can’t find blood oranges, navel oranges work perfectly too. -
2 regular oranges, peeled and sliced into rounds
Bright, juicy, and sweet! You can use any orange variety you love—Valencia and Cara Cara are excellent choices. -
1 grapefruit, peeled and sliced into rounds
The tartness of grapefruit perfectly balances the sweetness of the oranges. If you’re looking for something milder, pomelo is a great alternative. -
1/2 red onion, thinly sliced
The sharpness of red onion adds a lovely bite. If you want to tone down the flavor, soak the slices in water for 10 minutes before adding them to the salad. -
1/3 cup pistachios, roughly chopped
These beauties not only enhance the crunch but also add a nutty richness. Almonds or walnuts could also be a fantastic substitute. -
3 tablespoons extra virgin olive oil
A good quality oil brings a wonderful depth of flavor to your dressing. Avocado oil can serve as a good alternative if desired. -
2 tablespoons fresh lemon juice
The acidity from the lemon provides that bright pop of flavor! Lime juice can be swapped in for a different twist. -
1 tablespoon honey
This natural sweetener balances the tartness perfectly. For a vegan option, try maple syrup instead. -
1/2 teaspoon Dijon mustard
This adds a bit of zest to the dressing. If you’re not a fan of mustard, you can leave it out!
Step-by-Step Instructions
Now, let’s get down to the cooking part! Don’t worry; this is super simple and quite fun.
-
Prep Your Ingredients.
Start by washing your arugula under cold water and let it dry. You can use a salad spinner or lay it out on a clean kitchen towel. The crispier, the better! Next, peel and slice your blood oranges, regular oranges, and grapefruit. Aim for about ¼-inch thick rounds; they should make gorgeous layers in the salad. -
Slice the Red Onion.
Thinly slice the red onion. The goal is to have delicate ribbons that will blend beautifully with the rest of the salad without overpowering it. If raw onion is too strong for you, remember the soaking trick! -
Chop the Pistachios.
Roughly chop your pistachios. I love to keep them a bit chunky for that satisfying crunch! Just don’t forget to give them a little shake to release any dust—it’ll make them pop even more. -
Make the Dressing.
In a small bowl, whisk together the extra virgin olive oil, fresh lemon juice, honey, and Dijon mustard. This is where the magic happens! Taste it, and if you prefer it sweeter, add a touch more honey. If you want it tangier, a squeeze of more lemon juice works wonders. -
Assemble the Salad.
First, create a bed of arugula on a large serving platter. Layer the orange and grapefruit slices generously over the greens, fanning them out for visual appeal. Scatter the thin red onion slices on top, followed by the chopped pistachios. -
Dress the Salad.
Drizzle the dressing over the salad just before serving. I love to do this to keep the arugula fresh and vibrant! Toss gently with two forks to avoid bruising the fruits too much. -
Serve and Enjoy!
Serve immediately so all the flavors can shine at their best. If you happen to have leftovers, keep the dressing separate until serving to maintain freshness.
Serving Suggestions
Plate the salad on a large, shallow dish or in individual bowls, making each serving a feast for the eyes. A sprinkle of extra pistachios on top will make it all feel fancy without the fuss. You can also add a few fresh herbs like mint or basil for an aromatic finish. A side of crusty bread or a main protein like grilled chicken or shrimp can transform this salad into a complete meal!
Recipe Variations
Feeling adventurous? Here are a few creative twists to elevate your Citrus Arugula Salad:
-
Citrus Avocado Twist: Add sliced avocado for a creamy texture. The buttery richness pairs beautifully with the citrus.
-
Add Some Cheese: Consider crumbling some feta or goat cheese on top for a tangy complement to the salad.
-
Spiced Nuts: Use spiced almonds or walnuts instead of plain pistachios for an extra kick.
-
Add Grains: Toss in some cooked quinoa or farro for a more filling option that elevates the dish.
-
Herb Infusion: Experiment with fresh herbs like cilantro or parsley for an aromatic flair.
Chef’s Notes
Over the years, my Citrus Arugula Salad has evolved wonderfully. In the beginning, I used to add plain sliced almonds, but as I ventured into using more exotic nuts like pistachios, it took the flavor experience to a whole new level. One time, I added fresh mint to the dressing, and let me tell you, it’s a game-changer! That said, I believe this salad is a perfect canvas—add what you love, change it up, and make it your own!
FAQs and Troubleshooting
1. Can I make this salad ahead of time?
Absolutely! You can prep the individual ingredients a few hours in advance, just keep the dressing separate until you’re ready to serve to maintain the freshness of the arugula.
2. What if I can’t find blood oranges?
No worries! Regular oranges or even tangerines will work well. The key is maintaining that citrus zing.
3. How should I store leftovers?
If you have leftovers, store the salad in an airtight container in the fridge but keep the dressing on the side to prevent sogginess. Aim to consume within 24 hours for best freshness.
4. Can I use a different green?
Definitely! If arugula isn’t your thing, try mixing in some baby spinach or kale, or even create a blend for diverse flavors and textures.
Nutritional Info
The beauty of this Citrus Arugula Salad is not only in its taste but also in its nutritional benefits. Loaded with vitamins, healthy fats, and antioxidants, it’s a fantastic option for those aiming to eat cleaner. Keep an eye on portions of the honey and nuts if you’re watching sugar or calorie intake.
So there you have it! A delightful recipe that’s invigorating and oh-so-easy to whip up. Enjoy creating this Citrus Arugula Salad at home, and remember: cooking should be fun, flavorful, and inclusive of what you love. Happy cooking!
PrintCitrus Arugula Salad

A refreshing Citrus Arugula Salad featuring vibrant citrus fruits and peppery arugula, perfect for any gathering.
- Prep Time: 15 minutes
- Cook Time: 0 minutes
- Total Time: 15 minutes
- Yield: 4 servings 1x
- Category: Salad
- Method: No-Cook
- Cuisine: Mediterranean
- Diet: Vegetarian
Ingredients
- 4 cups fresh arugula
- 2 blood oranges, peeled and sliced into rounds
- 2 regular oranges, peeled and sliced into rounds
- 1 grapefruit, peeled and sliced into rounds
- 1/2 red onion, thinly sliced
- 1/3 cup pistachios, roughly chopped
- 3 tablespoons extra virgin olive oil
- 2 tablespoons fresh lemon juice
- 1 tablespoon honey
- 1/2 teaspoon Dijon mustard
Instructions
- Prep your ingredients by washing arugula and slicing the citrus fruits into rounds.
- Slice the red onion thinly to avoid overpowering flavors.
- Chop the pistachios for a crunchy texture.
- Make the dressing by whisking olive oil, lemon juice, honey, and Dijon mustard.
- Assemble the salad starting with a bed of arugula and layering the citrus and onions.
- Dress the salad with the dressing just before serving to keep it fresh.
- Serve immediately and enjoy!
Notes
Create a stunning presentation by plating the salad in a shallow dish and adding extra pistachios or fresh herbs.
Nutrition
- Serving Size: 1 serving
- Calories: 250
- Sugar: 10g
- Sodium: 100mg
- Fat: 18g
- Saturated Fat: 2g
- Unsaturated Fat: 16g
- Trans Fat: 0g
- Carbohydrates: 25g
- Fiber: 5g
- Protein: 6g
- Cholesterol: 0mg
Keywords: salad, citrus, arugula, healthy, vegetarian, summer recipe, fresh produce
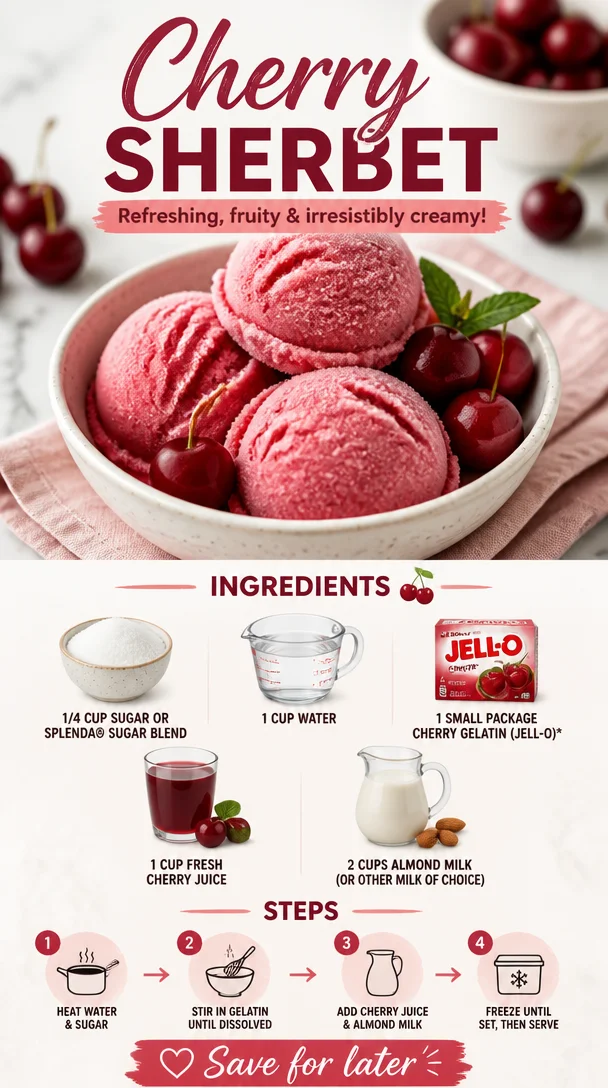
Cherry Sherbet
Cool Down with Homemade Cherry Sherbet
Welcome to another delightful adventure in the kitchen! Today, we’re diving into the refreshing world of cherry sherbet, a treat that will whisk you back to childhood memories and outdoor summer fun. There’s something oh-so-special about enjoying a bowl of homemade sherbet on a hot day, isn’t there? The creamy texture, the vibrant color, and the sweet-tart flavor all come together to create a delicious experience that makes your taste buds dance.
Growing up, my summers were filled with trips to the local ice cream shop with my family, where I would always opt for a scoop (or two) of cherry sherbet. I loved the way the cool, sweet flavor hit my tongue, a burst of cherries combined with that lovely creaminess. It was a simple pleasure in a world that often felt chaotic. As I got older, I realized I could recreate that joy in my own kitchen, and guess what? It’s easier than you might think!
Whether you’re making this to cool off after a long day or to impress your friends at a summer gathering, cherry sherbet is sure to bring smiles all around. So grab your apron, and let’s get started on this delicious journey!
A Cherry Memory
One of my fondest memories tied to cherry sherbet takes me back to summer barbecues at my grandparents’ house. The sun would be shining, the grill sizzling, and the aroma of burgers wafting through the air. After the main course, my grandma would always bring out her homemade cherry sherbet, which she’d churn in her old-fashioned ice cream maker. It was this beautiful pink color that made everyone’s hearts sing.
I can still hear the laughter of my cousins as we raced to the porch, bowls in hand, eager to dig in. My grandma would always say, “It’s made with love and the freshest cherries!” Those words stuck with me, and they inspire the way I create recipes today. That joy, that connection with family, and the simplicity of enjoying good food are what we’re all about here.
Ingredients
Gather up these simple ingredients to create your very own cherry sherbet:
-
1/4 cup sugar or SPLENDA® Sugar Blend
This sweetener helps balance the tartness of the cherries. If you’re looking to cut calories, SPLENDA is a great low-calorie option. Feel free to adjust the sweetness according to your taste! -
1 cup water
Water is the base for your syrup, helping dissolve the sugar and infuse flavor into the cherries. You can use sparkling water for an extra fizzy version—fun for gatherings! -
1 small package cherry gelatin (Jell-O)
This adds sweetness and helps create that wonderful sherbet texture. If you can’t find cherry, raspberry gelatin works beautifully as a substitute. -
1 cup fresh cherry juice
Fresh cherry juice packs a powerful punch of flavor! If cherry season isn’t in full swing, you can opt for bottled juice, but make sure it’s 100% juice with no added sugars. -
2 cups almond milk (or other milk of choice)
Almond milk adds creaminess while keeping it light. If you’re a fan of dairy, whole milk or half-and-half will work for a richer sherbet experience.
Step-by-Step Instructions
Ready to whip up this sweet treat? Let’s dive into the cooking steps, where I’ll sprinkle in some tips and tricks along the way!
-
Prepare the Cherry Syrup:
In a saucepan, combine the sugar and water over medium heat. Stir until the sugar is fully dissolved. Bring it to a gentle simmer, letting it bubble away for about 5 minutes. Chef’s Tip: Keeping your syrup warm will help the cherry gelatin dissolve more easily later on. -
Add the Jell-O:
Remove the saucepan from heat, and stir in the cherry gelatin. Keep stirring until it’s completely dissolved. This is the moment where that rich cherry aroma will fill your kitchen—you’ll be tempted to taste! -
Stir in Cherry Juice:
Once the gelatin is dissolved, add the fresh cherry juice. Give it a good stir to combine everything. The color should start turning a beautiful shade of pink, reminiscent of summer sunsets! Pro Tip: If you’re unsure about the cherry juice flavor, taste it and adjust the sweetness by adding more sugar if needed. -
Mix in the Almond Milk:
Now, let your mixture cool to room temperature. Once cooled, stir in the almond milk (or your milk of choice). This will give the sherbet its creamy, dreamy texture. Chef Hack: If you’re in a hurry, you can chill your syrup in the fridge for quicker cooling! -
Ice Cream Maker Time:
Pour the mixture into your ice cream maker and churn according to the manufacturer’s instructions. Typically, this should take around 20-30 minutes. If you don’t have an ice cream maker, don’t fret! Pour it into a shallow dish and freeze, stirring every 30 minutes until it reaches your desired consistency. -
Final Freeze:
Once it’s churned to a soft-serve consistency, transfer your cherry sherbet to a lidded container. Freeze for an additional 2-4 hours to firm it up. Side Note: If it’s too hard to scoop after freezing, let it sit at room temperature for a few minutes before serving. -
Serve and Enjoy:
Scoop your homemade cherry sherbet into bowls or cones and enjoy! Consider topping it off with fresh cherries, a sprinkle of coconut flakes, or a drizzle of chocolate sauce. You’ve earned it!
Serving Suggestions
When it comes to serving your cherry sherbet, presentation is key! Serve it in beautiful sundae glasses or waffle cones for that nostalgic ice cream shop feel. Don’t forget to add a few fresh cherries or a sprig of mint for a pop of color! If you’re feeling adventurous, layer it in a glass with some chocolate or vanilla ice cream for a marbled effect—sometimes the best recipes bring a little pizzazz!
Recipe Variations
Here are some fun alternatives to mix things up:
-
Berry Blast: Add a cup of other mixed berry juices (like blueberry or raspberry) for a sherbet mix that’s bursting with flavor.
-
Coconut Cherry: Substitute almond milk with coconut milk for a tropical flair.
-
Cherry Limeade: Mix in some fresh lime juice to brighten up the flavor and give it a zesty kick.
-
Frozen Yogurt Twist: Use yogurt instead of milk for a healthier, tangy version!
-
Alcohol-Infused: For an adult twist, blend in a splash of vodka or rum (just a touch!) when mixing the milk for a refreshing summertime cocktail.
Chef’s Notes
This cherry sherbet recipe has been a beloved staple in my family for years, evolving with each season. I often look back at my grandma’s old ice cream maker sitting in the corner of the kitchen, a beautiful reminder of simpler times. Sometimes, I add a dash of almond extract or vanilla for a more complex flavor profile. The best part? You can customize this recipe endlessly! Whether it’s a summer day with friends or a cozy winter evening, you can always find a reason to whip up a batch of this creamy goodness.
FAQs and Troubleshooting
1. Can I use frozen cherries instead of fresh ones?
Absolutely! Just thaw and juice them before using. You may need to adjust the sugar based on how sweet the cherries are.
2. What if my sherbet is too hard to scoop?
Let it sit out for 5-10 minutes before scooping. You can also blend it with a little milk for a softer texture.
3. How long will the sherbet last in the freezer?
It will keep for about 2-3 weeks in an airtight container, although it’s hard to resist for that long!
4. Is it necessary to use gelatin?
While gelatin helps achieve that scoopable texture, you can omit it if you prefer, though the texture may be a bit icier.
Enjoy this homemade cherry sherbet, and remember that cooking is all about joy, experimentation, and sharing this delicious journey with others. Life is too short not to indulge in vibrant, flavorful food—so let’s keep things fresh, simple, and above all, delicious!
PrintHomemade Cherry Sherbet

A refreshing cherry sherbet that combines sweet-tart cherries with a creamy texture, perfect for hot summer days.
- Prep Time: 15 minutes
- Cook Time: 35 minutes
- Total Time: 50 minutes
- Yield: 4 servings 1x
- Category: Dessert
- Method: Churning
- Cuisine: American
- Diet: Vegetarian
Ingredients
- 1/4 cup sugar or SPLENDA® Sugar Blend
- 1 cup water
- 1 small package cherry gelatin (Jell-O)
- 1 cup fresh cherry juice
- 2 cups almond milk (or other milk of choice)
Instructions
- Prepare the Cherry Syrup: In a saucepan, combine the sugar and water over medium heat. Stir until the sugar is fully dissolved. Bring to a gentle simmer for about 5 minutes.
- Add the Jell-O: Remove the saucepan from heat, and stir in the cherry gelatin until completely dissolved.
- Stir in Cherry Juice: Once the gelatin is dissolved, add the fresh cherry juice and stir to combine.
- Mix in the Almond Milk: Let the mixture cool to room temperature, then stir in the almond milk.
- Pour the mixture into your ice cream maker and churn according to the manufacturer’s instructions, typically around 20-30 minutes.
- Transfer the cherry sherbet to a lidded container and freeze for an additional 2-4 hours to firm it up.
- Serve and Enjoy: Scoop the homemade cherry sherbet into bowls or cones and enjoy!
Notes
Serve in sundae glasses or waffle cones. Consider topping with fresh cherries or a drizzle of chocolate sauce.
Nutrition
- Serving Size: 1 serving
- Calories: 220
- Sugar: 28g
- Sodium: 80mg
- Fat: 4g
- Saturated Fat: 0g
- Unsaturated Fat: 4g
- Trans Fat: 0g
- Carbohydrates: 42g
- Fiber: 1g
- Protein: 3g
- Cholesterol: 0mg
Keywords: cherry sherbet, homemade dessert, summer treat
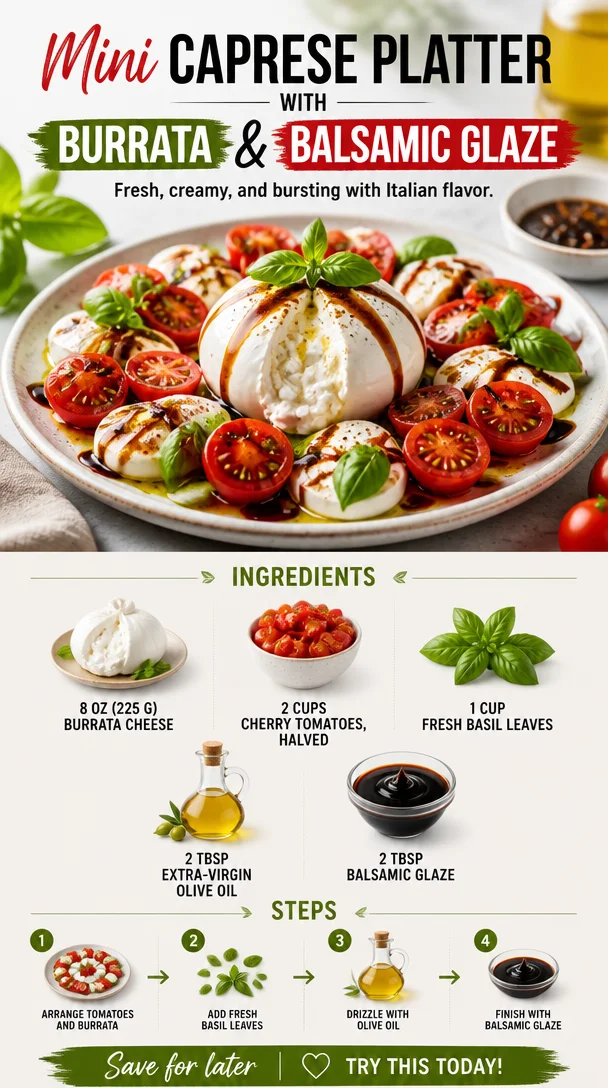
Min Caprese Platter with Burrata & Balsamic Glaze
Caprese Platter with Burrata & Balsamic Glaze
Welcome to Clean Plate Cravings! Today, we’re diving into a dish that truly expresses the beauty of fresh ingredients and simplicity— the fabulous Caprese Platter with Burrata & Balsamic Glaze. If you’ve never tried burrata, let me tell you, it’s like a creamy hug for your taste buds. Popping these vibrant flavors into your mouth is nothing less than pure joy.
Whether you’re entertaining guests or treating yourself to a refreshing bite, this platter is a show-stopper that takes no time to prepare. With warm days rolling in, it’s the perfect dish to serve at picnics or backyard barbecues. Picture this: a colorful spread featuring succulent cherry tomatoes, rich burrata cheese, and fragrant basil, all drizzled with a luscious balsamic glaze. If that doesn’t get you excited about summer cooking, I don’t know what will!
Personal Story
I remember the first time I had burrata cheese. It was during a trip to a little Italian restaurant tucked away in an alley in Florence. The waiter brought out a simple salad, but oh, what a salad it was! The centerpiece was a big, glistening ball of burrata, surrounded by the ripest tomatoes they could find, fresh basil picked that very morning, and a drizzle of the most incredible balsamic reduction I had ever tasted. The pairing was magical, and with each bite, I felt transported to a place where everything is beautiful and fresh.
This dish has become a staple in my kitchen since that Italian adventure. It brings back such joyous memories every time I prepare it. Plus, it’s incredibly versatile! You can enjoy it as a light meal, an impressive appetizer, or a vibrant snack. Whenever I need to whip up something quick but still want to wow my guests, this is my go-to.
Ingredients
Here’s what you’ll need to create this vibrant Caprese Platter:
-
8 oz (225 g) burrata cheese
Creamy, indulgent, and a delightful center when sliced open. If you can’t find burrata, fresh mozzarella can be a good substitute, though it won’t have the same luxurious creaminess. -
2 cups cherry tomatoes, halved
Bursting with flavor, cherry tomatoes add natural sweetness. Use whatever color you can find—red, yellow, or even heirloom cherry tomatoes for a beautiful palette. -
1 cup fresh basil leaves
Basil is the aromatic partner in this dish. Feel free to swap in other fresh herbs like mint or arugula for a unique twist. -
2 tbsp extra-virgin olive oil
A high-quality olive oil elevates any dish. Look for one labeled "first cold press" for the best taste. If you’re in the mood for something different, try a flavored oil, like garlic or lemon. -
2 tbsp balsamic glaze
Sweet and tangy, balsamic glaze is the finishing touch that brings everything together. You can make your own by reducing balsamic vinegar on the stove, or you can purchase a bottle for convenience.
Step-by-Step Instructions
Alright, let’s get into the nitty-gritty! Here’s how you can put this beautiful platter together.
-
Prep your ingredients
Start by gathering all your ingredients. Make sure your burrata is at room temperature; it’s creamier and softer this way. Rinse your cherry tomatoes under cool, running water. Gently pat them dry—you want to keep them fresh and ready to shine! -
Halve the cherry tomatoes
Slice each cherry tomato in half. This not only makes them easier to eat but also allows for more surface area to soak in the flavors of the olive oil and balsamic glaze. Plus, look at those vibrant colors! -
Prepare the basil leaves
Take your fresh basil leaves and give them a gentle rinse as well. Pat them dry and then tear larger leaves into smaller pieces. This releases the oils and enhances their aromatic qualities. You can leave smaller leaves whole for added visual appeal! -
Arrange the tomatoes
Grab your serving platter—this is all about presentation! Lay the halved cherry tomatoes on the platter, cut side facing up. Not only is that visually appealing, but it makes adding the burrata easier too! -
Add the burrata
Gently place the burrata in the center of the cherry tomatoes. When you cut into it, that luscious, creamy interior will spill out like a beautiful treasure, inviting everyone to dig in! -
Drizzle with olive oil
Use a spoon (or a drizzle bottle if you’re feeling fancy) to drizzle extra-virgin olive oil over the tomatoes, burrata, and basil. Elevate the flavor and keep things nice and flavorful! -
Finish with balsamic glaze
Finally, don’t skimp on the balsamic glaze! Drizzle it artfully across the whole platter. This transforms the dish into a visual masterpiece and adds that signature sweet-tangy flavor. -
Serve immediately!
Bring your platter to the table as soon as it’s ready; fresh is key here! Encourage everyone to dig in. The combination keeps getting better with every bite.
Serving Suggestions
For serving, you can keep it simple by bringing the platter to the table as-is, allowing guests to help themselves. Pair it with some crusty bread or toasted crostini for a wonderful bite. If you want to turn it into a full meal, serve with grilled chicken or a light pasta on the side. And don’t forget—a chilled glass of white wine pairs beautifully with this dish!
Recipe Variations
Feeling a little adventurous? Here are some fun twists on the classic Caprese Platter:
- Mediterranean Mix: Add olives and roasted red peppers for a delightful Mediterranean vibe.
- Grilled Addition: Grill the cherry tomatoes for a smoky flavor boost—yum!
- Pesto Upgrade: Swap out fresh basil for a dollop of pesto and then drizzle balsamic glaze for a flavor explosion.
- Fruit Fusion: Incorporate fresh peaches or strawberries for a refreshing and sweet touch.
- Spicy Kick: Sprinkle some crushed red pepper flakes on top for a little heat!
Chef’s Notes
This recipe has been a staple in my kitchen and has evolved over time. I used to make it exactly as outlined, but I’ve found that getting a little creative can keep things exciting! Sometimes, I add a sprinkle of sea salt or even layer in some arugula for an extra peppery bite. One time, I tried incorporating mango slices on a whim, and it turned out to be a delightful surprise!
Remember, cooking is about having fun and experimenting. Don’t be afraid to make this dish truly yours!
FAQs and Troubleshooting
Q: Can I make this Caprese Platter ahead of time?
A: While it’s best enjoyed fresh, you can prep the ingredients a few hours ahead. Just keep everything in separate containers in the fridge, and assemble right before serving.
Q: What if I can’t find burrata?
A: If burrata is unavailable, fresh mozzarella is a suitable substitute. Just make sure it’s high quality; the flavor is key here!
Q: How should I store leftovers?
A: Store any leftovers in an airtight container in the fridge. However, tomatoes can become soggy over time, so enjoy this fresh within a day.
Q: Can I use dried herbs instead of fresh?
A: Fresh herbs are truly the star here, but if you must use dried, remember that dried herbs are more concentrated, so use about one-third of the amount.
Nutritional Info
While nutritional info can vary based on portions and specific ingredients, this dish is generally low in calories but high in flavor and nutrients! The fresh veggies provide vitamins, while burrata adds a cozy dose of protein and healthy fats. Pair this dish with your favorite bread or protein for a balanced meal!
The Caprese Platter with Burrata & Balsamic Glaze is more than a dish; it’s an experience that captures the essence of fresh and approachable cooking. So grab your ingredients, and let’s celebrate the pure joy of food together!
PrintCaprese Platter with Burrata & Balsamic Glaze

A vibrant and fresh Caprese platter featuring creamy burrata, succulent cherry tomatoes, and aromatic basil, all drizzled with balsamic glaze.
- Prep Time: 15 minutes
- Cook Time: 0 minutes
- Total Time: 15 minutes
- Yield: 4 servings 1x
- Category: Appetizer
- Method: No Cooking
- Cuisine: Italian
- Diet: Vegetarian
Ingredients
- 8 oz (225 g) burrata cheese
- 2 cups cherry tomatoes, halved
- 1 cup fresh basil leaves
- 2 tbsp extra-virgin olive oil
- 2 tbsp balsamic glaze
Instructions
- Prep your ingredients by gathering them and ensuring the burrata is at room temperature.
- Halve the cherry tomatoes for easier eating and better flavor absorption.
- Prepare the basil leaves by rinsing and tearing them into smaller pieces.
- Arrange the halved cherry tomatoes on a serving platter, cut side facing up.
- Add the burrata in the center of the tomatoes.
- Drizzle extra-virgin olive oil over the fresh ingredients.
- Finish with a balsamic glaze drizzle for a sweet-tangy touch.
- Serve immediately to enjoy the freshness.
Notes
Serve with crusty bread or grilled chicken for a full meal, and pair with a chilled white wine.
Nutrition
- Serving Size: 1 serving
- Calories: 250
- Sugar: 5g
- Sodium: 300mg
- Fat: 18g
- Saturated Fat: 6g
- Unsaturated Fat: 10g
- Trans Fat: 0g
- Carbohydrates: 10g
- Fiber: 2g
- Protein: 12g
- Cholesterol: 30mg
Keywords: Caprese, Burrata, Summer Salad, Appetizer, Italian
Minute Creamy Strawberry Shortcake Fluff Salad Recipe
Strawberry Shortcake Fluff Salad: A Sweet Symphony of Flavor
Welcome, friends, to a delightful culinary journey where fun flavors and wholesome ingredients come together in perfect harmony! Today, I’m excited to share a recipe that embodies everything I believe about cooking and eating—it’s simple, absolutely delicious, and brings a smile to your face. Say hello to my Strawberry Shortcake Fluff Salad! Perfect for summer gatherings, cozy family dinners, or even a treat for yourself, this dish is all about celebrating fresh, feel-good food.
Picture this: it’s a sun-kissed afternoon, and the tantalizing smell of strawberries wafts through the air. Family and friends are gathered, laughter lingers, and the table is bursting with colors and joyful energy. That’s the essence of summer, isn’t it? When I think back to my childhood summers, one of my fondest memories is the big family picnics in my grandparents’ backyard. My grandmother, a culinary wizard in her own right, would whip up this fluffy, sweet Strawberry Shortcake Fluff Salad that had us all clamoring for seconds. It was a refreshing treat on hot days—a glorious blend of flavors that paired beautifully with sunshine and smiles.
You’ll find this dish captures that nostalgia while adding a modern twist. The sweetness of ripe strawberries, combined with fluffy whipped cream, luscious vanilla pudding, soft mini marshmallows, and buttery shortcake crumbles, creates a delightful dessert that’s not just a feast for the palate but also a visual delight. Trust me, this Strawberry Shortcake Fluff Salad will become a staple in your home, bringing joy and vibrant flavors to your table. Let’s dive into the kitchen and create this masterpiece!
A Sweet Memory to Savor
As I reminisce about those cherished summer picnics, I can almost hear the laughter and see the smiles of my loved ones as they dug into my grandma’s creation. It wasn’t just food; it was a moment—a celebration of unity, love, and summer. She always had a knack for making the simplest ingredients shine. I still remember her saying, “A good dish is all about love and good quality ingredients.” This philosophy inspired me to keep my recipes approachable but flavorful.
One summer, I decided to help her in the kitchen while she prepared the salad. I was responsible for slicing strawberries and sneaking a few into my mouth when I thought she wasn’t looking! The vibrant red of the berries, the fluffy clouds of cream, and the golden shortcake crumbles stuck with me. Every spoonful was a harmony of textures, flavors, and memories, and we both knew that sharing food makes every experience richer and more meaningful. Today, I cherish those moments and hope to pass on that joy and love through my cooking.
Let’s bring a bit of that nostalgia into your home with my rendition of this delightful Strawberry Shortcake Fluff Salad!
Ingredients
Before we roll up our sleeves and get cooking, let’s gather our ingredients. This recipe is as simple as it is delicious. Here’s what you’ll need:
-
2 cups fresh strawberries, sliced
- Fresh strawberries are the star of this dish! When choosing berries, look for vibrant, plump ones without any bruises. If you can’t find fresh strawberries, feel free to use frozen strawberries. Just thaw them first and drain excess moisture to avoid a soggy fluff.
-
1 cup whipped cream or Cool Whip
- Whipped cream adds a light and airy texture. You can use store-bought Cool Whip for convenience, or make your own by whipping heavy cream until it forms soft peaks. The home-made version will taste fresher!
-
1 cup vanilla pudding, prepared
- This ingredient brings creaminess and sweetness. You can use instant pudding, but for a richer flavor, consider preparing it from scratch with milk, sugar, and vanilla.
-
1 cup mini marshmallows
- Mini marshmallows add a fun, chewy texture to the fluff salad. If you’re feeling adventurous, swap these out for flavored marshmallows, like strawberry or coconut, for a unique twist.
-
1 cup crumbled shortcake or pound cake
- Shortcake or pound cake provides a comforting, buttery base. If you’re looking for a gluten-free version, there are plenty of gluten-free cakes available that will work beautifully!
These ingredients come together to create a dish that not only tastes incredible but also brings back joyful memories of family gatherings and sunny days.
Step-by-Step Instructions
Now that we have our lovely ingredients lined up, let’s get into the fun part—creating our Strawberry Shortcake Fluff Salad! Here’s a step-by-step guide:
-
Prep the Strawberries:
- Take your fresh strawberries, remove the green tops, and slice them into thin pieces. Don’t be shy about tasting a few as you go—quality control is a must! Set them aside in a bowl.
- Tip: For added flavor, sprinkle the sliced strawberries with a little sugar and let them sit for about 15 minutes. This will create a syrupy sweetness that enhances the overall flavor!
-
Whip the Cream:
- If you’re making your own whipped cream, use a mixing bowl and an electric mixer to whip the heavy cream until it forms soft peaks. Add a tablespoon of powdered sugar for sweetness and a splash of vanilla extract for flavor.
- Chef Hack: Make sure your mixing bowl and beaters are cold to ensure the cream whips up perfectly!
-
Prepare the Pudding:
- If using instant pudding, follow the package instructions by mixing it with milk. If you’re making your own, combine milk, sugar, and a touch of vanilla in a saucepan, heat until warm, then stir in your cornstarch until thickened.
- Let the pudding cool slightly before folding it into the whipped cream.
-
Combine Whipped Cream and Pudding:
- In a large mixing bowl, gently fold the prepared whipped cream into the vanilla pudding using a spatula. Be gentle; we want to keep that lovely light texture!
- Pro Tip: Folding involves gently mixing without deflating the whipped cream, rotating the bowl while you scrape along the sides and bottom with the spatula.
-
Mix in the Marshmallows:
- Add the mini marshmallows to the cream and pudding mixture, incorporating them subtly. These will be little delightful bites in your salad!
-
Assemble the Fluff Salad:
- In a large serving bowl, layer the prepared strawberry slices, followed by a generous layer of the whipped cream and pudding mixture. Then add a layer of crumbled shortcake or pound cake. Repeat until you’ve used all ingredients, finishing with a layer of the whipped cream mixture on top.
- Presentation Tip: You can also serve this is individual cups for a beautiful display—perfect for parties!
-
Chill and Serve:
- Cover the bowl with plastic wrap and let it chill in the refrigerator for at least 1 hour. This step is crucial! Chilling allows the flavors to meld and gives the marshmallows time to soften for that perfect fluffiness.
- When you’re ready to serve, give it a gentle stir, and enjoy the beautiful blend of flavors and textures!
Serving Suggestions
When it comes to serving Strawberry Shortcake Fluff Salad, the sky’s the limit! The vibrant colors make for a stunning presentation. You can serve it right from the bowl or in individual dessert cups layered elegantly—what a treat!
Consider garnishing each serving with additional sliced strawberries or a sprinkle of crushed shortcake crumbs on top for that extra touch. If you’re feeling a bit indulgent, a drizzle of chocolate or caramel sauce wouldn’t hurt either!
Recipe Variations
Now, if you’re feeling adventurous and want to tweak this recipe, I’ve got some fun suggestions for you:
-
Berry Medley: Swap out the strawberries for a mix of your favorite berries—blueberries, raspberries, or blackberries can add an exciting twist to the flavor profile.
-
Chocolate Lovers: Add some mini chocolate chips or a drizzle of chocolate syrup when layering for a rich chocolate-strawberry flavor explosion!
-
Nutty Delight: Sprinkle a handful of chopped nuts (like pecans or almonds) between the layers for added crunch and flavor.
-
Cream Cheese Variation: For a richer texture, consider folding in a bit of softened cream cheese into the whipped cream and pudding mixture. It adds a delicious creaminess to the fluff!
-
Dairy-Free Version: Use coconut cream in place of whipped cream, cashew milk pudding, and gluten-free cake to convert this into a delightful dairy-free treat!
Chef’s Notes
As I reflect on this recipe, I can’t help but think about how it has evolved over time. My grandmother had a knack for making seasonal fruits shine in her desserts, and she effortlessly balanced richness with lightness. I’ve kept her spirit alive by ensuring my recipe is just as simple, yet bursting with flavor.
Funny story: One year, I decided to throw a summer BBQ and whipped this salad up as an impromptu dessert, only to find out that I was also serving it as an appetizer while everyone mingled! Who could resist such a delicious, fluffy treat right from the start?
I love seeing how different families interpret this recipe—each version reflecting personal tastes and memories. It’s what makes cooking so special.
FAQs and Troubleshooting
1. Can I make this salad ahead of time?
Absolutely! This salad actually tastes better after sitting in the fridge for a few hours as the flavors meld. Just be sure to cover it well to keep it fresh.
2. How do I prevent the strawberries from getting mushy?
As mentioned earlier, tossing the sliced strawberries with a little sugar helps them maintain their structure before adding them to the fluff. Also, avoid mixing them in too early.
3. Can I use a different type of cake?
Definitely! Any soft cake will work. Angel food cake is an excellent alternative if you want something lighter, or even a sponge cake!
4. The marshmallows are sticking together; what can I do?
If the mini marshmallows tend to clump up, toss them lightly in a bit of cornstarch before adding them to the mix. This will help keep them fluffy!
Nutritional Info
While this dish falls squarely in the dessert category, it brings with it a medley of fresh fruit. Generally, a serving can provide:
- Calories: Approximately 250
- Protein: 2g
- Fat: 10g
- Carbohydrates: 36g
- Dietary Fiber: 1g
Of course, nutritional values will vary based on ingredients and portions, but who’s counting when you’re having this much fun?
And there you have it! The Strawberry Shortcake Fluff Salad, a beautiful dish that brings joy, laughter, and a bit of nostalgia to your table. Whether you serve it at a celebration, family picnic, or simply enjoy it at home, it’s a dessert that’s sure to please everyone. Remember, food is about creating memories—so gather your loved ones and let the magic happen! Enjoy, friends!
PrintStrawberry Shortcake Fluff Salad

A delightful and fluffy dessert that brings together fresh strawberries, whipped cream, vanilla pudding, mini marshmallows, and shortcake crumbles for a refreshing treat perfect for summer.
- Prep Time: 15 minutes
- Cook Time: 0 minutes
- Total Time: 75 minutes
- Yield: 4 servings 1x
- Category: Dessert
- Method: No Cooking
- Cuisine: American
- Diet: Vegetarian
Ingredients
- 2 cups fresh strawberries, sliced
- 1 cup whipped cream or Cool Whip
- 1 cup vanilla pudding, prepared
- 1 cup mini marshmallows
- 1 cup crumbled shortcake or pound cake
Instructions
- Prep the strawberries: Remove the green tops and slice them thinly. Set aside.
- Whip the cream: Whip the heavy cream until soft peaks form, adding powdered sugar and vanilla to taste.
- Prepare the pudding: Mix instant pudding with milk or prepare it from scratch and let it cool.
- Combine the whipped cream and pudding gently to maintain the texture.
- Mix in the mini marshmallows to the cream mixture.
- Assemble the salad by layering strawberries, whipped cream mixture, and shortcake in a serving bowl.
- Chill in the refrigerator for at least 1 hour before serving.
Notes
Can be made ahead of time and tastes better after chilling. Serve in bowls or individual cups for a beautiful presentation.
Nutrition
- Serving Size: 1 serving
- Calories: 250
- Sugar: 20g
- Sodium: 200mg
- Fat: 10g
- Saturated Fat: 6g
- Unsaturated Fat: 4g
- Trans Fat: 0g
- Carbohydrates: 36g
- Fiber: 1g
- Protein: 2g
- Cholesterol: 30mg
Keywords: dessert, strawberry salad, fluff salad, summer dessert
Minute Stone Fruit Salad for Fresh Summer Flavor
Elegant Stone Fruit Salad: A Burst of Summer on Your Plate
Welcome, fellow food lovers! Today, I’m excited to share with you a vibrant and refreshing dish that captures the essence of summer—an Elegant Stone Fruit Salad. Perfect for picnics, barbecues, or even a quiet dinner at home, this salad celebrates the bold, juicy flavors of seasonal stone fruits. Think peaches, plums, cherries, and apricots artfully tossed together with mixed greens, crumbled feta, and toasted walnuts—all brought together with a drizzle of olive oil and balsamic vinegar. Let’s get this delicious journey started!
Imagine walking through a sunlit orchard, warm breezes rustling the leaves overhead, and the sweet scent of ripe stone fruits filling the air. That’s exactly how I feel every time I make this salad. It brings back memories of long summer afternoons spent at my grandparents’ farmhouse, where we would pluck sun-warmed fruit straight from the tree and enjoy it at the picnic table under a sprawling oak. Each bite of this salad evokes that nostalgic bliss, making me feel a bit like a kid again.
Stone fruits, like peaches and plums, are not only delightful to eat but also full of nutrients. Each season, I can’t resist the vibrant colors and shapes they bring to my plate. This salad is a celebration—of flavor, of memories, and of fresh, wholesome food that doesn’t take itself too seriously. Because life is too short for boring meals, right? Let’s dive into this delightful dish and see how it all comes together!
Personal Story
Ah, stone fruits! The very name conjures up memories of sweet summer days. I remember visiting my grandparents during the harvest season, when the air was thick with sunshine and the promise of juicy bites. I’d trudge out to the orchard, eager to fill my basket with the best peaches and plums my small hands could grab. My grandfather would teach me the art of picking—how to choose the ripest ones without damaging the rest. After our harvest, we’d gather to prepare a feast that always included a stone fruit salad. It was a time for laughter, storytelling, and tons of taste-testing.
To this day, I carry those traditions into my kitchen. This Elegant Stone Fruit Salad is more than just a dish—it’s a way to connect with the past and celebrate the present. Every time I make it, I can hear my grandfather’s voice offering cooking tips, and that brings a big smile to my face. So, let’s honor those memories and make something that will create new ones, shall we?
Ingredients
Here’s what you’ll need to whip up this gorgeous salad:
- Peaches: Sweet and juicy, peaches are the stars of this salad. Choose firm but ripe to give your salad the right texture.
- Plums: A delightful complement to peaches, they add tartness and brilliant color. Any variety will work, so feel free to experiment!
- Cherries: Fresh, juicy cherries with a pop of sweetness! Look for bright red, plump ones—these will take your salad to the next level.
- Apricots: These little gems bring a unique sweetness and a lovely orange hue to the mix—plus, they’re rich in vitamins A and C.
- Mixed Greens: Any combination of greens works here—arugula, spinach, or even baby kale. The greens provide a refreshing base and balance out the sweetness of the fruits.
- Feta Cheese: Creamy, tangy, and briny, feta adds an incredible depth of flavor that brightens up the salad.
- Walnuts: Crunchy, toasty walnuts bring texture and healthy fats. You can roast them lightly for added flavor.
- Olive Oil: A good quality extra virgin olive oil will elevate your dish, adding richness without overwhelming the fresh flavors.
- Balsamic Vinegar: This adds a sweet-tart kick. Look for a high-quality balsamic for the best flavor.
- Salt & Pepper: Simple seasoning helps bring out the natural sweetness of the fruits.
Chef Insight
Keep in mind that fresh ingredients are key to making this salad pop! Always choose ripe, in-season fruits for the best flavor. If a certain stone fruit isn’t available, don’t hesitate to swap it out for whatever juicy fruits you can find.
Step-by-Step Instructions
Let’s bring this beautiful salad to life together! Here’s how to do it:
-
Gather Your Ingredients: First things first, make sure you have everything ready. This is important, especially with a salad, where you want to maintain the freshness of each component.
-
Prep the Fruits: Start by washing all your fruits under cool water. Pat them dry before slicing. Next, slice the peaches, plums, and apricots into thin wedges—about 1/4-inch thick—so they can mingle nicely with your greens. Prune cherries can be halved or left whole depending on your preference.
-
Chop the Greens: Toss the mixed greens into a large salad bowl. Feel free to tear them by hand; it makes for a lovely, rustic look.
-
Add the Fruits: Gently add the sliced fruits to the bowl. Aim for a visually pleasing arrangement! The more colorful the salad, the more inviting it will be.
-
Feta & Walnuts Time: Crumble the feta cheese over the top, creating little pockets of creamy goodness. Then, sprinkle in the walnuts for that crispy crunch.
-
Whisk the Dressing: In a small bowl, whisk together your olive oil and balsamic vinegar. Aim for a ratio of about 3 parts oil to 1 part vinegar, but feel free to adjust based on your taste. Whisk until well combined. Season with salt and pepper to taste.
-
Dress the Salad: Pour the dressing over the salad, but don’t drown it! You can always add more later, so toss gently to coat everything without bruising the greens or the fruits.
-
Taste and Adjust: This is where the magic happens! Taste your salad and see if it needs a little more salt, a drizzle of honey, or extra balsamic. Trust your taste buds!
-
Serve: Once everything is nicely mixed, it’s time to plate. Transfer your Elegant Stone Fruit Salad to a clean serving dish, allowing all the vibrant colors to shine.
Chef Tips
- Use a variety of stone fruits to provide a range of textures and flavors. Mix in anything else you love—like nectarines or colored cherries.
- Feel free to add some herbs like mint or basil for an extra flavor kick!
- Make it ahead of time for meal prep by storing the dressing separately to keep your greens fresh.
Serving Suggestions
How you present this salad can elevate the entire dining experience! I love serving it on a large, beautiful platter; scattering the fruits and greens so that every guest can see each vibrant component. Garnishing with extra feta and walnuts right before serving makes it look like a work of art. You could also serve it alongside grilled chicken or fish for a delightful complete meal.
Recipe Variations
Here are a few fun twists to mix things up:
-
Herbed Variation: Add fresh herbs like basil or mint for a refreshing twist on your salad.
-
Grilled Fruits: Fire up the grill! Grilling the fruits intensifies their sweetness and adds a smoky flavor, which is absolutely divine.
-
Nutty Swap: Switch walnuts for pecans or almonds to discover new textures and flavors.
-
Vegan Option: Leave the feta cheese out or use a vegan feta substitute to tailor this salad for strict plant-based diets.
-
Spicy Touch: Add a sprinkle of chili flakes or a drizzle of spicy honey for a sweet and heat combo that’ll awaken your palate!
Chef’s Notes
As I’ve gathered secrets and tips along my cooking journey, this salad has evolved a lot! Originally, I played with boring iceberg lettuce as the base. But along the way, I discovered mixed greens and just how versatile stone fruits can be. Honestly, every season brings in something new—swapping out fruits or adding components based on what’s fresh has made this dish close to my heart. The best part? It’s a recipe that begs for creativity, and that’s what cooking is all about!
FAQs and Troubleshooting
1. Can I make this salad ahead of time?
Absolutely! To keep the greens fresh, prepare the fruits and dressing ahead but wait to combine everything until right before serving. Just store everything separately in the fridge.
2. What if some of the fruits are overripe?
Use slightly softer stone fruits for a sauce or puree instead of raw. They can taste divine in a smoothie or as a topping for yogurt!
3. How do I adjust for a larger crowd?
Scaling this salad up is easy! Just increase the quantities while maintaining the same ratios. A little more fruit, greens, and nuts will go a long way!
4. What if I don’t have balsamic vinegar?
Not a problem! Substitute with apple cider vinegar or a splash of lemon juice mixed with honey for a lovely tangy dressing!
Nutritional Info
While the precise nutrition will vary based on your specific ingredients and portions, this salad is generally low in calories and high in vitamins, antioxidants, and healthy fats, making it a nourishing choice.
With the season’s best fruits at your fingertips, this Elegant Stone Fruit Salad is your ticket to vibrant meals that everyone will love. I invite you to dive into the joy of cooking and create beautiful memories with every delicious bite. Happy cooking, friends!
PrintElegant Stone Fruit Salad

A vibrant and refreshing stone fruit salad that captures the essence of summer with peaches, plums, cherries, and apricots, tossed with mixed greens, feta, and walnuts.
- Prep Time: 15 minutes
- Cook Time: 0 minutes
- Total Time: 15 minutes
- Yield: 4 servings 1x
- Category: Salad
- Method: No-Cook
- Cuisine: American
- Diet: Vegetarian
Ingredients
- 2 ripe peaches, sliced
- 2 plums, sliced
- 1 cup cherries, halved
- 4 apricots, sliced
- 4 cups mixed greens (arugula, spinach, or baby kale)
- 1/2 cup feta cheese, crumbled
- 1/4 cup walnuts, toasted
- 3 tbsp olive oil
- 1 tbsp balsamic vinegar
- Salt and pepper to taste
Instructions
- Gather your ingredients.
- Prep the fruits by washing them and slicing peaches, plums, and apricots into wedges.
- Chop the mixed greens into a large salad bowl.
- Add the sliced fruits to the bowl, arrange them attractively.
- Crumble the feta cheese over the top, then sprinkle in the walnuts.
- Whisk the olive oil and balsamic vinegar together in a small bowl.
- Dress the salad gently with the dressing, then adjust the seasoning.
- Serve the salad on a beautiful platter and enjoy!
Notes
Use ripe, in-season fruits for the best flavor. Feel free to experiment with different stone fruits or add fresh herbs.
Nutrition
- Serving Size: 1 serving
- Calories: 250
- Sugar: 15g
- Sodium: 250mg
- Fat: 18g
- Saturated Fat: 4g
- Unsaturated Fat: 12g
- Trans Fat: 0g
- Carbohydrates: 20g
- Fiber: 3g
- Protein: 5g
- Cholesterol: 10mg
Keywords: salad, stone fruits, summer salad, healthy recipe, picnic recipe