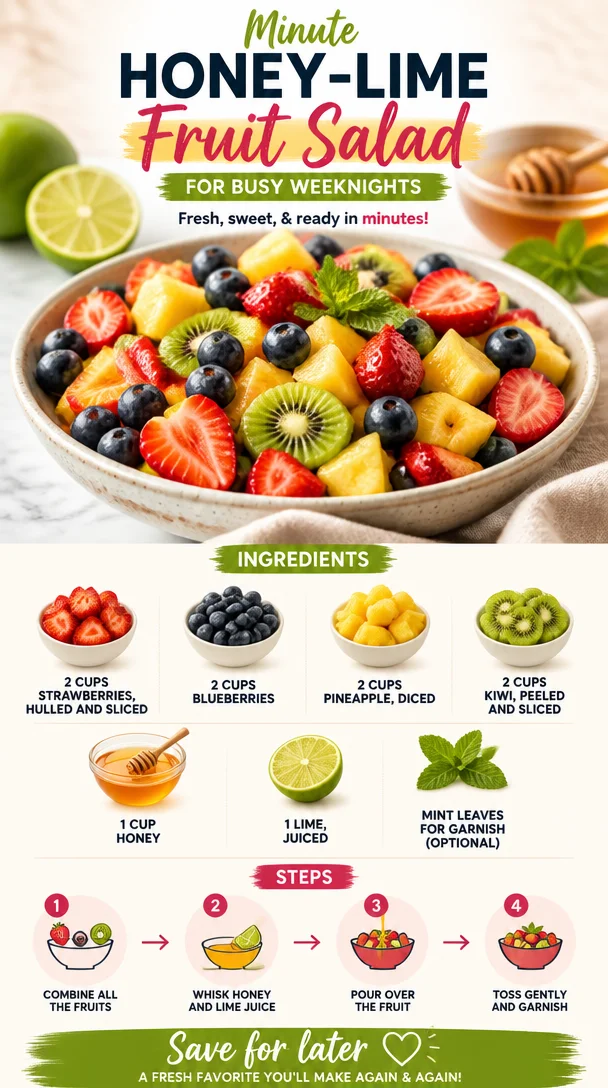
Minute Honey-Lime Fruit Salad for Busy Weeknights
Easy Fruit Salad with Honey Lime Dressing
Introduction
Hey there, fellow food lovers! If you’re like me, there’s just something about fruit that shouts "summer!" It’s vibrant, refreshing, and oh-so-delicious, especially when paired with a little zing from citrus and sweetness from honey. Today, I’m thrilled to share with you my go-to recipe for an Easy Fruit Salad with Honey Lime Dressing.
This dish is seriously perfect for any occasion—you can whip it up for brunch, serve it at a barbecue, or even enjoy a bowl for a light snack during the hot summer days. Believe me, this fruit salad is not your average bowl of chopped fruit. With the honey lime dressing, it transforms from a simple side dish into a flavor explosion that dances on your taste buds!
Growing up, my family had a tradition of making fruit salads during summer picnics. We’d gather around the picnic table, outdoors beneath the shade of giant oaks, laughing and reminiscing as we enjoyed our feast. My mom always encouraged us to get creative with the fruits we used, adding in whatever was fresh and seasonal. I think that’s the best part of this recipe: it’s flexible! You can mix and match or get a little adventurous with whatever’s in your fridge.
The honey lime dressing is the star here! It’s quick to make, and every drizzle brings a burst of brightness to the juicy fruits. Best of all, it’s an amazing way to get in those juicy vitamins and savor the season’s offerings. Ready to dive into the world of color and flavor? Let’s get started!
Personal Story
One of my fondest memories in the kitchen involves a bountiful summer day when my family decided to host a picnic at the local park. My siblings and I were tasked with creating the ultimate fruit salad. We raided our backyard and the local farmers’ market, gathering strawberries, blueberries, and a few things we thought looked "pretty." We threw in all the fruits we could find, of course, and I remember uncovering a hidden stash of ripe kiwis beneath the leaves in our fridge. Each of us had our signature touches—the kids were spread out in a joyous whirlwind of activity.
My job was to make the dressing, which really became the finishing touch! I squeezed fresh lime juice, drizzled honey, and—like a true little chef—tasted it after each addition, trying to find that perfect balance between sweet and tangy. We tossed everything together in a huge bowl, and as we carried it to our picnic spot, the bright colors and tantalizing aromas of our creation turned heads and brought smiles from other park-goers.
That day, we sat sprawled on checkered blankets, laughing and sharing stories, indulging in our creation. The sweet fruit, combined with that zingy dressing, was the highlight of the feast. To this day, I love making this fruit salad not just to relive that sweet nostalgia, but to create new memories with friends and family. Now, it’s your turn to make some fun memories with this delightful dish!
Ingredients
-
2 cups strawberries, hulled and sliced
- These juicy beauties are packed with vitamin C and are the sweetest way to start. If strawberries aren’t in season, feel free to substitute with raspberries or diced apples for a tart twist.
-
2 cups blueberries
- These little gems are like nature’s candy! They add a pop of color and are rich in antioxidants. No blueberries? No worries; think about adding blackberries or even diced peaches!
-
2 cups pineapple, diced
- Pineapple brings a tropical vibe and a sweet-tart flavor. If you don’t have fresh pineapple, drained canned pineapple works too, but fresh is always ideal for the best texture.
-
2 cups kiwi, peeled and sliced
- With its vibrant green color and unique taste, kiwi adds a refreshing twist. Don’t want to deal with peeling? Go ahead and swap it out for other fruits like mango or papaya for a tropical flair!
-
1 cup honey
- Honey is a natural sweetener that elevates the entire dish. If you’re vegan, feel free to swap honey for agave syrup or maple syrup for that same sweetness.
-
1 lime, juiced
- The star of the dressing! Lime juice brings in that necessary acidity to balance the sweetness. If limes aren’t handy, use lemons or even a splash of orange juice as a substitute.
-
Mint leaves for garnish (optional)
- These delicate leaves not only add a fresh aroma but also a lovely finish. If mint isn’t your thing, chopped basil could work just as nicely!
Step-by-Step Instructions
-
Gather Your Ingredients
- Start by gathering all your ingredients and equipment. This is the perfect time to channel your inner chef! You’ll need a large mixing bowl, a cutting board, a knife, and a small bowl if you want to mix the dressing separately.
-
Prep the Fruits
- Begin with the strawberries. Hull them by removing the green tops, then slice them into quarters or halves, depending on their size. Place the sliced strawberries into your mixing bowl. (Tip: If you allow the strawberries to sit a few minutes after slicing them, they’ll release their juices and create their own mini dressing!)
-
Add Blueberries
- Rinse the blueberries in cold water and drain them. No slicing needed—just toss them directly into the bowl with the strawberries. (Chefs Hack: If you’re using frozen blueberries, let them thaw for a bit first—this avoids mushiness!)
-
Cut the Pineapple
- If you’re using a fresh pineapple, carefully cut the top off, remove the skin, and dice the flesh into bite-sized pieces. Add the fresh pineapple to the mix. (Tip: To make this easier, cut the pineapple into rings and then dice through those rings!)
-
Slice the Kiwi
- Peel the kiwi and slice it into rounds or quarters, according to your preference. Toss them into the bowl with the other fruits, throwing in those beautiful green slices! (Pro Tip: Use a spoon to scoop out the kiwi flesh cleanly!)
-
Make the Honey Lime Dressing
- In a small bowl, combine the honey and lime juice. Give it a good stir with a whisk or a fork until fully blended. Want a little zing? You can add a bit more lime juice to suit your taste! (Tip: If it’s a hot day, you can lightly warm the honey for easier mixing!)
-
Combine Everything
- Drizzle the honey lime dressing over your colorful fruit medley. Using a large spoon or spatula, gently toss everything until the fruits are fully coated with that luscious dressing. (Caution: Be gentle! You don’t want to mush the fruits!)
-
Let it Marinate
- For an enhanced flavor experience, let the salad sit in the fridge for about 30 minutes. This allows the fruits to soak up some of that honey lime goodness and meld together beautifully.
Serving Suggestions
Once your fruit salad is nicely chilled and ready to go, grab a pretty bowl and spoon it in! You can serve it directly in individual bowls for guests or pile it high in one large dish for a family-style setting. Finishing touches? Add a few sprigs of fresh mint on top for a gorgeous pop of color and fragrance. This fruit salad also makes a delightful addition to brunch tables or summer feasts, bringing a burst of cheer and freshness to any spread!
Recipe Variations
Feeling adventurous? Here are some fun twists and variations to play around with:
- Tropical Twist: Switch out the kiwi for mango, add some shredded coconut, and maybe throw in a few macadamia nuts for crunch.
- Berry Blast: Use raspberries, blackberries, and sliced strawberries with a splash of orange juice instead of lime for a different citrus profile.
- Nutty Delight: Add a handful of chopped nuts like almonds or walnuts for a bit of crunch, or sprinkle with chia seeds for extra nutrition.
- Creamy Addition: Drizzle with a bit of yogurt on top for a creamy layer that complements the fruits beautifully!
Chef’s Notes
As I look back at those summers spent making fruit salads, I realize that my approach to this dish has changed over time. I’ve played with countless ingredients and combinations! Each evolution brought new friends and flavors, and now, I’m all about keeping it simple yet flexible. I adore taking whatever fruit is in season and transforming it into this delicious medley. And don’t let me forget: the key is all about the dressing! I’ve tried adding spices like cinnamon or ginger when feeling funky, and boy, have those been successful experiments!
FAQs and Troubleshooting
-
Can I use frozen fruits?
- Absolutely! Just be cautious because some fruits might change texture after thawing, especially bananas or and strawberries. Use frozen berries for best results.
-
How long does the fruit salad last?
- This salad is best enjoyed fresh, but you can store it in an airtight container in the fridge for up to 3 days. Just be mindful that it may get watery as it sits!
-
What if I don’t have honey?
- No problem! Agave syrup, maple syrup, or even amber syrup can easily take honey’s place. Just keep adjusting the sweetness to your liking!
-
Is there a way to make this salad ahead of time?
- Sure thing! You can pre-cut the fruits and mix the dressing, but keep them separate. Combine everything right before serving to maintain freshness and color.
Nutritional Info
(Optional, can be personalized based on specific dietary needs or preferences!)
This fruit salad is not just delicious but also nutritious! Each serving is low in calories yet high in vitamins and antioxidants, benefiting your overall health. Enjoy these nutritious powerhouse fruits without guilt, and feel free to get creative to make it even more nourishing!
So there you have it, friends—an Easy Fruit Salad with Honey Lime Dressing that not only tantalizes the taste buds but also brings back warm memories of summer sweetness! Whether for a gathering or a personal treat, this salad is sure to brighten anyone’s day. Happy cooking, and here’s to keeping things fresh, simple, and delicious!
PrintEasy Fruit Salad with Honey Lime Dressing
A vibrant, refreshing fruit salad with a zesty honey lime dressing, perfect for summer picnics and gatherings.
- Prep Time: 15 minutes
- Cook Time: 0 minutes
- Total Time: 15 minutes
- Yield: 6 servings 1x
- Category: Dessert
- Method: Mixing
- Cuisine: American
- Diet: Vegetarian
Ingredients
- 2 cups strawberries, hulled and sliced
- 2 cups blueberries
- 2 cups pineapple, diced
- 2 cups kiwi, peeled and sliced
- 1 cup honey
- 1 lime, juiced
- Mint leaves for garnish (optional)
Instructions
- Gather your ingredients.
- Prep the strawberries by hulling and slicing them, then place in mixing bowl.
- Add the rinsed blueberries directly into the bowl.
- Cut the fresh pineapple and add to the mix.
- Slice the kiwi and toss it into the bowl.
- Make the honey lime dressing by combining honey and lime juice in a small bowl.
- Combine everything by drizzling the dressing over the fruits and gently tossing to coat.
- Let it marinate in the fridge for about 30 minutes.
Notes
Serve chilled; can be garnished with fresh mint. Enjoy fresh for best results.
Nutrition
- Serving Size: 1 serving
- Calories: 100
- Sugar: 20g
- Sodium: 5mg
- Fat: 0g
- Saturated Fat: 0g
- Unsaturated Fat: 0g
- Trans Fat: 0g
- Carbohydrates: 25g
- Fiber: 3g
- Protein: 1g
- Cholesterol: 0mg
Keywords: fruit salad, summer salad, healthy dessert, honey lime dressing
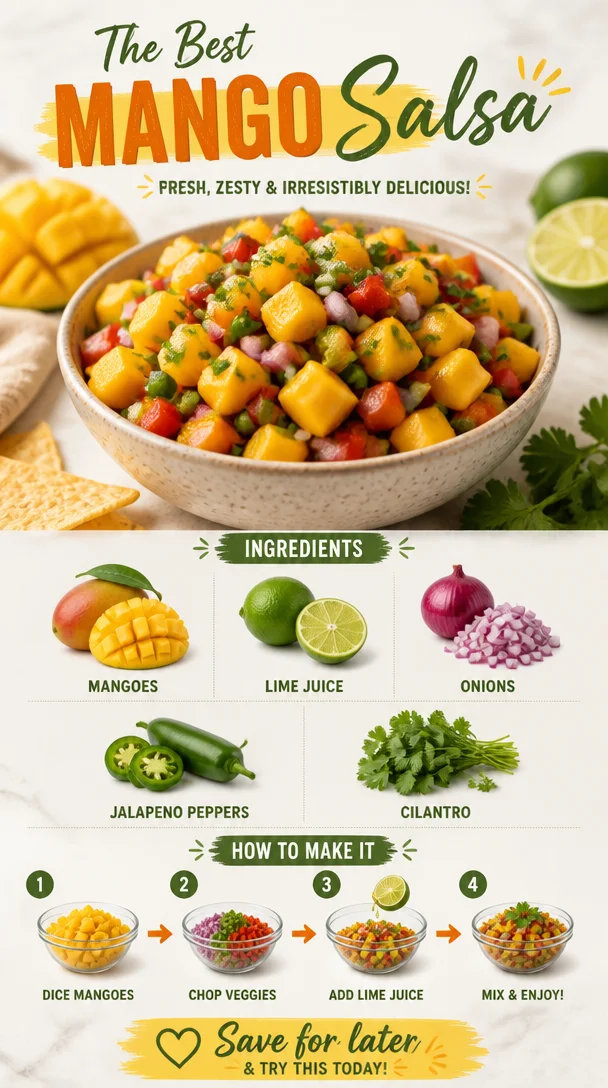
The Best Mango Salsa
The Best Mango Salsa: A Flavorful Journey
Welcome, my fellow food lovers, to another delicious adventure in the kitchen! Today, we’re diving into a bright and vibrant dish that embodies the essence of summer—Mango Salsa! This sweet and zesty salsa is not just a delight for your taste buds; it’s also a colorful addition to any meal.
Now, let’s talk about why mango salsa is a must-have in your repertoire. Imagine a sunny day, the warmth of the sun on your skin, and the tantalizing aroma of fresh ingredients all coming together. This salsa will transport you to that happy place, regardless of where you’re dining. It’s perfect for those cookouts, taco nights, or even as a refreshing snack on its own with the best crispy tortilla chips.
When you make this mango salsa, you’ll notice it gives a kick of flavor to everything it touches. Paired with grilled chicken, fish, or shrimp, it transforms a simple meal into a flavor explosion. Not to mention, it’s packed with nutrients, making it both health-conscious and utterly delicious. So grab your cutting board and let’s whip up this tropical treat!
A Taste of Nostalgia
Growing up, my family had a tradition of spending our summers at my aunt’s beach house. The salty air, sandy toes, and the wonderful aroma of her kitchen were everything a kid could dream of. One of my favorite memories is when my aunt would host these lively barbecues. Her mango salsa always made an appearance, and it was a showstopper!
I remember running into the kitchen, laughing and sneaking spoonfuls of that juicy salsa directly from the bowl—much to my aunt’s amusement. She would chuckle and say that the best recipes were meant to be enjoyed early and often! The combination of sweet mangoes, zesty lime, and fresh herbs danced on my palate like summer fireworks. Every bite was a burst of happiness, accompanied by the sound of waves crashing in the background.
To this day, any time I whip up this mango salsa, I’m transported back to those summer days, surrounded by family, laughter, and love. It’s more than just a recipe; it’s a celebration of life, food, and memories!
Ingredients
Gathering the freshest ingredients can elevate your mango salsa from good to out-of-this-world delicious. Here’s what you’ll need:
- Juicy Mangoes: The star of the show! Choose ripe mangoes that give slightly when you squeeze them. If mangoes aren’t in season, try using diced peaches for a similar sweetness.
- Lime Juice: This brings a zesty brightness that cuts through the sweetness of the mango. Freshly squeezed lime juice is key; bottled juice can’t match that zing!
- Onions: Red onions work beautifully in salsa, adding a mild bite and a splash of color. You can substitute with yellow or green onions if that’s what you have on hand—just adjust the quantity to your taste.
- Jalapeño Peppers: For a little kick, finely dice these beauties. If you prefer a milder flavor, remove the seeds or swap them for a bell pepper for that crunchy texture without the heat.
- Cilantro: This herb gives the salsa an earthy taste that compliments the mangoes. If you’re not a fan of cilantro (you know who you are!), fresh parsley works as a great alternative.
Step-by-Step Instructions
Now that you have your ingredients prepped, let’s dive into making this delicious mango salsa!
-
Prep Your Workspace: Before you begin, make sure your kitchen is tidy and all your tools are within reach. You’ll need a sharp knife, a cutting board, and a mixing bowl. A tidy space makes cooking a breeze!
-
Mango Magic: Start by peeling and dicing your mangoes. To peel, you can use a vegetable peeler or cut off the skin with a knife. Place the mango flat on the cutting board and slice down the sides of the seed. Then, chop it into small cubes. It’s a sticky process, but oh-so-worth it!
-
Chop the Veggies: Next, go ahead and finely chop the red onion and jalapeño. Don’t forget to wash your hands thoroughly after handling the jalapeño—you never want that spice to land in your eyes! For added flavor, try letting the chopped onions sit in lime juice for a few minutes before mixing it all together.
-
Flavor Burst with Lime: In a separate bowl, combine the diced mango, onion, and jalapeño. Drizzle freshly squeezed lime juice over the mixture, and don’t be shy; the more, the merrier!
-
Cilantro Celebration: Finely chop a handful of fresh cilantro and add it to the bowl. Stir it together gently, ensuring every piece gets covered in that zesty goodness.
-
Taste Test Time: Before you serve, take a moment to taste your salsa. Feel free to add more lime juice or even a pinch of salt to balance the flavors. This is your creation, so tweak it until it’s perfect for you!
-
Chill and Serve: If you have the time, let the salsa chill in the fridge for at least 30 minutes before serving. This allows the flavors to mingle and creates a delightful taste experience.
Serving Suggestions
Mango salsa can be served in various fun and inviting ways! You can plate it in a rustic bowl alongside crispy tortilla chips for a colorful appetizer that will wow your guests. If you’re serving it as a topping, scoop a generous portion onto grilled chicken, fish, or tacos. The vibrant colors and fresh flavors will undoubtedly make your dish pop!
You might also want to get creative with how you present it. Consider topping a beautiful platter of nachos with a generous amount of salsa or using it as a vibrant garnish for your meals. Your mango salsa deserves to shine!
Recipe Variations
While the classic version is simply unbeatable, here are a few tasty twists you can try!
- Tropical Twist: Add diced pineapple or kiwi for an even more fruity punch!
- Spicy Upgrade: For the heat lovers, toss in some diced habanero or serrano peppers. Just remember to start small!
- Avocado Addition: Creamy avocado can take your salsa to new heights. Just chop it into cubes and gently mix it in.
- Sweet & Savory: Drizzle a touch of honey or agave syrup for those days when you crave extra sweetness.
- Smoky Flavor: A dash of smoked paprika can add an intriguing depth to the salsa, perfect for grilled meals.
Chef’s Notes
As with many recipes, mango salsa has evolved throughout the years in my kitchen. I’ve tried countless variations, from incorporating exotic fruits to experimenting with different herbs. Every time I revisit this classic, it reminds me of my sun-soaked childhood and those joyous family gatherings.
One particularly funny memory that stands out is the time I thought I had bought ripe mangoes, only to discover they were rock solid. In a moment of desperation, I let them sit on the windowsill, hoping the sun would work its magic. Spoiler alert: it didn’t! Lesson learned—always check your fruit ripeness before you bail on last-minute ingredients.
FAQs and Troubleshooting
Q: What can I use if I can’t find fresh mangoes?
A: If fresh mangoes are out of season, try using frozen mango chunks. Just thaw, drain excess water, and chop!
Q: My salsa is too spicy; how do I tone it down?
A: Acidity can lessen heat! Add extra diced mango or a sprinkle of sugar to balance the spiciness.
Q: How long will this salsa last?
A: In an airtight container in the fridge, it can last up to 3 days, but it’s best enjoyed fresh for optimal taste and texture!
Q: Can I make this salsa ahead of time?
A: Yes! Just remember that the flavors will meld and taste even better after a day, so it’s a great make-ahead option. Just keep it chilled!
Nutritional Info
While I typically focus on the taste, it’s worth noting that mango salsa is a nutritious addition to your meals. Each serving is rich in vitamin C and fiber, adding a wholesome touch to your diet.
So there you have it, friends! You’re now equipped with all the tools to create the most delicious mango salsa. Whether you serve it at your next gathering or enjoy it solo with chips, I promise it’ll bring a smile to your face and sunshine to your palate. Happy cooking!
PrintThe Best Mango Salsa

Bright and vibrant mango salsa that embodies the essence of summer with its sweet and zesty flavor.
- Prep Time: 10 minutes
- Cook Time: 0 minutes
- Total Time: 40 minutes
- Yield: 4 servings
- Category: Appetizer
- Method: No-Cook
- Cuisine: Mexican
- Diet: Vegetarian
Ingredients
- Juicy Mangoes
- Lime Juice
- Red Onions
- Jalapeño Peppers
- Cilantro
Instructions
- Prep Your Workspace: Make sure your kitchen is tidy and all your tools are within reach.
- Start by peeling and dicing your mangoes.
- Chop the red onion and jalapeño finely.
- Combine the diced mango, onion, and jalapeño in a bowl.
- Drizzle freshly squeezed lime juice over the mixture.
- Chop a handful of fresh cilantro and add it to the bowl.
- Taste your salsa and adjust flavors as needed.
- Chill in the fridge for at least 30 minutes before serving.
Notes
For a twist, consider adding diced pineapple or avocado for extra flavor.
Nutrition
- Serving Size: 1 serving
- Calories: 150
- Sugar: 12g
- Sodium: 5mg
- Fat: 1g
- Saturated Fat: 0g
- Unsaturated Fat: 1g
- Trans Fat: 0g
- Carbohydrates: 35g
- Fiber: 4g
- Protein: 2g
- Cholesterol: 0mg
Keywords: mango salsa, summer salsa, fresh salsa, healthy dip, easy appetizer
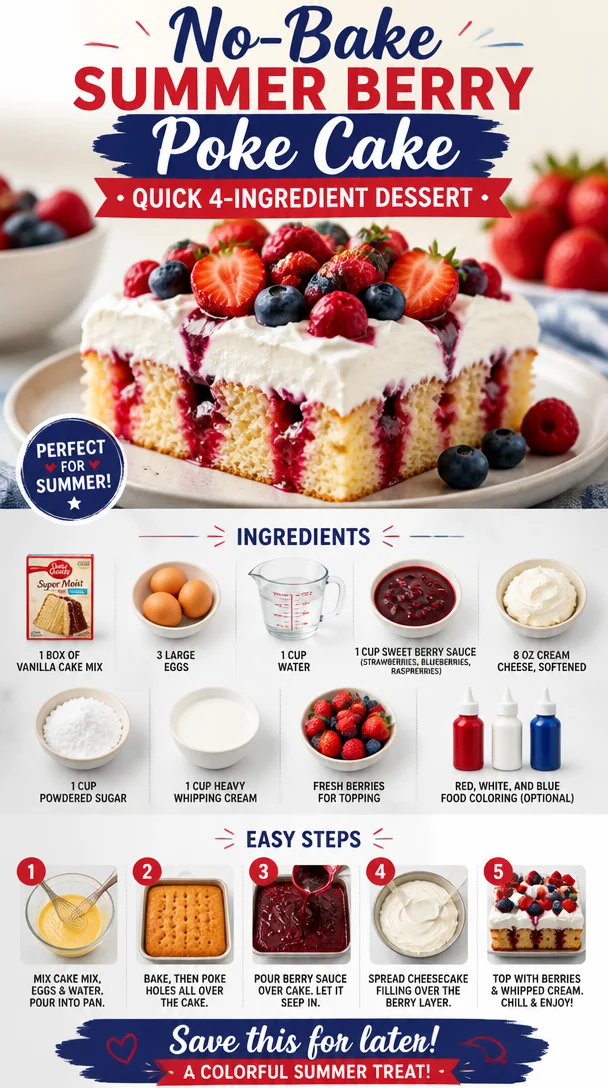
No-Bake Summer Berry Poke Cake: Quick 4-Ingredient Dessert
Get Ready to Dive into Summer with This Scrumptious Summer Berry Poke Cake!
Hey there, fellow foodies! It’s Ava Carter here, your go-to chef for all things delicious and nutritious. Today, I’m super excited to share a recipe that’s not only easy to whip up but also perfect for beating the summer heat—my delightful Summer Berry Poke Cake! This cake is a burst of flavor that screams sunshine and joy, making it an absolute hit for those warm weather gatherings, picnics, or even just a cozy day at home.
Imagine this: a soft, moist vanilla cake soaked in a luscious berry sauce, topped with a heavenly cream cheese frosting and crowned with fresh berries. Sounds dreamy, right? And let me tell you, the best part about this cake is that it’s not just about taste; it’s about creating memories too. So, grab your apron, and let’s get baking!
A Slice of Nostalgia: The Story Behind My Summer Berry Poke Cake
Every time I make this Summer Berry Poke Cake, I’m transported back to my childhood summers spent in Grandma’s kitchen. Oh, the memories! Grandma would whip this cake up on warm afternoons when my cousins and I would come running in from the backyard, our faces flushed from play and our tummies rumbling. The air would be filled with the sweet aroma of fluffy cake and berries, enticing us into the kitchen like moths to a flame.
We’d watch in awe as she poked tiny holes into the freshly baked cake, pouring that vibrant berry sauce all over. I remember the giggles as we fought over who got to add the freshest strawberries and blueberries on top. That special family tradition became a summer staple, a delicious reminder that food is more than just sustenance—it’s a way to connect, celebrate, and create joy. Today, I’m sharing that same joy with you, hoping you’ll create your own cherished moments with this ever-delicious berry beauty!
Ingredients You’ll Need
-
1 box of vanilla cake mix
A classic base for our cake, rich and fluffy! If you’re feeling adventurous, you could substitute with a lemon cake mix for a zesty twist. -
3 large eggs
Adding richness and acting as a binder, the eggs will help your cake rise beautifully. For an egg-free alternative, try flax eggs (1 tablespoon ground flaxseed mixed with 2.5 tablespoons water per egg). -
1 cup water
This keeps the cake moist. You can swap plain water for milk if you want a little extra richness in the flavor. -
1 cup sweet berry sauce
A blend of strawberries, blueberries, and raspberries creates that signature summer flavor. You can make your own sauce or pick up a store-bought version. -
8 oz cream cheese, softened
Essential for our frosting, adding creamy texture and tanginess. If you need a dairy-free option, use vegan cream cheese. -
1 cup powdered sugar
Sweetening things up! Sifting it can help achieve that perfect smooth frosting texture. -
1 cup heavy whipping cream
For fluffy frosting that holds its shape. If you’re low on cream, you can mix in some Greek yogurt for a lighter option. -
Fresh berries for topping
Think of it as nature’s confetti! Any combination of strawberries, blueberries, and raspberries works. -
Red, white, and blue food coloring (optional)
Perfect for a festive touch, especially around the Fourth of July! A few drops can make your cake even more visually stunning.
Step-by-Step Instructions
1. Preheat Your Oven:
Start by preheating your oven to 350°F (175°C). This ensures that your cake gets that perfect rise as soon as it hits the heat. A well-prepped oven is key to a fluffy, perfect cake!
2. Prepare the Cake Mix:
In a large mixing bowl, combine the box of vanilla cake mix, 3 large eggs, and 1 cup of water. Use an electric mixer on medium speed for about 2 minutes until the batter is smooth and blended. Tip: Don’t overmix! This can lead to a dense cake. Your batter should be light and airy.
3. Bake the Cake:
Pour the batter into a greased 9×13-inch baking pan. Bake in the preheated oven for 25-30 minutes or until a toothpick inserted in the center comes out clean. Chef’s hack: Set a timer for 25 minutes; check for doneness, and be careful not to open the oven door too soon!
4. Poke the Cake:
Once baked, allow the cake to cool in the pan for about 10 minutes. Then, take a fork or the handle of a wooden spoon and poke holes all over the top of the cake. This is where the magic happens! The holes will allow the berry sauce to seep in, making the cake super moist and flavorful.
5. Pour on the Berry Sauce:
In a separate bowl, mix your sweet berry sauce until it’s well combined. Pour this luscious sauce all over the entire poke cake, making sure to cover it evenly. Let it soak in as it cools completely—this is the star moment of your cake!
6. Make the Frosting:
In a clean mixing bowl, beat the softened cream cheese with an electric mixer until smooth and creamy. Gradually add powdered sugar, then mix in the heavy whipping cream until you achieve that luxurious frosting consistency. Little tip: Start slow to avoid a powdered sugar cloud!
7. Frost the Cake:
Once the cake is completely cooled, spread the cream cheese frosting evenly across the top. Use a spatula for a smooth finish, or get creative with a swirl pattern!
8. Add Fresh Berries:
Now comes the fun part! Top your frosted cake with fresh berries of your choice. Arrange them in a colorful pattern! Don’t skimp on the berries—this is a berry poke cake, after all!
Serving Suggestions
Slice up your Summer Berry Poke Cake and serve it chilled, perhaps with a dollop of whipped cream on the side. It’s perfect for afternoon gatherings or as a light dessert after a summer barbecue. For an extra touch, consider dusting with powdered sugar before serving—who doesn’t love that elegant finish?
Recipe Variations
-
Berry Swirl Cake: Instead of a plain berry sauce, swirl it right into the cake batter before baking for a delightful marbled effect.
-
Coconut Cream Frosting: Mix in some coconut cream with your frosting for a tropical twist.
-
Lemon Zest Add-In: Add zest from one lemon to your cake batter for a refreshing zing!
-
Gluten-Free Option: Use a gluten-free vanilla cake mix for a lovely gluten-free alternative that everyone can enjoy.
-
Sugar Alternatives: If you’re watching sugar intake, replace powdered sugar with a sugar-free version.
Chef’s Notes
This Summer Berry Poke Cake has truly evolved over the years. I remember the first time I attempted to create it—I accidentally forgot to add the eggs! The cake turned out dense and flat, but I added double the frosting and fresh berries, and guess what? Everyone loved it! That mistake taught me that a little creativity in the kitchen goes a long way. It’s all about having fun, experimenting, and not taking things too seriously.
FAQs and Troubleshooting
1. My cake didn’t rise. What went wrong?
Ensure that your baking powder and other ingredients are fresh and still active! Also, check that you mixed it just enough—over-mixing can lead to a dense texture.
2. How can I get a smooth frosting?
Make sure your cream cheese is at room temperature, and sift your powdered sugar to avoid lumps—this gives you that beautifully smooth texture.
3. Can I make this cake a day ahead?
Absolutely! Just keep it covered in the fridge. The flavors often blend overnight, making it even more delicious!
4. What if my berry sauce is too runny?
Try thickening it with a bit of cornstarch mixed with water, simmered on low heat until it reaches your desired consistency.
Nutritional Info
Per serving, roughly: 300 calories, 15g fat, 40g carbohydrates, 3g protein. (Nutritional values can vary based on specific brands and measurements.)
So there you have it, my dear food lovers! Dive into the season with this fabulous Summer Berry Poke Cake, and let it bring a little sunshine to your kitchen. Embrace the flavors, share the joy, and remember—food is all about love, laughter, and those cozy moments spent with family and friends. Happy baking! 🌟
PrintSummer Berry Poke Cake

A delightful and moist vanilla cake soaked in berry sauce, topped with cream cheese frosting and fresh berries, perfect for summer gatherings.
- Prep Time: 15 minutes
- Cook Time: 30 minutes
- Total Time: 45 minutes
- Yield: 12 servings 1x
- Category: Dessert
- Method: Baking
- Cuisine: American
- Diet: Vegetarian
Ingredients
- 1 box of vanilla cake mix
- 3 large eggs
- 1 cup water
- 1 cup sweet berry sauce
- 8 oz cream cheese, softened
- 1 cup powdered sugar
- 1 cup heavy whipping cream
- Fresh berries for topping
- Red, white, and blue food coloring (optional)
Instructions
- Preheat your oven to 350°F (175°C).
- Combine the vanilla cake mix, eggs, and water in a large mixing bowl and mix for about 2 minutes until smooth.
- Pour the batter into a greased 9×13-inch baking pan and bake for 25-30 minutes.
- Cool the cake in the pan for 10 minutes, then poke holes all over the top.
- Mix your sweet berry sauce until well combined and pour it over the cake.
- Beat the softened cream cheese until smooth, gradually add powdered sugar, then mix in heavy whipping cream until you achieve a luxurious frosting.
- Spread the cream cheese frosting evenly across the top of the cooled cake.
- Top the cake with fresh berries in a colorful pattern.
Notes
Serve chilled with a dollop of whipped cream on the side. For added elegance, dust with powdered sugar before serving.
Nutrition
- Serving Size: 1 slice
- Calories: 300
- Sugar: 20g
- Sodium: 350mg
- Fat: 15g
- Saturated Fat: 8g
- Unsaturated Fat: 5g
- Trans Fat: 0g
- Carbohydrates: 40g
- Fiber: 2g
- Protein: 3g
- Cholesterol: 90mg
Keywords: berry poke cake, summer dessert, vanilla cake, berry sauce, cream cheese frosting
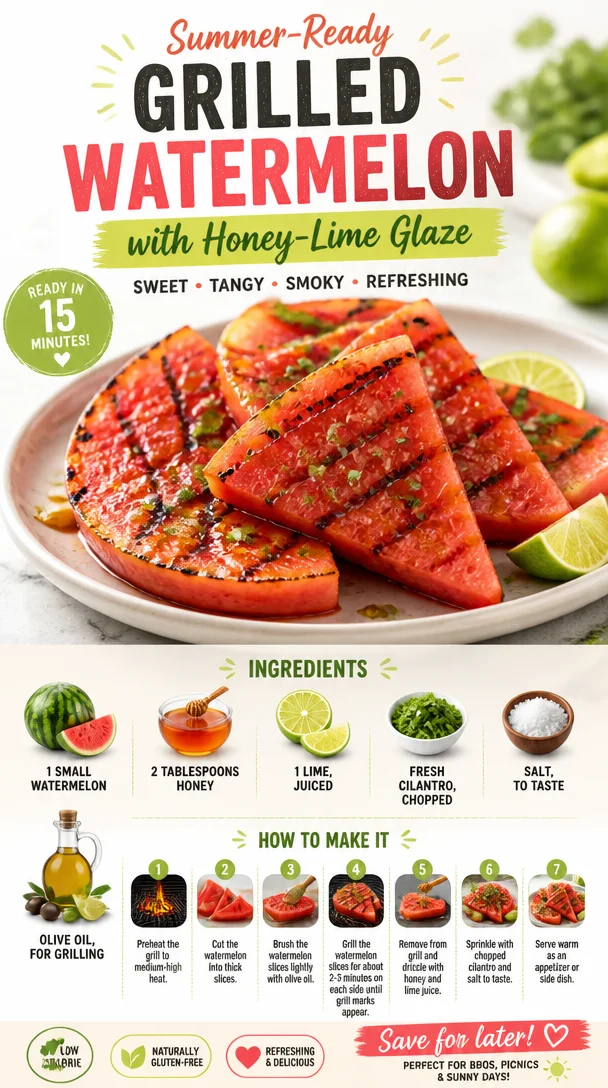
Summer-Ready Grilled Watermelon with Honey-Lime Glaze
Grilled Watermelon with Honey and Lime: A Summer Delight
Welcome to Clean Plate Cravings! If you’re here, you’re likely on a journey for fresh, vibrant, and feel-good meals. Today, I’m thrilled to share a recipe that’s not just easy to make—it’s utterly delightful: Grilled Watermelon with Honey and Lime. Trust me, once you sink your teeth into this sweet, smoky treat, you’ll want to keep it in your summer rotation all season long!
A Taste of Nostalgia
Let’s take a walk down memory lane, shall we? I’ll never forget the summer family barbecues at my grandparents’ house. My grandma, with her sunhat perched jauntily atop her head, would be in charge of the grill, flipping burgers, but what really stole the show was her grilled watermelon. As the sweet scent of caramelizing fruit filled the air, we kids would hover around the grill, waiting impatiently for that first slice. Fast forward to today, and I’ve taken grandma’s incredible idea and given it a little fresh twist. With a drizzle of honey and a zing of lime, it’s modernized but still pays homage to those sunny days spent with family.
Ingredients
Let’s talk ingredients! Here’s what you’ll need to whip up this refreshing grilled treat:
-
1 small watermelon: Look for one that’s firm, seedless, and has a symmetrical shape. These will yield the best grilling results. If watermelon isn’t your vibe, try swapping in cantaloupe for a twist!
-
2 tablespoons honey: This adds a touch of sweetness and helps create that gorgeous caramelized effect on the grill. Feel free to substitute with maple syrup or agave nectar for a vegan option.
-
1 lime, juiced: The bright acidity cuts through the sweetness, balancing the dish perfectly. If you don’t have lime, lemon can work in a pinch—just remember, it packs a different punch!
-
Fresh cilantro, chopped: This herb adds a fresh layer to the dish, making it vibrant. If cilantro isn’t your thing, fresh mint or basil can provide a lovely alternative, too!
-
Salt, to taste: Just a pinch of salt enhances all the flavors and balances the sweetness. It’s the secret ingredient that can bring everything together, so don’t skip it!
-
Olive oil, for grilling: A light brush of olive oil prevents sticking and adds a hint of richness. You can use avocado oil if you’re looking for a higher smoke point.
Step-by-Step Instructions
Ready to bring this dish to life? Let’s dive into the cooking process.
-
Prep the Watermelon: Start by cutting the watermelon into thick slices, about 1-inch each. Keep the rind on—this helps the slices hold their shape when grilling. Think of them as little juicy boats waiting to be flavored!
-
Make the Honey-Lime Drizzle: In a small bowl, mix together the honey and lime juice until well combined. This drizzle is the magic sauce that will elevate our grilled watermelon, so give it a little taste—sweet, tart, and refreshing all at once.
-
Heat the Grill: Preheat your grill to medium-high. You want it hot enough to get those lovely grill marks but not so hot that it scorches the watermelon. If you’re using a stovetop grill pan, preheat it similarly.
-
Oil the Grill: Brush your grill grates lightly with olive oil—this helps prevent sticking and creates those beautiful sear marks. You can use a paper towel dipped in oil held with tongs for this job.
-
Grill the Watermelon: Place the watermelon slices directly onto the grill. Let them grill for about 3-4 minutes on each side. You’re looking for those beautiful char marks and slightly softened flesh. You might hear some sizzle—this means you’re doing it right! Take this time to enjoy the smell; your kitchen (or backyard) should be filled with summer goodness.
-
Drizzle and Serve: Once those slices are perfectly grilled, remove them from the grill and drizzle your honey-lime mixture generously over each slice. Then sprinkle with a pinch of salt and finish with a sprinkle of freshly chopped cilantro. Voilà, your masterpiece is ready!
Serving Suggestions
Grilled watermelon is not only a dish but an experience! Serve it warm as an appetizer or side dish alongside your favorite grilled meats or even atop a bed of greens for a refreshing salad. You can also dress it up for dessert by pairing it with a scoop of vanilla ice cream for an extra indulgent treat!
Recipe Variations
Want to get adventurous? Here are a few ideas to switch things up:
-
Spicy Twist: Add a pinch of chili powder or cayenne pepper to your honey-lime drizzle for a spicy kick!
-
Feta Crumble: Crumble some feta cheese on top before serving for a savory-sweet contrast.
-
Balsamic Drizzle: Instead of honey, try adding a balsamic reduction for a tangy flavor.
-
Herbed Variation: Swap cilantro for fresh mint or basil to change up the herb profile entirely.
-
Grill Them All: You could also grill peaches, pineapple, or even zucchini alongside your watermelon for a colorful platter.
Chef’s Notes
I’ll admit—this recipe has come a long way since those childhood barbecues. The first time I tried grilling watermelon, I wasn’t sure what to expect. It didn’t take long to realize how deliciously unexpected the flavors were! Over the years, I’ve played with it and now love adding herbs and different drizzles. It’s one of those versatile dishes that tells a story of summer both in flavor and memory.
FAQs and Troubleshooting
Q: Can I make this dish ahead of time?
A: Grilled watermelon is best enjoyed fresh off the grill. If you need to prep in advance, store the grilled slices in the fridge for a couple of hours—just be sure to reheat them gently on the grill or in a pan to regain that lovely texture.
Q: What if my watermelon is too watery?
A: Smaller, seedless watermelons tend to be less watery and sweeter. If you find your watermelon is too juicy, you can grill it longer to help caramelize the sugars while reducing moisture.
Q: How do I know when the watermelon is done?
A: You want soft grill marks but firm mango-flavored flesh. If it’s too mushy, it may have been on the grill too long. Keep an eye on it as it grills!
Q: Can this recipe be adapted for a camping trip?
A: Absolutely! Just slice your watermelon ahead of time, pack your olive oil and drizzle ingredients, then grill it up over an open flame or portable grill. It’s a showstopper around the campfire!
Nutritional Info
While we won’t dive too deep into the numbers (because let’s face it—food is about joy, not just calories), grilled watermelon is low in calories, packed with hydration, and filled with vitamins A and C, making it a nutritious choice for those sunny days.
So there you have it, my dear foodies! Grilled Watermelon with Honey and Lime is your new summer staple that’s all about fresh flavors and feel-good vibes. I hope you enjoy preparing this dish as much as I enjoyed sharing it with you! Now, grab that watermelon, fire up the grill, and let’s create some delicious moments together!
PrintGrilled Watermelon with Honey and Lime
A refreshing summer dish featuring grilled watermelon drizzled with honey and lime.
- Prep Time: 10 minutes
- Cook Time: 10 minutes
- Total Time: 20 minutes
- Yield: 4 servings 1x
- Category: Dessert
- Method: Grilling
- Cuisine: American
- Diet: Vegetarian
Ingredients
- 1 small watermelon, firm and seedless
- 2 tablespoons honey (or maple syrup for a vegan option)
- 1 lime, juiced
- Fresh cilantro, chopped
- Salt, to taste
- Olive oil, for grilling
Instructions
- Prep the watermelon: Cut into 1-inch thick slices, keeping the rind on.
- Make the honey-lime drizzle by mixing honey and lime juice.
- Heat the grill to medium-high temperature.
- Oil the grill grates lightly with olive oil.
- Grill the watermelon slices for 3-4 minutes on each side, looking for char marks.
- Drizzle the honey-lime mixture over the grilled slices and sprinkle with salt and chopped cilantro.
Notes
Serve warm as an appetizer or side dish, or dress it up with ice cream for dessert!
Nutrition
- Serving Size: 1 serving
- Calories: 80
- Sugar: 14g
- Sodium: 20mg
- Fat: 0g
- Saturated Fat: 0g
- Unsaturated Fat: 0g
- Trans Fat: 0g
- Carbohydrates: 20g
- Fiber: 1g
- Protein: 1g
- Cholesterol: 0mg
Keywords: grilled watermelon, summer recipe, healthy dessert, fruity dessert, easy recipes
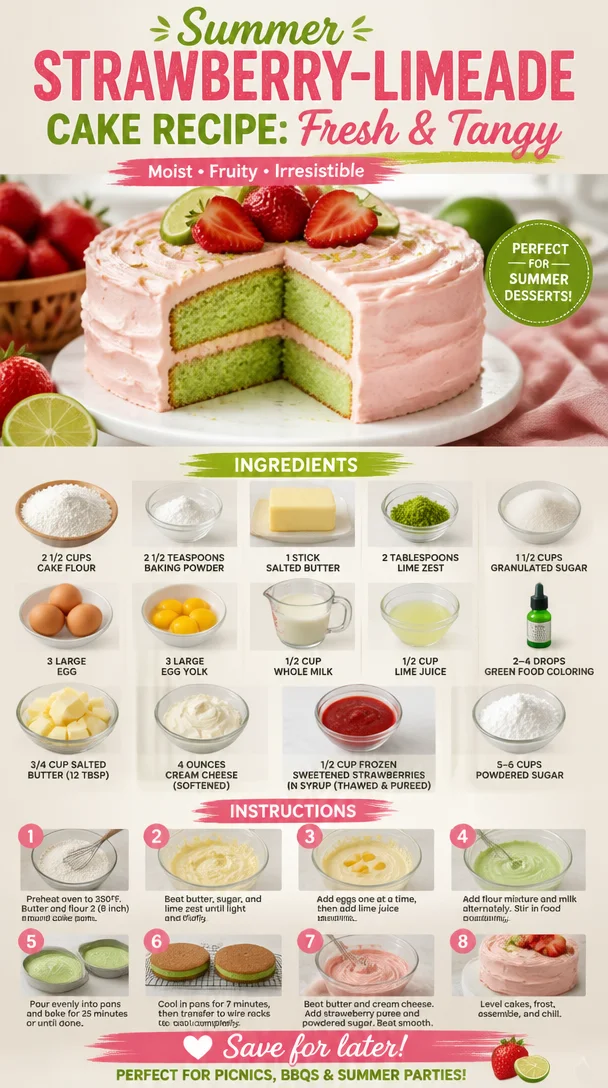
Summer Strawberry-Limeade Cake Recipe: Fresh & Tangy
Strawberry Limeade Cake Recipe: A Burst of Sweet Citrus!
Welcome, fellow food lovers! Today, I’m excited to share a recipe that’s as vibrant and refreshing as a summer day: Strawberry Limeade Cake. Trust me, this isn’t just any cake; it’s a delightful creation that’ll transport your taste buds to a sunny beach where the only thing on your agenda is pure bliss.
Imagine taking a bite into a moist, fluffy cake that tastes like a sweet dance between zesty lime and luscious strawberries. Sounds heavenly, right? This cake is perfect for everything from cozy family gatherings to festive celebrations. And the best part? It’s straightforward enough that even novice bakers will feel like seasoned pros!
So, let’s kick things off! Grab your apron and let’s jump into the story behind this scrumptious cake recipe.
A Slice of Memory
This Strawberry Limeade Cake holds a special place in my heart—let me tell you why. I first started making it while home from college, spending summer evenings on my patio with my family. Each time I baked this cake, my kitchen would fill with the aromatic scents of lime zest and sweet strawberries, instantly bringing everyone together.
I can still picture my little brother sneaking spoonfuls of the strawberry puree straight from the bowl, giggling as I tried to pry him away from it. And my mom? She’d always pop in to see how the baking magic was happening, inevitably stealing a taste of the batter (and convincing me to keep the bowl for a bit longer).
One year, I decided to make it for our family reunion. The look on my grandpa’s face—so thrilled to find a cake that tasted just like summer itself—was priceless. It was a hit! Everyone asked for the recipe, and little did I know, this cake would become a staple in our family traditions, showing up at birthdays, cookouts, and holiday celebrations.
Now, without further ado, let’s gather our ingredients and create this lovely cake together!
Ingredients
Here’s what you’ll need for your Strawberry Limeade Cake:
-
2 1/2 cups Cake Flour
This is the foundation of our cake. Using cake flour gives it that ultra-soft, tender crumb. If you don’t have cake flour, you can substitute it with all-purpose flour by removing 2 tablespoons per cup and replacing it with cornstarch. -
2 1/2 teaspoons Baking Powder
This is our leavening agent, helping the cake rise beautifully. Make sure it’s fresh—baking powder can lose its potency over time! -
1 stick Salted Butter (1/2 cup)
The richness from butter makes the cake moist and adds tons of flavor. You can use unsalted butter but will need to add a pinch of salt to balance. -
2 tablespoons Lime Zest
Zest brings that delightful burst of citrus flavor without adding too much acidity. Fresh is best, so grab that zester! If lime is unavailable, consider using lemon zest. -
1 1/2 cups Granulated Sugar
This sweetener not only adds sweetness but helps the cake achieve that beautiful golden color. For a lighter option, try coconut sugar! -
3 large Eggs + 3 large Egg Yolks
The whole eggs provide structure, while the extra yolks give a richer taste. For a vegan option, you could use flax eggs or applesauce as a substitute. -
1/2 cup Whole Milk
This is essential for the cake’s moisture content. Almond milk or oat milk work as perfect alternatives for a dairy-free option. -
1/2 cup Lime Juice
Freshly squeezed lime juice amps up the tangy flavor and balances the sweetness. If you don’t have fresh limes, bottled juice will do in a pinch. -
2-4 drops Green Food Coloring
This is purely for aesthetics! If you want that extra pop of color, feel free to add a few drops. It’s optional, of course.
For the frosting:
-
3/4 cup Salted Butter (1 1/2 sticks or 12 tablespoons)
Again, the richness of butter gives our cream cheese frosting a luscious texture. -
4 ounces Cream Cheese (softened)
Cream cheese brings tanginess and creaminess to our frosting. If you want to skip dairy, there are fantastic vegan cream cheese options available. -
1/2 cup Frozen Sweetened Strawberries in Syrup (thawed and pureed)
These will add an incredible strawberry flavor to your frosting. Can’t find sweetened strawberries? Fresh strawberries, blended and sweetened to taste, will work perfectly! -
5-6 cups Powdered Sugar
This helps to sweeten the frosting and gives it a thick, luscious consistency. Adjust according to your preferred sweetness!
Step-by-Step Instructions
-
Preheat the Oven
Preheat your oven to 350°F (175°C). This ensures that your cake bakes evenly. While the oven heats, you can prepare your cake pans! -
Prepare Your Cake Pans
Grease and flour two 9-inch round cake pans. This recipe loves a non-stick surface, and dusting them with flour prevents sticking. Alternatively, you can use parchment paper for an unbeatable release. -
Sift the Dry Ingredients
In a large mixing bowl, whisk together the cake flour and baking powder. Sifting is crucial here—it keeps your cake light and fluffy by incorporating air into the dry mix. -
Cream the Butter and Sugar
In another bowl, cream the stick of salted butter and granulated sugar until light and fluffy (about 3-4 minutes). This step is essential for achieving that lovely airy texture in our cake. -
Mix in the Eggs and Lime Zest
Add the whole eggs and egg yolks one at a time, mixing well after each addition. Then beat in the lime zest. The mixture should look smooth and fluffy. -
Incorporate the Milk and Lime Juice
Alternately add the dry mixture and the whole milk and lime juice to the butter-sugar-egg mixture, starting and ending with the dry ingredients. It’s crucial not to overmix here—just blend until you see no more streaks of flour. This will ensure a tender cake! -
Add Food Coloring
If you want that beautiful hint of green, add 2-4 drops of food coloring now and stir gently to combine. -
Pour and Bake
Divide the batter evenly between the prepared cake pans and smooth the tops with a spatula. Bake for 25-30 minutes or until a toothpick inserted in the center comes out clean. -
Cool the Cakes
Once baked, remove the cakes from the oven and let them cool in the pans for about 10 minutes. Then carefully transfer them to a wire rack to cool completely. Patience here is key—this will keep your layers from crumbling! -
Make the Frosting
In a large bowl, beat together the salted butter and cream cheese until smooth and fluffy. Gradually add the powdered sugar and beat until well combined. Next, mix in the pureed strawberries. If it’s too thick, you can add a teaspoon of milk to loosen it. -
Assemble the Cake
Once the cakes are completely cool, place one layer on a serving plate. Spread a generous layer of frosting on top before adding the second layer. Use the remaining frosting to cover the top and sides of the cake, smoothing it out with a spatula. -
Garnish
For a beautiful presentation, consider adding fresh strawberries on top. You could also sprinkle some lime zest around the edges for a pop of color!
Serving Suggestions
For a stunning presentation, place your Strawberry Limeade Cake on a colorful cake stand and garnish with fresh strawberries and sprigs of mint for that added "wow" factor. Serve each slice with a dollop of whipped cream and a drizzle of lime syrup if you’re feeling extra indulgent!
Recipe Variations
- Berry Medley: Swap out the strawberries for a mix of your favorite berries like raspberries and blueberries for a twist on flavor.
- Gluten-Free: Use a gluten-free cake flour alternative to accommodate gluten-sensitive friends and family.
- Lemonade Option: Substitute the lime juice and zest with fresh lemon juice and zest for a bright Lemonade Cake.
- Layered Delight: Turn this into a layered iced cake by slicing each cake into two layers for a total of four layers—frost between layers for even more fun!
Chef’s Notes
Whenever I make this cake, it reminds me of those sun-soaked days spent lounging on the patio. While perfecting this recipe over the years, I’ve learned that ingredients like fresh limes and strawberries truly make a difference. A funny story—one time I accidentally used expired baking powder, and let’s just say our cake turned into a pancake! Lesson learned: always check your ingredients!
FAQs and Troubleshooting
1. Why did my cake sink in the middle?
This could happen if the batter was overmixed or the oven temperature was too low. Always ensure your oven is fully preheated!
2. My cake is too dense; what went wrong?
Dense cakes often result from overmixing or using the wrong type of flour. Always sift and be gentle with your mixing!
3. How can I store leftovers?
Store leftover cake in an airtight container in the refrigerator for up to 4 days, or freeze slices wrapped in plastic wrap for up to 3 months.
4. What can I do if my frosting is too sweet?
If your frosting turns out too sweet, you can mix in more cream cheese or a pinch of salt to balance the sweetness.
Nutritional Info
(Optional- include nutritional values as per your preference; remember to consult a nutritional calculator if used here)
And there you have it—the ultimate Strawberry Limeade Cake recipe! Bursting with flavor and layers of joy, this cake is bound to become a favorite in your kitchen. So, gather your loved ones, bring out the forks, and let the deliciousness begin! Happy baking!
PrintStrawberry Limeade Cake

A vibrant and refreshing Strawberry Limeade Cake that perfectly balances zesty lime and luscious strawberries, making it ideal for gatherings and celebrations.
- Prep Time: 20 minutes
- Cook Time: 30 minutes
- Total Time: 50 minutes
- Yield: 12 servings 1x
- Category: Dessert
- Method: Baking
- Cuisine: American
- Diet: Vegetarian
Ingredients
- 2 1/2 cups Cake Flour
- 2 1/2 teaspoons Baking Powder
- 1 stick Salted Butter (1/2 cup)
- 2 tablespoons Lime Zest
- 1 1/2 cups Granulated Sugar
- 3 large Eggs + 3 large Egg Yolks
- 1/2 cup Whole Milk
- 1/2 cup Lime Juice
- 2–4 drops Green Food Coloring (optional)
- For the frosting:
- 3/4 cup Salted Butter (1 1/2 sticks)
- 4 ounces Cream Cheese (softened)
- 1/2 cup Frozen Sweetened Strawberries in Syrup (thawed and pureed)
- 5–6 cups Powdered Sugar
Instructions
- Preheat your oven to 350°F (175°C).
- Prepare two 9-inch round cake pans by greasing and flouring them.
- Sift together the cake flour and baking powder in a mixing bowl.
- Cream the salted butter and granulated sugar until light and fluffy.
- Mix in the eggs and lime zest one at a time.
- Incorporate the dry mixture, milk, and lime juice alternately into the butter-sugar-egg mixture.
- Add food coloring if desired and stir gently.
- Pour the batter into the prepared cake pans and smooth the tops.
- Bake for 25-30 minutes or until a toothpick comes out clean.
- Cool the cakes in the pans for about 10 minutes, then transfer to a wire rack.
- Make the frosting by beating together salted butter and cream cheese, then gradually adding powdered sugar and mixing in pureed strawberries.
- Assemble the cake by layering and frosting between the cakes and on the sides.
- Garnish with fresh strawberries and lime zest for presentation.
Notes
Use fresh ingredients for the best flavor. Adjust the frosting’s sweetness by adding more cream cheese if too sweet.
Nutrition
- Serving Size: 1 slice
- Calories: 400
- Sugar: 45g
- Sodium: 350mg
- Fat: 18g
- Saturated Fat: 10g
- Unsaturated Fat: 6g
- Trans Fat: 0g
- Carbohydrates: 55g
- Fiber: 1g
- Protein: 6g
- Cholesterol: 80mg
Keywords: cake, strawberry, limeade, dessert, summer
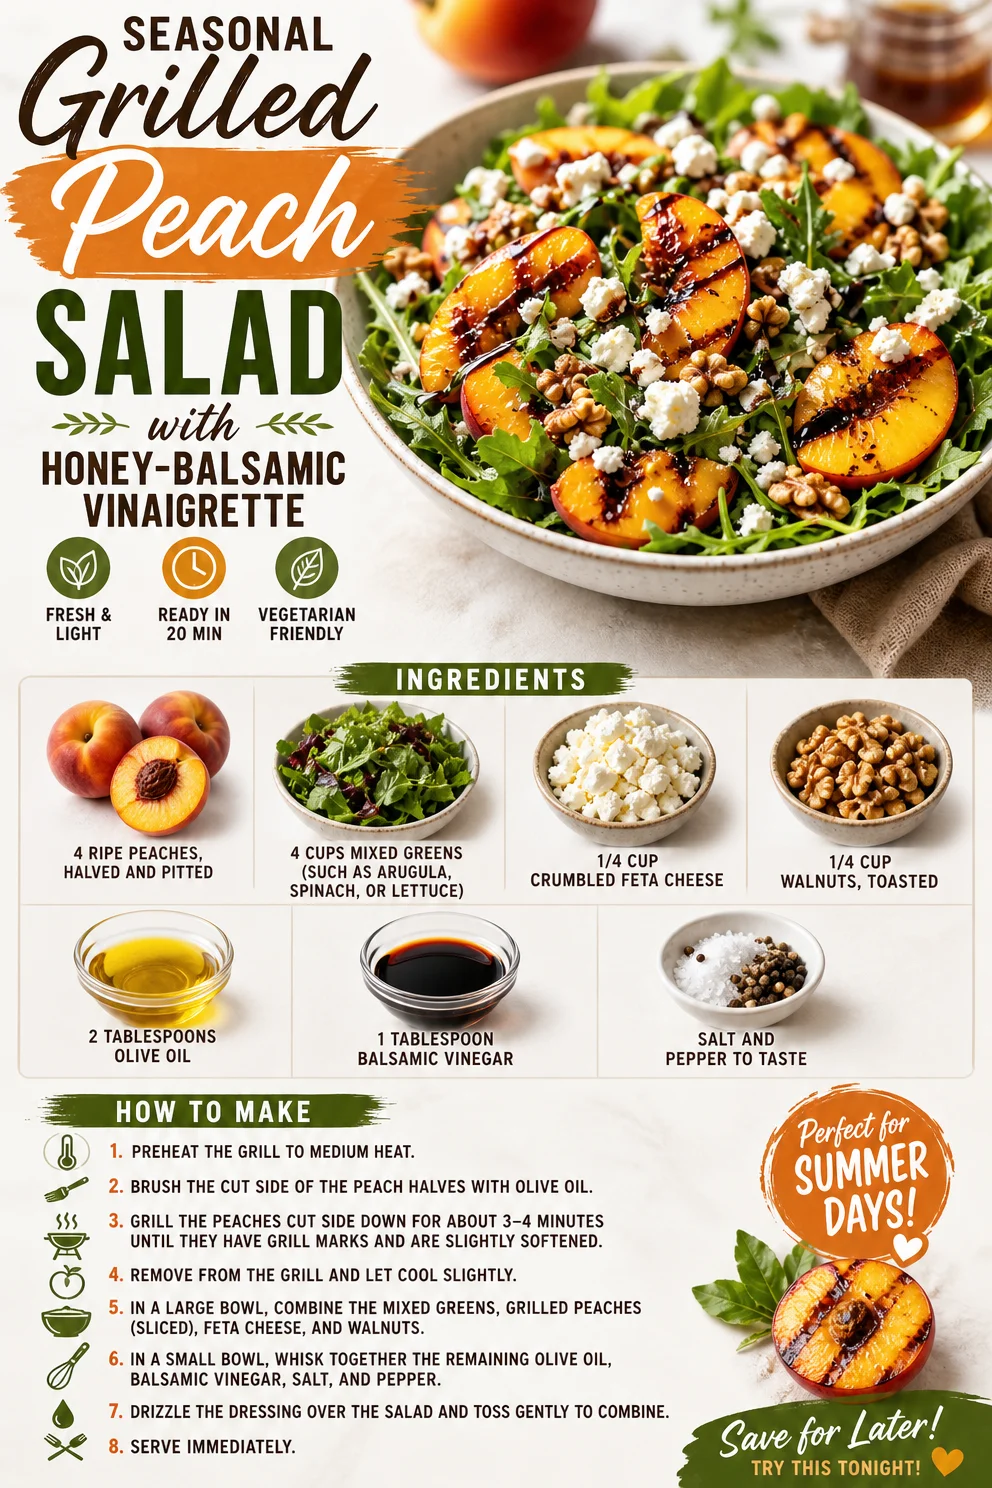
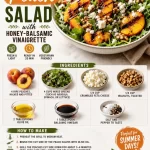
Seasonal Grilled Peach Salad with Honey-Balsamic Vinaigrette
Grilled Peach Salad: A Sweet Spin on a Classic
There’s something truly magical about the sweetness of summer, especially when it comes to peaches. Picture this: the sun is shining, the air is warm, and you’ve just come back from the local farmer’s market, a bag brimming with ripe, juicy peaches. It’s one of those moments that simply calls for a celebration, and what better way to embrace the season than with a vibrant Grilled Peach Salad!
Here at Clean Plate Cravings, I believe that food should be an experience—a joy to prepare and to eat. This Grilled Peach Salad is not just a dish; it’s a burst of summer happiness, beautifully balancing the sweetness of the peaches with the vibrancy of greens and the richness of feta cheese. Plus, it’s super easy to whip up! Let’s take a little trip down memory lane as I share a personal story about how this delightful salad came to be.
A Slice of Nostalgia
I remember the first time I had grilled peaches. It was at a backyard barbecue hosted by my dear friend, Sarah. The sun was starting to set, and the warm glow of the evening added a magical touch to our gathering. Sarah, a culinary whiz, decided to throw some peaches on the grill as a spontaneous appetizer. We all watched in anticipation, and when she pulled those charred, caramelized jewels off the grill, the aroma was simply heavenly.
With just a drizzle of honey and a sprinkle of sea salt, I took my first bite. The contrast of the warm, juicy peach against the tangy feta was a revelation! I could hardly believe how something so simple could taste so divine. It inspired me to create this salad, melding fresh greens with luscious grilled peaches. Every time I make it, it takes me back to that beautiful summer evening, surrounded by friends and laughter.
Ingredients
Let’s gather our star players for this Grilled Peach Salad:
-
4 ripe peaches, halved and pitted
Look for peaches that are slightly soft to the touch; they should give a little when pressed. If peaches aren’t in season, you can substitute with nectarines or even plums for a similar flavor. -
4 cups mixed greens (such as arugula, spinach, or lettuce)
Mixed greens add color and texture; arugula brings a peppery flavor, while spinach adds a tenderness. Feel free to use what you have on hand—kale or baby kale work great too! -
1/4 cup crumbled feta cheese
Feta adds a salty, creamy element that pairs perfectly with the sweetness of the peaches. If you want a different flavor profile, try goat cheese or even blue cheese for an extra punch. -
1/4 cup walnuts, toasted
Walnuts not only add crunch but also a lovely nutty flavor. To toast, simply place them in a dry skillet over medium heat until fragrant—something you’ll want to keep an eye on so they don’t burn! -
2 tablespoons olive oil
A good quality extra virgin olive oil enhances the flavor of every ingredient in this dish. If you’re feeling adventurous, try infusing it with herbs like rosemary or basil for an added kick. -
1 tablespoon balsamic vinegar
Balsamic is a classic dressing for salads, bringing a tangy sweetness that binds everything together. You can switch this with apple cider vinegar or lemon juice for a different sour note. -
Salt and pepper to taste
Always remember: seasoning is key to bringing out the flavors in your dish. Freshly cracked pepper adds a little heat, while sea salt elevates every ingredient beautifully.
Step-by-Step Instructions
Now that we have our ingredients ready, let’s dive into the cooking process. Don’t worry; I’ll walk you through it step by step and share some chef hacks along the way!
-
Preheat Your Grill
Make sure your grill is heated to medium-high. This ensures those beautiful grill marks and caramelization on the peaches. No grill? No worries! You can use a grill pan on the stovetop. -
Prep the Peaches
Halve the peaches and remove the pits. If they’re sticking a bit, you can run a knife around the pit and twist gently. Brush each half lightly with olive oil to prevent sticking and to enhance the flavor while grilling. -
Grill the Peaches
Place the peach halves cut-side down on the grill. Grill for about 3-4 minutes until they develop those stunning grill marks and are warm throughout. Keep an eye on them—grilled fruit cooks quickly, and you want that perfect caramelization without turning mushy. -
While the Peaches Grill
Start building your salad base! In a large bowl, combine your mixed greens. Toss them gently, allowing them to fluff up. This step makes the salad look inviting and airy. -
Toast the Walnuts
In a separate dry skillet over medium heat, add the walnuts. Toast them for about 5 minutes, stirring frequently until they are golden brown and fragrant. Stand nearby—these can go from toasted to burnt quickly! -
Dress It Up
In a small bowl, whisk together the remaining olive oil and balsamic vinegar with a pinch of salt and pepper. This will be your salad dressing—it’s fresh and simple! -
Put It All Together
Once the peaches are grilled, chop them into bite-sized pieces. Add the grilled peaches and toasted walnuts to the mixed greens. Crumble the feta cheese on top, and drizzle the dressing. Give it a gentle toss to combine all those delightful flavors. -
Taste Test!
This is the best part! Before serving, taste your salad and adjust the seasoning if necessary. Maybe you’d like a hint more salt or another drizzle of balsamic vinegar? Go for it!
Serving Suggestions
To serve, plate the salad in a large salad bowl or on individual plates. For a beautiful presentation, place generous portions of the mixed greens at the base, scatter the grilled peaches, crumbled feta, and toasted walnuts on top. Finish with a peek of extra balsamic drizzle, maybe a sprinkle of chopped fresh herbs for an added touch. Voilà, your stunning Grilled Peach Salad is ready to impress!
Recipe Variations
Feeling creative? Here are a few fun twists you can try with this Grilled Peach Salad:
- Add Grains: Incorporate cooked quinoa or farro for a heartier salad that packs a nutritional punch.
- Use Different Fruits: Try grilling other fruits like pineapples or apricots for a fun twist.
- Herbed Options: Toss in fresh herbs like basil or mint to elevate the flavor.
- Spicy Kick: Add some sliced jalapeños or red pepper flakes for a kick!
- Nuts Swap: Experiment with different nuts—almonds or pecans are great alternatives to walnuts.
Chef’s Notes
Every recipe has a backstory, and this one holds a special place in my heart. Over the years, I’ve experimented with various ingredients to create unique flavor combinations. I’ve swapped out the greens, replaced feta with goat cheese, and even tried a honey-lime dressing during one summer gathering. The beauty of this salad is its flexibility—feel free to make it your own!
And let me tell you, each version has been a total hit! I often reminisce about that first unforgettable taste of grilled peaches, unlocking a world of fruit-forward salads that leave everyone wanting more.
FAQs and Troubleshooting
1. My peaches are too firm. What should I do?
If your peaches aren’t ripe enough, you can still grill them! Just slice them thinner to help them caramelize better. Alternatively, let them ripen at room temperature for a couple of days.
2. How do I prevent my salad from wilting?
Dress the salad just before serving to keep the greens crisp. If you have leftovers, store the dressing separately for the next day.
3. Can I prepare this salad in advance?
You can grill the peaches and toast the walnuts ahead of time, but I recommend assembling the salad right before serving to maintain freshness.
4. What can I add for protein?
Grilled chicken, shrimp, or chickpeas are all fantastic options to boost protein in this salad. Just add them on top after tossing your other ingredients!
Nutritional Info
If you’re curious about the nutritional profile of this Grilled Peach Salad, here’s a quick breakdown (per serving):
- Calories: 250
- Protein: 6g
- Carbohydrates: 20g
- Fats: 18g
- Fiber: 3g
This salad is not only delicious but also packed with nutrients. It’s as nourishing as it is vibrant.
Whether you’re enjoying this Grilled Peach Salad as a light lunch, a side dish for dinner, or a star at your next barbecue, I hope it brings a refreshing burst of flavor to your table. Remember, cooking is all about creativity and having fun—so go ahead, make it your own, and savor each juicy bite! Enjoy!
PrintGrilled Peach Salad
A vibrant Grilled Peach Salad that beautifully balances the sweetness of peaches with fresh greens and rich feta cheese.
- Prep Time: 15 minutes
- Cook Time: 10 minutes
- Total Time: 25 minutes
- Yield: 4 servings 1x
- Category: Salad
- Method: Grilling
- Cuisine: American
- Diet: Vegetarian
Ingredients
- 4 ripe peaches, halved and pitted
- 4 cups mixed greens (such as arugula, spinach, or lettuce)
- 1/4 cup crumbled feta cheese
- 1/4 cup walnuts, toasted
- 2 tablespoons olive oil
- 1 tablespoon balsamic vinegar
- Salt and pepper to taste
Instructions
- Preheat your grill to medium-high.
- Prep the peaches by halving and removing the pits, brushing each half lightly with olive oil.
- Grill the peach halves cut-side down for about 3-4 minutes until warm throughout.
- While the peaches grill, combine mixed greens in a large bowl.
- Toast walnuts in a dry skillet over medium heat for about 5 minutes until golden brown and fragrant.
- Whisk together remaining olive oil and balsamic vinegar with a pinch of salt and pepper for the dressing.
- Put the grilled peach pieces and toasted walnuts into the mixed greens, add crumbled feta, and drizzle with dressing. Toss gently.
- Taste the salad and adjust seasoning if necessary before serving.
Notes
Feel free to substitute with nectarines or other seasonal fruits. This salad pairs beautifully with grilled chicken or shrimp for added protein.
Nutrition
- Serving Size: 1 serving
- Calories: 250
- Sugar: 10g
- Sodium: 200mg
- Fat: 18g
- Saturated Fat: 3g
- Unsaturated Fat: 15g
- Trans Fat: 0g
- Carbohydrates: 20g
- Fiber: 3g
- Protein: 6g
- Cholesterol: 10mg
Keywords: salad, grilled peaches, summer salad, vegetarian salad, healthy recipe
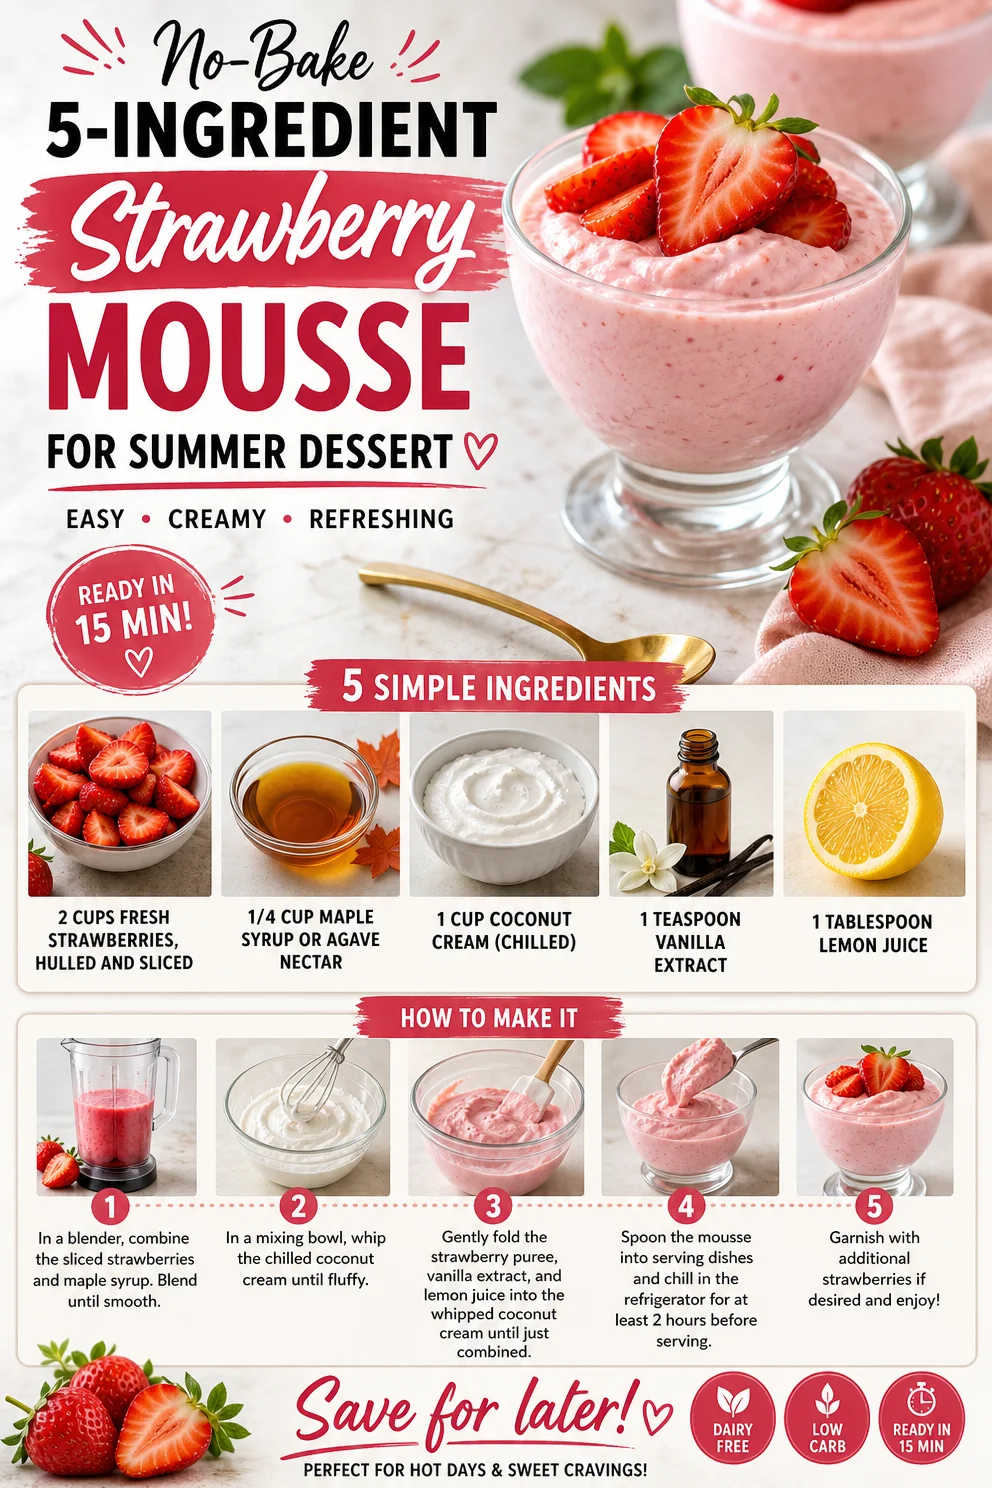
No-Bake 5-Ingredient Strawberry Mousse for Summer Dessert
Indulge in Freshness: A Delightful Strawberry Mousse
Welcome, fellow food lovers! Today, I’m shimmying into your kitchen to share one of my all-time favorite recipes—Strawberry Mousse. This light and fluffy dessert is as vibrant as a summer day and will have your taste buds dancing with delight. I mean, who doesn’t love the combination of creamy, dreamy textures mingling with the sweet-tartness of fresh strawberries? Trust me; this is a dessert that will make you feel like a culinary rockstar, even if you’re just starting out in the kitchen.
The beauty of Strawberry Mousse lies in its simplicity. With just a few wholesome ingredients, we can create a dish that feels indulgent yet remains guilt-free. Plus, it’s versatile enough to suit any occasion—from casual family dinners to fancy gatherings. It’s time to roll up those sleeves, grab your favorite apron, and let’s create a dessert that will be the star of the show.
A Sweet Childhood Memory
Before we dive into the how-to, let me whisk you away to my childhood for a moment. I grew up in a household that absolutely celebrated food. Some of my fondest memories revolve around summer afternoons spent in my grandmother’s sun-kissed garden, where strawberries grew in abundance. We’d pluck those ruby-red jewels right off the vine, their sweetness bursting in our mouths.
One day, my grandmother introduced me to her secret recipe for Strawberry Mousse. As we whipped the creamy mixture together, she shared stories from her childhood, her laughter mixing with the sounds of the mixer whirring. We indulged in cherry-red bowls of mousse on the porch, while the sun set behind us, painting the sky with hues of orange and pink.
Those moments instilled in me a love for cooking and sharing food. This Strawberry Mousse is my way of honoring those sun-drenched days filled with sweetness, laughter, and love. So, grab your strawberries, and let’s whip up some delicious memories of our own!
Ingredients
Here’s what you’ll need to create this delightful Strawberry Mousse:
-
2 cups fresh strawberries, hulled and sliced
The star ingredient! Choose ripe strawberries for the best flavor. If strawberries aren’t in season, feel free to substitute with frozen berries—just ensure they’re thawed and well-drained. -
1/4 cup maple syrup or agave nectar
A natural sweetener that adds richness! If you want to cut down on sweetness, feel free to adjust the amount. Honey can be used here too, just remember that it may change the flavor slightly. -
1 cup coconut cream (chilled)
This gives our mousse its luxurious, creamy texture. Chill your coconut cream overnight for the best results. Want a nut-free option? Try Greek yogurt instead. -
1 teaspoon vanilla extract
A splash of vanilla adds depth! Go for pure vanilla extract if you can; it makes all the difference in flavor. -
1 tablespoon lemon juice
Lemon juice brightens the flavors and balances the sweetness. If you don’t have fresh lemons, bottled lemon juice can work in a pinch.
Step-by-Step Instructions
Now that our ingredients are ready, let’s get into the nitty-gritty of creating this mousse! Follow these steps to ensure success:
-
Prepare Your Strawberries
Start by hulling and slicing your strawberries. A quick tip: use the tip of a paring knife to remove the green tops efficiently. Set aside a few lovely slices for garnishing later! -
Blend the Strawberries
Toss your sliced strawberries into a blender or food processor. Blend until smooth. You want it velvety! If you prefer textured mousse, pulse a few times to leave some tiny chunks. -
Sweeten It Up
Add the maple syrup (or your chosen sweetener) to the strawberry puree. Blend again until combined. Taste at this stage; adjust sweetness as needed! You can even add a tiny pinch of salt to enhance those sweet notes. -
Whip the Coconut Cream
In a separate bowl, beat your chilled coconut cream. Use an electric mixer on medium speed; you want it fluffy and light. It should take about 3-4 minutes. If it’s too stiff, you can add a splash of non-dairy milk to help it along. -
Combine the Mixtures
Gently fold the strawberry puree into the whipped coconut cream until well combined. Be careful not to deflate the cream too much; we want that airy texture to remain! This is where the magic happens. -
Add Vanilla and Lemon Juice
Now, add your teaspoon of vanilla extract and tablespoon of lemon juice. Fold it gently until everything is mixed in. The mousse should look pretty and light, with a beautiful pink color. -
Chill to Perfection
Spoon the mousse into your favorite serving dishes or glasses. Cover them with plastic wrap or a lid and chill in the fridge for at least an hour. This step is crucial to help the flavors meld and ensure it’s cool when served.
Serving Suggestions
Once your mousse has chilled, it’s time to serve! You can ladle it into elegant glasses for a fancy dinner party or into simple bowls for a cozy night-in. Garnish with those reserved strawberry slices, a dollop of coconut cream, or even a sprig of fresh mint for an extra pop of freshness. If you’re feeling adventurous, drizzle a little chocolate sauce over the top—this mousse is all about creative expression, after all!
Recipe Variations
Now, let’s jazz up this recipe with some fun twists, shall we? Here are a few ideas to keep things exciting:
-
Berry Medley Mousse: Blend in a mix of berries—think blueberries, raspberries, or blackberries. The colors and flavors will make your mousse appealing and delicious!
-
Chocolate-Covered Strawberry Mousse: Add 2 tablespoons of cocoa powder to the strawberry mixture for a decadent chocolate flavor that pairs beautifully with strawberries.
-
Citrus Burst: Replace lemon juice with lime or orange juice for a zesty twist on this classic dessert.
-
Herb-Infused: Add fresh mint or basil to the blender with the strawberries for a refreshing herbal note.
-
Nutty Mousse: Incorporate a tablespoon of almond extract along with the vanilla for a subtle nuttiness that complements the strawberries.
Chef’s Notes
This Strawberry Mousse is a canvas for creativity! I often swap ingredients based on what’s in my fridge or pantry—there’s no right or wrong way here. And if you happen to over-whip your coconut cream (guilty!), fear not! Simply add a tad more coconut cream to soften it back up.
I also learned in my kitchen adventures that a bit of patience goes a long way. Letting the mousse chill for a bit helps solidify the lovely fluffy texture. Plus, it allows the flavors to sing in harmony. So don’t rush it; good things take time—especially sweet, creamy things!
FAQs and Troubleshooting
-
Why is my mousse not thickening?
If your mousse isn’t thickening, ensure that your coconut cream is chilled properly before whipping. If you used regular cream, it may require more whipping. -
Can I make this ahead of time?
Absolutely! Strawberry Mousse can be made a day ahead, just keep it stored in the refrigerator. It’s a great make-ahead dessert. -
How long will the mousse last?
Stored in an airtight container in the refrigerator, this mousse will stay fresh for about 2-3 days. -
What if I want to make this recipe vegan?
The recipe is already vegan-friendly, thanks to the coconut cream and maple syrup. Just double-check that all your ingredients align with vegan diets.
Nutritional Info
Each serving of Strawberry Mousse contains approximately:
- Calories: 180
- Fat: 11g
- Carbohydrates: 20g
- Protein: 2g
- Fiber: 2g
And there you have it! A delightful Strawberry Mousse that’s fresh, delicious, and sure to impress. This dessert not only brings back beautiful memories but also creates new ones with every spoonful! Remember, the kitchen is your playground; experiment, enjoy, and most importantly, savor every bite. Happy cooking!
PrintStrawberry Mousse

A light and fluffy strawberry mousse that combines creamy textures with the sweet-tartness of fresh strawberries.
- Prep Time: 15 minutes
- Cook Time: 0 minutes
- Total Time: 60 minutes
- Yield: 4 servings 1x
- Category: Dessert
- Method: No-Cook
- Cuisine: International
- Diet: Vegan
Ingredients
- 2 cups fresh strawberries, hulled and sliced
- 1/4 cup maple syrup or agave nectar
- 1 cup coconut cream (chilled)
- 1 teaspoon vanilla extract
- 1 tablespoon lemon juice
Instructions
- Prepare your strawberries by hulling and slicing them. Set aside a few slices for garnishing later.
- Blend the sliced strawberries in a blender until smooth.
- Sweeten the strawberry puree by adding maple syrup and blending again. Adjust sweetness as needed.
- Whip the chilled coconut cream in a separate bowl until fluffy, about 3-4 minutes.
- Combine the strawberry puree with the whipped coconut cream, folding gently.
- Add the vanilla extract and lemon juice, folding until well mixed.
- Chill the mousse in serving dishes for at least an hour before serving.
Notes
You can garnish with additional strawberry slices or a dollop of coconut cream. This mousse can be made ahead of time and stored in the fridge for 2-3 days.
Nutrition
- Serving Size: 1 serving
- Calories: 180
- Sugar: 14g
- Sodium: 5mg
- Fat: 11g
- Saturated Fat: 10g
- Unsaturated Fat: 1g
- Trans Fat: 0g
- Carbohydrates: 20g
- Fiber: 2g
- Protein: 2g
- Cholesterol: 0mg
Keywords: strawberry mousse, dessert, vegan dessert, easy dessert, summer recipes