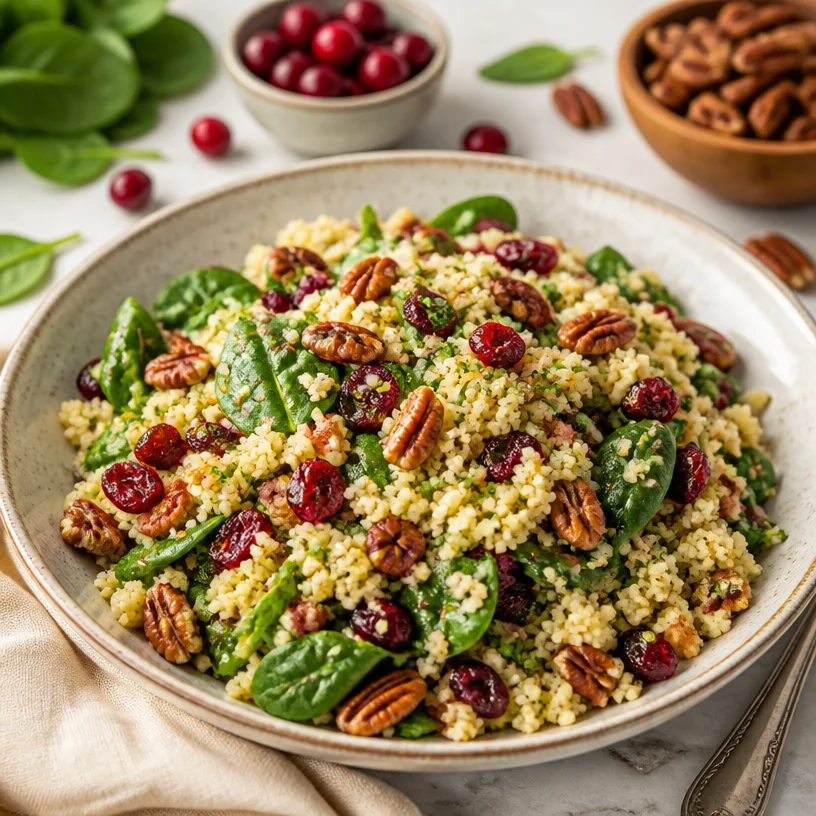
Harvest Couscous Salad
Harvest Couscous Salad: A Bowls Full of Flavor and Love
Welcome to my kitchen, foodie friends! Today, I’m excited to dive into a dish that captures the essence of fall flavors while remaining the perfect light meal year-round: Harvest Couscous Salad. This vibrant, colorful salad is not just a feast for the eyes; it’s packed with healthy ingredients that’ll make your taste buds dance. Prepare to be swept away by the delight of warm, toasted nuts, sweet cranberries, and crispy spinach, all encased in fluffy couscous.
Picture this: You come home after a long day, you’re tired, and the last thing on your mind is cooking. However, a warm bowl of Harvest Couscous Salad is waiting in your fridge, shining like a beacon of hope. Just grab a fork, and you’re transported to sunny fields filled with vibrant harvest hues. Trust me, this isn’t just food—it’s the heartwarming feeling of home, nutrition, and pure happiness all rolled into one delicious bowl.
Personal Story: A Cozy Memory
I still remember the very first time I made a couscous salad. I was visiting my grandmother for a weekend getaway in the countryside, where the air smelled of ripe apples, and the golden leaves crunched beneath our feet. One crisp afternoon, she invited me to join her in the kitchen, where she was whipping up a lovely salad for lunch. The way she brought simple ingredients together—couscous, herbs, and roasted veggies—felt like a magical performance.
As we tossed in vibrant cranberries and crunchy pecans, I found myself enchanted by the way food could create joy and connection. Every bite of that salad made me feel like I was tasting the very essence of love and nourishment. While I may have originally learned to make a simple version from her, I’m thrilled to have turned it into a heartwarming recipe that brings both comfort and vitality into my life!
Ingredients
Here’s what you’ll need for this delectable Harvest Couscous Salad:
-
Couscous: This little grain is the star of the show! Couscous cooks up light and fluffy, creating a perfect base for your salad. If you’re feeling adventurous, you can swap it out for quinoa or barley for some extra fiber and protein.
-
Cranberries: Dried cranberries add a lovely sweet-tart flavor that beautifully complements the other ingredients. If you don’t have cranberries, you could swap in raisins or chopped dried apricots for a different twist.
-
Pecans: These nuts are not only crunchy but also provide healthy fats and protein. Toasting them brings out their natural sweetness! If you have an allergy, walnuts or almonds would also work wonderfully—just loosely chop them.
-
Spinach: Fresh spinach renders the salad vibrant and refreshing. You could easily replace it with kale or arugula if you want a bit of peppery kick or added health benefits.
Step-by-Step Instructions
Let’s bring this Harvest Couscous Salad to life—follow my friendly chef’s instructions for a delicious result!
-
Cook the Couscous:
- In a medium saucepan, combine 1 cup of couscous with 1½ cups of water or vegetable broth for an extra flavor boost. Bring it to a boil, reduce the heat, cover, and let it simmer for about 10 minutes. Remove from heat and let it sit for 5 more minutes.
- Chef Hack: Fluff the couscous gently with a fork for that perfect light texture. This step makes a huge difference in avoiding clumps!
-
Toast the Pecans:
- While the couscous is cooking, preheat a skillet over medium heat. Add ½ cup of pecans and toast them for about 5 minutes, stirring frequently until they’re golden and fragrant.
- Tip: Keep a close eye on them—nuts can go from perfect to burnt in a matter of seconds!
-
Combine Ingredients:
- In a large bowl, combine your fluffed couscous, ½ cup of dried cranberries, and the toasted pecans. Mix gently to distribute the ingredients evenly.
- Chef Insight: The warmth from the couscous helps plump up the cranberries, enhancing their flavor.
-
Add Spinach:
- Now, fold in 2 cups of fresh spinach—tender baby spinach works best, but feel free to use chopped kale for heartiness.
- Tip: If you prefer wilted spinach, you can sauté it lightly in the same skillet used for the nuts—just add a drizzle of olive oil and cook for 1-2 minutes.
-
Season to Taste:
- Drizzle the salad with 2 tablespoons of olive oil, and add a squeeze of fresh lemon juice (roughly 1 tablespoon)—it makes all the flavors pop! Salt and pepper to taste.
- Chef Hack: If you want it extra zesty, consider adding a hint of maple syrup or honey to balance the flavors.
-
Toss and Serve:
- Give your salad a good toss to mix everything together. Make sure all the ingredients are well-coated with the dressing, and voila! Your Harvest Couscous Salad is ready to be enjoyed.
Serving Suggestions
For a stunning presentation, serve your Harvest Couscous Salad in individual bowls or on a large platter. Consider garnishing with additional pecans or a sprinkle of feta cheese for a creamy touch. For a refreshing twist, add slices of apple or pear on top right before serving. The salad can be enjoyed warm, at room temperature, or even cold—perfect for meal prep during a busy week!
Recipe Variations
Want to mix things up? Here are some fun variations you can try:
-
Mediterranean Twist: Add diced cucumbers, cherry tomatoes, olives, and feta cheese for a zesty Mediterranean vibe.
-
Mexican Flare: Spice it up by mixing in black beans, corn, and diced avocado, drizzled with lime juice for a refreshingly vibrant dish.
-
Roasted Vegetable Boost: Roast butternut squash, carrots, or bell peppers to add depth and texture—just toss them in after they’re cooled!
-
Protein Power: Add grilled chicken, tofu, or chickpeas for a hearty meal that keeps you satisfied.
-
Spicy Kick: Toss in some sliced jalapeños or sprinkle red pepper flakes for those who enjoy a little heat!
Chef’s Notes
This recipe has definitely evolved over time! Initially, I started with a family recipe that included only a couple of ingredients. Over the years, I experimented and added my own personal touches, and I’m absolutely thrilled with how it turned out. Plus, this dish has been a lifesaver at potlucks and dinner gatherings. It’s always a hit! It’s funny—I once kept forgetting to add the cranberries during a busy family dinner prep, but folks loved it just as much with the pecans and spinach alone.
FAQs and Troubleshooting
-
Why did my couscous turn out clumpy?
Clumpy couscous typically results from overcooking or insufficient fluffing. Ensure you’re following the cooking instructions and fluffing gently with a fork after letting it rest. -
Can I make this salad ahead of time?
Absolutely! This salad keeps well in the fridge for about 2-3 days. To keep the spinach fresh, consider adding this ingredient just before serving. -
What can I do if it’s too dry?
If you find that your salad is a bit dry, you can add a drizzle of olive oil or a splash of vegetable broth to moisten it up. -
Is this salad gluten-free?
Traditional couscous is made from wheat, so it isn’t gluten-free. However, you can substitute it with quinoa or a gluten-free couscous blend.
Nutritional Info
- Calories: Approximately 250 per serving
- Protein: 6g
- Fat: 10g
- Carbohydrates: 35g
- Fiber: 3g
- Sugar: 4g
There you have it—the cozy, delightful, and super simple Harvest Couscous Salad! With its bright flavors and nourishing ingredients, it’s sure to become a cherished go-to in your kitchen. So grab your apron, and let’s make some kitchen magic happen! Happy cooking!
PrintHarvest Couscous Salad
A vibrant and colorful salad, packed with healthy ingredients like toasted pecans, cranberries, and fresh spinach, all encased in fluffy couscous.
- Prep Time: 15 minutes
- Cook Time: 15 minutes
- Total Time: 30 minutes
- Yield: 4 servings 1x
- Category: Salad
- Method: Mixing
- Cuisine: Mediterranean
- Diet: Vegetarian
Ingredients
- 1 cup couscous
- 1½ cups water or vegetable broth
- ½ cup dried cranberries
- ½ cup pecans
- 2 cups fresh spinach
- 2 tablespoons olive oil
- 1 tablespoon fresh lemon juice
- Salt and pepper to taste
Instructions
- Cook the couscous: Combine 1 cup of couscous with 1½ cups of water or vegetable broth. Bring it to a boil, reduce heat, cover, and simmer for 10 minutes. Remove from heat and let sit for 5 minutes.
- Toast the pecans: Preheat a skillet over medium heat, add ½ cup pecans, and toast for 5 minutes, stirring frequently.
- Combine ingredients: In a large bowl, mix your fluffed couscous, ½ cup dried cranberries, and toasted pecans.
- Add spinach: Fold in 2 cups fresh spinach.
- Season to taste: Drizzle the salad with 2 tablespoons olive oil and 1 tablespoon fresh lemon juice. Add salt and pepper to taste.
- Toss and serve: Mix everything together and enjoy your Harvest Couscous Salad.
Notes
This salad can be enjoyed warm, at room temperature, or cold. It keeps well in the fridge for 2-3 days, but add spinach just before serving to keep it fresh.
Nutrition
- Serving Size: 1 serving
- Calories: 250
- Sugar: 4g
- Sodium: 200mg
- Fat: 10g
- Saturated Fat: 1g
- Unsaturated Fat: 8g
- Trans Fat: 0g
- Carbohydrates: 35g
- Fiber: 3g
- Protein: 6g
- Cholesterol: 0mg
Keywords: couscous salad, healthy salad, vegetarian, easy recipes, fall recipes
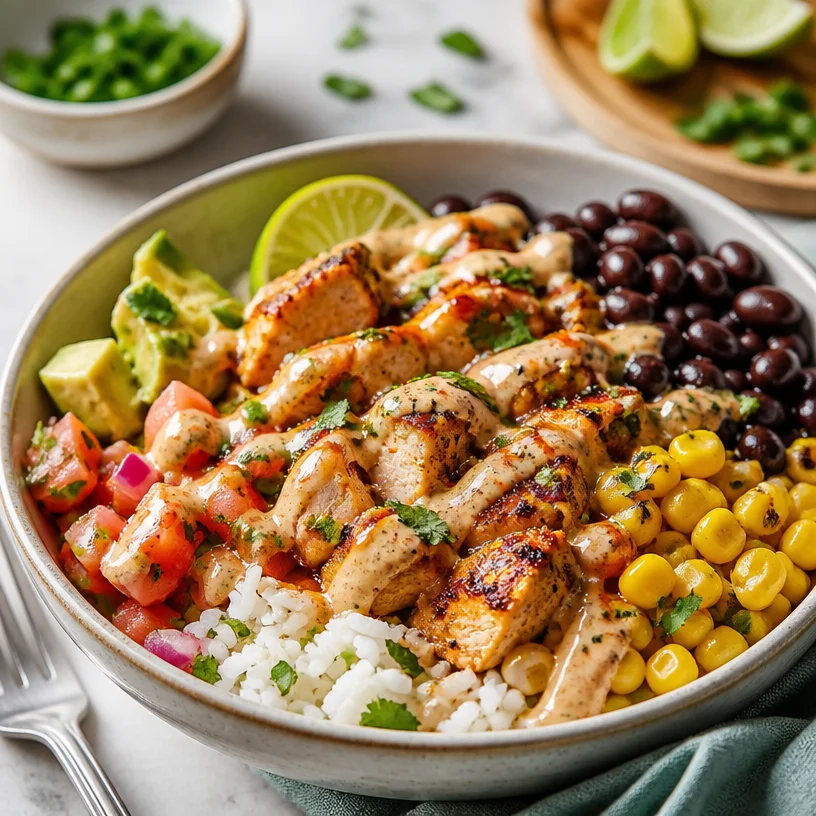
Minute Chicken Burrito Bowl: Simple, Flavorful Meal Prep
Chicken Burrito Bowl: A Fresh and Flavorful Delight
Welcome, fellow food lovers! Today, I’m inviting you into my kitchen to whip up a delicious Chicken Burrito Bowl that’s not just filling but also bursting with flavor! If you think eating clean means giving up on taste, I’m here to shatter that myth. Trust me, you’ll be excited to bring this bowl of goodness to your table.
When I think about burrito bowls, I can’t help but travel back in time to my first taste of one at a local food truck festival. The sizzling sound of chicken on the grill, the fresh aroma of cilantro-lime rice in the air, and the colorful array of toppings—it truly was a feast for both the eyes and the belly! That day sparked my love for healthy, fresh ingredients combined in delightful ways, and what emerged was the inspiration to create my own version of this classic dish.
So, put on your favorite apron, crank up some tunes, and let’s get ready to create a meal that’s not only nourishing but downright satisfying!
A Nostalgic Memory
One sunny afternoon, I found myself at the bustling farmer’s market, soaking in the vibrant sights and sounds. I stumbled upon a food stall that served the most amazing burrito bowls. The cook was a charismatic woman who shared her secret; it was all about the seasoning and fresh ingredients! I watched as she carefully grilled marinated chicken, garnishing it with freshly chopped cilantro and zesty lime. I left the market that day not just with a full belly but with a newfound passion for creative cooking and the magic of assembling flavors. That moment inspired me to blend fresh ingredients into my everyday meals, leading to countless delicious kitchen adventures.
Ingredients
Here’s what you need to create your Chicken Burrito Bowl—each ingredient adds its own flair to this mouthwatering dish!
-
Chicken Breast: Tender and lean, chicken breast is perfect for quick cooking. If you’re looking for a lighter option, you can substitute with turkey or plant-based protein, like tofu or tempeh.
-
Rice: I love using brown rice for its nutty flavor and added fiber, but feel free to swap it for white rice, quinoa, or cauliflower rice for a low-carb alternative.
-
Corn: Sweet, juicy corn adds a burst of sweetness. You can use fresh, frozen, or even canned corn (just rinse it out for extra freshness!).
-
Beans: Black beans are my go-to for their creamy texture and slightly earthy flavor. Pinto beans or chickpeas work well if you want to switch things up.
-
Spices: A blend of cumin, paprika, and chili powder brings warmth and depth to the chicken. Experiment with taco seasoning if you have it on hand!
-
Toppings: Don’t forget the fun stuff! Clear some space in your fridge for fresh cilantro, diced tomatoes, avocado, and a sprinkle of cheese or a dollop of sour cream.
Step-by-Step Instructions
Alright, let’s get cooking! Here’s how to bring your Chicken Burrito Bowl to life:
-
Prepare the Ingredients: Start by gathering all your ingredients. Rinse the rice under cold water until the water runs clear; this removes excess starch and keeps it fluffy. Dice your chicken breast into bite-sized pieces and season them with a blend of cumin, paprika, and chili powder. A pinch of salt goes a long way too!
-
Cook the Rice: In a pot, combine the rice with double the amount of water for cooking. Bring it to a boil, then reduce to a simmer, cover, and let it cook for about 40-45 minutes (for brown rice). The smell will be heavenly! For quicker cooking, you can use a rice cooker or grab some pre-cooked rice.
-
Sauté the Chicken: While the rice is cooking, heat up a skillet over medium-high heat and add a splash of olive oil. Once hot, throw in your seasoned chicken pieces. Cook them for about 6-8 minutes, stirring often, until they are golden brown and cooked through. The key is not to overcrowd the pan, as that can steam the chicken instead of giving it a nice sear.
-
Add the Corn and Beans: Once the chicken is nearly done, toss in the corn and black beans. Stir them around for about 2-3 minutes until everything is heated through. The vibrant colors will start to blend beautifully—that’s your cue to get excited!
-
Assemble the Burrito Bowl: Grab your bowl (make it a big one—you’ll want the room!), and start with a generous scoop of rice at the bottom. Top it with a pile of that delicious chicken, corn, and bean mixture.
-
Garnish with Fresh Toppings: This is where you can get creative! Sprinkle fresh cilantro, diced tomatoes, and avocado slices generously. If you’re a cheese lover, crumble some feta or sprinkle shredded cheese over the top. A squeeze of lime juice will brighten up those flavors even more!
Serving Suggestions
There’s something visually appealing about a well-assembled bowl! Layer your ingredients neatly—perhaps rice on the bottom, a colorful mix of chicken, corn, and beans, and a pop of freshness on top. If you’re feeling fancy, you can serve this delectable dish on a wooden board or in a vibrant bowl that showcases your colorful ingredients. Don’t forget those lime wedges on the side—they’re the cherry on top!
Recipe Variations
- Spicy Kick: Add some diced jalapeños or a drizzle of hot sauce for a spicy twist!
- Tropical Delight: Swap the regular toppings for mango salsa for a sweet and tangy paradise.
- Vegan Option: Use grilled portobello mushrooms instead of chicken for a satisfying texture without meat.
- Paleo-Friendly: Load up on veggies and substitute rice with riced cauliflower for a low-carb delight.
- Breakfast Bowl: Top with a fried egg and some salsa for a fun breakfast or brunch option!
Chef’s Notes
When I first started making burrito bowls, I played around with different spices and toppings, discovering new flavor combinations along the way. One of my friends suggested adding a drizzle of chipotle mayo, and I’ve never looked back! It’s those little inspirations that keep the kitchen fun and exciting. Remember, cooking is an adventure, and the best part is creating something that feels uniquely yours.
FAQs and Troubleshooting
-
Can I make this ahead of time? Absolutely! You can prepare the chicken, rice, and beans ahead and store them in separate containers in the fridge. Just assemble your bowls when it’s time to eat.
-
What if my rice is sticky? If your rice ends up sticky, it might be due to overcooking or using too much water. A quick fix is to let it sit covered for a few minutes, then fluff it with a fork.
-
Can I freeze leftovers? Yes! The chicken, corn, and beans freeze well. Just make sure everything is fully cooled before putting it in airtight containers.
-
How do I make this lower in calories? You can reduce the portion size of rice and opt for extra veggies instead. Feel free to skip high-calorie toppings like cheese and sour cream in favor of additional salsa or fresh veggies.
Nutritional Info (per serving) – Optional
- Calories: 450
- Protein: 35g
- Carbohydrates: 55g
- Fat: 15g
- Fiber: 10g
And there you have it! Your very own Chicken Burrito Bowl packed with flavor and health benefits. I hope this recipe sparks as much joy in your kitchen as it has in mine. Don’t hesitate to experiment, make it your own, and most importantly, have fun! Happy cooking! 🌟
PrintChicken Burrito Bowl

A fresh and flavorful Chicken Burrito Bowl that’s packed with ingredients and bursting with taste.
- Prep Time: 15 minutes
- Cook Time: 30 minutes
- Total Time: 45 minutes
- Yield: 4 servings 1x
- Category: Main Course
- Method: Sautéing
- Cuisine: Mexican
- Diet: Healthy
Ingredients
- 1 lb Chicken Breast, diced
- 1 cup Brown Rice
- 1 cup Corn (fresh, frozen, or canned)
- 1 cup Black Beans
- 1 tsp Cumin
- 1 tsp Paprika
- 1 tsp Chili Powder
- Salt to taste
- Fresh Cilantro, chopped
- Diced Tomatoes
- Avocado, sliced
- Shredded Cheese or Sour Cream
Instructions
- Prepare the Ingredients: Start by gathering all your ingredients. Rinse the rice under cold water until the water runs clear; this removes excess starch and keeps it fluffy. Dice your chicken breast into bite-sized pieces and season them with cumin, paprika, and chili powder. Add a pinch of salt!
- Cook the Rice: In a pot, combine the rice with double the amount of water. Bring it to a boil, then reduce to a simmer, cover, and let it cook for 40-45 minutes (for brown rice).
- Sauté the Chicken: Heat a skillet over medium-high heat and add a splash of olive oil. Once hot, add the seasoned chicken. Cook for 6-8 minutes until golden brown and cooked through.
- Add the Corn and Beans: Toss in the corn and black beans, and stir for about 2-3 minutes until heated through.
- Assemble the Burrito Bowl: Start with a scoop of rice at the bottom, top with chicken, corn, and beans.
- Garnish with Fresh Toppings: Sprinkle cilantro, diced tomatoes, and avocado on top. Add cheese or a squeeze of lime juice for extra flavor!
Notes
Feel free to get creative with toppings and spices. You can also prepare the ingredients ahead of time for quick assembly when it’s time to eat.
Nutrition
- Serving Size: 1 serving
- Calories: 450
- Sugar: 5g
- Sodium: 550mg
- Fat: 15g
- Saturated Fat: 4g
- Unsaturated Fat: 9g
- Trans Fat: 0g
- Carbohydrates: 55g
- Fiber: 10g
- Protein: 35g
- Cholesterol: 75mg
Keywords: Chicken, Burrito Bowl, Healthy, Easy Dinner, Mexican
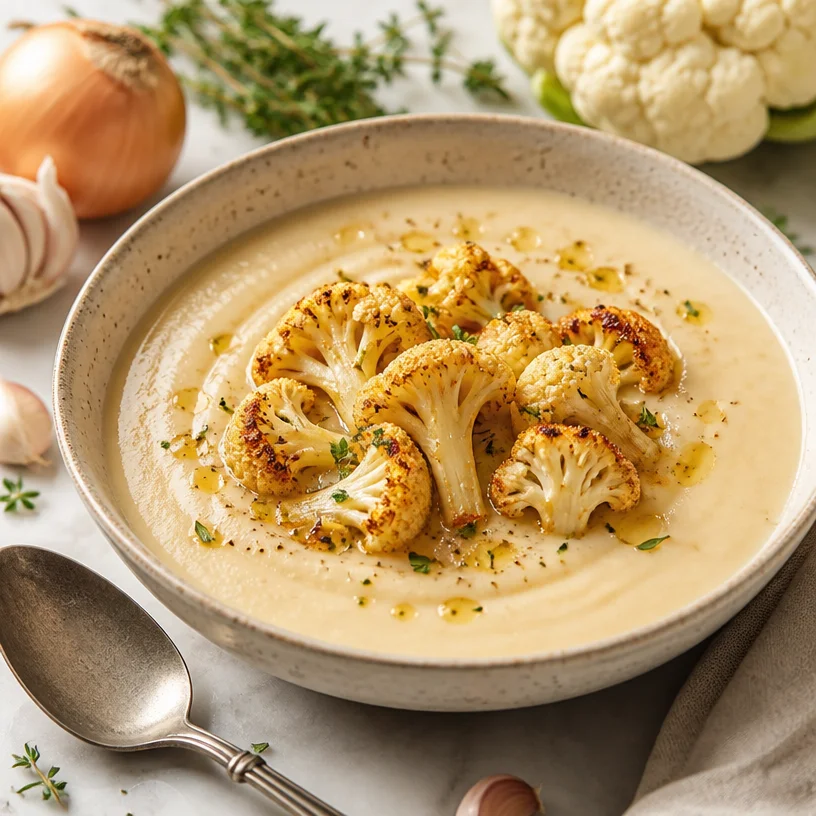
Minute Creamy Roasted Cauliflower Soup (One-Pot)
Delightful Roasted Cauliflower Soup: Warm Your Soul!
Ah, roasted cauliflower soup! Nothing says comfort on a chilly day quite like a steaming bowl of this velvety delight. Imagine the warm embrace of creamy soup infused with the nutty sweetness of roasted cauliflower, the savory depth from onions, and just a hint of richness from cream. This dish is not just a meal; it’s a cozy memory waiting to happen.
If you’ve ever wandered into a local café and been wooed by the aroma of freshly made soup, you know what I’m talking about! This roasted cauliflower soup recipe is designed for those moments when you crave something nourishing, vibrant, and tantalizingly delicious but don’t want to spend all day in the kitchen. So roll up your sleeves, grab your favorite apron, and let’s dive into this delightful experience together!
I started making this soup years ago when I was experimenting with ways to incorporate more vegetables into my meals without sacrificing flavor. One chilly evening, after a long day of work, I craved something hearty yet light at the same time. I grabbed a head of cauliflower, roasted it until it was golden-brown, and blended it into creamy perfection. Instant love! This soup warmed my heart, filled my belly, and sparked joy in my kitchen for years to come.
Ingredients
-
1 large head of cauliflower
- This is the star of our show! When choosing a cauliflower, look for one that’s firm and has tightly packed florets. You can substitute with broccoli if you’re looking for a fun twist!
-
1 medium onion
- Onions bring a sweet yet savory depth to the soup. You can use yellow, white, or even shallots for a more delicate flavor.
-
4 cups vegetable or chicken broth
- Broth adds a flavorful base. If you’re short on time, store-bought is fine! You can also use water if you prefer a lighter version; just season well.
-
1 cup heavy cream or a dairy-free alternative
- The cream adds a luxurious texture. For a lighter version, opt for coconut milk or cashew cream which brings a delightful, creamy touch without the dairy.
-
Olive oil, salt, and pepper
- These essential ingredients elevate everything! Use high-quality extra virgin olive oil for drizzling. Freshly cracked pepper adds a zing, while sea salt enhances all the flavors.
Step-by-Step Instructions
Step 1: Preheat Your Oven
Preheat your oven to 425°F (220°C). This high temperature is key to getting that lovely roasted flavor. It’ll caramelize the sugars in the cauliflower beautifully!
Step 2: Roast the Cauliflower
Cut your cauliflower into florets and toss them onto a baking sheet. Drizzle with olive oil, sprinkle with salt and pepper, and give them a good toss. Make sure the florets are evenly coated. This roasting step is where the magic happens. It will take about 25-30 minutes, and the cauliflower should be golden and slightly crispy when it’s done. The sweet aroma that fills your kitchen will have you doing a happy dance!
Step 3: Sauté the Onions
While the cauliflower roasts, heat a couple of tablespoons of olive oil in a large pot over medium heat. Add the chopped onion and sauté until soft and translucent, about 5-7 minutes. This will create a base that’s absolutely bursting with flavor. Turn the heat down a bit if you notice that the onions are browning too quickly; you want them to be sweet—not burnt!
Step 4: Combine Broth and Cauliflower
Once the cauliflower is perfectly roasted, add it to the pot with the onions. Next, pour in the broth, and bring the mixture to a gentle simmer. Let it cook for about 5-10 minutes so the flavors meld beautifully.
Step 5: Blend It Smooth
Now comes the fun part! Use an immersion blender to puree the soup until it’s silky smooth. If you don’t have an immersion blender, carefully transfer the soup to a regular blender in batches. Just be sure to let some steam escape, so you don’t end up with a kitchen explosion! If the soup seems too thick for your liking, feel free to add a little more broth or water to achieve your desired consistency.
Step 6: Finish with Cream
After blending, stir in the heavy cream. Taste and adjust the seasoning—add more salt or pepper if needed. If you’re feeling adventurous, a dash of lemon juice or a sprinkle of nutmeg can add a delightful kick!
Serving Suggestions
Now for the best part—serving! Ladle your creamy roasted cauliflower soup into bowls and garnish with a drizzle of olive oil and some freshly cracked black pepper. For an extra touch, toss in some freshly chopped herbs like parsley or chives for a pop of color and fresh flavor.
Pair this soup with a warm, crusty bread or a light salad for the perfect meal. Trust me, your guests will be raving about how comforting and delicious this soup is!
Recipe Variations
-
Spicy Kick: Add a pinch of red pepper flakes while sautéing the onions for a subtle spicy twist.
-
Herb Infusion: Incorporate fresh herbs like thyme, rosemary, or dill during the simmering process for added aroma and complexity.
-
Cheesy Goodness: Stir in a handful of grated cheese (like Parmesan or cheddar) right after blending for a rich, cheesy flavor.
-
Roasted Garlic: Toss a few garlic cloves in with your cauliflower before roasting for a sweet, aromatic surprise.
-
Nutty Addition: Top with toasted nuts like walnuts or almonds for an added crunch!
Chef’s Notes
Making this roasted cauliflower soup is like crafting a warm hug in a bowl! It’s a no-fuss recipe that has evolved over time from a simple roasted veggie blend to something that feels refined yet approachable. The first time I served this to friends, I paired it with home-baked sourdough. Let’s just say, it disappeared in minutes!
Sometimes, I even toss in leftover veggies (carrots, potatoes, you name it) that need using up—this soup always turns out amazing. So don’t be afraid to experiment; after all, cooking is all about joy, creativity, and sharing.
FAQs and Troubleshooting
Q: My soup is too thick; what can I do?
A: No worries! Just add a bit more broth or water to your desired consistency and blend again.
Q: Can I make this vegan?
A: Absolutely! Use vegetable broth and swap the heavy cream for coconut cream or cashew cream.
Q: What can I do with leftovers?
A: This soup keeps well in the fridge for up to a week! Reheat in a pot over low heat, stirring occasionally. It also freezes beautifully—just make sure to leave room in the container as it will expand when frozen.
Q: Why is my soup not smooth?
A: If using a blender, make sure not to overfill the jar and give it enough time to blend! An immersion blender tends to achieve a smoother texture but check that you’re thoroughly blending the cauliflower.
Nutritional Info (Optional)
Each serving of this delightful roasted cauliflower soup is nutritious and comforting. Estimated per serving (based on 4 servings):
- Calories: 250
- Protein: 4g
- Carbohydrates: 18g
- Fats: 20g
- Fiber: 4g
Now that you’ve got all the insights on this beautiful roasted cauliflower soup, I can’t wait to hear how yours turns out! So put on your favorite tunes, gather your ingredients, and let’s get cooking. Remember, it’s not just about the food; it’s about the joyful experience of creating something delicious. Here’s to warm kitchens and happy hearts! 🥣✨
PrintDelightful Roasted Cauliflower Soup

A comforting roasted cauliflower soup that’s creamy, nourishing, and full of flavor, perfect for chilly days.
- Prep Time: 10 minutes
- Cook Time: 30 minutes
- Total Time: 40 minutes
- Yield: 4 servings 1x
- Category: Soup
- Method: Blending
- Cuisine: American
- Diet: Vegetarian
Ingredients
- 1 large head of cauliflower
- 1 medium onion
- 4 cups vegetable or chicken broth
- 1 cup heavy cream or a dairy-free alternative
- Olive oil, salt, and pepper
Instructions
- Preheat your oven to 425°F (220°C).
- Cut your cauliflower into florets and toss them onto a baking sheet. Drizzle with olive oil, sprinkle with salt and pepper, and give them a good toss.
- Heat a couple of tablespoons of olive oil in a large pot over medium heat. Add the chopped onion and sauté until soft and translucent, about 5-7 minutes.
- Once the cauliflower is perfectly roasted, add it to the pot with the onions. Pour in the broth and bring the mixture to a gentle simmer.
- Use an immersion blender to puree the soup until it’s silky smooth.
- After blending, stir in the heavy cream and adjust seasoning as needed.
Notes
For additional flavor variations, try adding red pepper flakes, fresh herbs, cheese, roasted garlic, or toasted nuts.
Nutrition
- Serving Size: 1 serving
- Calories: 250
- Sugar: 4g
- Sodium: 700mg
- Fat: 20g
- Saturated Fat: 11g
- Unsaturated Fat: 9g
- Trans Fat: 0g
- Carbohydrates: 18g
- Fiber: 4g
- Protein: 4g
- Cholesterol: 62mg
Keywords: cauliflower soup, roasted vegetables, comfort food, vegan option, creamy soup
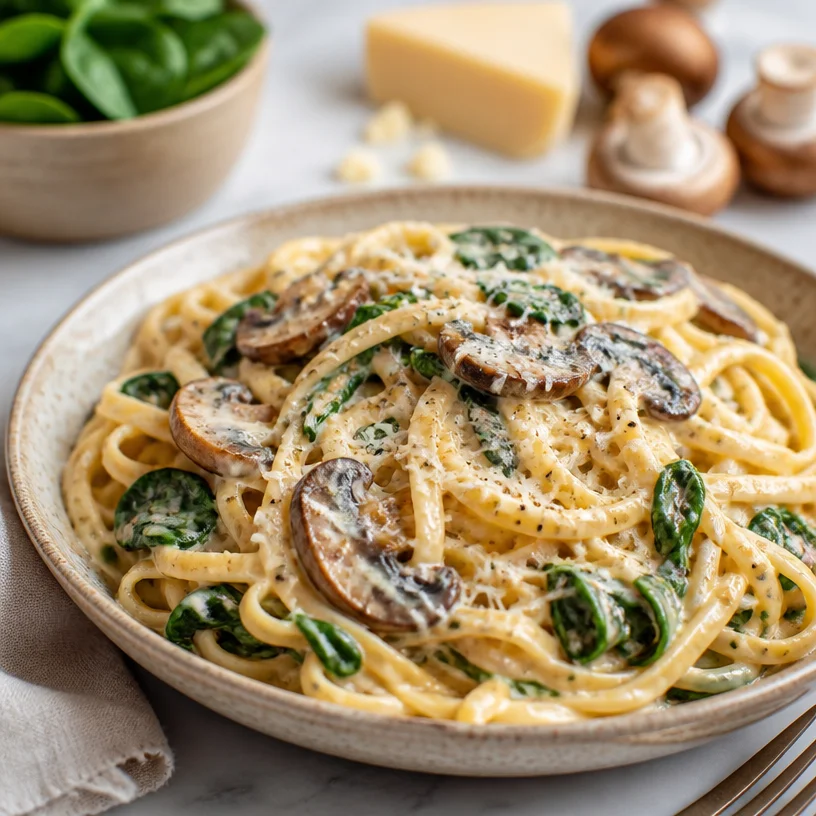
One-Pan Creamy Spinach Mushroom Pasta in 15 Minutes
Spinach Mushroom Pasta: A Soul-Warming Classic
Welcome to my kitchen, where fresh ingredients and nourishing flavors come together to celebrate the joys of cooking! Today, we’re diving into a dish that has been a staple in my life for years: Spinach Mushroom Pasta. If you’re seeking comforting meals that pack a punch of flavor, you’re in the right place.
This delightfully simple pasta dish bridges the gap between the hustle of daily life and the quiet joy of savoring something homemade and wholesome. It’s made with just a handful of fresh ingredients, yet each one shines vibrantly. So, grab your apron, and let’s stir up some magic!
A Taste of Nostalgia
I can’t help but chuckle when I think back to my early days in the kitchen, armed with a tiny cookbook and an adventurous spirit. One of my first culinary experiments was making pasta from scratch. However, I didn’t quite have the finesse I boast today, and my dough ended up a bit more like a pancake batter than the silky sheets of pasta I envisioned.
Nevertheless, in those moments of flour-covered countertops and laughter sprinkled with a dash of chaos, I discovered my affinity for creating something delicious out of simple ingredients. Fast forward a few years, and my love for pasta had only deepened.
I remember the day I first tried spinach mushroom pasta. It was a rainy afternoon, and the smell of sautéed mushrooms wafted through the air, mingling perfectly with the rustic embrace of garlic and the earthiness of fresh spinach. It felt like a warm hug on a cold day, and I was sold. Let’s just say, it became a cherished go-to recipe not just for myself but for friends and family as well. This dish is not just food; it’s a celebration of connection, comfort, and the many gatherings that pasta has facilitated over the years.
Ingredients
Here’s what you’ll need to create this delightful dish. Each ingredient plays a key role in the final flavor and texture, so let’s give them some love!
-
Pasta (8 oz): Choose your favorite type—spaghetti, fettuccine, or even whole-grain. They all work beautifully. Can’t gluten? Opt for chickpea or zucchini noodles!
-
Mushrooms (8 oz): Button, cremini, or shiitake mushrooms add a rich, umami flavor. If you’re feeling adventurous, try wild mushrooms for an earthy twist.
-
Spinach (4 cups, fresh): Packed with nutrients, spinach adds color and a mild flavor. Frozen spinach also works fine; just make sure to thaw and drain excess moisture!
-
Parmesan Cheese (½ cup, grated): This adds a salty, nutty flavor. For a vegan option, nutritional yeast gives a similar taste without dairy.
-
Garlic (3 cloves, minced): A must-have for that aromatic presence! Shallots can be a nice substitute if you prefer a sweeter, more delicate flavor.
-
Olive Oil (2 tbsp): A splash of extra virgin olive oil enhances everything, but feel free to swap it with avocado oil for a buttery flavor.
-
Salt and Pepper: To taste; if you’re watching your sodium, a dash of lemon juice can balance flavors beautifully!
Step-by-Step Instructions
Now that we have our ingredients set, let’s whip up some delightful Spinach Mushroom Pasta!
-
Cook the Pasta: Start by bringing a large pot of salted water to a boil. Once boiling, add your pasta and cook according to package directions until al dente. I like to reserve a cup of pasta water before draining, as it works wonders to adjust sauce consistency later on!
-
Sauté the Mushrooms: In a large skillet, heat the olive oil over medium heat. Add the sliced mushrooms and sauté for about 5-7 minutes until they’re golden and tender. Here’s a chef hack: don’t crowd the pan! This allows your mushrooms to brown beautifully instead of steaming.
-
Add Garlic: Toss in the minced garlic and sauté for another 1-2 minutes, just until fragrant. Be careful not to burn it; burnt garlic can taste bitter and ruin the dish!
-
Incorporate Spinach: Add in the fresh spinach and stir until it wilts down, about 3-4 minutes. The vibrant green color is incredibly satisfying, don’t you think? If using frozen spinach, ensure it’s thawed and drained.
-
Combine Pasta and Sauce: Drain the pasta and add it directly into the skillet with the sautéed veggies, tossing everything together. If it looks a tad dry, gradually add reserved pasta water until you reach your desired consistency. The starch in the water will help create a luxurious sauce that clings to the pasta.
-
Finish with Parmesan: Sprinkling in the grated Parmesan, toss until it melts and coats everything. The heat will work its magic here! Taste and adjust your seasoning with salt and pepper.
-
Plate and Serve: Transfer the pasta to bowls, and don’t forget to sprinkle a little extra Parmesan on top if you’re feeling indulgent!
As you savor each bite, relish that beautiful medley of flavors—a buttery mouthfeel from the pasta, the umami richness of mushrooms, and the freshness of spinach. This dish is not only satisfying but oh-so-fulfilling too!
Serving Suggestions
To plate this lovely pasta, twirl the noodles elegantly onto a bowl or plate, letting those ribbons cascade in a delightful way. A sprinkle of fresh cracked pepper and extra Parmesan elevates the dish’s presentation. Pair it with a simple side salad tossed with a light vinaigrette for a complete meal. As the saying goes, “We eat with our eyes first!”
Recipe Variations
Let’s spice things up! Here are a few creative twists on your Spinach Mushroom Pasta:
-
Add Protein: Toss in grilled chicken, shrimp, or chickpeas for a heartier option.
-
Creamy Texture: Mix in a splash of cream or a dollop of ricotta for a decadent sauce.
-
Herb Infusion: Fresh basil or parsley can elevate the flavors! Sprinkle them on top right before serving for a fresh finish.
-
Spicy Kick: If you’re in the mood for heat, a pinch of red pepper flakes or a drizzle of sriracha can jazz things up!
-
Nutty Addition: Toasted pine nuts or walnuts can add a delightful crunch and richness to your pasta.
Chef’s Notes
Every time I make this Spinach Mushroom Pasta, I’m reminded of how versatile and satisfying it truly is. I’ve made it for last-minute dinner parties and cozy nights in. Once, I even whipped it up to impress a date, and to my delight, it turned out to be a meal that made him weak in the knees (spoiler alert: it worked!).
Over the years, I’ve evolved this recipe, giving it personal touches that speak to my unique flavor palette. It’s a reminder that cooking is not just about following rules but letting your creativity shine through. So please, don’t hesitate to adjust the ingredients to suit your taste.
FAQs and Troubleshooting
-
What if my pasta is overcooked?
Overcooked pasta can happen to the best of us! If it’s a bit mushy, try pairing it with a bolder sauce to mask the texture. -
Can I freeze leftovers?
Absolutely! Store any leftover pasta in an airtight container. When reheating, add a splash of water or olive oil to revive the saucy goodness! -
What can I use instead of Parmesan?
Grated Pecorino Romano provides a strong flavor. For a dairy-free option, reach for nutritional yeast sprinkled in generously. -
What do I do if my sauce is too thick?
If your pasta looks dry, don’t fret! Just add a little of that reserved pasta cooking water until you reach the desired creaminess.
Nutritional Info
(Adjust this section if you’d like to include specific nutritional values based on your preferences or take it out altogether!)
This Spinach Mushroom Pasta embodies everything we strive for in home-cooked meals: wholesome, flavorful, and filled with memories. So, what are you waiting for? Get into the kitchen and enjoy this comforting dish that’s ready to nourish your body and soul. Happy cooking!
PrintSpinach Mushroom Pasta
A comforting and flavorful pasta dish made with fresh spinach and mushrooms, perfect for any occasion.
- Prep Time: 15 minutes
- Cook Time: 15 minutes
- Total Time: 30 minutes
- Yield: 4 servings 1x
- Category: Main Course
- Method: Baking
- Cuisine: Italian
- Diet: Vegetarian
Ingredients
- 8 oz pasta (spaghetti, fettuccine, or whole-grain)
- 8 oz mushrooms (button, cremini, or shiitake)
- 4 cups fresh spinach
- ½ cup grated Parmesan cheese
- 3 cloves garlic, minced
- 2 tbsp olive oil
- Salt and pepper to taste
Instructions
- Cook the Pasta: Bring a large pot of salted water to a boil, add pasta, and cook according to package directions until al dente.
- Sauté the Mushrooms: In a skillet, heat olive oil over medium heat, add sliced mushrooms, and sauté for 5-7 minutes.
- Add Garlic: Toss in minced garlic and sauté for 1-2 minutes until fragrant.
- Incorporate Spinach: Add fresh spinach and stir until wilted, about 3-4 minutes.
- Combine Pasta and Sauce: Drain pasta, add to skillet, and toss with veggies, adding reserved pasta water as needed.
- Finish with Parmesan: Sprinkle in grated Parmesan and toss until melted and combined.
- Plate and Serve: Transfer to bowls and garnish with more Parmesan if desired.
Notes
Feel free to adjust ingredients based on your preferences. Add protein or creamy textures for variations.
Nutrition
- Serving Size: 1 serving
- Calories: 350
- Sugar: 5g
- Sodium: 400mg
- Fat: 12g
- Saturated Fat: 4g
- Unsaturated Fat: 6g
- Trans Fat: 0g
- Carbohydrates: 45g
- Fiber: 3g
- Protein: 15g
- Cholesterol: 30mg
Keywords: spinach, mushroom, pasta, vegetarian, easy recipes
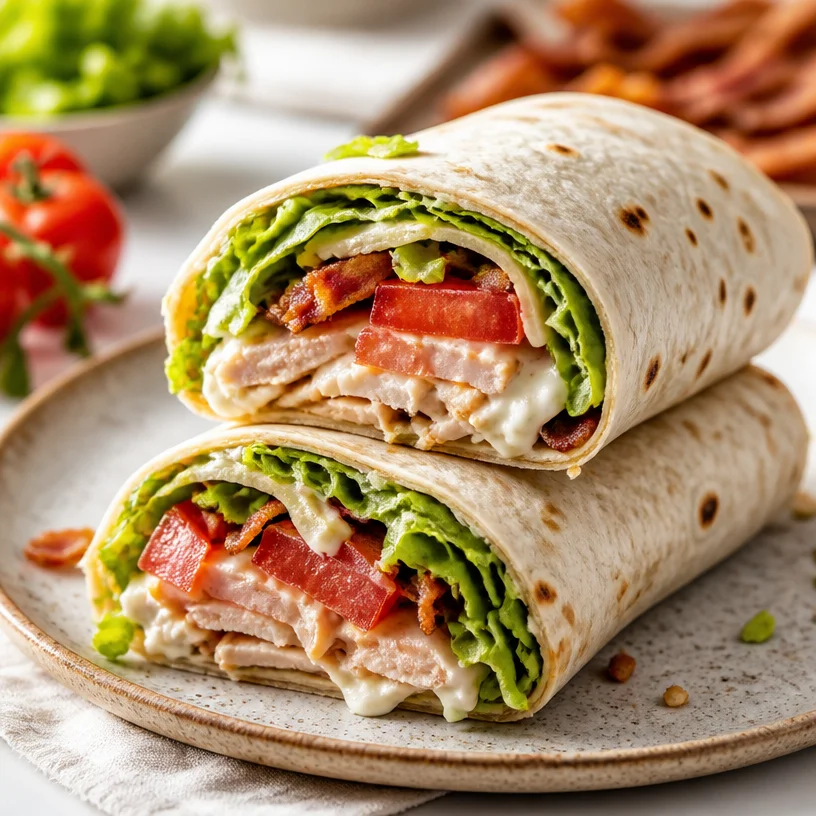
Minute Turkey Club Wrap for Busy Weeknights (Crispy)
The Ultimate Turkey Club Wrap: Your New Favorite Go-To Meal
Welcome to another delicious culinary adventure in the Clean Plate Cravings kitchen! Today, we’re diving into a classic favorite that’s easy to whip up, packed with flavor, and perfect for any meal — the Turkey Club Wrap! Picture this: a soft tortilla hugging slices of tender turkey, crispy bacon, juicy tomatoes, and crisp lettuce, all cozied together in a delightful embrace. It’s comfort food meets gourmet flair, and I can’t wait to share this journey with you.
We’ve all had one of those days when we want something delicious but don’t want to spend hours in the kitchen prepping and chopping. That’s where our Turkey Club Wrap swoops in like a culinary superhero! Not only is this wrap delightful, but it also gives you a great chance to be creative and make it your own. Whether you’re whipping it up for lunch, a quick dinner, or even a picnic with friends, this wrap ticks all the boxes.
Now, I don’t know about you, but nothing brings back the fondest memories of summer afternoons quite like eating wraps. They remind me of lazy days spent picnicking in the park, where we’d spread out a blanket, unpack delicious food, and enjoy the day soaking up the sun. So, grab your apron, and let’s roll up our sleeves for some kitchen fun as we explore this fresh and satisfying Turkey Club Wrap!
A Slice of Nostalgia
As I think back to my childhood, there’s one special memory that stands out among all the food experiences I had. I remember my grandma Mary, a true culinary wizard, making her signature club sandwiches. Each Saturday, she’d invite the entire family over. The kitchen would be filled with laughter, the aroma of crispy bacon sizzling in the pan, and of course, her famous homemade potato chips frying away in the corner.
Grandma Mary’s sandwiches were always a hit, and I loved watching her work. But it wasn’t just about the food; it was about connecting with family and sharing stories over a meal. She had this incredible way of turning ordinary ingredients into something magical. Fast forward a couple of decades, I found myself inspired to recreate her classic dish but with a modern twist — the Turkey Club Wrap!
While my version may not include her famous potato chips, it retains that same spirit of fun and family. And how cool is it that I can now share this recipe with all of you? So, let’s channel the nostalgia of those Saturday afternoons and bring some good vibes to our kitchens as we create this delightful wrap.
Ingredients
To make our savory Turkey Club Wrap, you’ll need a few simple ingredients. Here’s your shopping list, along with some delightful insights to help you make the best choices in the kitchen!
-
Turkey: Use deli turkey, roast turkey, or smoked turkey. If you’re aiming for a lighter option, turkey breast is fantastic! For a vegetarian twist, substitute with grilled tofu or hummus.
-
Bacon: Crispy bacon adds that mouthwatering crunch! If you’re looking for a healthier alternative, turkey bacon or veggie bacon work nicely too!
-
Tomato: Use ripe, juicy tomatoes for amazing flavor. Heirloom varieties are stunning and delicious, or opt for sun-dried tomatoes for a more intense taste.
-
Lettuce: Crisp romaine or butter lettuce works best for wraps. For a twist, try adding some arugula for a peppery bite or spinach for extra nutrients.
-
Tortilla or Wrap: You can’t go wrong with a classic flour tortilla or whole wheat for a healthier option. If you’re gluten-free, try a corn tortilla or a lettuce wrap for a fresh take!
-
Optional Add-ins: Consider adding some cheese like Swiss or cheddar for a creamy element! Also, a smudge of mayonnaise, mustard, or your favorite sauce can enhance the flavor – go wild with your creativity!
Step-by-Step Instructions
Now let’s get down to business! Here’s how to whip up your fabulous Turkey Club Wrap in just a few simple steps. Ready? Let’s do this!
-
Gather Your Ingredients: Start by assembling all your fresh ingredients on a clean cutting board. This makes it easy to grab everything as you prep.
-
Cook the Bacon: In a skillet over medium heat, cook the bacon until it’s crispy. About 5-7 minutes should do the trick! Remember, putting a splatter guard over your skillet can keep your kitchen a bit cleaner during this process. Once crispy, remove the bacon and place it on a paper towel to absorb the grease.
-
Prep the Vegetables: While the bacon is cooking, slice the tomatoes into thin rounds and rinse the lettuce to ensure it’s crispy and clean. Your veggies should be ready to go for assembly!
-
Warm the Tortilla: To give your wrap a lovely pliability, heat the tortilla in the microwave for about 10 seconds or wrap it in foil and stick it in the oven for about 5 minutes at low heat. This helps prevent tearing when you roll it!
-
Layer the Ingredients: Take your warmed tortilla and lay it flat. Start layering the ingredients: Begin with a generous handful of lettuce, followed by turkey slices, crispy bacon, and the fresh tomato slices. Feel free to add any optional avocados or cheese here too!
-
Roll It Up: Here comes the fun part! Fold the sides of the tortilla inwards, then roll it away from you tightly but gently to keep everything snug. A little bit of practice here leads to the perfect wrap!
-
Slice and Serve: Place your wrap seam side down on a clean cutting board, and slice it in half at a diagonal for a lovely presentation. It’s all about those Instagrammable moments, right?
Serving Suggestions
Serve your Turkey Club Wrap alongside a refreshing side of veggie sticks or a zesty Greek salad for a bright combination. You can also throw in some homemade chips or a small bowl of guacamole to keep the vibes going! Wraps are incredibly flexible, so think of them as a canvas, and let your creativity shine.
Recipe Variations
Ready to mix it up a bit? Here are some fun twists you can try to elevate your Turkey Club experience:
-
Spicy Kick: Add sliced jalapeños for a spicy twist or drizzle with sriracha for that extra kick!
-
Mediterranean Style: Swap out the turkey for grilled chicken or falafel, and add feta cheese and kalamata olives for a Mediterranean flair.
-
Sweet & Savory: Ditch the bacon and replace it with crispy apple slices to give your wrap a refreshing sweetness.
-
Rainbow Wrap: Add more veggies! Consider adding bell peppers, cucumbers, or avocados for a burst of color and extra crunch.
-
Breakfast Club Wrap: Make it a breakfast version by adding scrambled eggs, cheese, and sautéed spinach instead!
Chef’s Notes
This Turkey Club Wrap has slowly evolved over the years in my kitchen. Initially, I stuck to the classic elements, but as I’ve experimented more, I’ve discovered that the beauty of wraps is just how adaptable they can be. I’ve played around with different sauces, experimenting with hummus or pesto as tasty inclusions, and they’ve turned out beautifully delicious every time.
Funny enough, I once made this wrap during a brunch gathering, only to realize later my avocado was quite ripe — but instead of getting upset, I decided to mash it and blend it into a creamy spread. Everyone loved it! So, embrace the unexpected and keep having fun in the kitchen.
FAQs and Troubleshooting
-
Why did my wrap fall apart?
- Ensure you are wrapping it tightly, and avoid overstuffing. It’s the age-old story; less is more sometimes!
-
Can I make these ahead of time?
- Absolutely! Just be sure to use ingredients that won’t get soggy. Wrap it tightly in parchment paper or plastic wrap to keep it fresh.
-
What else can I put in my wrap?
- The sky’s the limit! Try adding roasted vegetables, pickles, or different proteins like chickpeas or grilled shrimp.
-
How can I make this wrap even healthier?
- Swap out the tortilla for a lettuce leaf to lighten things up or use a sprouted grain wrap for added nutrients.
Nutritional Info
While I won’t bombard you with numbers, I will say that this Turkey Club Wrap is a great source of protein, vitamins, and healthy fats. It’s versatile enough to fit various dietary preferences while still keeping things delicious and satisfying!
And there you have it—a delectable, approachable Turkey Club Wrap that’s as fun to make as it is to eat! I hope this recipe inspires you to get in the kitchen, experiment, and share your own fun memories around food. Remember, cooking should be a joyful experience, so keep it light, keep it fresh, and above all, enjoy every delicious bite! Happy cooking, friends!
PrintThe Ultimate Turkey Club Wrap

A delightful Turkey Club Wrap filled with tender turkey, crispy bacon, juicy tomatoes, and fresh lettuce, perfect for any meal.
- Prep Time: 10 minutes
- Cook Time: 10 minutes
- Total Time: 20 minutes
- Yield: 2 servings 1x
- Category: Lunch
- Method: Wrapping
- Cuisine: American
- Diet: Non-Vegetarian
Ingredients
- 8 slices deli turkey
- 4 slices crispy bacon
- 1 ripe tomato, sliced
- 1 cup crisp romaine lettuce
- 2 large flour tortillas
- Optional: Cheese, mayonnaise, mustard, or other sauces
Instructions
- Gather your ingredients on a clean cutting board.
- Cook the bacon in a skillet over medium heat until crispy, about 5-7 minutes. Remove and drain on paper towels.
- Prep the vegetables by slicing the tomatoes and rinsing the lettuce.
- Warm the tortillas in the microwave for about 10 seconds or in the oven for 5 minutes.
- Layer the ingredients on the tortilla: lettuce, turkey, bacon, and tomato.
- Roll the wrap tightly, folding the sides inwards.
- Slice the wrap in half, seam side down, for serving.
Notes
Feel free to customize with optional add-ins like avocado or cheese. Experiment with different sauces for more flavor.
Nutrition
- Serving Size: 1 wrap
- Calories: 480
- Sugar: 3g
- Sodium: 800mg
- Fat: 24g
- Saturated Fat: 8g
- Unsaturated Fat: 12g
- Trans Fat: 0g
- Carbohydrates: 42g
- Fiber: 4g
- Protein: 30g
- Cholesterol: 60mg
Keywords: Turkey Club Wrap, quick meals, easy lunch, sandwiches, wraps
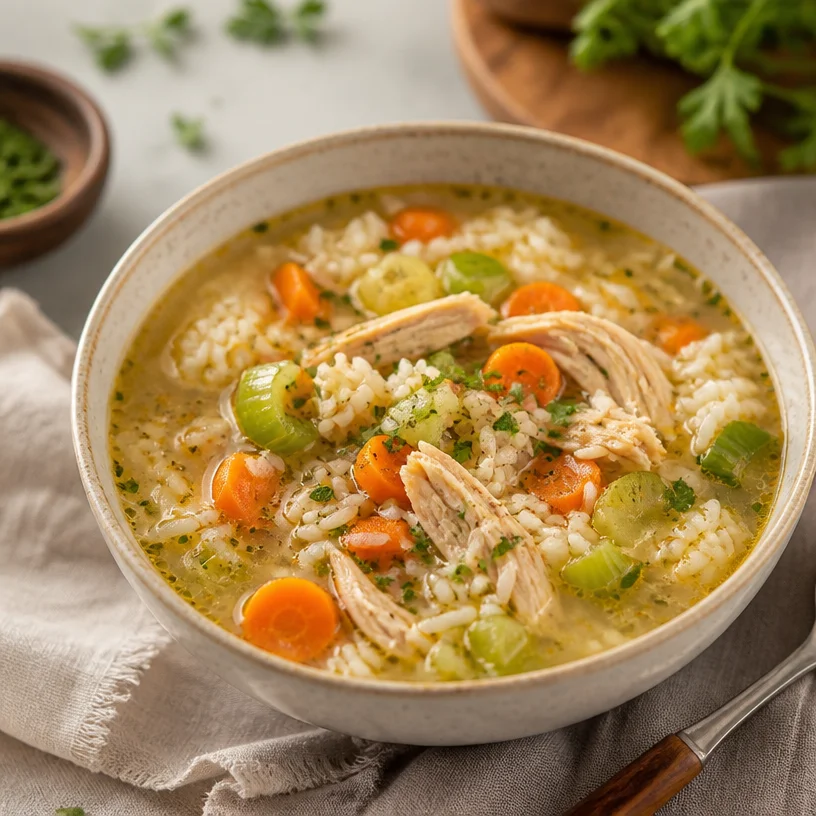
One-Pot 15-Minute Chicken Rice Soup for Busy Weeknights
Chicken Rice Soup: A Cozy Bowl Full of Flavor and Comfort
Welcome, food lovers! Today, I’m super excited to share a dish that feels like a warm hug on a chilly evening—Chicken Rice Soup. There’s something special and comforting about a big bowl of soup simmered with love and wholesome ingredients. Whether it’s for a cozy night in or to help soothe you when you’re feeling under the weather, this Chicken Rice Soup is a go-to recipe you’ll want to have in your culinary arsenal.
A Nourishing Bowl of Memories
Growing up, my favorite days were always those crisp autumn afternoons when my mom would fill our kitchen with the delicious aroma of chicken soup. We lived in a quaint little town where the days were short, but the flavors were rich. It was on one of those unforgettable days that I learned how to make my very first batch of chicken noodle soup. I was just a kid, standing on a stool, stirring the pot and sneaking tastes here and there while my mom shared her tips on the importance of letting the flavors meld together.
Fast forward a few years, and my love for cooking has blossomed into a passion. But there’s something about that childhood chicken soup that brings back the essence of home—sitting around the table with family, sharing stories and laughter over warm bowls of nourishing goodness. Now, I’ve added my own twist to that classic recipe by incorporating rice for added heartiness, making this Chicken Rice Soup not only flavorful but also satisfying enough to be a meal on its own.
So, grab your apron, and let’s dive into this delicious bowl of Chicken Rice Soup that’s sure to bring smiles and warmth to your kitchen!
Ingredients
Let’s gather our goodies! Here’s what you’ll need for this delicious Chicken Rice Soup:
-
Chicken: The star of the show! You can use boneless chicken breasts, thighs, or even a whole chicken cut into pieces. If you’re tight on time, rotisserie chicken is a fantastic shortcut. For substitutions, try turkey or even a plant-based protein like chickpeas or shredded jackfruit for a vegetarian twist.
-
Rice: I love using long-grain white rice, but feel free to swap in brown rice, jasmine, or even barley for a hearty variation. Just be aware that cooking times may vary.
-
Carrots: Not only do they provide natural sweetness, but they also add vibrant color. If you don’t have carrots on hand, try celery root or parsnips as a substitute.
-
Celery: This classic aromatic ingredient adds a lovely freshness to the soup. If you’re not a fan of celery, you could replace it with some diced leeks or even bell peppers.
-
Broth/Stock: Homemade chicken stock is unbeatable, but store-bought chicken or vegetable broth works great when time is of the essence. Ensure it’s low-sodium for better flavor control.
-
Onion and Garlic: These two work in harmony to build a flavorful base. Shallots make a great alternative if you’re looking for a milder taste.
-
Herbs: Fresh herbs like parsley or thyme add a beautiful aroma to the soup. Dried herbs are perfectly fine—just adjust the amount since dried herbs are more potent.
-
Olive Oil: For sautéing. You can also use butter for a richer flavor.
Step-by-Step Instructions
Ready to whip up this delicious Chicken Rice Soup? Let’s get started with these simple steps:
-
Prepare Your Ingredients: Start by chopping your onions, carrots, celery, and garlic. Take a moment to appreciate the colors—gorgeous, right? This will not only make cooking easier but will also help develop the flavors. Pro tip: when chopping onions, if you keep a sharp knife and cut quickly, you’ll avoid those pesky tears!
-
Sauté the Aromatics: In a large soup pot, heat about 2 tablespoons of olive oil over medium heat. Toss in your chopped onions, celery, and carrots. Sauté for about 5-7 minutes until they’re slightly softened. This step is crucial—it helps to develop the base flavors of your soup! Add minced garlic in the last minute of sautéing to unlock maximum flavor without burning.
-
Add the Chicken: If you’re using whole pieces of chicken, add them now. Pour in enough broth to cover the chicken almost completely. If you’re using shredded rotisserie chicken, hold off for later! Bring it to a boil, then reduce the heat and let it simmer for about 15 minutes (or longer if you have whole chicken pieces).
-
Incorporate Rice: Once your chicken is cooked through, remove it from the pot and set it aside. Stir in your rice of choice, letting it cook for about 15-20 minutes—just enough time to soak up all that delicious broth while becoming nice and tender.
-
Shred the Chicken: While the rice is cooking, take a fork and shred your cooked chicken into bite-sized pieces. Feel free to sneak a taste—the best part of cooking, right? Once shredded, return the chicken to the pot.
-
Season to Taste: This is where the magic happens! Add salt, pepper, and herbs to your liking. Here’s my pro tip: always taste your food before serving! You can adjust as needed, ensuring every bowl is perfect.
-
Final Touch: If you like a bit of brightness, squeeze in some fresh lemon juice right before serving. It elevates the flavors and adds a lovely zing!
Serving Suggestions
Pour your comforting Chicken Rice Soup into bowls, and top with a sprinkle of freshly chopped parsley or a dash of black pepper. Serve it with a side of crusty bread or a light salad for a wholesome meal. For an extra touch, find your favorite rustic bread, toast it just a bit, and serve it with a slather of butter.
Recipe Variations
Want to play around with your soup? Here are a few ideas to keep things interesting:
-
Herbed Lemon Chicken Rice Soup: Add a handful of fresh dill or basil for an aromatic kick. A squeeze of lemon brightens up the flavors beautifully!
-
Spicy Kick: For those who love a little heat, add a dash of red pepper flakes or a splash of hot sauce during cooking.
-
Veggie-Packed: Load your soup with additional vegetables like spinach, peas, or kale for extra nutrients. Toss them in towards the end so they retain their color and texture.
-
Curry Chicken Rice Soup: Add curry powder while sautéing onions for an exotic flavor profile. Coconut milk can also be incorporated for creaminess!
-
Coconut Lemongrass Version: Use coconut broth and add lemongrass for a Thai-inspired twist!
Chef’s Notes
Chicken Rice Soup is one of those recipes that has evolved in my kitchen. What started as a dish passed down from my mom has turned into a foundational recipe where I can take creative liberty! I once added leftover vegetables from the fridge, including those sad-looking zucchini and bell peppers, and I was amazed at how delicious it turned out. Each tweak has taught me that cooking doesn’t have to be perfect; it just has to be made with love and intention.
FAQs and Troubleshooting
-
What if my soup is too thick?: No worries! Add a little more broth or water to loosen it up; simply stir it in until you reach your desired consistency.
-
Can I freeze the soup?: Yes! This soup freezes beautifully. Just allow it to cool completely before transferring it to airtight containers. It’s perfect for meal prep!
-
What if I don’t have enough chicken?: No problem! You can bulk it up with more rice, or toss in extra veggies. The flavors will still be delightful.
-
My soup tastes bland!: This might be due to insufficient seasoning. Don’t skip the taste test! Add a pinch of salt, cracked pepper, or a splash of soy sauce to enhance the flavors!
Nutritional Info
While I don’t provide exact nutritional information, this Chicken Rice Soup is packed with protein from the chicken, wholesome carbs from the rice, and vitamins from the veggies. Perfect for a wholesome, balanced meal.
There you have it! A cozy bowl of Chicken Rice Soup that not only nourishes your body but also warms your soul. I hope you take this recipe and make it your own, adding your special touch and personal flair. Happy cooking! 🌟
PrintChicken Rice Soup

A comforting chicken rice soup that’s hearty, flavorful, and perfect for chilly evenings.
- Prep Time: 15 minutes
- Cook Time: 30 minutes
- Total Time: 45 minutes
- Yield: 4 servings
- Category: Main Course
- Method: Stovetop
- Cuisine: American
- Diet: Non-Vegetarian
Ingredients
- Chicken (boneless breasts, thighs, or whole chicken cut into pieces)
- Rice (long-grain white, brown, or jasmine)
- Carrots
- Celery
- Broth/Stock (homemade or store-bought, low-sodium)
- Onion
- Garlic
- Herbs (parsley or thyme)
- Olive Oil (or butter)
Instructions
- Prepare your ingredients: Chop onions, carrots, celery, and garlic.
- Sauté the aromatics: Heat olive oil in a large pot, add onions, celery, and carrots, and sauté for 5-7 minutes. Add garlic in the last minute.
- Add the chicken, pouring in enough broth to cover it. Bring to a boil, then simmer for about 15 minutes.
- Incorporate the rice: Remove the chicken, stir in the rice, and cook for 15-20 minutes.
- Shred the chicken into bite-sized pieces and return to the pot.
- Season to taste with salt, pepper, and herbs.
- Final touch: Squeeze fresh lemon juice before serving.
Notes
Top with parsley or black pepper. Serve with crusty bread or salad for a complete meal.
Nutrition
- Serving Size: 1 serving
- Calories: 400
- Sugar: 4g
- Sodium: 600mg
- Fat: 14g
- Saturated Fat: 3g
- Unsaturated Fat: 9g
- Trans Fat: 0g
- Carbohydrates: 45g
- Fiber: 2g
- Protein: 20g
- Cholesterol: 60mg
Keywords: chicken soup, rice soup, comfort food, cozy meal, family recipe
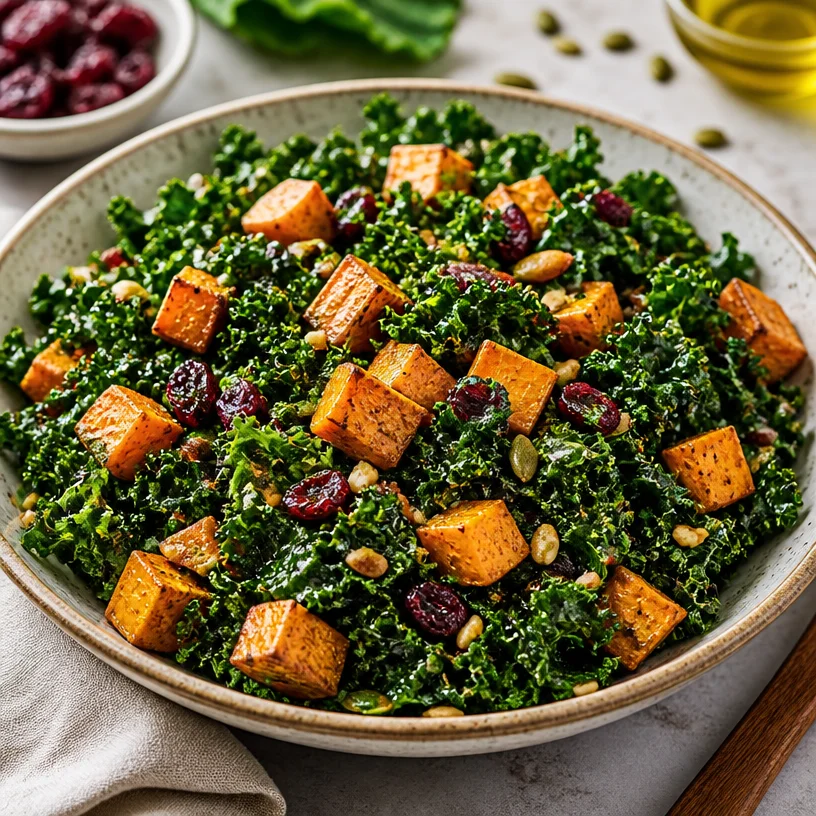
Simple Kale and Roasted Sweet Potato Salad for Meal Prep
Wholesome Kale Sweet Potato Salad: A Celebration of Fresh Flavors
Welcome to the kitchen, foodie friends! Today, we’re tossing together a vibrant and delicious Kale Sweet Potato Salad that’s not only brimming with flavor but also packed with nutrients to fuel your day. I can’t wait to guide you through this journey of flavors, textures, and wholesome goodness. Eating healthy doesn’t have to feel bland or boring, and this salad is the perfect embodiment of that philosophy!
When I think of this kale salad, I can’t help but remember family dinners spent around the table, laden with colorful dishes that seem to sing the virtues of fresh ingredients. This salad isn’t just a meal; it’s a celebration of coming together, sharing stories, laughter, and of course, a great meal that everyone can enjoy—no compromises necessary!
So, buckle up for a delightful ride through colorful veggies, tangy cranberries, and sweet roasted sweet potatoes that will make your taste buds dance! Whether you’re meal prepping for the week or looking to impress guests at your next dinner, this salad meets all criteria for a feel-good dish. Ready to dive in? Let’s go!
A Taste of Nostalgia
Growing up, my love for food was deeply intertwined with family gatherings. One of my most cherished memories is of my grandmother’s garden. It was a magical place bursting with colors, where I spent countless afternoons picking fresh vegetables and herbs alongside her. One summer, she introduced me to kale, a leafy green I initially thought was reserved for smoothies. She insisted it could shine just as brightly as any other dish if dressed right. Together, we created a kale salad laden with her home-roasted sweet potatoes and a drizzle of olive oil that made my taste buds sing.
Fast forward to today, and this Kale Sweet Potato Salad is an ode to those precious moments and the lessons about finding joy in simple ingredients. Just as my grandmother taught me, it’s all about letting the flavors shine and bringing love into the kitchen. So, let’s gather our ingredients and channel those good vibes!
Ingredients to Delight Your Tastebuds
Here’s what you’ll need to create our lovely Kale Sweet Potato Salad:
-
Kale: (1 bunch)
- A nutrient powerhouse rich in vitamins A, C, and K. This leafy green is the star of our salad! If you’re not a fan of kale’s toughness, try massaging it with a bit of olive oil and salt for a softer bite.
-
Sweet Potatoes: (2 medium)
- Naturally sweet and packed with fiber, sweet potatoes add a lovely creaminess to our salad. You can swap in butternut squash for a similar texture or use regular potatoes if needed.
-
Cranberries: (1/2 cup, dried)
- These add a burst of sweetness and a chewy texture that perfectly contrasts with the kale. For a tropical twist, substitute them with dried mango or apricots.
-
Olive Oil: (3 tablespoons)
- A fantastic source of healthy fats that helps dress and flavor our salad. If you’re looking to switch up the taste, avocado oil or a nutty sesame oil can give a different flair.
-
Salt: (to taste)
- Essential for enhancing flavors; more than just a seasoning, it brings everything together. Blossom salt or smoked salt can add a gourmet touch.
-
Pepper: (to taste)
- Freshly cracked black pepper adds a lovely kick. For a spicy surprise, consider swapping it with red pepper flakes or a pinch of cayenne.
Step-by-Step Instructions
Now, let’s get our hands a little dirty and make some salad magic happen! Here’s how to create this scrumptious dish from start to finish:
-
Preheat Your Oven:
- Start by preheating your oven to 425°F (220°C). This will ensure your sweet potatoes get perfectly roasted and caramelized.
-
Prepare the Sweet Potatoes:
- Peel and dice the sweet potatoes into 1-inch cubes. The uniform size helps them roast evenly. Drizzle them with 2 tablespoons of olive oil, salt, and a sprinkle of pepper. Give them a good toss to coat.
- Spread them out on a baking sheet lined with parchment paper. ROAST for about 25-30 minutes or until they get that irresistible golden-brown color, flipping halfway through for even cooking.
-
Prep the Kale:
- While the sweet potatoes are roasting, wash and dry the kale thoroughly. Remove the tough stems, and tear the leaves into bite-sized pieces.
- Here’s a fun chef hack: in a large bowl, add a pinch of salt and a drizzle of olive oil. Massage the kale with your hands for about 2-3 minutes until it’s tender. This step transforms kale from tough to tender, making it more enjoyable to eat!
-
Combine Ingredients:
- Once the sweet potatoes are done roasting, allow them to cool slightly before adding them to the kale. The warmth from the sweet potatoes will slightly wilt the kale, enhancing the flavor melds beautifully.
-
Dress the Salad:
- In a small bowl, mix together the remaining olive oil, a pinch of salt, and pepper. Pour this dressing over your delightful kale and sweet potato mixture. Toss gently to combine while making sure each piece gets a little love from the dressing.
-
Add Cranberries:
- Finally, toss in the dried cranberries. Their tart flavor and chewy texture will take your salad to the next level. Give the salad one last toss to mix everything together.
-
Plate and Enjoy!:
- Transfer your beautiful salad to a serving bowl or individual plates. Drizzle with a little extra olive oil or even a sprinkle of nuts for a lovely garnish.
Serving Suggestions
When it comes to serving this Kale Sweet Potato Salad, simple is best! Present it in a rustic wooden bowl or a colorful salad platter to emphasize its vibrant ingredients. For an extra touch, sprinkle some feta cheese or walnuts on top for a creamy or crunchy contrast. You can serve it as a light lunch or a hearty side dish—it’s a versatile gem that holds its own in any meal!
Recipe Variations
Looking to shake things up? Here are some creative twists on our basic kale salad:
- Add Protein: Toss in some grilled chicken, chickpeas, or quinoa for a complete meal!
- Nutty Twist: Incorporate toasted pecans or walnuts for an added crunch.
- Fruity Flair: Diced apples or pears can give a refreshing sweetness that pairs beautifully with the earthy flavors.
- Cheesy Indulgence: Crumbled goat cheese or feta can turn it into a cheesy delight.
- Spicy Kick: Add thinly sliced jalapeños for a bit of heat.
Chef’s Notes
This Kale Sweet Potato Salad is a tried-and-true favorite that has evolved over time. I remember the first time I made it for my friends—I was a bundle of nerves in the kitchen! Now, it’s become a staple not just for its taste but for the joy it brings to gatherings. Each layer tells a story, from pickling the sweet potatoes to choosing the freshest kale. Every time I make it, I can’t help but think of my grandmother and how her simple kitchen lessons shaped my love for cooking.
FAQs and Troubleshooting
Here are some common questions and potential pitfalls you might encounter:
-
Why is my kale still tough?
- Massaging the kale with olive oil and salt really helps break down the fibers and makes it tender. If it’s still tough, try massaging a bit more!
-
Can I make this salad ahead of time?
- Absolutely! You can pre-roast the sweet potatoes and chop the kale. Just wait to mix everything together until serving to keep the salad fresh.
-
What if I don’t like cranberries?
- No worries! Substitute with another dried fruit like raisins or even nuts for crunch. Fresh fruits, such as pomegranate seeds, work beautifully too!
-
How do I store leftovers?
- Store leftovers in an airtight container in the fridge for up to 3 days. The kale may wilt slightly but still tastes great!
Nutritional Info
This Kale Sweet Potato Salad is not only delicious but also packs a healthy punch. Here’s a quick rundown of some nutritional benefits:
- Kale: Excellent source of vitamins A, C, and K, plus calcium and iron.
- Sweet Potatoes: High in fiber and loaded with beta-carotene, fantastic for gut health and vision.
- Cranberries: Great for urinary tract health and full of antioxidants.
- Olive Oil: Healthy fats that reduce inflammation and boost heart health.
With this salad, you’re fueling your body with wholesome ingredients while enjoying every delicious bite.
So, roll up those sleeves and let’s make some culinary magic happen! Let me know how your salad turns out, and remember, cooking is all about enjoying the journey as much as the destination. Happy cooking, friends!
PrintWholesome Kale Sweet Potato Salad

A vibrant and nutritious salad featuring kale, roasted sweet potatoes, and tangy cranberries, perfect for any meal.
- Prep Time: 15 minutes
- Cook Time: 30 minutes
- Total Time: 45 minutes
- Yield: 4 servings
- Category: Side Dish
- Method: Roasting
- Cuisine: American
- Diet: Vegetarian
Ingredients
- Kale: 1 bunch
- Sweet Potatoes: 2 medium
- Cranberries: 1/2 cup, dried
- Olive Oil: 3 tablespoons
- Salt: to taste
- Pepper: to taste
Instructions
- Preheat your oven to 425°F (220°C).
- Prepare the sweet potatoes by peeling and dicing them into 1-inch cubes, then drizzling with 2 tablespoons of olive oil, salt, and pepper.
- Spread them out on a baking sheet lined with parchment paper. ROAST for about 25-30 minutes, flipping halfway through.
- Wash and dry the kale thoroughly, removing tough stems and tearing into bite-sized pieces.
- Massage the kale in a bowl with a pinch of salt and drizzle of olive oil for 2-3 minutes until tender.
- Combine the roasted sweet potatoes with the kale once cooled slightly.
- Dress the salad with a mixture of the remaining olive oil, salt, and pepper.
- Add dried cranberries and toss everything together.
- Transfer to a serving bowl and garnish as desired.
Notes
Great served with feta cheese or walnuts on top. Can be made ahead of time; just mix the ingredients right before serving.
Nutrition
- Serving Size: 1 serving
- Calories: 250
- Sugar: 10g
- Sodium: 200mg
- Fat: 10g
- Saturated Fat: 1.5g
- Unsaturated Fat: 8g
- Trans Fat: 0g
- Carbohydrates: 36g
- Fiber: 6g
- Protein: 5g
- Cholesterol: 0mg
Keywords: kale salad, sweet potato salad, healthy salad, vegetarian recipe, easy salad recipe
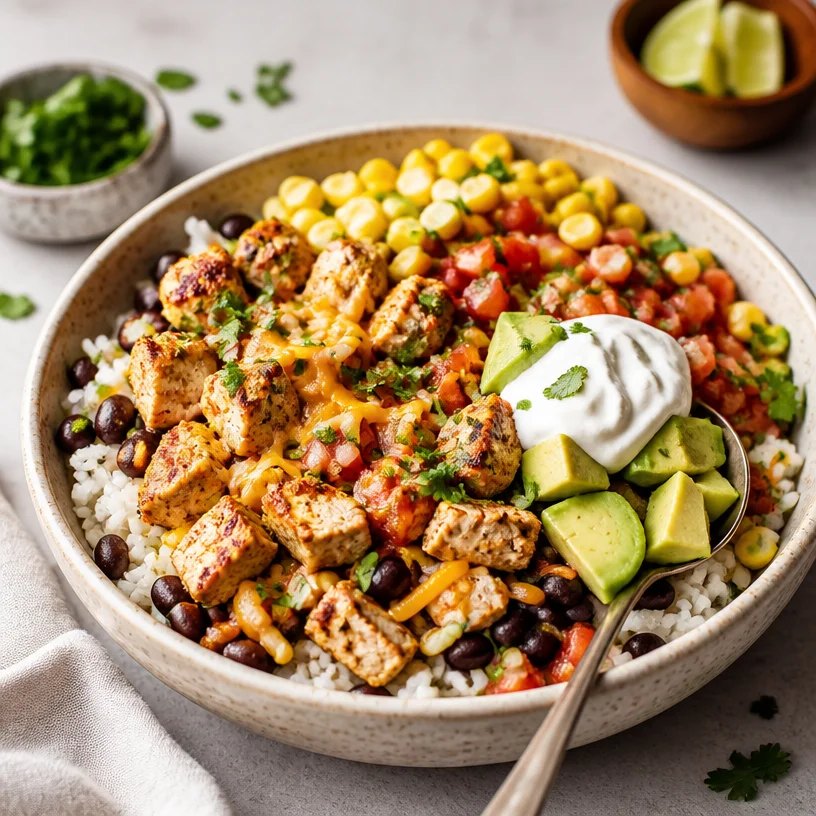
One-Pan Chicken Taco Bowl (15-Minute Weeknight Recipe)
Chicken Taco Bowl: A Vibrant Dish to Nourish Body and Soul
Welcome to Clean Plate Cravings! Today, we’re diving into a delightful, colorful dish that perfectly embodies the spirit of clean eating: the Chicken Taco Bowl. There’s something truly magical about bowls; they are like little culinary ecosystems, packed with flavors, colors, and textures all in one place. Whether you’re meal prepping for the week ahead or treating yourself to a fun weeknight dinner, this dish is as versatile as it is delicious.
Let’s face it—trying to eat healthier can sometimes feel like a chore, right? But that’s why I’m here! I believe that clean eating should be a celebration, not a restriction. Each bite of this scrumptious Chicken Taco Bowl brings together fresh ingredients, comforting flavors, and the kind of satisfaction that leaves you craving more.
A Flavorful Memory
As a child, tacos were a family favorite in my house. I can still recall the excitement building in the kitchen as my mom whipped up her famous taco sauce, the aroma wafting through the air and making our mouths water. Each taco was a masterpiece, filled to the brim with seasoned meat, crunchy lettuce, fresh tomatoes, and of course, a sprinkle of cheese. After dinner, we’d settle in front of the TV, bellies full, often discussing the day’s adventures or how many tacos we could fit in our hands.
These memories are what inspired me to create the Chicken Taco Bowl—bringing together the essence of those beloved tacos while making it a nourishing meal. With the heartiness of grilled chicken, fluffy rice, and a vibrant salsa, this bowl captures the joy of taco night but allows for a fresher, cleaner approach. Let’s step into the kitchen together and create this wholesome delight!
Ingredients
Here are the essential ingredients for your Chicken Taco Bowl, along with some chef insights and substitution tips:
-
Chicken (boneless, skinless breast or thighs): This is the star of the show! Chicken is lean, versatile, and loaded with protein. If you’re looking for a quick swap, turkey or even tofu works well for a vegetarian option.
-
Rice (white or brown): A fluffy base for your bowl. Brown rice adds extra fiber and nutrients, while white rice brings a softer texture. For a low-carb option, try cauliflower rice!
-
Beans (black beans or pinto beans): These add creaminess and heartiness to the bowl. Not a bean lover? Quinoa or corn can bring that same satisfying quality without the beans.
-
Salsa (store-bought or homemade): The zesty finishing touch that brings everything together! For a milder option, pico de gallo is fantastic. You can also blend in some avocado or mango for a tropical twist.
Step-by-Step Instructions
Alright, it’s time to roll up those sleeves and cook! Follow these step-by-step instructions to assemble your delicious Chicken Taco Bowl:
-
Cook the Rice:
- Start by rinsing your rice under cold water to remove excess starch—this ensures fluffy grains.
- In a medium pot, combine the rinsed rice with water in a 1:2 ratio (1 cup rice to 2 cups water).
- Bring to a boil, then reduce to low heat, cover, and let simmer for 15-20 minutes. Pro tip: Let it sit, covered for 5 minutes after cooking for perfect texture!
-
Prepare the Chicken:
- While the rice cooks, season your chicken. A mix of chili powder, cumin, garlic powder, salt, and pepper works wonders for flavor.
- In a skillet, heat a tablespoon of olive oil over medium-high heat. Once hot, add the chicken and cook for about 6-7 minutes per side or until fully cooked (the internal temperature should reach 165°F). Don’t forget to let it rest for a few minutes before slicing; it helps keep the juices locked in.
-
Warm the Beans:
- Open your can of beans (or cook your dried beans ahead of time), drain, and rinse to reduce sodium content.
- In a small saucepan, heat the beans over medium-low heat until warmed through—about 5-7 minutes. Stir in some cumin or lime juice for added zest if you’re feeling fancy.
-
Assemble the Bowl:
- Start with a generous scoop of rice at the bottom of your bowl.
- Next, layer on the sliced chicken, followed by a scoop of beans, and finish with salsa. Drizzle with some avocado or a sprinkle of cheese if you like.
-
Garnish and Enjoy:
- Top with fresh cilantro, diced avocado, sliced jalapeños, or even a dollop of Greek yogurt to add creaminess. The choices are endless!
Serving Suggestions
Presentation matters, even in the most casual meals! Serve your Chicken Taco Bowl nestled in a vibrant bowl, showcasing the colorful layers. Add a lime wedge on the side for that extra zing as you eat, and don’t shy away from garnishing with fresh herbs—it’s all about creating that visual appeal while elevating the flavors!
Recipe Variations
- Veggie Taco Bowl: Swap out the chicken for grilled vegetables like zucchini, bell peppers, and corn for a delicious vegetarian option.
- Spicy Chicken Bowl: For those who love heat, incorporate some diced chipotle peppers in adobo sauce into the chicken marinade for a smoky kick.
- Tropical Twist: Add pineapple salsa for a sweet and savory combo. The juicy pineapple brings a refreshing element to the dish!
- Mediterranean Flavor: Replace the taco spices with Italian herbs, add feta cheese, olives, and a drizzle of balsamic glaze for an outstanding Mediterranean Chicken Bowl experience.
Chef’s Notes
This Chicken Taco Bowl recipe has had a few fun iterations throughout the years in my kitchen. One time, I accidentally used coconut milk instead of water for rice while distracted by my favorite podcast—yikes! Although it felt like a major mishap at first, it turned out to be an exotic twist that we now often recreate. So, embrace your kitchen blunders—they can lead to delightful surprises!
Another thing to keep in mind is that this recipe is endlessly adaptable. You can load it up with all your favorite tacos ingredients or make it your own with whatever pantry staples you have on hand. That’s what I love about cooking—there’s always room for creativity!
FAQs and Troubleshooting
-
Q: How can I make this dish in advance?
A: Absolutely! Prepare your chicken, rice, and beans ahead of time and store them separately in the fridge. When you’re ready to eat, simply reheat and assemble! -
Q: My chicken turned out dry. What went wrong?
A: Overcooking is often the culprit! Make sure to monitor your cooking time closely, and using a meat thermometer can help avoid this in the future—165°F is your magic number! -
Q: Can I use frozen chicken?
A: Yes, just ensure to fully thaw it before cooking. You may need to adjust cooking time if starting from frozen. -
Q: What can I do with leftovers?
Transform leftovers into delicious burritos, salads, or even quesadillas for the next day’s lunch. No flavor goes to waste!
Nutritional Info
(Optional based on your preference)
Each serving of Chicken Taco Bowl (with standard ingredients) contains approximately:
- Calories: 540
- Protein: 40g
- Carbohydrates: 60g
- Fat: 15g
With this Chicken Taco Bowl recipe, you’re not just feeding your belly; you’re nourishing your spirit with vibrant flavors and heartwarming memories. Let’s keep our cooking adventures fresh and fun! Happy cooking, my foodie friends!
PrintChicken Taco Bowl

A colorful Chicken Taco Bowl that embodies clean eating with grilled chicken, fluffy rice, and vibrant salsa.
- Prep Time: 15 minutes
- Cook Time: 30 minutes
- Total Time: 45 minutes
- Yield: 4 servings 1x
- Category: Main Course
- Method: Sautéing
- Cuisine: Mexican
- Diet: Gluten-Free, High Protein
Ingredients
- 1 lb Chicken (boneless, skinless breast or thighs)
- 1 cup Rice (white or brown)
- 1 can Beans (black beans or pinto beans)
- 1 cup Salsa (store-bought or homemade)
- 1 tablespoon Olive oil
- Spices: chili powder, cumin, garlic powder, salt, and pepper
- Optional toppings: cilantro, diced avocado, sliced jalapeños, Greek yogurt
Instructions
- Rinse the rice under cold water to remove excess starch.
- Combine the rinsed rice with water in a 1:2 ratio (1 cup rice to 2 cups water).
- Bring to a boil, then reduce to low heat, cover, and let simmer for 15-20 minutes. Let it sit for 5 minutes after cooking for perfect texture.
- Season your chicken with a mix of chili powder, cumin, garlic powder, salt, and pepper.
- Heat olive oil in a skillet over medium-high heat. Once hot, add chicken and cook for 6-7 minutes per side until fully cooked (internal temperature should reach 165°F).
- Open the can of beans, drain, and rinse.
- Heat the beans in a small saucepan over medium-low heat for 5-7 minutes; stir in cumin or lime juice for added flavor.
- Start with rice at the bottom of your bowl, then layer sliced chicken, beans, and finish with salsa.
- Top with fresh cilantro, diced avocado, sliced jalapeños, or Greek yogurt.
Notes
This recipe is endlessly adaptable; you can load it up with your favorite taco ingredients or use whatever you have on hand.
Nutrition
- Serving Size: 1 bowl
- Calories: 540
- Sugar: 2g
- Sodium: 400mg
- Fat: 15g
- Saturated Fat: 2g
- Unsaturated Fat: 8g
- Trans Fat: 0g
- Carbohydrates: 60g
- Fiber: 8g
- Protein: 40g
- Cholesterol: 80mg
Keywords: chicken taco bowl, clean eating, meal prep, healthy dinner

Pumpkin Mac Bowl
Embrace the Comfort of a Pumpkin Mac Bowl
Have you ever found yourself wrapped in a cozy blanket, craving a dish that fills you with warmth and reminds you of home? One that brings back nostalgic memories while making your tastebuds dance with joy? Welcome to the delightful realm of the Pumpkin Mac Bowl! Here, creamy macaroni meets the subtle sweetness of pumpkin puree, blending together to create a dish that’s not only comforting but also quite nourishing.
As we step into the colorful embrace of fall, there’s something magical about adding pumpkin to our meals. Not only does it lend a vibrant hue, but pumpkin is also packed with nutrients! This dish finds the perfect balance between indulgence and health. It brings the creamy richness of classic mac and cheese into the light, ensuring you can enjoy your comfort food guilt-free.
I’ll never forget the first time I made this Pumpkin Mac Bowl. I was in college, huddled in my tiny kitchen, surrounded by textbooks and dim lighting. It was a chilly evening, and my ordinary mac and cheese just wasn’t going to cut it. I rummaged through my pantry and found a can of pumpkin puree. With a dash of spice and a sprinkle of cheese, I transformed that simple bowl of pasta into a dreamy, orange delight that left my soul (and tastebuds) satisfied. It was a recipe born out of necessity, yet became a beloved staple that warmed my heart and belly.
The Ingredients
To create your own cozy Pumpkin Mac Bowl, gather these ingredients:
-
Macaroni: The classic pasta shape that holds onto the cheesy goodness. You can swap it for any pasta you love—think whole grain, gluten-free, or even zoodles if you’re looking to lighten things up!
-
Pumpkin Puree: This superhero ingredient not only adds creaminess but is also loaded with vitamins and fiber. Always opt for 100% pure pumpkin (not pumpkin pie filling). If you’re feeling adventurous, you could make your own by roasting and pureeing fresh pumpkin.
-
Cheddar Cheese: A crowd favorite that brings richness to the dish. Sharp cheddar gives a wonderful tangy flavor, but feel free to mix it up with other cheeses like Monterey Jack, Gruyère, or even vegan cheese for a plant-based version.
-
Milk or Plant-based Milk: To help create a creamy sauce. Whole milk is rich, but almond or oat milk works beautifully too.
-
Butter: Adds a luscious texture. You can use olive oil or vegan butter if you’re looking for a healthier twist.
-
Spices: Salt, pepper, and a pinch of nutmeg. The nutmeg adds an unexpected warmth that enhances the pumpkin flavor beautifully.
-
Optional Toppings: Think crunchy breadcrumbs, herbs, or even crispy bacon for a flavor explosion.
With these simple ingredients, you’ll craft a meal that will leave you feeling pleasantly full and beautifully satisfied.
Step-by-Step Instructions
Now that we’ve gathered our ingredients, let’s dive into the process of creating your very own Pumpkin Mac Bowl. Ready, chef?
Step 1: Cook the Pasta
Start by bringing a large pot of salted water to a boil. Add your macaroni and cook according to the package instructions, usually about 7-9 minutes. Here’s a chef hack: save a cup of pasta water before draining! This starchy water can work wonders in making your sauce creamy later on.
Step 2: Make the Sauce
While your pasta is cooking, it’s time to prepare the cheese sauce. In a medium saucepan, melt 2 tablespoons of butter over medium heat. Once melted, stir in 2 tablespoons of flour to create a roux. Cook for about a minute or until it’s bubbling but not browned—this will help thicken your sauce.
Next, slowly pour in 2 cups of milk, whisking continuously to prevent lumps. Allow it to come to a gentle simmer, and in no time, you’ll have a smooth, creamy base!
Step 3: Add Pumpkin and Cheese
Once your milk is heated through, stir in 1 cup of pumpkin puree along with 2 cups of shredded cheddar cheese. Keep stirring until all the cheese has melted and is luscious and gooey. Add that precious pasta water bit by bit until you reach the desired creaminess—with no lumps in sight!
Step 4: Spice It Up
Now it’s time to season your sauce. Add salt and pepper to taste and a generous pinch of nutmeg. Stir well and taste; adjust seasonings as needed. The nutmeg will give your dish that extra depth of flavor that’s reminiscent of cozy fall days.
Step 5: Combine Pasta and Sauce
Drain the cooked pasta and stir it into the pumpkin cheese sauce until fully coated. If your mixture seems too thick, feel free to add a splash more of milk or that saved pasta water. When everything looks perfectly blended and happy, it’s time to plate up!
Serving Suggestions
To serve your Pumpkin Mac Bowl, scoop a generous portion into a rustic bowl, and sprinkle with your favorite toppings. A light dusting of breadcrumbs (baked until crispy) adds a delightful crunch! Fresh herbs like parsley or thyme can brighten the dish, while crispy bacon bits add a savory punch.
Recipe Variations
This Pumpkin Mac Bowl is incredibly versatile. Here are a few creative twists you might want to try:
-
Spicy Twist: Add a dash of cayenne pepper or some chopped jalapeños for a kick!
-
Meat Lover’s Delight: Mix in some cooked ground turkey or sausage for an added protein punch.
-
Veggie Power: Toss in some sautéed spinach, kale, or roasted Brussels sprouts for extra nutrition and color.
-
Cheesy Vegan Option: Swap the cheddar with a plant-based cheese and use almond milk instead of regular milk.
-
Herb Infusion: Stir in fresh herbs like rosemary or sage for a fragrant twist that complements the pumpkin beautifully.
Chef’s Notes
Creating this Pumpkin Mac Bowl has been a journey! Initially, I made it as a college student scrimping on groceries, but it has evolved into a beloved dish for gatherings with friends and family. My kitchen still welcomes those moments of culinary experimentation—like adding different spices or cheeses. It’s amazing how a simple dish can take you down memory lane; each bite reminds me of home, laughter, and love. And the best part? It’s perfectly acceptable to enjoy it for breakfast, lunch, or dinner—because who doesn’t love a wholesome bowl of mac and cheese?
FAQs and Troubleshooting
1. Why is my cheese sauce grainy?
This usually happens when the cheese is added too quickly to the sauce. Make sure to add it slowly and on low heat, stirring continuously. Also, ensure your cheese is at room temperature before adding.
2. Can I use other types of pasta?
Absolutely! Feel free to experiment with different pasta shapes like penne, fusilli, or even gluten-free options. Just adjust the cooking time as needed.
3. What if my sauce is too thick?
Pasta sauces can sometimes thicken upon cooling. Simply stir in a little extra milk or pasta water until you reach your desired consistency.
4. How can I store leftovers?
Store any leftovers in an airtight container in the fridge for up to three days. When reheating, add a splash of milk to restore creaminess!
Nutritional Info
This Pumpkin Mac Bowl is not just delicious; it’s also packed with nutrients! While exact nutritional values can vary depending on specific ingredients, here’s a rough estimate per serving:
- Calories: 450
- Protein: 15g
- Fat: 20g
- Carbohydrates: 50g
- Fiber: 4g
This dish is a comforting and nourishing choice for any day!
So there you have it! Your guide to the ultimate cozy Pumpkin Mac Bowl! Whether you’re whipping it up solo on a chilly evening or sharing it with friends and family, this dish is sure to spread smiles and warmth. Grab your favorite bowl, dive in, and savor that pumpkin goodness. Happy cooking, foodies!
PrintPumpkin Mac Bowl

A cozy and nourishing bowl of mac and cheese blended with creamy pumpkin puree, perfect for fall.
- Prep Time: 10 minutes
- Cook Time: 20 minutes
- Total Time: 30 minutes
- Yield: 4 servings 1x
- Category: Main Course
- Method: Baking
- Cuisine: American
- Diet: Vegetarian
Ingredients
- 8 ounces macaroni
- 1 cup pumpkin puree
- 2 cups shredded cheddar cheese
- 2 cups milk or plant-based milk
- 2 tablespoons butter
- 2 tablespoons flour
- Salt, to taste
- Pepper, to taste
- A generous pinch of nutmeg
- Optional toppings: breadcrumbs, herbs, crispy bacon
Instructions
- Cook the pasta in a large pot of salted water until al dente, about 7-9 minutes. Save a cup of pasta water, then drain.
- Prepare the cheese sauce by melting butter in a saucepan, whisking in flour to create a roux. Cook until bubbling, about 1 minute.
- Add milk slowly, whisking until smooth. Bring to a gentle simmer.
- Stir in pumpkin puree and cheddar cheese until melted and combined. Adjust consistency with reserved pasta water.
- Season with salt, pepper, and nutmeg. Mix thoroughly.
- Combine pasta with the cheese sauce, ensuring the pasta is well coated.
- Serve in bowls, topped with optional ingredients as desired.
Notes
Feel free to experiment with different toppings or pasta types. This dish is versatile and can be adjusted for dietary preferences.
Nutrition
- Serving Size: 1 serving
- Calories: 450
- Sugar: 4g
- Sodium: 650mg
- Fat: 20g
- Saturated Fat: 10g
- Unsaturated Fat: 4g
- Trans Fat: 0g
- Carbohydrates: 50g
- Fiber: 4g
- Protein: 15g
- Cholesterol: 50mg
Keywords: pumpkin, mac and cheese, comfort food, fall recipes, vegetarian
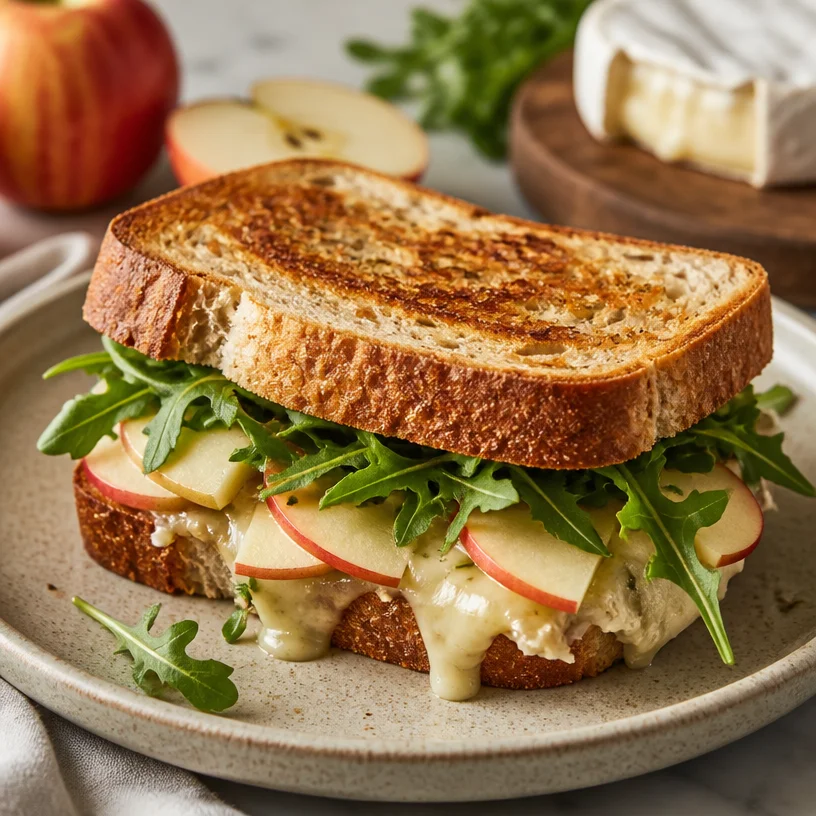
Minute Apple Brie Sandwich: Cozy Weeknight Comfort
Satisfy Your Cravings with a Delicious Apple Brie Sandwich
Welcome to Clean Plate Cravings! Today, we’re diving into a delightfully easy yet scrumptious dish that perfectly embodies fresh, feel-good eating: the Apple Brie Sandwich. If you’re anything like me, you understand that a truly satisfying meal doesn’t have to be complicated—it just needs the right ingredients and a little love. This sandwich is a stellar example of how simple ingredients can come together to create something incredible.
Imagine biting into a crispy, toasted slice of bread that gives way to gooey brie, perfectly balanced by the sweetness of crisp apples and the peppery kick of fresh arugula. Whether you enjoy it as a quick lunch, a snack, or even as a gourmet dinner option, this Apple Brie Sandwich is sure to hit the spot.
In this blog post, I’ll take you through the joys of crafting this delightful sandwich, share my culinary stories, and offer you tips, variations, and troubleshooting advice. By the end, you’ll be inspired to whip up your very own version of this delicious dish that will make your taste buds sing.
Let’s get into it!
A Taste of Nostalgia: My First Apple Brie Sandwich
I can still vividly remember the first time I tasted an Apple Brie Sandwich. It was at a quaint little café tucked away in a charming corner of my college campus. I was always searching for a place with good coffee and a creative menu, and this café quickly became my go-to spot. One chilly fall day, the aroma of toasted bread and sweet apples wafted through the air, luring me to a corner table where I could escape the bustling life of campus.
When the sandwich arrived, it was an absolute work of art. Golden-brown bread cradled the luxuriously creamy brie, and the caramelized apples peeked out invitingly. Each bite was a symphony of flavors—rich, savory, and just the right hint of sweetness. From that moment on, I was hooked, not only on this sandwich but also on the idea of creating meals that evoke warmth and happiness. It became my mission to recreate that perfect blend of flavors at home, sparking a love for combining unexpected ingredients that still fuels my cooking adventures today.
Ingredients You’ll Need
Let’s gather the essentials for crafting your very own Apple Brie Sandwich! Here’s what you need:
-
Brie Cheese: This creamy, soft cheese is the star of the show. Its buttery richness pairs perfectly with the crispy apples. If you can’t find brie, camembert or even a creamy goat cheese can be great substitutes.
-
Fresh Apples: Choose a variety that adds a delightful sweetness and crunch. I recommend crisp options like Honeycrisp or Fuji. Lost on what to substitute? Try pears for a similar texture and flavor profile.
-
Peppery Arugula: This leafy green adds a beautiful flavor contrast and a lovely peppery bite that balances the rich brie. Spinach can work too if you prefer something milder, or even kale for a heartier touch.
-
Bread: A crusty baguette, sourdough, or even a hearty whole-grain bread acts as the perfect foundation for our sandwich. Heading gluten-free? Don’t worry! Look for gluten-free bread that suits your taste buds.
Step-by-Step Instructions
Let’s get cooking! Here’s how to make your Apple Brie Sandwich step by step:
-
Gather Your Ingredients: Start by laying out all of your ingredients on a clean countertop. This way, you can easily grab what you need as you cook. Pour yourself a cup of tea or coffee to enjoy while you’re at it!
-
Choose Your Bread: Begin by selecting your bread. I love the crusty exterior of a sourdough loaf because it offers a lovely crunch. If you’re using a baguette, slice it into manageable pieces about 1-inch thick. For sandwich bread, two slices will do.
-
Slice the Apples: Take your apples and slice them thinly. Aim for about ¼-inch slices to showcase their crispness. You can leave the skin on for added nutrients and texture. Remember, if you’re going for presentation, a mandoline slicer works wonders for achieving even slices!
-
Prep Your Brie: Next comes the brie! If you want a little more flavor, slice the brie into about ¼-inch thick pieces. If you prefer, you can also leave the rind on as it adds an earthy flavor.
-
Assemble the Sandwich: Lay out your bread slices (or baguette halves) on a clean cutting board. Start with a generous layer of brie on one side of the bread. Add a layer of sliced apples atop the cheese, followed by a handful of fresh arugula. You can sprinkle a touch of salt or drizzle some honey over the arugula for an extra flavor punch if you’re feeling adventurous!
-
Top and Toast: Place the other slice of bread on top to close the sandwich. If you’re using a baguette, you can slice it in half and toast each piece separately. This step is essential for that crispy texture! If you have a panini press or an air fryer, it’s time to make use of it. For a stovetop method, heat a skillet over medium heat and butter the outside of the sandwich before placing it in the pan.
-
Grill to Perfection: Grill each side for about 3–5 minutes until golden brown and the cheese starts to melt. This is where the magic happens! Keep an eye on it to prevent burning, and use a spatula to gently press down for even cooking.
-
Slice and Serve: Once your sandwich is beautifully toasted and the cheese is gooey, remove it from the heat. Allow it to cool slightly before slicing it in half—this way, the cheesy goodness doesn’t ooze out everywhere. Place it on a plate and admire your creation for a moment before digging in!
Serving Suggestions
When it comes to serving your delightful Apple Brie Sandwich, simplicity is key! I recommend plating it with a side of crunchy veggie sticks—think cucumber, bell pepper, and carrot—or a light mixed greens salad drizzled with a lemon vinaigrette. A cup of rich pumpkin soup or a cozy bowl of tomato bisque would also make great complements, turning this into a lovely brunch or lunch combo.
Recipe Variations
Get creative with these fun variations!
-
Sweet & Savory Twist: Drizzle your apples with balsamic glaze for an added depth of flavor.
-
Nutty Crunch: Add some chopped walnuts or pecans for a delightful crunchy texture.
-
Herby Bliss: Sprinkle some fresh herbs like thyme or rosemary over your arugula for an aromatic kick.
-
Spicy Kick: Add a few slices of jalapeños or a smear of spicy mustard for those who enjoy a little heat.
-
Fruit Swap: Use sliced pears or figs instead of apples if you’re feeling adventurous.
Chef’s Notes
This recipe has evolved over time. Initially, my version was a straightforward brie and apple combo, but as I experimented with flavors and textures, I started incorporating more fresh greens and various kinds of bread. The sandwich has become a staple in my home kitchen because it’s so versatile and can be enjoyed in multiple ways throughout the year. Plus, it reminds me of those cozy café days back in college, when a delicious sandwich could make everything feel just a little bit better.
FAQs and Troubleshooting
-
What type of bread works best for this sandwich?
While crusty bread like sourdough or a baguette is ideal, you can use any bread you prefer. If you want it gluten-free, look for gluten-free sandwich or baguette bread! -
Can I make this sandwich ahead of time?
Yes, you can prepare the sandwich but it’s best to toast it right before serving. If you prepare it ahead of time, store it wrapped in the refrigerator, and toaster just before eating. -
How can I keep the apples from browning?
To prevent your apple slices from browning, you can toss them in a bit of lemon juice as you slice. -
What should I do if the sandwich is too gooey?
If your sandwich is too gooey or messy, consider letting it cool a bit before slicing. Also, solidify your bread choices with a heartier loaf that can handle the filling.
Nutritional Info
This Apple Brie Sandwich is a well-rounded choice for a light meal or snack. While it’s hard to pin down precise nutritional information due to variations in ingredients and portion sizes, it’s a balanced option that combines healthy fats from brie, fiber from bread and arugula, and vitamins from apples.
Conclusion
There you have it, foodies! A delightful Apple Brie Sandwich that’s both simple to make and full of flavor. It brings happiness not just through taste but by evoking memories and building connections around the dining table. So go ahead, grab those ingredients, put on your favorite playlist, and enjoy the delicious experience of making this incredible sandwich. Whether it’s for a light lunch or a lovely picnic, I know you’ll fall in love with each gooey, crunchy slice! Happy cooking!
PrintApple Brie Sandwich

A delightful and easy-to-make sandwich featuring creamy brie, crisp apples, and peppery arugula.
- Prep Time: 15 minutes
- Cook Time: 10 minutes
- Total Time: 25 minutes
- Yield: 2 servings
- Category: Sandwich
- Method: Grilling
- Cuisine: American
- Diet: Vegetarian
Ingredients
- Brie Cheese
- Fresh Apples (Honeycrisp or Fuji)
- Peppery Arugula
- Bread (sourdough, baguette, or gluten-free)
Instructions
- Gather your ingredients on a clean countertop.
- Choose your bread, slicing it if necessary.
- Slice the apples thinly, aiming for ¼-inch slices.
- Prep the brie by slicing it into ¼-inch thick pieces.
- Assemble the sandwich with brie, apples, and arugula.
- Top with another slice of bread.
- Grill each side for about 3–5 minutes until golden.
- Slice and serve warm.
Notes
For added flavor, consider drizzling honey or balsamic glaze. This sandwich can be served with veggie sticks or a light salad.
Nutrition
- Serving Size: 1 sandwich
- Calories: 450
- Sugar: 8g
- Sodium: 350mg
- Fat: 18g
- Saturated Fat: 10g
- Unsaturated Fat: 5g
- Trans Fat: 0g
- Carbohydrates: 50g
- Fiber: 3g
- Protein: 12g
- Cholesterol: 30mg
Keywords: apple, brie, sandwich, vegetarian, quick meal