
One-Pot Marry-Me Chicken Soup: Creamy, Weeknight Ready
Marry Me Chicken Soup: A Delightful, Heartwarming Recipe
Welcome to Clean Plate Cravings! Today, we’re diving into a cozy bowl of love with my Marry Me Chicken Soup. If you’ve been searching for that perfect blend of heartwarming flavors that wraps you up like a warm hug on a chilly day, you’re in for a treat! This soup is as comforting as your favorite childhood memories and just as delicious. Whether you’re navigating a busy week or seeking a dish that touches the heart, this recipe will have you swooning.
Imagine coming home after a long day, the aroma of garlic and sun-dried tomatoes wafting through the air, welcoming you like an old friend. That’s what you can expect with Marry Me Chicken Soup. It’s a dish that’s been known to create a little romance, hence the name! It’s all about simple ingredients coming together to create something extraordinary, and if that isn’t magic, I don’t know what is. So grab your favorite pot and let’s get to cooking!
A Little Love Story
This soup isn’t just about creamy goodness; it’s wrapped in a story of love and warmth. I vividly remember the first time I made this dish. It was a rainy Sunday afternoon, and I was preparing a cozy dinner for my partner and myself. I wanted something that would impress but also have that homey feeling. While flipping through one of my cookbooks, a recipe for creamy chicken soup caught my eye. I decided to put my twist on it—adding sun-dried tomatoes for that vibrant pop of flavor and fresh spinach for a little color and nutrition.
As the soup simmered on the stove, we sat on the couch, excited about a cozy evening together. By the time it was ready, the aroma had completely transformed our space into a delightful haven. We savored each spoonful, and with every bite, I could feel the love brewing between us. It quickly became a staple in our home, a dish that not only satisfied our bellies but also warmed our hearts. Who would have thought a simple soup could spark such passion? With each bowl we share, I’m reminded of that rainy day, and I can confidently say it deserves every ounce of love it gets.
Ingredients
Let’s gather our stars for this delightful Marry Me Chicken Soup! Here’s what you’ll need:
- Chicken Breast: The star of our soup! I recommend using boneless, skinless chicken breasts for lean protein. If you’re short on time, rotisserie chicken works great as a quick substitution.
- Sun-Dried Tomatoes: These little gems add a burst of tangy flavor. Preferably, use the oil-packed version for extra richness. If you don’t have any on hand, fresh tomatoes can work as a substitute; just increase the simmering time to let them break down.
- Spinach: Bright and nutritious, spinach adds color and health benefits. Feel free to swap it with kale or swiss chard for a different flair.
- Garlic: A must-have! Fresh garlic gives the best flavor, but if you’re in a pinch, garlic powder can be used (just adjust the quantity).
- Parmesan Cheese: This brings a wonderful nutty flavor and creaminess. If you’re vegan or dairy-free, try nutritional yeast for a similar taste.
- Cream: Heavy cream transforms the soup into a rich, silky experience. Half-and-half or a plant-based cream alternative would also work if you prefer a lighter option.
- Chicken Broth: This serves as our soup’s base, bringing everything together. Low-sodium broth is always a good choice so that you can control the saltiness.
Step-by-Step Instructions
Alright, fellow foodies, let’s get cooking! Here’s the detailed process to whip up this scrumptious Marry Me Chicken Soup:
-
Prep Your Ingredients: Before you dive in, gather all your ingredients. Dice the chicken into bite-sized pieces, chop the sun-dried tomatoes, and mince the garlic. Prepping ahead of time makes cooking a breeze!
-
Sauté the Chicken: In a large pot, heat a tablespoon of olive oil over medium heat. Add the diced chicken and season with salt and pepper. Cook until the chicken is browned and cooked through, about 5-7 minutes. Chef’s Tip: Don’t overcrowd the chicken in the pan; this will ensure it browns nicely.
-
Add Garlic and Tomatoes: Toss in the minced garlic and sun-dried tomatoes, stirring well for about 1-2 minutes until fragrant. Little Hack: The oil from the sun-dried tomatoes will blend beautifully with the chicken, infusing more flavor into the dish.
-
Pour in the Chicken Broth: Add the chicken broth to the pot, scraping up any brown bits from the bottom of the pan. This is where the flavor magic happens! Let the mixture come to a gentle boil.
-
Incorporate the Cream: Once it’s boiling, reduce the heat and stir in the cream. Allow it to simmer for just a couple of minutes until it thickens slightly. If you’re using a lighter option, just keep an eye on it so it doesn’t curdle.
-
Add Spinach: Toss in the fresh spinach and let it wilt. This should take about 2-3 minutes. Chef Insight: Adding spinach towards the end keeps it vibrant and fresh, ensuring it doesn’t lose its nutrients.
-
Finish with Parmesan Cheese: Stir in the grated Parmesan cheese until melted and creamy. Taste and adjust seasoning if necessary. You’ll want that perfect balance of flavors!
-
Serve and Enjoy: Ladle the soup into bowls and top with extra Parmesan if desired. Crusty bread on the side is a must—it’s perfect for dipping!
Serving Suggestions
To plate this delicious Marry Me Chicken Soup, I love to serve it in cozy, oversized bowls. A sprinkle of fresh parsley or additional Parmesan on top adds a finishing touch. Pair it with a side of homemade garlic bread or a light salad for a delightful meal. Don’t be shy about curling up on the couch with your bowl—this soup is best enjoyed while cozying up with your loved ones!
Recipe Variations
For those looking to switch things up, here are a few creative twists to try:
- Herbed Variation: Add fresh herbs like thyme or basil for an aromatic twist!
- Spicy Kick: Toss in a pinch of red pepper flakes for a hint of heat.
- Veggie Delight: Up the veggie content with carrots, bell peppers, or zucchini; just sauté them alongside the chicken.
- Noodle Lover: Throw in some cooked pasta or rice for a heartier soup.
Chef’s Notes
This recipe has evolved over time, and I love to personalize it based on what I have in my fridge. I remember the first attempt included a lot more sun-dried tomatoes, and while it was delicious, it was a little too tangy for some. Finding that balance has been a fun journey! I’ve also experimented with the creamier elements, and I find that a little extra cheese never hurt anyone. In the end, this soup is not just a recipe; it’s a canvas for your creativity and taste preferences.
FAQs and Troubleshooting
1. My soup is too thick; how can I thin it out?
No problem! Just add a bit more chicken broth or water to achieve your desired consistency. Stir well.
2. Can I make this soup in advance?
Absolutely! Make a big batch and store it in an airtight container in the fridge for up to 3 days. Just reheat and enjoy!
3. What if I don’t like sun-dried tomatoes?
You can skip them entirely or swap them for roasted red peppers or even diced fresh tomatoes for a different flavor profile.
4. How can I make this soup healthier?
Try using low-fat cream or a dairy-free milk alternative and lessen the cheese a bit. You can also add more veggies to increase fiber and nutrients!
Nutritional Info
(Approximate per serving)
- Calories: 350
- Protein: 30g
- Carbohydrates: 6g
- Fat: 22g
- Fiber: 2g
- Sugar: 2g
So there you have it, my friends! Marry Me Chicken Soup, a hearty and heavenly bowl ready to win over anyone’s heart. Whether you’re impressing a date, enjoying a quiet night in, or just wanting to indulge in some feel-good food, this soup will surely do the trick. Let’s keep it fresh, simple, and most importantly—delicious! Happy cooking!
PrintMarry Me Chicken Soup

A cozy and heartwarming chicken soup featuring sun-dried tomatoes and spinach, perfect for impressing loved ones.
- Prep Time: 15 minutes
- Cook Time: 30 minutes
- Total Time: 45 minutes
- Yield: 4 servings 1x
- Category: Main Course
- Method: Stovetop
- Cuisine: Italian
- Diet: Paleo
Ingredients
- 1 lb Boneless, skinless chicken breasts
- 1/2 cup Sun-dried tomatoes (oil-packed)
- 2 cups Fresh spinach
- 3 cloves Garlic (minced)
- 1/2 cup Parmesan cheese (grated)
- 1 cup Heavy cream
- 4 cups Chicken broth (low-sodium)
- 1 tbsp Olive oil
- Salt and pepper to taste
Instructions
- Prep your ingredients: Dice the chicken, chop the tomatoes, and mince the garlic.
- Sauté the chicken: Heat olive oil in a large pot, add chicken, season, and cook until browned (about 5-7 minutes).
- Add garlic and tomatoes, stir for about 1-2 minutes until fragrant.
- Pour in the chicken broth and scrape up brown bits. Let it come to a gentle boil.
- Incorporate the cream and simmer until it thickens slightly.
- Add spinach and let it wilt for 2-3 minutes.
- Finish with Parmesan, stir until melted, and adjust seasoning to taste.
- Serve the soup in bowls and top with extra Parmesan if desired.
Notes
This soup can be made in advance and stored in the fridge for up to 3 days. Serve with crusty bread for dipping.
Nutrition
- Serving Size: 1 serving
- Calories: 350
- Sugar: 2g
- Sodium: 400mg
- Fat: 22g
- Saturated Fat: 12g
- Unsaturated Fat: 7g
- Trans Fat: 0g
- Carbohydrates: 6g
- Fiber: 2g
- Protein: 30g
- Cholesterol: 90mg
Keywords: chicken soup, comfort food, easy recipes, cozy meals, warm soup
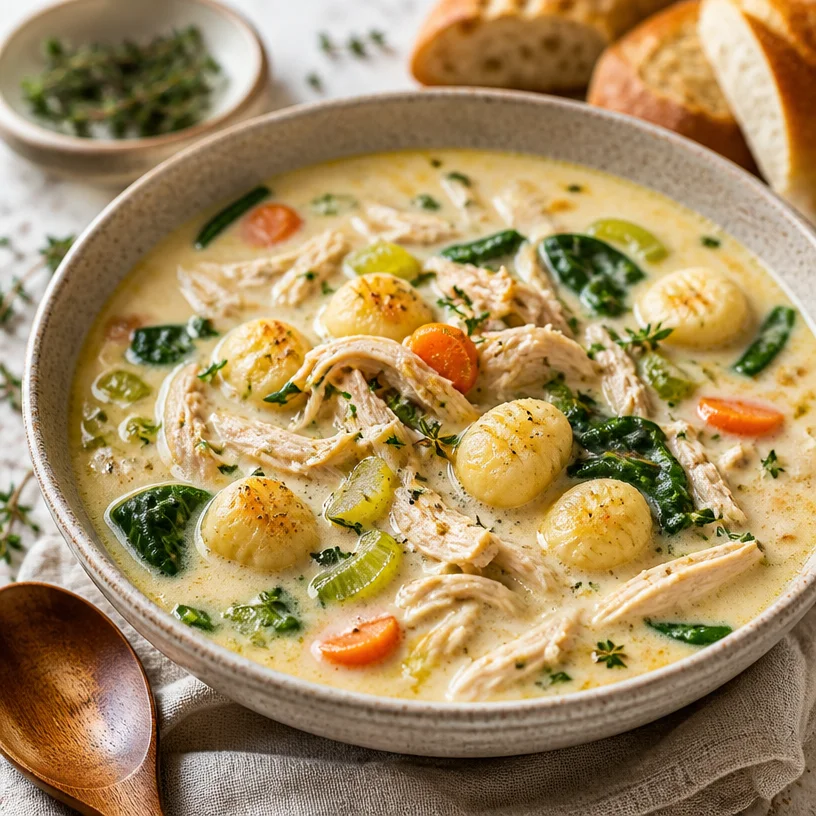
Creamy Chicken Gnocchi Soup: 20-Minute Cozy Dinner
Creamy Chicken Gnocchi Soup: A Comforting Embrace in a Bowl
Welcome to my cozy kitchen corner, where the aromas of homemade goodness swirl around like old friends catching up. If you’re anything like me, you know that some dishes have a magical way of warming the heart and nurturing the soul. Today, I’m excited to share a recipe that embodies that warmth: Creamy Chicken Gnocchi Soup. This delightful creation is your ticket to a comforting culinary experience that brings the best of fresh ingredients into your bowl and fills your home with love and flavor.
There’s something truly special about a bowl of soup that feels like a hug. The luscious creaminess of this chicken gnocchi soup, with its tender chicken, fluffy gnocchi, and vibrant veggies, really captures that spirit. When the chill of winter wraps around us or the hustle and bustle of life gets a little too hectic, this soup is exactly what we need. Not only is it packed with wholesome ingredients, but it’s also easy enough to whip up even on the busiest days. As we stir, taste, and savor, this soup becomes more than just a meal—it transforms into a comforting ritual.
Imagine gathering your loved ones around the table as the steam rises from each bowl, your house becoming a haven of warmth and laughter. There’s nothing quite like that moment when you serve a meal that’s not only delicious but also nourishes the body and soul. So, grab your apron, and let’s dive into a recipe that’s as refreshing as a spring morning yet comforting enough for a cozy evening in!
A Nostalgic Taste of Home
Let me take you back to my childhood, where soup was a staple in our household. My grandmother, a master in the kitchen, always had a pot simmering on the stove, filling our home with the smell of her handmade broths. One of her favorites was a creamy chicken soup that often included dumplings, reminiscent of gnocchi. I can still picture her stirring that pot, the sun streaming through the kitchen window as we crowded around, eager for our bowls.
There was a particular winter evening when I was about ten years old that I’ll never forget. The snow was falling thick outside, blanketing the world in white, and we were snug inside. My grandmother handed me a wooden spoon and said, "Today, you’re the chef." I stumbled through the recipe, giggling and making a mess, but there was a certain magic in creating something delicious together.
Years later, I decided to blend those fond memories with my love for easy, nourishing meals and created my version of her recipe—Creamy Chicken Gnocchi Soup. I wanted to capture that warmth and nostalgia while keeping it simple for everyone to enjoy. Now, whenever I make this soup, I can almost hear my grandmother’s laughter in the kitchen as I whip up this creamy, delicious dish.
Ingredients: All the Goodness You’ll Need
Here’s what we’ll be using to create our creamy masterpiece. Don’t fret if you’re missing an ingredient—I’ll share some handy substitutions too!
-
Chicken (boneless, skinless): The star of our soup! I like using chicken breast or thighs for tenderness. If you’re short on time, a rotisserie chicken works great as a shortcut.
-
Potato gnocchi: These little pillows of goodness provide a delightful texture. You can find them fresh or dried in most grocery stores. Looking for a gluten-free option? Try using gluten-free gnocchi, or even better, make your own!
-
Carrots: Adding sweetness and a pop of color! I slice them thinly for quicker cooking. Baby carrots work just as well—just chop them up!
-
Celery: A classic flavor base that brings depth to every spoonful. If you’re not a fan of celery, feel free to swap in some fresh green beans or bell peppers.
-
Spinach: A powerhouse of nutrients that wilts down beautifully. Kale or Swiss chard are great alternatives if you want a sturdier green.
-
Cream (heavy or half-and-half): This is what gives our soup its luscious creaminess. You can lighten it up with whole milk, or even a splash of coconut milk if you’re feeling adventurous!
Let’s gather these ingredients, and get ready to create some magic in the kitchen. Each one plays a vital role in turning simple elements into a comforting soup that everyone can enjoy.
Step-by-Step Instructions: Cooking Your Soup
Now, let’s roll up our sleeves and get into the nitty-gritty of cooking this creamy goodness!
-
Prepare the Chicken: Start by cooking your chicken. You can either grill, roast, or pan-sear it. If you’re using raw chicken, season it with salt and pepper, then cook it in a large pot over medium heat until it’s golden brown. About 5-6 minutes per side should do it. If you’re using leftover chicken or rotisserie chicken, just shred it with forks for easy mixing.
Chef’s Tip: Let your chicken rest for a few minutes before slicing to retain those juices!
-
Sauté the Veggies: In the same pot, add a splash of olive oil (about 2 tablespoons) and toss in your carrots and celery. Sauté them for about 5-7 minutes until they’re starting to soften. The colors will brighten, and the fragrance will fill your kitchen—trust me, you’ll feel happy just breathing it in!
Little Kitchen Hack: Use a pinch of salt when sautéing veggies; it helps draw moisture out and promotes flavor.
-
Add the Gnocchi: Now it’s time for the gnocchi! Stir in your potato gnocchi with the sautéed veggies. Allow them to cook for about 2-3 minutes, lingering just enough for them to absorb some of those veggie flavors.
-
Pour in the Liquid: Add around 4 cups of chicken broth to the pot, and bring everything to a simmer. This is where the magic happens! You’ll see the gnocchi begin to float on the surface—this means they’re cooking perfectly.
-
Stir in the Cream: Lower the heat and gently pour in your cream, stirring to combine. The soup should start thickening slightly, becoming rich and velvety. Don’t rush this step; let the cream mingle with the broth and gnocchi. You can use a whisk to make it extra smooth!
-
Finish with Spinach: Toss in your fresh spinach and allow it to wilt down for just a couple of minutes. The vibrant green will make your soup pop visually and nutritionally.
-
Taste and Adjust: Give it a taste! This is your moment to shine. If it needs more seasoning, add a pinch of salt, a crack of black pepper, or even a squeeze of lemon for brightness.
-
Serve It Up: Once everything is just right, ladle your soup into bowls, and garnish with fresh herbs like parsley or thyme if you’re feeling fancy.
Chef’s Tip: A drizzle of extra virgin olive oil on top right before serving adds a lovely finish!
Serving Suggestions: How to Present Your Soup
Plating is where you can really let your creativity shine! Serve this creamy chicken gnocchi soup in beautiful bowls to enhance its appeal. For an extra touch, sprinkle some freshly grated Parmesan cheese on top and perhaps a few crushed red pepper flakes for those who love a bit of heat.
Pair the soup with a crunchy baguette or some homemade garlic bread for dipping. This creates a full, satisfying meal perfect for any occasion. You might even want to serve a light salad on the side to balance the richness of the soup.
Recipe Variations: Creative Twists for Every Taste
Now, let’s mix things up a bit! Here are some fun variations you can try:
-
Herbed Chicken Gnocchi Soup: Add fresh herbs like dill or tarragon for a refreshing twist that complements the creamy chicken well.
-
Cheesy Spinach Variation: Stir in some shredded cheese—like sharp cheddar or Gruyere—into the soup for a cheesy delight.
-
Italian Twist: Add Italian sausage instead of chicken for a different flavor and a bit of spice.
-
Vegetarian Option: Replace chicken with chickpeas or lentils for a hearty vegetarian variant. Just remember to use vegetable broth!
-
Add More Veggies: Feel free to sneak in more vegetables like corn, zucchini, or sweet potatoes for added nutrition and color.
Chef’s Notes: My Personal Touches
I’ve made this recipe countless times, and each iteration feels like a delightful reunion with the flavors of my childhood. I remember one time, I decided to add a touch of lemon. It not only brightened the soup but also elevated its creaminess by cutting through the richness.
Sometimes when I make this soup, I like to recount the funny stories about my grandma’s kitchen mishaps—like the time she mistook salt for sugar and created the most unforgettable soup disaster. It’s these memories that make the cooking experience more enjoyable and relatable!
FAQs and Troubleshooting: Your Questions Answered
-
Can I use frozen gnocchi?
Absolutely! Just add them directly into the soup without thawing, but keep in mind that the cooking time might need a slight adjustment. -
What if my soup is too thick?
No problem! Just gradually add more chicken broth or water until you reach your desired consistency. -
How should I store leftovers?
Store any soup leftovers in an airtight container in the refrigerator for about 3–4 days. Reheat gently on the stove, adding a splash of broth if it seems too thick. -
Why did my gnocchi fall apart?
If gnocchi isn’t cooked properly, they can fall apart. Be sure not to overcook them! They should float to the top when done.
Nutritional Info
While I won’t overload you with numbers, I will mention that this Creamy Chicken Gnocchi Soup is a balanced meal packed with protein from the chicken, carbs from the gnocchi, and heaps of vitamins from the vegetables. It’s an excellent option for a hearty lunch or dinner, giving you both sustenance and comfort!
Thank you for joining me in my kitchen today! I hope you find as much joy in creating this Creamy Chicken Gnocchi Soup as I do in sharing it with you. Here’s to delicious meals, cherished memories, and flavor-packed days! Let’s keep the kitchen lively, the conversation flowing, and the food fresh. Happy cooking!
PrintCreamy Chicken Gnocchi Soup

A comforting and creamy soup filled with tender chicken, fluffy potato gnocchi, and vibrant vegetables, perfect for warming the heart.
- Prep Time: 15 minutes
- Cook Time: 30 minutes
- Total Time: 45 minutes
- Yield: 4 servings 1x
- Category: Soup
- Method: Stovetop
- Cuisine: Italian
- Diet: Paleo
Ingredients
- 1 pound boneless, skinless chicken (breast or thighs)
- 16 oz potato gnocchi
- 2 medium carrots, sliced
- 2 stalks celery, diced
- 2 cups fresh spinach
- 4 cups chicken broth
- 1 cup heavy cream (or half-and-half)
- 2 tablespoons olive oil
- Salt and pepper to taste
Instructions
- Prepare the chicken by seasoning and cooking it in a pot until golden brown, about 5-6 minutes per side.
- Sauté the carrots and celery in olive oil for 5-7 minutes until softened.
- Add the gnocchi and cook for 2-3 minutes with the vegetables.
- Pour in the chicken broth and bring to a simmer, allowing the gnocchi to float.
- Stir in the cream and let the soup thicken slightly.
- Finish by adding the spinach and allowing it to wilt for a couple of minutes.
- Taste and adjust seasoning if necessary.
- Serve in bowls and garnish with herbs and a drizzle of olive oil.
Notes
Serve with a crunchy baguette or garlic bread for dipping.
Nutrition
- Serving Size: 1 bowl
- Calories: 400
- Sugar: 5g
- Sodium: 800mg
- Fat: 20g
- Saturated Fat: 10g
- Unsaturated Fat: 8g
- Trans Fat: 0g
- Carbohydrates: 35g
- Fiber: 3g
- Protein: 25g
- Cholesterol: 80mg
Keywords: soup, chicken, gnocchi, creamy, comfort food
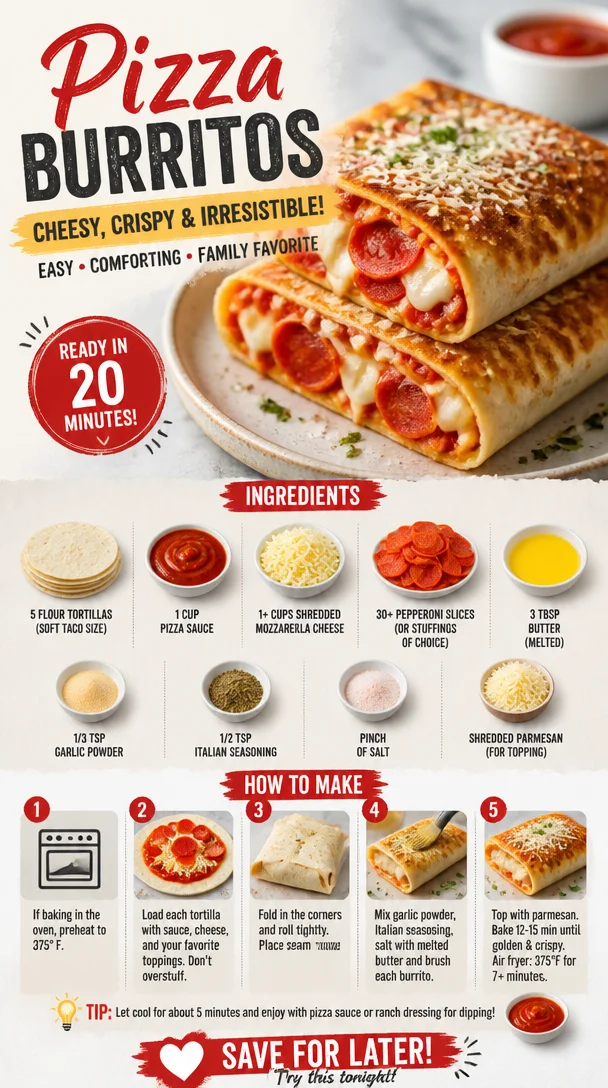
Pizza Burritos
Pizza Burritos: A Culinary Adventure Awaits!
Hey there, food lovers! Are you ready to embark on a delicious journey that combines the magic of pizza with the fun of a burrito? Yup, you guessed it; we’re diving into the delightful world of Pizza Burritos! It’s one of those dishes that’s not only mouth-watering but also incredibly versatile. Imagine all your favorite pizza toppings wrapped snugly in a soft tortilla, baked to a golden perfection. Intrigued? Let’s get cooking!
Before we start whipping up this cozy meal, let’s talk a bit about why I love this recipe. Picture this: a late Friday night after a long week, and all I want is pizza but—surprise—I don’t have the energy to deal with delivery waiting times or the usual greasy fare. This is when the idea of Pizza Burritos hit me! It was the perfect dinner-it’s quick, satisfying, and didn’t require a trip to the restaurant. Plus, you can customize it with whatever toppings you’ve got on hand! So, pull up a chair, grab your apron, and let’s get into this!
My Pizza Burrito Story
Ah, the nostalgia! I still remember the very first time I made Pizza Burritos: it was a rainy Saturday afternoon, and I was stuck inside with nothing but time and a fridge full of leftover pizza ingredients. Instinct kicked in, and I found myself rolling flour tortillas around pepperoni, cheese, and the leftover pizza sauce from the delivery the night before! As I baked my creations in the oven, the cheesy aroma filled the kitchen, evoking memories of pizza nights with friends and laughter echoing around the table.
Those little burrito-shaped morsels turned out to be an instant hit! Everyone was eagerly digging in, with gooey cheese and that crispy outer layer creating the kind of comfort food experience that warms your heart. From that day on, it became a Saturday staple. Now, the ritual of making Pizza Burritos with friends or family has morphed into a delightful tradition. Whether we’re piled up on the couch under a mountain of blankets or gathered cheers for game night, these burritos always steal the spotlight.
Ingredients
You ready to roll up those sleeves? Here’s what we need to create your new favorite comfort food!
-
5 Flour Tortillas (soft taco size): These lovely rounds will cradle all the filling goodness. You can swap them out for whole wheat tortillas or gluten-free varieties if you’re looking for alternative options.
-
1 cup Pizza Sauce: This is where the magic begins! Use your favorite store-bought sauce or whip up a homemade one using crushed tomatoes, garlic, and herbs. If you want a kick, try a spicy marinara!
-
1+ cups Shredded Mozzarella Cheese: The star of the show! This cheese brings that gooey goodness to your burritos. Feel free to mix in some cheddar for a flavor twist or use a dairy-free option if you’re going vegan.
-
30+ Pepperoni Slices: Classic pepperoni is always a hit! But don’t stop there—cook up some veggies like bell peppers, mushrooms, or even lean turkey if pepperoni’s not your jam.
-
3 tbsp Butter (melted): This is for brushing the tortillas, giving them that beautiful, golden finish and adding a savory flavor. You can use olive oil or vegan butter if you’re looking for a healthier or plant-based option.
-
1/3 tsp Garlic Powder: This adds amazing flavor without the fuss of chopping fresh garlic. Fresh minced garlic works too if that’s your vibe!
-
1/2 tsp Italian Seasoning: Because every pizza needs an Italian twist! If you don’t have Italian seasoning, try a mix of oregano, basil, and thyme.
-
Pinch of Salt: Just a smidge to enhance all those rich flavors.
-
Shredded Parmesan (for topping): This is optional but highly recommended! It adds an extra layer of cheesy goodness when your burritos come bubbling out of the oven.
Step-by-Step Instructions
Let’s get to the fun part—the cooking! Follow these steps to craft your own Pizza Burrito:
-
Preheat Your Oven: First things first, crank up that oven to 400°F (200°C). We want it nice and hot to get that crispy finish on our burritos.
-
Prepare the Tortillas: Lay out your tortillas on a clean surface. If they feel stiff, pop them in the microwave for about 15-20 seconds to make them pliable. Nobody likes a cracked burrito!
-
Spread the Sauce: Take 1 tablespoon of the pizza sauce and spread it evenly on each tortilla. Leave a little room around the edges to prevent spillage. Trust me, it’s a messy business otherwise!
-
Add the Cheese: Sprinkle a generous amount of mozzarella cheese over the sauce. Don’t be shy; this is where it gets creamy and delicious!
-
Layer on the Toppings: Now, place your pepperoni slices (or any other toppings) right on top of that cheesy goodness. Be adventurous! Throw in some veggies or even some diced cooked chicken if you’re feeling creative.
-
Roll it Up: Here comes the burrito magic! Fold in the sides of the tortilla and tightly roll it up from the bottom, tucking in the fillings as you go. Aim for a snug fit but don’t squish it too hard; we want some room for melting!
-
Brush with Butter: Pour the melted butter into a small bowl and mix in your garlic powder, Italian seasoning, and a pinch of salt. Using a brush, gently coat the outside of each burrito with this flavorful mix.
-
Bake It: Place the burritos seam-side down on a baking sheet lined with parchment paper. Bake in the preheated oven for about 20 minutes or until golden brown and crispy. Don’t be afraid to peek and drool at the sight!
-
Add Parmesan: Once they’re done, sprinkle some shredded parmesan on top immediately and return them to the oven for an additional 2-3 minutes until it’s melted and bubbly.
-
Serve and Enjoy: Remove the burritos from the oven and let them cool for a minute before slicing in half to reveal that glorious melty cheese. Toast a slice of garlic bread or serve with a garden salad to round out your meal.
Serving Suggestions
To plate your Pizza Burritos, slice them in half at an angle to expose all those delicious fillings inside. Arrange them on a big platter and serve them alongside a small bowl of extra pizza sauce for dipping. Add some colorful fresh herbs on top for that extra pop! Who says you can’t eat with your eyes first?
Recipe Variations
Let’s shake things up! Here are a few fun twists to keep things exciting:
-
Veggie Pizza Burritos: Swap out the pepperoni for a medley of sautéed bell peppers, onions, mushrooms, and spinach for a vibrant vegetarian version.
-
BBQ Chicken Burritos: Use shredded rotisserie chicken mixed with BBQ sauce instead of pizza sauce. Toss in some caramelized onions and cheese for a delicious smoky flavor.
-
Buffalo Cauliflower Burritos: Roast cauliflower tossed in buffalo sauce and add ranch dressing for a spicy twist. These are perfect for those looking to kick things up a notch!
-
Breakfast Pizza Burritos: Scramble some eggs and mix in cooked sausage or bacon, cheese, and some jalapeños for a breakfast burrito that feels like pizza!
Chef’s Notes
This recipe began as a way to clear out my fridge and has evolved into a family favorite! It’s amazing how simple ingredients can come together to create something magical. Over the years, I’ve experimented with all sorts of toppings and flavors—I’ve even made dessert burritos with Nutella and bananas! The possibilities are endless, and that’s part of the fun! If you have a craving, don’t hesitate to experiment. September evenings or cozy winter nights, these burritos are perfect any time of year!
FAQs and Troubleshooting
1. Why are my burritos falling apart?
Make sure you’re rolling them tightly and tucking in the sides as you go. If they still seem loose, try using slightly smaller tortillas for better control.
2. Can I prep these ahead of time?
Absolutely! You can assemble the burritos and refrigerate them for up to 24 hours before baking. Just brush with butter just before popping them in the oven.
3. What if I don’t have pizza sauce?
No problem! You can use marinara sauce, tomato sauce, or even pesto for a fresh twist. Just make sure whatever you choose is packed with flavor!
4. How do I store leftovers?
If you have any leftovers (unlikely, but hey, it happens!), wrap them tightly in foil or place in an airtight container. Reheat in the oven for the best results, but microwave works in a pinch if that’s all you’ve got.
Nutritional Info (Optional)
While this recipe is all about yumminess, a single Pizza Burrito will roughly contain around 400-500 calories, depending on your ingredients and portion sizes. They’re a decadently cheesy treat, so just keep that in mind as you dig in!
There you have it, folks! Dive into your kitchen and whip up these Pizza Burritos for your next cozy meal, family gathering, or movie night. With so many options and variations, you’ll never tire of them! Remember, the kitchen is your playground—so don’t be afraid to mix it up and have fun! Happy cooking, and may your Pizza Burritos always be gooey and delicious!
PrintPizza Burritos

A delightful combination of pizza flavors wrapped in soft tortillas and baked for a crispy finish.
- Prep Time: 15 minutes
- Cook Time: 20 minutes
- Total Time: 35 minutes
- Yield: 4 servings 1x
- Category: Main Course
- Method: Baking
- Cuisine: Italian
- Diet: Vegetarian
Ingredients
- 5 Flour Tortillas (soft taco size)
- 1 cup Pizza Sauce
- 1+ cups Shredded Mozzarella Cheese
- 30+ Pepperoni Slices
- 3 tbsp Butter (melted)
- 1/3 tsp Garlic Powder
- 1/2 tsp Italian Seasoning
- Pinch of Salt
- Shredded Parmesan (for topping)
Instructions
- Preheat your oven to 400°F (200°C).
- Prepare the tortillas by microwaving them for about 15-20 seconds if they feel stiff.
- Spread 1 tablespoon of pizza sauce evenly on each tortilla.
- Add a generous amount of mozzarella cheese over the sauce.
- Layer on pepperoni slices or your choice of toppings.
- Roll the tortilla tightly from the bottom, tucking in the fillings as you go.
- Brush the outside with a mixture of melted butter, garlic powder, Italian seasoning, and salt.
- Bake the burritos seam-side down on a lined baking sheet for about 20 minutes.
- Add shredded parmesan on top and bake an additional 2-3 minutes until melted.
- Serve and enjoy your delicious Pizza Burritos!
Notes
Customizable with various toppings and sauces; serve with extra pizza sauce for dipping.
Nutrition
- Serving Size: 1 burrito
- Calories: 450
- Sugar: 5g
- Sodium: 700mg
- Fat: 22g
- Saturated Fat: 10g
- Unsaturated Fat: 9g
- Trans Fat: 0g
- Carbohydrates: 40g
- Fiber: 2g
- Protein: 15g
- Cholesterol: 40mg
Keywords: Pizza Burritos, Comfort Food, Easy Recipe
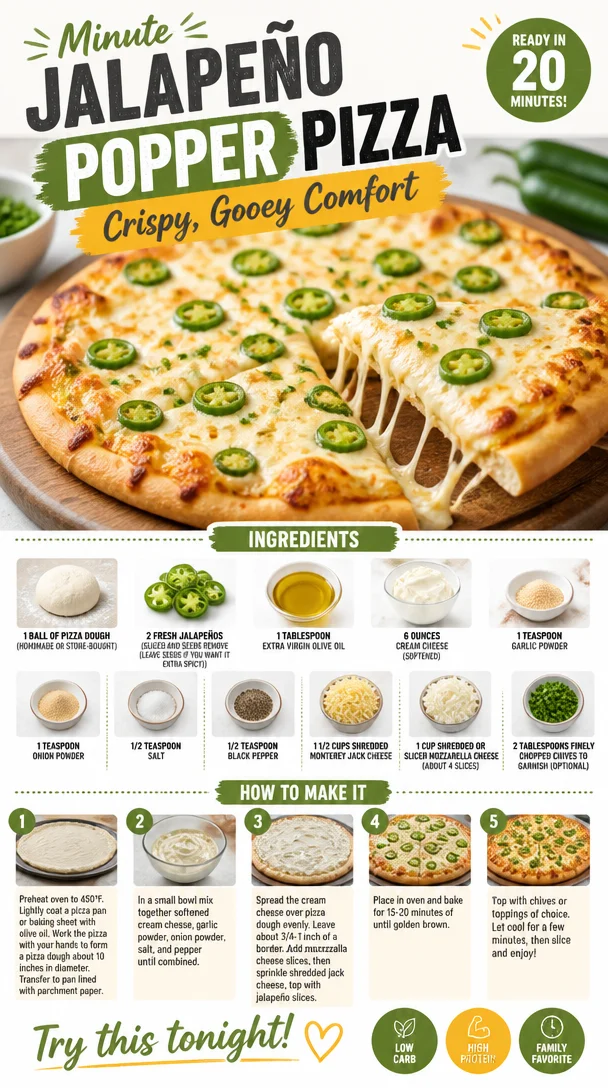
Minute Jalapeño Popper Pizza: Crispy, Gooey Comfort
Jalapeño Popper Pizza: A Flavorful Twist on a Classic Favorite
Welcome back to Clean Plate Cravings, my kitchen-loving friends! If you’re looking for a dish that combines the cheesy dreams of pizza with the spicy, creamy delight of jalapeño poppers, you’ve hit the jackpot! Today, we’re diving into the world of Jalapeño Popper Pizza, where every bite is an explosion of flavor. Whether you’re hosting friends for game night or just craving a comforting evening meal, this recipe is sure to impress without being overly complicated.
Imagine sinking your teeth into a crispy crust topped with a luscious layer of cream cheese, fresh jalapeños, and mountains of gooey cheese. Friends, it’s the perfect fusion of both worlds—a pizza you’ll want to make again and again. I find that cooking should be an adventure filled with joy and excitement, so let’s gear up and get cooking!
A Walk Down Memory Lane
Growing up, my family had a tradition of Friday night pizza parties. As a kid, I looked forward to it each week. We’d gather in the kitchen, and my dad would roll out the dough while the aroma of bubbling cheese filled the air. It was the kind of cozy chaos that caused laughter and a few flour-covered kitchen disasters. He had this knack for experimenting with flavors and toppings, and one night, he introduced us to the blissful experience of jalapeño poppers.
Flash-forward a few years, and I can still remember the crunch of that first bite. You know the one where the spicy, creamy goodness sends your taste buds on a joyride? That memory stayed with me, and it inspired me to create this Jalapeño Popper Pizza. It’s a celebration of flavors, nostalgia, and family traditions rolled into one fantastic pie that you can enjoy in the comfort of your own home.
Ingredients
Here’s what you’ll need to whip up this delicious Jalapeño Popper Pizza.
-
1 ball of pizza dough
You can use store-bought or make your own! If you’re using store-bought, look for a quality brand, or if you’re feeling adventurous, try my homemade dough recipe from earlier posts. -
2 fresh jalapeños (sliced and seeds removed)
If you like the heat, feel free to leave some seeds in! They bring a lovely depth of flavor. You can also substitute with roasted red peppers for a milder option. -
1 tablespoon extra virgin olive oil
This will help create a crispy crust and infuse flavor into the dough. You could also use melted butter for a richer taste. -
6 ounces cream cheese (softened)
The star of our popper-inspired topping! Be sure it’s softened—nothing’s worse than firm cream cheese trying to spread out. You can swap it with vegan cream cheese for a dairy-free version. -
1 teaspoon garlic powder
For that extra punch of flavor without biting into garlic chunks. Fresh minced garlic can also be used—just a little less than a teaspoon for the same effect! -
1 teaspoon onion powder
This brings a lovely sweetness to balance the heat from the jalapeños. Fresh onions can be used here; just make sure to sauté them first until they’re translucent. -
1/2 teaspoon salt
Essential for elevating all those delicious flavors! -
1/2 teaspoon black pepper
A must to add a bit of warmth. -
1 1/2 cups shredded Monterey Jack Cheese
This cheese melts beautifully and has a wonderful mild flavor. Pepper Jack could also add a little kick! -
1 cup shredded or sliced mozzarella cheese (about 4 slices)
Classic pizza cheese! You can experiment with provolone or gouda for something a bit different. -
2 tablespoons finely chopped chives (to garnish, optional)
Chives add a fresh burst of flavor on top! You could use green onions or even cilantro for a twist.
Step-by-Step Instructions
Now that we’ve snagged our ingredients, let’s jump into making our amazing Jalapeño Popper Pizza—step by step!
-
Preheat your oven: Start by preheating your oven to 475°F (245°C). This ensures your pizza crust gets that perfect golden-brown finish.
-
Prepare your pizza dough: If you’re using homemade dough, this is the time to roll it out! Lightly flour your work surface and roll your dough into your desired shape—be it round or rectangular. If you’re working with store-bought dough, follow the instructions on the packaging for the best results. Trust me, a good dough is the backbone of any pizza!
-
Brush with olive oil: After shaping your dough, transfer it to a baking sheet lined with parchment paper (or a pizza stone if you have one). Drizzle a tablespoon of extra virgin olive oil onto the surface of the dough, using a pastry brush or your fingers to spread it evenly across the top. This will give it a beautiful crust!
-
Soften the cream cheese: In a small bowl, combine your softened cream cheese, garlic powder, onion powder, salt, and black pepper. Mix well with a spatula or fork until smooth. This luscious mixture is the “popper” part of our pizza!
-
Spread the cream cheese mixture: Using a spatula, evenly spread the cream cheese mixture over the rolled-out dough, leaving a small border around the edges for the crust.
-
Add jalapeños: Scatter the freshly sliced jalapeños over the cream cheese layer. Use as few or as many as your heat tolerance allows. If you’re feeling bold, I’d say go for it—load it up!
-
Top with cheese: Now it’s time for cheese heaven! Sprinkle the shredded Monterey Jack cheese evenly over the jalapeños, then layer the mozzarella on top. Seriously, what’s pizza without a generous amount of ooey-gooey cheese?
-
Bake it up: Slide the pizza into the preheated oven and bake for about 12-15 minutes, or until the crust is golden brown and the cheese is bubbly and slightly caramelized. Keep an eye on it! Ovens can vary so make adjustments accordingly.
-
Garnish: In the last minute of baking, chop up your chives, so they’re ready to top your finished pizza.
-
Cool and serve: Once the pizza is out of the oven, let it cool for just a moment. This way, you’ll avoid burning your tongue on that molten cheese! Then, sprinkle the chopped chives on top for a pop of color and freshness.
Serving Suggestions
When it comes to serving up this Jalapeño Popper Pizza, keeping it casual is key! Slice it into wedges and serve with a side of ranch or blue cheese dressing for dipping. If you’re feeling generous, you can even whip up a quick and refreshing side salad to balance out that cheesy goodness. A simple arugula salad with lemon olive oil dressing or a classic Caesar salad would complement this dish perfectly!
Recipe Variations
Now that you’ve mastered the classic version, here are some fun ways to change it up:
-
BBQ Chicken Jalapeño Pizza: Add shredded cooked chicken and some BBQ sauce to the cream cheese mixture for an exciting twist!
-
Vegetarian Delight: Replace the jalapeños with bell peppers, mushrooms, or spinach for a veggie-packed version.
-
Spicy Sausage: Top with some crumbled spicy Italian sausage for a flavorful kick!
-
Double Cheese: Layer more creamy cheese like ricotta under the toppings for an extra indulgent pizza.
-
Gluten-Free Option: Use a gluten-free pizza crust to make this recipe friendly for everyone!
Chef’s Notes
This recipe brings back so many memories of my Friday night pizza nights, and it has evolved quite a bit over the years! Initially, I used very standard toppings until I discovered combining jalapeño poppers with pizza was an absolute game changer. Now, I love experimenting with different cheeses and toppings to see what new flavors I can create. One time I added a drizzle of honey after baking, and let me tell you, it took things to a whole new sweet-savory level!
FAQs and Troubleshooting
-
What if my dough doesn’t rise?
Make sure your yeast is fresh! If you’re using store-bought dough, follow the package’s instructions closely. If it’s homemade, double-check that your environment is warm enough for the dough to rise. -
My crust is soggy! What did I do wrong?
This could happen if you overload the toppings or don’t bake it long enough. Make sure to bake thoroughly and remove excess moisture from toppings, like patting the jalapeños dry. -
Can I make this ahead of time?
Absolutely! You can prepare the cream cheese mixture and slice your jalapeños ahead of time. Assemble the pizza just before baking for optimal freshness. -
How do I store leftovers?
Store leftover slices in an airtight container in the fridge for up to three days. Reheat in the oven for that freshly baked taste!
Nutritional Info
While I won’t dive deep into the nitty-gritty—because, hey, it’s pizza!—you can expect this Jalapeño Popper Pizza to be a delightful treat. Each slice combined with fresh ingredients provides a balance of fats, carbs, and proteins that can make your taste buds sing!
So there you have it! A culinary journey fueled by love, nostalgia, and a few spicy peppers. I hope you feel inspired to roll up your sleeves and create your own version of this Jalapeño Popper Pizza. It’s time to gather your friends, put on some fun music, and dig into some delicious homemade pies! Until next time, keep it fresh, simple, and seriously delicious!
PrintJalapeño Popper Pizza

A delicious fusion of pizza and jalapeño poppers with a crispy crust, creamy cheese, and a spicy kick.
- Prep Time: 15 minutes
- Cook Time: 15 minutes
- Total Time: 30 minutes
- Yield: 4 servings 1x
- Category: Main Course
- Method: Baking
- Cuisine: American
- Diet: Vegetarian
Ingredients
- 1 ball of pizza dough
- 2 fresh jalapeños (sliced and seeds removed)
- 1 tablespoon extra virgin olive oil
- 6 ounces cream cheese (softened)
- 1 teaspoon garlic powder
- 1 teaspoon onion powder
- 1/2 teaspoon salt
- 1/2 teaspoon black pepper
- 1 1/2 cups shredded Monterey Jack Cheese
- 1 cup shredded or sliced mozzarella cheese
- 2 tablespoons finely chopped chives (to garnish, optional)
Instructions
- Preheat your oven to 475°F (245°C).
- Prepare your pizza dough by rolling it out into your desired shape.
- Brush the shaped dough with olive oil.
- Soften the cream cheese and mix it with garlic powder, onion powder, salt, and black pepper.
- Spread the cream cheese mixture over the dough.
- Add sliced jalapeños over the cream cheese layer.
- Top with shredded Monterey Jack cheese and mozzarella cheese.
- Bake for about 12-15 minutes until the crust is golden brown and cheese is bubbly.
- Garnish with chopped chives before serving.
- Cool for a moment and then slice to serve.
Notes
Feel free to experiment with different toppings like BBQ chicken or bell peppers. Serve with ranch or blue cheese dressing for dipping.
Nutrition
- Serving Size: 1 slice
- Calories: 400
- Sugar: 2g
- Sodium: 450mg
- Fat: 22g
- Saturated Fat: 10g
- Unsaturated Fat: 8g
- Trans Fat: 0g
- Carbohydrates: 35g
- Fiber: 2g
- Protein: 15g
- Cholesterol: 40mg
Keywords: pizza, jalapeño poppers, creamy cheese, spicy pizza, comfort food
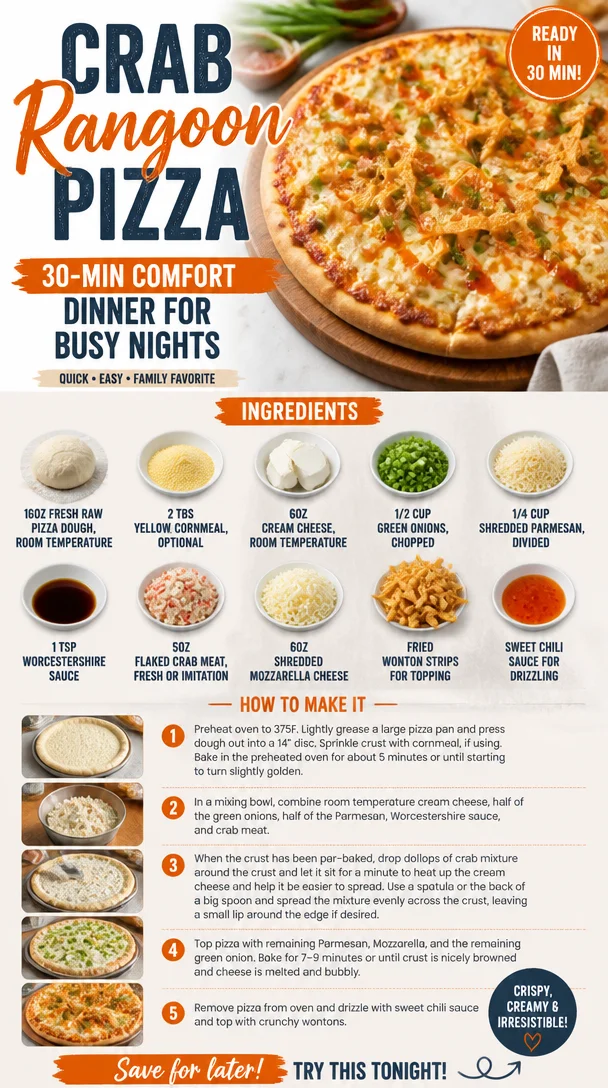
Crab Rangoon Pizza: 30-Min Comfort Dinner for Busy Nights
Crab Rangoon Pizza: A Delicious Fusion of Flavors and Fun
Oh, pizza! The ultimate comfort food that brings a smile to our faces on days that need a little extra love. But what if I told you there’s a way to take your pizza game to an entirely new level? Enter Crab Rangoon Pizza, where the crispy, creamy delight of crab rangoon meets the cheesy, doughy goodness of pizza. It’s a fun twist that combines two beloved dishes, and if you’re like me, you’re positively itching to pull it off your baking stone and take a big, cheesy bite.
Imagine the joy this dish will bring not just to your taste buds but also to your friends and family. Perfect for a cozy pizza night, festive gatherings, or just whenever the craving strikes—you’re going to want to keep this recipe in your back pocket. We’re talking about a creamy, cheesy masterpiece topped with crumbled crab, fresh scallions, and that delightful crunch that makes crab rangoon so addictive. With a drizzle of sweet chili sauce to finish it off, every bite is an experience! So, grab your apron, turn up the music, and let’s get cooking!
A Personal Story About Crab Rangoon
Growing up, I had a love affair with takeout food, and crab rangoon was always high on my list of favorites. The crispy little packages filled with creamy goodness and flaked crab meat would disappear before I even had a chance to savor them. My best friend and I would plan our Saturday movie marathons around our takeout spree, and the highlight was always wolfing down crab rangoon with our favorite dipping sauces.
Years later, as I started experimenting with my own recipes, I thought, why not marry that nostalgic flavor with one of my ultimate comfort foods, pizza? After some trial and error (a few failed crusts and an eruption of cheese in the oven later), Crab Rangoon Pizza was born! This recipe not only captures all that creamy, crabby magic but also lets you share it with others, making it a part of your own cherished memories. There’s something so special about creating a dish that combines nostalgia with a new twist, and when I serve this pizza, it’s like I’m inviting everyone into a warm kitchen filled with laughter and flavors that are oh-so-comforting.
Ingredients
Here’s everything you need to whip up this flavorful pizza masterpiece:
-
16oz fresh raw pizza dough, room temperature
This is the foundation of your pizza paradise. You can use store-bought or homemade dough. If you’re short on time, feel free to grab some from your favorite pizzeria! -
2 TBS yellow cornmeal (optional)
This gives your pizza base a delightful crunch and slightly nutty flavor. If you don’t have cornmeal, semolina or even a dusting of flour will work just fine. -
6oz cream cheese, room temperature
Cream cheese provides that classic creaminess we associate with crab rangoon. You can substitute this with ricotta or a plant-based cream cheese for a dairy-free option. -
1/2 cup green onions, chopped
These aromatic beauties not only enhance the pizza with their fresh flavor but also add a pop of color. If you’re not a fan, chives make a great alternative. -
1/4 cup shredded Parmesan, divided
Parmesan adds a savory depth to your pizza. If you’re avoiding dairy, nutritional yeast can provide a cheesy flavor without the actual cheese. -
1 tsp Worcestershire sauce
This powerful ingredient enhances the umami flavor of the crab. It’s also quite flexible; if you’re vegan, you might look into a plant-based Worcestershire sauce. -
5oz flaked crab meat (fresh or imitation)
No crab rangoon (or pizza) is complete without it! I recommend fresh crab meat for the best flavor, but imitation crab is a budget-friendly option that works surprisingly well. -
6oz shredded mozzarella cheese
Standard pizza fare! Mozzarella is the classic choice here, but feel free to mix it up with provolone or even a vegan cheese for a dairy-free option. -
Fried wonton strips (for topping)
These will add that delightful crunch we love in crab rangoon. If you’re short on time, store-bought wonton strips work perfectly, and you can even make your own if you’re feeling adventurous! -
Sweet chili sauce (for drizzling)
Drizzling this sweet-savory sauce ties the whole pizza together, shifting your taste buds into that perfect balance of flavor. It’s a staple in Asian cuisine, and you can easily find it in most grocery stores.
Step-by-Step Instructions
Now, let’s dive into the fun part—putting everything together! Follow these steps closely, and remember to enjoy the process. Cooking is as much about the journey as it is about the destination.
-
Preheat Your Oven
Preheat your oven to 475°F (245°C). A hot oven is key for a crispy crust! -
Prepare Your Workspace
Dust your counter or a baking sheet with the two tablespoons of cornmeal (if you’re using it). This will help the pizza slide easily when it’s done. -
Roll Out the Dough
Take your pizza dough and stretch it out into a flat circle (or rectangle, if that’s your jam) about 12 inches in diameter. Don’t worry about making it perfect—rustic is perfectly beautiful! Use your hands, or a rolling pin if you prefer. -
Layer the Cream Cheese Mixture
In a medium bowl, mix your softened cream cheese, chopped green onions, half of the shredded Parmesan, and Worcestershire sauce. Give it a good stir until everything is well combined. Spread this mixture evenly over the pizza dough, leaving a small border around the edges for the crust. This is where the cheesy magic begins! -
Add the Crab
Sprinkle the flaked crab meat across the cream cheese layer evenly. Remember, you want that crab flavor to burst through each slice, so don’t skimp! -
Top It with Cheese
Now it’s time for the mozzarella! Sprinkle it generously over the crab layer, making sure to cover evenly. Finish it off by adding the remaining Parmesan for an extra cheesy crust. -
Bake the Pizza
Carefully transfer your pizza onto the preheated oven (use a pizza stone or a baking sheet if you like). Bake for about 12-15 minutes, or until the crust is golden brown and the cheese is bubbling and slightly browned. Keep an eye on it—oven temperatures can vary! -
Add the Wontons
In the last minute of baking, toss those fried wonton strips on top to give them a little warmth and crisp them up just slightly. -
Drizzle with Sweet Chili Sauce
Once your pizza is done, remove it from the oven and let it rest for a few minutes. Then, drizzle sweet chili sauce over the entire pizza. This adds the perfect, glistening finish! -
Slice and Serve
Use a pizza cutter to slice it up and serve it hot. If you want, feel free to sprinkle a few extra green onions on top for that fresh crunch!
Serving Suggestions
Plating is key when it comes to a dish that’s as visually enticing as this! Serve your Crab Rangoon Pizza hot from the oven on a wooden cutting board or in a fun pizza pan. Pair it with a refreshing cucumber salad on the side or some steamed edamame for a full Asian-inspired feast. For a fun twist, set out some extra sweet chili sauce and soy sauce for dipping. Trust me; you’ll want to keep the flavor party going!
Recipe Variations
Now that you have the classic Crab Rangoon Pizza down, let’s talk variations. Here are a few creative twists to keep things fun:
- Spicy Crab Rangoon Pizza: Add red pepper flakes or sriracha to the cream cheese mixture for a kick!
- Vegetable Delight: Add bell peppers, mushrooms, or spinach for a veggie-rich option that’s still decadent.
- Buffalo Crab Rangoon Pizza: Toss the crab in some buffalo sauce before layering it on the pizza for a zesty flavor explosion.
- Gluten-Free Option: Use a gluten-free pizza crust or cauliflower crust for those avoiding gluten.
- Cheesy Bacon Version: Mix in crispy crumbled bacon for an irresistible salty crunch atop this cheesy delight.
Chef’s Notes
I’ve made this pizza for parties, cozy nights in, and even brunches—you wouldn’t believe how quickly it disappears! One time, I invited friends over for a “pizza challenge,” where we all brought a unique pizza recipe to share. I thought mine’d be the star, but to my surprise, everyone was equally charmed by their creations! It just goes to show that when you get creative in the kitchen, you can surprise even yourself! Remember, this dish has evolved over time for me. Don’t be afraid to tinker with the recipe, omit what you don’t love, and inject your personality into the dish.
FAQs and Troubleshooting
-
My pizza dough doesn’t stretch easily! What do I do?
If your dough is too cold or too tough, let it sit at room temperature for a bit longer. A little bit of patience can do wonders! -
What if I don’t have crab meat?
You can easily swap the crab for cooked chicken, shrimp, or even chickpeas for a vegetarian version! -
My crust isn’t crispy! What happened?
Ensure your oven is fully preheated and consider baking directly on a pizza stone for optimal heat transfer. If using a baking sheet, try preheating it in the oven before placing the pizza. -
Can I prepare the pizza in advance?
Yes! You can assemble the pizza up to 24 hours in advance and store it in the refrigerator before baking. Just don’t add the fried wontons until you’re ready to bake.
Nutritional Info
While I’m all about balance and enjoying food, here’s a rough estimate per slice (based on 8 slices):
- Calories: 320
- Protein: 14g
- Carbohydrates: 30g
- Fat: 15g
- Fiber: 1g
Now that you’re armed with this delicious and engaging Crab Rangoon Pizza recipe, it’s time to gather your ingredients and get your bake on! Trust me, you’re going to love every cheesy, satisfying bite. Enjoy!
PrintCrab Rangoon Pizza

A delicious fusion of crab rangoon and pizza, featuring creamy crab, fresh scallions, and topped with crispy wonton strips and sweet chili sauce.
- Prep Time: 15 minutes
- Cook Time: 15 minutes
- Total Time: 30 minutes
- Yield: 8 servings 1x
- Category: Main Course
- Method: Baking
- Cuisine: Asian Fusion
- Diet: Pescatarian
Ingredients
- 16oz fresh raw pizza dough, room temperature
- 2 TBS yellow cornmeal (optional)
- 6oz cream cheese, room temperature
- 1/2 cup green onions, chopped
- 1/4 cup shredded Parmesan, divided
- 1 tsp Worcestershire sauce
- 5oz flaked crab meat (fresh or imitation)
- 6oz shredded mozzarella cheese
- Fried wonton strips (for topping)
- Sweet chili sauce (for drizzling)
Instructions
- Preheat your oven to 475°F (245°C).
- Dust your counter or a baking sheet with the cornmeal.
- Roll out the pizza dough into a flat circle about 12 inches in diameter.
- Mix cream cheese, green onions, half the Parmesan, and Worcestershire sauce in a bowl.
- Spread the cream cheese mixture over the pizza dough.
- Sprinkle the flaked crab meat evenly across the cream cheese layer.
- Cover with shredded mozzarella and the remaining Parmesan.
- Bake the pizza for about 12-15 minutes until golden brown.
- Add fried wonton strips on top in the last minute of baking.
- Drizzle with sweet chili sauce and let it rest before slicing and serving.
Notes
Serve hot with extra sweet chili sauce and enjoy the fusion of flavors!
Nutrition
- Serving Size: 1 slice
- Calories: 320
- Sugar: 4g
- Sodium: 500mg
- Fat: 15g
- Saturated Fat: 7g
- Unsaturated Fat: 6g
- Trans Fat: 0g
- Carbohydrates: 30g
- Fiber: 1g
- Protein: 14g
- Cholesterol: 30mg
Keywords: Crab Rangoon, Pizza, Fusion Recipe
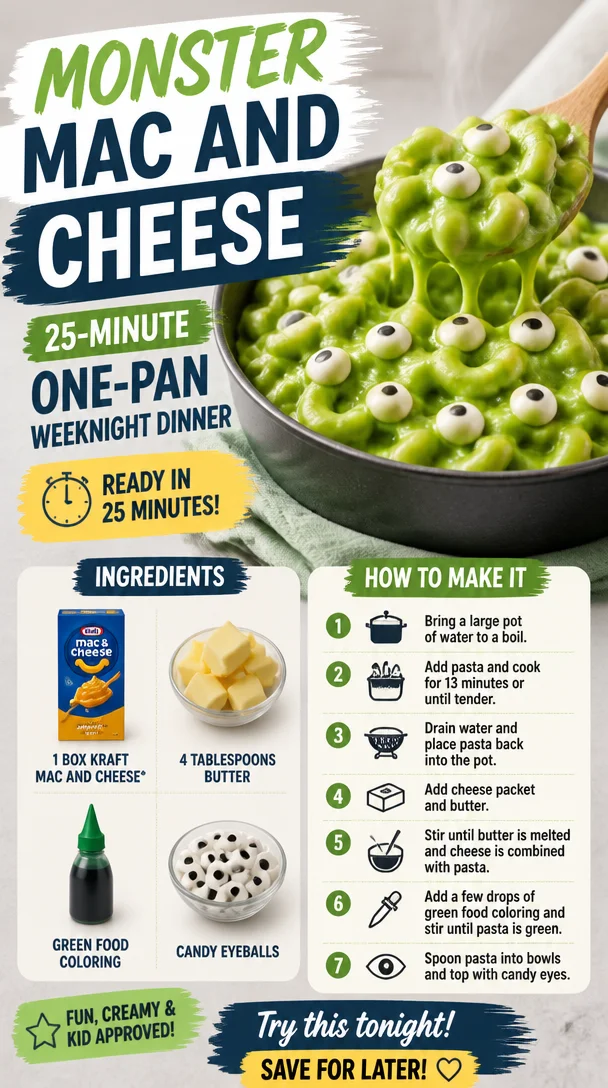
Monster Mac and Cheese: 25-Minute One-Pan Weeknight Dinner
Monster Mac and Cheese: A Ghoulishly Delicious Treat
Hey there, fellow food lovers! Ava here, and today, we’re diving into a whimsical world where comfort food meets creativity—today, I’m excited to share my recipe for Monster Mac and Cheese! This isn’t your average mac and cheese; oh no! We’re talking about a Halloween-inspired dish that’s sure to delight both kids and adults alike.
Imagine creamy, cheesy mac and cheese transformed into colorful, monster-filled fun. This dish is perfect for spooky getting-togethers, Halloween parties, or anytime you’re in the mood for a little culinary mischief. And the best part? It’s super simple and downright delicious!
Before we get started, let me take you on a little trip down memory lane.
Personal Story: A Spooky Tradition
Growing up, Halloween was always a highlight of my year. I’d spend the whole month picking out costumes, decorating the house, and, of course, cooking up fun dishes with my family. One of my favorite memories is from when I was about eight years old, standing in the kitchen with my mom and little sister, all of us wearing matching witch hats.
We decided to craft the ultimate Halloween dinner, filled with creepy treats. That year, we made “witch’s brew” soup and started a tradition of creating ghoulishly fun snacks. But the pièce de résistance was always the mac and cheese, which we dressed up into all sorts of creatures, using food coloring and a variety of toppings.
This Monster Mac and Cheese is a nod to those delightful moments—colorful, full of flavor, and a lively addition to any spooky feast. So grab your whisk, and let’s turn your kitchen into a monster cave!
Ingredients
Here’s what you’ll need for your Monster Mac and Cheese:
-
1 box Kraft mac and cheese*
A classic base with creamy cheese powder that makes preparations easy. If you want to skip processed cheese, feel free to use your homemade macaroni and cheese instead! -
4 tablespoons butter
Adds richness and creaminess. You could use olive oil or plant-based butter for a healthier or vegan alternative. -
Green food coloring
This gives our dish an eye-popping green hue that screams ‘monster!’ Feel free to use any color food dye if you want to get creative! -
Candy eyeballs
The finishing touch! These cute little eyes give our mac and cheese its monster personality! You can find edible candy eyes in most baking sections or try making your own out of fondant.
Chef Insight
Remember, the beauty of cooking is flexibility! Don’t feel tied down to the ingredients—switch them up to match your taste or what you have on hand. Cooking should be all about fun and experimenting.
Step-by-Step Instructions
Now that we’ve rounded up our ingredients, let’s dive into making this delightful Monster Mac and Cheese. Follow these steps to whip up a dish that will surely entertain:
-
Boil the Pasta
Start by bringing a large pot of salted water to a boil. Add the macaroni from your Kraft box and cook according to the package instructions (usually about 7-8 minutes).
Chef’s Tip: Stir occasionally to prevent sticking. The salt in the water enhances the flavor of the noodles! -
Prepare the Cheese Sauce
While the pasta is cooking, in a separate saucepan, melt 4 tablespoons of butter over medium heat. Once melted, whisk in the cheese powder from the Kraft box until smooth.
Hack: For extra creaminess, you can add a splash of milk to the mixture. Just be sure to keep whisking until fully blended! -
Color It Green
Now for the fun part! Add a few drops of green food coloring to the cheese sauce. Stir until you reach your desired monster hue. No limits here—go wild with the color!
Chef’s Note: If you’re feeling adventurous, adding a pinch of garlic powder can elevate the flavor, producing a more palate-pleasing monster. -
Combine
Once your macaroni is cooked, drain it and return it to the pot. Pour the green cheese mixture over the pasta and stir until every piece is coated in that delicious cheesy goodness.
Tip: A spatula can help you mix everything together without breaking the pasta. -
Monster Assembly
Serve the mac and cheese hot in bowls, and now’s the time to add the cutest part—candy eyeballs! Scatter them generously over the top to create your monstrous masterpiece.
Presentation Tip: Use a little extra green food coloring on the rim of your bowls for an added touch of spooky flair.
Serving Suggestions
To plate your Monster Mac and Cheese, you can serve it in colorful bowls, topped with a sprinkle of parsley or edible glitter for a festive touch. For extra fun, add some fall-themed decorations around the plate—think mini pumpkins or ghost-shaped candles for that perfect Halloween ambiance!
Recipe Variations
- Spicy Monster Mac: Add diced jalapeños or a sprinkle of cayenne for a delicious kick!
- Veggie Monsters: Stir in some steamed broccoli or peas for a nutritious twist. They can double as ‘monster arms’!
- Meaty Madness: Toss in cooked ground beef or sausage for a hearty version.
- Vegan Delight: Swap the butter for plant-based alternative and use a vegan cheese powder for a completely dairy-free treat.
Chef’s Notes
The Monster Mac and Cheese has evolved a lot since my childhood! I still remember the little surprised faces of my family when we unveiled our spooky dish. Over the years, I’ve played with flavors and colors, making it a staple at my Halloween gatherings. It always brings a smile, sometimes even giggles, especially when they connect a bite to those googly eyes floating around on top!
I encourage you to take this recipe and make it your own. Cooking is truly about sharing joy and creating memories, so have fun with it!
FAQs and Troubleshooting
1. How can I make my mac and cheese creamier?
You can add a splash of milk or even a dollop of cream cheese for extra richness when mixing the cheese sauce.
2. What if I’m not a fan of green food coloring?
Feel free to skip it or swap it out for any color you prefer! Blue mac and cheese could be just as fun!
3. Can I use gluten-free pasta?
Absolutely! Just follow the cooking instructions on the gluten-free pasta box, and you’ll have a delicious gluten-free Monster Mac!
4. My cheese sauce is lumpy! What happened?
This can happen if the butter is overheated or if you added the cheese powder too quickly. Take it off the heat, whisk vigorously, and add a little bit of warm milk to smooth it out.
Nutritional Info (if applicable)
While this Monster Mac and Cheese is all about fun, it’s important to balance it out as part of a healthy diet. If you’re looking for health-conscious adjustments, consider lighter versions of some ingredients, as mentioned before.
So there you have it, my food-loving friends! A ghoulishly delicious and fun-filled recipe that’s sure to make your Halloween gatherings memorable. Remember, cooking is a celebration—enjoy every moment spent in the kitchen! Keep it fresh, simple, and delicious. Happy cooking!
PrintMonster Mac and Cheese
A Halloween-inspired mac and cheese dish that’s colorful, fun, and perfect for spooky gatherings.
- Prep Time: 10 minutes
- Cook Time: 15 minutes
- Total Time: 25 minutes
- Yield: 4 servings 1x
- Category: Main Course
- Method: Boiling and Mixing
- Cuisine: American
- Diet: Vegetarian
Ingredients
- 1 box Kraft mac and cheese
- 4 tablespoons butter
- Green food coloring
- Candy eyeballs
Instructions
- Boil the pasta: Start by bringing a large pot of salted water to a boil. Add the macaroni from your Kraft box and cook according to the package instructions (usually about 7-8 minutes).
- Prepare the cheese sauce: While the pasta is cooking, in a separate saucepan, melt 4 tablespoons of butter over medium heat. Once melted, whisk in the cheese powder from the Kraft box until smooth.
- Color it green: Add a few drops of green food coloring to the cheese sauce. Stir until you reach your desired monster hue.
- Combine: Once your macaroni is cooked, drain it and return it to the pot. Pour the green cheese mixture over the pasta and stir until every piece is coated.
- Monster assembly: Serve the mac and cheese hot in bowls and scatter the candy eyeballs generously over the top.
Notes
Feel free to switch up ingredients according to taste. Cooking should be fun and flexible!
Nutrition
- Serving Size: 1 serving
- Calories: 400
- Sugar: 10g
- Sodium: 600mg
- Fat: 18g
- Saturated Fat: 9g
- Unsaturated Fat: 5g
- Trans Fat: 0g
- Carbohydrates: 50g
- Fiber: 2g
- Protein: 12g
- Cholesterol: 40mg
Keywords: Halloween, Monster Mac and Cheese, Kids Recipes, Comfort Food, Fun Recipes

Macaroni and Cheese Stuffed Peppers
Macaroni and Cheese Stuffed Peppers: A Comfort Food Twist
Welcome to Clean Plate Cravings, foodie friends! Today, we’re diving into a dish that not only warms the soul but also puts a fun twist on a classic childhood favorite: Macaroni and Cheese Stuffed Peppers. Ah, macaroni and cheese—a comforting hug in bowl form that brings back cherry-red childhood memories of family dinners, movie nights, and lazy rainy days. Now, imagine elevating this comfort food by stuffing it into vibrant orange bell peppers. Intrigued? Let’s get cooking!
Personal Story
Growing up, my grandmother was the queen of macaroni and cheese. I still remember the sound of her old, creaky kitchen chair as she settled in for an afternoon of cooking. The walls would fill with the delicious aroma of bubbling cheese and buttery breadcrumbs. She’d whip up a giant casserole dish for my siblings and me, and we could hardly wait for it to cool before diving in. It was a dish that brought our family together, sparking laughter, stories, and the kind of bond that only comes from sharing delicious food.
One stormy weekend, she decided to get creative. We had a fridge full of bell peppers, and she suggested we stuff macaroni and cheese inside them—what a revelation! The combination of creamy pasta and soft roasted peppers made for a surprising yet delightful meal. Ever since that day, stuffed peppers have held a special place in my heart. Emulating Grandma’s creativity, I added my flair to the dish by mixing in Greek yogurt for creaminess and using a sharp cheddar that makes every bite a taste sensation. So, grab your apron—we’re about to dive into a recipe that marries nostalgia with vibrant flavor!
Ingredients
To create these delicious Macaroni and Cheese Stuffed Peppers, here’s what you’ll need:
-
6 Orange Bell Peppers: These vibrant beauties not only add a pop of color to your plate but also provide a sweet crunch. Feel free to swap them for green, red, or yellow if you prefer!
-
8 Ounces Elbow Macaroni (or pasta of your choice): Cook according to package directions. If you’re gluten-free, substitute with your favorite gluten-free pasta.
-
7 Ounces Truly Grass Fed Naturally Sharp Cheddar Cheese, shredded: This cheese is the star of the show. Its sharp flavor elevates the dish. If you need a dairy-free option, try a vegan cheese blend.
-
3 Tablespoons Truly Grass Fed Naturally Creamy Butter, divided: We’ll use this to create a rich, decadent roux. You can replace butter with olive oil for a dairy-free version.
-
2 Tablespoons All-Purpose Flour: This helps thicken our cheese sauce. If you want a gluten-free option, cornstarch or a gluten-free flour blend can work wonderfully!
-
½ Teaspoon Salt: A touch of salt enhances all the flavors. Add more to taste, but be careful, as the cheese will contribute some saltiness.
-
1 Clove Garlic, smashed and minced (or ½ tsp garlic powder): Fresh garlic brings an aromatic quality. Use garlic powder if you have it on hand.
-
1 Cup Whole or 2% Milk: This adds creaminess to your cheese sauce. Non-dairy milk (like almond or oat milk) can be used for a lighter option.
-
¼ Cup Plain Greek Yogurt: A secret ingredient for tang and health benefits! Swap it with sour cream for a similar taste.
-
½ Cup Panko Bread Crumbs: These add a fantastic crunch on top. For a unique twist, try Italian-seasoned bread crumbs for an extra boost of flavor.
Step-by-Step Instructions
Now that we have our ingredients lined up, let’s get cooking!
-
Preheat the Oven: Start by preheating your oven to 375°F (190°C). This ensures the peppers are tender and the cheese is bubbly!
-
Prep the Peppers: Cut the tops off your orange bell peppers, removing the seeds and membranes. Feel free to save those vibrant tops for a veggie stir-fry later! Place your peppers upright in a baking dish. (Tip: If they won’t stand, trim a small slice off the bottom to create a flat base.)
-
Cook the Pasta: Boil water in a large pot and cook the elbow macaroni according to the package directions until al dente. Drain and set aside—but hold onto a cup of pasta water, just in case!
-
Make the Roux: In a medium saucepan over medium heat, melt 2 tablespoons of butter. When it’s bubbling, add the flour and whisk constantly for 1-2 minutes until it’s golden and smells toasty—this is the base of your creamy cheese sauce!
-
Add Milk and Cheese: Gradually pour in the milk while whisking—no lumps allowed! Cook until the mixture thickens, which should take about 2-3 minutes. Lower the heat, then stir in the shredded Truly Grass Fed Naturally Sharp Cheddar Cheese until melted and smooth. (Chef’s hack: if the sauce is too thick, add a splash of that reserved pasta water!)
-
Flavor Boost: Stir in the minced garlic, Greek yogurt, and ½ teaspoon of salt. Taste and adjust seasoning as necessary. This creamy goodness should sing with flavor!
-
Combine Pasta and Sauce: Gently mix the cooked macaroni noodles with the cheese sauce, ensuring every noodle is coated with that cheesy goodness. It’s about to get even better!
-
Stuff the Peppers: Using a spoon, carefully fill each pepper with your macaroni and cheese mixture. Pile it high—trust me, it’ll be worth it!
-
Crunchy Topping: In a small bowl, mix together the panko breadcrumbs and the remaining tablespoon of melted butter. Sprinkle this crunchy mixture generously on top of the stuffed peppers for that golden finish.
-
Bake: Cover the dish with aluminum foil and pop it in the oven for 25 minutes. Remove the foil and bake for an additional 10-15 minutes until the tops are golden brown. Stand back and enjoy the aroma wafting through your kitchen!
Serving Suggestions
Once those beautiful peppers emerge from the oven, serve them hot for a delightful dinner. Garnish with fresh herbs, like parsley or chives, to elevate the presentation and freshness. Pair these stuffed peppers with a crisp green salad for a complete meal. You can also drizzle some hot sauce or ranch dressing on top for an extra kick—whatever tickles your taste buds!
Recipe Variations
Feeling adventurous? Here are some creative variations you can try out:
-
Meaty Option: Add cooked ground turkey, beef, or even shredded chicken into the macaroni and cheese mixture for added protein.
-
Veggie-Packed: Incorporate finely chopped spinach or kale into the cheese mixture for an extra nutrient boost.
-
Spicy Twist: Stir in diced jalapeños for a spicy kick, or top with a sprinkle of crushed red pepper flakes before serving.
-
Italian Flair: Mix in Italian seasoning or sun-dried tomatoes into the cheese sauce for a Mediterranean twist.
-
BBQ Chicken Stuffed Peppers: Swap the macaroni filling for leftover BBQ chicken and cheese for a smoky flavor punch.
Chef’s Notes
This recipe has come a long way since my grandmother’s initial creation. I love experimenting with different ingredients and flavors, which is why I’m always switching things up based on what’s in my fridge. You know what they say, a great recipe is only as good as the love and creativity you put into it!
One of my fondest kitchen memories involves a slight disaster: I forgot to cover the peppers during the first bake! The panko topping turned a dark brown, but once I tasted it, the toasty flavor was a hit! In the end, it became a favorite among my friends during dinner parties. So, embrace the kitchen chaos—it often leads to delicious surprises!
FAQs and Troubleshooting
Q: My cheese sauce turned out lumpy. What did I do wrong?
A: This can happen if the milk is added too quickly to the roux. Always add it slowly while whisking continuously to create a smooth sauce.
Q: How do I know when the peppers are done?
A: They should be tender and the tops golden brown. A fork should easily pierce through the pepper skin.
Q: Can I make this dish ahead of time?
A: Absolutely! You can prepare the stuffed peppers, cover them, and refrigerate. When ready to eat, just bake straight from the fridge, adding additional time to heat through.
Q: Do I need to pre-cook the peppers?
A: No need! The cooking time in the oven will tenderize the peppers while fluffing up the macaroni.
Nutritional Info (Optional)
While these stuffed peppers are a delightful indulgence, they can also be a source of nourishment! Here’s a rough estimate per stuffed pepper, making it a balanced meal option when paired with a side salad:
- Calories: 350
- Protein: 15g
- Carbohydrates: 40g
- Fat: 15g
Incorporating vibrant ingredients doesn’t just boost flavor; it keeps you feeling full and satisfied!
And there you have it—a cozy and delicious way to enjoy macaroni and cheese like never before! Remember, cooking is all about enjoying the process, so have fun experimenting with flavors and share it with loved ones. Happy cooking, and as always, keep those plates clean and cravings satisfied!
PrintMacaroni and Cheese Stuffed Peppers

A comforting twist on a classic favorite, these Macaroni and Cheese Stuffed Peppers marry nostalgia with vibrant flavor.
- Prep Time: 15 minutes
- Cook Time: 30 minutes
- Total Time: 45 minutes
- Yield: 4 servings 1x
- Category: Main Course
- Method: Baking
- Cuisine: American
- Diet: Vegetarian
Ingredients
- 6 Orange Bell Peppers
- 8 Ounces Elbow Macaroni
- 7 Ounces Truly Grass Fed Naturally Sharp Cheddar Cheese, shredded
- 3 Tablespoons Truly Grass Fed Naturally Creamy Butter, divided
- 2 Tablespoons All-Purpose Flour
- ½ Teaspoon Salt
- 1 Clove Garlic, smashed and minced
- 1 Cup Whole or 2% Milk
- ¼ Cup Plain Greek Yogurt
- ½ Cup Panko Bread Crumbs
Instructions
- Preheat the Oven: Start by preheating your oven to 375°F (190°C).
- Prep the Peppers: Cut the tops off your orange bell peppers, removing the seeds and membranes.
- Cook the Pasta: Boil water and cook the elbow macaroni until al dente. Drain and set aside.
- Make the Roux: In a medium saucepan, melt 2 tablespoons of butter and whisk in the flour.
- Add Milk and Cheese: Gradually pour in the milk while whisking until thickened, then stir in the cheese until melted.
- Flavor Boost: Stir in the garlic, Greek yogurt, and salt. Adjust seasoning as necessary.
- Combine Pasta and Sauce: Mix the cooked macaroni with the cheese sauce until coated.
- Stuff the Peppers: Fill each pepper with the macaroni and cheese mixture.
- Crunchy Topping: Mix panko breadcrumbs with the remaining butter and sprinkle on top.
- Bake: Cover with foil and bake for 25 minutes, then uncover and bake until tops are golden brown.
Notes
Serve garnished with fresh herbs and pair with a crisp green salad for a complete meal.
Nutrition
- Serving Size: 1 stuffed pepper
- Calories: 350
- Sugar: 2g
- Sodium: 400mg
- Fat: 15g
- Saturated Fat: 7g
- Unsaturated Fat: 6g
- Trans Fat: 0g
- Carbohydrates: 40g
- Fiber: 3g
- Protein: 15g
- Cholesterol: 30mg
Keywords: macaroni and cheese, stuffed peppers, comfort food, vegetarian recipe, family dinner
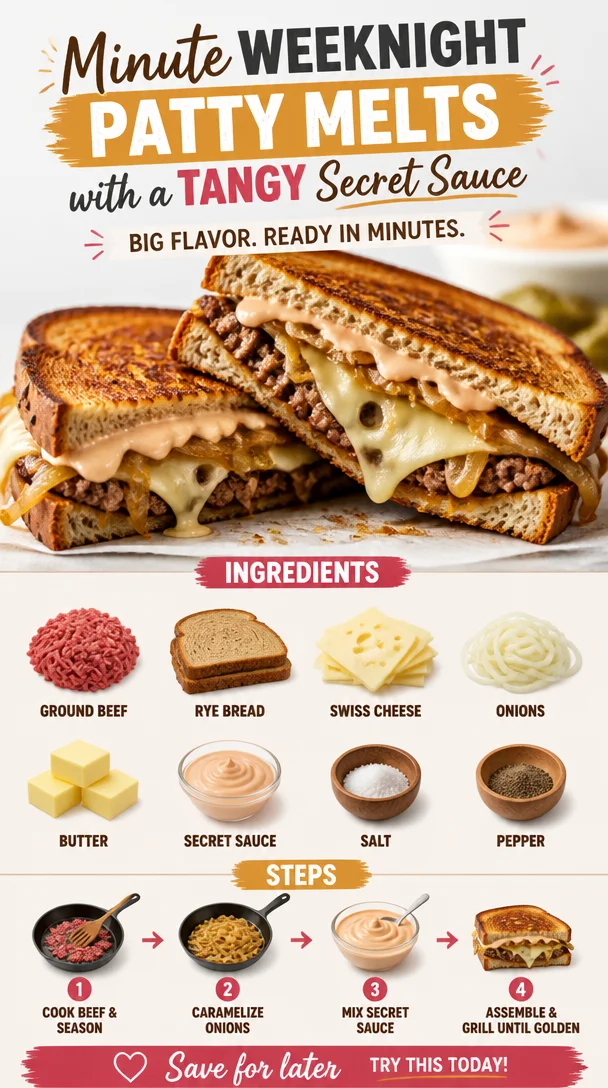
Minute Weeknight Patty Melts with a Tangy Secret Sauce
Patty Melts with Secret Sauce: A Nostalgic Twist on a Classic
Welcome to Clean Plate Cravings! Today, I’ve got a dish in store that’ll warm your heart and tickle your taste buds: Patty Melts with Secret Sauce. If you’ve never tried one of these savory delights, get ready to embark on a delicious journey that blends juicy beef, melty cheese, and a special sauce that’ll have you licking your plate clean.
As a cook, food is more than just nourishment; it’s about gathering around the table, sharing stories, and connecting with loved ones. I think of patty melts as the ultimate comfort food, a classic diner dish that reminds us of simpler times. Imagine sinking your teeth into the crisp, golden rye bread, followed by the rich flavors of perfectly seasoned beef and gooey Swiss cheese—all brought together with a secret sauce that hits the spot every time.
In this blog post, not only will we dive into how to whip up these mouthwatering patty melts, but I’ll also share a personal memory that makes this recipe even more special to me. So grab your apron and let’s get cooking!
A Personal Story
Let me take you back to my childhood. Growing up, weekends in my family were synonymous with cozy kitchen gatherings and comfort food. My dad had this knack for creating simple yet satisfying meals, often involving whatever was in the fridge, and one of our family favorites was his version of the patty melt. I still remember him standing at the stovetop, tendrils of steam wafting up as he grilled the patties to juicy perfection, the sizzle of the onions filling the air with an aroma that had us all eagerly hovering around the kitchen.
He’d make this secret sauce that was a mix of ketchup, mayonnaise, and mustard—a combination that, funny enough, still makes my mouth water just thinking about it! We’d pile everything between thick slices of buttery rye bread, and just like that, the world was right. It was those simple moments—sharing hearty food, laughter, and stories—that ignited my passion for cooking. Fast forward to today, and I’ve adapted that classic recipe to include my own twists, but the soul of those family dinners remains embedded in each melt I create.
Ingredients
To make these delicious patty melts, you’ll need the following ingredients:
-
Ground Beef: The star of our show! Choose a good quality ground beef (80/20 is ideal for flavor and juiciness). If you want a leaner option, turkey or chicken can be used as substitutes, but they might require some adjustments to keep them moist.
-
Rye Bread: Its distinctive flavor pairs so well with the beef and cheese. Feel free to swap it for sourdough or whole wheat, depending on your preference.
-
Swiss Cheese: We’re going for that creamy, melty goodness! If Swiss isn’t your thing, try provolone or cheddar for a different flavor profile.
-
Onions: Sweet, caramelized onions are a must for depth of flavor. You can swap them out for shallots or omit them altogether, but honestly—don’t skip this step!
-
Butter: We’ll use butter to toast the bread to a golden crisp. For a dairy-free option, you can utilize olive oil or vegan butter.
-
Secret Sauce: Mix mayonnaise, ketchup, and mustard to create this flavor-packed sauce. Feel free to tweak the ratios to match your taste, or even add a pinch of garlic powder for an extra kick.
-
Salt and Pepper: Essential for seasoning our beef. Remember, seasoning can be adjusted as per your preference.
Here’s the quick pro tip: prep all your ingredients before you start assembling. This makes everything a breeze and ensures you won’t have to scramble around the kitchen!
Step-by-Step Instructions
Now that we’ve got our ingredients lined up, let’s dive into how to make these patty melts:
-
Prepare the Secret Sauce:
- In a small bowl, mix ¼ cup mayonnaise, 2 tablespoons ketchup, and 1 tablespoon mustard. Adjust the ratios as needed to suit your taste. This sauce will add a delicious creaminess and tanginess to the final dish.
-
Caramelize the Onions:
- Heat a tablespoon of butter in a skillet over medium heat. Add thinly sliced onions (about 1 large onion will do) and a pinch of salt.
- Cook them slowly for about 15-20 minutes, stirring occasionally until they become golden brown and soft. This is where the magic happens; your kitchen will smell divine!
-
Shape the Patties:
- While the onions are caramelizing, take 1 pound of ground beef and divide it into four equal portions. Shape them into patties—slightly larger than your bread since they’ll shrink while cooking. Season each patty with salt and pepper.
-
Cook the Patties:
- In the same skillet (if there’s enough room, otherwise grab another), heat it over medium-high heat. Add a bit more butter if needed.
- Cook your patties for about 4 minutes on one side. Flip them over, add a slice of Swiss cheese on top, and cook for another 3-4 minutes until they reach your desired doneness (medium is ideal for flavor).
-
Toast the Bread:
- While the patties are cooking, in a separate skillet, butter one side of each rye bread slice (2 slices per sandwich). Toast them face down until golden brown—about 3 minutes.
-
Assemble the Patty Melt:
- On the unbuttered side of one slice of toasted rye, spread a generous layer of the secret sauce. Place your cheesy patty on top, followed by a spoonful of those luscious caramelized onions. Add another slice of cheese if you’re feeling indulgent!
- Top it with a second slice of bread, buttered side up.
-
Grill the Patty Melt:
- Place the sandwich back in the skillet and grill it on medium heat until the bread is golden brown and crispy, about 3-4 minutes per side. Press down lightly with a spatula to ensure it grills evenly and the cheese melts perfectly.
-
Slice & Serve:
- Once your patty melt is ready, remove it from the skillet and allow it to rest for a minute—if you can resist! Slice it in half diagonally and see that glorious cheese stretch!
Serving Suggestions
To serve your patty melts, plate them up with some crispy, seasoned fries or a fresh green salad. Garnish with pickle spears for that extra crunch and zing. You could also drizzle a little extra secret sauce on the side for dipping, because who doesn’t love a good dip?
Recipe Variations
Feeling adventurous? Here are some creative twists on the classic patty melt:
-
Veggie Patty Melt: Swap out the beef for black bean or lentil patties for a plant-based delight.
-
Spicy Kick: Add jalapeños or sriracha to your secret sauce for a fiery version that’ll wake up your taste buds.
-
Mushroom & Swiss: Sauté some mushrooms along with the onions for an earthy flavor that complements the Swiss cheese beautifully.
-
Different Cheeses: Experiment with gouda, blue cheese, or a spicy pepper jack for a unique cheesy experience.
-
French Onion Patty Melt: Top with a bit more of that caramelized onion and a sprinkle of beef broth when cooking for a French onion flair.
Chef’s Notes
As I reflect on how this recipe has evolved over time, I realize that what I love most about cooking is the freedom to change things up based on inspiration, seasonality, and, let’s face it, pantry odds and ends. I’ll admit, there have been kitchen mishaps—like the time I accidentally grabbed paprika instead of garlic powder for the sauce (yikes!). But those moments are what make us better cooks.
As you embark on your own culinary journey, embrace the joys and mishaps alike. Whether you make this recipe just as I’ve shared or give it your own twist, what truly matters is the love you put into it and the smiles it brings around your table.
FAQs and Troubleshooting
1. My patties fell apart while cooking. What went wrong?
- This can happen if there isn’t enough fat in the meat or if they aren’t packed tightly enough. Ensure you’re using ground beef with enough fat content (like 80/20) or try chilling the patties for 15 minutes before cooking to help them hold their shape.
2. How can I tell when the beef is cooked through?
- The best way to check for doneness is to use a meat thermometer. Ground beef should reach an internal temperature of 160°F. If you don’t have one, a good indication is when the juices run clear, and the patty is brown in the center.
3. Can I make these in advance?
- Absolutely! You can prep the patties and onions ahead of time and store them in the fridge. Just give them a quick grill on a busy weeknight for an easy dinner.
4. What if I don’t have rye bread?
- No problem! Substitute with whatever bread you have on hand. Sourdough or whole grain will work just fine.
Nutritional Info
Each patty melt can vary based on ingredients, but on average, one serving (one melted sandwich) contains roughly:
- Calories: 600-700
- Protein: 30-35g
- Fat: 40-45g
- Carbohydrates: 40-50g
(If you want a more precise breakdown, consider using a nutrition calculator based on the exact ingredients you use!)
Embrace the creativity that comes with cooking, and don’t shy away from making this patty melt your own. Whether it’s for a cozy night in or a backyard gathering with friends, these patty melts with secret sauce are sure to impress. Happy cooking, and here’s to many delicious memories in the kitchen!
PrintPatty Melts with Secret Sauce
A nostalgic twist on the classic patty melt, featuring juicy beef, melty cheese, and a delicious secret sauce.
- Prep Time: 15 minutes
- Cook Time: 30 minutes
- Total Time: 45 minutes
- Yield: 4 servings 1x
- Category: Main Course
- Method: Grilling
- Cuisine: American
- Diet: Non-Vegetarian
Ingredients
- 1 pound ground beef (80/20)
- 4 slices rye bread
- 4 slices Swiss cheese
- 1 large onion, thinly sliced
- 2 tablespoons butter
- ¼ cup mayonnaise
- 2 tablespoons ketchup
- 1 tablespoon mustard
- Salt and pepper to taste
Instructions
- Prepare the Secret Sauce: In a small bowl, mix ¼ cup mayonnaise, 2 tablespoons ketchup, and 1 tablespoon mustard. Adjust the ratios as needed to suit your taste.
- Caramelize the Onions: Heat a tablespoon of butter in a skillet over medium heat. Add sliced onions and a pinch of salt. Cook slowly for about 15-20 minutes, stirring occasionally until golden brown.
- Shape the Patties: Divide the ground beef into four equal portions and shape them into patties slightly larger than the bread.
- Cook the Patties: In the skillet, cook the patties for 4 minutes on one side, flip, and add Swiss cheese. Cook for another 3-4 minutes until desired doneness.
- Toast the Bread: Butter one side of each rye bread slice and toast them face down in a separate skillet until golden brown, about 3 minutes.
- Assemble the Patty Melt: On the unbuttered side of one slice, spread secret sauce. Place the cheese-covered patty on top, add caramelized onions, and another slice of cheese. Top with a second slice of bread, buttered side up.
- Grill the Patty Melt: Grill the sandwich in the skillet until it’s golden brown and crispy, about 3-4 minutes per side.
- Slice & Serve: Remove from skillet, let rest, slice in half, and serve!
Notes
For a dairy-free option, use olive oil or vegan butter. You can use different breads like sourdough or whole wheat if preferred.
Nutrition
- Serving Size: 1 sandwich
- Calories: 650
- Sugar: 5g
- Sodium: 800mg
- Fat: 45g
- Saturated Fat: 18g
- Unsaturated Fat: 20g
- Trans Fat: 0g
- Carbohydrates: 40g
- Fiber: 2g
- Protein: 32g
- Cholesterol: 75mg
Keywords: patty melt, comfort food, secret sauce, classic recipe, nostalgic food
Cinnamon Bun Scones That Will Cozy Up Your Mornings
Cozy Up Your Mornings with Cinnamon Bun Scones
Hey there, fellow foodies! If you’re like me, there’s just something about the scent of cinnamon wafting through your kitchen that instantly turns any ordinary morning into a special occasion. You can practically hear the “oohs” and “aahs” as you bring these beauties out of the oven. Today, we’re diving into the delightful world of Cinnamon Bun Scones! These fluffy treats bring all the cozy vibes of classic cinnamon buns but in a much simpler form. Perfect for brunch, a cozy breakfast, or even as a sweet afternoon snack—they’re incredibly versatile!
Imagine this: it’s early Sunday morning, the sun is just peeking through the clouds, and you’ve got your favorite playlist softly lilting in the background. You pull a tray of scones from the oven, and the moment is just blissful. You take that first bite—flaky, warm, and oh-so-cinnamony—and everything feels right in the world. Are you ready to embark on this baking journey with me? Let’s go!
My Connection to Cinnamon Bun Scones
Growing up, Sundays were sacred in our household. They were always a blend of lazy mornings and a bit of culinary magic. My mom had this adorable vintage cookbook filled with recipes from the 1970s, most of which featured a ton of baking—and you guessed it, cinnamon buns were in there! I fondly remember waking up to the sweet aroma of cinnamon and sugar wafting up the stairs as my mom whipped up a batch. There was a certain joy in rolling that dough, sprinkling the cinnamon mixture all over, and then waiting with sheer anticipation for them to rise and bake.
But, let’s be honest—life can be busy, and sometimes those delightful cinnamon buns feel far too complicated for an everyday treat. That’s where these Cinnamon Bun Scones come into play! They capture that nostalgic flavor without requiring hours of kneading and rising. Each bite is a hug in pastry form that takes me back to those carefree Sunday mornings. Let’s create that experience for you, shall we?
Ingredients
Here’s what you’ll need to whip up these fabulous scones, along with some chef tips for each ingredient:
-
1 cup Toasted Chopped Pecans (Optional)
These nutty gems add a lovely crunch! If you’re not a nut fan, feel free to swap them out for sweet raisins instead. Just be careful with the substitutions to maintain that lovely texture! -
1/2 cup Firmly Packed Light Brown Sugar
This is where the sweetness comes from! You could swap it with granulated sugar for a simpler flavor, but I find that brown sugar gives a deeper, richer taste that pairs perfectly with cinnamon. -
1 tbsp Ground Cinnamon
Make sure to use fresh cinnamon for the best aroma! A little tip: store your cinnamon in a cool, dark place to keep it potent. -
2 cups All-Purpose Flour
If you’re gluten-free, no worries! You can use a gluten-free flour blend here. Just ensure it contains xanthan gum for that fluffy texture. -
1 cup Old-Fashioned Rolled Oats
These oats provide a chewier texture that complements the scones beautifully! If you’re in a pinch, you can use instant oats, but keep in mind the texture will be different. -
1/4 cup Granulated Sugar
Adjust the amount based on your sweetness preference. You can play with this if your sweet tooth is feeling particularly bold! -
1 tbsp Baking Powder
Make sure it’s fresh; nothing is worse than flat scones. Trust me; this ingredient is essential for achieving that delightful rise! -
1/2 tsp Salt
A little pinch of salt balances out the sweetness, making the flavors pop! Feel free to adjust or omit it depending on dietary restrictions. -
1/2 cup Unsalted Butter
Use cold butter here, cut into cubes for the perfect flaky textures! If you’re dairy-free, coconut oil works like a charm. -
1 cup Milk
Cow’s milk is great, but non-dairy options like almond or oat milk work beautifully too—keeping it rich and creamy! -
1 large Egg
This is lightly beaten to help bind the ingredients. You can use a flax egg as a vegan alternative (1 tbsp flaxseed meal + 2.5 tbsp water), and it works just as well! -
1 tsp Vanilla Extract
This adds a depth of flavor that makes your scones sing! If you’re after a more robust flavor, try almond extract instead.
Step-by-Step Instructions
Ready to bake? Let’s get started with our Cinnamon Bun Scones! Here’s how you can bring these delicate treats to life, step-by-step.
-
Preheat Your Oven
Start by preheating your oven to 400°F (200°C). This warm embrace will help your scones bake perfectly and turn golden brown! -
Prep the Baking Sheet
While that oven is warming up, line a baking sheet with parchment paper. This prevents the scones from sticking and makes for an easier clean-up! -
Mix Dry Ingredients
In a large mixing bowl, combine the flour, oats, baking powder, salt, brown sugar, granulated sugar, and ground cinnamon. Use a whisk to mix everything together evenly. It’s so satisfying to watch those ingredients come to life! -
Cut in the Butter
Now, take your cold butter cubes and add them to the dry ingredients. Using a pastry cutter (or your fingers), work the butter into the flour mixture until it resembles coarse crumbs. This step is crucial for those flaky layers! Don’t overmix; we want those tiny pockets of butter to stay intact. -
Combine Wet Ingredients
In a separate bowl, whisk together the egg, milk, and vanilla extract. This is where the magic begins! What’s a scone without that creamy richness? -
Bring Mixtures Together
Gradually pour the wet mixture into the dry mixture. Gently stir until just combined. The dough might seem a tad sticky—don’t worry; that’s exactly what we want! -
Add the Fun Stuff
Fold in those toasted pecans (or raisins if you’re swapping). This is also a great time to get creative—think about adding chocolate chips or dried fruit! -
Shape the Scones
On a floured surface, turn the dough out and shape it into a circle about 1-inch thick. Cut into wedges or use a biscuit cutter for round scones. I like to use a bench scraper to make clean cuts! -
Bake
Place scones onto your prepared baking sheet and bake for 15-18 minutes until they’re golden brown. The smell that envelops your home during this time is pure bliss—you’ll be counting down the minutes! -
Cool and Enjoy
Once they’re baked, let them cool for a few minutes on the baking sheet before transferring them to a wire rack. This ensures they won’t steam and stay perfect.
Serving Suggestions
These scones are perfect served warm, straight out of the oven! I love to plate them up with a drizzle of maple glaze, a sprinkle of chopped pecans, or even a dollop of whipped cream cheese. Pair them with your favorite morning beverage—coffee, tea, or even a refreshing fruit smoothie—and you’ve got yourself a cozy breakfast situation that’s sure to impress!
Recipe Variations
Feeling adventurous? Here are a few fun twists to make these scones your own:
- Pumpkin Spice Scones: Swap out some of the flour for pumpkin puree and add pumpkin spice!
- Chocolate Chip Scones: For a sweet twist, fold in mini chocolate chips.
- Maple Pecan Scones: Drizzle with maple syrup instead of traditional icing!
- Dried Fruit Scones: Consider adding chopped dried apricots or cranberries for a tart and sweet contrast.
- Lemon Zest Scones: A hint of lemon zest perks up the cinnamon flavors beautifully.
Chef’s Notes
Oh, and here’s a little tidbit from my kitchen: I once tried to make these scones in a “then-what-was-I-thinking” health kick, subbing out ingredients left and right. Let’s just say, while the effort was commendable, it turned my scones into something that resembled a shy pancake instead! So, my friends, while it’s wonderful to experiment, sometimes sticking to the basics is what keeps these scones truly magical. Trust the ingredients and techniques!
FAQs and Troubleshooting
-
Why are my scones dry?
This can happen if you overmix the dough or add too much flour. Gently fold your ingredients, and remember that cold ingredients help create the flakiness! -
Can I freeze these scones?
Absolutely! Freeze them before baking on a parchment-lined baking sheet and transfer them to a zip-seal bag. When ready to enjoy, bake from frozen, adding a couple of extra minutes to the bake time. -
How do I store left-over scones?
Store them in an airtight container at room temperature for 1-2 days. For longevity, consider refrigerating them in a sealed container. -
Can I make these scones vegan?
Yes! Use plant-based milk, coconut oil instead of butter, and a flax egg instead of the egg. They’ll be just as delicious!
Nutritional Info
While cooking, I focus on food that’s both delicious and nourishing. Depending on your chosen variations and ingredient swaps, the nutritional details will vary. It’s all about balance, and I encourage you to personalize your scones to suit your diet!
Alright, my dear food enthusiasts, it’s time to get into your kitchens and whip up a batch of these Cinnamon Bun Scones! Enjoy the process, savor the aromas, and most importantly, relish every bite. Here’s to cozy mornings and flavor-packed adventures! Happy baking!
PrintCinnamon Bun Scones
Fluffy scones that capture the cozy vibes of classic cinnamon buns, perfect for brunch or a sweet afternoon snack.
- Prep Time: 15 minutes
- Cook Time: 18 minutes
- Total Time: 33 minutes
- Yield: 8 servings 1x
- Category: Breakfast
- Method: Baking
- Cuisine: American
- Diet: Vegetarian
Ingredients
- 1 cup Toasted Chopped Pecans (Optional)
- 1/2 cup Firmly Packed Light Brown Sugar
- 1 tbsp Ground Cinnamon
- 2 cups All-Purpose Flour
- 1 cup Old-Fashioned Rolled Oats
- 1/4 cup Granulated Sugar
- 1 tbsp Baking Powder
- 1/2 tsp Salt
- 1/2 cup Unsalted Butter
- 1 cup Milk
- 1 large Egg
- 1 tsp Vanilla Extract
Instructions
- Preheat your oven to 400°F (200°C).
- Prep a baking sheet with parchment paper.
- Mix dry ingredients in a large bowl.
- Cut in the cold butter until it resembles coarse crumbs.
- Combine wet ingredients in a separate bowl and whisk together.
- Bring the wet mixture into the dry mixture and stir until just combined.
- Add the toasted pecans (or raisins) to the mixture.
- Shape the dough into a circle about 1-inch thick and cut into wedges.
- Bake for 15-18 minutes until golden brown.
- Cool for a few minutes before transferring to a wire rack.
Notes
Serve warm with a drizzle of maple glaze or a dollop of whipped cream cheese.
Nutrition
- Serving Size: 1 scone
- Calories: 250
- Sugar: 12g
- Sodium: 200mg
- Fat: 10g
- Saturated Fat: 5g
- Unsaturated Fat: 4g
- Trans Fat: 0g
- Carbohydrates: 32g
- Fiber: 2g
- Protein: 4g
- Cholesterol: 30mg
Keywords: scones, cinnamon, breakfast, easy recipe, baking
One-Bowl Cinnamon Sugar Donut Bread Recipe (Soft & Gooey)
The Sweet Beginnings of Cinnamon Sugar Donut Bread: A Slice of Nostalgia
If there’s one thing that can effortlessly transport you back to sun-soaked childhood mornings, it’s the warm aroma of cinnamon and sugar wafting through the air. Welcome, dear foodie friends, to the delightful world of Cinnamon Sugar Donut Bread! This scrumptious treat is a beautiful combination of sweet, soft bread that reminds us of our favorite donuts but in loaf form. Yes, you heard that right—donut in loaf form. Let’s dive into how this delightful dish can make your kitchen a little sweeter and your mornings a lot brighter!
I can still picture the cozy kitchen of my childhood home. The sun peeked through the window, casting a golden hue over the countertops, while my mom haphazardly tossed flour, sugar, and cinnamon into a mixing bowl. It was an annual tradition—a Sunday ritual where we baked sweet treats to share with neighbors and friends. The highlight was undoubtedly this Cinnamon Sugar Donut Bread, which always disappeared faster than you could say “delicious.” With each slice, we’d slather on some butter, watch the sugar glisten, and savor every bite.
Creating this dish at home is like wrapping up a hug for your taste buds—a cozy, familiar embrace that invites you to slow down and enjoy the simple pleasures in life. Whether you’re whipping it up for brunch or just because it’s Tuesday, this bread is bound to become a favorite in your home. So, grab your apron, and let’s embark on this sweet culinary journey together!
A Slice of Family Tradition
Reflecting on those blissful mornings, one particular memory stands out—sitting cross-legged on the floor, peering over the kitchen island as my mom mixed the ingredients together. I vividly recall the way she’d carefully measure out the flour, while I hopped up every few moments hoping to catch that golden mixing bowl before it was whisked away to the oven.
As the bread baked, the kitchen would fill with a mouthwatering aroma that made time stand still. Each of my siblings would crowd around, arms outstretched with anticipation, eager for the first slice. What I realized was that the bread was more than just food—it was a symbol of love, connection, and joyful mornings spent together as a family. This Cinnamon Sugar Donut Bread embodies those sweet moments, and I can’t wait for you all to experience a bit of that joy in your own kitchens.
Ingredients
Here’s what you’ll need to create this heavenly Cinnamon Sugar Donut Bread:
-
2 cups all-purpose flour
- Provides the structure for your bread. You can substitute with whole wheat flour for a heartier version or a gluten-free mix if needed.
-
1 cup granulated sugar
- The sweetness that brings everything together! Feel free to reduce the sugar a bit if you prefer a less sweet bread.
-
1 tablespoon baking powder
- The secret behind that fluffy texture. Make sure it’s fresh for the best rise.
-
1 teaspoon cinnamon
- It’s not just a flavor; it’s an experience! Consider using freshly ground cinnamon for a more intense flavor.
-
1/2 teaspoon salt
- A pinch brings balance to the sweetness. Don’t skip it!
-
1/2 cup unsalted butter, melted
- Adds richness and moisture. Coconut oil or vegetable oil work as great substitutes.
-
1 cup milk
- The liquid gold that binds everything. You can swap it for any milk alternative like almond milk or oat milk.
-
2 large eggs
- They help with binding and add moisture too. If you’re vegan, consider using flax eggs (1 tablespoon ground flaxseed mixed with 2.5 tablespoons water per egg).
-
1 teaspoon vanilla extract
- For that extra hint of warmth! You can also use almond extract for a different twist.
-
1/4 cup granulated sugar (for coating)
- This sweet touch is non-negotiable! You could mix it up with brown sugar for a richer flavor.
-
1 teaspoon cinnamon (for coating)
- Because we can never have too much cinnamon!
Step-by-Step Instructions
Now that we have our ingredients lined up, it’s time to get cooking! Here’s how to create your own masterpiece:
Step 1: Preheat and Prepare
Preheat your oven to 350°F (175°C). Grease a 9×5-inch loaf pan with butter or non-stick spray. This is crucial to ensure that your beautiful bread doesn’t stick, making it easier to pop out once it’s done baking. You want that gorgeous loaf to have a grand entrance!
Step 2: Mix the Dry Ingredients
In a medium bowl, whisk together your flour, sugar, baking powder, cinnamon, and salt. If you can, sift the flour before measuring—it can make for a fluffier loaf. Set this lovely mixture aside while we tackle the wet ingredients.
Step 3: Blend Wet Ingredients
In a large mixing bowl, combine the melted butter, milk, eggs, and vanilla extract. Whisk them until everything is beautifully blended. Here’s a little chef hack: letting your eggs come to room temperature before adding them to the mixture helps with a better rise and texture in your final loaf.
Step 4: Combine Wet and Dry
Slowly add the dry ingredients to the wet mixture, stirring gently to avoid overmixing. Overmixed batter can lead to a tough bread—no one wants that! Aim for just mixed until you see a few lumps. Remember, some imperfections make it homey.
Step 5: Pour into the Pan
Pour the batter into your prepared loaf pan, smoothing the top with a spatula. Don’t worry too much about perfection at this stage; you’re going to cover it up with that sugary goodness soon!
Step 6: Bake It Up
Pop that loaf into your preheated oven and let it bake for about 50-60 minutes. Check it around the 50-minute mark with a toothpick; it’s done when it comes out clean (with maybe a crumb or two). The warm, heavenly scent will envelop your kitchen before you even realize it.
Step 7: The Sweet Coating
While the bread bakes, prepare your cinnamon sugar coating by whisking together the sugar and cinnamon in a shallow dish. This is where the magic happens! Once you’ve taken the bread out of the oven, let it cool in the pan for about 10 minutes before transforming it into a sugary delight.
Step 8: Final Touch
Remove the loaf from the pan and while it’s still warm, roll it in the cinnamon-sugar mix until it’s fully coated. This is the stage where your bread gets its iconic donut-esque finish. Trust me, this is where you’ll want to sneak an edge before it cools completely!
Serving Suggestions
To serve this delightful Cinnamon Sugar Donut Bread, slice it into thick, generous pieces. You could enjoy it warm with a smear of butter, or if you really want to elevate it, try adding a dollop of cream cheese frosting or a drizzle of icing. It also pairs perfectly with a steaming cup of coffee or a refreshing glass of milk. Best enjoyed with friends or family—after all, sharing is caring!
Recipe Variations
-
Pumpkin Spice Twist: Add 1/2 cup of pureed pumpkin for a fall-inspired version; swap out some cinnamon for pumpkin spice for an extra kick.
-
Nutty Addition: Fold in some chopped walnuts or pecans into the batter for a crunchy texture and a rich flavor contrast.
-
Fruit Infusion: Toss in a cup of fresh or frozen blueberries for a fruity twist. Just be sure not to overmix—gentle folds are key!
-
Gluten-Free Option: Use a 1:1 gluten-free flour blend for the all-purpose flour, and you’re good to go!
-
Chocolate Drizzle: Melt some chocolate and drizzle it over the top once it’s cooled for a decadent twist. Because let’s be real, who doesn’t love chocolate?
Chef’s Notes
I love that this recipe can evolve alongside me—after all, food is like life. It grows and changes with every scoop of batter and sprinkle of cinnamon! The memories associated with this bread only get sweeter as the years go by. It’s about experimentation, too. One day I may add more spice, and the next day I might take a classic approach—the beauty is in the creativity.
Another favorite kitchen memory? One Christmas, I decided to gift this bread as holiday treats to neighbors. It was a delightful experiment that brought sweet smiles to faces. Package a loaf in pretty paper, and trust me—it’ll be a cherished gift!
FAQs and Troubleshooting
Q: My bread didn’t rise! What happened?
A: This could be due to old baking powder or overmixing the batter. Always check the freshness of your baking ingredients!
Q: Can I make this ahead of time?
A: Absolutely! The bread can be stored in an airtight container at room temperature for up to 3 days or in the fridge for about a week. For longer storage, freeze it, and simply thaw when you crave it!
Q: Why is my bread so dense?
A: Overmixing or not using enough leavening agent (baking powder) could be culprits. Light touches when mixing and double-checking your ingredients will help!
Q: Can I use something other than milk?
A: Yes! You can substitute it with any non-dairy milk like almond, oat, or soy. Just make sure it’s unsweetened to keep the flavors balanced.
Nutritional Info (per slice)
Calories: 210
Fat: 9g
Carbohydrates: 31g
Fiber: 1g
Protein: 3g
Sugar: 10g
So there you have it, friends! You now have all the keys to unlock the magic of Cinnamon Sugar Donut Bread in your kitchen. Make it your own, sprinkle in some love, and enjoy the deliciousness that follows. Happy baking!
PrintCinnamon Sugar Donut Bread
A delightful loaf that combines the sweetness of cinnamon and sugar in a bread format reminiscent of your favorite donuts.
- Prep Time: 15 minutes
- Cook Time: 60 minutes
- Total Time: 75 minutes
- Yield: 8 servings 1x
- Category: Dessert
- Method: Baking
- Cuisine: American
- Diet: Vegetarian
Ingredients
- 2 cups all-purpose flour
- 1 cup granulated sugar
- 1 tablespoon baking powder
- 1 teaspoon cinnamon
- 1/2 teaspoon salt
- 1/2 cup unsalted butter, melted
- 1 cup milk
- 2 large eggs
- 1 teaspoon vanilla extract
- 1/4 cup granulated sugar (for coating)
- 1 teaspoon cinnamon (for coating)
Instructions
- Preheat your oven to 350°F (175°C). Grease a 9×5-inch loaf pan.
- Mix together your flour, sugar, baking powder, cinnamon, and salt in a medium bowl.
- Blend the melted butter, milk, eggs, and vanilla extract in a large mixing bowl.
- Combine the dry ingredients with the wet mixture, stirring gently to avoid overmixing.
- Pour the batter into your prepared loaf pan, smoothing the top.
- Bake for 50-60 minutes, checking with a toothpick around the 50-minute mark.
- Prepare the cinnamon sugar coating by whisking together the sugar and cinnamon.
- Remove the loaf from the pan and roll it in the cinnamon-sugar mix while still warm.
Notes
Enjoy it warm with butter or cream cheese frosting. Pairs perfectly with coffee or milk.
Nutrition
- Serving Size: 1 slice
- Calories: 210
- Sugar: 10g
- Sodium: 300mg
- Fat: 9g
- Saturated Fat: 5g
- Unsaturated Fat: 3g
- Trans Fat: 0g
- Carbohydrates: 31g
- Fiber: 1g
- Protein: 3g
- Cholesterol: 60mg
Keywords: cinnamon, sugar, bread, dessert, baking