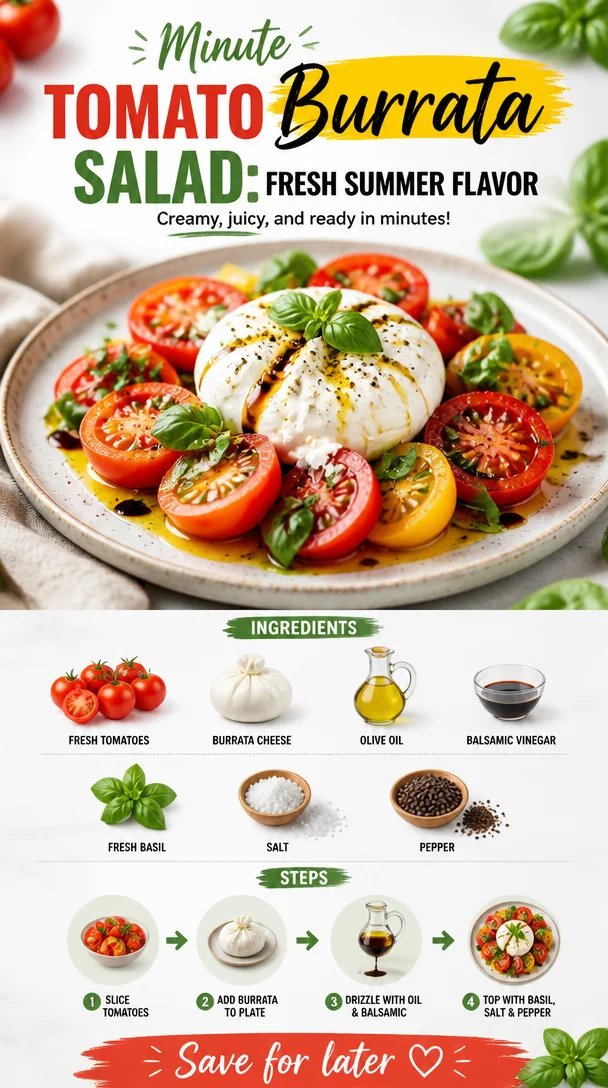
Minute Tomato Burrata Salad: Fresh Summer Flavor
Tomato and Burrata Salad: A Love Letter to Simplicity and Flavor
Welcome, food lovers! Today, we’re diving into one of my all-time favorite dishes: Tomato and Burrata Salad. I can tell you with absolute certainty that this dish is a shining star in the realm of fresh, vibrant eating. With summer’s bounty bursting forth, who wouldn’t want to highlight those juicy tomatoes paired with creamy burrata? It’s a delightful combination that screams sunshine and satisfaction.
Now, let’s be real: we all lead hectic lives. The last thing we want to do when we come home is stress over what to whip up for dinner, right? That’s why I am all about cravings that don’t overwhelm you with complicated steps or lengthy lists of ingredients. Tomato and Burrata Salad is simplicity at its finest—an impressive dish that you can whip up in just about 15 minutes. Yes, you heard that right! Perfect for those busy weeknights or lazy weekends when you want to indulge without breaking a sweat.
This salad is not just a feast for the taste buds; it’s also a visual delight. The vibrant hues of ripe tomatoes, luscious white burrata, and green basil are a pleasure to behold. Drizzled with good quality olive oil and a splash of balsamic vinegar, it not only tastes amazing but also gives you that feel-good factor as you nourish your body with fresh ingredients.
So grab your apron, and let’s get cooking! But first, let me share a little story that will set the mood for this delicious journey.
A Personal Story: The Summer I Discovered Burrata
I still remember the first time I tasted burrata like it was yesterday. It was a lovely summer afternoon at an open-air farmer’s market, the kind that bursts with life, colors, and laughter. My friends and I were wandering from stall to stall, sampling everything from artisanal cheeses to homemade bread.
As we approached a cheese vendor, a creamy white globe caught my eye. Curious, I couldn’t resist asking for a sample. When I took that first bite, my life changed forever! The outer shell was delicate, and when I broke it apart, the creamy center oozed out like a luscious, cheesy river. Pairing it with the perfectly ripe heirloom tomatoes at the market was a no-brainer.
After that day, I became obsessed with recreating that magical salad at home. I could never quite get the burrata quite as magical as that first bite, but I came pretty close! Each summer since, I’ve made it a tradition to treat myself to some fresh burrata and tomatoes, celebrating the season’s offerings while reminiscing about that magical market day.
Now, let’s get into the nitty-gritty of making this fantastic Tomato and Burrata Salad that draws inspiration from that unforgettable experience!
Ingredients
Here’s what you’ll need to create this mouthwatering salad. Each ingredient brings a unique quality to the dish, making it truly special.
-
Fresh Tomatoes: The star of the show! Use ripe, juicy tomatoes like heirlooms, cherry, or vine-ripened for the best flavor. Pro tip: If tomatoes aren’t in season, feel free to use good quality canned tomatoes in a pinch!
-
Burrata Cheese: This creamy cheese takes the dish to another level. If you can’t find burrata, fresh mozzarella is a great substitute, but do yourself a favor and try to find burrata if you can!
-
Olive Oil: A high-quality extra virgin olive oil will elevate your salad. A drizzle of this liquid gold ties all the flavors together. If you want a twist, flavored olive oils like basil or lemon can add an extra pop.
-
Balsamic Vinegar: A drizzle of balsamic adds acidity and sweetness. Opt for a good quality aged balsamic for depth. If you want to mix it up, try balsamic glaze for a thicker consistency.
-
Fresh Basil: Nothing beats the aroma and flavor of fresh herbs. Basil complements the tomatoes and burrata beautifully. If basil isn’t your style, you can use arugula or mint for a different flavor profile.
-
Salt: A sprinkle of flaky sea salt enhances the flavors of the tomatoes and cheese. Don’t skip this step—it makes all the difference.
-
Pepper: Freshly cracked black pepper adds that necessary kick. For a twist, try using a mix of colored peppercorns for a more visual appeal.
Ready to assemble these goodies? Let’s jump into the cooking action!
Step-by-Step Instructions
Here’s how you can put this fresh and fabulous dish together:
-
Prep Your Tomatoes
Start by washing your tomatoes under cool running water. If you’re using larger heirlooms, slice them into thick wedges. Cherry tomatoes can be halved. Aim for a variety of shapes and sizes to make the dish visually appealing. Remember, the more color, the better! -
Slice the Burrata
Be gentle! Burrata is delicate, so use a sharp knife to slice the burrata open, letting that creamy center spill out. It’s like a cheesy surprise waiting to be enjoyed. Be ready to indulge! -
Arrange on a Plate
Grab a large plate or a shallow bowl. Start by arranging your tomatoes however your heart desires. It could be a pretty circular pattern, a casual toss of colors, or any way that speaks to you. The beauty of this dish is in its simplicity—there’s no wrong way to do it! -
Add the Burrata
Nestle the burrata pieces among the tomatoes. Make sure to drape the creamy insides in such a way that everyone will be able to scoop a little when serving. -
Drizzle Some Olive Oil
Generously drizzle your extra virgin olive oil all over the salad. It not only adds incredible flavor but also acts as a beautiful sheen that makes everything look enticing. Don’t be shy; it brings everything together! -
Sprinkle with Balsamic Vinegar
Now, for the balsamic! A light drizzle will do the trick, but feel free to adjust according to your taste. Remember, a little goes a long way, so start small and add more if desired. -
Season with Salt and Pepper
Finish with a sprinkle of flaky sea salt and a generous crack of freshly ground black pepper. This simple seasoning elevates the dish and enhances all the amazing flavors. -
Top with Fresh Basil
Lastly, tear some fresh basil leaves over the top. They can be as small or as large as you like—just make sure to include enough to enjoy that fresh basil flavor with each bite.
And there you have it! Simple, beautiful, and oh-so-delicious Tomato and Burrata Salad ready to be devoured.
Serving Suggestions
When it’s time to serve your Tomato and Burrata Salad, consider presenting it on a wooden platter for a rustic feel or a white plate to really make those colors pop! Pair it with some crusty bread for mopping up any leftover olive oil and gooey burrata. A chilled glass of rosé or a light white wine complements this dish perfectly. Enjoy this salad as a refreshing starter, a side dish alongside grilled meats, or even as a satisfying light lunch on its own!
Recipe Variations
Feeling adventurous? Here are a few fun variations you can explore:
-
Mediterranean Style: Add black olives and capers for a briny punch that complements the sweetness of the tomatoes.
-
Grilled Option: Toss your tomatoes on the grill for a slight char! The smokiness will add an exciting depth of flavor.
-
Pesto Twist: Replace the basil with a drizzle of homemade or store-bought pesto for an herbaceous kick.
-
Fruit Fusion: Add slices of ripe peaches or nectarines for a fruity twist that pairs well with the cheese!
-
Nuts Galore: Toss in some toasted pine nuts or chopped walnuts for added crunch and a nutty flavor.
Explore these variations to suit your taste and make this dish your own!
Chef’s Notes
One of the beautiful things about this Tomato and Burrata Salad is how easy it is to adapt. Over the years, I’ve played around with different cheeses and even roasted my tomatoes to intensify their flavor. Each version has its merits! I often find myself standing over the sink, tearing off pieces of burrata and nibbling while prepping—it’s hard not to!
I love to think of this salad as a blank canvas; you can let your creativity shine. Whether I’m enjoying it on a sunny afternoon, hosting friends, or simply needing a happy food moment, this salad never fails to deliver.
FAQs and Troubleshooting
Q: My burrata is too runny. What did I do wrong?
A: Burrata can be tricky! Make sure to drain it well if it’s packed in liquid. If you bite into it and it’s too runny, just enjoy it as is—runny burrata is still delicious!
Q: Can I make this salad ahead of time?
A: This salad is best enjoyed fresh. However, you can prep the ingredients in advance but avoid adding the burrata and drizzles of oil and balsamic until just before serving.
Q: What should I do if my tomatoes aren’t flavorful?
A: Choose the ripest tomatoes you can find! If they lack flavor, add a pinch of sugar to enhance their sweetness or drizzle a touch more balsamic vinegar for added depth.
Q: Can I use dried herbs instead of fresh basil?
A: While fresh herbs are best for this recipe, if you must use dried herbs, remember that dried herbs are more potent, so use them sparingly. Add them in with the oil and vinegar to help rehydrate them.
Nutritional Info
While I usually focus on the joy of cooking rather than calorie counting, a serving of Tomato and Burrata Salad is generally low in calories but high in healthy fats, vitamins, and antioxidants. Each serving can provide a great source of lycopene from the tomatoes, healthy fats from the olive oil and burrata, and fresh flavors from the herbs.
Well, there you have it—an inviting journey through the wonderful world of Tomato and Burrata Salad! I hope this recipe inspires you to bring a little sunshine to your table. Remember, the kitchen is a place of joy, experimentation, and love. So roll up those sleeves and let’s enjoy the beauty of fresh, feel-good food together! Happy cooking!
PrintTomato and Burrata Salad
A vibrant and fresh Tomato and Burrata Salad highlighting juicy tomatoes paired with creamy burrata, drizzled with olive oil and balsamic vinegar.
- Prep Time: 15 minutes
- Cook Time: 0 minutes
- Total Time: 15 minutes
- Yield: 4 servings
- Category: Salad
- Method: No Cooking
- Cuisine: Italian
- Diet: Vegetarian
Ingredients
- Fresh Tomatoes (heirloom, cherry, or vine-ripened)
- Burrata Cheese
- Olive Oil (extra virgin)
- Balsamic Vinegar
- Fresh Basil
- Salt
- Pepper
Instructions
- Prep your tomatoes by washing them and slicing them into wedges or halves.
- Slice the burrata gently to reveal its creamy center.
- Arrange tomatoes on a large plate or shallow bowl creatively.
- Add the burrata pieces among the tomatoes.
- Drizzle olive oil generously over the salad.
- Sprinkle balsamic vinegar lightly according to taste.
- Season with flaky sea salt and freshly cracked black pepper.
- Top with torn fresh basil leaves before serving.
Notes
Experiment with different variations like adding olives, grilling the tomatoes, or using pesto instead of basil.
Nutrition
- Serving Size: 1 serving
- Calories: 250
- Sugar: 6g
- Sodium: 300mg
- Fat: 20g
- Saturated Fat: 10g
- Unsaturated Fat: 9g
- Trans Fat: 0g
- Carbohydrates: 14g
- Fiber: 2g
- Protein: 8g
- Cholesterol: 30mg
Keywords: salad, tomatoes, burrata, vegetarian, fresh, summer
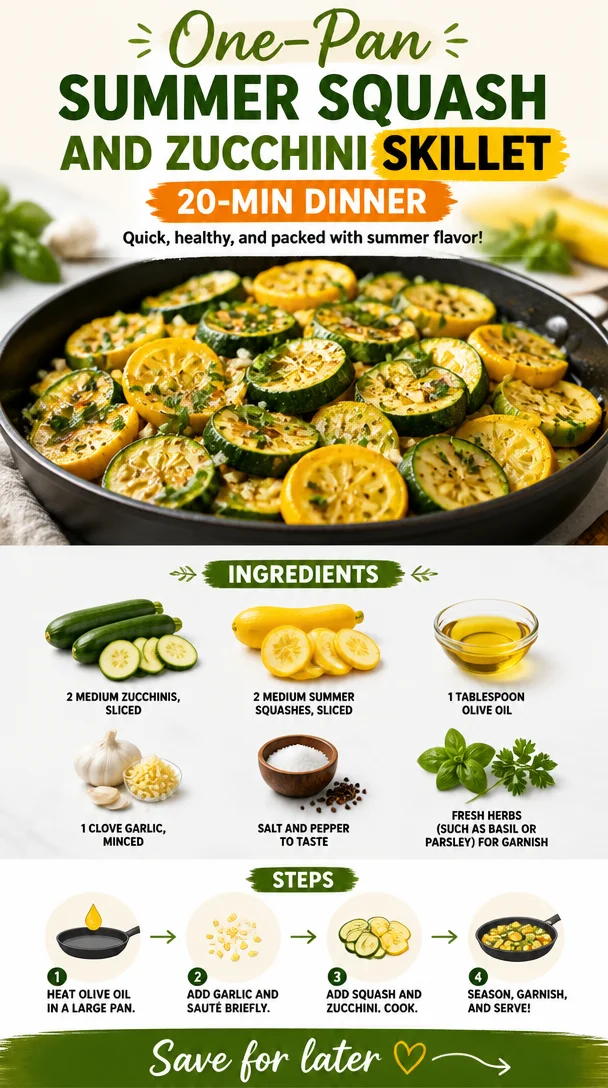
One-Pan Summer Squash and Zucchini Skillet – 20-Min Dinner
Quick Summer Squash and Zucchini Skillet: A Flavorful Essential
Summer is here, and with it comes the bounty of summer squash and zucchini! There’s something magical about stepping into a kitchen filled with the fragrance of fresh vegetables, the vibrant greens glistening on my cutting board. These simple yet scrumptious ingredients deserve the spotlight, and today, we’re whipping up a Quick Summer Squash and Zucchini Skillet that’s sure to tickle your taste buds!
This dish is not just a great way to use up the freshest summer produce; it captures the essence of easy cooking, allowing you to savor the flavors of summer without spending hours in the kitchen. Picture this: a sizzling skillet, a little olive oil creating a warm embrace, and the bright colors of fresh vegetables mingling together. Doesn’t that sound delightful? Plus, it’s incredibly versatile, making it perfect for any meal of the day.
Growing up, my grandmother always had a special place for zucchini in her garden. I fondly remember her summer dinners, where she would serve sautéed zucchini alongside family favorites. The simple act of cooking together with her inspired a lifelong love for food, where each meal felt special, vibrant, and filled with love. Today, I carry those cherished memories into my cooking, ensuring that every recipe I share is more than just a meal—it’s a slice of nostalgia. So let’s dive into this vibrant recipe that’s not just about cooking; it’s about sharing joy and flavor with the ones you love.
Ingredients
For this Quick Summer Squash and Zucchini Skillet, you’ll need the following:
-
2 medium zucchinis, sliced
Zucchini is versatile, packed with moisture, and has a mild flavor that pairs wonderfully with spices. Look for firm zucchinis with a shiny, unblemished skin for the best taste.
Substitution Tip: If you can’t find zucchini, yellow squash works beautifully as well! -
2 medium summer squashes, sliced
Summer squash is slightly sweeter than zucchini and adds a delightful color contrast in the dish.
Chef Insight: You can use any variety of summer squash, such as pattypan or yellow squash, for a unique twist! -
1 tablespoon olive oil
Olive oil provides a fragrant richness and helps to sauté the vegetables perfectly, bringing out their natural flavors.
Tip: You can substitute it with avocado oil for a higher smoke point if you’re cooking at higher temperatures. -
1 clove garlic, minced
Garlic brings an aromatic punch that elevates the dish and gives it a lovely flavor boost.
Quick Tip: Fresh garlic is best, but pre-minced in a jar can work in a pinch—just be mindful of its stronger taste. -
Salt and pepper to taste
Essentials for enhancing flavor; they’re what transforms the dish from bland to grand!
Insider Tip: Try adding a sprinkle of smoked salt for a unique depth. -
Fresh herbs (such as basil or parsley) for garnish
Fresh herbs brighten the dish and add a pop of color and additional flavor.
Creativity Tip: Experiment with oregano or thyme for different flavor profiles!
Step-by-Step Instructions
Now that we’ve gathered all our delicious ingredients, let’s get cooking! Follow these simple steps to whip up your Quick Summer Squash and Zucchini Skillet:
-
Prep Your Veggies
Start by washing the zucchinis and summer squashes thoroughly. Slice them into half-inch rounds or half-moons, depending on your preference. The goal is to ensure they cook evenly.
Chef Hack: If you’re short on time, grab pre-sliced veggies from the grocery store! -
Heat the Skillet
In a large skillet, heat one tablespoon of olive oil over medium heat. Let it warm until it has a gentle shimmer—this indicates it’s ready for sautéing.
Tip: A nonstick skillet works wonders if you want to avoid any sticking! -
Sauté the Garlic
Add the minced garlic first, and sauté for about 30 seconds until it’s fragrant but not browned—browned garlic can turn bitter. This step is key for infusing the oil with flavor!
Personal Touch: Sometimes, I even add a pinch of red pepper flakes at this stage for a hint of heat! -
Add the Sliced Veggies
Toss in the sliced zucchini and summer squash. Stir them gently to coat with the olive oil and garlic, ensuring they’re well mixed.
Pro Tip: Avoid overcrowding the skillet; if necessary, sauté in batches to achieve that perfect sear. -
Season
After the veggies have cooked for about 5-7 minutes, sprinkle with salt and pepper to taste. You want them tender but still slightly crisp to retain that delightful mouthfeel.
Chef’s Choice: For an added flavor dimension, consider a splash of lemon juice for brightness! -
Garnish and Serve
As soon as the zucchini and summer squash are tender, remove the skillet from the heat. Finely chop your chosen fresh herbs and sprinkle them generously over the top before serving.
Final Touch: A light drizzle of balsamic glaze over the veggies can give a lovely sweetness that complements the dish beautifully.
Serving Suggestions
Serve your Quick Summer Squash and Zucchini Skillet warm as a delightful side dish next to grilled chicken, fish, or even atop a bed of quinoa or rice for a light vegetarian main. To plate, use a large serving bowl or a colorful dish to show off the vibrant hues of the sautéed veggies. If you’re feeling fancy, add a sprinkle of feta or a dollop of Greek yogurt to make it even more delectable!
Recipe Variations
Feeling adventurous? Here are a few tasty twists to try with your skillet dish:
-
Add Protein: Toss in some cooked shrimp, chicken, or chickpeas for an easy protein boost to make it a standalone meal.
-
Cheesy Goodness: Grate some Parmesan or sprinkle feta cheese on top, letting it melt slightly over the warm veggies for a creamy addition.
-
Herb Fusion: Switch it up with herbs like dill or thyme for a different aromatic experience; each herb will change the entire flavor profile of the dish!
-
Nutty Finish: Consider topping the dish with a handful of toasted pine nuts or almonds for extra crunch and a nutritional kick.
-
Spicy Kick: For those who like it hot, add a pinch of cayenne pepper or diced jalapeños while sautéing for some heat.
Chef’s Notes
This Quick Summer Squash and Zucchini Skillet is like a canvas—it’s a base for creativity! I love reminiscing about those summer evenings spent in my grandmother’s cozy kitchen, where every sprinkle of herb or dash of seasoning sparked a conversation. Over time, I’ve learned that these simple ingredients can tell a story, while tiny adjustments can yield new masterpieces. Don’t be afraid to experiment and make this recipe your own; each tweak brings a new flavor journey!
FAQs and Troubleshooting
1. My zucchini turned mushy. What went wrong?
Zucchini has a high water content. To avoid mushiness, cook them just until tender and avoid overcrowding the skillet. Make sure your heat is set to medium to achieve that perfect balance!
2. Can I store leftovers?
Absolutely! Store any leftovers in an airtight container in the fridge for up to 2-3 days. However, note that reheating might make the veggies softer, so I recommend to enjoy them fresh if possible!
3. What can I do with the squash if I don’t use it all?
Leftover squash is perfect for adding to salads, soups, or frittatas the next day. It can also be blended into a smoothie if you’re feeling adventurous!
4. Can I use frozen zucchini or squash?
While you can technically use frozen veggies, they often come pre-cooked and can be mushy. Fresh vegetables yield the best texture and flavor for this skillet dish.
Nutritional Info
While I always encourage enjoying food without the stress of numbers, here’s a rough idea of what’s in your dish to guide you:
- Calories: Approximately 100 per serving
- Protein: 2g
- Carbohydrates: 10g
- Fat: 6g
- Fiber: 2g
Quick, simple, and packed with flavor, this Quick Summer Squash and Zucchini Skillet is more than just a meal—it’s a celebration of summer’s bounty. So, gather those fresh ingredients, put on your favorite playlist, and let’s create something delicious together! Here’s to fresh plates, happy hearts, and the kind of cooking that feels as good as it tastes. Enjoy!
PrintQuick Summer Squash and Zucchini Skillet
A vibrant and delicious skillet dish featuring fresh summer squash and zucchini, perfect for any meal of the day.
- Prep Time: 10 minutes
- Cook Time: 10 minutes
- Total Time: 20 minutes
- Yield: 4 servings 1x
- Category: Side Dish
- Method: Sautéing
- Cuisine: American
- Diet: Vegetarian
Ingredients
- 2 medium zucchinis, sliced
- 2 medium summer squashes, sliced
- 1 tablespoon olive oil
- 1 clove garlic, minced
- Salt and pepper to taste
- Fresh herbs (such as basil or parsley) for garnish
Instructions
- Prep your veggies. Start by washing the zucchinis and summer squashes thoroughly. Slice them into half-inch rounds or half-moons, depending on your preference.
- Heat the skillet. In a large skillet, heat one tablespoon of olive oil over medium heat.
- Sauté the garlic. Add the minced garlic first, and sauté for about 30 seconds until it’s fragrant.
- Add the sliced veggies. Toss in the sliced zucchini and summer squash.
- Season the veggies. After they have cooked for about 5-7 minutes, sprinkle with salt and pepper to taste.
- Garnish and serve. As soon as the zucchini and summer squash are tender, remove the skillet from the heat and sprinkle with fresh herbs before serving.
Notes
For additional flavor, consider a splash of lemon juice or a drizzle of balsamic glaze. Experiment with adding proteins or different herbs for variation.
Nutrition
- Serving Size: 1 serving
- Calories: 100
- Sugar: 3g
- Sodium: 200mg
- Fat: 6g
- Saturated Fat: 1g
- Unsaturated Fat: 5g
- Trans Fat: 0g
- Carbohydrates: 10g
- Fiber: 2g
- Protein: 2g
- Cholesterol: 0mg
Keywords: zucchini, summer squash, vegetable skillet, quick side dish, healthy cooking
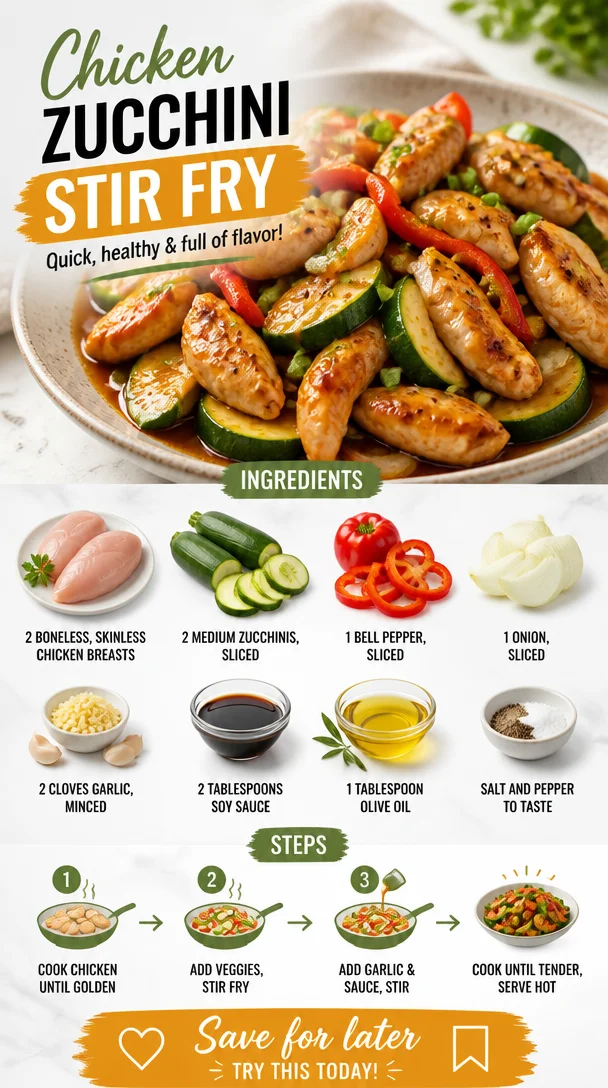
Chicken Zucchini Stir Fry
Delightful Chicken Zucchini Stir Fry: A Colorful and Flavorful Meal
Welcome to Clean Plate Cravings, my kitchen haven where delicious meets nutritious! Today, I’m thrilled to share a vibrant Chicken Zucchini Stir Fry that’s not only packed with flavors but also represents everything I believe about enjoying food. Eating well shouldn’t feel like a chore; it should be a joyful experience where colors, tastes, and even the smell of cooking coax you into a happy dance in the kitchen!
Imagine the sizzle of chicken, the crunch of the bell pepper, and the fresh aroma of garlic filling your home. This stir fry is made with simple, fresh ingredients that are likely hanging out in your fridge right now. It’s the kind of recipe that fits perfectly into a busy weeknight cooking schedule or an everyday meal prepped on a Sunday, ready to be enjoyed all week long.
Stir fry dishes are one of my favorite ways to whip up quick, delicious meals. With minimal cooking time, you can whip together something that not only tastes good but also fuels your body with nutrients. This Chicken Zucchini Stir Fry is certainly one of those dishes that delivers on taste while keeping it light and healthy. So, let’s dive deep into this recipe and stir up some magic together!
A Bite of Nostalgia: Mom’s Kitchen Wisdom
This dish brings back sweet memories from my childhood when my mom would whip up her famous stir fry for dinner. As a busy working mom, she had her ways of making the kitchen her own little sanctuary, producing meals that not only tasted great but were also wholesome. I remember sitting at the kitchen counter, watching her slice vibrant veggies. Every slice was precise and purposeful, and she always emphasized using what’s fresh and in season.
I’d help her wash the vegetables while she’d hum along to our favorite tunes playing in the background. Those moments taught me the importance of bringing joy into cooking and reminded me that food can forge connections, comfort, and perhaps even a little nostalgia. That’s why this Chicken Zucchini Stir Fry is special to me—it embodies what I learned from her: keep it simple, vibrant, and full of love.
Ingredients
Before we jump into the kitchen, let’s gather our ingredients. Here’s what you’ll need to create this colorful stir fry:
-
2 boneless, skinless chicken breasts
Tender chicken is the base of this dish. You can swap it for turkey breast if you prefer. For a plant-based option, try using tofu or tempeh! -
2 medium zucchinis, sliced
Zucchini adds a lovely crunch and absorbs all the flavors beautifully. If zucchini isn’t available, yellow squash works just as well. -
1 bell pepper, sliced
Use any color you have on hand—red, yellow, or green—each brings its own sweetness. If you’re looking for a spicy twist, try a jalapeño instead! -
1 onion, sliced
Onions enhance the overall flavor. I love using red onions, but yellow or sweet onions can be fantastic substitutes too. -
2 cloves garlic, minced
Garlic is the secret flavor booster in this dish! If you love garlic, feel free to add more. If you’re short on fresh, garlic powder can be used, too—just keep it light. -
2 tablespoons soy sauce
This brings the salty umami flavor that stir fry is known for. If you want a gluten-free option, use tamari or coconut aminos instead. -
1 tablespoon olive oil
Olive oil is perfect for cooking due to its light flavor and health benefits. Feel free to use avocado oil or sesame oil for an Asian flair. -
Salt and pepper to taste
Always be generous with seasoning! What matters is it’s to your preference.
Step-by-Step Instructions
Now that we have everything ready, it’s time to cook! Cooking is all about enjoying the process, so grab your favorite playlist, and let’s get started.
-
Prepare Your Ingredients
Start by slicing your chicken, zucchini, bell pepper, and onion into bite-sized pieces. Keep everything uniform so it cooks evenly. Pro-tip: use a sharp knife for quicker and easier cutting. If you struggle with knifework, check out some online tutorials for handy tips! -
Sauté the Chicken
Heat the olive oil in a large skillet or wok over medium-high heat. Once it’s shimmering, add in the chicken pieces. Season with salt and pepper. Sauté the chicken for about 5-7 minutes until it’s fully cooked and golden brown. Make sure not to crowd the pan—this allows for a nice sear. Here’s a hack: if you use a wooden spoon to flip the chicken, you’ll get an even cook on all sides. -
Add the Aromatics
Toss in the minced garlic and sliced onions into the pan. The fragrance will hit you like a wave of comfort! Stir-fry this mix for about 1-2 minutes until fragrant and the onions become translucent. Keep it moving so the garlic doesn’t burn—charred garlic can turn bitter. -
In with the Veggies
Next, add the sliced zucchini and bell pepper to the pan. Stir well and cook for another 3-5 minutes, allowing the vegetables to soften while still being crisp. Remember, we want crunch in our stir fry! If your veggies start wilting too fast, turn down the heat slightly to avoid overcooking. -
Season It Up
Finally, pour in the soy sauce. It’ll add depth and richness! Stir everything together and allow it to cook for another minute to let the flavors meld. If you like a bit of zing, try adding a dash of chili paste or sesame oil at this stage. -
Taste Test and Adjust
Before serving, taste your dish and adjust the seasoning as needed—you might find it needs a little more salt or soy sauce. Cooking is about personal preference, so don’t hesitate to make it yours. -
Serve and Savor
Once everything is cooked, remove it from heat and let it rest for a couple of minutes. This gives the flavors a moment to settle before serving.
Serving Suggestions
Serving this Chicken Zucchini Stir Fry is all about presentation and satisfaction. I love serving it over a fluffy bed of jasmine rice or whole grain quinoa for a wholesome touch. You can also enjoy it wrapped in lettuce leaves for a fresh, low-carb option. Drizzle a little extra soy sauce or a sprinkle of sesame seeds for a finishing touch.
Recipe Variations
Let’s get creative with some variations to keep this dish exciting:
- Spicy Kick: Add sliced red chili peppers or a sprinkle of chili flakes for a bit of heat!
- Coconut Delight: Stir in a splash of coconut milk for a creamy twist.
- Herb Weave: Finish with a handful of fresh basil or cilantro for a zesty lift.
- Noodle Swap: Swap out the chicken for shrimp and toss in some rice noodles for an easy Asian-inspired meal.
- Veggie Load: Add in additional veggies like broccoli, snap peas, or carrots based on what you have.
Chef’s Notes
This Chicken Zucchini Stir Fry is a staple in my kitchen for good reason! The recipe has evolved since those childhood memories; now I play with various ingredients to keep things fresh and in line with the season. I often encourage people to explore their pantry and fridge and let those ingredients dictate the meal. This stir fry has seen everything from leftover veggies to different protein sources, emphasizing its versatility.
And let me tell you a little secret: there’s no wrong way to stir fry. One time, I accidentally spilled in some red wine while cooking, and instead of being upset, I embraced it! That was one of the most delicious flukes I’ve ever created in my kitchen.
FAQs and Troubleshooting
Here are some common questions and potential hiccups you might run into:
-
Why is my stir fry watery?
Make sure you’re cooking on high heat, which helps to evaporate excess moisture. If it’s still watery, you might have added too much sauce—consider using less next time or increasing your cooking time to reduce it. -
Can I make this ahead of time?
Absolutely! This stir fry stores well in an airtight container in the fridge for up to 3 days. Just reheat it in a skillet or microwave when you’re ready to enjoy it again. -
What if my veggies overcook?
If this happens, next time try adding the firmer veggies, like carrots and onion, first, and add the softer ones, like zucchini and peppers, later in the cooking process. -
Can I freeze this dish?
Yes, but I recommend freezing just the chicken and veggies before cooking, as stir-fried vegetables don’t retain their texture well after freezing and reheating.
Nutritional Info
- Calories: 350 per serving (approx.)
- Protein: 30g
- Carbohydrates: 15g
- Fats: 15g
- Fiber: 2g
(Note: Nutritional values can vary based on exact ingredients and portion sizes.)
Thanks for tuning in! I hope this Chicken Zucchini Stir Fry brings warmth to your kitchen and joy to your table. Don’t forget to embrace your creativity and bake with love. Happy cooking, foodies!
PrintChicken Zucchini Stir Fry
A vibrant Chicken Zucchini Stir Fry that’s packed with flavors and perfect for a quick weeknight meal.
- Prep Time: 15 minutes
- Cook Time: 15 minutes
- Total Time: 30 minutes
- Yield: 4 servings 1x
- Category: Main Course
- Method: Stir Fry
- Cuisine: Asian
- Diet: Gluten-Free
Ingredients
- 2 boneless, skinless chicken breasts
- 2 medium zucchinis, sliced
- 1 bell pepper, sliced
- 1 onion, sliced
- 2 cloves garlic, minced
- 2 tablespoons soy sauce
- 1 tablespoon olive oil
- Salt and pepper to taste
Instructions
- Prepare your ingredients by slicing your chicken, zucchini, bell pepper, and onion into bite-sized pieces.
- Sauté the chicken in a large skillet over medium-high heat with olive oil, seasoning with salt and pepper, for 5-7 minutes.
- Add minced garlic and sliced onions, stir-frying for 1-2 minutes until fragrant.
- In with the sliced zucchini and bell pepper, cooking for an additional 3-5 minutes.
- Season it up by pouring in the soy sauce and letting it cook for another minute.
- Taste test and adjust the seasoning before serving.
- Serve the stir fry over jasmine rice or quinoa, and enjoy!
Notes
This stir fry can be customized with different vegetables or proteins like tofu, shrimp, or even a splash of coconut milk for creaminess.
Nutrition
- Serving Size: 1 serving
- Calories: 350
- Sugar: 5g
- Sodium: 700mg
- Fat: 15g
- Saturated Fat: 2g
- Unsaturated Fat: 10g
- Trans Fat: 0g
- Carbohydrates: 15g
- Fiber: 2g
- Protein: 30g
- Cholesterol: 70mg
Keywords: chicken, zucchini, stir fry, quick meal, healthy cooking
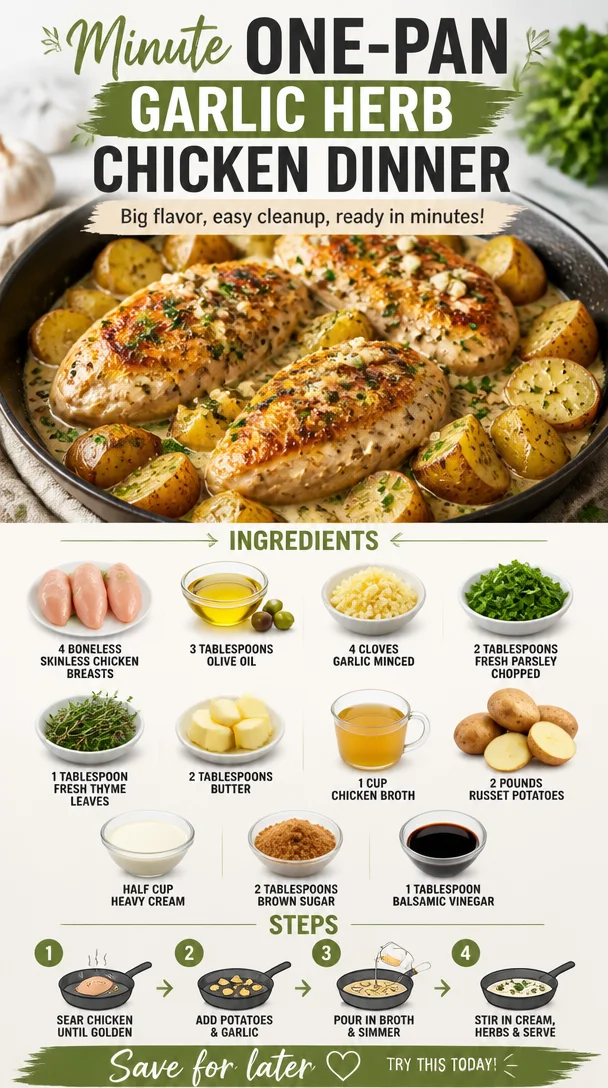
Minute One-Pan Garlic Herb Chicken Dinner
Garlic Herb Chicken: A Wholesome Delight for Every Home Cook
Welcome back to Clean Plate Cravings, food lovers! Today, I am excited to share one of my absolute favorite dishes—Garlic Herb Chicken. This dish is a beautiful celebration of fresh flavors, zesty garlic, and tender chicken that pairs beautifully with a multitude of sides. Picture this: juicy chicken breasts sizzling in a pan, infused with fragrant herbs and rich garlic, all while you’re whisking together some luscious creamy potatoes on the side. Are you drooling yet?
Let’s dive right into this culinary journey that not only tantalizes your taste buds but also fills your home with the warm aroma of a home-cooked meal. Throughout this post, I’ll take you step-by-step through easy-to-follow instructions, sprinkling in some personal anecdotes and chef hacks to elevate your cooking experience. Whether you’re looking to impress dinner guests or just craving a comforting meal after a long day, Garlic Herb Chicken is the way to go!
Personal Story
Ah, Garlic Herb Chicken brings back fond memories of cozy family dinners gathered around the dining table. I can still picture it vividly—my mom whipping up her signature dish while the aroma of garlic wafted through the house. We’d all sit at the table, waiting with growing anticipation as the sizzle from the stovetop made our mouths water. It was more than just a meal; it was a time for connection, laughter, and storytelling. I remember my siblings and I racing to see who could finish their plates first, a not-so-subtle competition that always ended with my mom reminding us to savor our food.
Seeing everyone enjoy a dish that was drenched in love and flavor made cooking feel magical. Inspired by those moments, I started experimenting with recipes in my own kitchen, aiming to recreate that same warmth and joy. Today, I find happiness in sharing this Garlic Herb Chicken recipe with you all, hoping it brings as much joy to your table as it did to mine.
Ingredients
Before we jump into cooking, let’s talk about the vibrant ingredients that make this dish so special. Here’s what you’ll need:
-
4 boneless skinless chicken breasts
The star of the show! Opt for organic or free-range chicken for the best flavor. If you prefer dark meat, substitute with chicken thighs. -
3 tablespoons olive oil
A healthier fat that enhances the dish’s flavor. For a twist, swap it with avocado oil, which has a higher smoke point! -
4 cloves garlic, minced
Garlic adds a punch of flavor. Feel free to use roasted garlic for a sweeter, mellow taste! -
2 tablespoons fresh parsley, chopped
Adds a burst of freshness. If you don’t have fresh parsley, dried parsley can work—use about a teaspoon. -
1 tablespoon fresh thyme leaves
Thyme pairs beautifully with chicken. Substitute with rosemary or oregano for a different twist. -
2 tablespoons butter
Because butter makes everything better! For a dairy-free option, use ghee or a plant-based butter. -
1 cup chicken broth
This is foundational for flavor. You can use vegetable broth if you want to make it vegetarian or choose a low-sodium option for a healthier take. -
2 pounds russet potatoes
Creamy russets are perfect here. Swap them for sweet potatoes for a different flavor profile! -
½ cup heavy cream
Rich, luscious, and creamy. Use coconut cream for a dairy-free alternative. -
2 tablespoons brown sugar
Just a hint of sweetness to balance flavors. Feel free to substitute with honey or maple syrup. -
1 tablespoon balsamic vinegar
This adds depth and brightness. Try red wine vinegar if you need a substitute.
Step-by-Step Instructions
Now that we’ve gathered our ingredients, let’s move on to the fun part—cooking! Follow these step-by-step instructions for a foolproof Garlic Herb Chicken that will delight your senses.
-
Prep the Chicken
Begin by patting the chicken breasts dry with paper towels. This helps get that lovely golden-brown sear on the outside. Season both sides generously with salt and pepper. This is your chance to infuse flavor right at the start! -
Heat the Oil
In a large pan or skillet, heat 3 tablespoons of olive oil over medium-high heat. Watch closely and let it shimmer. You want the oil hot enough to sear without burning! If you’ve got a cast-iron skillet, now’s the time to whip that baby out! -
Sear the Chicken
Carefully place the chicken breasts in the hot oil, leaving space between them. Avoid overcrowding the pan; this ensures a nice sear. Cook for 5-7 minutes on each side—this will create that beautiful browning! Don’t rush—let the chicken do its work. -
Add Aromatics
Once the chicken is nicely browned, add in the minced garlic, fresh parsley, and thyme. Stir it all around until fragrant—about 30 seconds. Keep a close watch because garlic can burn quickly! -
Create the Sauce
Add 2 tablespoons of butter to the pan, letting it melt and mix with the garlic and herbs. Then pour in 1 cup of chicken broth, scraping any delicious bits stuck to the skillet. This is the moment the magic happens—those flavors meld together in perfect harmony. -
Simmer the Chicken
Reduce the heat to low and cover the skillet. Simmer the chicken for 10-15 minutes until it’s cooked through. Use a meat thermometer for precision; the internal temp should reach 165°F (75°C). Juicy chicken awaits! -
Finish with Cream
In the final few minutes of cooking, stir in the heavy cream, brown sugar, and balsamic vinegar. This creamy sauce will give your chicken an incredible richness. Let it simmer uncovered for 2-3 minutes until it thickens slightly. -
Serve It Up
Remove the chicken from the skillet and spoon that luscious sauce over the top. Garnish with extra herbs if you’re feeling fancy!
Serving Suggestions
To plate your Garlic Herb Chicken, serve with a side of roasted or creamy mashed potatoes, drizzling the sauce over both. You can also pair it with your favorite seasonal vegetables like steamed green beans or a light salad for a refreshing touch. Want to make it a feast? Add some warm crusty bread to soak up all that delicious sauce.
Recipe Variations
- Lemon Garlic Chicken: Swap some of the balsamic vinegar with fresh lemon juice for a bright, zesty flavor that dances on your palate.
- Spicy Garlic Chicken: Add red pepper flakes or a minced jalapeño to introduce some heat into your sauce.
- Herb Crusted Chicken: Before searing, coat the chicken in a mixture of breadcrumbs, parmesan, and herbs for a crunchy texture.
- Creamy Sun-Dried Tomato Variation: Toss in some chopped sun-dried tomatoes into the sauce for an Italian flair.
- Low-Carb Option: Serve the chicken on a bed of zoodles (zucchini noodles) instead of potatoes for a lower-carb alternative!
Chef’s Notes
Throughout my cooking journey, Garlic Herb Chicken has evolved into a dish that’s not just about satisfying hunger, but also one that connects hearts. I’ve experimented with different herbs, sauces, and even cooking methods. There was a day I accidentally used smoked paprika instead of brown sugar, and while it turned out surprisingly good, it was a reminder that cooking allows for creativity and spontaneity. Don’t be afraid to tweak this recipe; make it your own!
FAQs and Troubleshooting
Q: My chicken turned out dry. What happened?
A: Overcooking can lead to dry chicken. Be sure to use a meat thermometer and check for an internal temp of 165°F (75°C) to ensure juicy results.
Q: Can I use frozen chicken breasts?
A: Yes, you can! Just be sure to thaw them completely before cooking. You may need to adjust the cooking time slightly.
Q: What if I don’t have chicken broth?
A: No worries! You can use water or a low-sodium vegetable broth. The flavor may be slightly milder, but it will still be delicious!
Q: How can I make this dish dairy-free?
A: Swap the butter with coconut oil and the heavy cream with coconut cream or a dairy-free alternative.
Nutritional Info
(Nutritional info can be provided based on your specific calculations or requirements based on the ingredients you use. Consider providing calories, protein, fats, and carbs per serving if desired.)
In conclusion, I hope you enjoy making this Garlic Herb Chicken as much as I do! It’s all about gathering those around you, sharing good food, and creating lush memories. I’m excited to see how you make this recipe your own. Until next time, keep those cravings clean and delicious!
PrintGarlic Herb Chicken
A delicious and wholesome Garlic Herb Chicken recipe that combines juicy chicken breasts with fragrant herbs and rich garlic, served with creamy potatoes.
- Prep Time: 15 minutes
- Cook Time: 30 minutes
- Total Time: 45 minutes
- Yield: 4 servings 1x
- Category: Main Course
- Method: Searing
- Cuisine: American
- Diet: Gluten-Free
Ingredients
- 4 boneless skinless chicken breasts
- 3 tablespoons olive oil
- 4 cloves garlic, minced
- 2 tablespoons fresh parsley, chopped
- 1 tablespoon fresh thyme leaves
- 2 tablespoons butter
- 1 cup chicken broth
- 2 pounds russet potatoes
- ½ cup heavy cream
- 2 tablespoons brown sugar
- 1 tablespoon balsamic vinegar
Instructions
- Begin by patting the chicken breasts dry with paper towels. Season both sides generously with salt and pepper.
- Heat 3 tablespoons of olive oil in a large pan over medium-high heat until it shimmers.
- Carefully place the chicken breasts in the hot oil, ensuring space between them. Sear for 5-7 minutes on each side.
- Once browned, add minced garlic, parsley, and thyme. Stir until fragrant, about 30 seconds.
- Add 2 tablespoons of butter, allowing it to melt and mix with the herbs.
- Pour in 1 cup of chicken broth, scraping the skillet for flavor bits.
- Reduce heat to low, cover, and simmer for 10-15 minutes until the chicken reaches 165°F (75°C).
- Stir in heavy cream, brown sugar, and balsamic vinegar. Simmer uncovered for 2-3 minutes until slightly thickened.
- Remove the chicken from the skillet and spoon the sauce over the top. Garnish with extra herbs if desired.
Notes
For a dairy-free option, swap butter with coconut oil and heavy cream with coconut cream. Use low-sodium broth for a healthier twist.
Nutrition
- Serving Size: 1 serving
- Calories: 400
- Sugar: 6g
- Sodium: 500mg
- Fat: 20g
- Saturated Fat: 8g
- Unsaturated Fat: 10g
- Trans Fat: 0g
- Carbohydrates: 35g
- Fiber: 4g
- Protein: 30g
- Cholesterol: 75mg
Keywords: chicken, garlic, herbs, easy recipe, dinner
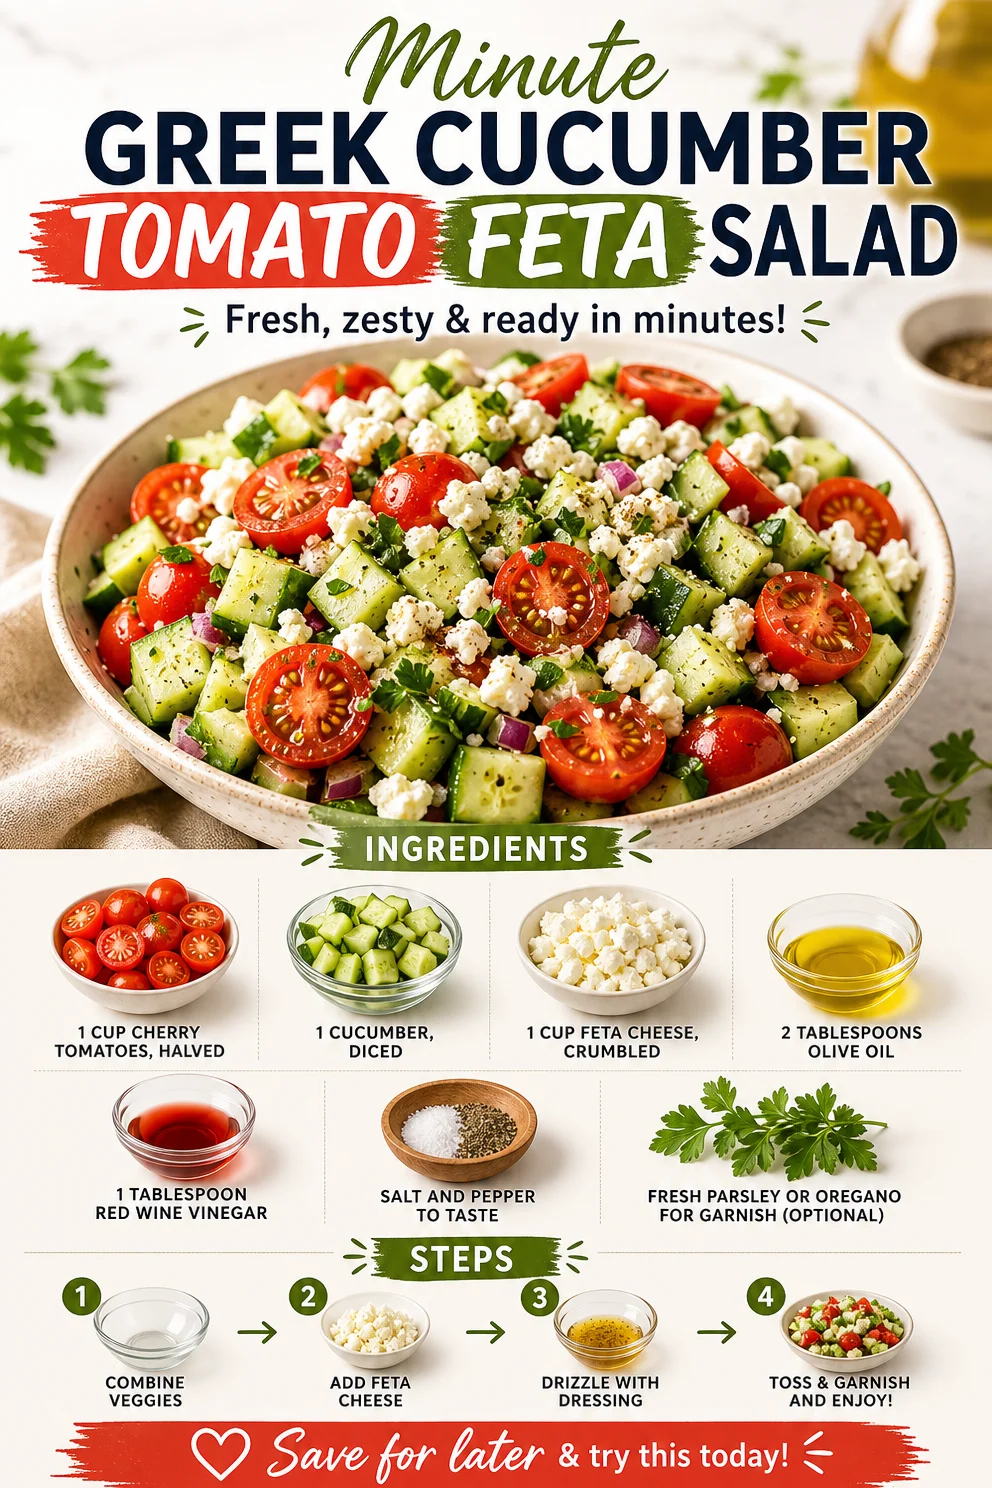
Minute Greek Cucumber Tomato Feta Salad (Fresh & Zesty)
Refreshing Greek Cucumber Tomato Feta Salad: A Taste of Summer in Every Bite
Welcome back to Clean Plate Cravings, my fellow food lovers! Today, we’re diving into a dish that feels like a sunny vacation in a bowl: the Greek Cucumber Tomato Feta Salad. This vibrant salad is not only a feast for the eyes but also a celebration of simple ingredients that come together to create something truly delightful. Whether you’re looking for a side dish for your next barbecue, a healthy lunch option, or just a way to add some freshness to your weekly meals, this salad is your go-to solution.
Let’s take a moment to appreciate the Canadian summer I spent with my grandmother, lounging on her porch, listening to the birds chirp as the sun warmed our faces. Several of her meals included fresh, colorful salads that tasted like sunshine. One particular day, she prepared a Greek salad that was bursting with flavor, and I can still remember the tangy feta that danced in harmony with the juicy tomatoes and crisp cucumbers. I watched closely as she tossed in extra olive oil and sprinkled fresh herbs with a deft hand. Eating it was a joyful experience that lingered long after our lunch. This Greek Cucumber Tomato Feta Salad captures that nostalgia, those warm moments spent around a table filled with love and laughter.
Let’s get started on this delicious, feel-good salad!
Ingredients
Here’s what you’ll need for this refreshing salad:
-
1 cup cherry tomatoes, halved
Sweet and juicy cherry tomatoes are the star of this dish! Their size makes them perfect for popping into your mouth. You can also use grape tomatoes for a similar burst of flavor. If you want something more substantial, diced large tomatoes work just as well. -
1 cucumber, diced
Crisp and refreshing, cucumbers add a crunchy texture. Look for English cucumbers—they’re mild and have fewer seeds. If you prefer, you can swap them for Persian cucumbers or even some diced bell peppers for a sweet crunch. -
1 cup feta cheese, crumbled
Ah, feta! This tangy cheese is what turns a simple salad into a flavor-packed dish. If you’re dairy-free, try using vegan feta or a crumbly tofu seasoned with lemon and spices for a similar taste. -
2 tablespoons olive oil
Olive oil not only brings the ingredients together, but it also adds a rich flavor. Extra virgin olive oil is your best bet for its fruity notes. If you don’t have olive oil, avocado oil or a light vegetable oil works too. -
1 tablespoon red wine vinegar
The acidity from red wine vinegar brightens the salad and enhances the flavors. You could swap it for lemon juice or balsamic vinegar for a different tang. -
Salt and pepper to taste
Never underestimate the power of seasoning! A pinch of salt and pepper elevates every ingredient. For an added twist, try smoked salt! -
Fresh parsley or oregano for garnish (optional)
Fresh herbs add a beautiful finish and extra flavor. If you don’t have parsley, dill or basil also makes a great garnish.
Step-by-Step Instructions
Now, let’s make this salad in a few simple steps. We’ll keep it straightforward, so you can enjoy the cooking process as much as the eating!
-
Prepare the Ingredients
Start by gathering all your ingredients. Freshness is key, so make sure to pick ripe tomatoes and crispy cucumbers. Don’t forget to wash them well! A quick rinse under cold water goes a long way. -
Chop the Cherry Tomatoes
Slice each cherry tomato in half. This is where the magic begins! Enjoy the burst of juices as you cut into them. If you like, you can also remove the seeds for a less watery salad, although I’m all about maximizing flavor! -
Dice the Cucumber
Cut your cucumber into bite-sized pieces. I prefer skin-on for added nutrients and crunch, but peeling it is also an option if that’s your style. Make sure the pieces are of uniform size—this ensures even distribution of flavors in every bite! -
Crumble the Feta
In a medium bowl, crumble your feta cheese. If it’s block feta, use your fingers or a fork to break it into small chunks. Be generous with this—who doesn’t love extra cheese? -
Drizzle Olive Oil and Red Wine Vinegar
Add the olive oil and red wine vinegar to the bowl with tomatoes, cucumber, and feta. This is where the flavors start melding together beautifully! Feel free to adjust the amounts based on your preference; just remember that the acidity is vital for brightening up the salad. -
Season with Salt and Pepper
It’s time to season! Sprinkle salt and freshly cracked black pepper. Remember, it’s easier to add more later, so start small and enhance to your liking. -
Gently Toss Everything Together
Carefully mix everything with a spatula to ensure all the ingredients are coated in the dressing. You don’t want to over-mix, or the feta will crumble and lose its texture. Aim for a light mix—just enough to unite the flavors. -
Garnish and Serve
Finish your salad with chopped parsley or oregano. Serving it right away lets you enjoy the freshest flavors. But if you’re meal prepping, this salad keeps well in the fridge for up to 24 hours—the flavors get better with time!
Serving Suggestions
When it comes to plating your Greek Cucumber Tomato Feta Salad, simplicity is key! I love using a beautiful white bowl to make the colors pop. You can serve it on its own as a light lunch or as a side dish to grilled chicken, fish, or even a hearty pita wrap. For a fancy touch, drizzle a bit of extra olive oil on top and add a few extra herbs as garnish.
Recipe Variations
Feel free to give this salad your own spin! Here are a few variations to consider:
-
Mediterranean Additions: Toss in kalamata olives or artichoke hearts for an authentic Mediterranean flavor.
-
Protein Power: Add grilled chicken, shrimp, or chickpeas to turn this salad into a complete meal.
-
Grain Boost: Serve the salad over a bed of quinoa or farro for added texture and nutrition.
-
Spice It Up: A pinch of red pepper flakes can add a kick of heat that balances the creamy feta and sweet tomatoes.
-
Herbed Twist: Replace parsley or oregano with fresh mint for an aromatic flavor that sings of summer!
Chef’s Notes
This Greek Cucumber Tomato Feta Salad has been a favorite in my kitchen for years and has evolved over time. I remember experimenting with different herbs, and it wasn’t until a friend suggested adding mint that I discovered an entirely new dimension of flavor. Plus, the simplicity of the dish means you can customize it based on what’s in season or whatever you have in your fridge—no stress, just creativity!
One time, I decided to make this salad during a dinner party—only to realize I had run out of feta! In the spirit of improvisation, I crumbled some goat cheese instead, and let me tell you, a new tradition was born! Keep this in mind; cooking doesn’t have to go perfectly. Sometimes, the best dishes come from unexpected swaps!
FAQs and Troubleshooting
1. Can I make this salad ahead of time?
Absolutely! Just keep in mind that it’s best eaten fresh. However, if you make it a few hours ahead, it will still taste great. Just wait to add salt until you’re ready to serve, as it can draw moisture from the cucumbers.
2. What if I don’t have red wine vinegar?
No worries! You can easily swap it for white wine vinegar or fresh lemon juice, both of which will add that necessary acidity to the salad.
3. How do I store leftovers?
Store any leftovers in an airtight container in the fridge. It should remain fresh for up to 24 hours. After that, you may find some of the ingredients start to lose their crunch and crispness.
4. Can I add a sweet element?
Absolutely! A handful of pitted olives or even a few halved strawberries will add a sweet contrast to the salty feta and tangy dressing.
Nutritional Info
While I love focusing on fresh ingredients, here’s a quick note on the nutritional benefits: This salad is packed with vitamins A and C from the veggies, healthy fats from the olive oil, and protein from the feta cheese. It’s a great option for a nutrient balance in your diet!
If you’re as excited about this Greek Cucumber Tomato Feta Salad as I am, I hope you’ll whip it up soon! Every bite is a reminder that fresh, wholesome food can be quick, easy, and totally satisfying! Let me know how it turns out and any personal touches you add; I’d love to hear your stories too! Happy cooking!
PrintRefreshing Greek Cucumber Tomato Feta Salad
A vibrant salad celebrating fresh ingredients, perfect for summer.
- Prep Time: 15 minutes
- Cook Time: 0 minutes
- Total Time: 15 minutes
- Yield: 4 servings 1x
- Category: Salad
- Method: No-Cook
- Cuisine: Greek
- Diet: Vegetarian
Ingredients
- 1 cup cherry tomatoes, halved
- 1 cucumber, diced
- 1 cup feta cheese, crumbled
- 2 tablespoons olive oil
- 1 tablespoon red wine vinegar
- Salt and pepper to taste
- Fresh parsley or oregano for garnish (optional)
Instructions
- Prepare the ingredients by gathering everything and washing it well.
- Chop the cherry tomatoes in half to release their juices.
- Dice the cucumber into bite-sized pieces for texture.
- Crumble the feta cheese into small chunks in a medium bowl.
- Drizzle olive oil and red wine vinegar over the vegetables.
- Season with salt and freshly cracked black pepper.
- Gently toss everything together to combine the flavors.
- Garnish with parsley or oregano before serving.
Notes
Best enjoyed fresh but can be stored in the fridge for up to 24 hours.
Nutrition
- Serving Size: 1 serving
- Calories: 210
- Sugar: 4g
- Sodium: 500mg
- Fat: 16g
- Saturated Fat: 5g
- Unsaturated Fat: 10g
- Trans Fat: 0g
- Carbohydrates: 9g
- Fiber: 2g
- Protein: 6g
- Cholesterol: 20mg
Keywords: Greek Salad, Cucumber Salad, Summer Recipe
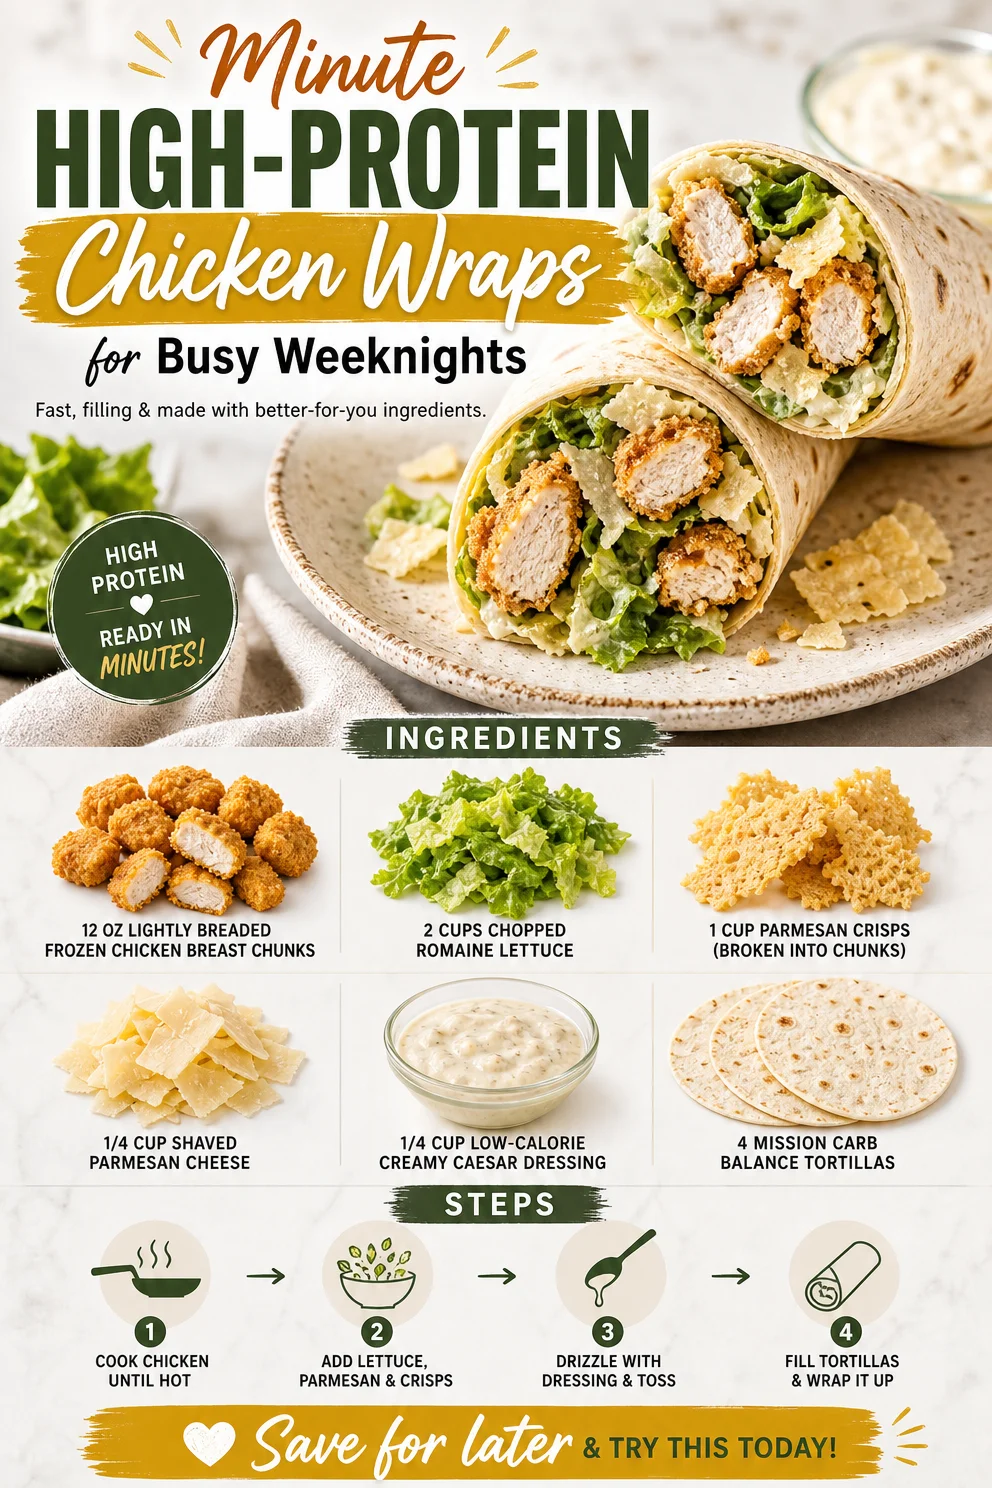
Minute High-Protein Chicken Wraps for Busy Weeknights
High Protein Chicken Wraps: A Delicious Twist on Healthy Eating
Welcome to another tasty adventure in the kitchen at Clean Plate Cravings! Today, we’re whipping up something that’s not just easy to make, but also packed with protein and flavor—High Protein Chicken Wraps! These wraps are the perfect meal for anyone looking to enjoy a fulfilling, healthful dish without sacrificing taste. They’re great for lunch, dinner, or even a snack, and you’ll love how simple it is to bring them to life with just a few ingredients.
Now, let’s take a moment to break down why these wraps are a game changer. First off, they’re quick to assemble, which is perfect for those of us who lead busy lives (let’s be honest, we’re all there sometimes!). With lightly breaded frozen chicken breast chunks as the star of the show, these wraps pack a protein punch that’ll keep you feeling satisfied for hours. Plus, let’s not forget the fresh and crunchy romaine lettuce, savory Parmesan crisps, and the creamy, dreamy Caesar dressing that ties it all together.
As a chef, I believe that food is not just about nourishment; it’s about joy, creativity, and connecting with the people you love. The vibrant flavors in these wraps make them perfect for any gathering—whether you’re meal prepping for the week or hosting friends for a cozy night in. So roll up your sleeves, grab your favorite cutting board, and let’s dive into this delicious recipe!
A Journey Down Memory Lane
Let me take you back to a summer afternoon when I was a teenager, back when my love affair with food blossomed. My best friend, Lily, and I decided to have a “wrap-off” after seeing a food truck festival in town. We invited a group of friends, each tasked with creating the best wrap using whatever ingredients we could find in our kitchens.
Lily brought an assortment of ingredients she had from baking experiments gone wild, while I opted for a simple approach with grilled chicken, fresh veggies, and a tangy sauce. As we all gathered around the table, taste-testing one another’s creations and laughing until our bellies hurt, I realized then how powerful food could be—not just as a source of nourishment but as a catalyst for connection.
Years later, I’m still drawn to wraps, and now I’ve elevated them into these High Protein Chicken Wraps, perfect for any occasion. They bring me back to that vibrant summer day, and I hope they can do the same for you!
Ingredients
Here’s what you’ll need for these yummy High Protein Chicken Wraps:
-
12 oz lightly breaded frozen chicken breast chunks
- Chef Insight: These provide a convenient and crunchy protein base. You can swap them for grilled chicken strips or even some spicy fried tofu if you’re looking for plant-based protein!
-
2 cups chopped romaine lettuce
- Substitution Tip: Any leafy green works here! Spinach or kale will add a bit of a different flavor profile and can sneak in more nutrients.
-
1 cup Parmesan crisps (broken into chunks)
- Substitution Tip: If you’re looking for extra crunch, feel free to swap in other crispy elements like crushed tortilla chips or baked pita chips.
-
1/4 cup shaved Parmesan cheese
- Chef Insight: This adds a creamy, cheesy depth. Nutritional yeast can be a great vegan substitute if you’re looking to cut out dairy.
-
1/4 cup low-calorie creamy Caesar dressing
- Tip: Experiment with different dressings like ranch or a balsamic vinaigrette if you’re feeling adventurous.
-
4 Mission Carb Balance tortillas
- Substitution Tip: Try gluten-free wraps or lettuce leaves for a low-carb alternative.
Step-by-Step Instructions
Let’s get cooking! These wraps can come together in under 30 minutes if you have your ingredients prepped. Here’s how to make these delicious wraps:
-
Cook the Chicken
- Start by preheating your oven according to the instructions on the frozen chicken packaging. Spread the chicken chunks out on a baking sheet in an even layer. Bake until they are golden and crispy, usually around 15 minutes.
- Chef’s Tip: To ensure the crispiest results, flip the chicken halfway through cooking. The last 5 minutes can also be a great time to set your oven to broil to get that extra crunch!
-
Prep the Veggies
- While your chicken is baking, go ahead and chop those romaine lettuce leaves. The crunch from the lettuce is what brings life to the wraps, so don’t skimp on this step!
- Pro Tip: You can also toss the chopped lettuce with a splash of lemon juice or a dash of salt to enhance its flavor while you wait!
-
Assemble the Wraps
- Once the chicken is crispy and your lettuce is prepped, it’s time to build your masterpiece. Lay out a tortilla on a clean, flat surface.
- Begin layering by placing handfuls of chopped romaine, followed by the chicken chunks.
- Add the Parmesan crisps and sprinkle on the shaved Parmesan cheese. Drizzle with the creamy Caesar dressing to your liking.
- Chef Hack: If you want to avoid messy wraps, don’t overstuff them! About a cup of chicken and greens is usually a good starting point.
-
Wrap It Up!
- Fold in the sides of the tortilla and then roll it up tightly from the bottom to the top. Voila! You’ve created a wrap that’s ready to go.
- Pro Tip: If wrapping is tricky, you can also cut the tortilla’s edges to create a better folding experience.
-
Slice and Serve
- For a nice presentation, slice your wrap in half diagonally and lay it on a plate with the cut side facing upwards, showing off all those glorious layers.
- Serving Suggestion: Serve with some extra dressing for dipping and a few extra Parmesan crisps on the side for crunch!
Recipe Variations
Feeling adventurous? Here are some fun twists you can try with this recipe:
-
Buffalo Chicken Wrap: Swap the Caesar dressing for buffalo sauce and add some crumbled blue cheese to give it a spicy kick.
-
Mediterranean Twist: Use feta cheese instead of Parmesan, add diced cucumbers, cherry tomatoes, and a drizzle of tzatziki for a refreshing touch.
-
Southwest Style: Incorporate corn, black beans, avocado, and some sprinkle of taco seasoning for a fiesta in every bite.
-
Vegan Option: Replace chicken with crispy chickpeas and use a vegan Caesar or tahini dressing for a plant-based delight!
-
Breakfast Wrap: Use scrambled eggs instead of chicken, add diced tomatoes, spinach, and a sprinkle of cheese for a hearty morning meal.
Chef’s Notes
This recipe has a special place in my heart, and it’s seen some evolution over the years. Initially, I made it with whatever leftovers I and my family had in the fridge, but I’ve tailored it to keep the flavors balanced and satisfying. Experimenting with different dressings and textures over time has taught me a few things about wraps—each fold holds a story, and every bite is a chance for creativity!
I also remember the disastrous time I tried to showcase my “chef-ness” by making a wrap for a picnic only to realize I’d forgotten to put any dressing on it! Cue dry chicken and sad lettuce. Now, I always ensure to add that creamy touch; it truly makes a huge difference!
FAQs and Troubleshooting
-
Q: Can I make these wraps ahead of time?
- A: Absolutely! Just keep the wraps tightly wrapped in foil or plastic wrap in the fridge for up to 2 days. They may lose some crispiness, but they’ll still be tasty!
-
Q: What can I do if my chicken is undercooked?
- A: Make sure to cook the chicken according to package directions. If it’s undercooked, pop it back into the oven until it’s heated all the way through—better safe than sorry!
-
Q: How can I prevent my wraps from getting soggy?
- A: To avoid soggy wraps, make sure to keep the dressing on the side until you’re ready to eat. You can also use thicker spreads or hummus as a base to prevent moisture.
-
Q: Can I freeze the wraps?
- A: Yes! Wrap them tightly in foil or plastic before freezing. Just remember to let them thaw in the fridge overnight before enjoying them.
Nutritional Info (Optional)
While nutritional content will vary based on specific ingredient brands used, here’s a rough estimate per wrap:
- Calories: 350
- Protein: 30g
- Carbohydrates: 30g
- Fat: 15g
Enjoy the process, and remember to keep it fresh, healthy, and full of flavor. Happy cooking, friends!
PrintHigh Protein Chicken Wraps
A delicious and healthy chicken wrap packed with protein, fresh veggies, and creamy Caesar dressing.
- Prep Time: 15 minutes
- Cook Time: 15 minutes
- Total Time: 30 minutes
- Yield: 4 servings 1x
- Category: Main Course
- Method: Baking
- Cuisine: American
- Diet: High Protein
Ingredients
- 12 oz lightly breaded frozen chicken breast chunks
- 2 cups chopped romaine lettuce
- 1 cup Parmesan crisps (broken into chunks)
- 1/4 cup shaved Parmesan cheese
- 1/4 cup low-calorie creamy Caesar dressing
- 4 Mission Carb Balance tortillas
Instructions
- Preheat your oven according to the instructions on the frozen chicken packaging. Spread the chicken chunks out on a baking sheet in an even layer. Bake until they are golden and crispy, usually around 15 minutes.
- Chop the romaine lettuce leaves while the chicken is baking.
- Layer a tortilla on a clean, flat surface. Place chopped romaine, chicken chunks, Parmesan crisps, and shaved Parmesan cheese. Drizzle with Caesar dressing.
- Fold in the sides of the tortilla and roll it up tightly from the bottom to the top.
- Slice the wrap in half diagonally and serve with extra dressing for dipping.
Notes
Wraps can be made ahead of time; keep them tightly wrapped in the fridge for up to 2 days. To avoid sogginess, keep dressing on the side until ready to eat.
Nutrition
- Serving Size: 1 wrap
- Calories: 350
- Sugar: 3g
- Sodium: 700mg
- Fat: 15g
- Saturated Fat: 5g
- Unsaturated Fat: 8g
- Trans Fat: 0g
- Carbohydrates: 30g
- Fiber: 4g
- Protein: 30g
- Cholesterol: 40mg
Keywords: chicken wraps, high protein, healthy recipe, quick meal, easy dinner

Minute One-Serving Cottage Cheese Pancake (High-Protein)
Easy Cottage Cheese Pancake for One
Welcome to Clean Plate Cravings! Today, we’re diving into something so simple yet oh-so-delicious: the Easy Cottage Cheese Pancake for One. If you’re like me and love breakfast that feels more like a hug than a chore, this dish is about to become your go-to. With just a handful of wholesome ingredients, you can whip up a fluffy pancake that’s packed with protein and flavor, satisfying both your morning cravings and your health goals. So, grab your mixing bowl and let’s get cooking!
A Fluffy Memory
I remember the first time I stumbled upon cottage cheese pancakes. I was in college, loaded with textbooks and energy drinks, trying to juggle classes and my part-time job. Cooking was often a hurried affair in my tiny kitchen, with little time for elaborate meals. One morning, rummaging through the fridge, I found a tub of cottage cheese that was about to expire. “Why not?” I thought. I mixed it up with some oats and an egg and threw it onto a hot skillet. The aroma that filled my kitchen was so enticing that I couldn’t help but take a moment to savor it. The first bite was a revelation! Fluffy, satisfying, and utterly delicious, these pancakes quickly became a staple in my breakfast rotation. They were budget-friendly, fueled my busy days, and even made me feel like a chef in my small little space. They’ve been a cherished part of my mornings ever since, and I’m thrilled to share this delight with you!
Ingredients
-
1/2 cup cottage cheese
A creamy base that adds protein and moisture to your pancakes. If you’re not a fan of cottage cheese, Greek yogurt can be a great substitute for a similar texture. -
1/2 cup oats
Rolled oats give these pancakes a hearty bite. For a gluten-free option, use certified gluten-free oats. If you’re looking for something different, you can blend the oats into oat flour for a smoother texture. -
1 egg
The egg binds everything together and adds richness. You can replace it with a flax egg (1 tablespoon ground flaxseed mixed with 2.5 tablespoons of water) for a vegan version. -
1/4 teaspoon baking powder
This little powerhouse helps your pancakes rise, making them light and fluffy. Don’t skip this step—it’s essential for the perfect pancake! -
Salt to taste
A pinch of salt enhances the flavors. Feel free to add a dash of cinnamon if you want to bring a warm spice element to your pancakes. -
Butter or oil for cooking
Whether you choose butter for that rich flavor or a bit of coconut oil for a subtle sweetness, both options work beautifully. Just make sure the skillet is hot enough so they don’t stick!
Step-by-Step Instructions
-
Mix the Batter
In a mixing bowl, combine the cottage cheese, oats, egg, baking powder, and salt. Use a fork to mash the cottage cheese slightly, blending all the ingredients together. You want everything to come together nicely, but it’s okay if the mixture isn’t completely smooth. Chef’s Tip: Don’t overmix; a few lumps are perfectly fine and will add to the texture of your pancake! -
Heat the Skillet
Place a non-stick skillet or frying pan over medium heat and add butter or oil as it heats up. Chef Hack: To test if your skillet is hot enough, sprinkle a few drops of water on the surface. If they sizzle and evaporate immediately, you’re ready to go! -
Cook the Pancake
Pour half of your batter into the skillet, using a spatula to gently spread it into a round shape. Cook for 2-3 minutes until the edges look set and you see bubbles forming on top. Chef Insight: If you find it hard to flip, let it cook a bit longer! Patience is key for the fluffiest pancake. -
Flip and Finish
Carefully flip the pancake using a spatula and cook for another 1-2 minutes on the other side until golden brown. It should feel springy to the touch! Repeat the process with the remaining batter. -
Serve
Once cooked, transfer your pancake(s) onto a plate and stack them high for an impressive presentation. Pro Tip: Top with fresh fruit, maple syrup, or a dollop of yogurt for added deliciousness!
Serving Suggestions
When it comes to serving your Easy Cottage Cheese Pancake, the sky’s the limit! I love topping mine with a mix of fresh blueberries and a drizzle of honey. You could also try a sprinkle of nuts for crunch or a dusting of powdered sugar for a sweet touch. Feel free to get creative—this pancake is a blank canvas waiting for your culinary artistry!
Recipe Variations
- Savory Twist: Add herbs and cheese (like feta or cheddar) to the batter for a savory pancake perfect for brunch.
- Sweet Surprise: Mix in a mashed banana or a splash of vanilla extract for a hint of sweetness.
- Spiced Up: Add a dash of cinnamon or nutmeg to the batter to warm up those flavors.
- Pumpkin Spice: Use canned pumpkin puree in place of some of the cottage cheese for a seasonal touch.
- Chocolate Lovers: Fold in some dark chocolate chips while cooking for a special treat.
Chef’s Notes
These cottage cheese pancakes have been a kitchen staple for years! I can’t even count how many variations I’ve tried—some were epic fails, like the time I accidentally used expired cottage cheese (yikes!). But even those mishaps taught me to embrace the kitchen adventure. What I love most about these pancakes is their versatility; they adapt beautifully to whatever ingredients you have on hand. So don’t hesitate to experiment and make this recipe your own!
FAQs and Troubleshooting
-
Why are my pancakes sticking to the pan?
Make sure your skillet is adequately greased and hot before you pour in the batter. If you’re using a cast-iron skillet, preheat it well and season it properly for the best results. -
My pancakes are too dense. What did I do wrong?
This could be due to overmixing the batter or not enough baking powder. Give it a little stir, ensuring a few lumps remain, and check your baking powder’s freshness! -
Can I make the batter ahead of time?
Yes! You can prep it the night before and store it in the fridge. Just give it a quick stir before cooking to reintegrate everything. -
How can I make these pancakes sweeter?
If you prefer a sweeter pancake, add a tablespoon of honey or maple syrup to the batter, or top with your favorite syrup or sweet spread.
Nutritional Info
This Easy Cottage Cheese Pancake is not only delicious but also packed with nutrients! Depending on specific brands and measurements, one pancake contains approximately:
- Calories: 200
- Protein: 15g
- Carbohydrates: 20g
- Fat: 7g
- Fiber: 3g
Conclusion
There you have it! A delightful, easy recipe for Cottage Cheese Pancakes that’s perfect for a quick breakfast or a leisurely brunch. With every bite, you’ll experience a blend of hearty oats and creamy cottage cheese, making your mornings that much brighter. So why wait? Gather your ingredients and treat yourself to a delicious pancake experience today. Happy cooking, and let’s keep it fresh, simple, and seriously delicious!
PrintEasy Cottage Cheese Pancake for One

A fluffy and protein-packed pancake made with cottage cheese and oats, perfect for a quick breakfast.
- Prep Time: 5 minutes
- Cook Time: 5 minutes
- Total Time: 10 minutes
- Yield: 1 serving 1x
- Category: Breakfast
- Method: Cooking
- Cuisine: American
- Diet: Vegetarian
Ingredients
- 1/2 cup cottage cheese
- 1/2 cup oats
- 1 egg
- 1/4 teaspoon baking powder
- Salt to taste
- Butter or oil for cooking
Instructions
- Mix the Batter: In a mixing bowl, combine the cottage cheese, oats, egg, baking powder, and salt. Use a fork to mash the cottage cheese slightly, blending all the ingredients together.
- Heat the Skillet: Place a non-stick skillet over medium heat and add butter or oil as it heats up.
- Cook the Pancake: Pour half of your batter into the skillet and gently spread it into a round shape. Cook for 2-3 minutes until the edges look set and bubbles form on top.
- Flip and Finish: Carefully flip the pancake and cook for another 1-2 minutes until golden brown. Repeat with the remaining batter.
- Serve: Transfer your pancake(s) onto a plate and stack them high. Top with fresh fruit, syrup, or yogurt.
Notes
Feel free to experiment with different toppings and mix-ins for a personalized pancake experience.
Nutrition
- Serving Size: 1 pancake
- Calories: 200
- Sugar: 3g
- Sodium: 200mg
- Fat: 7g
- Saturated Fat: 2g
- Unsaturated Fat: 5g
- Trans Fat: 0g
- Carbohydrates: 20g
- Fiber: 3g
- Protein: 15g
- Cholesterol: 130mg
Keywords: pancakes, cottage cheese, breakfast, easy recipe, healthy pancakes
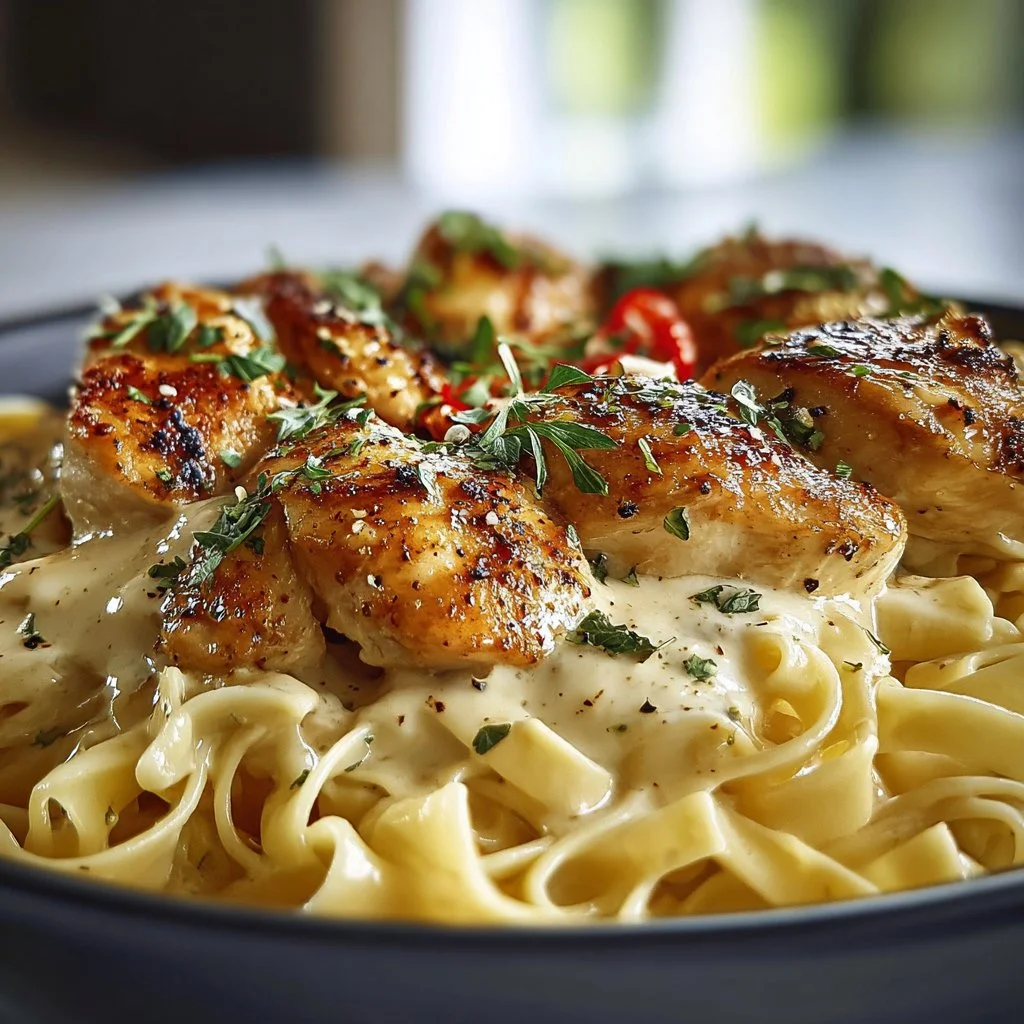
One-Pan Chicken with Buttered Noodles
One-Pan Chicken with Buttered Noodles: A Comforting Classic
Welcome to another delicious adventure here at Clean Plate Cravings! Today, we’re diving into a dish that’s not only comforting but also incredibly simple to whip up on busy weeknights: One-Pan Chicken with Buttered Noodles. This dish is the definition of cozy, packing in all those warm flavors that remind you of home-cooked meals shared with loved ones. So grab your apron, and let’s get cooking together!
A Touch of Nostalgia
Growing up, my family had a tradition of Sunday dinners that brought us all together. The kitchen would fill with the sound of laughter, the aromas of simmering garlic and tasty sauces, and the unmistakable rhythm of pots and pans clinking. One of those memorable meals was a chicken and pasta dish that my mom made, and I can still remember the way the egg noodles twirled around my fork, perfectly coated in creamy goodness with those beautifully seared chicken breasts.
There was something magical about cooking together during those Sunday afternoons. As Mom would sauté the chicken, I was usually perched on a stool, eager to help, because that meant I got to add the garlic—the official starter to any flavor explosion, right? Little did I know how much that kitchen experience would later shape my love for cooking and sharing recipes. Today, looking back, it’s not just about the food; it’s about those moments spent with family, and that’s precisely the spirit I want to convey in my own kitchen today. Let’s make a comforting dish that’s flavorful, hearty, and destined to create its own warm memories in your home!
Ingredients
Here’s the lineup of ingredients you’ll need for our One-Pan Chicken with Buttered Noodles:
-
4 boneless, skinless chicken breasts (1.5 lbs)
These are the stars of the show! You can also use thighs if you prefer darker meat. Just remember, cooking times might differ slightly. -
8 oz egg noodles
Egg noodles are perfect because they soak up the chicken broth well. If you’re feeling adventurous, switch them out for whole-grain or gluten-free pasta! -
4 tbsp real butter
Butter adds that lovely richness. If you’d like a lighter option, coconut oil can be a wonderful substitute. -
4 cloves garlic, minced
Garlic is a flavor powerhouse! You can use garlic powder in a pinch, but nothing beats fresh garlic. -
2 cups low-sodium chicken broth
This builds the base of our sauce. Low-sodium keeps things under control salt-wise, but homemade broth is even better if you have it on hand! -
¼ cup fresh parsley, chopped
Fresh parsley adds color and freshness. Don’t have fresh? You can use dried, but half the amount is all you need. -
Salt and pepper to taste
These are your flavor friends—don’t be shy to taste as you go!
Step-by-Step Instructions
Alright, let’s roll up our sleeves and get cooking!
-
Prep the chicken:
Start by seasoning the chicken breasts generously with salt and pepper. This isn’t just a sprinkle; you want a nice coating that will enhance the flavor when we sear them. Take this moment to channel your inner chef—give those breasts a little pat to make sure the seasoning sticks! -
Sear the chicken:
In a large skillet (trust me, you’ll love this one-pan business), melt 2 tablespoons of butter over medium heat. Once it’s bubbly, add your seasoned chicken breasts. Sear them for about 5-6 minutes on each side until they form that golden-brown crust. This is where the flavor explosion begins! If the chicken is sticking, give it a few more moments—patience is key. -
Add the garlic:
When the chicken is beautifully browned, throw in the minced garlic. Stir it around for about 30 seconds until it’s fragrant. Keep an eye on it to avoid burning; this is a common rookie mistake (trust me!). -
Pour in the broth:
Now it’s time to add the chicken broth to the same skillet. Gently scrape the bottom of the pan with a wooden spoon to release those flavorful brown bits (they’re called fond, and they add an incredible taste!). Bring the broth to a simmer, and then nestle the chicken back into the skillet. -
Cook the noodles:
Once the broth is simmering, add in the egg noodles. Cover the skillet and let everything cook for about 10 minutes, stirring occasionally until the noodles are al dente and the chicken is cooked through. This is that moment where magic happens—everything melds into one deliciously cohesive dish. -
Finishing touches:
Once the noodles are tender, remove the skillet from heat. Take out the chicken breasts and let them rest on a plate. This is crucial because resting allows the juices to redistribute, resulting in succulent chicken. Add the remaining butter and chopped parsley to the noodles and give them a good toss. -
Slice and serve:
Slice the chicken breasts into medallions and arrange them over the buttery noodles. Sprinkle with extra parsley for a pop of color.
Serving Suggestions
To plate this delightful dish, use a large serving bowl or individual plates for a more elegant touch. Gather the buttery noodles in the center, artfully lay the sliced chicken on top, and finish with a sprinkle of fresh parsley. Want to impress? Add a drizzle of olive oil or a squeeze of lemon for a fresh zing!
Recipe Variations
-
Herb-Infused Chicken:
Marinate the chicken in a mixture of olive oil and your favorite herbs like thyme or rosemary before searing for deeper flavor. -
Veggie Booster:
Toss in some spinach, peas, or cherry tomatoes along with the noodles to amp up the nutritional value and color! -
Creamy Twist:
For a creamier sauce, stir in a splash of heavy cream towards the end of cooking. It creates a luscious, restaurant-style finish. -
Add Heat:
Sprinkle in some red pepper flakes while cooking for an added kick that brings the dish to life! -
Cheesy Delight:
Top the dish with freshly grated Parmesan or Pecorino cheese before serving for an extra indulgent experience.
Chef’s Notes
This recipe has become one of my go-to comfort meals over the years. I remember my first attempt; I was so excited that I forgot to season the chicken, and it turned out bland! Lesson learned: seasoning is your best friend. Over the years, this recipe has evolved from being just a quick fix for my family into a crowd-pleaser among friends and a staple in my cooking repertoire. It never fails to ignite discussions and nostalgia, just like the heartfelt Sunday dinners of my childhood.
FAQs and Troubleshooting
-
What if my chicken is dry?
If your chicken is overcooked, next time, try using a meat thermometer to check for doneness—it should reach 165°F (75°C). Also, consider letting it rest before slicing. -
Why are my noodles sticky?
Make sure you stir the noodles occasionally while they cook. Additionally, adding enough liquid is essential, so ensure you don’t skimp on the broth! -
Can I make this dish ahead of time?
While it’s best served fresh, you can certainly prep the chicken and garlic in advance. Just put everything together shortly before mealtime for best results. -
My sauce is too thin. How can I thicken it?
If you prefer a thicker sauce, you can mix a teaspoon of cornstarch with cold water and stir it in while simmering. Let it cook for a few more minutes to thicken!
Nutritional Info (Optional)
While specific nutritional content can vary based on ingredient brands and portions, a serving of this One-Pan Chicken with Buttered Noodles is generally around 450 calories, with 30 grams of protein, 20 grams of carbs, and 25 grams of fat.
This One-Pan Chicken with Buttered Noodles is more than just a meal—it’s a celebration of simple ingredients and cherished memories. I hope this recipe brings a smile to your face, fills your kitchen with delightful scents, and more importantly, ignites your passion for cooking. So gather your loved ones and dig into this simple yet satisfying dish. Happy cooking!
PrintOne-Pan Chicken with Buttered Noodles
A comforting dish of juicy chicken and buttery egg noodles, perfect for busy weeknights.
- Prep Time: 10 minutes
- Cook Time: 20 minutes
- Total Time: 30 minutes
- Yield: 4 servings 1x
- Category: Main Course
- Method: Stovetop
- Cuisine: American
- Diet: Gluten-Free, Dairy-Free upon substitution
Ingredients
- 4 boneless, skinless chicken breasts (1.5 lbs)
- 8 oz egg noodles
- 4 tbsp real butter
- 4 cloves garlic, minced
- 2 cups low-sodium chicken broth
- ¼ cup fresh parsley, chopped
- Salt and pepper to taste
Instructions
- Prep the chicken: Season the chicken breasts generously with salt and pepper.
- Sear the chicken: In a large skillet, melt 2 tablespoons of butter over medium heat and sear the chicken for about 5-6 minutes on each side.
- Add the garlic: Throw in the minced garlic and stir it around for about 30 seconds until fragrant.
- Pour in the broth: Add the chicken broth, scraping the bottom of the pan, and bring to a simmer.
- Cook the noodles: Add in the egg noodles, cover, and cook for about 10 minutes until the noodles are al dente and the chicken is cooked through.
- Finishing touches: Remove the skillet from heat, let the chicken rest, and stir the remaining butter and parsley into the noodles.
- Slice and serve: Slice the chicken and arrange over the noodles, garnishing with extra parsley.
Notes
For a creamier sauce, stir in a splash of heavy cream before serving. Adjust seasoning to taste.
Nutrition
- Serving Size: 1 serving
- Calories: 450
- Sugar: 2g
- Sodium: 350mg
- Fat: 25g
- Saturated Fat: 10g
- Unsaturated Fat: 12g
- Trans Fat: 0g
- Carbohydrates: 30g
- Fiber: 2g
- Protein: 30g
- Cholesterol: 80mg
Keywords: chicken, pasta, quick meal, comfort food, one-pan dish