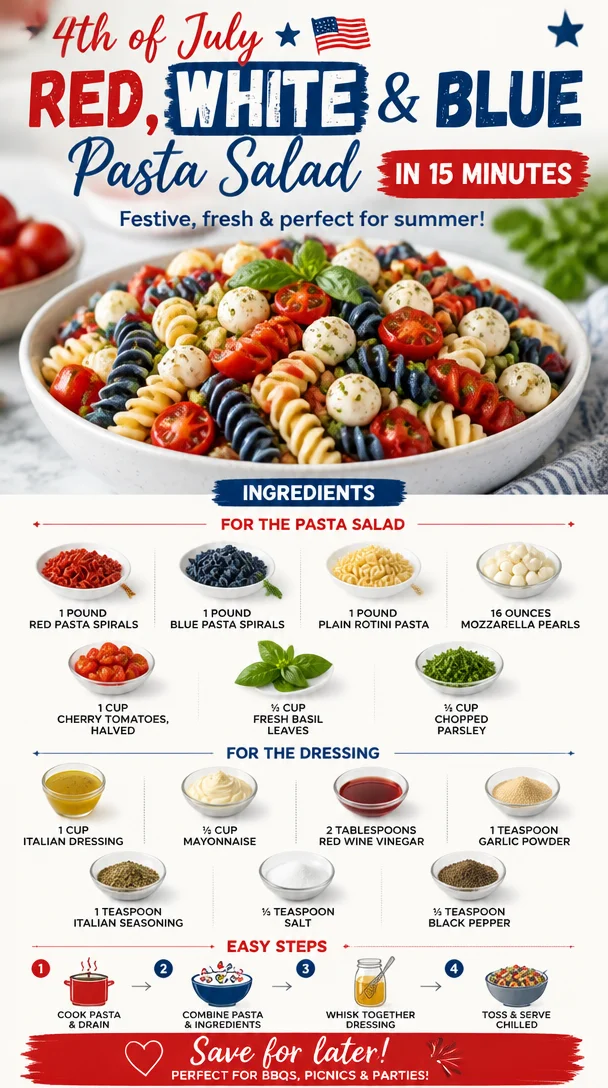
4th of July Red, White & Blue Pasta Salad in 15 Minutes
Red, White, and Blue Pasta Salad: A Celebration of Flavor and Fun
Hello, fellow foodies! Ava here, and I am beyond excited to share with you a dish that not only brings a pop of color to your table but also celebrates the freshness of summer in every bite. Get ready for my glorious Red, White, and Blue Pasta Salad that’s perfect for picnics, barbecues, or just because you deserve something delicious today!
This vibrant pasta salad captures the spirit of summer, combining the playful colors of fresh ingredients with a tangy dressing that will have everyone asking for seconds. The best part? It’s quick, easy, and absolutely instagrammable—your friends will be raving about it long after the last bite. So let’s dive in!
A Nostalgic Culinary Adventure
Whenever I think of the Red, White, and Blue Pasta Salad, I’m instantly transported to my childhood summers spent at family barbecues. Picture this: the sun shining, the smell of chargrilled burgers in the air, and a table overflowing with colorful dishes. I remember my aunt preparing her famous pasta salad, a family favorite that always seemed to disappear as quickly as she could make it.
While her version was a little more traditional, I’ve jazzed it up with a twist that makes it perfect for any occasion. I wanted to create something that reflects not just my love for cooking but also that sense of connection and joy that comes from sharing a meal. This pasta salad does just that—it’s full of vibrant flavors, nostalgic feelings, and a sprinkle of creativity. Plus, it’s super easy to whip up, so you can enjoy those sunny days without being stuck in the kitchen!
Ingredients You’ll Need
To make the magic happen, here’s what you’ll need for the Red, White, and Blue Pasta Salad:
For the Pasta Salad:
-
1 pound red pasta spirals
Perfect for adding that festive color and a slightly sweet flavor. If you can’t find red pasta, feel free to use regular rotini or a mix of other fun shapes. -
1 pound blue pasta spirals
These will add a pop of blue and uniqueness to your salad. They can be a little harder to find, but don’t fret! If you can’t source blue pasta, use regular pasta and throw in some blue cheese crumbles for a fun touch. -
1 pound plain rotini pasta
The base of your salad! Rotini holds onto the dressing beautifully, making every bite flavorful. -
16 ounces mozzarella pearls
Creamy and delightful, mozzarella pearls bring a mild flavor that balances out the tangy dressing. If you’re looking for a dairy-free option, try cashew cheese or omit entirely! -
1 cup cherry tomatoes, halved
Sweet and juicy, these little gems add a burst of flavor. Any fresh tomato variety will do—just keep that vibrant red color! -
½ cup fresh basil leaves
Basil adds a fragrant, herbaceous note. You can substitute with fresh parsley or even arugula if that’s what you have on hand! -
¼ cup chopped parsley
This not only adds flavor but also a nice contrast to the other ingredients. Don’t have fresh? Dried parsley will work in a pinch.
For the Dressing:
-
1 cup Italian dressing
A zesty base that pairs perfectly with the pasta. Feel free to make your own if you’re feeling adventurous! -
½ cup mayonnaise
For creaminess and richness; you can use Greek yogurt for a lighter, healthier twist without sacrificing taste. -
2 tablespoons red wine vinegar
This adds a tangy kick! Lemon juice is a great alternative if you want something a bit fresher. -
1 teaspoon garlic powder
A must for that extra flavor punch—fresh minced garlic works beautifully, too, if you want something more robust. -
1 teaspoon Italian seasoning
This blends all the flavors together. You can swap it out for any dried herbs you prefer, such as oregano or thyme. -
½ teaspoon salt
To enjoy the full flavor of your ingredients—always taste as you go! -
½ teaspoon black pepper
A basic seasoning that makes all the difference. Spice it up with red pepper flakes if you like a bit of heat!
Cooking Up a Storm: Step-by-Step Instructions
Step 1: Boil Your Pasta
Start by bringing a large pot of salted water to a boil. Add in your red, blue, and rotini pasta. Cook according to package instructions until al dente, usually around 8-10 minutes. Remember to stir occasionally to prevent sticking! A little tip: rinse the pasta in cold water after draining to stop the cooking process and cool it down for the salad.
Step 2: Prepare the Dressing
While the pasta is cooking, whisk together the Italian dressing, mayonnaise, red wine vinegar, garlic powder, Italian seasoning, salt, and black pepper in a large bowl. (Trust me, this dressing is where the magic happens!) Make sure to taste and adjust any flavors according to your preference. If you like it tangier, add more vinegar; for creaminess, throw in more mayo.
Step 3: Chop the Veggies
While waiting for the pasta, go ahead and halve the cherry tomatoes, chop the fresh basil, and parsley. Aim for sizes they’ll mix well with the pasta but not too small that they lose their identity—nobody wants mush in their salad!
Step 4: Combine Ingredients
Once the pasta is cooked and cooled, add it to the bowl with your dressing. Toss gently to coat. Then, add in the mozzarella pearls, cherry tomatoes, basil, and parsley. Mix everything nicely until everything is just combined.
Step 5: Chill and Serve
For the best flavor, cover the salad and let it chill in the fridge for at least 30 minutes before serving. This allows the flavors to meld beautifully, making every bite incredibly tasty! When ready to serve, give it a quick stir and adjust seasoning if needed.
Serving Suggestions
When it’s time to dig in, presentation is key! You can serve the pasta salad in a big, colorful bowl, garnished with extra basil leaves for that pop of green. Pair it with some grilled chicken or shrimp for a protein boost and a light drizzle of olive oil. For a fun twist, serve it in mason jars for individual portions—great for picnics!
Recipe Variations
Want to switch things up? Here are a few fun variations to experiment with:
- Add Protein: Toss in some cooked chicken, shrimp, or chickpeas for a more filling meal.
- Switch the Cheese: Try feta or goat cheese instead of mozzarella for a tangy flavor.
- Spice It Up: Add chopped jalapeños or a dash of hot sauce to give it a kick!
- Go Green: Mix in some spinach or arugula for added nutrients and color.
- Noodle-Free Option: Use zucchini noodles for a gluten-free, veggie-packed version.
Chef’s Notes
This pasta salad has really evolved over the years for me. What started as a simple family recipe quickly turned into an adventurous canvas! I’ve played with flavorings, tried various veggies, and even switched up the dressings. But the heart of this dish—color, freshness, and joy—remains the same. And I love how interactive it is; grab a friend or family member, and let’s whip this up together! Cooking is about the journey as much as it is the destination.
FAQs and Troubleshooting
1. Can I make this salad ahead of time?
Absolutely! This salad tastes even better the next day as it really allows the flavors to meld together. Just keep it covered in the fridge, and it should last 3-5 days.
2. What if the dressing is too thick?
If your dressing ends up too thick, simply whisk in a tablespoon or two of water or extra olive oil until you reach your desired consistency.
3. How can I keep my pasta from sticking together?
Make sure to rinse your pasta in cold water after cooking! This not only stops the cooking process but also reduces stickiness, giving you lovely, separate pasta spirals.
4. Can I use different types of pasta?
Absolutely! Feel free to mix and match your favorite pasta shapes—just make sure they cook evenly so everything blends beautifully!
Nutritional Info (Optional)
- Calories: Approximately 410 per serving (for a serving size of 1 cup)
- Protein: 12g
- Fat: 22g
- Carbohydrates: 40g
- Fiber: 2g
And there you have it—a colorful, delicious Red, White, and Blue Pasta Salad that is sure to impress your family and friends! Remember, the kitchen is a playground—have fun with your food and don’t be afraid to get creative. If you try this recipe, I’d love to hear how it turned out for you. Happy cooking, and enjoy every bite!
PrintRed, White, and Blue Pasta Salad
A vibrant pasta salad celebrating summer with colorful ingredients and a tangy dressing, perfect for picnics and barbecues.
- Prep Time: 15 minutes
- Cook Time: 10 minutes
- Total Time: 45 minutes
- Yield: 8 servings 1x
- Category: Salad
- Method: Mixing
- Cuisine: American
- Diet: Vegetarian
Ingredients
- 1 pound red pasta spirals
- 1 pound blue pasta spirals
- 1 pound plain rotini pasta
- 16 ounces mozzarella pearls
- 1 cup cherry tomatoes, halved
- ½ cup fresh basil leaves
- ¼ cup chopped parsley
- 1 cup Italian dressing
- ½ cup mayonnaise
- 2 tablespoons red wine vinegar
- 1 teaspoon garlic powder
- 1 teaspoon Italian seasoning
- ½ teaspoon salt
- ½ teaspoon black pepper
Instructions
- Boil your pasta by bringing a large pot of salted water to a boil. Add the red, blue, and rotini pasta. Cook until al dente, about 8-10 minutes. Rinse in cold water after draining.
- Prepare the dressing by whisking together the Italian dressing, mayonnaise, red wine vinegar, garlic powder, Italian seasoning, salt, and black pepper in a large bowl.
- Chop the cherry tomatoes, basil, and parsley while the pasta is cooking.
- Combine the cooked pasta with the dressing and toss gently to coat. Add mozzarella, cherry tomatoes, basil, and parsley, mixing until combined.
- Chill the salad in the fridge for at least 30 minutes before serving.
Notes
This salad improves in flavor the next day. Keep it covered in the fridge, and it should last 3-5 days.
Nutrition
- Serving Size: 1 serving
- Calories: 410
- Sugar: 3g
- Sodium: 600mg
- Fat: 22g
- Saturated Fat: 4g
- Unsaturated Fat: 14g
- Trans Fat: 0g
- Carbohydrates: 40g
- Fiber: 2g
- Protein: 12g
- Cholesterol: 15mg
Keywords: pasta salad, summer recipes, picnic food, vibrant colors, easy recipes
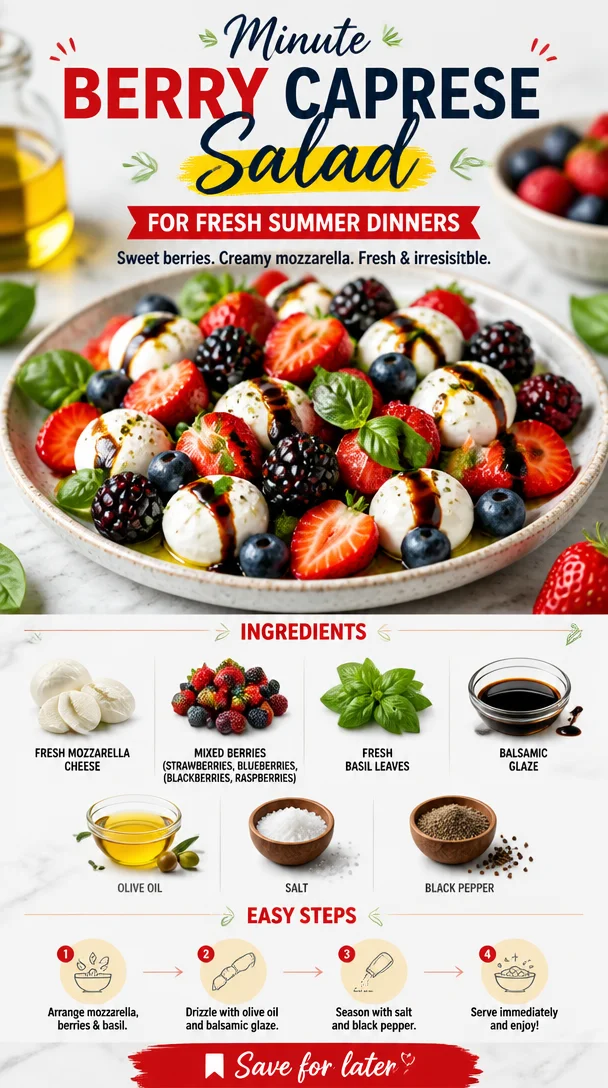
Minute Berry Caprese Salad for Fresh Summer Dinners
Berry Caprese Salad: A Fresh Take on a Classic
Welcome to another delicious day in my kitchen! Today, we’re whipping up a dish that will bring a smile to your face and a burst of flavor to your palate: Berry Caprese Salad. If you’re a fan of vibrant, playful salads that don’t just look good but taste incredible, then you’ve stumbled upon something special. Picture this: luscious, creamy mozzarella hugging juicy mixed berries, all wrapped up in the aromatic embrace of fresh basil. You’d be right to think that this sounds like a heavenly match, and trust me, it is!
What I love about this salad is that it perfectly straddles the line between indulgent and healthy. Each ingredient shines, and when they come together, it’s magic in a bowl. There’s something about the sweet-tart explosion from the berries paired with the smooth, mild mozzarella that creates a symphony of flavors. Whether you’re planning a fancy picnic, a backyard BBQ, or just looking for a quick and nutritious lunch, Berry Caprese Salad is here to elevate your meal.
Now, before we dive into the details, let me reminisce a bit and share how this delightful dish became a staple in my cuisine.
A Nostalgic Memory: The First Time I Made a Berry Caprese Salad
It was several summers ago when I first encountered the charm of a Berry Caprese Salad. I was hosting a backyard gathering, excited to impress my friends with my culinary creations. The idea of a traditional Caprese Salad was dancing around in my head, but I wanted to kick it up a notch, something fun and unexpected. As I strolled through the local farmer’s market, the ripe strawberries and vibrant blueberries called out to me. It struck me like a bolt of lightning! Why not combine the fresh berries with the classic Caprese elements?
So, with a basket of colorful produce, I headed home, eager to experiment. My friends were skeptical as I set the table—after all, the classic tomato and mozzarella duo is hard to beat! But as soon as I took that first bite of our innovative creation, laughter erupted around the table. It was a hit! The sweet berries playfully danced with the creamy mozzarella, and everyone was hooked. From that moment on, Berry Caprese Salad became my summer showstopper—a dish that ushered in laughter, friendships, and the joy of shared meals. And now, I’m thrilled to share that joy with you!
Ingredients: Fresh, Colorful, and Simple
Here’s what you’ll need to create this delightful dish, along with some little chef insights to help you shine in your kitchen:
-
Fresh Mozzarella Cheese: Creamy and mild, fresh mozzarella is a must for that authentic Caprese experience. If you can’t find it, burrata works beautifully too. It adds an extra creaminess that’s simply divine!
-
Mixed Berries (strawberries, blueberries, blackberries, raspberries): The star of the show! Feel free to mix and match based on what you love or what’s in season. You could even try blackcurrants or cherries for a twist!
-
Fresh Basil Leaves: Aromatic and bright, basil adds a fantastic herbal note. Look for vibrant green leaves, and don’t be shy! The more, the merrier. If you’re feeling adventurous, mint could be a refreshing substitute!
-
Balsamic Glaze: This adds that sweet-and-sour punch that ties everything together. If you don’t have balsamic glaze on hand, a drizzle of balsamic vinegar works too—just ensure to use a high-quality one for maximum flavor.
-
Olive Oil: A good drizzle of extra virgin olive oil enhances the richness of the mozzarella and balances the sweetness of the fruit. You can substitute with avocado oil for a different flavor profile.
-
Salt: Just a pinch, please! Salt brings out the flavors of the ingredients and helps them shine. Try flaky sea salt for a gourmet touch.
-
Black Pepper: Freshly cracked black pepper adds a bit of zesty warmth to the salad. For a spicy kick, you can use a bit of crushed red pepper instead.
Step-by-Step Instructions: Let’s Get Cooking!
Alright, my foodie friends, it’s time to roll up your sleeves and jump into the fun of assembling this gorgeous salad. Follow these steps, and you’ll have a masterpiece in no time:
-
Prepare the Ingredients: Start by gathering all your ingredients. Rinse the berries gently under cool water; be careful not to squish them! Pat them dry with a paper towel.
-
Slice the Mozzarella: Carefully slice your fresh mozzarella into bite-sized pieces. Aim for roughly half-inch thick slices—big enough to enjoy but small enough to fit comfortably on your fork. If you’re using burrata, simply break it apart with your fingers; that creamy goodness should be easily accessible!
-
Tear the Basil: Take a handful of fresh basil leaves and tear them into smaller pieces. This helps release their aromatic oils, which enhances the overall flavor of the dish.
-
Assemble the Salad: On a serving platter or in a large bowl, start layering your salad. Begin with a base of sliced mozzarella, then alternate with mixed berries and torn basil leaves. Don’t worry about perfection; this dish is all about showing off cozy, rustic beauty. The colors should shine!
-
Drizzle with Balsamic Glaze and Olive Oil: Now comes the magic touch. Drizzle balsamic glaze over the salad, allowing it to cascade down the mozzarella and berries. Next, add a gentle drizzle of olive oil for that rich mouthfeel. It’s like giving your salad a fashionable coat to wear!
-
Season It Right: Sprinkle a pinch of salt and a few cracks of fresh black pepper over the top. Just enough to elevate those flavors without overpowering the delightful balance.
-
Taste and Adjust: Before serving, give it a little taste test. Adjust seasoning if needed, and maybe add more balsamic or olive oil if you’re feeling fancy. Each bite should excite your taste buds!
-
Serve Immediately: This salad is best enjoyed fresh, so try to serve it right away. If you must make it ahead, keep the dressed salad in the fridge and assemble it just before serving.
As you prepare your Berry Caprese Salad, don’t hesitate to enjoy the process! Chat with someone nearby, sip a tasty drink, and relish the fresh aromas wafting through your kitchen.
Serving Suggestions: Make It a Masterpiece
When it comes to serving this dish, presentation matters just as much as taste! If you’ve assembled it on a platter, simply bring it to the table for a stunning centerpiece. For individual servings, layer each component into clear glasses for a charming effect where guests can see the beautiful colors. This elevates your salad to a culinary art piece!
This salad pairs wonderfully with grilled meats, crusty bread, or can be served as a refreshing side dish at a summer BBQ. Don’t forget about wine! A chilled rosé or Sauvignon Blanc adds to the experience—trust me on this one.
Recipe Variations: Get Creative
This Berry Caprese Salad is a great canvas for your culinary creativity. Here are a few tasty variations to consider:
-
Tropical Twist: Substitute strawberries and blueberries for pineapple and mango for a tropical vibe. The sweetness of the fruit will pair beautifully with the mozzarella.
-
Nuts for Crunch: Toss in some toasted pine nuts or walnuts for an added crunch. They provide a lovely texture while enhancing the flavors.
-
Balsamic Berry Vinaigrette: Whisk together balsamic vinegar, Dijon mustard, and honey for a unique dressing instead of glaze. This lightens up the dish while adding more zing.
-
Spicy Kick: Add thin slices of jalapeño or drizzle some spicy chili oil for those who like it hot! This unexpected twist will surprise and delight your guests.
-
Vegan Delight: Swap out the mozzarella for vegan cheese or marinated tofu. The flavors from the berries and basil will make it a hit for everyone!
Chef’s Notes: A Personal Touch
Every recipe tells a story, and this one is no different! Over the years, I have enjoyed experimenting with flavors and ingredients. One fun memory that stands out was during a cooking class I held in my home. I asked my students to brainstorm exotic berries to include, and we ended up trying out some astonishing combinations like goji berries and raspberries. The twist made it an unforgettable event filled with laughter and new friendships.
It’s important to remember that cooking is a form of self-expression. Each time you make this salad, let your creativity shine! Have fun with it, and never hesitate to try something new.
FAQs and Troubleshooting: Your Burning Questions Answered
-
Can I make this salad ahead of time?
Absolutely! However, I recommend keeping the berries and mozzarella separate from the dressing until you’re ready to serve. If you mix it all, the salad can become soggy, and that’s not what we want! -
What if I can’t find fresh mozzarella?
No worries at all! Feel free to substitute with regular mozzarella cheese or even feta if you’re looking for something a bit tangier. Reminder: the flavor profile will change slightly, but it will still be delicious! -
Is it possible to make this dish low-sugar?
Yes! Simply reduce or eliminate the balsamic glaze in favor of plain balsamic vinegar or a drizzle of olive oil. Focus on letting the natural sweetness of the berries stand out. -
How do I prevent the salad from getting soggy in the fridge?
Store the berries and mozzarella in separate containers from the dressing. When you’re ready to enjoy, toss it together for the freshest taste.
Nutritional Info
While I encourage you to savor each bite without stress, here’s a rough estimate of what you’re indulging in:
- Calories: 230 per serving (This can vary based on quantity and specific ingredients)
- Protein: 10g
- Carbohydrates: 15g
- Fat: 15g
Conclusion
And there you have it! A vibrant, Berry Caprese Salad that not only looks stunning on the plate but also tantalizes your taste buds. I hope you enjoy making it as much as I do! Remember, cooking is all about balance, so feel free to swap and experiment while keeping the essence of this delightful dish alive. Let food be delightful fuel for your life, and share it generously with those you love. Happy cooking!
PrintBerry Caprese Salad

A vibrant and playful salad that combines creamy mozzarella with juicy mixed berries and fresh basil, drizzled with balsamic glaze.
- Prep Time: 15 minutes
- Cook Time: 0 minutes
- Total Time: 15 minutes
- Yield: 4 servings
- Category: Salad
- Method: Assembling
- Cuisine: Italian
- Diet: Vegetarian
Ingredients
- Fresh Mozzarella Cheese
- Mixed Berries (strawberries, blueberries, blackberries, raspberries)
- Fresh Basil Leaves
- Balsamic Glaze
- Olive Oil
- Salt
- Black Pepper
Instructions
- Prepare the Ingredients: Gather all ingredients and rinse berries gently under cool water; pat dry.
- Slice the Mozzarella: Cut fresh mozzarella into bite-sized slices.
- Tear the Basil: Tear basil leaves into smaller pieces to release oils.
- Assemble the Salad: Layer salad starting with mozzarella, followed by mixed berries and basil.
- Drizzle with Balsamic Glaze and Olive Oil: Let glaze cascade over the salad.
- Season It Right: Sprinkle salt and black pepper over the top.
- Taste and Adjust: Adjust seasoning as needed.
- Serve Immediately: Best enjoyed fresh.
Notes
This salad pairs well with grilled meats or crusty bread. For serving, layer ingredients in clear glasses for a charming effect.
Nutrition
- Serving Size: 1 serving
- Calories: 230
- Sugar: 10g
- Sodium: 200mg
- Fat: 15g
- Saturated Fat: 5g
- Unsaturated Fat: 8g
- Trans Fat: 0g
- Carbohydrates: 15g
- Fiber: 3g
- Protein: 10g
- Cholesterol: 30mg
Keywords: salad, berry salad, caprese, fresh ingredients, summer recipe

No-Bake Mango Cheesecake: 30-Minute Creamy Summer Treat
No Bake Mango Cheesecake: A Sweet Escape into Flavor
Welcome to another delightful episode of Clean Plate Cravings! Today, we’re diving into a dessert that’s not only a crowd-pleaser but also requires absolutely no baking—yes, you heard that right! This No Bake Mango Cheesecake is the epitome of summer joy captured in a creamy, dreamy slice of bliss. With its tropical vibes and luscious texture, this cheesecake is your ticket to a sun-soaked paradise, no matter what the season.
Now, let me ask you: Have you ever tasted something that instantly transported you back in time? For me, it’s the sweet, luscious flavor of mango. I still remember family gatherings at my aunt’s house, where she would whip up an array of exotic desserts that left us drooling in delight. The highlight? Her sensational mango cheesecake that had an incredibly smooth texture and a fruity zing that danced on our tongues. As kids, we’d scramble for seconds (and thirds!), not caring about our dessert limits as long as there was that velvety cheesecake to savor. It was a magical time filled with giggles, delicious food, and endless love—or at least, as endless as our appetites were!
Inspired by those cherished memories, I created this No Bake Mango Cheesecake to share with all of you (and to relive those delightful moments in a brand new way). Trust me, this dessert is easy to whip up and promises to impress your friends and family, leaving them begging for the recipe. Ready to jump in? Let’s create something sweet together!
Ingredients
Here’s what you’ll need to make your No Bake Mango Cheesecake:
-
2 cups graham cracker crumbs
These crunchy bits form the base of our cheesecake, providing a deliciously sweet and slightly salty foundation. If you want a gluten-free version, you can substitute with almond flour or gluten-free graham crackers. -
1/2 cup unsalted butter, melted
This golden goodness not only binds the graham cracker crumbs but also adds rich flavor. For a lighter option, consider using coconut oil—just make sure it’s melted and cooled! -
16 oz cream cheese, softened
The star of our show! Cream cheese gives its luxurious creaminess. If you want a lighter alternative, try using Greek yogurt, though the texture and flavor may differ slightly. -
1 cup powdered sugar
This sweetener creates a velvety texture and resists crystallization. You can substitute with honey or maple syrup, but reduce the liquid in the recipe slightly to maintain consistency. -
1 teaspoon vanilla extract
A splash of vanilla adds warmth and depth of flavor to our cheesecake. Feel free to use pure vanilla extract for the best flavor. -
1 cup heavy cream
Whipped to perfection, heavy cream creates that iconic fluffy texture. For a low-fat option, you can use whipped coconut cream, but the result may be less rich. -
2 cups mango puree
Fresh or canned mango—either option will infuse an amazing tropical flavor. If you can’t find mango, feel free to substitute with other fruits like peach or passionfruit. -
1 tablespoon lemon juice
This little add-in brightens the cheesecake, balancing the richness. Lime juice works well too for additional zest!
Step-by-Step Instructions
Let’s get this creamy masterpiece going! Follow these steps, and in no time, you’ll be indulging in your very own No Bake Mango Cheesecake.
-
Prepare the crust:
In a medium-sized bowl, combine 2 cups of graham cracker crumbs with 1/2 cup of melted unsalted butter. Mix until the crumbs are evenly coated and have a sandy consistency.
Chef Tip: If you prefer a more textured crust, you can add chopped nuts like almonds or walnuts for a delightful crunch! -
Press and chill the crust:
Press the crumb mixture firmly into the bottom of a 9-inch springform pan, ensuring it’s even. Use the flat bottom of a measuring cup for the best results. Place the crust in the refrigerator to chill while we work on the filling—the cold will help it set perfectly.
Chef Hack: Need to speed up the chilling? Pop it in the freezer for about 15 minutes! -
Make the filling:
In a large mixing bowl, beat 16 oz of softened cream cheese until smooth and creamy with a hand mixer. Gradually add in 1 cup of powdered sugar and continue beating until fully incorporated. Then add in that lovely 1 teaspoon of vanilla extract and 1 tablespoon of lemon juice, blending until well combined.
Tip from Ava: Scrape the sides of the bowl frequently to ensure everything blends evenly! -
Whip the cream:
In a separate bowl, whip 1 cup of heavy cream until soft peaks form. This step is key; aim for that light and airy texture to fold into your cheesecake mixture.
Quick Note: For even more volume, chill your mixing bowl and whisk beforehand! -
Combine and fold:
Gently fold the whipped cream into the cream cheese mixture—you want to maintain all that lightness. Once combined, add in 2 cups of mango puree and fold everything together until you have a smooth, luscious filling.
Chef Insight: Taste the filling at this point! If you prefer a stronger mango flavor, you can add a bit more puree or sweeten further to your liking. -
Fill the crust:
Pour the mango cheesecake filling on top of the chilled crust, spreading it evenly with a spatula. Give it a gentle tap to even it out.
Chef Tip: Create a decorative swirl by using a skewer or knife to gently mix the top layer if you’re in the mood for artsy cheesecake! -
Chill and set:
Cover your cheesecake with plastic wrap and let it chill in the refrigerator for at least 4-6 hours, or ideally overnight. This helps it set properly, ensuring you get those beautiful slices.
Pro Tip: If you’re short on time, a quick 1-hour chill in the freezer will help—but don’t forget to return it to the fridge afterward!
Serving Suggestions
Now that your No Bake Mango Cheesecake is perfectly set, it’s time to serve it up! Carefully run a knife around the edge of the springform pan before releasing the sides. Slice into generous pieces, and serve on a colorful dessert plate. Garnish with a dollop of whipped cream, fresh mango slices, and perhaps a sprig of mint for that wow factor. Trust me; your guests will be snapping photos before they even take a bite!
Recipe Variations
Want to experiment? Here are some creative twists you can incorporate into this mango cheesecake:
- Coconut Mango Cheesecake: Add shredded coconut into the crust for a tropical flair.
- Berry Swirl: Top your cheesecake with mixed berries or create a berry swirl in the filling for a burst of color and flavor.
- Vegan Version: Swap the cream cheese for coconut cream and use dairy-free whipped cream to make a delicious plant-based option.
- Chocolate Drizzle: Drizzle some melted dark chocolate over the top for an indulgent touch. It pairs beautifully with mango!
- Mango Passionfruit Fusion: Combine mango puree with passionfruit for a tangy, exotic twist.
Chef’s Notes
This No Bake Mango Cheesecake has a special place in my heart. I love how easy it is to make, especially when the mangoes are ripe and in season. The original recipe evolved when I wanted to bring the joy of that childhood dessert to modern kitchens. We all lead busy lives but that doesn’t mean giving up on delectable desserts. This cheesecake proves that you can have your cake and eat it too—without any hassle!
Fun fact: each time I make this recipe, I find myself reminiscing about those carefree childhood days, crafting new memories with friends and family over slices of this creamy delight.
FAQs and Troubleshooting
1. Can I use fresh mango instead of puree?
Absolutely! Just blend fresh mango until smooth and strain if necessary to remove any fibrous bits.
2. Why didn’t my cream cheese filling set?
Ensure your cream cheese is at room temperature and properly combined with the whipped cream. If it’s too soft, your dessert might not hold its shape.
3. How long can I store leftovers?
Your cheesecake can be stored in the fridge for up to 3 days, covered tightly. If left outside, it’s best enjoyed the same day!
4. Can I freeze the No Bake Mango Cheesecake?
Yes! You can freeze it for up to 2 months. Just make sure to let it thaw in the refrigerator before serving for the best texture.
Nutritional Info
While I typically focus more on flavors than numbers, here’s a rough nutritional breakdown for one slice (assuming you get 12 servings):
- Calories: 372
- Protein: 5g
- Carbohydrates: 35g
- Fat: 25g
- Sugar: 18g
And there you have it—a No Bake Mango Cheesecake that not only delights the taste buds but also rekindles warm memories and creates new ones. I can’t wait for you to try making it and hope it becomes a staple in your dessert repertoire. Happy baking, or should I say “happy mixing!” Enjoy every scrumptious bite, and let’s keep those cravings clean and delicious!
PrintNo Bake Mango Cheesecake

A delightful no-bake mango cheesecake that captures the essence of summer with its creamy texture and tropical flavors.
- Prep Time: 20 minutes
- Cook Time: 0 minutes
- Total Time: 360 minutes
- Yield: 12 servings 1x
- Category: Dessert
- Method: No Bake
- Cuisine: International
- Diet: Vegetarian
Ingredients
- 2 cups graham cracker crumbs
- 1/2 cup unsalted butter, melted
- 16 oz cream cheese, softened
- 1 cup powdered sugar
- 1 teaspoon vanilla extract
- 1 cup heavy cream
- 2 cups mango puree
- 1 tablespoon lemon juice
Instructions
- Prepare the crust: In a medium-sized bowl, combine 2 cups of graham cracker crumbs with 1/2 cup of melted unsalted butter. Mix until the crumbs are evenly coated.
- Press the crust: Press the crumb mixture firmly into the bottom of a 9-inch springform pan and chill in the refrigerator.
- Make the filling: In a large mixing bowl, beat 16 oz of softened cream cheese until smooth. Gradually add 1 cup of powdered sugar, then mix in 1 teaspoon of vanilla extract and 1 tablespoon of lemon juice.
- Whip the cream: In a separate bowl, whip 1 cup of heavy cream until soft peaks form.
- Combine: Gently fold the whipped cream into the cream cheese mixture, then add 2 cups of mango puree and mix until smooth.
- Fill the crust: Pour the mango cheesecake filling on top of the chilled crust, spreading it evenly.
- Chill and set: Cover and refrigerate for at least 4-6 hours or overnight to allow it to set.
Notes
For a decorative touch, garnish with a dollop of whipped cream and fresh mango slices. You can also freeze the cheesecake for up to 2 months.
Nutrition
- Serving Size: 1 slice
- Calories: 372
- Sugar: 18g
- Sodium: 200mg
- Fat: 25g
- Saturated Fat: 15g
- Unsaturated Fat: 5g
- Trans Fat: 0g
- Carbohydrates: 35g
- Fiber: 1g
- Protein: 5g
- Cholesterol: 60mg
Keywords: cheesecake, mango dessert, no bake dessert, summer dessert
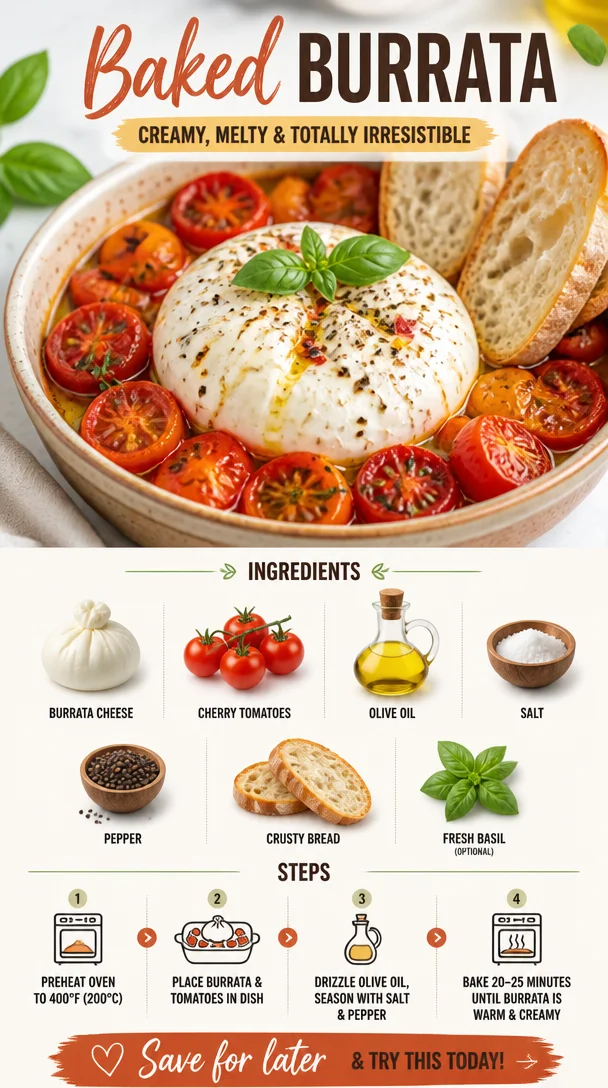
Baked Burrata
The Magic of Baked Burrata: A Delightful Culinary Journey
Welcome to my cozy corner of the kitchen, where we’re about to embark on a delicious adventure with a dish that sings comfort and flavor: Baked Burrata! If you’ve ever wanted to elevate your cheese game and impress your friends, then you’re in for a treat. This delightful dish is not just a meal; it’s an experience—a testament to the joy of simple ingredients coming together to create something breathtakingly delicious.
Picture this: a creamy ball of burrata cheese perfectly nestled among roasted cherry tomatoes, drizzled with a hint of olive oil, and finished with a sprinkle of salt and pepper. It’s a symphony of flavors, served warm and oozy—perfect for sharing or indulging all by your lonesome when the craving strikes. And trust me, once you try Baked Burrata, you’ll wonder how you ever lived without it!
One of the things I love most about Baked Burrata is how it resonates with real life. A dish this comforting and satisfying works beautifully for date nights, lazy Sundays, or even last-minute gatherings with friends. The ingredients are simple, but when combined, they create something extraordinary that can transform any occasion into a feast.
Our journey into the world of Baked Burrata is more than just cooking; it’s about celebrating the moments that happen around the table—the laughter, the connection, and the love that fills the air. So, grab your apron, preheat that oven, and let’s dive into the wonderful world of Baked Burrata!
A Fond Memory: The Burrata Moment
I remember the first time I tasted burrata. It was at a quaint little Italian café tucked away in the heart of the city. The owner, a warm and spirited chef with a twinkle in his eye, proudly presented us with a dish of freshly baked burrata, surrounded by bright cherry tomatoes that looked like jewels against white porcelain. That first gooey bite was nothing short of a revelation. The creaminess of the burrata mingling with the sweetness of the tomatoes was a love story I never wanted to end.
Fast forward a few years, and I’ve taken that memory and transformed it into a dish I can whip up whenever the mood strikes. The simplicity of baking burrata at home means I can enjoy my favorite café experience on a casual Wednesday or serve it at the next gathering with friends. It’s a nostalgic taste of Italy that I can now share with all of you!
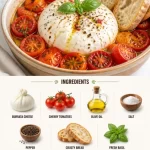
Ingredients: What You Need
Here’s what you’ll need to bring this delightful dish to life:
-
Burrata Cheese: The star of the show! Burrata is a creamy Italian cheese that’s an ode to indulgence. If you can’t find burrata, fresh mozzarella, while not quite the same, provides a similar texture.
-
Cherry Tomatoes: These tiny flavor bombs burst with sweetness as they roast. If you’re feeling adventurous, you can swap them out for sun-dried tomatoes for a different flavor profile.
-
Olive Oil: A drizzle of good olive oil adds richness and depth. If you’re low on olive oil, any light oil like avocado or grapeseed can work.
-
Salt: Brings all the flavors together—use sea salt or kosher salt for texture, or go for flavorful finishing salts like flaky Maldon for a gourmet touch.
-
Pepper: A little bit of freshly cracked black pepper adds a lovely bite. You can substitute with red pepper flakes for a spicy kick!
-
Crusty Bread: Perfect for dipping into that luscious burrata! If you’re gluten-free, consider serving it with veggie sticks or gluten-free crackers.
-
Fresh Basil (Optional): Adds a fresh burst of flavor and a beautiful pop of color! If you can’t find fresh basil, a sprinkle of dried herbs like oregano can suffice.
Step-by-Step Instructions: Let’s Get Cooking!
Now that we have our ingredients ready, let’s dive into the cooking process. Trust me, it’s easier than you think!
-
Preheat Your Oven: Start by preheating your oven to 400°F (200°C). The goal is to create a warm environment for our burrata to melt into cheesy bliss!
-
Arrange the Tomatoes: Grab a baking dish and throw in your cherry tomatoes. They can be halved for quicker cooking, but I love throwing them in whole for that extra burst of juiciness. Drizzle them generously with olive oil, and sprinkle with salt and pepper to taste. Give them a gentle toss to ensure every tomato is coated in that luscious oil.
-
Make a Space for the Burrata: Create a little nest among the tomatoes for the burrata to rest comfortably. This allows it to absorb some of that tomato goodness as it bakes. Place the burrata directly in the center of your beautiful tomato bed.
-
Drizzle More Olive Oil: Don’t be shy—drizzle a little more olive oil over the burrata. This step is purely for indulgence! It enhances the flavor and helps achieve that beautiful golden-brown crust.
-
Bake It Up: Pop the baking dish into your preheated oven for about 15 minutes. You’ll know it’s done when the burrata is warm and slightly oozy and the tomatoes start to blister and burst. Your kitchen will smell incredible, by the way.
-
Garnish and Serve: Once it’s out of the oven, let it rest for a minute (if you can resist!). Finish it off with a sprinkle of fresh basil. This step is totally optional but does add that lovely, aromatic touch. Now get your crusty bread ready for dipping!
-
Dig In: Serve this beauty straight out of the oven—there’s something magical about that warm, gooey burrata just waiting to be scooped up with your bread. Don’t forget to drizzle any leftover tomato juice over the top. It’s pure heaven!
Serving Suggestions: An Elegant Plating
When it comes to serving Baked Burrata, keep it simple and delicious. Use a beautiful wooden board or a rustic platter for presentation. Place the baking dish in the center, and surround it with toasted slices of crusty bread for scooping. You might even throw in a small bowl of balsamic reduction or a sprinkle of pine nuts for an extra touch. Drizzle with a bit more olive oil and fresh basil for that final pop of color—your guests will be in awe!
Recipe Variations: Get Creative
Baked Burrata is as versatile as it is delicious! Here are a few creative twists to try:
-
Pesto Infusion: Add a spoonful of basil pesto to the tomatoes before baking for an extra layer of flavor.
-
Spicy Kick: Toss in some red pepper flakes with the tomatoes for a delightful heat that pairs well with the creamy cheese.
-
Roasted Garlic: Include a few cloves of whole, unpeeled garlic with the tomatoes for a sweet and mellow roasted garlic flavor.
-
Mediterranean Twist: Mix in some olives and artichokes for a Mediterranean flair that adds even more depth to the dish.
-
Herb-Infused: Experiment with fresh herbs like thyme or rosemary for a unique twist on flavor.
Chef’s Notes: Lessons from the Kitchen
Baked Burrata has become a staple in my kitchen, and I’ve learned a few things along the way. Once, I tried to bake it with flavored oils, and the result was a bit too overwhelming. Now, I stick to good-quality olive oil to let the burrata shine on its own. Also, don’t let leftover tomatoes go to waste—mix them into a salad or pasta dish the next day for a refreshing lunch!
Cooking can be an adventure, and every little mishap in the kitchen is a chance to learn something new. Whether it’s forgetting to preheat the oven or realizing you’re out of olive oil (oops!), those moments often lead to surprisingly delicious outcomes.
FAQs and Troubleshooting: Your Questions Answered
-
Can I use regular mozzarella instead of burrata?
Yes! While burrata has a creamier texture, fresh mozzarella will still deliver a satisfying result. Just make sure to use a good quality one. -
What should I do if my tomatoes aren’t bursting?
If your tomatoes aren’t bursting, try roasting them a little longer. They need that heat to release their natural juices, but keep an eye on the burrata to prevent overcooking. -
How do I store leftovers?
If there’s any left (which is rare!), store it in an airtight container in the fridge. Reheat gently in the oven or microwave—just be careful not to dry out the burrata! -
What can I serve with baked burrata?
It pairs beautifully with a light salad, savory roasted vegetables, or even as a stunning appetizer before pasta dishes!
Nutritional Info
While every dish can vary based on specific ingredients and portions, here’s a rough idea per serving of Baked Burrata:
- Calories: Approximately 300-400 (including bread)
- Carbohydrates: 20-30g (depending on bread choice)
- Protein: 15-20g
- Fats: 25-30g
Note that the nutritional information will change based on substitutions and portions used, but remember, enjoyment and balance in what you eat are what truly matters!
And there you have it! Baked Burrata is more than just a dish; it’s a celebration of flavor, nostalgia, and, best of all, the art of uncomplicated cooking. I hope you relish making this delightful recipe and create your own kitchen memories along the way. Happy cooking, my fellow foodies!
PrintBaked Burrata
A comforting and indulgent baked burrata cheese dish served with roasted cherry tomatoes and crusty bread, perfect for sharing or solo feasting.
- Prep Time: 10 minutes
- Cook Time: 15 minutes
- Total Time: 25 minutes
- Yield: 4 servings
- Category: Appetizer
- Method: Baking
- Cuisine: Italian
- Diet: Vegetarian
Ingredients
- Burrata Cheese
- Cherry Tomatoes
- Olive Oil
- Salt
- Pepper
- Crusty Bread
- Fresh Basil (Optional)
Instructions
- Preheat your oven to 400°F (200°C).
- Arrange the cherry tomatoes in a baking dish, drizzle with olive oil, and sprinkle with salt and pepper.
- Create a space among the tomatoes for the burrata to rest.
- Drizzle more olive oil over the burrata for added flavor.
- Bake for about 15 minutes until the burrata is warm and oozy, and the tomatoes start to blister.
- Garnish with fresh basil if desired, then serve with crusty bread for dipping.
- Dig in and enjoy the warm, gooey burrata with the roasted tomatoes.
Notes
Feel free to experiment with different add-ins like pesto, red pepper flakes, or garlic for additional flavor.
Nutrition
- Serving Size: 1 serving
- Calories: 350
- Sugar: 5g
- Sodium: 400mg
- Fat: 30g
- Saturated Fat: 10g
- Unsaturated Fat: 15g
- Trans Fat: 0g
- Carbohydrates: 22g
- Fiber: 3g
- Protein: 20g
- Cholesterol: 30mg
Keywords: baked burrata, burrata recipe, Italian cheese, comfort food, easy appetizer
Baked Burrata
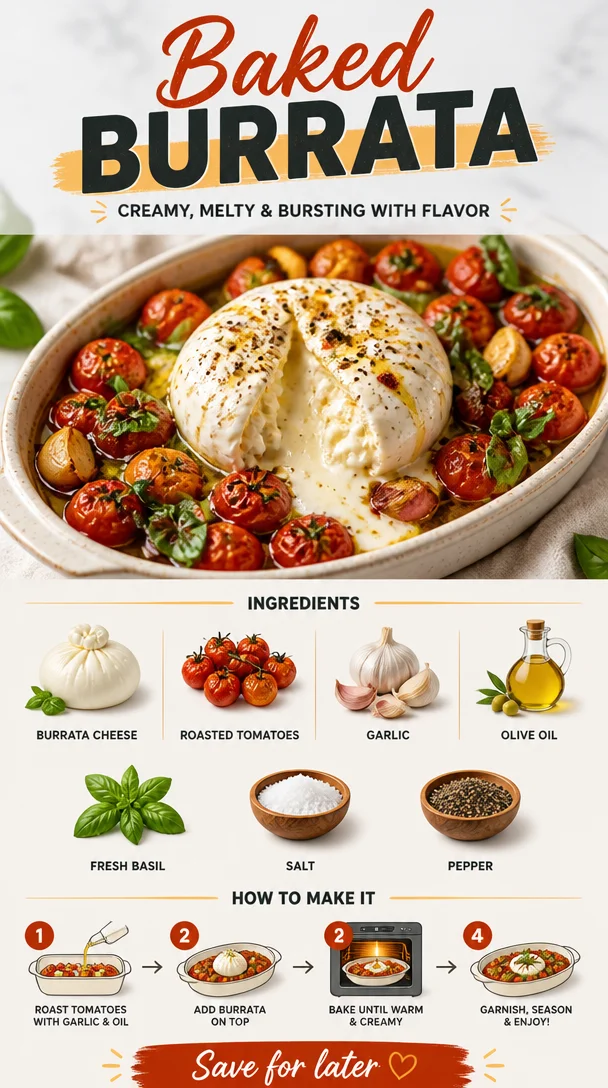
Baked Burrata: A Warm & Cheesy Hug in a Dish
Welcome to the cozy world of Clean Plate Cravings, where each recipe feels like a warm embrace! Today, we’re diving into a dish that epitomizes comfort food while keeping it fresh and vibrant—Baked Burrata. Picture it: creamy, dreamy burrata cheese wrapped in a crisp shell, complemented by luscious roasted tomatoes, aromatic garlic, and fragrant basil. It’s like a personal invitation to indulge without the side of guilt. So grab your apron and let’s get cooking!
A Story Behind The Dish
Baked burrata holds a special place in my heart, not just because it lights up any dinner table but also for the nostalgic memories it brings back. I recall a sun-soaked afternoon spent at a charming little café in Florence, Italy with friends. We had just spent the day wandering through narrow cobblestone streets, soaking in the sights, sounds, and of course, the mouthwatering smells wafting from every bakery and trattoria.
We settled down at this quaint café with cute, colorful plates and rustic wooden tables. We ordered a plate of baked burrata, blissfully unaware of how that dish would become a staple in my own kitchen. When it arrived, the cheese was bubbly and golden, surrounded by a medley of roasted tomatoes and fragrant herbs. The first bite—oh my! It was rich and creamy, a burst of flavor that seemed to sing with each mouthful. That day, I discovered the beauty of simple yet sumptuous creations.
Since then, I’ve made it my mission to recreate the magic of that meal. And here we are! Ready to bring a taste of Italy straight into your own kitchen. Let’s joyfully explore the flavors that make this dish a masterpiece.
Ingredients You’ll Need
Here’s what you need to whip up this creamy delight:
-
Burrata Cheese: This soft cheese is the star of the show! If you can’t find burrata, fresh mozzarella can be a decent substitute, although it won’t have that creamy center.
-
Roasted Tomatoes: Sweet, succulent, and bursting with flavor! Feel free to use cherry or grape tomatoes—they caramelize beautifully. You can roast them in advance and keep them in your fridge for quick meals!
-
Garlic: Freshly minced garlic adds depth and aromatic warmth. If you’re not a fan, roasted garlic is a sweeter alternative.
-
Olive Oil: Extra virgin olive oil not only enhances flavors but also adds richness when drizzled over the dish. Avocado oil can be a suitable substitute if you want a higher smoke point.
-
Fresh Basil: This fragrant herb elevates the dish with its distinct flavor. You can swap it for fresh parsley or even a sprinkle of dried basil in a pinch.
-
Salt & Pepper: These pantry staples are essential for seasoning. Use kosher salt for better control and fresh cracked black pepper for a more vibrant flavor.
Step-by-Step Instructions to Baked Burrata Bliss
Now, let’s dive into the cooking process. Follow these steps, and it will feel like a culinary hug with each bite.
-
Preheat the Oven: First off, turn your oven to 400°F (200°C). A hot oven is crucial for roasting those tomatoes to perfection and getting that burrata bubbly!
Chef Tip: Always preheat your oven. It ensures an even cooking temperature, which is key to wonderful roasted flavors.
-
Prepare the Tomatoes: Slice your cherry or grape tomatoes in half. Toss them on a baking sheet with a drizzle of olive oil, minced garlic, and season with salt and pepper.
Hacks: You could add a splash of balsamic vinegar or a sprinkle of sugar to enhance their sweetness.
-
Roast the Tomatoes: Place the baking sheet in the preheated oven and roast for about 20-25 minutes. You want them to become blistered and juicy—just watch for any that might start to burn!
Chef Insight: Roasting concentrates the tomatoes’ sweetness and deepens their flavors. Trust me; you don’t want to skip this step!
-
Add the Burrata: Once your tomatoes have caramelized beautifully, it’s time to introduce the burrata. Nestle the burrata in the center of the pan, gently pressing it into the tomatoes like making a little cheesy bed. Drizzle with more olive oil and a dash of salt and pepper.
-
Bake Again: Pop the tray back into the oven for another 10-15 minutes, just until the burrata begins to soften and ooze. The cheese should be melty and ever so slightly golden on the top.
Chef Hack: You can broil the top for the last couple of minutes for that golden color—just keep an eye on it!
-
Finish with Basil: Once you’ve pulled it out of the oven, tear fresh basil leaves on top. The heat from the dish will release the aromatic fragrance of the basil—pure heaven!
Happiness Tip: Don’t skimp on the basil; it’s what lifts this dish to new heights!
Serving Suggestions
Serving baked burrata is almost as fun as making it! I recommend plating it family-style, straight from the baking dish. Let your guests dig in—pair it with crusty bread for dipping, or serve it over a fresh arugula salad for a delightful contrast. You could also whip up a bruschetta topping using the baked burrata and tomatoes, spreading it generously over toasted crostini. It’s a versatile dish and sure to impress!
Recipe Variations
Let your creativity shine with these delicious twists on baked burrata:
-
Spicy Kick: Add red pepper flakes for a spicy touch! It beautifully balances the creaminess of burrata.
-
Mediterranean Vibes: Toss in olives and artichoke hearts before baking for extra depth of flavor.
-
Vegetable Medley: Mix in other roasted veggies like zucchini, bell peppers, or asparagus for a colorful addition.
-
Pest-o it Up: Incorporate dollops of pesto sauce before baking for a vibrant herbaceous note.
-
Add Nuts: Sprinkle some toasted pine nuts or walnuts on top for an added crunch and healthy fats!
Chef’s Notes
Cooking is always an adventure, right? When I first experimented with this recipe, I was a little hesitant about combining tomatoes directly with burrata. But from the moment I took that first bite of melting cheese fused with sweet, roasted tomatoes, I knew I hit the jackpot. I’ve since played around with flavors and ingredients, continuously evolving this simple dish. Sometimes it turns into a gorgeous summer salad; other times, it’s a comforting winter warmer.
FAQs and Troubleshooting
1. Why is my burrata not melting?
Burrata can be quite delicate. Ensure you’re using fresh burrata and fire up the heat in your oven! If it’s not melting after the suggested time, try checking for doneness—sometimes it just needs a bit more time.
2. Can I prepare this dish in advance?
Absolutely! You can roast the tomatoes ahead of time, store them in the fridge, and bake the burrata just before serving. It’s a great prep hack!
3. What should I do if my tomatoes burn?
If your tomatoes start to burn, reduce the heat. It’s better to roast for a longer time at lower heat than to char them in the oven.
4. Can I make this dish vegan?
Yes! While burrata is a dairy product, you could try vegan cheese alternatives, though flavors will vary. Try soft cashew cheese or a nut-based ricotta substitute for that creamy texture.
Nutritional Info (Optional)
While I always advocate for enjoying food without restriction, here’s a quick look at what’s in your delicious baked burrata per serving (calculated for 4 servings):
- Calories: 310
- Protein: 10g
- Carbohydrates: 6g
- Fats: 28g
Feel free to adjust servings based on your needs!
Thank you for joining this flavorful journey into the world of baked burrata! It’s a dish that’s perfect for gatherings or cozy nights in, and I can’t wait for you to experience the joy it brings. Happy cooking, friends! 🌿🍅🧀
PrintBaked Burrata

A warm and cheesy dish featuring creamy burrata cheese, roasted tomatoes, garlic, and fresh basil.
- Prep Time: 15 minutes
- Cook Time: 30 minutes
- Total Time: 45 minutes
- Yield: 4 servings
- Category: Main Course
- Method: Baking
- Cuisine: Italian
- Diet: Vegetarian
Ingredients
- Burrata Cheese
- Cherry or Grape Tomatoes
- Garlic
- Extra Virgin Olive Oil
- Fresh Basil
- Salt
- Pepper
Instructions
- Preheat the oven to 400°F (200°C).
- Prepare the tomatoes by slicing them in half and tossing them on a baking sheet with olive oil, minced garlic, salt, and pepper.
- Roast the tomatoes in the oven for about 20-25 minutes until blistered and juicy.
- Add the burrata to the center of the pan and drizzle with more olive oil, salt, and pepper.
- Bake again for 10-15 minutes until the burrata is softened and slightly golden.
- Finish by tearing fresh basil leaves on top before serving.
Notes
Pair with crusty bread or a fresh arugula salad for a delightful contrast.
Nutrition
- Serving Size: 1 serving
- Calories: 310
- Sugar: 4g
- Sodium: 300mg
- Fat: 28g
- Saturated Fat: 10g
- Unsaturated Fat: 16g
- Trans Fat: 0g
- Carbohydrates: 6g
- Fiber: 2g
- Protein: 10g
- Cholesterol: 30mg
Keywords: baked burrata, comfort food, Italian dish, creamy cheese, roasted tomatoes
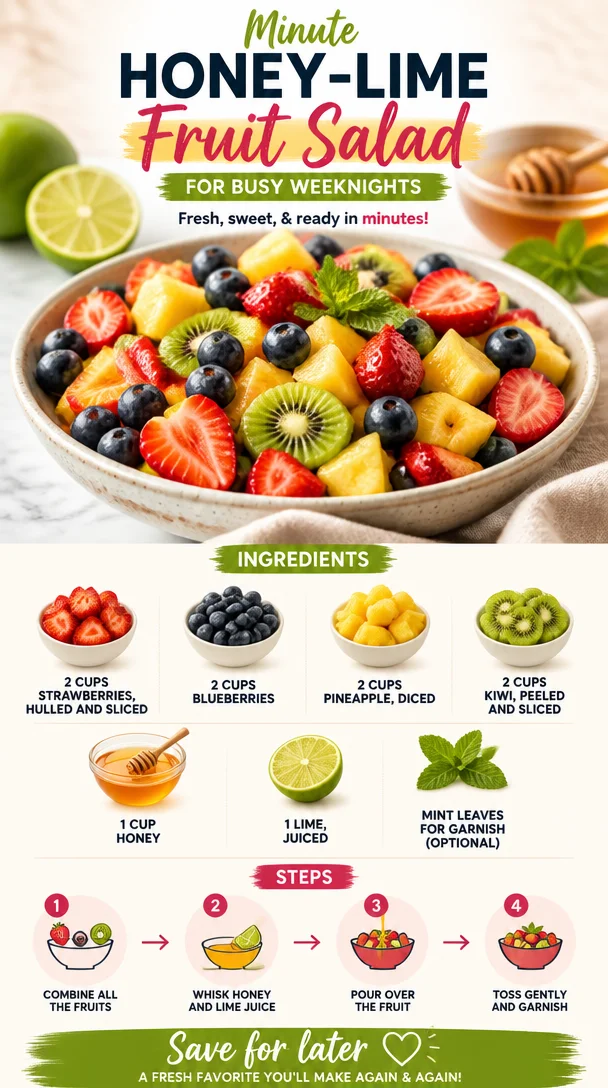
Minute Honey-Lime Fruit Salad for Busy Weeknights
Easy Fruit Salad with Honey Lime Dressing
Introduction
Hey there, fellow food lovers! If you’re like me, there’s just something about fruit that shouts "summer!" It’s vibrant, refreshing, and oh-so-delicious, especially when paired with a little zing from citrus and sweetness from honey. Today, I’m thrilled to share with you my go-to recipe for an Easy Fruit Salad with Honey Lime Dressing.
This dish is seriously perfect for any occasion—you can whip it up for brunch, serve it at a barbecue, or even enjoy a bowl for a light snack during the hot summer days. Believe me, this fruit salad is not your average bowl of chopped fruit. With the honey lime dressing, it transforms from a simple side dish into a flavor explosion that dances on your taste buds!
Growing up, my family had a tradition of making fruit salads during summer picnics. We’d gather around the picnic table, outdoors beneath the shade of giant oaks, laughing and reminiscing as we enjoyed our feast. My mom always encouraged us to get creative with the fruits we used, adding in whatever was fresh and seasonal. I think that’s the best part of this recipe: it’s flexible! You can mix and match or get a little adventurous with whatever’s in your fridge.
The honey lime dressing is the star here! It’s quick to make, and every drizzle brings a burst of brightness to the juicy fruits. Best of all, it’s an amazing way to get in those juicy vitamins and savor the season’s offerings. Ready to dive into the world of color and flavor? Let’s get started!
Personal Story
One of my fondest memories in the kitchen involves a bountiful summer day when my family decided to host a picnic at the local park. My siblings and I were tasked with creating the ultimate fruit salad. We raided our backyard and the local farmers’ market, gathering strawberries, blueberries, and a few things we thought looked "pretty." We threw in all the fruits we could find, of course, and I remember uncovering a hidden stash of ripe kiwis beneath the leaves in our fridge. Each of us had our signature touches—the kids were spread out in a joyous whirlwind of activity.
My job was to make the dressing, which really became the finishing touch! I squeezed fresh lime juice, drizzled honey, and—like a true little chef—tasted it after each addition, trying to find that perfect balance between sweet and tangy. We tossed everything together in a huge bowl, and as we carried it to our picnic spot, the bright colors and tantalizing aromas of our creation turned heads and brought smiles from other park-goers.
That day, we sat sprawled on checkered blankets, laughing and sharing stories, indulging in our creation. The sweet fruit, combined with that zingy dressing, was the highlight of the feast. To this day, I love making this fruit salad not just to relive that sweet nostalgia, but to create new memories with friends and family. Now, it’s your turn to make some fun memories with this delightful dish!
Ingredients
-
2 cups strawberries, hulled and sliced
- These juicy beauties are packed with vitamin C and are the sweetest way to start. If strawberries aren’t in season, feel free to substitute with raspberries or diced apples for a tart twist.
-
2 cups blueberries
- These little gems are like nature’s candy! They add a pop of color and are rich in antioxidants. No blueberries? No worries; think about adding blackberries or even diced peaches!
-
2 cups pineapple, diced
- Pineapple brings a tropical vibe and a sweet-tart flavor. If you don’t have fresh pineapple, drained canned pineapple works too, but fresh is always ideal for the best texture.
-
2 cups kiwi, peeled and sliced
- With its vibrant green color and unique taste, kiwi adds a refreshing twist. Don’t want to deal with peeling? Go ahead and swap it out for other fruits like mango or papaya for a tropical flair!
-
1 cup honey
- Honey is a natural sweetener that elevates the entire dish. If you’re vegan, feel free to swap honey for agave syrup or maple syrup for that same sweetness.
-
1 lime, juiced
- The star of the dressing! Lime juice brings in that necessary acidity to balance the sweetness. If limes aren’t handy, use lemons or even a splash of orange juice as a substitute.
-
Mint leaves for garnish (optional)
- These delicate leaves not only add a fresh aroma but also a lovely finish. If mint isn’t your thing, chopped basil could work just as nicely!
Step-by-Step Instructions
-
Gather Your Ingredients
- Start by gathering all your ingredients and equipment. This is the perfect time to channel your inner chef! You’ll need a large mixing bowl, a cutting board, a knife, and a small bowl if you want to mix the dressing separately.
-
Prep the Fruits
- Begin with the strawberries. Hull them by removing the green tops, then slice them into quarters or halves, depending on their size. Place the sliced strawberries into your mixing bowl. (Tip: If you allow the strawberries to sit a few minutes after slicing them, they’ll release their juices and create their own mini dressing!)
-
Add Blueberries
- Rinse the blueberries in cold water and drain them. No slicing needed—just toss them directly into the bowl with the strawberries. (Chefs Hack: If you’re using frozen blueberries, let them thaw for a bit first—this avoids mushiness!)
-
Cut the Pineapple
- If you’re using a fresh pineapple, carefully cut the top off, remove the skin, and dice the flesh into bite-sized pieces. Add the fresh pineapple to the mix. (Tip: To make this easier, cut the pineapple into rings and then dice through those rings!)
-
Slice the Kiwi
- Peel the kiwi and slice it into rounds or quarters, according to your preference. Toss them into the bowl with the other fruits, throwing in those beautiful green slices! (Pro Tip: Use a spoon to scoop out the kiwi flesh cleanly!)
-
Make the Honey Lime Dressing
- In a small bowl, combine the honey and lime juice. Give it a good stir with a whisk or a fork until fully blended. Want a little zing? You can add a bit more lime juice to suit your taste! (Tip: If it’s a hot day, you can lightly warm the honey for easier mixing!)
-
Combine Everything
- Drizzle the honey lime dressing over your colorful fruit medley. Using a large spoon or spatula, gently toss everything until the fruits are fully coated with that luscious dressing. (Caution: Be gentle! You don’t want to mush the fruits!)
-
Let it Marinate
- For an enhanced flavor experience, let the salad sit in the fridge for about 30 minutes. This allows the fruits to soak up some of that honey lime goodness and meld together beautifully.
Serving Suggestions
Once your fruit salad is nicely chilled and ready to go, grab a pretty bowl and spoon it in! You can serve it directly in individual bowls for guests or pile it high in one large dish for a family-style setting. Finishing touches? Add a few sprigs of fresh mint on top for a gorgeous pop of color and fragrance. This fruit salad also makes a delightful addition to brunch tables or summer feasts, bringing a burst of cheer and freshness to any spread!
Recipe Variations
Feeling adventurous? Here are some fun twists and variations to play around with:
- Tropical Twist: Switch out the kiwi for mango, add some shredded coconut, and maybe throw in a few macadamia nuts for crunch.
- Berry Blast: Use raspberries, blackberries, and sliced strawberries with a splash of orange juice instead of lime for a different citrus profile.
- Nutty Delight: Add a handful of chopped nuts like almonds or walnuts for a bit of crunch, or sprinkle with chia seeds for extra nutrition.
- Creamy Addition: Drizzle with a bit of yogurt on top for a creamy layer that complements the fruits beautifully!
Chef’s Notes
As I look back at those summers spent making fruit salads, I realize that my approach to this dish has changed over time. I’ve played with countless ingredients and combinations! Each evolution brought new friends and flavors, and now, I’m all about keeping it simple yet flexible. I adore taking whatever fruit is in season and transforming it into this delicious medley. And don’t let me forget: the key is all about the dressing! I’ve tried adding spices like cinnamon or ginger when feeling funky, and boy, have those been successful experiments!
FAQs and Troubleshooting
-
Can I use frozen fruits?
- Absolutely! Just be cautious because some fruits might change texture after thawing, especially bananas or and strawberries. Use frozen berries for best results.
-
How long does the fruit salad last?
- This salad is best enjoyed fresh, but you can store it in an airtight container in the fridge for up to 3 days. Just be mindful that it may get watery as it sits!
-
What if I don’t have honey?
- No problem! Agave syrup, maple syrup, or even amber syrup can easily take honey’s place. Just keep adjusting the sweetness to your liking!
-
Is there a way to make this salad ahead of time?
- Sure thing! You can pre-cut the fruits and mix the dressing, but keep them separate. Combine everything right before serving to maintain freshness and color.
Nutritional Info
(Optional, can be personalized based on specific dietary needs or preferences!)
This fruit salad is not just delicious but also nutritious! Each serving is low in calories yet high in vitamins and antioxidants, benefiting your overall health. Enjoy these nutritious powerhouse fruits without guilt, and feel free to get creative to make it even more nourishing!
So there you have it, friends—an Easy Fruit Salad with Honey Lime Dressing that not only tantalizes the taste buds but also brings back warm memories of summer sweetness! Whether for a gathering or a personal treat, this salad is sure to brighten anyone’s day. Happy cooking, and here’s to keeping things fresh, simple, and delicious!
PrintEasy Fruit Salad with Honey Lime Dressing

A vibrant, refreshing fruit salad with a zesty honey lime dressing, perfect for summer picnics and gatherings.
- Prep Time: 15 minutes
- Cook Time: 0 minutes
- Total Time: 15 minutes
- Yield: 6 servings 1x
- Category: Dessert
- Method: Mixing
- Cuisine: American
- Diet: Vegetarian
Ingredients
- 2 cups strawberries, hulled and sliced
- 2 cups blueberries
- 2 cups pineapple, diced
- 2 cups kiwi, peeled and sliced
- 1 cup honey
- 1 lime, juiced
- Mint leaves for garnish (optional)
Instructions
- Gather your ingredients.
- Prep the strawberries by hulling and slicing them, then place in mixing bowl.
- Add the rinsed blueberries directly into the bowl.
- Cut the fresh pineapple and add to the mix.
- Slice the kiwi and toss it into the bowl.
- Make the honey lime dressing by combining honey and lime juice in a small bowl.
- Combine everything by drizzling the dressing over the fruits and gently tossing to coat.
- Let it marinate in the fridge for about 30 minutes.
Notes
Serve chilled; can be garnished with fresh mint. Enjoy fresh for best results.
Nutrition
- Serving Size: 1 serving
- Calories: 100
- Sugar: 20g
- Sodium: 5mg
- Fat: 0g
- Saturated Fat: 0g
- Unsaturated Fat: 0g
- Trans Fat: 0g
- Carbohydrates: 25g
- Fiber: 3g
- Protein: 1g
- Cholesterol: 0mg
Keywords: fruit salad, summer salad, healthy dessert, honey lime dressing