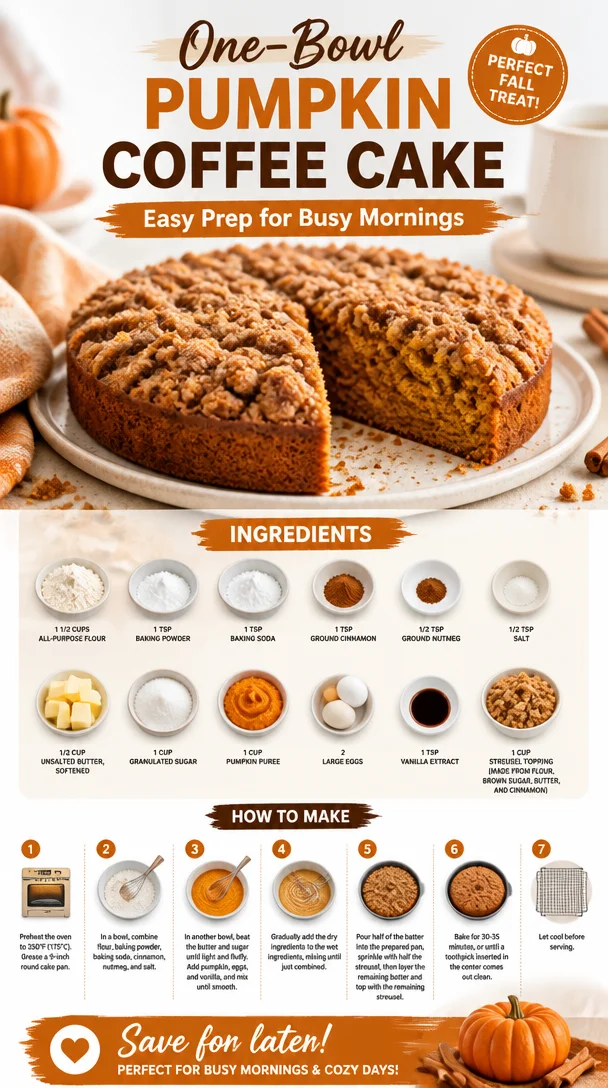
One-Bowl Pumpkin Coffee Cake: Easy Prep for Busy Mornings
The Ultimate Pumpkin Coffee Cake Recipe: A Slice of Fall in Your Kitchen
Welcome to Clean Plate Cravings! If you’re like me and can’t resist the warm, spicy aroma of pumpkin treats wafting through your kitchen, then you’re in for a delicious delight today. Today, we’re diving into a recipe I hold close to my heart: Pumpkin Coffee Cake. Imagine this: a moist, spiced coffee cake topped with a buttery streusel that brings just the right amount of sweetness. Whether you’re sipping coffee in the morning or gathering with friends for an afternoon treat, this cake is the perfect companion.
Pumpkin Coffee Cake is not just delicious; it’s also a celebration of the cozy fall season. With its inviting flavors, it makes every bite feel like a warm hug. The best part? It’s surprisingly simple to make—even for those who don’t consider themselves seasoned bakers. So grab your apron, and let’s bake something beautiful together!
A Slice of Nostalgia
When I think of pumpkin coffee cake, my mind unexpectedly drifts back to my childhood kitchen. Every autumn, my family would gather for an annual pumpkin-picking adventure at a local farm. The excitement of choosing the perfect pumpkin was always followed by the same ritual: returning home to bake with Mom.
One particular year, I remember the weather being crisp, with just a hint of frost in the air. My mom had an old recipe box filled with index cards, each covered in smudges and a little bit of love. That day, she pulled from it a faded card with her handwritten Pumpkin Coffee Cake recipe. As we measured and mixed, the spices filled the air, creating a cozy atmosphere that felt like pure joy.
Fast forward to years later—every time I bake this cake, those memories come rushing back. The laughter, the stories, the delicious smells—it’s all bundled up in this recipe. It’s not just food; it’s a tradition, an experience, and a blast from the past that I’m thrilled to share with you!
Ingredients
Let’s gather what we need to create this scrumptious treat! Here’s what you’ll need:
-
1 1/2 cups all-purpose flour
Perfect for providing structure to your cake! If you’re looking for a gluten-free option, try using a 1:1 gluten-free flour blend. -
1 teaspoon baking powder
This is your leavening agent, ensuring the cake rises beautifully. Always check the date on your baking powder; expired powder won’t give you the lift you need! -
1 teaspoon baking soda
A vital partner to the baking powder and helps with the cake’s fluffy texture. -
1 teaspoon ground cinnamon
The warmth of cinnamon makes this cake quintessentially fall! If you like a twist, try using fresh cinnamon for a more robust flavor. -
1/2 teaspoon ground nutmeg
A little nutmeg goes a long way in adding that cozy, spiced note. If you want an extra zing, freshly grated nutmeg is a must! -
1/2 teaspoon salt
Salt enhances all the other flavors, making each bite even more flavorful. -
1/2 cup unsalted butter, softened
This becomes the rich base of the cake. Don’t forget to let it soften at room temperature for easy mixing—plus, it blends smoothly. -
1 cup granulated sugar
Sweetness is key! Feel free to swap with coconut sugar for a more caramelly flavor and a healthier take. -
1 cup pumpkin puree
This is not just for flavor but also moisture! Aim for pure pumpkin puree (not the spiced pie filling) for the best results. -
2 large eggs
Eggs bind the ingredients together and contribute to the cake’s texture. For a vegan alternative, use flax eggs or applesauce. -
1 teaspoon vanilla extract
This adds a depth of flavor that makes everything taste like home. -
1 cup streusel topping
Made from flour, brown sugar, butter, and cinnamon, this is the crown jewel of the cake! You can mix it up with chopped nuts or oats for a delightful crunch.
Step-by-Step Instructions
Now that we have everything, let’s roll up our sleeves and get baking! Follow along for each step, and I’ll sprinkle in some chef tips along the way.
Step 1: Preheat Your Oven
Preheat your oven to 350°F (175°C). This is crucial for baking a perfectly fluffy cake! While the oven warms up, prepare yourself for the heavenly scents that will soon fill your kitchen.
Step 2: Prepare Your Baking Pan
Grease a 9×13-inch baking pan with butter or cooking spray. This step is vital to ensure your cake doesn’t stick! Alternatively, you can line it with parchment paper for easy removal.
Step 3: Mix Your Dry Ingredients
In a mixing bowl, whisk together the flour, baking powder, baking soda, cinnamon, nutmeg, and salt. Make sure everything is well combined; this helps distribute the leavening agents evenly throughout the cake.
Step 4: Cream the Butter and Sugar
In another mixing bowl, cream together the softened unsalted butter and granulated sugar until light and fluffy—about 3 minutes. This step adds air and ensures a tender crumb!
Here’s a little tip: when creaming, use a stand mixer with a paddle attachment or a handheld mixer for best results.
Step 5: Add the Eggs and Pumpkin
Next, beat in the eggs one at a time, mixing well after each. Then, add the pumpkin puree and vanilla extract. Blend until smooth. It’s crucial to incorporate the wet ingredients fully into the butter-sugar mix to make sure they don’t separate during baking!
Step 6: Combine Wet and Dry Ingredients
Gradually add the dry ingredients to the wet ingredients. Stir until just combined; a few lumps are okay. Overmixing can lead to a dense cake, and nobody wants that!
Step 7: Prepare the Streusel Topping
In a separate bowl, mix together the flour, brown sugar, melted butter, and cinnamon for the streusel topping. Use a fork or your fingers to create a crumbly texture. It should have small clumps—this is what gives it that delightful crunch!
Step 8: Assemble and Bake
Pour your pumpkin cake batter into the prepared baking pan, smoothing the top with a spatula. Now comes the magic: sprinkle the streusel topping generously over the cake batter.
Bake in the preheated oven for 30-35 minutes, or until a toothpick comes out clean from the center. Your kitchen will smell divine, with all those spiced notes wafting through the air.
Step 9: Cool and Serve
Once it’s done, let it cool in the pan for about 10-15 minutes before transferring it to a wire rack. This helps the cake set up beautifully. Slice into squares and enjoy this delicious treat while it’s still warm!
Serving Suggestions
For an extra special touch, serve your Pumpkin Coffee Cake with a generous drizzle of cream cheese frosting or a dollop of whipped cream. A steaming cup of coffee or chai tea makes the perfect pairing for this delightful slice of fall!
Recipe Variations
- Nutty Pumpkin Cake: Fold in 1/2 cup of chopped nuts like pecans or walnuts for an unexpected crunch.
- Chocolate Chip Pumpkin Cake: Mix in 1/2 cup of chocolate chips for a richer flavor—can never go wrong with chocolate!
- Gluten-Free Version: Substitute all-purpose flour with a gluten-free flour blend, ensuring your baking powder and baking soda are also gluten-free.
- Spiced Up: Add some ginger or cloves for an elevated spice level that truly screams fall!
Chef’s Notes
This Pumpkin Coffee Cake is one of those recipes that has grown with me over the years. I started with my mom’s classic version and have been experimenting with variations ever since. Sometimes I even throw in a splash of maple syrup for extra sweetness! Cooking is all about creativity, and I love encouraging you to put your spin on these recipes.
And here’s a fun little story—last year, I accidentally grabbed the cayenne pepper instead of cinnamon for the streusel topping. Let’s just say that was a spicy surprise! But the lesson? Mistakes can sometimes lead to delightful culinary discoveries.
FAQs and Troubleshooting
Q1: My cake didn’t rise, what went wrong?
A: This can happen if your baking powder or soda is expired. Always check those dates! Also, make sure not to overmix your batter, as this can deflate the cake.
Q2: Can I use fresh pumpkin instead of canned?
A: Absolutely! Just make sure to cook and puree the pumpkin until smooth. Drain off excess moisture if necessary, as this affects the cake’s texture.
Q3: Why is my coffee cake too dense?
A: This could be due to overmixing or measuring your flour improperly. Spoon the flour into your measuring cup rather than scooping directly from the bag to prevent packed flour.
Q4: How should I store leftover cake?
A: Store any leftover cake in an airtight container at room temperature for up to three days. If you want to keep it longer, refrigerate it, and it’ll stay fresh for about a week!
Nutritional Info:
For those keeping an eye on nutrition, each slice of Pumpkin Coffee Cake (based on 12 servings) roughly contains:
- Calories: 220
- Fat: 10g
- Carbohydrates: 31g
- Fiber: 1g
- Protein: 3g
(Note: Please adjust according to specific ingredients and serving sizes.)
And voilà! You’ve created a spectacular Pumpkin Coffee Cake that’s sure to bring smiles and satisfaction to family and friends alike. Happy baking, and enjoy every delicious slice!
PrintUltimate Pumpkin Coffee Cake
A moist, spiced coffee cake topped with buttery streusel, perfect for fall gatherings.
- Prep Time: 15 minutes
- Cook Time: 35 minutes
- Total Time: 50 minutes
- Yield: 12 servings 1x
- Category: Dessert
- Method: Baking
- Cuisine: American
- Diet: Vegetarian
Ingredients
- 1 1/2 cups all-purpose flour
- 1 teaspoon baking powder
- 1 teaspoon baking soda
- 1 teaspoon ground cinnamon
- 1/2 teaspoon ground nutmeg
- 1/2 teaspoon salt
- 1/2 cup unsalted butter, softened
- 1 cup granulated sugar
- 1 cup pumpkin puree
- 2 large eggs
- 1 teaspoon vanilla extract
- 1 cup streusel topping
Instructions
- Preheat your oven to 350°F (175°C).
- Grease a 9×13-inch baking pan with butter or cooking spray.
- Whisk together the flour, baking powder, baking soda, cinnamon, nutmeg, and salt in a bowl.
- Cream the butter and sugar until light and fluffy.
- Add the eggs one at a time, mixing well after each, then add the pumpkin puree and vanilla.
- Gradually add the dry ingredients to the wet ingredients and stir until just combined.
- Mix the streusel topping ingredients in a separate bowl until crumbly.
- Pour the cake batter into the prepared pan and top with streusel.
- Bake for 30-35 minutes or until a toothpick comes out clean.
- Let cool for 10-15 minutes before serving.
Notes
Serve warm with cream cheese frosting or whipped cream. A great pairing with coffee or chai tea.
Nutrition
- Serving Size: 1 slice
- Calories: 220
- Sugar: 10g
- Sodium: 200mg
- Fat: 10g
- Saturated Fat: 6g
- Unsaturated Fat: 4g
- Trans Fat: 0g
- Carbohydrates: 31g
- Fiber: 1g
- Protein: 3g
- Cholesterol: 30mg
Keywords: pumpkin coffee cake, fall dessert, coffee cake, pumpkin dessert
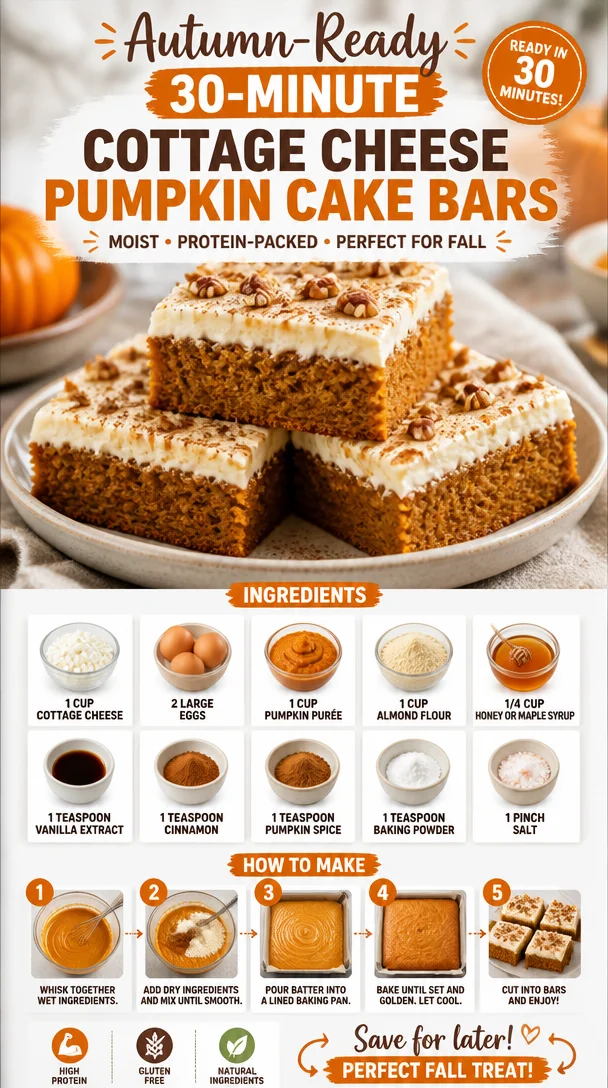
Autumn-Ready 30-Minute Cottage Cheese Pumpkin Cake Bars
Irresistibly Easy Cottage Cheese Pumpkin Cake Bars
Welcome, food lovers! Today, we’re diving into something truly delightful—Cottage Cheese Pumpkin Cake Bars. As the cooler months roll in and the leaves start to change, I can’t help but think about all the comfort foods that come into play. These cake bars are the perfect blend of cozy pumpkin flavors and the smoothness of cottage cheese, making them a must-try for anyone who appreciates a little sweetness in their life without straying too far from the healthy lane.
So let’s roll up those sleeves, turn on some tunes, and let’s bake together! Trust me; by the end of this post, you’ll be swiping the last piece off the pan and thinking, “How can something this healthy taste so fabulous?”
A Slice of Nostalgia
Growing up, autumn was always special in my family. The air would turn crisp, and the kitchen would transform into a haven filled with the scents of cinnamon and nutmeg. My mom had this magical ability to turn the simplest ingredients into unforgettable treats. One of my favorite memories is when she introduced us to pumpkin anything. Whether it was a hearty soup or fluffy muffins, pumpkin was the star of the show.
But it wasn’t until I stumbled upon the idea of adding cottage cheese to a pumpkin dessert that the magic truly happened. I remember the first time I tried making pumpkin bars with cottage cheese. The end result was a revelation. They were moist, packed with protein, and had that rich, comforting flavor. It felt like that warm hug from my childhood, but somehow lighter.
The ease and versatility of the recipe quickly made it a staple in my kitchen, and it’s become a family favorite. Now, I’m thrilled to share this gem with you so you, too, can recreate those cozy autumn vibes all year long!
Ingredients
Here’s what you’ll need for these delicious Cottage Cheese Pumpkin Cake Bars:
-
1 cup Cottage cheese
Provides moisture and protein. It’s creamy and contributes to the fluffiness of the bars. If you want a dairy-free option, try Greek yogurt or silken tofu! -
2 large Eggs
Acts as a binder to hold everything together. If you need an egg substitute, you can use flax eggs (1 tablespoon flaxseed meal mixed with 2.5 tablespoons water per egg). -
1 cup Pumpkin purée
Adds that quintessential pumpkin flavor and moisture. Canned pumpkin is great for convenience, but feel free to roast your own for a fresh taste! -
1 cup Almond flour
A gluten-free option that gives a nice texture to the bars. You can swap it for whole wheat flour or oat flour for a different flavor and texture. -
1/4 cup Honey or maple syrup
Adds optional sweetness, although the pumpkin is naturally sweet as well! Use your favorite sweetener—agave or coconut sugar work nicely too. -
1 teaspoon Vanilla extract
Enhances all the flavors. Freshly scraped vanilla bean will take it to the next level if you’re feeling fancy! -
1 teaspoon Cinnamon
This warm spice is the essence of fall. You can also mix in a bit of cardamom for a unique twist. -
1 teaspoon Pumpkin spice
A blend of spices that brings complexity. If you don’t have it, a mix of nutmeg and ginger will do the trick. -
1 teaspoon Baking powder
Helps the bars rise and get that nice fluffy texture. -
1 pinch Salt
Balances the sweetness, making everything taste better.
Step-by-Step Instructions
Now, let’s get cooking! Here’s how to whip up these delightful cake bars, step by step.
-
Preheat your oven
Preheat your oven to 350°F (175°C). This ensures your batter cooks evenly. While it warms up, you can gather your ingredients and prep the pans. -
Grease your baking dish
Use a butter or non-stick spray to coat an 8×8 inch baking dish. If you want easy cleanup, consider lining it with parchment paper—just leave some overhang for easy lifting later. -
Blend the cottage cheese
In a mixing bowl or blender, add your cottage cheese. If you want a smoother texture, blend it until creamy. Trust me, this makes a difference in the final product! -
Add the eggs and pumpkin
Crack the eggs into the bowl with your cottage cheese and add the pumpkin purée. Mix it all together until smooth. You want these ingredients to be well incorporated. -
Stir in the sweetener and vanilla
Pour in your honey (or maple syrup) and vanilla extract. Give it a good stir to combine all those lovely flavors. -
Combine the dry ingredients
In another bowl, whisk together the almond flour, cinnamon, pumpkin spice, baking powder, and salt. This step helps distribute the leavening evenly. -
Merge wet and dry ingredients
Gradually fold the dry mixture into your pumpkin mixture. Use a spatula to carefully combine until just mixed—don’t overdo it! A few lumps are okay. -
Pour and spread the batter
Scoop your thick batter into the prepared baking dish. Use the spatula to spread it out evenly. You can sprinkle a dash of cinnamon on top for that extra cozy touch! -
Bake!
Pop your dish in the preheated oven and bake for about 25-30 minutes. It’s ready when a toothpick inserted into the center comes out clean (or with a few moist crumbs). -
Cool and cut
Let the bars cool in the pan for about 10 minutes, then carefully lift them out using the parchment paper. Cut them into squares and enjoy!
Serving Suggestions
These Cottage Cheese Pumpkin Cake Bars can be enjoyed warm from the oven, or let them cool down for a portable treat. Serve them with a dollop of Greek yogurt or a sprinkle of nuts for added crunch. A drizzle of honey or maple syrup also makes for an excellent finishing touch!
Recipe Variations
Feel free to get creative with this recipe! Here are some fun variations:
-
Chocolate Chip Twist: Add 1/2 cup of dark chocolate chips to the batter for a sweet surprise.
-
Nutty Delight: Mix in a handful of chopped walnuts or pecans for an added crunch.
-
Dairy-Free Version: Use almond or coconut yogurt in place of cottage cheese and adjust the sweetener to taste.
-
Spice it Up: Swap traditional pumpkin spice with chai spice or even gingerbread spice for a festive flair!
-
Fruit Infusion: Toss in 1/2 cup of cranberries or raisins for a burst of fruity flavor.
Chef’s Notes
I can’t help but chuckle every time I think about the first time I made these bars; I forgot to add the eggs! Can you imagine my surprise when they turned out more like a dense cake than bars? But hey, even those dense cakes ended up being a hit in the family, so there’s always room for happy accidents in the kitchen!
Over time, I’ve tweaked this recipe to strike the perfect balance between taste and nutrition. It’s evolved into a go-to, not just in the fall but any time I crave something sweet yet wholesome. It just goes to show—never stop experimenting, because you might stumble upon something delicious.
FAQs and Troubleshooting
1. Can I make these bars ahead of time?
Absolutely! These bars keep well in an airtight container in the fridge for up to a week. Just reheat them slightly in the microwave if you prefer them warm!
2. What if I don’t have almond flour?
No problem! You can use all-purpose flour or oat flour if gluten isn’t an issue. Just be cautious with quantities, as different flours absorb moisture differently.
3. How do I know when they’re done?
Insert a toothpick in the center of the bars. If it comes out clean or with a few moist crumbs, they’re perfect! If you see wet batter, continue baking for a few more minutes.
4. My batter is too thick; what can I do?
If your batter feels dense, don’t fret! You can mix in a tablespoon of milk or dairy-free milk to loosen it up. Sometimes, especially with almond flour, the absorption can vary.
Nutritional Info
These Cottage Cheese Pumpkin Cake Bars pack a nutritious punch! Each bar is rich in protein thanks to the cottage cheese and eggs while being lower in carbohydrates compared to traditional cake. Plus, the pumpkin adds fiber and essential vitamins!
So there you have it, friends! Irresistibly easy Cottage Cheese Pumpkin Cake Bars that not only satisfy your sweet tooth but also keep things on the healthy side. I honestly can’t wait for you to try these out! They’re perfect for breakfast, a snack, or even dessert. Happy baking, and remember: keep it simple, keep it fresh, and always keep it delicious!
PrintIrresistibly Easy Cottage Cheese Pumpkin Cake Bars
A delightful blend of cozy pumpkin flavors and smooth cottage cheese, perfect for a healthy treat.
- Prep Time: 10 minutes
- Cook Time: 30 minutes
- Total Time: 40 minutes
- Yield: 16 servings 1x
- Category: Dessert
- Method: Baking
- Cuisine: American
- Diet: Vegetarian
Ingredients
- 1 cup Cottage cheese
- 2 large Eggs
- 1 cup Pumpkin purée
- 1 cup Almond flour
- 1/4 cup Honey or maple syrup
- 1 teaspoon Vanilla extract
- 1 teaspoon Cinnamon
- 1 teaspoon Pumpkin spice
- 1 teaspoon Baking powder
- 1 pinch Salt
Instructions
- Preheat your oven to 350°F (175°C).
- Grease an 8×8 inch baking dish.
- Blend the cottage cheese until creamy.
- Add the eggs and pumpkin purée, mixing until smooth.
- Stir in the honey and vanilla extract.
- Combine the dry ingredients in another bowl.
- Merge the wet and dry ingredients carefully.
- Pour the batter into the prepared dish.
- Bake for about 25-30 minutes.
- Cool for 10 minutes, cut into squares, and enjoy!
Notes
These bars can be made ahead of time and stored in an airtight container in the fridge for up to a week.
Nutrition
- Serving Size: 1 bar
- Calories: 200
- Sugar: 8g
- Sodium: 150mg
- Fat: 6g
- Saturated Fat: 2g
- Unsaturated Fat: 4g
- Trans Fat: 0g
- Carbohydrates: 28g
- Fiber: 2g
- Protein: 6g
- Cholesterol: 50mg
Keywords: cottage cheese pumpkin cake, healthy dessert, pumpkin bars
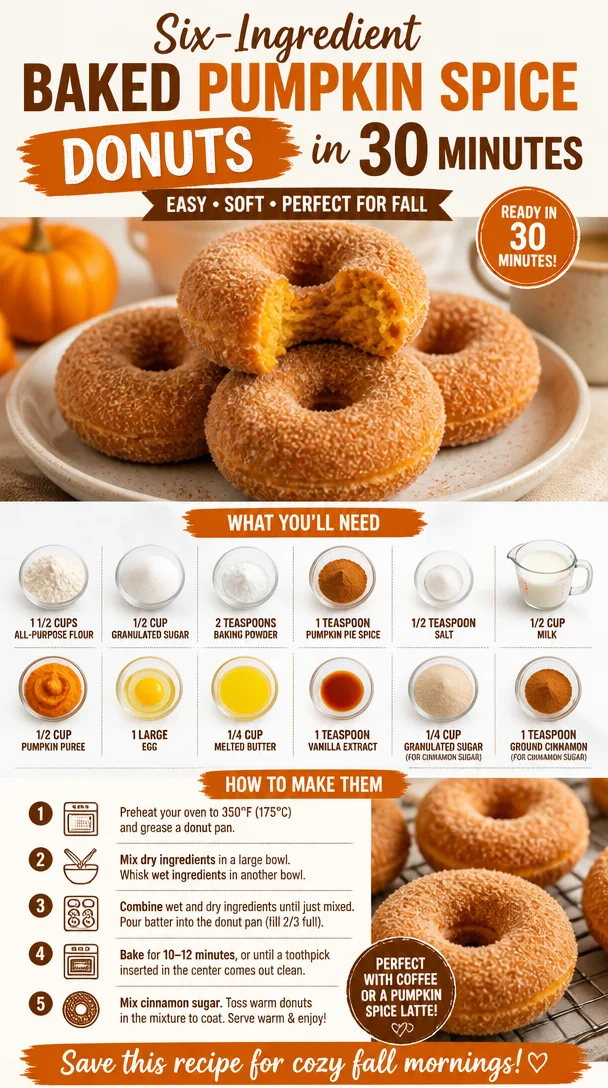
Six-Ingredient Baked Pumpkin Spice Donuts in 30 Minutes
Baked Pumpkin Spice Donuts: The Best Fall Treat
Welcome back to Clean Plate Cravings, my delightful kitchen haven where food equals joy, and flavors ignite happiness! Today, we’re diving into a cozy treat that brings all the autumn vibes: Baked Pumpkin Spice Donuts! 🍩
There’s something magical about the transition from summer to fall. The air turns crisp, leaves start to dance into shades of gold and red, and everything seems to slow down just a bit. Coffee shops begin showcasing their pumpkin spice everything, and I can’t help but feel that giddy anticipation for this beloved season. But let’s be honest—while sipping on a pumpkin spice latte is a lovely indulgence, I’m all about finding ways to enjoy those fall flavors without stepping outside, especially when I can whip up a batch of these irresistibly fluffy and spiced donuts in my own kitchen!
These donuts are not just about the taste; they’re a warm hug on a chilly day, sharing a slice of nostalgia from childhood adventures to the farmer’s market in the autumn. I remember the joy of picking pumpkins on sunny afternoons, carving them into jack-o’-lanterns, and then sneaking bites of baked goods made with that glorious pumpkin puree. It’s a comforting circle of life, and now, I can share that warmth with you through these easy-to-make treats!
Trust me; once you smell that aromatic pumpkin spice wafting through your home, the world outside could be blustery, and you’d still be wrapped in a blanket of cozy bliss. So grab your apron, and let’s get baking!
A Little Slice of Autumn: My Pumpkin Spice Memory
I can still picture it: a cool October afternoon, my siblings and I racing through fields of orange pumpkins, laughter bouncing on the crisp air. We always made sure to pick the perfect pumpkins, ones that held the promise of countless pies and treats. Later on, back at home, we’d gather in the kitchen as my mom transformed those pumpkins into something magical.
Her warm pumpkin bread was our favorite, a moist delight that filled the house with the scent of cinnamon and nutmeg. As we waited, impatiently hovering by the oven, we’d steal bits of cinnamon-sugar-coated batter and tease each other about who sneaked the most. Those memories are imprinted on my heart, and it was only a natural evolution to create my own spin on that autumn classic—these baked pumpkin spice donuts.
It’s funny how food has this wonderful way of connecting us to our memories, isn’t it? And each donut is like a bite-sized piece of those cherished moments—comforting, nostalgic, and oh-so-delicious. Let’s dive into the ingredients that will take us back down memory lane!
Ingredients
Here’s what you’ll need to whip up these delightful pumpkin spice donuts, along with some handy chef insights:
-
1 1/2 cups all-purpose flour
This forms the base of our donuts, creating that fluffy and tender texture. You can swap it with whole wheat flour for a heartier flavor, but yield may vary in lightness. -
1/2 cup granulated sugar
Regular sugar will do just fine here, but if you’re feeling adventurous, try using coconut sugar for a hint of caramel flavor. -
2 teaspoons baking powder
This is our leavening agent, giving those donuts the lift they need for that airy bite! -
1 teaspoon pumpkin pie spice
A delicious spice mix that usually contains cinnamon, nutmeg, ginger, and allspice. You can easily make your own if you have the individual spices on hand! -
1/2 teaspoon salt
Just a pinch enhances all the flavors, balancing the sweetness beautifully. -
1/2 cup milk
Use your choice of dairy or non-dairy milk here. Almond milk, oat milk, or even buttermilk will work well. -
1/2 cup pumpkin puree
The star of our dish! Fresh puree is fantastic, but canned pumpkin works wonders, too—it’s got that rich, velvety texture that we need! -
1 large egg
This binds our donuts together and gives them an amazing texture. For a vegan version, use a flax egg (1 tablespoon ground flaxseed mixed with 2.5 tablespoons water). -
1/4 cup melted butter
It’s what gives our donuts that rich, indulgent flavor. In a pinch, you can use coconut oil for a dairy-free option. -
1 teaspoon vanilla extract
Always a must in baking! It brightens flavors and adds a subtle warmth. -
1/4 cup granulated sugar (for cinnamon sugar)
This will add a delightful sweetness for our donut coating. -
1 teaspoon ground cinnamon (for cinnamon sugar)
It’s a classic pairing with pumpkin spice—use it generously for a spiced crunch!
Step-by-Step Instructions
Now that we’ve rounded up all our ingredients, let’s roll up our sleeves and get baking!
Step 1: Preheat Your Oven
First things first, preheat your oven to 350°F (175°C). This ensures those donuts bake evenly. If you have a silicone donut pan, great! If not, you can lightly grease a metal donut pan with cooking spray or butter, making sure those little circles will pop out easily later on.
Step 2: Combine Dry Ingredients
In a mixing bowl, whisk together the all-purpose flour, sugar, baking powder, pumpkin pie spice, and salt. Adding the dry ingredients first allows for even distribution of the leavening agent, which helps our donuts rise perfectly.
Step 3: Mix Wet Ingredients
In a separate bowl, whisk together the milk, pumpkin puree, egg, melted butter, and vanilla extract until smooth. A tip from the chef: Make sure your butter is cool enough so it doesn’t scramble the egg when you add it!
Step 4: Combine Wet and Dry
Now, pour the wet ingredients into the dry mixture. Gently fold it together with a rubber spatula until just combined; it’s okay if there are a few lumps! Overmixing can lead to denser donuts, and nobody wants that!
Step 5: Fill the Pan
Carefully spoon or pipe the batter into the prepared donut pan, filling each cavity about 2/3 full. This is where the magic happens! If you haven’t used a piping bag before, don’t worry—it’s a breeze! Just snip the corner of a zip-top bag if you don’t have one, and you’re ready to go.
Step 6: Bake
Pop those donuts into the oven and set a timer for 10–12 minutes. You’ll know they’re done when they spring back lightly when tapped and a toothpick comes out clean. Pro tip: Don’t overbake! A few extra minutes can dry out the donuts.
Step 7: Cool and Coat
Once baked, let the donuts cool in the pan for about 5 minutes, then carefully transfer them to a wire rack to cool completely. While they’re still warm, mix the granulated sugar and cinnamon in a small bowl and roll the donuts in this sweet mixture for that perfect finishing touch.
Serving Suggestions
These baked pumpkin spice donuts are best enjoyed fresh but can be stored in an airtight container for a few days—if they last that long! Serve them on a beautiful platter with a sprinkle of additional cinnamon sugar and a delightful warming drink, like a spiced chai or creamy hot chocolate. ☕️ They make a great addition to your weekend brunch spread or as sweet little snacks to brighten your day!
Recipe Variations
-
Glazed Pumpkin Spice Donuts: After rolling in cinnamon sugar, dip in a simple glaze made from powdered sugar and milk for an extra sweet touch.
-
Choco-Pumpkin Delight: Fold in chocolate chips into the donut batter for a dual flavor explosion.
-
Nutty Crunch: Add chopped nuts, like pecans or walnuts, for a lovely crunch in each bite.
-
Pumpkin Maple Glaze: Substitute 1/4 cup of maple syrup in the glaze for a richer flavor that complements the pumpkin beautifully.
-
Mini Donuts: Use a mini donut pan for bite-sized treats perfect for sharing.
Chef’s Notes
I’ve loved tinkering to get this recipe just right. The great thing about donuts is that they’re so forgiving and versatile! I initially made these with a heavier batter, and while tasty, they sometimes turned into more of a muffin. Through trial and a few (okay, maybe many) batches, I found the sweet spot for softness and fluffiness. Also, don’t forget to involve the little chefs in your life—they’ll love helping out with rolling in the sugar!
FAQs and Troubleshooting
1. Why aren’t my donuts rising?
Make sure your baking powder is fresh! Old leavening agents may not do their job properly.
2. Can I use gluten-free flour?
Absolutely! Just swap out all-purpose flour for a gluten-free blend. Make sure it has xantham gum if it’s not already in the blend.
3. How do I store these donuts?
Once cooled, store them in an airtight container at room temperature for up to 3 days or refrigerate for a week. You can freeze them—just thaw and reheat in the microwave!
4. Why did my donuts come out dense?
This can happen from overmixing the batter. Remember, mix just until combined! Also, make sure not to pack the flour too tightly when measuring.
Nutritional Info (optional)
While I won’t list comprehensive nutritional info to avoid overwhelming you, feel free to consider these donuts a guilt-free indulgence with wholesome ingredients that provide a lovely treat for body and soul!
So there you have it! Delicious, baked pumpkin spice donuts that capture all the fall magic in every bite. I can’t wait for you to try them and savor those delightful memories, perhaps while creating a few new ones along the way. Happy baking, my foodie friends! 🍂
PrintBaked Pumpkin Spice Donuts
Delightful baked pumpkin spice donuts that bring the cozy vibes of fall to your kitchen, perfect for enjoying fresh with coffee or as a special treat.
- Prep Time: 15 minutes
- Cook Time: 12 minutes
- Total Time: 27 minutes
- Yield: 12 donuts 1x
- Category: Dessert
- Method: Baking
- Cuisine: American
- Diet: Vegetarian
Ingredients
- 1 1/2 cups all-purpose flour
- 1/2 cup granulated sugar
- 2 teaspoons baking powder
- 1 teaspoon pumpkin pie spice
- 1/2 teaspoon salt
- 1/2 cup milk
- 1/2 cup pumpkin puree
- 1 large egg
- 1/4 cup melted butter
- 1 teaspoon vanilla extract
- 1/4 cup granulated sugar (for cinnamon sugar)
- 1 teaspoon ground cinnamon (for cinnamon sugar)
Instructions
- Preheat your oven to 350°F (175°C).
- Combine the all-purpose flour, sugar, baking powder, pumpkin pie spice, and salt in a mixing bowl.
- Mix the milk, pumpkin puree, egg, melted butter, and vanilla extract in a separate bowl.
- Combine the wet ingredients into the dry mixture and fold together until just combined.
- Fill the donut pan cavities about 2/3 full.
- Bake for 10–12 minutes until a toothpick comes out clean.
- Cool the donuts for 5 minutes in the pan, then transfer to a wire rack.
- Coat the warm donuts in a mixture of granulated sugar and cinnamon.
Notes
These donuts are best enjoyed fresh but can be stored in an airtight container for up to 3 days. For added flavor, try folding in chocolate chips or nuts.
Nutrition
- Serving Size: 1 donut
- Calories: 250
- Sugar: 10g
- Sodium: 300mg
- Fat: 8g
- Saturated Fat: 4g
- Unsaturated Fat: 4g
- Trans Fat: 0g
- Carbohydrates: 38g
- Fiber: 2g
- Protein: 4g
- Cholesterol: 30mg
Keywords: pumpkin, donuts, fall treats
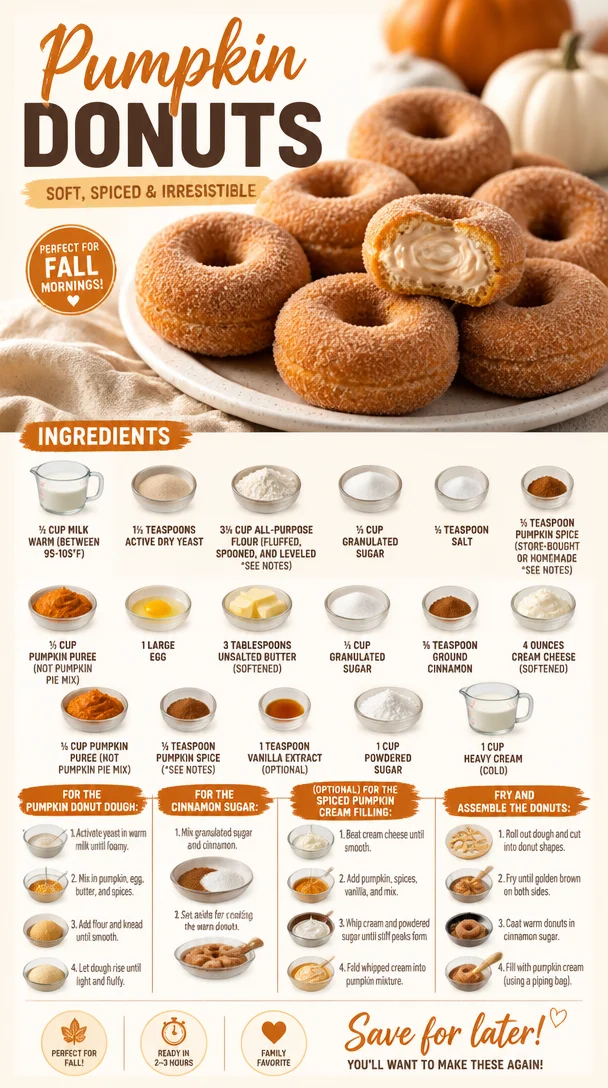
Pumpkin Donuts
Whipped Pumpkin Bliss: Your New Favorite Pumpkin Donuts Recipe
As the leaves begin to fall and the air grows crisp, we all know what that means: it’s pumpkin season! A time when everything from our lattes to our baking transforms with the rich, warm flavors of harvest. But let’s be honest—who can resist the soft, fluffy goodness of a freshly baked donut? Today, I’m excited to share my delightful pumpkin donut recipe that’s perfect for cozy mornings or delightful afternoon snacks. Trust me; your taste buds will be singing!
These pumpkin donuts are not just any ordinary treat; they are light, airy, and infused with the essence of autumn. The secret? A blend of warm spices and the natural sweetness of pumpkin puree. Not to mention, they’re super easy to whip up, making them a great project for a chilly weekend in the kitchen. With each bite, you can almost hear the crunching leaves beneath your feet! So grab your apron, and let’s get those ovens warm—we’re about to create some magic!
A Touch of Nostalgia: My First Pumpkin Donut Adventure
I remember the very first time I decided to make pumpkin donuts. It was one of those overcast October afternoons when the rain tapped softly against the window. I was home from college for the weekend, and my mom had a stash of pumpkin puree left over from her annual baking spree. I can still picture us together in the kitchen, flour flying every which way. We had a blast mixing the ingredients and giggling as we tasted the batter (I couldn’t help but sneak a few spoonfuls!).
Once we pulled those golden, warm donuts from the oven, the heavenly smell filled our home and wrapped around us like a cozy blanket. As we dipped them into cinnamon sugar, our hearts and stomachs were filled with love and joy. That day sparked my passion for kitchen experimenting, and now I can’t wait for you to experience the same delight! So grab that pumpkin puree, and let’s create some sweet memories together.
Ingredients
Here’s what you’ll need to make these delightful pumpkin donuts:
-
½ cup warm milk (between 95-105°F): This helps activate the yeast to make your donuts fluffy. If you don’t have milk, almond or oat milk works too!
-
1½ teaspoons active dry yeast: This little magic worker gives your donuts that perfect rise. If you’re using instant yeast, you can skip the activation step!
-
3¼ cups all-purpose flour (fluffed, spooned, and leveled): Measuring is crucial for successful baking! Fluffing your flour aerates it, giving you a lighter donut.
-
⅓ cup granulated sugar: This adds sweetness! Brown sugar can be swapped for a deeper flavor if you like.
-
½ teaspoon salt: A pinch of salt enhances all the flavors, so don’t skip it!
-
½ teaspoon pumpkin spice (store-bought or homemade): This aromatic mixture brings the warm, cozy flavors of fall into your donuts. Feel free to make your own using cinnamon, ginger, nutmeg, and cloves!
-
⅔ cup pumpkin puree (NOT pumpkin pie mix): Pure pumpkin gives the donuts moisture and flavor without extra sugars. Canned is fine but be sure to check it’s the pure stuff!
-
1 large egg: Binds the ingredients together and adds richness (vegan substitution is coming up!).
-
3 tablespoons unsalted butter (softened): Adds a lovely richness. You can substitute with coconut oil for a dairy-free option.
-
½ cup granulated sugar: For the cinnamon-sugar coating, because who doesn’t love that?
-
¾ teaspoon ground cinnamon: Essential for that warm, spicy goodness!
-
4 ounces cream cheese (softened): This will be part of the creamy glaze. It makes it luscious!
-
¼ cup pumpkin puree (NOT pumpkin pie mix): Additional pumpkin in the glaze? Yes, please!
-
½ teaspoon pumpkin spice: A sprinkle again for extra flavor in that glaze.
-
1 teaspoon vanilla extract (optional): Optional but highly recommended for an extra layer of depth.
-
1 cup powdered sugar: For that sweet, satisfying glaze.
-
1 cup heavy cream (cold): Makes the glaze a dreamy consistency. You could substitute with a non-dairy cream or coconut cream if you’d like!
With all these ingredients in hand, you’re on the way to creating the most delightful pumpkin donuts!
Step-by-Step Instructions
-
Activate the yeast: In a small bowl, combine the warm milk and active dry yeast. Let it sit for about 5-10 minutes until it becomes foamy. This tells you the yeast is alive and ready to do its job—don’t skip this step! If you don’t see foam, start over with new yeast.
-
Make the dough: In a large bowl, mix the flour, sugar, salt, and pumpkin spice. Whisk it well to combine. Then, create a well in the center and add the yeast mixture, pumpkin puree, egg, and softened butter.
-
Knead the dough: Mix until a shaggy dough forms. Lightly flour your counter and knead the dough for about 5-7 minutes, or until it becomes smooth and elastic. If it’s too sticky, sprinkle a bit more flour, but be careful not to overdo it! We want that fluffy texture.
-
Let it rise: Place the dough in a greased bowl, cover it with a kitchen towel, and let it rise in a warm spot for about 1-2 hours or until doubled in size. This is the perfect time to clean up your kitchen a bit or enjoy a cozy cup of tea!
-
Shape the donuts: Once your dough has risen, punch it down gently to release the air. Transfer it to a floured surface and roll it out to about ½-inch thick. Use a donut cutter or two round cookie cutters (one large and one small) to cut out your donuts.
-
Heat the oil: In a deep saucepan, heat oil to about 375°F. You can use a thermometer to ensure it’s at the right temperature. If you don’t have a thermometer, drop a small piece of dough in; if it sizzles and rises, you’re good to go!
-
Fry the donuts: Carefully place the donuts in the hot oil, a few at a time, and fry them for about 1-2 minutes on each side until golden brown. Remember, don’t overcrowd the pan!
-
Drain and coat: Use a slotted spoon to transfer the donuts to a paper towel-lined plate to drain excess oil. After a minute, while they’re still warm, toss them in the cinnamon-sugar mixture until well coated.
-
Prepare the glaze: In a medium bowl, beat the softened cream cheese until smooth. Add the additional pumpkin puree, pumpkin spice, vanilla extract, and powdered sugar. Mix until creamy and smooth. Slowly whisk in the cold heavy cream for a velvety glaze.
-
Glaze the donuts: Once the donuts have cooled slightly, dip each one into the pumpkin glaze, letting the excess drip off. Set them on a wire rack to allow the glaze to set.
And there you have it—beautiful pumpkin donuts that will fill your kitchen with the aroma of autumn!
Serving Suggestions
These pumpkin donuts are best served warm! Arrange them on a beautiful platter, and feel free to sprinkle a dash of cinnamon on top for that extra cozy vibe. Drizzle with any leftover glaze or serve with a side of creamy coffee or chai for a delightful pairing.
Recipe Variations
Want to switch things up? Here are a few fun ideas to make your pumpkin donuts uniquely yours:
-
Spicy Pumpkin Chocolate Chip: Fold in ½ cup of chocolate chips into your batter for a chocolatey twist!
-
Maple Glazed: Swap the cream cheese glaze for a maple glaze by mixing powdered sugar with maple syrup and a bit of milk.
-
Vegan Donuts: Use flaxseed eggs (1 tablespoon flaxseed meal + 2.5 tablespoons water = 1 egg), almond milk instead of cow’s milk, and coconut oil instead of butter.
-
Nutty Crunch: Top your donuts with chopped pecans or walnuts for a bit of crunchy texture!
-
Cream-filled Delight: Instead of dipping in glaze, you can fill these donuts with your favorite flavored filling—a delicious surprise inside!
Chef’s Notes
Over the years, this pumpkin donuts recipe has morphed and changed, filled with stories of impromptu kitchen parties and cozy family gatherings. I fondly remember the time I hosted a fall-themed brunch and made these donuts for friends, proving to them that homemade isn’t just better, but irresistibly delicious.
Baking is about experimenting and having fun—with a sprinkle of laughter and a dash of joy. I encourage you to put your personality into this recipe and make it your own. Embrace the seasonal ingredients, and allow yourself to enjoy the journey in the kitchen.
FAQs and Troubleshooting
1. What if my donuts turned out too dense?
If your donuts are dense, it could be because your yeast didn’t activate correctly or the flour was packed too tightly. Always fluff and spoon your flour before measuring.
2. Can I make the dough ahead of time?
Absolutely! You can make the dough, let it rise, punch it down, and refrigerate it overnight. The next day, just let it come to room temperature before rolling out and frying.
3. What can I do if I don’t have a donut cutter?
No worries! Use two round cookie cutters, or even the top of a glass for the outer circle and the cap from a bottle for the inner circle.
4. My glaze is too runny. What do I do?
If your glaze is too runny, gradually add more powdered sugar until you reach your desired consistency. The creaminess of the cream cheese should give it a nice thickness.
Nutritional Info
While I don’t usually dive deep into nutrition stats here, I believe in balance. These pumpkin donuts are a treat meant to be enjoyed as part of your beautiful life—don’t forget to savor each bite!
In conclusion, these pumpkin donuts aren’t just a delightful treat; they bring people together and celebrate the simple joys of life. I can’t wait for you to try them and share your kitchen adventures! Remember, cooking is about creativity and love, so sprinkle a little bit of both in everything you make. Happy baking!
PrintWhipped Pumpkin Bliss: Your New Favorite Pumpkin Donuts
Delight in the flavors of autumn with these light and airy pumpkin donuts, perfect for cozy mornings or delightful afternoon snacks.
- Prep Time: 30 minutes
- Cook Time: 30 minutes
- Total Time: 60 minutes
- Yield: 12 donuts 1x
- Category: Dessert
- Method: Frying
- Cuisine: American
- Diet: Vegetarian
Ingredients
- ½ cup warm milk (between 95-105°F)
- 1½ teaspoons active dry yeast
- 3¼ cups all-purpose flour (fluffed, spooned, and leveled)
- ⅓ cup granulated sugar
- ½ teaspoon salt
- ½ teaspoon pumpkin spice
- ⅔ cup pumpkin puree (NOT pumpkin pie mix)
- 1 large egg
- 3 tablespoons unsalted butter (softened)
- ½ cup granulated sugar (for coating)
- ¾ teaspoon ground cinnamon
- 4 ounces cream cheese (softened)
- ¼ cup pumpkin puree (for glaze)
- ½ teaspoon pumpkin spice (for glaze)
- 1 teaspoon vanilla extract (optional)
- 1 cup powdered sugar
- 1 cup heavy cream (cold)
Instructions
- Activate the yeast: In a small bowl, combine the warm milk and active dry yeast. Let it sit for about 5-10 minutes until it becomes foamy.
- Make the dough: In a large bowl, mix the flour, sugar, salt, and pumpkin spice. Create a well in the center and add the yeast mixture, pumpkin puree, egg, and softened butter.
- Knead the dough: Mix until a shaggy dough forms. Knead for about 5-7 minutes until smooth and elastic.
- Let it rise: Place the dough in a greased bowl, cover it, and let it rise in a warm spot for about 1-2 hours until doubled in size.
- Shape the donuts: Punch down the dough gently. Roll it out to about ½-inch thick and cut out your donuts.
- Heat the oil: Heat oil to about 375°F in a deep saucepan.
- Fry the donuts: Carefully fry the donuts for about 1-2 minutes on each side until golden brown.
- Drain and coat: Transfer to a paper towel-lined plate. Coat in cinnamon-sugar mixture while warm.
- Prepare the glaze: Beat the cream cheese until smooth, and mix in additional pumpkin puree, pumpkin spice, vanilla extract, and powdered sugar. Whisk in cold heavy cream.
- Glaze the donuts: Dip each donut into the pumpkin glaze and set on a wire rack to allow the glaze to set.
Notes
These donuts are best served warm. Pair with coffee or chai for a delightful experience.
Nutrition
- Serving Size: 1 donut
- Calories: 250
- Sugar: 15g
- Sodium: 200mg
- Fat: 10g
- Saturated Fat: 5g
- Unsaturated Fat: 4g
- Trans Fat: 0g
- Carbohydrates: 35g
- Fiber: 1g
- Protein: 3g
- Cholesterol: 30mg
Keywords: pumpkin donuts, fall recipes, baking, autumn desserts
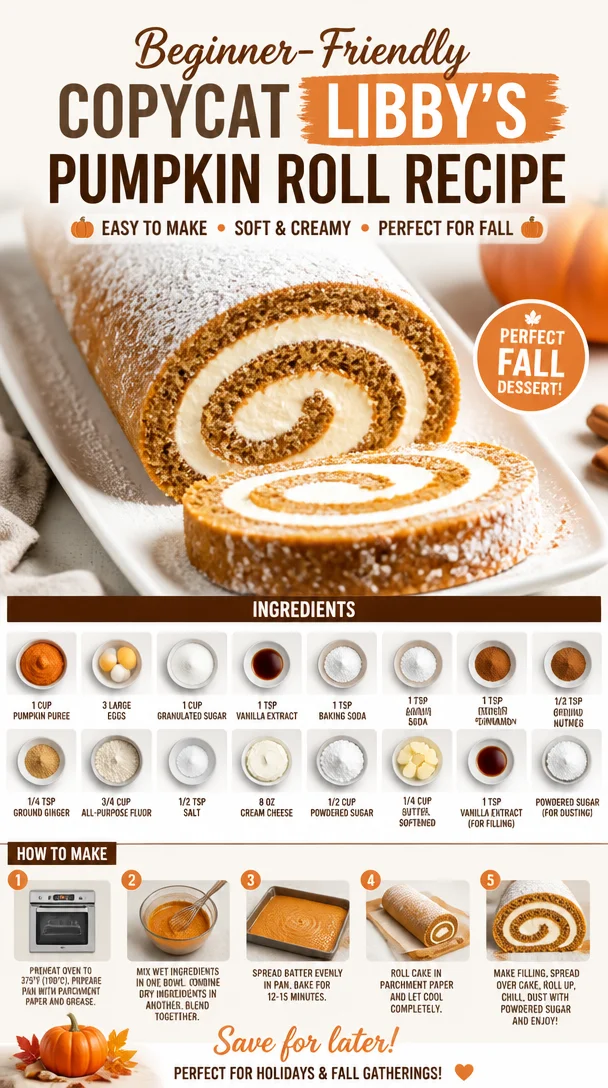
Beginner-Friendly Copycat Libby’s Pumpkin Roll Recipe
A Slice of Autumn: Copycat Libby’s Pumpkin Roll Recipe
As the leaves turn crisp and the air becomes cool and invigorating, there’s one treat that captures the essence of fall better than any other: the classic pumpkin roll. I’m Ava Carter, your cheerful kitchen companion, and today we’re diving into the nostalgic world of pumpkin rolls with a delightful homemade version that’s a heartfelt homage to Libby’s iconic dessert. Imagine rolling tender pumpkin cake filled with a sweet and creamy cream cheese mixture, all dusted with a light sprinkle of powdered sugar. It’s pure bliss on a plate and sure to impress your family and friends.
I remember the first time I tasted a pumpkin roll; it was at a family gathering in the midst of autumn festivities. My aunt, who’s an absolute whiz in the kitchen, brought this glorious creation to the table. I watched in awe as she carefully unrolled the cake to reveal the creamy filling, a spectacle that instantly made my heart race with excitement. With just one bite, I was hooked! The way the flavors of warm spices danced alongside the creamy filling left a mark on my taste buds that I still yearn for today. Now, years later, I’m here to share my version of this cherished recipe with you —one that’s approachable, delicious, and perfect for any gathering or cozy night in.
So put on your favorite apron, crank up some upbeat tunes, and let’s bake something magnificent that embodies all the warmth and sweetness of the fall season. Whether you’re planning a holiday feast or simply want to indulge in some seasonal sweetness, this pumpkin roll will be your new go-to recipe!
Ingredients
Before we dive into the cooking, let’s gather our ingredients! Below is what you’ll need along with some handy tips from your friendly neighborhood chef.
-
1 cup pumpkin puree: The star of our show! Fresh or canned, pumpkin puree adds moisture and flavor. If you can’t find pumpkin puree, you can make your own by roasting fresh pumpkin and blending the flesh until smooth.
-
3 large eggs: Eggs help bind the cake together, giving it a fluffy texture. If you’re vegan, consider using a flaxseed or chia seed slurry as a substitute (1 tablespoon flaxseed meal or chia seeds mixed with 2.5 tablespoons water per egg, set aside to gel).
-
1 cup granulated sugar: Sweetness is key! You can use coconut sugar or a sugar alternative if you’re looking for a healthier option.
-
1 teaspoon vanilla extract: A little splash of vanilla adds richness. You can also experiment with almond extract if you’re feeling adventurous.
-
1 teaspoon baking powder: This helps the cake rise beautifully. If you’re out of baking powder, you can make your own with 1/4 teaspoon baking soda and 1/2 teaspoon cream of tartar.
-
1 teaspoon baking soda: This works in tandem with the baking powder to ensure a light cake. Make sure it’s fresh; old baking soda can lose its power!
-
1 teaspoon ground cinnamon: The warm, cozy spice that screams fall! If you want to intensify the flavor, try adding a dash of freshly grated nutmeg.
-
1/2 teaspoon ground nutmeg: Another perfect fall spice that complements pumpkin. If you prefer, use allspice or pumpkin pie spice for a different twist.
-
1/4 teaspoon ground ginger: Adds a bit of zing! Ground ginger can be swapped for fresh ginger (fresh always adds a great kick!).
-
3/4 cup all-purpose flour: This is your base for the cake. For a gluten-free option, you can use a 1:1 gluten-free flour blend.
-
1/2 teaspoon salt: A dash of salt enhances sweetness and balances flavors beautifully.
-
8 oz cream cheese: The perfect creamy filling! If you’re after a vegan alternative, use a vegan cream cheese spread.
-
1/2 cup powdered sugar: For a sweet creaminess! You can make your own powdered sugar by blending granulated sugar into a fine powder.
-
1/4 cup butter, softened: This helps create a luscious filling. You can replace this with vegan butter or coconut oil for a dairy-free option.
-
1 teaspoon vanilla extract (for filling): It’s all about layers of flavor, right? Go for quality vanilla extract for the best taste!
-
Powdered sugar (for dusting): A light sprinkle at the end adds visual appeal and a sweet finish!
Step-by-Step Instructions
Okay, time to roll up our sleeves and bring this pumpkin roll to life! Here’s how to whip up this delightful dessert in just a few simple steps.
-
Preheat Your Oven: Let’s start by preheating your oven to 375°F (190°C). This is crucial for getting that beautiful rise and even baking!
-
Prep Your Baking Sheet: Line a 15×10 inch jelly roll pan with parchment paper and lightly grease it. This ensures our cake doesn’t stick — nobody wants a pancake instead of a roll!
-
Mix the Wet Ingredients: In a large mixing bowl, whisk together your pumpkin puree, eggs, granulated sugar, and vanilla extract until smooth. This creates a uniformly sweet base. Pro tip: Use room temperature eggs for better mixing!
-
Combine Dry Ingredients: In another bowl, mix your flour, baking powder, baking soda, and spices (cinnamon, nutmeg, ginger, and salt) together. Whisking them separately helps distribute the baking powder and baking soda evenly throughout the batter.
-
Blend Wet & Dry Mixtures: Gradually fold the dry ingredients into the wet mixture. Be careful not to overmix — just until combined! We want our cake to be soft and tender.
-
Pour Into Pan: Spread the batter evenly in your prepared jelly roll pan. Use a spatula to smooth it out. Don’t worry if it looks a bit thin; it’ll rise beautifully while baking!
-
Bake: Pop it into the oven and bake for about 15 minutes or until a toothpick inserted in the center comes out clean. Your kitchen will smell heavenly during this time!
-
Cool: As soon as it’s done, take it out and place it on a wire rack to cool for about 5 minutes. Then, you’ll want to invert it onto a clean kitchen towel that’s been dusted with powdered sugar. This prevents sticking and allows for easy rolling!
-
Roll it Up: While the cake is still warm, carefully grab the edge of the towel and roll the cake up, starting from the short end. This step is crucial for creating those gorgeous swirls later! Let it cool completely while rolled up.
-
Prepare the Filling: In a medium bowl, beat together the cream cheese, softened butter, powdered sugar, and vanilla extract until smooth and creamy. You can use a hand mixer for this to save time!
-
Unroll the Cake: Once the cake is completely cooled, carefully unroll it from the towel. Spread the cream cheese filling evenly over the surface, right to the edges.
-
Roll the Cake Again: Now, roll the cake back up without the towel this time. This will create that delightful spiral. You can wrap it in plastic wrap once you’re done rolling for a few hours in the fridge to set if you’d like!
-
Dust & Serve: Before serving, dust the top with powdered sugar for a beautiful finish. Slice it up, and you’re ready to enjoy this autumn delight!
Serving Suggestions
Plate your pumpkin roll slices on a colorful platter — it’s all about presentation! Drizzle a bit of caramel sauce from the center of the plate for an elegant touch. You might also sprinkle some extra cinnamon or nutmeg over the top for that added seasonal flair. Serve with a dollop of whipped cream or a scoop of vanilla ice cream for those who appreciate a little decadence!
Recipe Variations
-
Spiced Rum Version: Add a splash of spiced rum to the filling for a kick! It pairs perfectly with the pumpkin flavors.
-
Chocolate Pumpkin Roll: Substitute half of the flour with cocoa powder for a chocolate twist. You can also consider folding in mini chocolate chips into the filling.
-
Nutty Flavor: Mix in finely chopped walnuts or pecans to the filling for added texture and flavor.
-
Dairy-Free Delight: Use coconut cream in place of the cream cheese for a coconut-flavored filling that’s just as creamy.
-
Maple Cream Filling: Swap the vanilla in the filling for maple extract — it gives an irresistible autumn twist!
Chef’s Notes
I can’t help but smile every time I make this pumpkin roll. It reminds me of how cooking can bring everyone together. The best part? This cake has a magical ability to evoke memories and create new ones! My aunt passed down so many kitchen secrets and techniques, but the love she infused in her baking is what lingers. I’ve tweaked this recipe over the years, but the essence remains the same: a celebration of flavor and comfort.
I also want to share a humorous mishap! The first time I tried rolling the cake, I was so excited that I forgot to dust the towel with powdered sugar. Let’s just say pumpkins and sticky cakes don’t go well together! Crumbled cake on the floor was a small price to pay for a valuable lesson learned — always read the instructions!
FAQs and Troubleshooting
1. My pumpkin roll cracked when I rolled it. What happened?
Cracking often occurs when the cake is too dry or it hasn’t cooled enough. Make sure you’ve followed the baking time accurately, and let the cake cool completely before rolling. If it does crack, don’t fret! You can always cover it with extra filling when serving.
2. Can I make this a day ahead?
Absolutely! In fact, many bakers find it even better the next day when the flavors have really melded. Just ensure it’s wrapped well so that it stays fresh, and dust with powdered sugar right before serving.
3. How do I store leftovers?
Wrap remaining slices tightly in plastic wrap and store them in the refrigerator for up to 4 days. You can also freeze it wrapped well for up to 3 months. Just thaw it in the fridge overnight before serving.
4. Can I use a different filling?
Of course! Feel free to experiment with fillings. A simple whipped cream or flavored whipped cream (think orange zest or almond extract) would work beautifully.
Nutritional Info
While the nutritional info can vary based on specific ingredients used, here’s a rough estimate per slice (assuming 10 slices):
- Calories: 230
- Protein: 3g
- Carbohydrates: 30g
- Fat: 10g
- Sugar: 15g
Conclusion
The season of pumpkin spice, cozy sweaters, and joyful kitchen moments is upon us. This Copycat Libby’s Pumpkin Roll is a beautiful way to embrace all the flavors of autumn and share love through something as simple as a homemade treat. Remember, every roll and swirl has a story, much like the ones we create in our kitchens day by day. I hope this recipe finds a special place in your heart, just as it has in mine. Happy baking, and may every slice bring sweetness to your table!
PrintCopycat Libby’s Pumpkin Roll
A delightful homemade version of the classic pumpkin roll, filled with a sweet and creamy cream cheese mixture, perfect for any fall gathering.
- Prep Time: 20 minutes
- Cook Time: 15 minutes
- Total Time: 35 minutes
- Yield: 10 servings 1x
- Category: Dessert
- Method: Baking
- Cuisine: American
- Diet: Vegetarian
Ingredients
- 1 cup pumpkin puree
- 3 large eggs
- 1 cup granulated sugar
- 1 teaspoon vanilla extract
- 1 teaspoon baking powder
- 1 teaspoon baking soda
- 1 teaspoon ground cinnamon
- 1/2 teaspoon ground nutmeg
- 1/4 teaspoon ground ginger
- 3/4 cup all-purpose flour
- 1/2 teaspoon salt
- 8 oz cream cheese
- 1/2 cup powdered sugar
- 1/4 cup butter, softened
- 1 teaspoon vanilla extract (for filling)
- Powdered sugar (for dusting)
Instructions
- Preheat your oven to 375°F (190°C).
- Prep a 15×10 inch jelly roll pan with parchment paper and grease it.
- Mix the wet ingredients: whisk together pumpkin puree, eggs, granulated sugar, and vanilla extract until smooth.
- Combine dry ingredients: mix flour, baking powder, baking soda, and spices together.
- Blend the dry ingredients into the wet mixture just until combined.
- Pour the batter evenly into the prepared jelly roll pan.
- Bake for about 15 minutes or until a toothpick comes out clean.
- Cool for 5 minutes, then invert onto a kitchen towel dusted with powdered sugar.
- Roll the cake up in the towel while it’s warm.
- Prepare the filling: beat together cream cheese, softened butter, powdered sugar, and vanilla until smooth.
- Unroll the cake and spread the cream cheese filling evenly.
- Roll the cake back up without the towel this time.
- Dust with powdered sugar before serving.
Notes
This pumpkin roll can be made a day ahead for even better flavor. Ensure it’s stored well before serving.
Nutrition
- Serving Size: 1 slice
- Calories: 230
- Sugar: 15g
- Sodium: 210mg
- Fat: 10g
- Saturated Fat: 5g
- Unsaturated Fat: 5g
- Trans Fat: 0g
- Carbohydrates: 30g
- Fiber: 1g
- Protein: 3g
- Cholesterol: 70mg
Keywords: pumpkin roll, fall dessert, autumn recipe, cream cheese filling, Libby's recipe
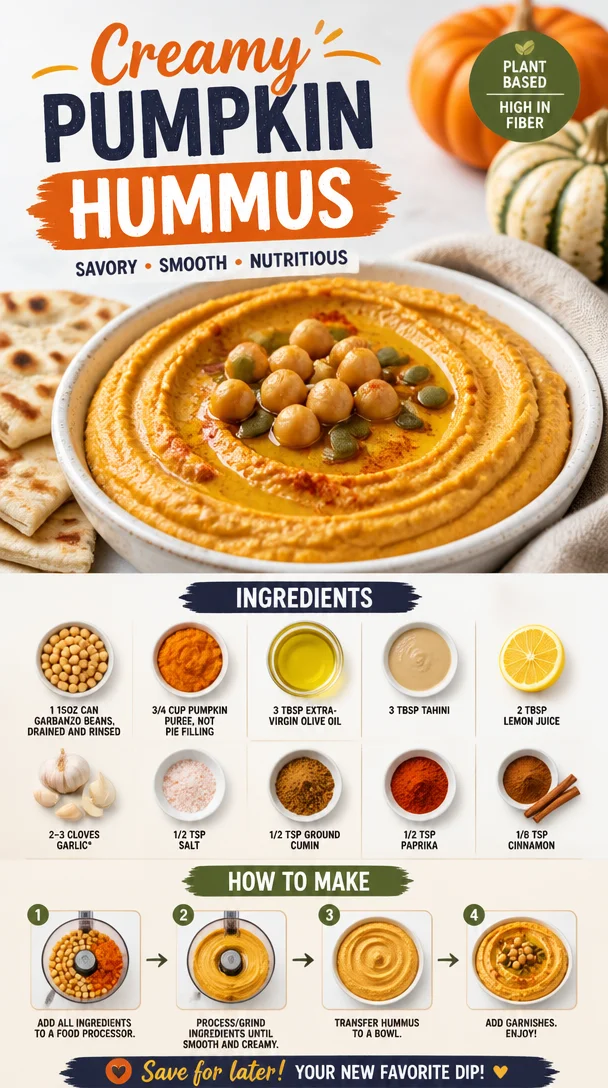
Pumpkin Hummus
Whip Up a Batch of Pumpkin Hummus: A Flavorful Adventure Awaits!
Welcome back to Clean Plate Cravings, my fellow food enthusiasts! Today, I’m thrilled to take you on a delicious journey into the cozy, comforting world of pumpkin hummus. With the leaves turning golden and the air getting a tad crisp, there’s no better time to embrace the warm, earthy flavors that pumpkin brings to our plates. This dish is not only a fantastic way to cheer up any snack time, but it’s also packed with nutrients, creativity, and a whole lot of satisfaction!
Now, I know what you might be thinking: pumpkin in hummus? Why not? This blend is a delightful twist on the classic chickpea dip, adding a seasonal flair that elevates your snack game. Below, I’ll share everything from my personal story with pumpkin hummus to the straightforward ingredients and step-by-step instructions that’ll have you whipping it up in no time.
Let’s get rolling!
A Fun Memory: My First Encounter with Pumpkin Hummus
Picture this: It was a crisp fall afternoon, and I found myself at a cozy little farmers’ market booth with the sweet aroma of roasted pumpkin wafting through the air. A vendor was showcasing a seasonal lineup that highlighted all things pumpkin, and there it was—pumpkin hummus. The vibrant orange dip caught my eye, and the vendor offered me a sample on a crunchy pita chip. I remember that first bite so vividly! It was creamy, spiced just right, and had that delightful warmth that only pumpkin can bring.
That tantalizing taste ignited a culinary curiosity within me, and I immediately went home to experiment with my own version. I played around with flavors, added my own twist, and there you have it: a pumpkin hummus recipe that not only reminds me of that fun, foodie day but has become a staple in my kitchen ever since!
Ingredients
Here’s what you’ll need to whip up this scrumptious pumpkin hummus at home:
-
1 (15 oz) can garbanzo beans: The star of your hummus! Chickpeas are packed with protein and fiber. If you prefer, you can cook your own from dried beans; just remember to soak them beforehand.
-
3/4 cup pumpkin puree: This adds a velvety texture and seasonal flavor. Make sure it’s pure pumpkin puree, not pumpkin pie filling, which contains added sugars and spices.
-
3 tbsp extra-virgin olive oil: For that rich, smooth mouthfeel and a boost of healthy fats! You can substitute it with avocado oil for a different flavor profile.
-
3 tbsp tahini: A sesame seed paste that gives depth and creaminess. If you’re nut-free, sunflower seed butter or pumpkin seed butter works nicely too.
-
2 tbsp lemon juice: Freshly squeezed lemon juice brightens the flavors and adds a zesty kick. Lime juice can be a fun substitute if you’re feeling adventurous!
-
2-3 cloves garlic: The aromatic hero of the dish! If you’re not a garlic lover, roasted garlic will provide a milder, sweeter flavor.
-
1/2 tsp salt: Essential for flavor balance. Remember to start small—you can always add more to taste!
-
1/2 tsp ground cumin: This adds warmth and depth. For a twist, try smoked paprika for a slightly different flavor profile.
-
1/2 tsp paprika: Adds a lovely visual appeal and a hint of sweetness. You can also use spicy paprika for an extra kick.
-
1/8 tsp cinnamon: Just a dash lends warmth and a unique twist to the overall taste! It’s optional, but trust me, it’s worth it.
Step-by-Step Instructions
Ready to bring your pumpkin hummus to life? Let’s dive into the cooking process!
-
Rinse the Chickpeas: Start by draining and rinsing the canned chickpeas under cool water. This helps to remove some of the salt and any canning liquid. Plus, it can make the hummus smoother! If you prefer to use dried chickpeas, soak them overnight and cook until tender.
-
Blend the Base Ingredients: In a food processor or high-powered blender, combine the rinsed chickpeas, pumpkin puree, extra-virgin olive oil, tahini, lemon juice, garlic, salt, ground cumin, paprika, and cinnamon. Tip: Start with less garlic to avoid overpowering the other flavors, especially if it’s fresh garlic.
-
Blend Away!: Pulse the mixture a few times to get things moving, then blend on high until smooth. Chef Hack: If your hummus seems too thick, add a tablespoon of water or olive oil at a time until you reach your desired creaminess.
-
Taste and Adjust: Stop the blender and taste your hummus. This is where the magic happens! Depending on your preference, you may want to add more salt, lemon juice, or garlic. Don’t be shy; it’s your masterpiece!
-
Chill Out: For the best flavor, let your hummus chill in the refrigerator for at least 30 minutes. This allows the flavors to meld together beautifully.
-
Serve and Enjoy: When you’re ready, scoop your velvety hummus into a bowl, drizzle with a little extra olive oil, sprinkle with additional paprika, and maybe even toss on some roasted pumpkin seeds for extra texture!
Serving Suggestions
Let’s get this pumpkin hummus on the party table! Serve it with warm pita bread, crunchy veggie sticks (think carrots, cucumbers, and bell peppers), or spread it on your favorite sandwich or wrap. For a fun twist, you can even use it as a spread for breakfast on toast topped with avocado!
Recipe Variations
Feeling adventurous? Here are some creative twists on the classic pumpkin hummus:
-
Spicy Pumpkin Hummus: Add a pinch of cayenne pepper or a dash of hot sauce for some heat!
-
Herbed Version: Mix in fresh herbs like parsley, cilantro, or even a bit of dill for a fresh touch.
-
Smoky Pumpkin Hummus: Swap out regular paprika for smoked paprika, and you can even add some roasted red peppers for a flavor explosion.
-
Sweet Pumpkin Hummus: Yes! You can create a sweet version by adding a bit of maple syrup or honey and a sprinkle of nutmeg.
-
Lentil Hummus: Substitute half the chickpeas with cooked red lentils for an extra protein punch.
Chef’s Notes
This pumpkin hummus has become a beloved staple in my kitchen. I can’t tell you how many times it has saved me from snack-time boredom! Over the years, I’ve experimented with it, tweaking the spices here and there. I even added a swirl of pesto one day out of whimsy, and it was a hit!
So, if you’re ever in a pinch for a quick appetizer or an easy meal prep option, remember this gem of a recipe.
FAQs and Troubleshooting
Q: Why is my hummus grainy?
A: This can happen when the chickpeas haven’t been blended long enough, or they didn’t get rinsed well. Keep blending or add a little more olive oil or water to smooth the texture.
Q: Can I make pumpkin hummus in advance?
A: Absolutely! It will taste even better after chilling overnight, so feel free to prep ahead of time. Just give it a good stir before serving.
Q: How long will my hummus last in the fridge?
A: Typically, it keeps well for about a week. Just make sure to store it in an airtight container.
Q: Can I freeze pumpkin hummus?
A: Yes! Scoop it into containers or ice cube trays for individual portions. Just remember to thaw it in the fridge overnight before eating, and give it a stir to revive the texture!
Nutritional Info
While I don’t usually get into the nitty-gritty of nutrition, it’s helpful to know that a serving of this delightful pumpkin hummus is lower in calories than many snack foods, rich in protein, fiber, and vitamin A thanks to the pumpkin. Serve it up alongside fresh veggies, and you have a wholesome treat that feels indulgent without the guilt!
So there you have it, my friends! An irresistible pumpkin hummus that’s easy, satisfying, and truly delicious. Embrace the flavors of fall, gather your ingredients, and let’s create a culinary masterpiece together. Happy cooking, and remember: keep it fresh, simple, and seriously delicious!
PrintPumpkin Hummus
A delightful twist on classic hummus, packed with seasonal pumpkin flavors and creamy texture, perfect for snacks or appetizers.
- Prep Time: 15 minutes
- Cook Time: 0 minutes
- Total Time: 15 minutes
- Yield: 4 servings 1x
- Category: Appetizer
- Method: Blending
- Cuisine: Middle Eastern
- Diet: Vegan
Ingredients
- 1 (15 oz) can garbanzo beans
- 3/4 cup pumpkin puree
- 3 tbsp extra-virgin olive oil
- 3 tbsp tahini
- 2 tbsp lemon juice
- 2–3 cloves garlic
- 1/2 tsp salt
- 1/2 tsp ground cumin
- 1/2 tsp paprika
- 1/8 tsp cinnamon
Instructions
- Rinse the chickpeas: Start by draining and rinsing the canned chickpeas under cool water.
- Blend the base ingredients: In a food processor, combine the rinsed chickpeas, pumpkin puree, olive oil, tahini, lemon juice, garlic, salt, cumin, paprika, and cinnamon.
- Blend away!: Pulse a few times, then blend on high until smooth.
- Taste and adjust: Stop the blender and taste your hummus; adjust the seasoning as needed.
- Chill out: Refrigerate for at least 30 minutes to meld the flavors.
- Serve and enjoy: Scoop into a bowl, drizzle with olive oil, sprinkle with paprika, and add toppings if desired.
Notes
Refrigerate for up to a week in an airtight container. Great for meal prep and can be frozen in portions.
Nutrition
- Serving Size: 1 serving
- Calories: 250
- Sugar: 3g
- Sodium: 350mg
- Fat: 10g
- Saturated Fat: 1g
- Unsaturated Fat: 9g
- Trans Fat: 0g
- Carbohydrates: 30g
- Fiber: 8g
- Protein: 9g
- Cholesterol: 0mg
Keywords: pumpkin hummus, easy appetizer, vegan dip, fall recipes
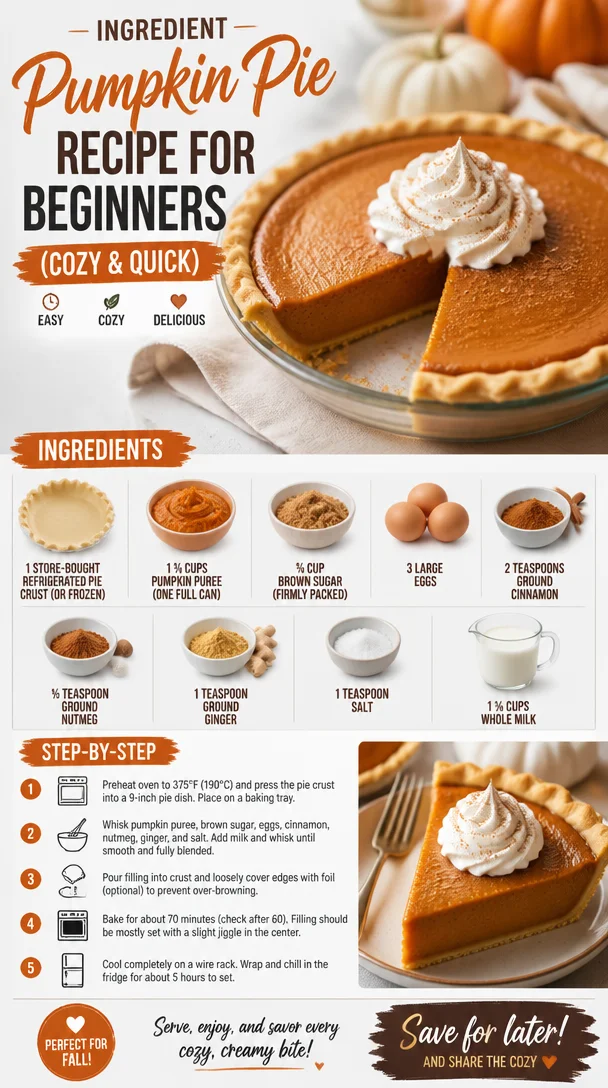
Ingredient Pumpkin Pie Recipe for Beginners (Cozy & Quick)
Pumpkin Pie Recipe: A Slice of Nostalgia
Hello, fellow foodies! Ava here, and I can’t wait to take you on a delicious journey through one of my all-time favorite desserts—Pumpkin Pie! As the leaves start changing colors and the air gets that crisp, cozy feeling, there’s nothing quite like the aroma of pumpkin pie wafting through your home. This pie is a nostalgic staple for many of us—it’s more than just a dessert; it’s a warm hug on a plate, a family tradition, and a perfect ending to a festive meal.
A Slice of My Past
Growing up, pumpkin pie was a fixture on our dinner table during Thanksgiving. I remember helping my mom in the kitchen, rolling out dough while trying not to eat all the spoons full of pumpkin mixture! My favorite moment? Watching our pie rise in the oven, the scent of spices mingling with the sound of laughter and chatter all around. It felt like magic. After the meal, we would all gather around the table with thick slices of pie, dolloped with whipped cream, sharing stories and, of course, bickering over who got the last piece.
This dish evokes such love and warmth that it has become one of my go-to recipes whenever I want to bring people together. Plus, it’s so simple to make! Trust me; when you bake this pie, it’s hard not to feel like a rock star in the kitchen. Let’s dive into the magic of creating this delightfully creamy, spiced Pumpkin Pie together!
Ingredients
Here’s what you’ll need to create your own pumpkin pie masterpiece:
-
1 store-bought refrigerated pie crust (or frozen)
Chef Tip: If you’re feeling adventurous, make your own crust! But hey, store-bought is just fine if you’re short on time. Just make sure to let it come to room temp before rolling out. -
1 ¾ cups pumpkin puree (one full can)
Substitution: You can also use fresh pumpkin puree if you want a more homemade feel, but the canned stuff saves time and tastes great! -
¾ cup brown sugar (firmly packed)
Tip: Use light or dark brown sugar; both will work! Dark brown sugar will give your pie a deeper flavor. Classic kit! -
3 large eggs
Chef Insight: The eggs help bind everything together and create that creamy pudding-like texture. Make sure they’re at room temperature for easier mixing! -
2 teaspoons ground cinnamon
Flavor Alert: This spice is the star of the show! It brings warmth and a hint of sweetness. -
½ teaspoon ground nutmeg
Tip: Freshly grated nutmeg takes this up a notch if you have it. It’s worth hunting down! -
1 teaspoon ground ginger
Fun Fact: Ginger gives a lovely zing! You could swap it with ground allspice or cloves if you prefer. -
1 teaspoon salt
Chef Hack: Salt enhances all flavors—don’t skip it! -
1 ¾ cups whole milk
Substitution: You can use almond milk or any dairy alternative, but whole milk gives the creamiest texture.
Step-by-Step Instructions
Now, let’s get into the fun part—actually making the pie!
-
Preheat Your Oven:
Preheat your oven to 425°F (220°C). This high temperature will help set that beautiful crust while we prepare our filling. -
Prep the Pie Crust:
Grab your pie crust and fit it into a 9-inch pie plate. If it’s frozen, let it thaw for about 10 minutes first. Crimp the edges with your fingers or a fork to make it fancy! Remember, it doesn’t have to be perfect; pie perfection is all about the love you put into it! -
Mix the Filling:
In a large mixing bowl, whisk together your pumpkin puree, brown sugar, and eggs until smooth. *Pro Tip: Use an electric mixer if you’ve got one—it makes it super easy! -
Spice It Up:
Add in the ground cinnamon, nutmeg, ginger, and salt to the mix. Go ahead and whisk until it’s all combined! Trust me, this is the part when your kitchen will smell like autumn! -
Pour in the Milk:
Next, gradually whisk in your whole milk until the mixture is velvety and smooth. Chef’s Insight: Make sure there are no lumps—nobody likes a lumpy pie! -
Fill the Crust:
Carefully pour the filling into your pie crust, smoothing out the top with a spatula. Don’t overfill! Leave a little space at the top; it will puff up just a bit as it bakes. -
Bake it Up:
Place the pie in the preheated oven and bake for 15 minutes. Then, reduce the temperature to 350°F (175°C) and continue baking for another 40-50 minutes or until the center is set and a toothpick comes out clean. If the crust starts browning too quickly, you can cover the edges with foil. -
Cool and Serve:
Once baked, let your pumpkin pie cool on a wire rack—I know, the waiting is the hardest part! This allows the filling to set perfectly. Once cool, slice it up and serve with whipped cream on top for the ultimate treat!
Serving Suggestions
When it’s finally time to serve your gorgeous creation, plate it up with a dollop of freshly whipped cream (or a scoop of ice cream if you’re feeling indulgent)! A sprinkle of cinnamon on top adds a nice touch, too. For extra flair, serve slices alongside some spiced nuts or caramel sauce drizzled over the top.
Recipe Variations
Trying new twists can make this classic even more enjoyable! Here are some creative ideas:
- Maple Pumpkin Pie: Replace the brown sugar with pure maple syrup for a unique flavor profile.
- Chocolate Chip Pumpkin Pie: Fold in some semi-sweet chocolate chips before pouring into the crust for a delicious surprise bite.
- Vegan Pumpkin Pie: Swap out the eggs for flax eggs or aquafaba and use coconut milk instead of whole milk for a dairy-free delight.
- Spiced Rum Pumpkin Pie: Add a tablespoon of spiced rum to the mixture for an adult twist!
- Coconut Pumpkin Pie: Mix in a half cup of toasted coconut flakes for added texture and flavor.
Chef’s Notes
I can’t tell you how many times this recipe has come in handy, especially during the holidays! It’s one I’ve perfected over the years. There’s just something about watching friends and family gather around the table, sharing stories and laughter while devouring slices of this pie. I’ve experienced the joy of seeing guests take that first bite, their eyes lighting up.
And let me tell you, I once tried adding coriander to the spice mix—let’s just say that didn’t go over so well! But that’s part of the kitchen fun—experimenting and learning what works. I’m delighted to share these stories and tips with you, so don’t be afraid to have fun with your cooking!
FAQs and Troubleshooting
1. Why is my pumpkin pie cracking on top?
Cracking is usually due to the pie cooling too quickly. Allow your pie to cool gradually at room temperature for a smoother finish next time.
2. Can I make this pie ahead of time?
Absolutely! You can make it a day or two ahead of your gathering; just store it in the fridge.
3. How do I know when my pie is done?
When the edges are set, and the center has a slight jiggle but is mostly firm. A toothpick inserted should come out clean.
4. What should I do if I burned the crust?
If your crust is getting too dark during baking, you can cover it with foil to prevent it from burning while the filling continues to cook.
Nutritional Info (Optional)
For one slice of pumpkin pie (1/8 of the pie):
- Calories: Approximately 330
- Protein: 5g
- Fat: 12g
- Carbohydrates: 54g
- Fiber: 2g
- Sugars: 22g
And there you have it—the ultimate Pumpkin Pie recipe that not only satisfies the taste buds but also warms the soul. I hope you have as much fun making this as I do! Let’s keep it fresh, simple, and oh-so-delicious. Happy baking! 🍂🥧
PrintPumpkin Pie
A delightful and creamy Pumpkin Pie recipe perfect for festive gatherings and holiday celebrations.
- Prep Time: 15 minutes
- Cook Time: 55 minutes
- Total Time: 70 minutes
- Yield: 8 servings 1x
- Category: Dessert
- Method: Baking
- Cuisine: American
- Diet: Vegetarian
Ingredients
- 1 store-bought refrigerated pie crust
- 1 ¾ cups pumpkin puree
- ¾ cup brown sugar, firmly packed
- 3 large eggs
- 2 teaspoons ground cinnamon
- ½ teaspoon ground nutmeg
- 1 teaspoon ground ginger
- 1 teaspoon salt
- 1 ¾ cups whole milk
Instructions
- Preheat your oven to 425°F (220°C).
- Grab your pie crust and fit it into a 9-inch pie plate.
- In a large mixing bowl, whisk together your pumpkin puree, brown sugar, and eggs until smooth.
- Add in the ground cinnamon, nutmeg, ginger, and salt to the mix, and whisk until combined.
- Gradually whisk in your whole milk until the mixture is velvety and smooth.
- Carefully pour the filling into your pie crust, smoothing out the top with a spatula.
- Place the pie in the preheated oven and bake for 15 minutes.
- Reduce the temperature to 350°F (175°C) and continue baking for another 40-50 minutes.
- Once baked, let your pumpkin pie cool on a wire rack before slicing.
Notes
Serve with whipped cream or a scoop of ice cream. You can make it ahead of time and store in the fridge.
Nutrition
- Serving Size: 1 slice
- Calories: 330
- Sugar: 22g
- Sodium: 400mg
- Fat: 12g
- Saturated Fat: 4g
- Unsaturated Fat: 6g
- Trans Fat: 0g
- Carbohydrates: 54g
- Fiber: 2g
- Protein: 5g
- Cholesterol: 30mg
Keywords: pumpkin pie, holiday dessert, Thanksgiving recipe, creamy pumpkin pie, festive baking
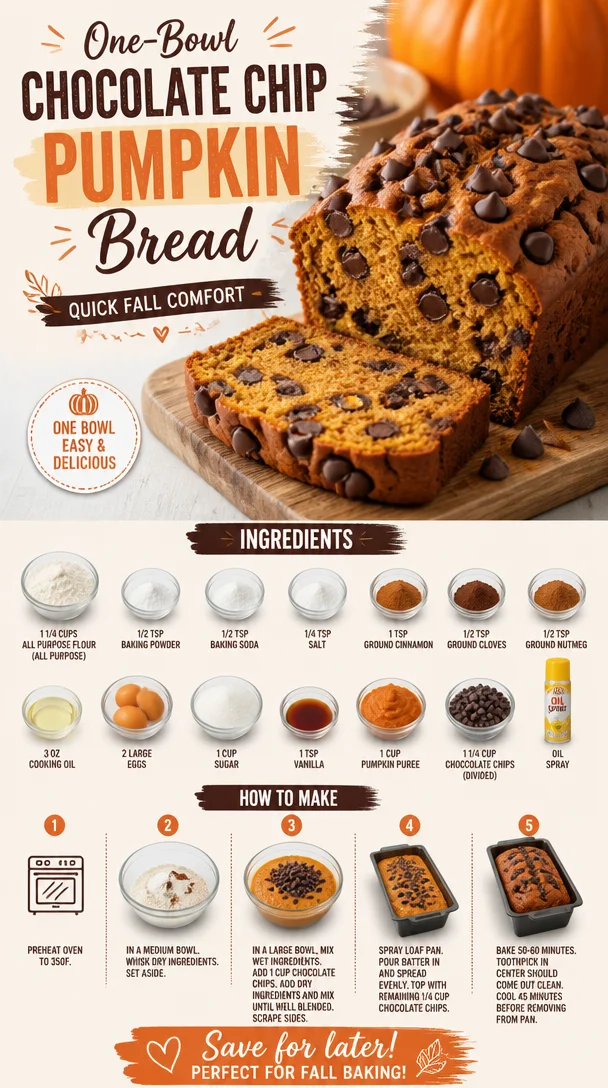
One-Bowl Chocolate Chip Pumpkin Bread: Quick Fall Comfort
Best Chocolate Chip Pumpkin Bread: A Cozy Fall Favorite
Welcome, fellow foodies! Today, we’re diving into one of my all-time favorite autumn treats: Chocolate Chip Pumpkin Bread. Here at Clean Plate Cravings, we believe that the change of seasons means it’s time to cozy up in the kitchen and whip up some delightful eats that make you feel good. Trust me, this pumpkin bread is about to become a staple in your fall repertoire!
Imagine this: the leaves are turning, there’s a crisp chill in the air, and your favorite sweater is just begging to be worn. There’s no better way to celebrate the harvest season than with the warm, comforting aroma of pumpkin spice wafting through your home. And just when you think it can’t get any better, you add chocolate chips to the mix. Yes, please! This chocolate chip pumpkin bread is not just a recipe; it’s a hug in a loaf.
But wait—let’s remember: enjoying food should be about balance and joy, not just the seasonal requirement. That’s why I’m sharing a recipe that combines wholesome ingredients with that sweet, indulgent treat we all crave. So grab your apron, and let’s get cozy in the kitchen!
A Slice of Nostalgia
Growing up, my grandmother was the queen of baking delicious foods. Her secret weapon? Pumpkin bread! Each fall, my family would gather in her kitchen, and the sound of her mixing bowl filled the house—a cheerful sound that echoed warmth and love. I’d stand on my tiptoes, peering over the counter, trying to catch a glimpse of her mixing the vibrant orange pumpkin puree with the rich springtime spices.
But it was the chocolate chips that took the cake—or should I say, the bread! That delightful surprise melted into the loaf, creating a perfect blend of sweet and savory. There was something magical about each slice—crispy on the outside, rich and fluffy on the inside, with chocolate chips peeking out like little treasures.
Now, every time I make this chocolate chip pumpkin bread, I’m transported back in time, cherishing those moments with my grandma. It’s more than just a recipe; it’s a beloved tradition that I hope captures the hearts of my readers as well.
Ingredients
Let’s talk about the ingredients that make this pumpkin bread truly special. Here’s what you’ll need:
-
1 1/4 cups all-purpose flour
All-purpose flour provides the structure of our bread. If you need a gluten-free option, feel free to swap it out for gluten-free flour blends. -
1/2 tsp baking powder
This ingredient helps our bread rise a bit while keeping it moist. A must-have for that soft, fluffy texture! -
1/2 tsp baking soda
Using both baking soda and baking powder balances the leavening and ensures your bread is light and airy. -
1/4 tsp salt
A pinch of salt amplifies the flavor without making the bread taste salty. Trust me; it’s essential! -
1 tsp ground cinnamon
Cinnamon is the heart and soul of fall baking. It adds warmth and a cozy aroma that fills your home with happiness. -
1/2 tsp ground cloves
Cloves pack an aromatic punch! They also balance the sweetness of the chocolate. -
1/2 tsp ground nutmeg
Nutmeg enhances the depth of flavor in your pumpkin bread and brings that classic autumn vibe. -
3 oz cooking oil
Oil keeps our cake moist and tender. You can switch it out for applesauce to cut calories or use melted coconut oil for a tropical twist. -
2 large eggs
Eggs help bind the ingredients while providing richness. Vegan? Substitute with flax eggs (1 tablespoon flaxseed meal mixed with 2.5 tablespoons water per egg). -
1 cup sugar
Sweetness is essential! You can use brown sugar for added moisture and a deeper flavor. -
1 tsp vanilla
A splash of vanilla rounds out all the flavors and adds to the delightful aroma of pumpkin bread. -
1 cup pumpkin puree
Pure pumpkin purée brings moisture and the classic autumn flavor. Use canned for convenience or make your own if you’re feeling adventurous! -
1 1/4 cup chocolate chips (divided)
Chocolate chips are the surprise that everyone looks forward to! Use semi-sweet, dark chocolate, or even white chocolate for a fun twist. -
Oil spray
For greasing your pan. Don’t skip this step, or you might end up with stuck bread!
Step-by-Step Instructions
Now that we’ve got our ingredients ready, let’s dive into the process of making this heavenly chocolate chip pumpkin bread!
1. Preheat Your Oven
Preheat your oven to 350°F (175°C). This is an essential step, folks! We want our bread to bake evenly and rise to perfection.
2. Prepare Your Loaf Pan
Grab a 9×5-inch loaf pan and spray it lightly with oil or grease it with butter. This will ensure that your beautiful loaf slides right out when it’s done.
3. Mix the Dry Ingredients
In a medium bowl, whisk together the all-purpose flour, baking powder, baking soda, salt, cinnamon, cloves, and nutmeg. This step helps evenly distribute the leavening agents and spices throughout the flour.
4. Combine the Wet Ingredients
In a large bowl, whisk together the oil, eggs, sugar, vanilla, and pumpkin purée until smooth. Take your time with this step—it’s where you’re capturing all those cozy fall flavors.
5. Combine Gently
Gradually add the dry mixture to the wet, folding gently with a spatula or wooden spoon until just combined. Don’t overmix! Overmixing can lead to tough bread, and we want tenderness, remember?
6. Fold in the Chocolate Chips
Gently fold in 1 cup of the chocolate chips. It’s okay to sneak a few for yourself while you’re at it!
7. Pour into the Pan
Pour the batter into the prepared loaf pan and sprinkle the remaining chocolate chips on top. This makes for a beautiful presentation and ensures it looks as decadently delicious as it tastes!
8. Bake
Place your loaf pan in the preheated oven and bake for 50-60 minutes, or until a toothpick inserted into the center comes out clean. Keep an eye on it the last 10 minutes—every oven is different, and you want that golden brown crust!
9. Cool Down
Once your bread is baked, let it cool in the pan for about 10 minutes. Then, carefully transfer it to a wire rack to cool completely. The smell in your kitchen will be utterly irresistible!
10. Slice and Enjoy!
Once cooled, slice your pumpkin bread into generous portions. Serve it fresh, or toast it with a bit of butter for an extra indulgent treat.
Serving Suggestions
I love to serve this chocolate chip pumpkin bread with a hot cup of coffee or tea for a cozy afternoon snack. You could also add a dollop of whipped cream cheese on top or serve it with a scoop of vanilla ice cream for dessert—hello, fall flavors!
Recipe Variations
Feeling creative? Here are a few fun twists on this classic recipe:
- Spice it Up: Add in some chopped nuts like walnuts or pecans for added crunch.
- Sweet Swaps: Substitute half the sugar with maple syrup for a deeper flavor.
- Choco-Loaded: Mix in white chocolate chips or butterscotch chips for different flavor profiles.
- Gluten-Free: Swap out all-purpose flour for gluten-free flour blends for a gluten-free option!
- Pumpkin & Banana: Add 1 ripe mashed banana to the batter for an added fruity twist!
Chef’s Notes
Every time I make this pumpkin bread, I think back to the conversation I had with my grandma about baking. She taught me about the little things—like how a pinch of love can make a dish taste infinitely better. Over the years, I’ve tweaked this recipe to fit my evolving taste, introducing chocolate chips and experimenting with spices. It’s a reminder that cooking is a beautiful journey of growth and discovery.
Funny story: one time, I decided to double the chocolate chips in a rush while chatting with my friend on the phone. It turned out to be a happy accident; we ended up calling it “Chocopotamus Bread” because it was so loaded with chocolate! It’s definitely one of those sweet kitchen mishaps that turned into a cherished memory.
FAQs and Troubleshooting
1. My bread is too dense. What did I do wrong?
Overmixing can be a culprit! When mixing your batter, just combine until the wet and dry ingredients are incorporated. A little flour here and there is okay!
2. Can I use fresh pumpkin instead of canned?
Absolutely! Just roast and purée your pumpkin until smooth. Be sure to drain any excess liquid to avoid a soggy bread.
3. How do I store the leftovers?
You can keep your pumpkin bread wrapped tightly at room temperature for up to 3 days or in the fridge for about a week. For longer storage, you can freeze slices in an airtight container for up to 3 months.
4. Why did my loaf sink in the middle?
This can happen due to too much humidity, underbaking, or opening the oven door too soon. Make sure you let your bread bake fully and resist the temptation to check on it until the last 10-15 minutes!
Nutritional Info
If you’re curious, one slice of this delightful chocolate chip pumpkin bread contains approximately:
- Calories: 250
- Protein: 3g
- Carbohydrates: 35g
- Total Fat: 10g
(Nutritional values will vary based on ingredients used; this is an estimate!)
And there you have it! Your ultimate guide to baking the best Chocolate Chip Pumpkin Bread—complete with memories, tips, tricks, and a few stories to hold close. I hope this fills your kitchen with warmth and brings joy to your table this fall. Remember, cooking is about having fun and sharing great food with the people you love. Happy baking, friends!
PrintBest Chocolate Chip Pumpkin Bread
A cozy fall favorite, this Chocolate Chip Pumpkin Bread combines rich pumpkin flavor with sweet chocolate chips for a delightful treat.
- Prep Time: 15 minutes
- Cook Time: 60 minutes
- Total Time: 75 minutes
- Yield: 8 servings 1x
- Category: Dessert
- Method: Baking
- Cuisine: American
- Diet: Vegetarian
Ingredients
- 1 1/4 cups all-purpose flour
- 1/2 tsp baking powder
- 1/2 tsp baking soda
- 1/4 tsp salt
- 1 tsp ground cinnamon
- 1/2 tsp ground cloves
- 1/2 tsp ground nutmeg
- 3 oz cooking oil
- 2 large eggs
- 1 cup sugar
- 1 tsp vanilla
- 1 cup pumpkin puree
- 1 1/4 cups chocolate chips (divided)
- Oil spray for greasing
Instructions
- Preheat your oven to 350°F (175°C).
- Prepare a 9×5-inch loaf pan by spraying it lightly with oil.
- Mix the dry ingredients: flour, baking powder, baking soda, salt, cinnamon, cloves, and nutmeg in a medium bowl.
- Combine the wet ingredients: oil, eggs, sugar, vanilla, and pumpkin purée in a large bowl until smooth.
- Add the dry mixture to the wet mixture, folding gently until just combined.
- Fold in 1 cup of chocolate chips.
- Pour the batter into the prepared loaf pan and sprinkle the remaining chocolate chips on top.
- Bake for 50-60 minutes, or until a toothpick comes out clean.
- Cool the bread in the pan for about 10 minutes, then transfer to a wire rack.
- Slice and enjoy!
Notes
Serve with coffee or tea for a cozy snack, or add whipped cream cheese on top for an indulgent treat. Store leftovers tightly wrapped at room temperature or in the fridge.
Nutrition
- Serving Size: 1 slice
- Calories: 250
- Sugar: 15g
- Sodium: 150mg
- Fat: 10g
- Saturated Fat: 1g
- Unsaturated Fat: 7g
- Trans Fat: 0g
- Carbohydrates: 35g
- Fiber: 1g
- Protein: 3g
- Cholesterol: 30mg
Keywords: pumpkin bread, chocolate chip, fall baking, autumn recipes
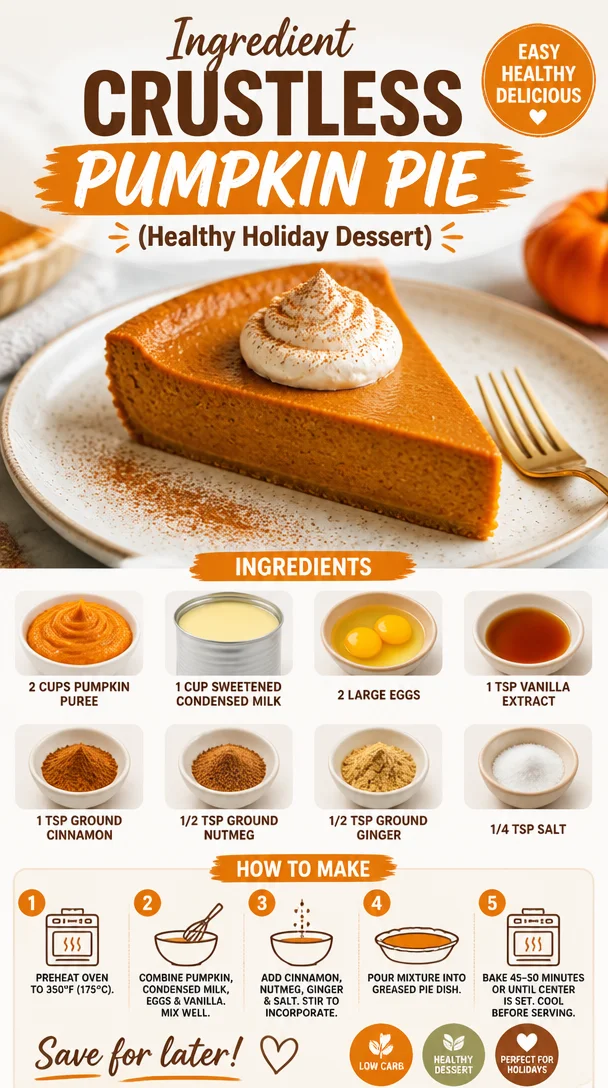
Ingredient Crustless Pumpkin Pie (Healthy Holiday Dessert)
Crustless Pumpkin Pie: A Cozy Slice of Autumn
Ah, the cozy embrace of autumn! There’s nothing quite like the crisp air, vibrant leaves, and the warm spices that fill our kitchens this time of year. When I think of fall, my mind goes directly to pumpkin pie—a classic that brings a nostalgic smile and an undeniable comfort. However, in my quest for simplicity and deliciousness, I’ve fallen head over heels for the marvel that is crustless pumpkin pie. Yes, you heard me right! It’s all the creamy, spiced goodness we love about traditional pumpkin pie, minus the fuss of a crust. That means more time enjoying every delicious bite and less time worrying about whether that crust is flaky enough!
Imagine this: a chilly October evening, gathering around the table with loved ones, the flicker of candlelight casting a warm glow while the rich aroma of spices wafts through the air. That’s when this crustless pumpkin pie comes into play, transforming your kitchen into a cozy haven. It’s a dessert that’s not just easy to whip up but also a show-stopper when served.
Now, you might be thinking, "But Ava, what about the crust?" Here’s the beauty of this recipe: the filling is so flavorful and satisfying that it stands on its own! Plus, it’s a wonderful option for those who might be gluten-free or looking to cut back on carbs. Let’s dive deeper into this recipe, shall we? Grab your apron and let’s get baking!
My Pumpkin Pie Journey
Let’s rewind to my childhood for a moment—thanksgiving dinners full of family, laughter, and an overwhelmingly delicious spread. My grandmother would whip up her famous pumpkin pie every year. I remember peeking over the countertop, the warm, spicy scent making my mouth water, and my tummy rumble with excitement. The pie would emerge golden-brown from the oven, and as we gathered around the table, every slice served held a piece of tradition and joy.
Fast forward to my early 20s, as I began experimenting with baking in my small kitchen. After a few epic fails with pastry, I realized that the crust was what was holding me back. The desire to recreate my grandma’s pumpkin pie was strong, but I needed a way to simplify the process. Thus, the crustless pumpkin pie was born! It was a revelation. Just like my grandmother’s recipe, it had a rich texture, but now it was effortless to make. And while it may not have that traditional crust, it still brings back fond memories and, most importantly, it tastes divine!
Ingredients
Here’s what you’ll need for this delightful crustless pumpkin pie, along with some chef insights:
-
2 cups pumpkin puree
You can use canned pumpkin puree for convenience, but if you’re feeling adventurous, roast and blend your own pumpkin for a fresher taste! Just be sure to use pure pumpkin, not pumpkin pie filling. -
1 cup sweetened condensed milk
This ingredient adds the perfect amount of sweetness and creaminess. If you’re looking for a non-dairy option, try coconut cream or a homemade nut milk with a touch of sugar. -
2 large eggs
These act as the binding agents, giving your pie that lovely custardy texture. If you’re vegan, you could substitute with flax eggs (2 tablespoons of flaxseed meal mixed with 6 tablespoons of water per egg). -
1 tsp vanilla extract
A dash of vanilla rounds out the flavors beautifully. If you want to mix things up, use almond extract for a unique twist. -
1 tsp ground cinnamon
The epitome of fall spice! Cinnamon not only adds warmth but also elevates the flavors in pumpkin. If you love spices, consider adding a bit more. -
1/2 tsp ground nutmeg
This aromatic spice complements pumpkin perfectly. Freshly grated nutmeg is a game-changer if you have it on hand! -
1/2 tsp ground ginger
Ginger brings a subtle kick that enhances your pie’s flavor profile. If you’d like more heat, go for a teaspoon! -
1/4 tsp salt
A pinch of salt intensifies sweetness. Don’t skip it—balance is key!
Step-by-Step Instructions
Ready to roll up your sleeves and get started? Let’s make this pie happen!
-
Preheat Your Oven
Preheat your oven to 350°F (175°C). This is a crucial step because a properly warmed oven helps your pie bake evenly and rise beautifully. -
Mixing the Filling
In a large mixing bowl, add the pumpkin puree, sweetened condensed milk, eggs, vanilla extract, cinnamon, nutmeg, ginger, and salt. Start whisking until everything is well combined and smooth. Pro tip: Use a hand mixer for an extra fluffy filling! -
Prepare Your Baking Dish
Grease a 9-inch pie dish with a little butter or cooking spray. This helps the pie come out easily once it’s finished baking. I like using a glass dish because you can see the lovely color of the pie! -
Pour the Mixture
Carefully pour the pumpkin mixture into the prepared pie dish. Don’t worry if it seems runny; it will firm up beautifully during baking! -
Bake in the Oven
Place your pie in the preheated oven and bake for about 55-60 minutes. You’ll know it’s done when the center is set and a toothpick inserted comes out clean. Keep an eye on it; ovens can vary! -
Cool Down
Once out of the oven, let it cool on a wire rack for at least 30 minutes. This helps the filling set further and makes it easier to slice. -
Serve and Enjoy!
This is the best part! You can serve it warm or chilled. For an extra touch, top it with whipped cream or a sprinkle of cinnamon, and watch your guests’ faces light up.
Serving Suggestions
Now that your crustless pumpkin pie is ready, how should you present it? Slice it into wedges and serve it on a beautiful plate. A dollop of freshly whipped cream on the side adds a lovely touch. If you’re feeling festive, you can even garnish with a sprinkle of crushed gingersnap cookies or toasted pecans for added texture and flavor. This pie is perfect for any celebration or casual gathering, and trust me—it’s a slice of comfort everyone will appreciate!
Recipe Variations
Want to shake things up a bit? Here are a few fun variations you can try with your crustless pumpkin pie:
- Spiced Up: Add a touch of cayenne pepper for a gentle heat that pairs beautifully with pumpkin.
- Nutty Delight: Stir in some toasted pecans or walnuts into the mixture for added crunch.
- Chocolate Lover’s Dream: Mix in a handful of mini chocolate chips for a decadent twist.
- Dairy-Free Version: Substitute the sweetened condensed milk with coconut cream for a rich, non-dairy option.
- Maple Syrup Sweetener: Swap out the sweetened condensed milk for a mix of maple syrup and coconut milk for a healthier alternative.
Chef’s Notes
This crustless pumpkin pie has been a game-changer in my kitchen. It’s versatile yet simple—perfect for home cooks of all levels. I love how it reminds me of my grandmother while allowing me to add my personal touch. Over the years, I’ve experimented with different spices and variations, and each time, it turns into a fun culinary adventure. And believe me, the smiles on people’s faces as they take their first bite is worth every minute spent in the kitchen!
FAQs and Troubleshooting
Here are a few common questions you might have as you embark on your crustless pumpkin pie journey:
-
What if my pie is too runny?
Ensure your pumpkin puree is well-drained and you’ve whisked the ingredients thoroughly. If it’s too runny, it might need a little more time in the oven. -
Can I make it ahead of time?
Absolutely! This dessert keeps well in the fridge for about 3-4 days—just cover it tightly with plastic wrap or foil after it cools. -
How do I know when it’s done?
When the center is just set and a toothpick comes out clean! It might puff up a little during baking and settle as it cools. -
Can I freeze it?
Yes! You can freeze slices of the pie. Just wrap them tightly in plastic wrap and aluminum foil before placing them in the freezer. Thaw in the fridge before serving.
Nutritional Info (Optional)
Just for your reference, a slice of crustless pumpkin pie (1 slice assuming 8 servings) has approximately:
- Calories: 180
- Protein: 4g
- Carbohydrates: 23g
- Fat: 8g
- Dietary Fiber: 2g
Final Thoughts
In the end, a crustless pumpkin pie is more than just a dessert; it’s a symbol of warmth, nostalgia, and the cozy spirit of fall. Simple, delicious, and easy to make, it’s sure to become a staple in your kitchen just as it is in mine. So why wait? Gather your ingredients, invite some friends over, and enjoy a slice of comfort food that brings everyone together. Just remember to savor each bite—it’s all about the experience and the love you put into it! Happy baking!
PrintCrustless Pumpkin Pie
A deliciously easy pumpkin pie without the hassle of a crust, perfect for fall gatherings.
- Prep Time: 15 minutes
- Cook Time: 60 minutes
- Total Time: 75 minutes
- Yield: 8 servings 1x
- Category: Dessert
- Method: Baking
- Cuisine: American
- Diet: Vegetarian
Ingredients
- 2 cups pumpkin puree
- 1 cup sweetened condensed milk
- 2 large eggs
- 1 tsp vanilla extract
- 1 tsp ground cinnamon
- 1/2 tsp ground nutmeg
- 1/2 tsp ground ginger
- 1/4 tsp salt
Instructions
- Preheat your oven to 350°F (175°C).
- In a large mixing bowl, add the pumpkin puree, sweetened condensed milk, eggs, vanilla extract, cinnamon, nutmeg, ginger, and salt. Start whisking until everything is well combined and smooth.
- Grease a 9-inch pie dish with butter or cooking spray.
- Carefully pour the pumpkin mixture into the prepared pie dish.
- Place your pie in the preheated oven and bake for about 55-60 minutes.
- Once out of the oven, let it cool on a wire rack for at least 30 minutes.
- Serve warm or chilled with whipped cream or a sprinkle of cinnamon.
Notes
For added texture, consider garnishing with crushed gingersnap cookies or toasted pecans.
Nutrition
- Serving Size: 1 slice
- Calories: 180
- Sugar: 12g
- Sodium: 100mg
- Fat: 8g
- Saturated Fat: 3g
- Unsaturated Fat: 5g
- Trans Fat: 0g
- Carbohydrates: 23g
- Fiber: 2g
- Protein: 4g
- Cholesterol: 75mg
Keywords: pumpkin pie, crustless pie, fall dessert, easy dessert
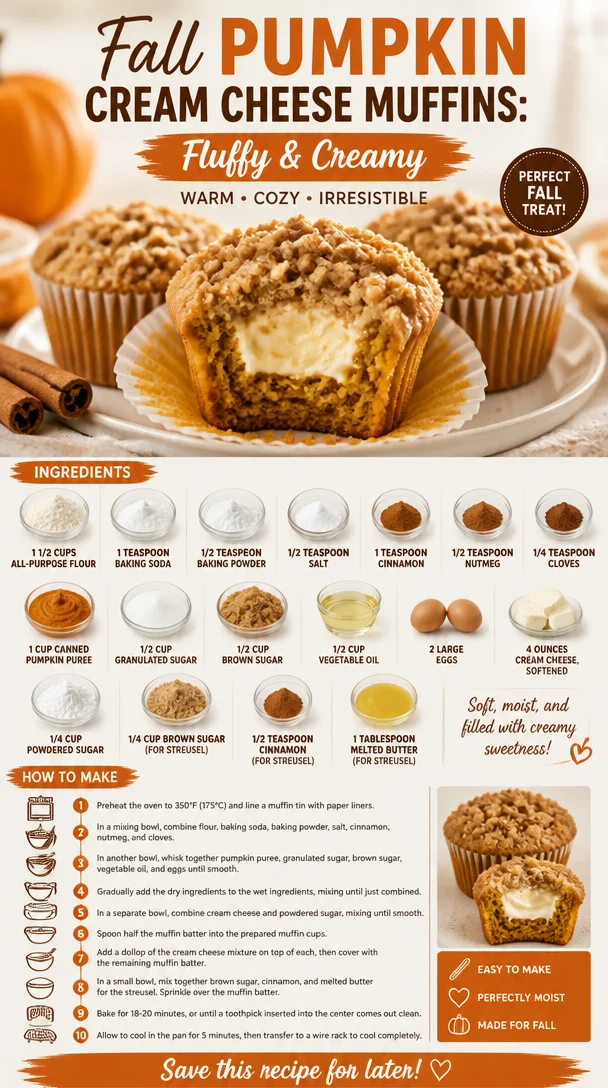
Fall Pumpkin Cream Cheese Muffins: Fluffy & Creamy
Pumpkin Cream Cheese Muffins: A Warm Autumn Delight
Welcome to my kitchen, where the tantalizing aroma of freshly baked muffins fills the air, and every bite feels like a warm hug! Today, we’re diving into one of my absolute favorite autumn recipes—Pumpkin Cream Cheese Muffins. There’s just something magical about the blend of spiced pumpkin and creamy, decadent cream cheese, making these muffins a perfect treat for breakfast, brunch, or a cozy afternoon snack.
Fall is a season of change, and with it comes the excitement of autumn flavors. Pumpkin is the star of the show, and when it’s paired with cream cheese, the result is a delightful mélange of textures and tastes. I can’t wait to share my tips, tricks, and a heartfelt story behind these scrumptious muffins!
Personal Story
Let me take you back to my childhood, when the leaves would start to change, and the air turned crisp. My grandmother had a way of making everything feel special, especially during the fall. One of my fondest memories is of her kitchen filled with laughter, the warmth of the oven, and the intoxicating smell of pumpkin muffins baking.
On weekends, I would wake up to the sweet scent wafting through the house, tugging me out of bed like a cozy blanket calling me to start the day. My favorite part? Helping Grandma swirl the cream cheese filling into the muffins—an art form in itself! We’d sneak bites of the unbaked batter and giggle as the kitchen turned into a flour-dusted wonderland.
Those muffins not only filled our bellies but also created lasting memories, and to this day, I make them often, recalling those moments fondly. So, in the spirit of nostalgia and yummy flavors, let’s jump into these Pumpkin Cream Cheese Muffins!
Ingredients
Here’s what you’ll need to whip up these delightful muffins:
-
1 1/2 cups all-purpose flour: The base of our muffins. If you prefer a lighter texture, consider using cake flour.
-
1 teaspoon baking soda: This gives our muffins a nice rise. Don’t skip it!
-
1/2 teaspoon baking powder: Works alongside the baking soda to help the muffins fluff up.
-
1/2 teaspoon salt: Balances all the flavors, enhancing the sweetness of the pumpkin.
-
1 teaspoon cinnamon: A warm spice that brings out the cozy, autumn vibes.
-
1/2 teaspoon nutmeg: Adds a hint of earthiness—totally essential for that pumpkin experience.
-
1/4 teaspoon cloves: Just a pinch brings depth to our flavor profile.
-
1 cup canned pumpkin puree: Use 100% pure pumpkin puree. Don’t confuse it with pumpkin pie filling, which has added spices and sugars.
-
1/2 cup granulated sugar: Sweetens the mix without overwhelming the pumpkin flavor.
-
1/2 cup brown sugar: Brown sugar adds a deeper flavor and moisture to our muffins.
-
1/2 cup vegetable oil: Keeps the muffins moist and tender. You can substitute with melted coconut oil for a healthier option.
-
2 large eggs: These bind the ingredients and help create a lovely texture.
-
4 ounces cream cheese, softened: The star of our filling! Use full-fat cream cheese for the best results.
-
1/4 cup powdered sugar: Sweetens our cream cheese filling—it’s all about balance!
-
1/4 cup brown sugar (for streusel): Adds a delightful crunch and sweetness on top.
-
1/2 teaspoon cinnamon (for streusel): Just like before, enhances the flavor.
-
1 tablespoon melted butter (for streusel): Holds everything together and brings a buttery richness.
Step-by-Step Instructions
Alright, let’s get our hands a little messy and bake these muffins together!
-
Preheat your oven to 350°F (175°C) and line a muffin tin with paper liners or grease it with non-stick spray. This is key to getting those muffins out in one piece!
-
In a medium bowl, whisk together the flour, baking soda, baking powder, salt, cinnamon, nutmeg, and cloves. This ensures even distribution of the dry ingredients—nobody likes a mouthful of baking soda!
-
In a large bowl, combine the canned pumpkin puree, granulated sugar, brown sugar, vegetable oil, and eggs. Mix well with a spatula or a hand mixer until creamy and smooth. Look at that vibrant orange color—it screams fall!
-
Gradually add the dry ingredients into the pumpkin mixture, being careful not to overmix. Stir until just combined; a few lumps are totally okay. This is a classic chef trick—overmixing leads to dense muffins, and nobody wants that!
-
Prepare the cream cheese filling: In a separate bowl, beat the softened cream cheese with powdered sugar until smooth and fluffy. You can add a dash of vanilla extract for an extra flavor kick.
-
Make the streusel topping: In a small bowl, combine the brown sugar, cinnamon, and melted butter. Add in flour until you get a crumbly mixture. You want it to hold together but still be crumbly.
-
Divide the muffin batter equally among the liners, filling each about halfway. Then, drop a spoonful of the cream cheese mixture into the center of each muffin. Don’t be shy—generous is the name of the game!
-
Top off with the remaining muffin batter, covering the cream cheese filling entirely. Finally, sprinkle the streusel topping over each muffin.
-
Bake in the preheated oven for 20 to 25 minutes, or until a toothpick inserted comes out clean (though a little cream cheese on it is okay!). Your kitchen will smell heavenly!
-
Let them cool in the pan for about 5 minutes before transferring to a wire rack—this allows the muffins to set and makes them easier to handle.
Serving Suggestions
These Pumpkin Cream Cheese Muffins are best served warm, fresh from the oven. I love to eat them just as they are, but a light dusting of powdered sugar adds a special touch. Serve them alongside a steaming cup of coffee or chai latte for a perfect morning treat or cozy afternoon snack.
Recipe Variations
Want to switch things up? Here are some creative tweaks you can try:
-
Add-ins: Toss in some chocolate chips or chopped nuts for added texture and flavor.
-
Gluten-Free Option: Swap the all-purpose flour for a gluten-free flour blend.
-
Spiced Up: Increase the spice levels by adding more cinnamon or a pinch of cayenne for a little heat.
-
Dairy-Free: Use vegan cream cheese instead of regular cream cheese for a dairy-free version.
-
Mini Muffins: Make mini muffins for bite-sized snacks—just reduce the baking time by about 5 minutes!
Chef’s Notes
These muffins have been a staple in my kitchen for years, and I love how they evolve with each batch. I remember one time, I got a little too excited with the spices, and they turned out almost too spiced! But my family loved them and declared them "Boom Boom Muffins!" Now, I always leave a little room for experimentation.
If you’re in the mood to switch up the filling, try cream cheese mixed with orange zest or cranberry for a festive twist; you won’t be disappointed!
FAQs and Troubleshooting
1. Why are my muffins dense?
Overmixing the batter can lead to dense muffins. Try mixing until just combined for lighter, fluffier results.
2. Can I freeze these muffins?
Absolutely! Once completely cooled, wrap them individually in plastic wrap and store them in an airtight bag. They can last for up to three months in the freezer.
3. How can I tell when my muffins are done?
Insert a toothpick in the center of a muffin. If it comes out clean or with a few moist crumbs, they’re done!
4. My streusel topping didn’t crisp up. What did I do wrong?
Ensure the butter is melted just enough to combine with the sugars and flour properly. If it’s too melted, it won’t hold its shape!
Nutritional Info (per muffin)
- Calories: 180
- Protein: 4g
- Carbohydrates: 25g
- Fat: 8g
- Fiber: 1g
- Sugar: 10g (includes natural and added sugars)
So there you have it! A delightful recipe for Pumpkin Cream Cheese Muffins that’s sure to warm your heart and fill your belly. Whether you’re reminiscing about your grandma’s kitchen or blending your own unique flavors, these muffins will always hit the spot. Enjoy baking (and eating!) them, and remember—good food is all about the joy it brings, not just the taste! Let’s savor each moment and keep those cravings coming!
PrintPumpkin Cream Cheese Muffins
Delicious muffins featuring spiced pumpkin and creamy cream cheese, perfect for breakfast or snacks during autumn.
- Prep Time: 15 minutes
- Cook Time: 25 minutes
- Total Time: 40 minutes
- Yield: 12 servings 1x
- Category: Dessert
- Method: Baking
- Cuisine: American
- Diet: Vegetarian
Ingredients
- 1 1/2 cups all-purpose flour
- 1 teaspoon baking soda
- 1/2 teaspoon baking powder
- 1/2 teaspoon salt
- 1 teaspoon cinnamon
- 1/2 teaspoon nutmeg
- 1/4 teaspoon cloves
- 1 cup canned pumpkin puree
- 1/2 cup granulated sugar
- 1/2 cup brown sugar
- 1/2 cup vegetable oil
- 2 large eggs
- 4 ounces cream cheese, softened
- 1/4 cup powdered sugar
- 1/4 cup brown sugar (for streusel)
- 1/2 teaspoon cinnamon (for streusel)
- 1 tablespoon melted butter (for streusel)
Instructions
- Preheat your oven to 350°F (175°C) and line a muffin tin with paper liners or grease it.
- Whisk together the flour, baking soda, baking powder, salt, cinnamon, nutmeg, and cloves in a medium bowl.
- Combine the pumpkin puree, granulated sugar, brown sugar, vegetable oil, and eggs in a large bowl and mix until creamy.
- Add the dry ingredients gradually into the pumpkin mixture, stirring until just combined.
- Prepare the cream cheese filling by beating the cream cheese with powdered sugar until smooth.
- Make the streusel topping by mixing brown sugar, cinnamon, and melted butter, then incorporating flour until crumbly.
- Divide the muffin batter among the liners, adding cream cheese mixture on top, then cover with more muffin batter.
- Sprinkle the streusel topping over each muffin.
- Bake for 20 to 25 minutes, or until a toothpick comes out clean.
- Cool in the pan for 5 minutes before transferring to a wire rack.
Notes
These muffins are best enjoyed warm and can be frozen individually for up to three months.
Nutrition
- Serving Size: 1 muffin
- Calories: 180
- Sugar: 10g
- Sodium: 200mg
- Fat: 8g
- Saturated Fat: 2g
- Unsaturated Fat: 5g
- Trans Fat: 0g
- Carbohydrates: 25g
- Fiber: 1g
- Protein: 4g
- Cholesterol: 40mg
Keywords: pumpkin muffins, fall baking, cream cheese filling