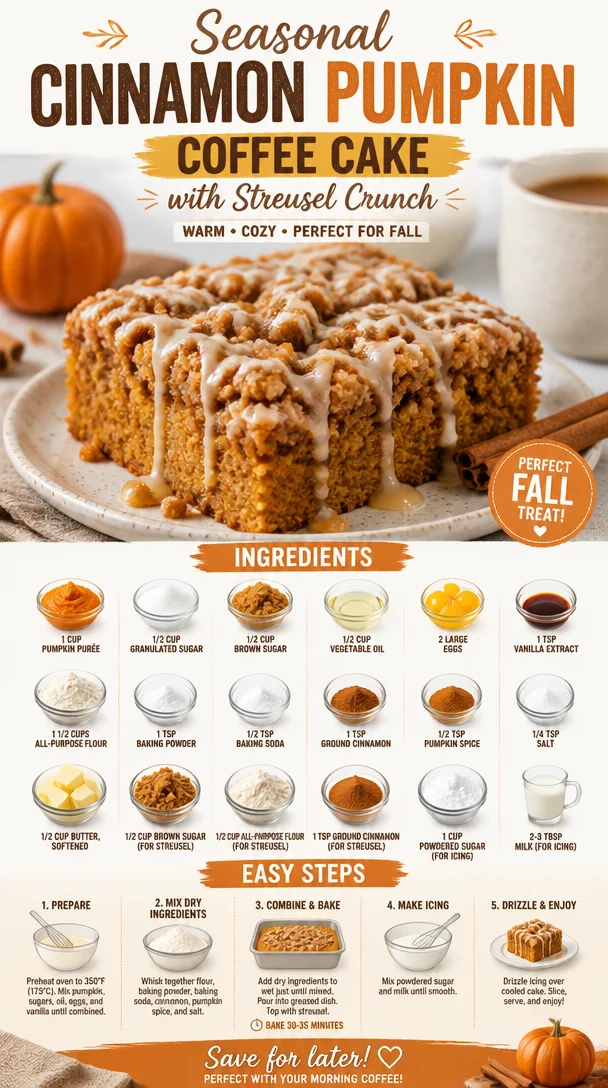
Seasonal Cinnamon Pumpkin Coffee Cake with Streusel Crunch
Cinnamon Streusel Pumpkin Coffee Cake: A Cozy Bite of Autumn
Welcome to Clean Plate Cravings! Today, we’re diving deep into the yummy world of fall flavors with a delightful recipe for Cinnamon Streusel Pumpkin Coffee Cake. If you’ve been feeling that familiar autumn chill in the air, then you know it’s time to crank up the oven, brew some coffee, and fill your kitchen with the warm aromas of pumpkin and cinnamon. It’s a celebration of one of my favorite time of year—fuzzy sweaters, crunchy leaves, and, yes, everything pumpkin-spiced!
There’s just something about pumpkin-flavored treats that immediately wraps you in a warm hug, wouldn’t you agree? This cake is moist, scrumptious, and topped with a crunchy streusel that will make your taste buds sing. And let’s not forget the perfectly sweet icing drizzle that sets everything off just right. So grab your mixing bowl and let’s create a masterpiece filled with memories, comfort, and flavors that remind us of the best kind of indulgence!
But wait! Before we jump into the baking, let me take you on a little journey down memory lane…
A Slice of Nostalgia
As the leaves began to fall each year, my family had a tradition of visiting the nearby pumpkin patch. Armed with a wicker basket, we’d wander through the fields, searching for the perfect pumpkin to bring home. After hours of picking, playing, and absorbing the autumn sunshine, we’d inevitably head home with more than just one gourd.
One of my cherished memories from those trips was my grandma’s famous pumpkin coffee cake. With its warm spice, soft texture, and that absolutely irresistible cinnamon streusel topping, it was an instant classic. She made it every year, and the scent alone could bring everyone running from every corner of the house.
As I grew older and ventured into the world of cooking, it became a tradition of my own to recreate that joyful recipe, making a few tweaks along the way. Each time I bake this Cinnamon Streusel Pumpkin Coffee Cake, I can feel the crunchy leaves under my boots, hear laughter mingling with rustling wind, and, of course, taste that sweet, spiced cake that embodies the season perfectly. Now, let’s get into this delightful recipe so you can create your own fall memories!
Ingredients
Here’s what you’ll need to bring this comforting pumpkin coffee cake to life:
-
1 cup pumpkin purée
The star of the dish! You can use canned pumpkin for convenience or make your own by roasting fresh pumpkins. Either way, this gives the cake its rich flavor and moisture. -
1/2 cup granulated sugar
This provides sweetness and helps with the cake’s structure. If you’re looking to reduce sugar, you can swap a portion with coconut sugar for a deeper flavor. -
1/2 cup brown sugar
For that lovely molasses flavor and additional moisture, brown sugar is a must. You can use light or dark brown sugar depending on how rich you want the flavor to be. -
1/2 cup vegetable oil
This keeps our cake moist. You can use melted coconut oil or applesauce as a healthier alternative! -
2 large eggs
Eggs are essential for binding the ingredients together. If you want to go egg-free, consider using flax eggs or unsweetened applesauce. -
1 teaspoon vanilla extract
A splash of vanilla enhances the flavor beautifully. If you have it, try using vanilla bean paste for an intense vanilla flavor! -
1 1/2 cups all-purpose flour
The base of your cake! You could substitute with gluten-free flour if you’d prefer a gluten-free version—just make sure it’s a blend meant for baking. -
1 teaspoon baking powder
This helps our cake rise and gives it a fluffy texture. Just make sure to check the expiration date! -
1/2 teaspoon baking soda
Essential for balance; the baking soda reacts with the acidity of the pumpkin. -
1 teaspoon ground cinnamon
The spice of the season! It fills your kitchen with that warm smell and rounds out the flavors in the cake. -
1/2 teaspoon pumpkin spice
This adds an extra kick of flavor—if you don’t have pumpkin spice, a mix of nutmeg and ginger will also do the trick! -
1/4 teaspoon salt
Salt enhances the sweetness of the cake, making sure each bite is bursting with flavor.
For the Streusel Topping:
-
1/2 cup butter, softened
This adds richness and helps create that delightful crumbly topping. For a lighter version, you can use a plant-based butter or even coconut oil. -
1/2 cup brown sugar (for streusel)
Again, a touch of deep sweetness! Feel free to use a sugar substitute here for a lower-calorie option. -
1/2 cup all-purpose flour (for streusel)
This binds the streusel together. You might swap this for oats if you prefer a crunchier topping! -
1 teaspoon ground cinnamon (for streusel)
Because there can never be too much cinnamon, right?
For the Icing:
-
1 cup powdered sugar
This sweet glaze brings everything together beautifully. You can adjust the sweetness by adding more or using a sugar substitute. -
2-3 tablespoons milk
For thinning the icing, you can use almond milk or oat milk if you want a dairy-free glaze.
Now that you have all your ingredients ready to roll, let’s get baking!
Step-by-Step Instructions
-
Preheat Your Oven
First thing’s first, preheat your oven to 350°F (175°C). A properly heated oven is key to that perfect rise! -
Mix the Wet Ingredients
In a mixing bowl, beat together the pumpkin purée, granulated sugar, brown sugar, and vegetable oil until well combined. Add the eggs and vanilla, mixing until everything is nicely blended. Pro-tip: use a whisk for extra fluffy batter! -
Combine the Dry Ingredients
In a separate bowl, whisk together the flour, baking powder, baking soda, ground cinnamon, pumpkin spice, and salt. This helps to ensure even distribution of the leavening agents. -
Combine Wet and Dry
Gradually add the dry ingredients to the wet mixture, stirring until just combined. Be careful not to overmix—some small lumps are perfectly fine! -
Prepare the Streusel
In a bowl, combine softened butter, brown sugar, flour, and cinnamon. Use your hands or a fork to mix it until you achieve a crumbly texture. Keep it cool in the fridge while you prep the cake. -
Pour into the Pan
Grease a 9×13 inch baking pan, and pour the pumpkin cake batter into it. Spread it evenly with a spatula. -
Add the Streusel Topping
Sprinkle the streusel mixture generously over the top of the cake batter. Feel free to push it in slightly for some added texture. -
Bake
Bake the cake in the preheated oven for about 30-35 minutes. It’s ready when a toothpick inserted in the center comes out clean. Your kitchen will smell SO good—trust me. -
Cool Down
Once out of the oven, let the cake cool in the pan for at least 15 minutes. For added indulgence, move it to a cooling rack. -
Prepare the Icing
While the cake is cooling, whisk together the powdered sugar and milk until smooth. Adjust the milk for your desired consistency—thicker for drizzle, thinner for pour. -
Drizzle and Serve
Once the cake has cooled, drizzle the icing over the top. Slice, serve, and enjoy!
Serving Suggestions
To plate this luscious Cinnamon Streusel Pumpkin Coffee Cake, cut it into squares and place them on a beautiful serving platter. Dust with a sprinkle of cinnamon for a touch of elegance. Pair this cake with a hot cup of coffee or spiced chai for the ultimate cozy experience—perfect for a chilly fall morning or an afternoon treat!
Recipe Variations
- Chocolate Chip Pumpkin Cake: Add 1 cup of chocolate chips to the batter for a sweet twist!
- Nuts About It: Toss in 1/2 cup of chopped walnuts or pecans to the streusel for added crunch.
- Coconut Infusion: Stir in shredded coconut into the batter for an exotic flair!
- Gluten-Free Option: Substitute the all-purpose flour with a 1:1 gluten-free flour blend to accommodate dietary needs.
- Vegan Delight: Use flax eggs and nut milk to make this recipe plant-based!
Chef’s Notes
This recipe has evolved through my attempts to recreate that famed family coffee cake. I started with my grandma’s method but slowly adjusted sugar amounts and introduced healthier alternatives. And let’s be honest, having a cake that’s both festive and a touch on the healthier side feels like a win-win!
One hilarious memory I have involves a baking “oops” moment when I accidentally grabbed cayenne pepper instead of cinnamon. Let’s just say, those unsuspecting family taste testers were in for quite the surprise! Now, my spice jars are meticulously labeled.
FAQs and Troubleshooting
1. Why is my coffee cake dense?
A common culprit is overmixing the batter. Combine wet and dry ingredients until just mixed to avoid a dense texture.
2. Can I use fresh pumpkin instead of canned?
Absolutely! Just make sure it’s well-purged of excess moisture and puréed smoothly. Roasting fresh pumpkins can bring out an even richer flavor!
3. How can I store leftovers?
Keep any leftover cake in an airtight container at room temperature for 3-4 days. You can also refrigerate it but remember to bring it back to room temp for the best texture when you serve it.
4. Can I freeze this cake?
Yes, it freezes beautifully! Just wrap it tightly in plastic wrap and then foil. When you’re ready to eat it, thaw it at room temperature or reheat it gently in the oven.
Nutritional Info
Each slice of this magical Cinnamon Streusel Pumpkin Coffee Cake has approximately 280 calories, with a happy balance of carbs, fat, and protein, making it a lovely treat for you to enjoy!
There you have it, my friend—your ticket to an autumn-filled kitchen overflowing with warm, spiced deliciousness. The Cinnamon Streusel Pumpkin Coffee Cake brings not just flavor but also memories that you’ll pass down. So, go ahead and whip up a batch to celebrate life’s cozy moments. Happy baking!
PrintCinnamon Streusel Pumpkin Coffee Cake
A delightful and moist pumpkin coffee cake topped with crunchy streusel and sweet icing, perfect for cozy autumn days.
- Prep Time: 15 minutes
- Cook Time: 35 minutes
- Total Time: 50 minutes
- Yield: 12 servings 1x
- Category: Dessert
- Method: Baking
- Cuisine: American
- Diet: Vegetarian
Ingredients
- 1 cup pumpkin purée
- 1/2 cup granulated sugar
- 1/2 cup brown sugar
- 1/2 cup vegetable oil
- 2 large eggs
- 1 teaspoon vanilla extract
- 1 1/2 cups all-purpose flour
- 1 teaspoon baking powder
- 1/2 teaspoon baking soda
- 1 teaspoon ground cinnamon
- 1/2 teaspoon pumpkin spice
- 1/4 teaspoon salt
- 1/2 cup butter, softened (for streusel)
- 1/2 cup brown sugar (for streusel)
- 1/2 cup all-purpose flour (for streusel)
- 1 teaspoon ground cinnamon (for streusel)
- 1 cup powdered sugar (for icing)
- 2–3 tablespoons milk (for icing)
Instructions
- Preheat your oven to 350°F (175°C).
- Mix the pumpkin purée, granulated sugar, brown sugar, and vegetable oil until well combined. Add the eggs and vanilla, and mix until blended.
- Combine the flour, baking powder, baking soda, ground cinnamon, pumpkin spice, and salt in a separate bowl.
- Gradually add the dry ingredients to the wet mixture, stirring until just combined.
- Prepare the streusel by mixing softened butter, brown sugar, flour, and cinnamon until crumbly.
- Pour the batter into a greased 9×13 inch baking pan.
- Sprinkle the streusel mixture over the cake batter.
- Bake for 30-35 minutes or until a toothpick comes out clean.
- Cool the cake in the pan for at least 15 minutes.
- Prepare the icing by whisking powdered sugar and milk until smooth.
- Drizzle the icing over the cooled cake, slice, and serve.
Notes
Feel free to add chocolate chips or nuts for variation. This recipe can be made gluten-free or vegan.
Nutrition
- Serving Size: 1 slice
- Calories: 280
- Sugar: 20g
- Sodium: 150mg
- Fat: 12g
- Saturated Fat: 6g
- Unsaturated Fat: 4g
- Trans Fat: 0g
- Carbohydrates: 40g
- Fiber: 2g
- Protein: 3g
- Cholesterol: 30mg
Keywords: pumpkin coffee cake, fall dessert, cinnamon streusel, cozy baking, autumn recipes
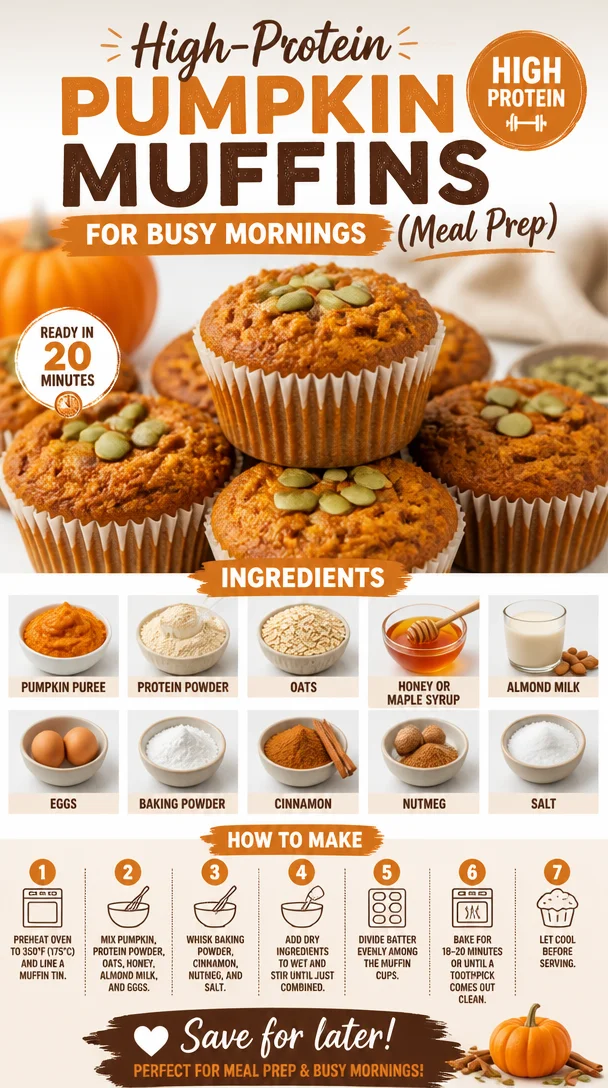
High-Protein Pumpkin Muffins for Busy Mornings (Meal Prep)
Pumpkin Protein Muffins: A Cozy Kitchen Treat
Welcome back to Clean Plate Cravings! Today, I’m thrilled to share a recipe that warms my heart and fills my kitchen with the delightful scent of fall—Pumpkin Protein Muffins. These muffins are not just a delicious treat; they’re a wholesome way to fuel your day, whether you need a quick breakfast on the go or a tasty snack to keep you energized.
Now, let’s be real—pumpkin isn’t just for lattes and pies. It’s a powerhouse of nutrition, packed with fiber, vitamins, and minerals. And when combined with protein powder and oats, these muffins transform into a satisfying bite that keeps you feeling lighter and brighter. Plus, they’re simple enough to whip up, making them the perfect addition to your weekly meal prep!
A Taste of Nostalgia: My Pumpkin Muffin Memories
One of my fondest memories from childhood involves my grandma’s kitchen during the crisp autumn months. The air would be filled with the sweet aroma of spices—cinnamon, nutmeg, and cloves—as she baked her famous pumpkin muffins. I remember standing on a stool, watching her carefully mix the ingredients, and getting excited about the first bite. Her recipe was a bit indulgent, rich with sugar and butter, but oh, was it amazing!
Fast forward to now, and I’ve had my fair share of muffin experiments. I wanted to recreate that nostalgic warmth and aroma, but with a healthier twist. After many trials and a few delightful failures (which we can laugh about now), I finally landed on this version that honors my grandmother’s recipe while keeping it clean and protein-packed. So, grab your apron and let’s bake together!
Ingredients That Shine
Here’s what you’ll need to whip up these scrumptious Pumpkin Protein Muffins:
-
1 cup pumpkin puree
A must for that classic pumpkin flavor! You can use canned pumpkin for convenience or make your own from fresh pumpkin. If you need a swap, try using mashed bananas for a different flavor. -
1/2 cup protein powder
Boosts the protein content and keeps you full longer. I personally love using vanilla whey or plant-based protein. If you don’t have protein powder, you can increase the oats to 1 cup, but the texture may differ. -
1/2 cup oats
Adds texture and heartiness. I recommend rolled or old-fashioned oats. For a gluten-free option, use certified gluten-free oats. -
1/4 cup honey or maple syrup
Natural sweeteners that add moisture and sweetness. Maple syrup gives a lovely flavor twist. If you lean towards lower sugar, feel free to reduce the amount or substitute with stevia or monk fruit. -
1/2 cup almond milk
Lightens the mixture and keeps it moist. You can substitute with any milk you prefer—dairy, oat, or soy will all work well. -
2 eggs
Binds everything together. For a vegan alternative, you can use flax eggs (1 tablespoon of flaxseed meal mixed with 2.5 tablespoons of water equals one egg). -
1 teaspoon baking powder
Provides that delightful rise. If you’re out, baking soda can work with a tiny splash of vinegar. -
1 teaspoon cinnamon
A warm spice that really enhances the pumpkin flavor. Feel free to adjust the amount based on your preference. -
1/2 teaspoon nutmeg
Another classic spice that complements pumpkin perfectly. If you don’t have nutmeg on hand, try a pinch of allspice instead. -
1/4 teaspoon salt
Balances the sweetness and enhances the overall flavor.
Step-by-Step Cooking Instructions
-
Preheat Your Oven:
Preheat your oven to 350°F (175°C) and line a muffin tin with paper liners or lightly grease it. This will ensure our muffins bake evenly and pop out easily. -
Mix Dry Ingredients:
In a large mixing bowl, combine the protein powder, oats, baking powder, cinnamon, nutmeg, and salt. Tip: Whisk them together to have a uniform mixture and avoid clumps. -
Combine Wet Ingredients:
In another bowl, mix the pumpkin puree, honey (or maple syrup), almond milk, and eggs. Chef’s insight: Give this a good whisk to incorporate the eggs fully; you want a smooth, creamy base for your muffins. -
Combine Wet and Dry:
Pour the wet mixture into the dry ingredients and gently fold them together. Be careful not to overmix—just until you see no dry flour! Tip: A rubber spatula works wonders here, ensuring no pockets of flour remain. -
Fill Muffin Tin:
Scoop the batter into the prepared muffin tin, filling each cup about 2/3 full. Hack: Use an ice cream scoop for an even fill, and you’ll impress your friends with the presentation!. -
Bake:
Place the muffin tin in the oven and bake for about 18-20 minutes until the tops are golden and a toothpick inserted into the center comes out clean. -
Cooldown:
Remove from the oven and let them cool for about 5 minutes in the tin before transferring to a wire rack. Trust me, the cooling step is crucial—this is where the texture gets just right!
Serving Suggestions
These muffins are perfect for breakfast, but they shine in so many situations. Serve them warm, slathered with a bit of almond butter for an extra protein punch, or enjoy them alongside a steaming cup of herbal tea. They also make fantastic snacks post-workout or packed in lunchboxes—kids and adults will love them alike!
Recipe Variations
-
Nutty Delight: Add 1/2 cup of chopped walnuts or pecans for a satisfying crunch.
-
Berry Boost: Fold in 1/2 cup of blueberries or cranberries for extra flavor and antioxidants.
-
Chocolate Twist: Add 1/4 cup of dark chocolate chips for a decadent surprise.
-
Spiced Up: Experiment with 1 tablespoon of pumpkin pie spice instead of the individual spices for a bolder flavor.
-
Vegan Version: Replace the eggs with flax eggs and use maple syrup as your sweetener for a vegan-friendly option.
Chef’s Notes
These muffins have come a long way from my grandma’s recipe, but the heart remains the same—bringing people together through delicious, comforting food. I often find myself altering the grain options based on the season; in summer, I toss in fresh blueberries to brighten them up! And let’s not forget the myriad of toppings you can try: honey drizzles, yogurt dollops, or even a sprinkle of granola for added texture.
Baking is a bit like life—sometimes it takes a couple of tries to get things just right. I once forgot to add the eggs and ended up with a dense pumpkin bread rather than muffins—while it wasn’t what I intended, it made for a delightful surprise coffee cake!
FAQs and Troubleshooting
1. My muffins didn’t rise as expected. What happened?
If your muffins are flat, it could be that your baking powder is old. Always check the expiration date and ensure you mix it well with the dry ingredients.
2. Can I store these muffins for later?
Absolutely! Let them cool completely, then store them in an airtight container at room temperature for a few days. They also freeze beautifully for up to three months. Just let them thaw before munching!
3. What if I’m allergic to nuts?
No problem! Just swap almond milk for oat or coconut milk, and skip any nut add-ins.
4. Can I make a bigger batch?
Yes! You can double the recipe and store extras—or share them with friends! Just remember to adjust your bake time slightly if you’re using more than one muffin tin.
Nutritional Info
While I’m all about enjoying delicious food, I know it’s helpful to have a grip on what we’re putting in our bodies. Each muffin (based on 12 muffins per batch) packs in roughly:
- Calories: 150
- Protein: 8g
- Fiber: 3g
- Sugars: 5g
Remember, nutritional values can vary based on ingredient selections and brands.
So there you have it—a heartfelt recipe packed with flavor and nutrition, perfect for any time of the day. As you bake these delightful Pumpkin Protein Muffins, I hope they bring you warmth, nostalgia, and a little happiness, just like they do for me. Happy baking, friend!
PrintPumpkin Protein Muffins
A wholesome take on classic pumpkin muffins, packed with protein and delicious spices to fuel your day.
- Prep Time: 10 minutes
- Cook Time: 20 minutes
- Total Time: 30 minutes
- Yield: 12 servings 1x
- Category: Snack
- Method: Baking
- Cuisine: American
- Diet: Vegetarian
Ingredients
- 1 cup pumpkin puree
- 1/2 cup protein powder
- 1/2 cup oats
- 1/4 cup honey or maple syrup
- 1/2 cup almond milk
- 2 eggs
- 1 teaspoon baking powder
- 1 teaspoon cinnamon
- 1/2 teaspoon nutmeg
- 1/4 teaspoon salt
Instructions
- Preheat your oven to 350°F (175°C) and line a muffin tin with paper liners or lightly grease it.
- Mix dry ingredients: In a large bowl, combine protein powder, oats, baking powder, cinnamon, nutmeg, and salt.
- Combine wet ingredients: In another bowl, mix pumpkin puree, honey (or maple syrup), almond milk, and eggs.
- Combine wet and dry: Pour the wet mixture into the dry ingredients and gently fold them together.
- Fill muffin tin: Scoop the batter into the prepared muffin tin, filling each cup about 2/3 full.
- Bake: Place the muffin tin in the oven and bake for about 18-20 minutes until the tops are golden and a toothpick comes out clean.
- Cooldown: Remove from the oven and let cool for about 5 minutes before transferring to a wire rack.
Notes
These muffins are versatile—feel free to add nuts, berries, or chocolate chips for variations. They also freeze well for up to three months.
Nutrition
- Serving Size: 1 muffin
- Calories: 150
- Sugar: 5g
- Sodium: 130mg
- Fat: 3g
- Saturated Fat: 0.5g
- Unsaturated Fat: 2g
- Trans Fat: 0g
- Carbohydrates: 25g
- Fiber: 3g
- Protein: 8g
- Cholesterol: 40mg
Keywords: pumpkin muffins, protein muffins, healthy snacks, fall baking, quick breakfasts
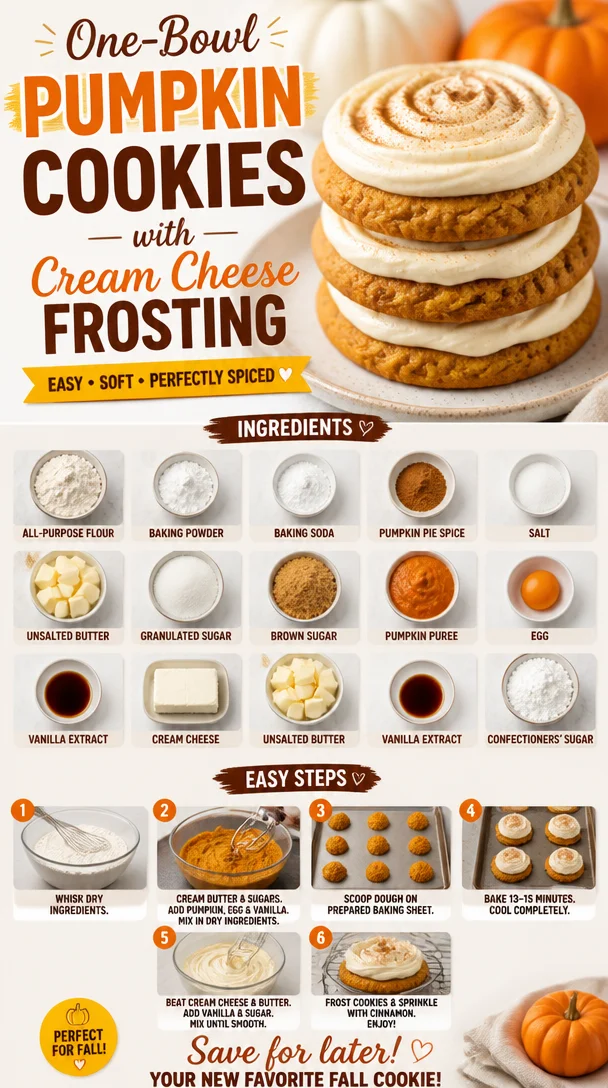
One-Bowl Pumpkin Cookies with Cream Cheese Frosting
Pumpkin Cookies with Cream Cheese Frosting: A Fall Favorite
When you think of fall, what comes to mind? Crisp leaves, cozy sweaters, and, of course, the aroma of pumpkin-spiced treats filling the air. As the days grow shorter and cooler, I can’t help but reach for my favorite seasonal ingredients—especially pumpkin! Among all my pumpkin recipes, these pumpkin cookies with cream cheese frosting hold a special place in my heart. There’s something undeniably magical about the combination of warm spices, fluffy cookies, and that cream cheese frosting that just brightens up any day. They’re not just cookies; they’re little bites of joy wrapped in nostalgia.
Baking these pumpkin cookies takes me back to my childhood kitchen, where every autumn weekend was a baking adventure. My mom would set up all the ingredients on the counter, and while the leaves outside painted the world in shades of orange and gold, we would whip up batches of our favorite cookies. I can still hear the sound of the electric mixer buzzing away while we danced around the kitchen, flour flying, laughter echoing, and, of course, my mom always declaring, “You have to taste the batter—it’s the best part!”
Fast-forward a few years, and here I am, sharing this cherished recipe with all of you. These cookies are not just sweets; they’re a warm hug, a reminder that life is about savoring the simple pleasures. Whether you’re hosting a gathering, treating your family, or simply indulging in a little self-care, these pumpkin cookies are sure to bring smiles all around. They’re fluffy, soft, and topped with creamy, dreamy frosting that makes each bite irresistible. So grab your mixing bowl, put on your favorite tunes, and let’s get baking!
Ingredients
Here’s everything you’ll need to make these delicious pumpkin cookies with cream cheese frosting:
-
2 1/2 cups (312 g) all-purpose flour
This is the base of your cookies! All-purpose flour gives them the perfect structure. If you want a gluten-free option, you can substitute it with a 1:1 gluten-free flour blend. -
1 teaspoon baking powder
This little powder helps your cookies rise just enough to give them that fluffy texture. Make sure it’s fresh; old baking powder can leave your cookies flat. -
1 teaspoon baking soda
Combined with the acid in the pumpkin, baking soda is essential for that soft, tender crumb. Just like baking powder, freshness is key! -
1 tablespoon pumpkin pie spice (plus extra for sprinkling)
This is the flavor star of the show! A mix of cinnamon, nutmeg, ginger, and cloves, pumpkin pie spice encapsulates fall. You can make your own by combining these spices if you don’t have it on hand. -
1/2 teaspoon salt
A sprinkle of salt enhances all the flavors, balancing the sweetness. Don’t skip this! -
3/4 cup (170 g) unsalted butter (room temperature)
Butter not only adds richness but also helps create that tender texture. Room temperature butter is key—it should be soft but not melted. -
3/4 cup (150 g) granulated sugar
This brings the sweetness to your cookies. You can substitute some of it with coconut sugar for a deeper flavor, just remember that it may alter the color slightly. -
1/2 cup (100 g) packed light brown sugar
Brown sugar adds moisture and a slight caramel undertone. If you’re out, you can use more granulated sugar, but you might miss that lovely depth of flavor. -
1 1/4 cups (305 g) canned pumpkin puree
Make sure to use pure pumpkin puree, not pumpkin pie filling, which contains extra sugars and spices. This is what gives your cookies that beautiful orange hue and moisture! -
1 large egg (room temperature)
Eggs bind everything together and add richness. Using a room temperature egg helps to better incorporate the ingredients. -
1 teaspoon pure vanilla extract
A splash of vanilla brings warmth and depth to the cookies’ flavor profile.
For the Cream Cheese Frosting:
-
8 ounces (1 brick or 226 g) block-style cream cheese (softened but still cool)
This is the star of your frosting! Block-style cream cheese holds its shape better than whipped cream cheese. -
¼ cup (56 g) unsalted butter (softened but still cool)
This pairs with the cream cheese to create a rich, creamy frosting that’s easy to spread. -
1 teaspoon pure vanilla extract
Just like in the cookies, pure vanilla enhances that creamy flavor of the frosting. -
1 3/4 cups (210 g) confectioners’ sugar (sifted)
Sifting the sugar ensures your frosting will be smooth without any lumps. You can adjust the sugar based on how sweet you like your frosting!
Step-by-Step Instructions
Let’s get that oven preheated and those cookies baking! Follow these detailed steps for perfect pumpkin cookies every time.
-
Preheat the oven to 350°F (175°C). This ensures your cookies bake evenly. It’s always best to start with a preheated oven!
-
Prepare your baking sheets by lining them with parchment paper or silicone baking mats. This prevents sticking and makes for easy cleanup.
-
In a large mixing bowl, whisk together the flour, baking powder, baking soda, pumpkin pie spice, and salt. This helps to evenly distribute the leavening agents and spices throughout the flour. Set this bowl aside; we’ll come back to it in a bit!
-
In another large bowl, beat the softened butter, granulated sugar, and brown sugar together until light and fluffy. This usually takes about 2-3 minutes. While mixing, make sure to scrape down the sides of your bowl so everything gets incorporated evenly. It’s important for the butter and sugar to be well-aerated to create those soft cookies.
-
Add in the canned pumpkin puree, egg, and vanilla extract, continuing to mix until everything is smoothly combined. The batter should have a beautiful, vibrant orange color, a sure sign of all that yummy pumpkin goodness!
-
Gradually add the dry ingredients to the wet ingredients, mixing until just combined. Try not to overmix—this can make your cookies tough. A few lumps are perfectly fine!
-
Using a cookie scoop or spoon, drop rounded tablespoons of dough onto your prepared baking sheets, spacing them about 2 inches apart. You can also use a spatula to gently shape them into mounds if you prefer a more uniform look.
-
Sprinkle a little extra pumpkin pie spice on top of each cookie before baking for that extra flavor boost! It also adds a lovely touch of elegance.
-
Bake for 12-15 minutes, until the edges are lightly golden and the tops appear set. They’ll continue to firm up once out of the oven, so don’t worry if they still look a tad soft!
-
Allow the cookies to cool on the baking sheet for a few minutes before transferring them to wire racks. This cooling time prevents them from breaking apart. Grab a cup of coffee or tea while you wait—trust me, you’ll need it once you start sampling!
-
For the cream cheese frosting, beat the softened cream cheese and butter together until smooth and creamy. Then, add the vanilla extract. Gradually beat in the sifted confectioners’ sugar until the frosting is fluffy and reaches your desired thickness. If it’s too runny, add more sugar!
-
Frost the completely cooled cookies with a generous dollop of frosting. Alternatively, you can pipe it on for a more decorative touch. Feel free to get creative here!
Serving Suggestions
These pumpkin cookies are best enjoyed fresh, but they also keep well for several days in an airtight container at room temperature. Consider serving them with a dash of extra pumpkin pie spice on top for a visually appealing touch. Pair them with a steaming cup of coffee, a chai tea, or even a scoop of vanilla ice cream for a delightful autumn dessert! I love arranging them on a festive platter and sharing them with friends and family. Whatever the occasion, these cookies are sure to make it memorable.
Recipe Variations
Feeling adventurous? Here are a few fun twists you can try with this recipe:
-
Chocolate Chip Pumpkin Cookies: Add 1 cup of chocolate chips into the dough for a delicious, sweet surprise!
-
Nutty Delight: Mix in 1/2 cup of chopped walnuts or pecans for an added crunch.
-
Maple Cream Cheese Frosting: Swap out the vanilla in the frosting for maple extract for a touch of that fall flavor.
-
Oatmeal Pumpkin Cookies: Substitute 1 cup of flour for rolled oats for a chewier texture.
-
Spicy Coconut Pumpkin Cookies: Add shredded coconut to the dough and a pinch of cayenne pepper for a spicy kick!
Chef’s Notes
This recipe brings back so many memories for me. What started as a simple fall tradition turned into a real love for baking and sharing these flavors with friends and family. Over the years, I’ve played around with the spices and even tried different types of frostings, but the classic cream cheese frosting has always captured my heart. Sometimes, I’ll sneak a few spoonfuls of frosting while I’m decorating—a little chef’s secret!
FAQs and Troubleshooting
1. My cookies turned out flat! What happened?
This can happen if your butter was too soft or you overmixed the dough. Make sure to use room temperature butter that’s soft but not melted, and mix until just combined.
2. Can I freeze these cookies?
Absolutely! You can freeze the cookies before frosting or after. Just make sure to store them in an airtight container. When you’re ready to enjoy, let them thaw at room temperature.
3. How do I know when my cookies are done?
Look for a light golden edge, and the center should feel set but might seem a bit soft. They’ll firm up as they cool!
4. What’s the best way to store leftovers?
Keep them in an airtight container at room temperature for up to a week, or you can refrigerate them to extend their freshness. Just be sure to let them come back to room temperature before serving for the best texture!
Nutritional Info
While it’s hard to resist indulging, here’s a rough breakdown of the nutrition for one cookie (frosted):
- Calories: 200
- Total Fat: 10g
- Saturated Fat: 6g
- Carbohydrates: 26g
- Sugar: 12g
- Protein: 2g
Enjoy making these delightful pumpkin cookies and sharing the deliciousness with everyone around you. Happy baking, friends!
PrintPumpkin Cookies with Cream Cheese Frosting
Delicious pumpkin cookies topped with a creamy cream cheese frosting, perfect for fall gatherings.
- Prep Time: 15 minutes
- Cook Time: 15 minutes
- Total Time: 30 minutes
- Yield: 24 cookies 1x
- Category: Dessert
- Method: Baking
- Cuisine: American
- Diet: Vegetarian
Ingredients
- 2 1/2 cups (312 g) all-purpose flour
- 1 teaspoon baking powder
- 1 teaspoon baking soda
- 1 tablespoon pumpkin pie spice (plus extra for sprinkling)
- 1/2 teaspoon salt
- 3/4 cup (170 g) unsalted butter (room temperature)
- 3/4 cup (150 g) granulated sugar
- 1/2 cup (100 g) packed light brown sugar
- 1 1/4 cups (305 g) canned pumpkin puree
- 1 large egg (room temperature)
- 1 teaspoon pure vanilla extract
- 8 ounces (226 g) block-style cream cheese (softened but still cool)
- 1/4 cup (56 g) unsalted butter (softened but still cool)
- 1 teaspoon pure vanilla extract (for frosting)
- 1 3/4 cups (210 g) confectioners’ sugar (sifted)
Instructions
- Preheat the oven to 350°F (175°C).
- Prepare your baking sheets by lining them with parchment paper or silicone baking mats.
- Whisk together the flour, baking powder, baking soda, pumpkin pie spice, and salt in a large mixing bowl.
- Beat the softened butter, granulated sugar, and brown sugar together until light and fluffy.
- Add in the canned pumpkin puree, egg, and vanilla extract, continue mixing until smoothly combined.
- Gradually add the dry ingredients to the wet ingredients, mixing until just combined.
- Using a cookie scoop or spoon, drop rounded tablespoons of dough onto your prepared baking sheets.
- Sprinkle a little extra pumpkin pie spice on top of each cookie before baking.
- Bake for 12-15 minutes, until the edges are lightly golden and tops appear set.
- Allow cookies to cool on the baking sheet for a few minutes before transferring to wire racks.
- Beat the softened cream cheese and butter together until smooth and creamy for frosting.
- Add the vanilla extract and gradually beat in the sifted confectioners’ sugar until fluffy.
- Frost the cooled cookies with a generous dollop of frosting.
Notes
These cookies are best enjoyed fresh but can be stored in an airtight container for several days.
Nutrition
- Serving Size: 1 cookie
- Calories: 200
- Sugar: 12g
- Sodium: 150mg
- Fat: 10g
- Saturated Fat: 6g
- Unsaturated Fat: 4g
- Trans Fat: 0g
- Carbohydrates: 26g
- Fiber: 1g
- Protein: 2g
- Cholesterol: 30mg
Keywords: pumpkin cookies, fall recipes, dessert, cream cheese frosting
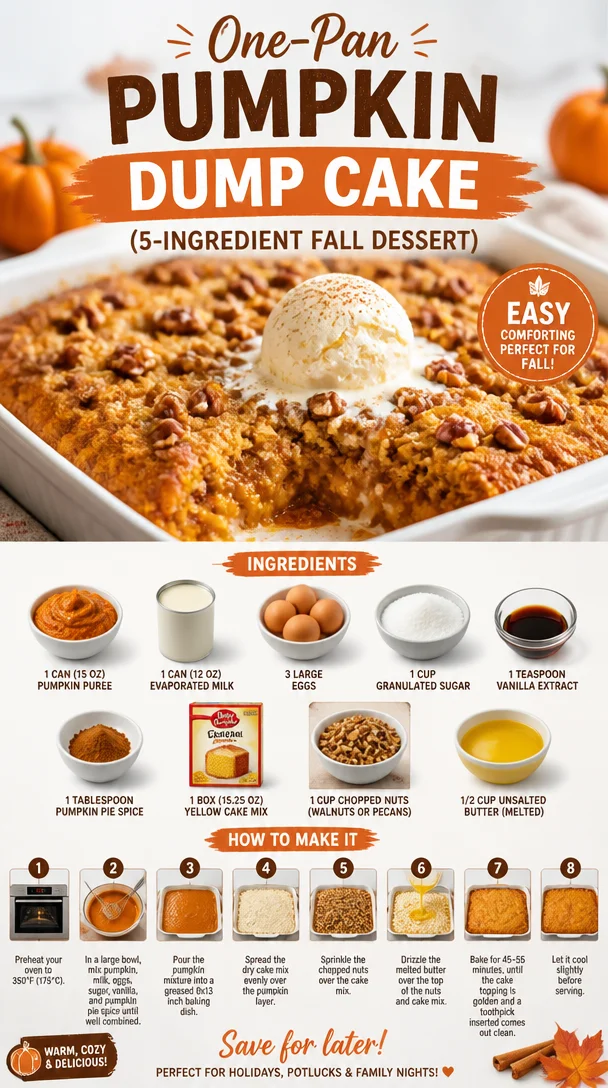
One-Pan Pumpkin Dump Cake (5-Ingredient Fall Dessert)
Pumpkin Dump Cake: A Slice of Autumn
Welcome to my cozy corner of Clean Plate Cravings! Today, we’re diving into a delightful dessert that embodies the essence of fall—Pumpkin Dump Cake. Picture the rich, comforting flavors of pumpkin spice wafting through your kitchen, enveloping you in warm nostalgia as if a beloved memory just walked through the door.
Now, you might be thinking, “Ava, what’s the deal with a ‘dump cake’?” Well, let me tell you—this isn’t just any cake. It’s a no-fuss, throw-it-all-together kind of creation that delivers on taste while being incredibly simple to make. The best part? It’s chocolatey, custardy, and the perfect way to celebrate autumn’s bounty without spending hours in the kitchen.
A Nostalgic Twist
Let me take you back to a crisp October afternoon in my childhood. My family would gather in the kitchen, ready to dive into a pumpkin-carving frenzy, with one eye on the pumpkins and the other on the warm treats waiting to be savored. My mom’s enchanting pumpkin dump cake was the star of our fall family gatherings. The sweet aroma of spices and pumpkin filled the air as it baked in the oven for what felt like an eternity.
I vividly remember peeking through the oven door, watching the golden top bubble and rise, excitement buzzing in the air. When it finally came out, warm and gooey, we would devour it with dollops of whipped cream and steaming cups of cider. It felt like magic back then—and trust me, it still does! This dish holds so many sweet memories, and I’m thrilled to share this gem with you today.
Ingredients
For this delightful Pumpkin Dump Cake, you’ll need the following ingredients:
-
1 can (15 oz) pumpkin puree: Pure pumpkin puree brings that authentic fall flavor. If fresh pumpkin is available, roast and puree it for an even richer taste!
-
1 can (12 oz) evaporated milk: This ingredient gives the cake its creamy texture. In a pinch, you can substitute with regular milk or a non-dairy alternative like almond milk, but note it may slightly alter the consistency.
-
3 large eggs: Eggs create the structure and add richness. If you need an egg substitute, try using flax eggs (1 tablespoon ground flaxseed + 2.5 tablespoons water) for each egg.
-
1 cup granulated sugar: Sugar adds sweetness to balance the pumpkin’s earthiness. Feel free to use brown sugar for a deeper caramel flavor, or a sugar alternative like stevia if you want it to be lighter.
-
1 teaspoon vanilla extract: This extrudes a lovely aroma. Always opt for pure vanilla for the best flavor; imitation vanilla just doesn’t cut it in the flavor department!
-
1 tablespoon pumpkin pie spice: The essence of fall! If you don’t have premade pumpkin spice, mix 1 teaspoon cinnamon, 1/2 teaspoon nutmeg, 1/2 teaspoon ginger, and 1/4 teaspoon cloves.
-
1 box (15.25 oz) yellow cake mix: The base of our dump cake. You can use a gluten-free cake mix if needed, or even make your own if you’re feeling adventurous!
-
1 cup chopped nuts (walnuts or pecans): I love adding these for crunch! But if you prefer a nut-free version, simply skip this step or substitute with crispy oats.
-
1/2 cup unsalted butter (melted): Butter adds richness and moisture. You can substitute with coconut oil for a dairy-free version.
With these wholesome ingredients, we’re ready to create a cake that’s bursting with flavor and memories!
Step-by-Step Instructions
Let’s turn that fall dream into a reality with this easy-to-follow recipe. Ready? Let’s cook!
-
Preheat Your Oven: Preheat your oven to 350°F (175°C). This temperature will create the perfect environment for your cake to bake evenly and rise beautifully.
-
Prepare the Baking Dish: Grab a 9×13-inch baking dish and grease it lightly with butter or non-stick spray. This cute little technique will ensure your cake comes out perfectly and doesn’t stick!
-
Mix the Wet Ingredients: In a large bowl, combine the pumpkin puree, evaporated milk, eggs, sugar, vanilla extract, and pumpkin pie spice. Whisk until everything is beautifully blended. Don’t forget to taste it! This is your opportunity to get a sneak peek at how creamy and sweet it’ll be.
-
Pour the Mixture: Pour this luscious pumpkin mixture into your prepared baking dish, spreading it evenly across the bottom.
-
Add the Cake Mix: Take your box of yellow cake mix and sprinkle it evenly over the pumpkin mixture. No need to stir or mix; just let it sit there looking gorgeous! This is where the "dump" in dump cake comes from—easy peasy, right?
-
Sprinkle the Nuts: Grab your chopped nuts and sprinkle them over the cake mix. This adds that scrumptious crunch to each bite, elevating the texture perfectly.
-
Pour the Butter: Drizzle the melted butter over the top. It’s okay if it doesn’t cover every nook and cranny—this helps create a crispy, golden crust. Don’t skimp on the butter for those incredibly rich flavors!
-
Bake to Perfection: Pop it in your preheated oven and bake for about 50-60 minutes, or until the top is golden brown and the edges are bubbly. The aroma will make it hard not to eat the whole thing before it cools!
-
Cool Before Serving: Let it cool for at least 15 minutes before digging in. This allows the filling to set beautifully, ensuring that glorious gooey texture.
Serving Suggestions
Once your cake has cooled a bit, it’s time for the fun part—serving! Cut generous squares and plate them with a dollop of freshly whipped cream (or a scoop of vanilla ice cream if you’re feeling extra). For some added flair, sprinkle a touch more pumpkin pie spice on top or even a drizzle of caramel sauce.
You could even go full fall-mode with a sprinkle of cinnamon or a sprig of mint for color. Whatever your heart desires! It’s also a fantastic dish to serve at gatherings. Your friends and family will think you’ve been slaving away all day, when in reality, you whipped it up in no time!
Recipe Variations
Want to mix things up? Here are a few fun variations to consider:
-
Chocolate Pumpkin Dump Cake: Add a packet of chocolate cake mix instead of yellow for a decadent twist!
-
Spicy Kick: Add a pinch of cayenne pepper or chipotle powder to the pumpkin mixture for a sweet-and-spicy flavor profile.
-
Nut-Free Version: Omit the chopped nuts and consider adding chopped up chocolate bars instead for some gooey chocolate goodness!
-
Coconut Lover’s Delight: Top it with shredded coconut before drizzling the butter for a tropical vibe!
-
Gluten-Free Cake: Swap out the yellow cake mix for a gluten-free variant, and you’ve got a dish everyone can enjoy!
Chef’s Notes
As I’ve developed this recipe over time, I’ve learned the importance of balance. Once, I tried to add an extra can of pumpkin puree and neglected the other ingredients, thinking I could create a super pumpkin-flavored cake. Spoiler alert: it turned out gummy and sad! I promise that the tried-and-true recipe below leads to consistently heavenly results.
Over the years, I’ve also learned to embrace the messiness of cooking—and I mean that in the most joyful way! The sprinkle of flour on my cheek, the flour explosion when I accidentally dumped too much in—these moments make cooking so much fun! So don’t fret about looking perfect; embrace the chaos, enjoy the creative process, and let the love for food shine through in every dish.
FAQs and Troubleshooting
Can I prepare this ahead of time?
Absolutely! You can mix everything together the night before and bake it before serving. Just don’t pour the butter until you’re ready to bake; it keeps everything fresh!
What if my cake isn’t setting?
If it’s still gooey in the middle after the baking time, keep it in the oven for an additional 5-10 minutes. Keep an eye on the edges—they should start to brown nicely while the center firms up. Use a toothpick to check for a “clean” pull.
Can I freeze the leftovers?
You can freeze this beauty! Just ensure it’s properly cooled, then wrap it tightly in foil or plastic wrap and freeze for up to 3 months. When you’re ready to indulge again, simply defrost in the fridge overnight and reheat in the oven.
How do I ensure my cake mix doesn’t dry out?
Be sure not to overbake it. Every oven is different, so check for doneness a few minutes before the suggested time. Moistness is the name of the game here!
Nutritional Info
Nutritional info is approximate and varies based on specific ingredients used:
- Serving Size: 1 slice (1/12 of cake)
- Calories: 290
- Protein: 5g
- Carbohydrates: 42g
- Fat: 12g
- Sugar: 22g
There you have it, friends! Pumpkin Dump Cake—a delightful blend of flavors and memories that will surely uplift your fall gatherings. I hope you enjoy making this dish as much as I do (and remember to get a little messy in the process). Happy baking! 🍂✨
PrintPumpkin Dump Cake
A delightful dessert that embodies the essence of fall with rich pumpkin spice flavors, perfect for autumn gatherings.
- Prep Time: 15 minutes
- Cook Time: 60 minutes
- Total Time: 75 minutes
- Yield: 12 servings 1x
- Category: Dessert
- Method: Baking
- Cuisine: American
- Diet: Vegetarian
Ingredients
- 1 can (15 oz) pumpkin puree
- 1 can (12 oz) evaporated milk
- 3 large eggs
- 1 cup granulated sugar
- 1 teaspoon vanilla extract
- 1 tablespoon pumpkin pie spice
- 1 box (15.25 oz) yellow cake mix
- 1 cup chopped nuts (walnuts or pecans)
- 1/2 cup unsalted butter (melted)
Instructions
- Preheat your oven to 350°F (175°C).
- Prepare a 9×13-inch baking dish and grease it lightly with butter or non-stick spray.
- Mix the pumpkin puree, evaporated milk, eggs, sugar, vanilla extract, and pumpkin pie spice in a large bowl until blended.
- Pour the pumpkin mixture into your prepared baking dish, spreading it evenly.
- Add the yellow cake mix by sprinkling it evenly over the pumpkin mixture.
- Sprinkle the chopped nuts over the cake mix.
- Pour the melted butter over the top.
- Bake for about 50-60 minutes, or until the top is golden brown and edges are bubbly.
- Cool for at least 15 minutes before serving.
Notes
Serve with whipped cream or vanilla ice cream for extra deliciousness.
Nutrition
- Serving Size: 1 slice
- Calories: 290
- Sugar: 22g
- Sodium: 100mg
- Fat: 12g
- Saturated Fat: 7g
- Unsaturated Fat: 5g
- Trans Fat: 0g
- Carbohydrates: 42g
- Fiber: 2g
- Protein: 5g
- Cholesterol: 120mg
Keywords: pumpkin, dump cake, fall dessert, easy dessert, holiday baking
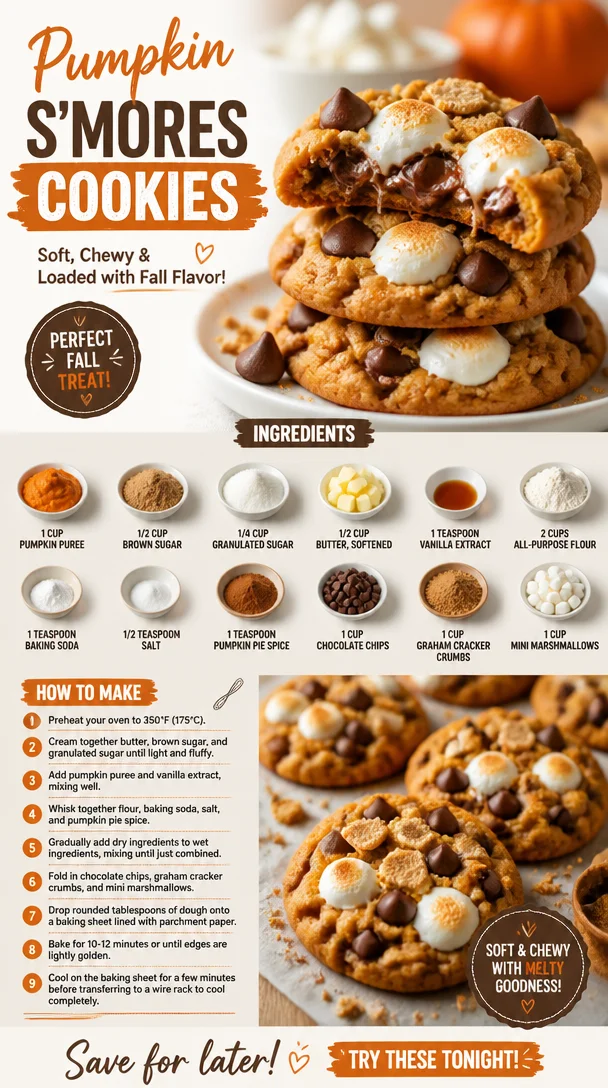
Pumpkin S’mores Cookies
Pumpkin S’mores Cookies: A Cozy Autumn Delight
Welcome, fellow foodies! As the crisp autumn air sweeps in and the leaves start to transform into a spectacular palette of golds and reds, my thoughts inevitably drift to those delightful treats that just scream fall. This season is all about warm spices, cozy gatherings, and, of course, indulging in something sweet that reminds us of our childhood. Enter Pumpkin S’mores Cookies—a delectable blend of autumn flavors that encapsulates the essence of fall and the nostalgia of campfire nights.
Picture this: the smell of pumpkin spice wafting through the air, the crunch of graham crackers paired with gooey marshmallows, and the rich, melty chocolate that dances on your taste buds. The fusion of these flavors in cookie form is simply irresistible. These cookies are not just a dessert; they evoke a heartfelt memory from many a campfire gathering, filling our bellies with warmth and joy.
So, roll up your sleeves and put on your favorite apron! I’m excited to take you through the delightful process of making these Pumpkin S’mores Cookies. Trust me—once you get a whiff of that pumpkin and spice combo baking in your oven, you’ll feel like you’re wrapped in a big, cozy blanket!
A Little Slice of Nostalgia
Growing up, I was lucky enough to have parents who embraced all the seasonal festivities. One of my fondest memories revolves around autumn evenings spent roasting marshmallows over the campfire. My friends and I would laugh, play games, and of course, indulge in the timeless classic of s’mores—those gooey, melty concoctions of chocolate, marshmallow, and graham crackers.
The aroma of toasted marshmallows mixing with the earthy scent of fallen leaves painted the perfect backdrop for laughter and camaraderie. As a kid, s’mores felt like magic. The anticipation of constructing that perfect treat, the moment it all came together in my mouth—it was pure bliss. Fast forward to today, and I’ve taken that same delight and infused it with the flavors of fall—welcome to the creation of Pumpkin S’mores Cookies!
These cookies are my homage to those cherished nights, capturing all the goodness of s’mores and blending it with warm pumpkin spices. Each bite is a reminder that life’s sweetest moments often come from simple ingredients and shared experiences.
Ingredients You’ll Need
Here’s what you’ll need to create these scrumptious Pumpkin S’mores Cookies:
-
1 cup pumpkin puree: This is your star ingredient! It adds moisture and that delightful fall flavor. You can substitute it with applesauce for a lighter take, but the pumpkin really is key for that cozy, seasonal vibe.
-
1/2 cup brown sugar: This sugar not only sweetens the cookies but also adds a lovely depth due to its molasses content. If you’re out of brown sugar, you can mix granulated sugar with a teaspoon of molasses for a quick fix.
-
1/4 cup granulated sugar: A little additional sweetness never hurt anyone! You can swap it with coconut sugar if you’re looking for a more natural option.
-
1/2 cup butter, softened: Butter contributes that rich flavor and chewy texture. If you want to make this recipe dairy-free, you can use coconut oil instead.
-
1 teaspoon vanilla extract: Pure vanilla extract enhances all the flavors in your cookies. If you’re in a pinch, imitation vanilla will work, though pure is always a better choice!
-
2 cups all-purpose flour: The base of your cookie. For a gluten-free variant, you can use a 1:1 gluten-free flour blend.
-
1 teaspoon baking soda: This ingredient acts as a leavening agent to help your cookies rise slightly. Make sure it’s fresh for the best results!
-
1/2 teaspoon salt: Just a pinch of salt brings out the sweetness in your cookies. You can omit it if you’re watching your sodium intake.
-
1 teaspoon pumpkin pie spice: A blend of cinnamon, nutmeg, and ginger that screams fall! If you don’t have this on hand, a mix of cinnamon and nutmeg will suffice.
-
1 cup chocolate chips: Melty and decadent, chocolate is a must! Go for dark chocolate for a richer flavor or use milk chocolate if you prefer something sweeter.
-
1 cup graham cracker crumbs: These crumbs give that classic s’mores texture. You can crush your own graham crackers or purchase pre-made crumbs for convenience.
-
1 cup mini marshmallows: The gooey, sweet element that ties it all together. If you want to cut down on sugar, you can use large marshmallows cut in half.
Step-by-Step Instructions
Ready to get baking? Let’s break down the steps to make these delightful cookies!
Step 1: Preheat and Prep
Preheat your oven to 350°F (175°C). Line two baking sheets with parchment paper. This will not only prevent sticking but also make cleanup a breeze! Prepare your tools: measuring cups, a mixing bowl, a baking spatula, and a mixer (hand or stand).
Step 2: Cream the Butter and Sugars
In a large mixing bowl, combine the softened butter, brown sugar, and granulated sugar. Cream them together using your mixer (or a good old-fashioned whisk if you’re feeling strong!). You want the mixture to be light and fluffy, which usually takes about 3-4 minutes. This step is important as it aerates the butter, resulting in a lighter cookie.
Step 3: Add Pumpkin and Vanilla
Once your butter and sugar mixture is fluffy, add in your pumpkin puree and vanilla extract. Mix until just combined. This is where the magic starts to happen, transforming your mixture into a beautiful, orangey blend that smells divine!
Step 4: Combine Dry Ingredients
In a separate bowl, whisk together the flour, baking soda, salt, and pumpkin pie spice. Take a moment to revel in that aroma—nothing says fall like a waft of warming spices. Gradually add the dry ingredients to the wet mixture, mixing just until combined. Be careful not to overmix; we want soft, chewy cookies here, not tough ones!
Step 5: Fold in the Goodies
Gently fold in your chocolate chips, graham cracker crumbs, and mini marshmallows. At this point, the batter may look a little rustic, and that’s okay! The more goodies, the better!
Step 6: Scoop and Bake
Using a cookie scoop or two tablespoons, drop dollops of cookie dough onto your prepared baking sheets (leave about 2 inches between each cookie to allow for spreading). Bake for 10-12 minutes, or until the edges are golden and the centers look set (they’ll continue to bake a bit once removed from the oven).
Step 7: Cool and Enjoy
Once out of the oven, let the cookies cool on the baking sheet for about 5 minutes before transferring them to a wire rack. This helps them firm up a bit and makes them easier to handle. Now’s the hard part—waiting for them to cool completely! Trust me; the wait is worth it.
Serving Suggestions
These Pumpkin S’mores Cookies are just begging to be enjoyed with a warm beverage. Whether it’s a steaming cup of spiced chai, pumpkin spice latte, or some hot cocoa, pair it up and dive into a cozy afternoon treat. You can also dust a bit of extra pumpkin pie spice on top before serving for that added autumn flair!
Recipe Variations
Want to switch things up a bit? Here are some tasty variations to consider!
- Nutty Crunch: Add 1/2 cup of chopped walnuts or pecans for added crunch and flavor.
- Dried Fruit Delight: Throw in some dried cranberries or chopped dates for a chewy texture and a hint of tartness.
- Ginger Snap: Substitute some of the all-purpose flour for ground ginger. This adds a delightful zing to your cookies!
- S’mores-Style: Replace mini marshmallows with full-size toasted marshmallows for a gooey, messy treat. Just be sure to eat them right away!
- Coconut Twist: Mix in some sweetened shredded coconut for a tropical take on these cookies!
Chef’s Notes
Every recipe has a story, and this one is no different! The idea of blending pumpkin and s’mores came to me when I realized that many of my favorite fall flavors could come together in one delicious cookie. This recipe has evolved through trial and error—each iteration teaching me a little more about balancing textures and flavors. One of my kitchen mishaps involved using too much marshmallow; my cookies ended up more like a gooey cake than a cookie! However, those mistakes taught me the importance of balance, which is what these Pumpkin S’mores Cookies are all about!
FAQs and Troubleshooting
Q: My cookies spread too much during baking. What went wrong?
A: This could be due to overly soft butter or too much liquid in the pumpkin puree. Make sure the butter is just softened (not melted) and measure your pumpkin carefully.
Q: Can I freeze the cookie dough?
A: Absolutely! You can scoop the dough into balls and freeze them in a single layer on a baking sheet. Once frozen, transfer them to a zip-top bag. You can bake them straight from the freezer; just add a couple of minutes to the baking time.
Q: What if I want a thicker cookie?
A: Chill the dough for at least 30 minutes before baking, which will help the cookies hold their shape better in the oven.
Q: Can I use a sugar substitute?
A: Yes! You can use a sugar substitute like stevia or erythritol if you’re looking to cut down on sugar, but keep in mind that they might affect the taste and texture slightly.
Nutritional Info
Each cookie (based on yields of approximately 24 cookies) contains roughly:
- Calories: 172
- Fat: 8g
- Carbohydrates: 24g
- Fiber: 1g
- Protein: 2g
Digging into Pumpkin S’mores Cookies is not just about satisfying a sweet tooth; it’s about celebrating the season and making memories with each bite. I hope you enjoy making these delightful cookies as much as I do! Gather your friends, sip on your favorite fall drink, and create some lovely memories this autumn. Happy baking!
PrintPumpkin S’mores Cookies

A delectable blend of pumpkin spice and classic s’mores flavors, these cookies are perfect for cozy autumn gatherings.
- Prep Time: 15 minutes
- Cook Time: 12 minutes
- Total Time: 27 minutes
- Yield: 24 cookies 1x
- Category: Dessert
- Method: Baking
- Cuisine: American
- Diet: Vegetarian
Ingredients
- 1 cup pumpkin puree
- 1/2 cup brown sugar
- 1/4 cup granulated sugar
- 1/2 cup butter, softened
- 1 teaspoon vanilla extract
- 2 cups all-purpose flour
- 1 teaspoon baking soda
- 1/2 teaspoon salt
- 1 teaspoon pumpkin pie spice
- 1 cup chocolate chips
- 1 cup graham cracker crumbs
- 1 cup mini marshmallows
Instructions
- Preheat your oven to 350°F (175°C). Line two baking sheets with parchment paper.
- Cream the butter, brown sugar, and granulated sugar together until light and fluffy.
- Add pumpkin puree and vanilla extract to the mixture and mix until just combined.
- Combine the flour, baking soda, salt, and pumpkin pie spice in a separate bowl. Gradually add to the wet mixture.
- Fold in chocolate chips, graham cracker crumbs, and mini marshmallows until mixed.
- Scoop dollops of cookie dough onto the prepared baking sheets, leaving space between each.
- Bake for 10-12 minutes until edges are golden and centers look set.
- Cool on the baking sheet for 5 minutes before transferring to a wire rack.
Notes
Serve with a warm beverage for the ultimate autumn experience.
Nutrition
- Serving Size: 1 cookie
- Calories: 172
- Sugar: 10g
- Sodium: 150mg
- Fat: 8g
- Saturated Fat: 4g
- Unsaturated Fat: 2g
- Trans Fat: 0g
- Carbohydrates: 24g
- Fiber: 1g
- Protein: 2g
- Cholesterol: 30mg
Keywords: pumpkin cookies, s'mores, fall baking, autumn dessert, cozy treats
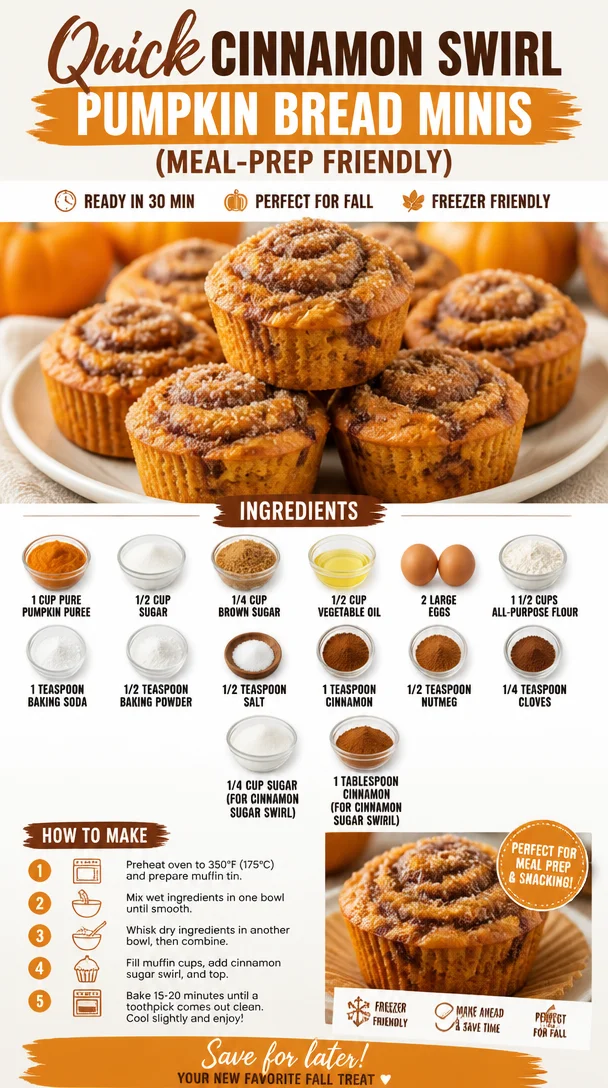
Quick Cinnamon Swirl Pumpkin Bread Minis (Meal-Prep Friendly)
The Sweet Whiff of Fall: Cinnamon Swirl Pumpkin Bread Minis
Ah, fall! The season of cozy sweaters, crunchy leaves, and, best of all, the scent of pumpkin spice wafting through the air. As temperatures drop and days grow crisp, nothing captures the essence of this beautiful season quite like a fragrant loaf of pumpkin bread. But what if I told you there was a way to elevate that classic recipe into delightful little masterpieces perfect for sharing? Enter my Cinnamon Swirl Pumpkin Bread Minis! These adorable bite-sized treats are not only easy to make but also an absolute delight to both the eyes and the taste buds.
Growing up, the kitchen was often filled with the warm and spicy aroma of homemade baked goods. My family had a tradition of gathering in the kitchen every Sunday afternoon, where we’d whip up our favorite recipes while sharing stories, laughter, and occasionally a little flour fight or two. The highlight of those days was always when my grandmother would bring out her famous pumpkin bread. She had this magical ability to make simple ingredients transform into something utterly delicious. While anyone could bake a loaf, her secret was the cinnamon swirl that added a layer of warmth and sweetness. It was love at first bite! Today, I’ve taken that warm, nostalgic feeling and put my own spin on it, creating these adorable mini loaves that pack a comforting punch of flavor in every bite.
Are you ready to create your very own batch of these irresistible Cinnamon Swirl Pumpkin Bread Minis? Grab an apron, turn up the music, and let’s bake some magic!
Ingredients
To bring these delicious little mini loaves to life, you’ll need the following ingredients:
-
1 cup pure pumpkin puree
This key ingredient gives the bread its moist and dreamy texture. You can also use homemade pumpkin puree if you’re feeling adventurous! Canned is perfectly fine, but look for brands that don’t add extra sugar or preservatives for the best flavor. -
1/2 cup sugar
This granulated sugar sweetens the batter beautifully. If you’d like a less sugary loaf, feel free to reduce this amount slightly. -
1/4 cup brown sugar
Brown sugar adds depth and a slight toffee flavor while helping maintain moisture in the bread. If you don’t have brown sugar on hand, you can substitute it with an equal amount of white sugar mixed with a teaspoon of molasses. -
1/2 cup vegetable oil
Oil keeps the bread tender and moist. You can also use melted coconut oil for a hint of tropical flavor or apple sauce for a healthier approach. -
2 large eggs
Eggs bind everything together and provide structure. For a vegan option, try using flax eggs (1 tablespoon of ground flaxseed mixed with 2.5 tablespoons of water per egg, let it sit for a few minutes until it gels). -
1 1/2 cups all-purpose flour
This forms the base of your bread. You could substitute half for whole wheat flour to add extra fiber and flavor. -
1 teaspoon baking soda
Essential for leavening! It helps your bread rise beautifully. -
1/2 teaspoon baking powder
A little extra lift never hurt! You can skip this if you want to keep your ingredients minimal. -
1/2 teaspoon salt
Salt enhances the sweetness and balances flavors, so don’t skip it! -
1 teaspoon cinnamon
The star spice of this recipe, adding warmth and a comforting aroma. -
1/2 teaspoon nutmeg
This nutty flavor complements the cinnamon perfectly. If you don’t have nutmeg, you can add an additional 1/2 teaspoon of cinnamon for a similar warmth. -
1/4 teaspoon cloves
A pinch of cloves contributes a robust, aromatic punch to the mix. You can skip it if you’re not a fan. -
1/4 cup sugar (for cinnamon sugar swirl)
This added sugar is the secret for our delightful swirl in the mini loaves! -
1 tablespoon cinnamon (for cinnamon sugar swirl)
Sprinkle this cinnamon goodness into the sugar, and you’ve got a heavenly mix perfect for swirling into the batter.
Step-by-Step Instructions
Now that you have all your ingredients, let’s get baking! Follow these steps closely to ensure your mini masterpieces turn out perfectly every time.
-
Preheat your oven: Begin by preheating your oven to 350°F (175°C). This is a crucial first step, as it allows your bread to bake evenly. You can also prepare your mini loaf pans by greasing them or lining them with parchment paper.
-
Mix the wet ingredients: In a large mixing bowl, combine the pumpkin puree, vegetable oil, granulated sugar, brown sugar, and eggs. Use a whisk to blend everything together until smooth and uniform. You want to make sure the sugars dissolve completely. A quick tip: try to use room temperature eggs for best results!
-
Combine the dry ingredients: In another bowl, whisk together the all-purpose flour, baking soda, baking powder, salt, cinnamon, nutmeg, and cloves. Mixing the dry ingredients separately prevents clumps and ensures even distribution throughout the batter.
-
Combine wet and dry mixtures: Gradually add the dry ingredients to the wet mixture, using a spatula or wooden spoon to fold them together. Be careful not to overmix—just mix until you see no more flour streaks. Overmixing can lead to tough bread, and we want it soft and tender.
-
Prepare the cinnamon sugar swirl: In a small bowl, combine the 1/4 cup sugar and 1 tablespoon cinnamon. This will be your lovely swirl mix. The sugar will caramelize slightly during baking, creating a sweet surprise when you cut into the mini loaves.
-
Fill the mini loaf pans: Pour a generous amount of the batter into each mini loaf pan, filling them about halfway. Then, sprinkle a layer of the cinnamon sugar mixture on top of each filled pan. Next, gently add more batter over the sugar sprinkle until they are about 2/3 full.
-
Swirl it around: Using a toothpick or the end of a knife, swirl the batter and cinnamon sugar together to create a beautiful marbled effect. You can make a couple of swirls, but don’t overdo it; we want to see those pretty layers!
-
Bake them up: Place the mini loaf pans in the preheated oven and bake for approximately 25-30 minutes, or until a toothpick inserted in the center comes out clean. Keep an eye on them, as ovens vary. No one likes burnt edges!
-
Cool down: Once done, remove the pans from the oven and let them cool in the pan for about 10 minutes. Then, carefully transfer the loaves to a wire rack to cool completely. The smell in your kitchen will have everyone flocking to see what you’ve made!
-
Slice and serve: Once cool, slice the mini loaves, add a pat of butter (optional but oh-so-delicious), and watch how smiles spread across the faces of those who indulge!
Serving Suggestions
These Cinnamon Swirl Pumpkin Bread Minis are already a feast for the eyes, but here are a few serving ideas to make them even more delightful:
- With Coffee or Tea: Serve warm alongside a steaming cup of coffee or your favorite herbal tea for the ultimate cozy experience.
- Top with Cream Cheese Frosting: For a little indulgence, whip up a simple cream cheese frosting and spread a thin layer on top. The tanginess contrasts beautifully with the sweetness of the bread!
- Garnish with Nuts: Sprinkle some chopped walnuts or pecans on top for added crunch and richness.
Recipe Variations
Want to mix things up a bit? Here are some fun variations you might consider trying:
-
Chocolate Chip Surprise: Add a handful of chocolate chips to the batter for deeper flavor and sweetness.
-
Nutty Banana: Replace half of the pumpkin puree with mashed ripe banana for an extra fruity twist and moisture.
-
Gluten-Free Delight: Substitute regular flour with gluten-free all-purpose flour for a gluten-free version that everyone can enjoy.
-
Maple Glaze: Drizzle some maple syrup over the cooled bread for a seasonal sweetness that complements the pumpkin spice flavors perfectly.
-
Dried Fruit Addition: Toss in some chopped dried cranberries or raisins to the batter for a little chewiness and surprise.
Chef’s Notes
This recipe is very near and dear to my heart. What started as a simple adaptation of my grandmother’s pumpkin bread turned into a cherished tradition of baking with friends on chilly autumn days. Over the years, I’ve added my flair to the recipe—experimenting with spices, oils, and various add-ins. I’ve learned that cooking is all about making it your own and embracing the creative process. Plus, there’s nothing like enjoying a warm slice of pumpkin bread while reminiscing about those happy kitchen memories!
FAQs and Troubleshooting
-
Why is my pumpkin bread too dense?
A dense loaf can result from overmixing the batter or not using enough leavening agents. Ensure you’re gentle when combining the wet and dry ingredients, and don’t forget those baking soda and powder! -
Can I use pumpkin pie filling instead of pure pumpkin puree?
While you can use pumpkin pie filling, it often contains sugar and spices that will alter the flavor of your bread, so you might want to adjust your sugar and spice measurements accordingly. -
How do I store leftovers?
Keep your mini loaves in an airtight container at room temperature for up to 3 days. For longer storage, they freeze beautifully! Just wrap them tightly in plastic wrap and place them in a freezer bag. Thaw at room temperature when ready to enjoy. -
My bread sunk in the middle—what went wrong?
This can happen if the oven temperature is too low, or if you opened the oven door too often during baking. Try keeping the oven door closed and make sure your oven is fully preheated before baking.
Nutritional Info
While I don’t want to dwell too much on specific numbers when we’re about the joy of cooking and eating, here’s a quick estimate for one mini loaf (based on standard ingredients):
- Calories: Approximately 180 kcal
- Total Fat: 7g
- Saturated Fat: 1g
- Carbohydrates: 26g
- Fiber: 1g
- Protein: 3g
Calories may vary depending on ingredient substitutions and exact serving size, so always best to adjust according to your needs!
There you have it—the ultimate guide to creating delicious Cinnamon Swirl Pumpkin Bread Minis! I hope these recipes and tips inspire you to fill your kitchen with joy this fall. Let’s keep the oven warm, the aromas sweet, and the laughter ringing! Happy baking, my fellow foodies! 🍂🥧
PrintCinnamon Swirl Pumpkin Bread Minis
Delightful mini loaves of pumpkin bread with a swirl of cinnamon sugar, perfect for sharing this fall.
- Prep Time: 15 minutes
- Cook Time: 30 minutes
- Total Time: 45 minutes
- Yield: 12 mini loaves 1x
- Category: Dessert
- Method: Baking
- Cuisine: American
- Diet: Vegetarian
Ingredients
- 1 cup pure pumpkin puree
- 1/2 cup sugar
- 1/4 cup brown sugar
- 1/2 cup vegetable oil
- 2 large eggs
- 1 1/2 cups all-purpose flour
- 1 teaspoon baking soda
- 1/2 teaspoon baking powder
- 1/2 teaspoon salt
- 1 teaspoon cinnamon
- 1/2 teaspoon nutmeg
- 1/4 teaspoon cloves
- 1/4 cup sugar (for cinnamon sugar swirl)
- 1 tablespoon cinnamon (for cinnamon sugar swirl)
Instructions
- Preheat your oven to 350°F (175°C).
- Mix the pumpkin puree, vegetable oil, granulated sugar, brown sugar, and eggs in a bowl until smooth.
- Combine the all-purpose flour, baking soda, baking powder, salt, cinnamon, nutmeg, and cloves in another bowl.
- Add the dry ingredients to the wet mixture and gently fold together.
- Prepare the cinnamon sugar swirl by mixing the 1/4 cup sugar and 1 tablespoon cinnamon in a small bowl.
- Fill mini loaf pans halfway with batter, sprinkle with the cinnamon sugar, then add more batter until 2/3 full.
- Swirl the batter and cinnamon sugar together using a toothpick.
- Bake for approximately 25-30 minutes, or until a toothpick comes out clean.
- Cool in the pan for 10 minutes, then transfer to a wire rack to cool completely.
- Slice and serve as desired.
Notes
These mini loaves are perfect for sharing and can be served warm with butter, alongside coffee, or with cream cheese frosting.
Nutrition
- Serving Size: 1 mini loaf
- Calories: 180
- Sugar: 12g
- Sodium: 200mg
- Fat: 7g
- Saturated Fat: 1g
- Unsaturated Fat: 4g
- Trans Fat: 0g
- Carbohydrates: 26g
- Fiber: 1g
- Protein: 3g
- Cholesterol: 30mg
Keywords: pumpkin bread, fall recipes, dessert, baking, cinnamon
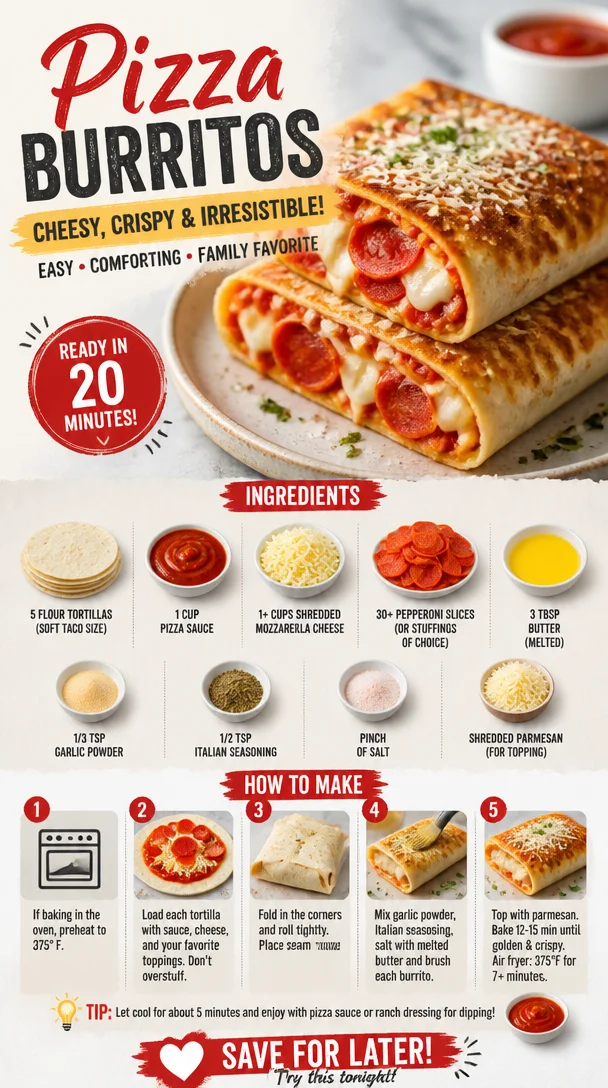
Pizza Burritos
Pizza Burritos: A Culinary Adventure Awaits!
Hey there, food lovers! Are you ready to embark on a delicious journey that combines the magic of pizza with the fun of a burrito? Yup, you guessed it; we’re diving into the delightful world of Pizza Burritos! It’s one of those dishes that’s not only mouth-watering but also incredibly versatile. Imagine all your favorite pizza toppings wrapped snugly in a soft tortilla, baked to a golden perfection. Intrigued? Let’s get cooking!
Before we start whipping up this cozy meal, let’s talk a bit about why I love this recipe. Picture this: a late Friday night after a long week, and all I want is pizza but—surprise—I don’t have the energy to deal with delivery waiting times or the usual greasy fare. This is when the idea of Pizza Burritos hit me! It was the perfect dinner-it’s quick, satisfying, and didn’t require a trip to the restaurant. Plus, you can customize it with whatever toppings you’ve got on hand! So, pull up a chair, grab your apron, and let’s get into this!
My Pizza Burrito Story
Ah, the nostalgia! I still remember the very first time I made Pizza Burritos: it was a rainy Saturday afternoon, and I was stuck inside with nothing but time and a fridge full of leftover pizza ingredients. Instinct kicked in, and I found myself rolling flour tortillas around pepperoni, cheese, and the leftover pizza sauce from the delivery the night before! As I baked my creations in the oven, the cheesy aroma filled the kitchen, evoking memories of pizza nights with friends and laughter echoing around the table.
Those little burrito-shaped morsels turned out to be an instant hit! Everyone was eagerly digging in, with gooey cheese and that crispy outer layer creating the kind of comfort food experience that warms your heart. From that day on, it became a Saturday staple. Now, the ritual of making Pizza Burritos with friends or family has morphed into a delightful tradition. Whether we’re piled up on the couch under a mountain of blankets or gathered cheers for game night, these burritos always steal the spotlight.
Ingredients
You ready to roll up those sleeves? Here’s what we need to create your new favorite comfort food!
-
5 Flour Tortillas (soft taco size): These lovely rounds will cradle all the filling goodness. You can swap them out for whole wheat tortillas or gluten-free varieties if you’re looking for alternative options.
-
1 cup Pizza Sauce: This is where the magic begins! Use your favorite store-bought sauce or whip up a homemade one using crushed tomatoes, garlic, and herbs. If you want a kick, try a spicy marinara!
-
1+ cups Shredded Mozzarella Cheese: The star of the show! This cheese brings that gooey goodness to your burritos. Feel free to mix in some cheddar for a flavor twist or use a dairy-free option if you’re going vegan.
-
30+ Pepperoni Slices: Classic pepperoni is always a hit! But don’t stop there—cook up some veggies like bell peppers, mushrooms, or even lean turkey if pepperoni’s not your jam.
-
3 tbsp Butter (melted): This is for brushing the tortillas, giving them that beautiful, golden finish and adding a savory flavor. You can use olive oil or vegan butter if you’re looking for a healthier or plant-based option.
-
1/3 tsp Garlic Powder: This adds amazing flavor without the fuss of chopping fresh garlic. Fresh minced garlic works too if that’s your vibe!
-
1/2 tsp Italian Seasoning: Because every pizza needs an Italian twist! If you don’t have Italian seasoning, try a mix of oregano, basil, and thyme.
-
Pinch of Salt: Just a smidge to enhance all those rich flavors.
-
Shredded Parmesan (for topping): This is optional but highly recommended! It adds an extra layer of cheesy goodness when your burritos come bubbling out of the oven.
Step-by-Step Instructions
Let’s get to the fun part—the cooking! Follow these steps to craft your own Pizza Burrito:
-
Preheat Your Oven: First things first, crank up that oven to 400°F (200°C). We want it nice and hot to get that crispy finish on our burritos.
-
Prepare the Tortillas: Lay out your tortillas on a clean surface. If they feel stiff, pop them in the microwave for about 15-20 seconds to make them pliable. Nobody likes a cracked burrito!
-
Spread the Sauce: Take 1 tablespoon of the pizza sauce and spread it evenly on each tortilla. Leave a little room around the edges to prevent spillage. Trust me, it’s a messy business otherwise!
-
Add the Cheese: Sprinkle a generous amount of mozzarella cheese over the sauce. Don’t be shy; this is where it gets creamy and delicious!
-
Layer on the Toppings: Now, place your pepperoni slices (or any other toppings) right on top of that cheesy goodness. Be adventurous! Throw in some veggies or even some diced cooked chicken if you’re feeling creative.
-
Roll it Up: Here comes the burrito magic! Fold in the sides of the tortilla and tightly roll it up from the bottom, tucking in the fillings as you go. Aim for a snug fit but don’t squish it too hard; we want some room for melting!
-
Brush with Butter: Pour the melted butter into a small bowl and mix in your garlic powder, Italian seasoning, and a pinch of salt. Using a brush, gently coat the outside of each burrito with this flavorful mix.
-
Bake It: Place the burritos seam-side down on a baking sheet lined with parchment paper. Bake in the preheated oven for about 20 minutes or until golden brown and crispy. Don’t be afraid to peek and drool at the sight!
-
Add Parmesan: Once they’re done, sprinkle some shredded parmesan on top immediately and return them to the oven for an additional 2-3 minutes until it’s melted and bubbly.
-
Serve and Enjoy: Remove the burritos from the oven and let them cool for a minute before slicing in half to reveal that glorious melty cheese. Toast a slice of garlic bread or serve with a garden salad to round out your meal.
Serving Suggestions
To plate your Pizza Burritos, slice them in half at an angle to expose all those delicious fillings inside. Arrange them on a big platter and serve them alongside a small bowl of extra pizza sauce for dipping. Add some colorful fresh herbs on top for that extra pop! Who says you can’t eat with your eyes first?
Recipe Variations
Let’s shake things up! Here are a few fun twists to keep things exciting:
-
Veggie Pizza Burritos: Swap out the pepperoni for a medley of sautéed bell peppers, onions, mushrooms, and spinach for a vibrant vegetarian version.
-
BBQ Chicken Burritos: Use shredded rotisserie chicken mixed with BBQ sauce instead of pizza sauce. Toss in some caramelized onions and cheese for a delicious smoky flavor.
-
Buffalo Cauliflower Burritos: Roast cauliflower tossed in buffalo sauce and add ranch dressing for a spicy twist. These are perfect for those looking to kick things up a notch!
-
Breakfast Pizza Burritos: Scramble some eggs and mix in cooked sausage or bacon, cheese, and some jalapeños for a breakfast burrito that feels like pizza!
Chef’s Notes
This recipe began as a way to clear out my fridge and has evolved into a family favorite! It’s amazing how simple ingredients can come together to create something magical. Over the years, I’ve experimented with all sorts of toppings and flavors—I’ve even made dessert burritos with Nutella and bananas! The possibilities are endless, and that’s part of the fun! If you have a craving, don’t hesitate to experiment. September evenings or cozy winter nights, these burritos are perfect any time of year!
FAQs and Troubleshooting
1. Why are my burritos falling apart?
Make sure you’re rolling them tightly and tucking in the sides as you go. If they still seem loose, try using slightly smaller tortillas for better control.
2. Can I prep these ahead of time?
Absolutely! You can assemble the burritos and refrigerate them for up to 24 hours before baking. Just brush with butter just before popping them in the oven.
3. What if I don’t have pizza sauce?
No problem! You can use marinara sauce, tomato sauce, or even pesto for a fresh twist. Just make sure whatever you choose is packed with flavor!
4. How do I store leftovers?
If you have any leftovers (unlikely, but hey, it happens!), wrap them tightly in foil or place in an airtight container. Reheat in the oven for the best results, but microwave works in a pinch if that’s all you’ve got.
Nutritional Info (Optional)
While this recipe is all about yumminess, a single Pizza Burrito will roughly contain around 400-500 calories, depending on your ingredients and portion sizes. They’re a decadently cheesy treat, so just keep that in mind as you dig in!
There you have it, folks! Dive into your kitchen and whip up these Pizza Burritos for your next cozy meal, family gathering, or movie night. With so many options and variations, you’ll never tire of them! Remember, the kitchen is your playground—so don’t be afraid to mix it up and have fun! Happy cooking, and may your Pizza Burritos always be gooey and delicious!
PrintPizza Burritos

A delightful combination of pizza flavors wrapped in soft tortillas and baked for a crispy finish.
- Prep Time: 15 minutes
- Cook Time: 20 minutes
- Total Time: 35 minutes
- Yield: 4 servings 1x
- Category: Main Course
- Method: Baking
- Cuisine: Italian
- Diet: Vegetarian
Ingredients
- 5 Flour Tortillas (soft taco size)
- 1 cup Pizza Sauce
- 1+ cups Shredded Mozzarella Cheese
- 30+ Pepperoni Slices
- 3 tbsp Butter (melted)
- 1/3 tsp Garlic Powder
- 1/2 tsp Italian Seasoning
- Pinch of Salt
- Shredded Parmesan (for topping)
Instructions
- Preheat your oven to 400°F (200°C).
- Prepare the tortillas by microwaving them for about 15-20 seconds if they feel stiff.
- Spread 1 tablespoon of pizza sauce evenly on each tortilla.
- Add a generous amount of mozzarella cheese over the sauce.
- Layer on pepperoni slices or your choice of toppings.
- Roll the tortilla tightly from the bottom, tucking in the fillings as you go.
- Brush the outside with a mixture of melted butter, garlic powder, Italian seasoning, and salt.
- Bake the burritos seam-side down on a lined baking sheet for about 20 minutes.
- Add shredded parmesan on top and bake an additional 2-3 minutes until melted.
- Serve and enjoy your delicious Pizza Burritos!
Notes
Customizable with various toppings and sauces; serve with extra pizza sauce for dipping.
Nutrition
- Serving Size: 1 burrito
- Calories: 450
- Sugar: 5g
- Sodium: 700mg
- Fat: 22g
- Saturated Fat: 10g
- Unsaturated Fat: 9g
- Trans Fat: 0g
- Carbohydrates: 40g
- Fiber: 2g
- Protein: 15g
- Cholesterol: 40mg
Keywords: Pizza Burritos, Comfort Food, Easy Recipe
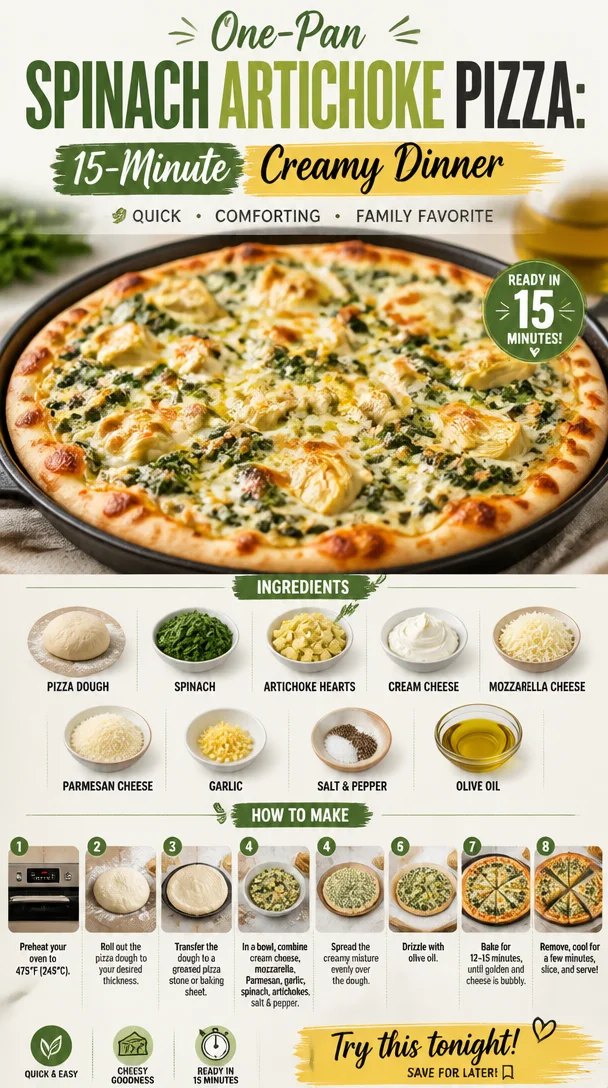
One-Pan Spinach Artichoke Pizza: 15-Minute Creamy Dinner
Spinach Artichoke Pizza: A Flavorful Twist on a Classic Favorite
Welcome back, food lovers! Today, we’re diving into a recipe that’s going to take your pizza night from ordinary to extraordinary: Spinach Artichoke Pizza! Yep, you read that right. This pie combines all the goodness of the classic spinach artichoke dip you love with the comforting embrace of pizza dough. Trust me, it’s as delightful as it sounds, and I can’t wait for you to try it!
Introduction
If you haven’t yet experienced the joy of spinach and artichoke as a pizza topping, you’re in for a wonderful surprise. This pizza recipe embodies everything I believe in when it comes to clean eating: fresh ingredients, vibrant flavors, and pure satisfaction after every bite. Not only is it a fantastic way to incorporate more greens into your diet, but it also comes together in no time at all, making it perfect for those busy weeknights, casual hangouts, or even a little self-care moment on the weekend.
As someone who spent countless weekends in a bustling kitchen, chatting and laughing with friends while cooking up delicious meals, I cherish how food brings people together. My love for pizza started way back when my family and I would gather around the dining table, crafty little hands at work making our own pies. It was a beautiful mess—toppings flying, flour everywhere, and endless laughter ringing in the air. This Spinach Artichoke Pizza is inspired by those beautiful moments, where ingredients become a canvas, and sharing food feels like an art of its own.
So grab your apron, roll up those sleeves, and let’s indulge in the flavors of this delectable dish!
Personal Story
Growing up, my mom had this incredible knack for turning our favorite appetizers into main courses. One evening, tired after a long day, she whipped up a sumptuous spinach artichoke dip—an absolute classic at our family gatherings. I remember gathering around the coffee table with my siblings, chips in hand, devouring that creamy dip faster than you could say “extras!” Those moments were always filled with cozy chats and contagious laughter.
In an effort to spice up our weekly dinners, I decided to turn that memorable appetizer into a hearty meal: Spinach Artichoke Pizza! It was like taking a joyful trip down memory lane, with each gooey, cheesy slice reminding me of that unforgettable dip that brought our family closer. This pizza is not just food; it’s a reminder of the love and warmth that comes with sharing meals, and I can’t wait for you to create your own delicious memory with it!
Ingredients
Alright, let’s gather our stars for this delicious pizza! Here’s what you’ll need:
-
1 pizza dough: You can use store-bought or make your own from scratch! It gives you that perfect chewy crust that holds all the goodness.
-
1 cup spinach, chopped: Fresh spinach is ideal, but you can use frozen as well—just be sure to thaw and drain it well. Spinach is packed with iron and vitamins that are great for your health.
-
1 cup artichoke hearts, chopped: Canned or frozen artichokes work beautifully. They bring a delightful tanginess to the pizza that complements the creaminess of the cheese.
-
1 cup cream cheese, softened: This is the secret ingredient that brings creaminess and a rich flavor. Light cream cheese can work too if you’re looking for a healthier option.
-
1 cup mozzarella cheese, shredded: Because what’s pizza without gooey, melty cheese? You can use part-skim mozzarella for a lighter option or mix in some gouda for a smoky flavor.
-
1/2 cup Parmesan cheese, grated: The nutty flavor of Parmesan takes this pizza to the next level. Grate it fresh for a superior taste!
-
2 cloves garlic, minced: Fresh garlic adds zest and aroma. If you’re short on fresh, garlic powder can work in a pinch—just a teaspoon should do!
-
Salt and pepper to taste: Essential seasonings! Don’t be shy; they bring out the flavors of all the ingredients.
-
Olive oil: A drizzle of olive oil to finish it off keeps the crust crispy and adds a nice depth of flavor to your pizza.
Step-by-Step Instructions
Now that we have our ingredients in front of us, let’s get cooking! Follow these simple steps to create your Spinach Artichoke Pizza:
-
Preheat Your Oven: Start by preheating your oven to 475°F (245°C). A hot oven is key to achieving that crunchy crust we all adore.
-
Prepare the Pizza Dough: If you’re using store-bought dough, take it out of the fridge to come to room temperature for about 30 minutes. It makes stretching so much easier! If you’re feeling ambitious and want to make your dough, go for it—just allow it to rise for about an hour beforehand.
-
Roll It Out: On a floured surface, roll out your pizza dough into your desired thickness. I love a crispy thin crust, but go thicker if that’s your style! Transfer the rolled dough to a pizza stone or a baking sheet (lightly greased or lined with parchment).
-
Mix the Sauce: In a bowl, combine your cream cheese with minced garlic, a pinch of salt, and pepper. Stir until nicely blended. This will serve as your base sauce, and it’s going to be wonderfully creamy.
-
Add Spinach and Artichokes: Gently fold in the chopped spinach and artichoke hearts until they’re well incorporated. This mixture is where the magic happens!
-
Spread the Mixture: Evenly spread the creamy spinach-artichoke mix on top of your rolled-out dough, leaving a little edge for the crust. You want it to be smooth and inviting!
-
Heavenly Cheese Layer: Sprinkle mozzarella cheese generously on top. Don’t be stingy! Then follow it up with a shower of grated Parmesan. It’s all about that melty, cheesy goodness.
-
Drizzle Olive Oil: For an added depth of flavor and nice golden color, drizzle a little olive oil over the top and give a light sprinkle of extra salt and pepper.
-
Bake: Slide your masterpiece into the oven and let it bake for about 12-15 minutes, or until the cheese is bubbly and the crust is golden brown.
-
Slice and Serve: Once out of the oven, let your pizza cool for a minute before slicing it up. You can sprinkle some red pepper flakes for an extra kick if you’re feeling adventurous!
Serving Suggestions
To serve, you can either cut your pizza into traditional wedges or charismatic squares for a fun twist. A fresh side salad drizzled with lemon vinaigrette pairs deliciously with this creamy pizza. If you want to keep things casual, serve it straight from the oven to the table on a wooden pizza board for that rustic, homey vibe. Cheers to delicious bites and great company!
Recipe Variations
- Meat Lovers: Add cooked chicken or sausage for an extra protein boost!
- Spicy Kick: Toss in some diced jalapeños or crushed red pepper flakes for a fiery touch.
- Cheese Overload: Go cheese crazy! Mix in cheddar or feta for added flavor.
- Mediterranean Twist: Top with olives and sun-dried tomatoes for a Mediterranean flair.
- Gluten-Free: Use a gluten-free pizza crust—there are plenty of delicious options available today!
Chef’s Notes
This recipe has evolved quite a bit since I first tried it! Initially, I kept it simple, but over time, I found that adding garlic and tweaking the cheese ratios made it richer and more flavorful. Also, I discovered that a hint of red pepper flakes can elevate the pizza to a new level of deliciousness. Plus, it’s always a joy to gather feedback from friends and family, and they’ve shared their ingenious twists that inspired me as well. It’s a reminder that cooking is as much about collaboration and connection as it is about the food itself.
FAQs and Troubleshooting
Q: My crust turned out soggy. What happened?
A: This can happen if there’s too much moisture in the toppings. Make sure to drain the artichokes thoroughly and use fresh spinach instead of frozen if possible. Also, pre-baking the crust for a few minutes before adding the toppings helps!
Q: Can I use other cheeses?
A: Absolutely! Feel free to go wild with your cheese choices. Gouda, fontina, or even a sprinkle of goat cheese can bring unique flavors to your pizza.
Q: How do I store leftovers?
A: Wrap individual slices in plastic wrap and store them in the fridge for up to 3 days. You can reheat in the oven for the best texture!
Q: What if I can’t find artichokes?
A: Don’t fret! You can substitute with roasted red peppers or sun-dried tomatoes to keep that vibrant flavor profile intact.
Nutritional Info
While nutrition may vary based on the specific products and brands used, this Spinach Artichoke Pizza is generally a well-balanced choice, rich in vegetables and flavors that satisfy without leaving you heavy. It’s a fun way to indulge while staying mindful of your health!
Let’s keep those kitchen adventures rolling! I can’t wait to hear how your Spinach Artichoke Pizza turns out. Remember, cooking is about joy and creativity, so feel free to add your own flair! Enjoy every bite!
PrintSpinach Artichoke Pizza

A delicious twist on the classic spinach artichoke dip, transformed into a flavorful pizza.
- Prep Time: 15 minutes
- Cook Time: 15 minutes
- Total Time: 30 minutes
- Yield: 4 servings 1x
- Category: Main Course
- Method: Baking
- Cuisine: Italian
- Diet: Vegetarian
Ingredients
- 1 pizza dough
- 1 cup spinach, chopped
- 1 cup artichoke hearts, chopped
- 1 cup cream cheese, softened
- 1 cup mozzarella cheese, shredded
- 1/2 cup Parmesan cheese, grated
- 2 cloves garlic, minced
- Salt and pepper to taste
- Olive oil
Instructions
- Preheat your oven to 475°F (245°C).
- Prepare the pizza dough by bringing it to room temperature for about 30 minutes.
- Roll out your pizza dough on a floured surface into your desired thickness.
- Mix the sauce by combining cream cheese with minced garlic, salt, and pepper in a bowl.
- Add chopped spinach and artichoke hearts, folding them into the mixture.
- Spread the spinach-artichoke mix evenly on top of the rolled-out dough.
- Sprinkle mozzarella cheese and grated Parmesan generously over the mixture.
- Drizzle olive oil on top and add a light sprinkle of salt and pepper.
- Bake for 12-15 minutes or until the cheese is bubbly and the crust is golden brown.
- Slice and serve once cooled slightly.
Notes
For extra flavors, consider mixing in some jalapeños or adding a sprinkle of red pepper flakes before serving.
Nutrition
- Serving Size: 1 serving
- Calories: 350
- Sugar: 5g
- Sodium: 400mg
- Fat: 12g
- Saturated Fat: 4g
- Unsaturated Fat: 6g
- Trans Fat: 0g
- Carbohydrates: 45g
- Fiber: 3g
- Protein: 15g
- Cholesterol: 30mg
Keywords: Pizza, Spinach, Artichoke, Vegetarian, Comfort Food

Biscuits and Sausage Gravy Breakfast Pizza
Biscuits and Sausage Gravy Breakfast Pizza: Start Your Day with a Flavor Punch!
Welcome back, food lovers! Today, we’re flipping the script on breakfast with a dish that’s destined to become your new favorite morning treat: Biscuits and Sausage Gravy Breakfast Pizza. Imagine fluffy biscuits, rich and creamy sausage gravy, and cheesy goodness—all on a perfectly crispy pizza crust. It’s breakfast reimagined, and it’s every bit as delicious as it sounds!
As you may know, breakfast is often dubbed the most important meal of the day, but let’s be real: it’s also the meal that sets the tone for everything that follows. When you start your day with something hearty and full of flavor, it not only fuels your body but makes your spirit soar. And this breakfast pizza packs all those punchy flavors into every delectable bite.
Now, I won’t sugarcoat it—this recipe may seem a bit indulgent, but it’s entirely approachable and oh-so-rewarding. Plus, it’s perfect for breakfast gatherings, lazy Sunday mornings, or any day when you need a sprinkle of joy right from the get-go. So let’s get cooking; I promise you’ll want this in your breakfast rotation after just one bite!
Personal Story: The Breakfast Tradition
I’ll never forget the first time I tried sausage gravy. My grandma, bless her heart, would whip up a massive pan of it every Sunday morning, and the aroma would waft through the house as we were still snuggled up in our blankets. I remember rolling out of bed, feeling the chill of the morning air, and being greeted by that warm embrace of rich, savory breakfast goodness. Of course, she’d serve it over freshly baked biscuits, and somehow, it always tasted like love.
Fast forward to today, and I wanted to capture that nostalgia but put a fun twist on it. The idea of transforming my childhood favorite into a breakfast pizza was born on a particularly busy morning when I was craving something hearty but didn’t want to miss out on the classic flavors. And let me tell you—it turned out to be a hit! Now, every bite takes me back to those cozy Sundays, bringing comfort and satisfaction to my mornings.
Ingredients
Here’s what you’ll need to whip up this delicious breakfast pizza:
-
1 package (16 oz) breakfast sausage
Look for a quality sausage that’s seasoned well. If you prefer turkey or plant-based sausage, those work just as well! -
1/4 cup all-purpose flour
This will help thicken our gravy. If you’re gluten-free, feel free to substitute with a gluten-free flour blend. -
2 cups milk, divided
Whole milk gives you a richer flavor, but you can also use 2% or even a dairy-free milk option, like almond or oat milk, if needed. -
Ground black pepper, to taste
A key seasoning to enhance the flavors. Feel free to experiment with different kinds of pepper, like white pepper for a subtle heat. -
1 tbsp olive oil (optional)
Use this if you want to give your sausage a little extra flavor and help it crisp up beautifully. -
1 pre-baked pizza crust (12-inch)
I love using a ready-made crust for convenience, but if you’re feeling adventurous, you can make your own! -
Cooking spray
This will help avoid any sticking. You could also use a touch of olive oil here instead. -
6 large eggs
These will be scrambled and added to the top of our pizza, giving it that extra protein punch! -
1/4 cup milk (for eggs)
This makes your scrambled eggs fluffier! You can skip it, but trust me, you won’t regret adding it. -
1 cup shredded Cheddar cheese (or more, as desired)
I’m a firm believer that you can never go wrong with extra cheese! Feel free to mix in other cheese varieties like Monterey Jack or Pepper Jack for a spicy kick. -
Crispy fried onions for topping
They add a nice crunch and flavor. If you’d like, you can also use fresh herbs like chives for a pop of color and taste.
Step-by-Step Instructions
Let’s dive into the cooking process! Here’s how to transform those simple ingredients into a savory masterpiece that will have everyone flocking to your breakfast table.
Step 1: Prepare the Sausage Gravy
-
Cook the sausage: In a large skillet over medium heat, add the breakfast sausage. If you’re using olive oil, pour that in first. Cook the sausage until it’s browned and cooked through, breaking it up with a spatula. This usually takes about 5-7 minutes.
Chef Tip: If you like a bit of spice, consider adding some red pepper flakes during the last minute of cooking!
-
Make the roux: Once the sausage is nicely browned, sprinkle in the all-purpose flour. Stir it into the sausage, allowing it to cook for about 1 minute. This helps to cook off the raw flour taste.
A golden brown roux will give your gravy a richer flavor!
-
Add the milk: Slowly pour in 1.5 cups of milk while continuously stirring. This ensures there are no lumps. The mixture will start to thicken. Sprinkle in some black pepper according to your taste, and let it simmer on low for about 3-5 minutes.
Chef Insight: If it’s too thick for your liking, add a splash more milk until you get a creamy consistency.
Step 2: Scramble the Eggs
-
Whisk the eggs: In a separate bowl, whisk together the eggs and 1/4 cup of milk until well combined. Add a pinch of salt and pepper to the mixture.
Fun Fact: Adding milk to your scrambled eggs not only makes them fluffier but also adds creaminess!
-
Cook the eggs: In a non-stick skillet over medium-low heat, add a little oil or butter. Pour in the egg mixture, and gently stir with a spatula to create soft curds. After 2-3 minutes, remove from heat when they’re just set—remember, they’ll continue cooking even after you take them off the burner!
Chef Tip: For creamy eggs, remove them from heat just before they look fully cooked.
Step 3: Assemble the Pizza
-
Get the crust ready: Preheat your oven to the temperature indicated on your pizza crust packaging. Lightly spray your pizza crust with cooking spray—this will help get a nice crunch as it bakes.
Love a little garlic flavor? Sprinkle some garlic powder on the crust for an exciting twist!
-
Spread the gravy: Pour the sausage gravy evenly over your prepared pizza crust, spreading it out to cover it evenly.
-
Add the eggs: Gently spoon the scrambled eggs over the gravy, ensuring even distribution.
-
Sprinkle on the cheese: Top the pizza with shredded cheddar cheese (or more, if you’re like me and love extra cheesy goodness).
Did you know? Mixing different cheese types can create a uniquely delicious flavor profile!
Step 4: Bake and Serve
-
Pop it in the oven: Bake according to the crust instructions, usually around 12-15 minutes, or until the cheese is melted and bubbly.
Pro Tip: If you want that perfect cheese pull, place on broil for the last 1-2 minutes, but keep an eye on it!
-
Top it off: Once the pizza is out of the oven, sprinkle crispy fried onions over the top for that delightful crunch.
For a fresh twist, you can also add diced green onions or chives here!
Step 5: Slice and Enjoy
- Slice and serve: Let the pizza cool for a minute, slice it up, and serve it hot! Watch as everyone digs into breakfast bliss!
Pair it with fresh fruit or a side salad for an extra vibrant breakfast spread!
Serving Suggestions
When it comes to plating, simplicity is key. Serve your Biscuits and Sausage Gravy Breakfast Pizza on a wooden board or a large platter to create a relaxed dining vibe. You can add a side of fresh fruit, like sliced strawberries or juicy oranges, to balance out the richness of the pizza. A sprinkle of fresh herbs or an extra dash of black pepper can bring your dish to the next level. And don’t forget to pour a cup of coffee or tea to wash it all down!
Recipe Variations
Want to shake things up a bit? Here are some fun twists you could try:
- Vegetarian Version: Swap out the breakfast sausage for your favorite plant-based sausage or a sautéed veggie mix, such as mushrooms and bell peppers.
- Spicy Kick: Add diced jalapeños or your favorite hot sauce to the sausage gravy for those who like it spicy!
- Southwestern Flair: Top with black beans and corn, and try mixing pepper jack cheese for a zesty twist.
- Mediterranean Style: Incorporate feta cheese, spinach, and sun-dried tomatoes for a fresh Mediterranean breakfast experience.
- Herbed Delight: Add fresh herbs like basil or cilantro in the scrambled eggs for a fresh, aromatic touch.
Chef’s Notes
This Biscuits and Sausage Gravy Breakfast Pizza has become a family favorite and a comfort dish for many. I love how it marries my childhood memories with a modern twist, allowing me to enjoy that nostalgic flavor while experimenting with new ideas. And guess what? You can make the gravy ahead of time and store it in the fridge—easy meal prep for those busy mornings! Just reheat it before you pour it over your pizza crust, and you’re good to go.
Oh, and I have to share my funniest kitchen story about this recipe! The first time I attempted it, I was excited and didn’t notice my oven was set to broil. Let’s just say the first pizza turned into an unexpected charred creation. But hey, now I make sure to double-check oven settings! Lesson learned.
FAQs and Troubleshooting
1. My gravy is too thick—what should I do?
If your sausage gravy turns out too thick, simply whisk in a little more milk over low heat until it reaches your desired consistency.
2. Can I make this ahead of time?
Absolutely! You can prepare the sausage gravy and scramble the eggs ahead of time. Just reheat them before assembling the pizza.
3. What if my eggs are dry?
To prevent dry scrambled eggs, cook them on low heat and remove them just before they’re fully set. The residual heat will finish cooking them without drying them out.
4. How do I store leftovers?
Store any leftover pizza in an airtight container in the fridge for up to 3 days. Reheat in the oven or microwave for best results.
Nutritional Info (Optional)
Although I didn’t cover specific nutritional info in this post, I encourage you to look up approximate values based on your ingredient choices. Enjoying a hearty breakfast like this can be balanced with lighter meals throughout the day!
So there you have it! A delightful blend of nostalgia and innovation—all packed into a Biscuits and Sausage Gravy Breakfast Pizza that promises to fuel your morning with flavor and joy. I hope you enjoy making this dish as much as I do, and don’t forget to come back and share your own stories from the kitchen! Happy cooking!
PrintBiscuits and Sausage Gravy Breakfast Pizza

A delicious blend of fluffy biscuits and creamy sausage gravy topped on a crispy pizza crust, perfect for a hearty breakfast.
- Prep Time: 15 minutes
- Cook Time: 30 minutes
- Total Time: 45 minutes
- Yield: 4 servings 1x
- Category: Breakfast
- Method: Baking
- Cuisine: American
- Diet: None
Ingredients
- 1 package (16 oz) breakfast sausage
- 1/4 cup all-purpose flour
- 2 cups milk, divided
- Ground black pepper, to taste
- 1 tbsp olive oil (optional)
- 1 pre-baked pizza crust (12-inch)
- Cooking spray
- 6 large eggs
- 1/4 cup milk (for eggs)
- 1 cup shredded Cheddar cheese (or more, as desired)
- Crispy fried onions for topping
Instructions
- Cook the sausage: In a large skillet over medium heat, add the breakfast sausage. If you’re using olive oil, pour that in first. Cook until browned and cooked through, breaking it up with a spatula, about 5-7 minutes.
- Make the roux: Sprinkle in the all-purpose flour once the sausage is browned and stir, cooking for about 1 minute.
- Add the milk: Slowly pour in 1.5 cups of milk while continuously stirring. Let it simmer on low for about 3-5 minutes.
- Whisk the eggs: In a separate bowl, whisk together the eggs and 1/4 cup of milk. Season with salt and pepper.
- Cook the eggs: In a non-stick skillet over medium-low heat, pour in the egg mixture, gently stirring until soft curds form. Remove from heat just before fully cooked.
- Preheat oven: Preheat your oven according to the crust instructions. Lightly spray your pizza crust with cooking spray.
- Spread the gravy: Pour the sausage gravy over the prepared pizza crust.
- Add the eggs: Spoon the scrambled eggs over the gravy.
- Sprinkle on cheese: Top with shredded cheddar cheese.
- Bake: Bake according to crust instructions, about 12-15 minutes, or until cheese is melted. Optionally, broil for 1-2 minutes for a perfect cheese pull.
- Top it off: Sprinkle crispy fried onions over the top when done.
- Slice and serve: Let cool for a minute, slice, and serve hot!
Notes
Feel free to substitute with turkey or plant-based sausage. You can also prep the gravy ahead of time for convenience.
Nutrition
- Serving Size: 1 slice
- Calories: 450
- Sugar: 3g
- Sodium: 600mg
- Fat: 25g
- Saturated Fat: 10g
- Unsaturated Fat: 10g
- Trans Fat: 0g
- Carbohydrates: 35g
- Fiber: 2g
- Protein: 20g
- Cholesterol: 200mg
Keywords: breakfast pizza, sausage gravy, biscuits, comfort food
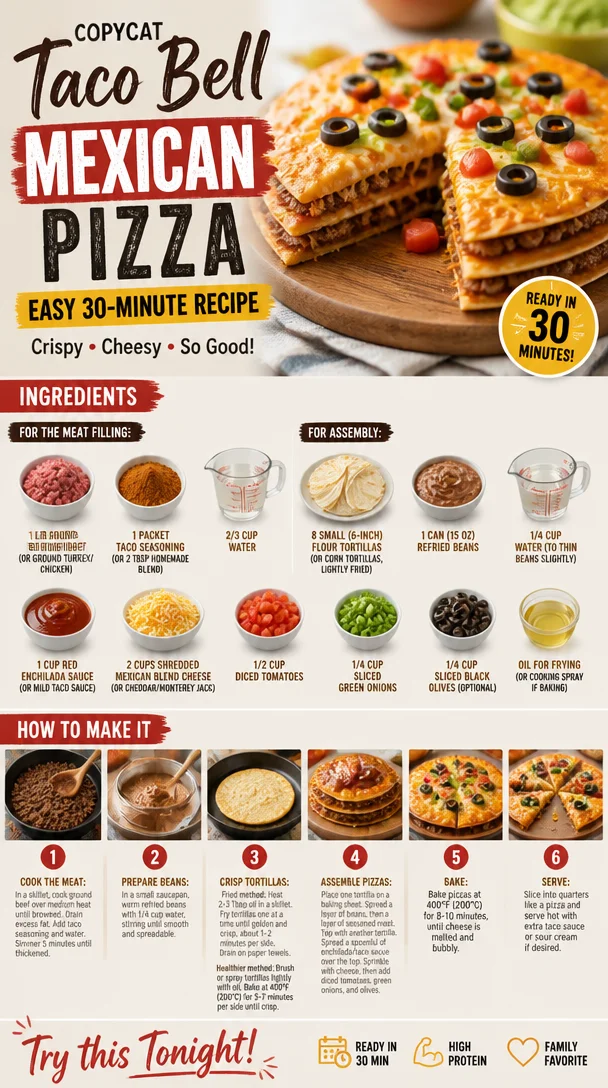
Copycat Taco Bell Mexican Pizza: Easy 30-Minute Recipe
Taco Bell Mexican Pizza: A Nostalgic Twist on a Fast-Food Favorite
Welcome to Clean Plate Cravings! Today, we’re diving into a dish that has ignited a frenzy of nostalgia and flavor for so many of us: the Taco Bell Mexican Pizza. You know, that glorious creation that hits just right after a long day or makes a perfect late-night snack. I’m Ava, your food-loving guide, and I can’t wait to share my take on this classic dish, bringing it from the drive-thru to your kitchen in a way that’s fresh, fun, and downright delicious!
Picture this: it’s Friday night in my childhood home, and the sun’s just beginning to set. My family and I are gathered around the kitchen table, the beautiful chaos of dinner prep all around us. My parents have just returned from a trip to Taco Bell—our treat for the week! Our dining table was transformed into a Mexican feast, complete with a stack of those iconic Mexican Pizzas. There was just something about the melty cheese, crunchy tortillas, and spiced meat that felt like a hug on a plate. We couldn’t get enough! We’d devour those layered beauties until the wrappers were gone, each bite a burst of flavor that I still vividly remember.
Now, you might think that recreating such a beloved item seems daunting, but I’m here to tell you it’s super simple and, most importantly, a lot of fun. I promise that your homemade version will be both cleaner and more satisfying than anything from the drive-thru. So, grab your apron, and let’s whip up this cheesy delight in your own kitchen!
Ingredients
Here’s what you’ll need to bring your homemade Taco Bell Mexican Pizza to life:
For the Meat Filling:
-
1 lb ground beef (or ground turkey/chicken)
- Ah, the star of our pizza! You can totally swap in ground turkey or chicken for a lighter version, or even a plant-based substitute if you want to keep it vegetarian.
-
1 packet taco seasoning (or 2 Tbsp homemade blend)
- I love making my homemade taco seasoning with spices like chili powder, cumin, and paprika. It’s a great way to control the flavors!
-
2/3 cup water
- This helps to hydrate the spices and meat, making it juicy and flavorful.
For Assembly:
-
8 small (6-inch) flour tortillas (or corn tortillas, lightly fried)
- Flour gives that classic taste, but you can easily use corn tortillas if you’re aiming for a gluten-free option. Lightly frying them adds a delicious crunch!
-
1 can (15 oz) refried beans
- A key player! These beans lend creaminess and flavor. If you want to lighten it up, try making your own using black beans or pinto beans.
-
1/4 cup water (to thin beans slightly)
- This is to help spread the beans across the tortilla smoothly.
-
1 cup red enchilada sauce (or mild taco sauce)
- You can ditch the bottled stuff if you’re feeling adventurous—try making your own enchilada sauce, and you’ll never look back!
-
2 cups shredded Mexican blend cheese (or cheddar/Monterey jack)
- Get ready for melty goodness! That blend of cheeses completely elevates the meal.
-
1/2 cup diced tomatoes
- Fresh tomatoes add brightness. You could replace these with salsa for an extra kick!
-
1/4 cup sliced green onions
- Green onions give a fresh flavor and a lovely pop of color!
-
1/4 cup sliced black olives (optional)
- If you’re an olive lover like me, toss these in! If not, feel free to leave them out.
-
Oil for frying (or cooking spray if baking)
- If you’re frying your tortillas, a little oil will help them crisp up beautifully. I also love using spray oil for a lighter, baked version!
Step-by-Step Instructions
Alright, my friend! Now that we have our ingredients ready, let’s get cooking!
Step 1: Prepare the Meat Filling
Start by heating a non-stick skillet over medium heat. Add your ground beef (or turkey/chicken) and cook until it’s browned, about 5-7 minutes. Keep stirring to break up the meat into crumbs. Don’t rush this part! It’s where the flavor magic happens. Once browned, drain the excess fat if necessary.
Now, sprinkle in your taco seasoning and pour in the water. Stir everything together and let it simmer for 3-5 minutes until the mixture thickens a bit. This is your flavor bomb, so taste it! Add more seasoning if you’d like a bolder flavor.
Step 2: Prep the Tortillas
If you decide to fry your tortillas, heat oil in a separate pan over medium-high heat. Gently fry each tortilla for about 30 seconds on each side until they’re golden and crunchy. You want them crisp but not too dark; they’re going to be doing double duty as our pizza’s base! If you’re baking them, simply give them a light spray of oil on both sides and bake at 400°F (200°C) for about 5-10 minutes until they’re crispy.
Step 3: Assemble the Pizza
Let’s layer this pizza up! Grab a crispy tortilla and start by spreading a layer of refried beans over the surface. Mix the beans with 1/4 cup of water beforehand to make spreading easier. Next, spoon a generous amount of your seasoned meat filling on top of the beans, followed by a drizzle of the enchilada sauce.
Now comes the cheesy goodness—sprinkle about 1/2 cup of your shredded cheese over the top. Repeat this process with another tortilla, layering the remaining toppings once more (beans, meat, sauce, and cheese). Don’t be shy with the cheese—more is always better!
Step 4: Cook the Pizza
Carefully transfer your assembled pizzas back to the skillet (using a spatula helps) and cook on medium heat for about 5-7 minutes. Cover the skillet with a lid to help the cheese melt. If you’re baking, place them in the oven at 400°F (200°C) for about 10-15 minutes, watching closely until the cheese is melty and bubbling.
Step 5: Add the Toppings
After removing the pizzas from heat, it’s time to garnish! Sprinkle the diced tomatoes, sliced green onions, and black olives. I like to serve mine with a side of sour cream or guacamole for an extra flavor boost.
Serving Suggestions
To plate up your Taco Bell Mexican Pizza, slice it into quarters and serve on a vibrant platter. Add a dollop of sour cream on top or a side of fresh guacamole to enhance the flavor. A sprinkle of cilantro could also really liven it up—I mean, who doesn’t love a pop of green on their pizza? Let your guests go wild with the toppings!
Recipe Variations
Looking to switch things up? Here are some quick variations to tempt your taste buds:
- Spicy Kick: Add jalapeños or hot sauce to give your pizza a fiery zing.
- Vegetarian Delight: Substitute the meat with sautéed veggies like bell peppers and zucchini.
- BBQ Twist: Use BBQ sauce in place of enchilada sauce and top with grilled chicken for a smoky flavor.
- Breakfast Pizza: Swap the beef with scrambled eggs and add diced bell peppers for a breakfast version—perfect for brunch!
- Cheesy Spin: Play around with different cheese blends like pepper jack for extra heat or feta for a Mediterranean flair.
Chef’s Notes
Ah, the nostalgia! I’ve made this recipe for gatherings, family dinners, and even just for a fun cooking night. Each time I do, I’m reminded of those Friday nights with my family. Over the years, I’ve adapted this recipe, experimenting with different toppings and sauces to make it uniquely my own. My friends have come to expect this as the showstopper for any potluck or get-together I attend, and it never disappoints!
FAQs and Troubleshooting
1. My pizzas turned out soggy! What did I do wrong?
- Ensure that your tortillas are crispy enough before adding the toppings. If they’re too soft or you overloaded them with toppings, they may lose their crunch!
2. Can I bake these instead of frying?
- Absolutely! Just spray your tortillas lightly with oil and bake them at 400°F (200°C) until they’re golden and crispy. Both methods yield delicious results!
3. What can I use instead of refried beans?
- You can blend in some smashed avocado for a creamy base or use hummus for a fresh twist.
4. Can I make this ahead of time?
- Definitely! Prepare the meat filling and assemble the pizzas ahead of time. Just keep them covered in the fridge and bake them fresh when you’re ready to serve!
Nutritional Info
While I haven’t included specific nutritional information here, remember this is a customizable recipe! You can modify ingredient quantities to suit your dietary preferences. With real ingredients, you can feel good about what you’re putting into your body.
So there you have it! A fun, friendly take on the classic Taco Bell Mexican Pizza that’s perfect for any occasion. Gather your loved ones, roll up your sleeves, and enjoy the delightful process of creating this tasty meal. Happy cooking, and may your kitchen be filled with laughter and joy!
PrintTaco Bell Mexican Pizza

Recreate the nostalgic Taco Bell Mexican Pizza at home with this fun, delicious recipe that’s perfect for any night of the week.
- Prep Time: 15 minutes
- Cook Time: 30 minutes
- Total Time: 45 minutes
- Yield: 4 servings 1x
- Category: Main Course
- Method: Baking or Frying
- Cuisine: Mexican
- Diet: Vegetarian option available
Ingredients
- 1 lb ground beef (or ground turkey/chicken)
- 1 packet taco seasoning (or 2 Tbsp homemade blend)
- 2/3 cup water
- 8 small (6-inch) flour tortillas (or corn tortillas, lightly fried)
- 1 can (15 oz) refried beans
- 1/4 cup water (to thin beans slightly)
- 1 cup red enchilada sauce (or mild taco sauce)
- 2 cups shredded Mexican blend cheese (or cheddar/Monterey jack)
- 1/2 cup diced tomatoes
- 1/4 cup sliced green onions
- 1/4 cup sliced black olives (optional)
- Oil for frying (or cooking spray if baking)
Instructions
- Prepare the Meat Filling: Heat a non-stick skillet over medium heat. Add your ground beef (or turkey/chicken) and cook until browned, about 5-7 minutes. Drain excess fat if necessary. Stir in taco seasoning and water; let simmer for 3-5 minutes.
- Prep the Tortillas: If frying, heat oil in a separate pan and fry each tortilla for about 30 seconds on each side until golden and crunchy. For baking, lightly spray with oil and bake at 400°F (200°C) for 5-10 minutes.
- Assemble the Pizza: Spread a layer of refried beans on a crispy tortilla. Spoon the seasoned meat filling on top, followed by enchilada sauce and cheese. Repeat with another tortilla and layer the toppings.
- Cook the Pizza: Transfer the assembled pizzas to the skillet and cook on medium heat for about 5-7 minutes, covered, until cheese melts. For baking, place in the oven at 400°F (200°C) for 10-15 minutes.
- Add the Toppings: Remove from heat and garnish with diced tomatoes, green onions, and black olives. Serve with sour cream or guacamole.
Notes
You can easily modify the recipe to be vegetarian or to add a spicy kick with jalapeños. Make sure tortillas are crispy before adding toppings to avoid sogginess.
Nutrition
- Serving Size: 1 pizza slice
- Calories: 400
- Sugar: 5g
- Sodium: 800mg
- Fat: 20g
- Saturated Fat: 8g
- Unsaturated Fat: 10g
- Trans Fat: 0g
- Carbohydrates: 40g
- Fiber: 5g
- Protein: 20g
- Cholesterol: 50mg
Keywords: Taco Bell, Mexican Pizza, homemade pizza, comfort food, easy recipes