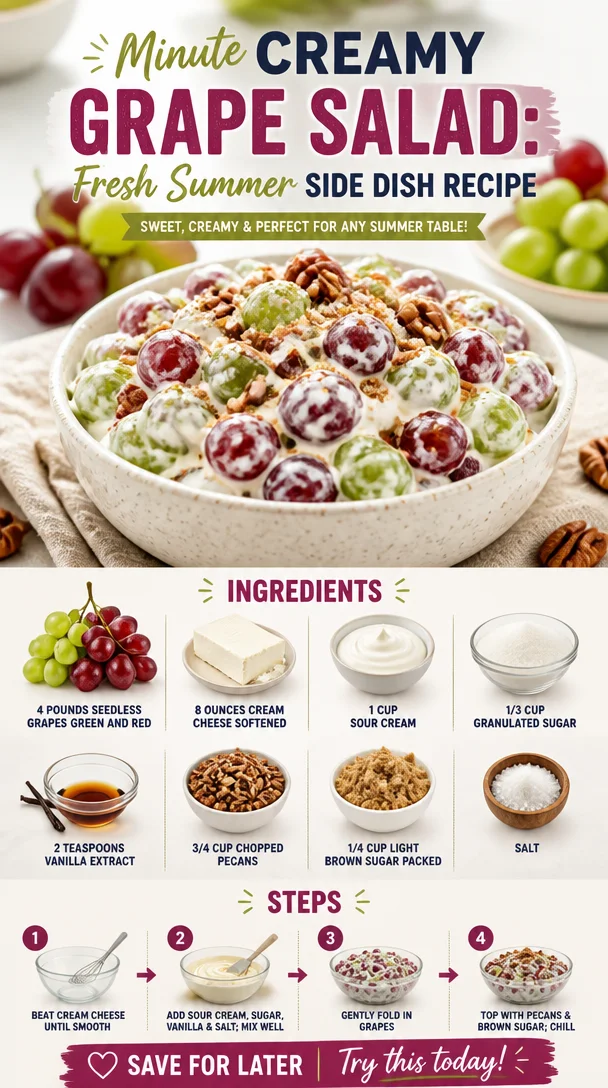
Minute Creamy Grape Salad: Fresh Summer Side Dish Recipe
Cool and Creamy Grape Salad: A Fruity Delight to Brighten Your Day
Welcome to Clean Plate Cravings! Today, we’re diving into a dish that perfectly encapsulates the essence of fresh, vibrant flavors and the joy of gathering around the table with loved ones. Picture this: a sunny afternoon, laughter in the air, and a salad that’s as delightful to look at as it is to eat. Enter the Cool and Creamy Grape Salad. Whether you’re serving it at a picnic, family gathering, or just for a sweet treat to enjoy at home, this dish is sure to be a hit.
You might be wondering, “Why a salad of grapes? Isn’t that just fruit?” Trust me—this is not your average fruit bowl! This creamy concoction combines succulent grapes with a luscious dressing that transforms it into a delightful side or dessert. Think of it as a sweet symphony played by fresh produce, a medley of flavors that dances on your palate and leaves you wanting more.
Growing up, grape salad was a staple at every family picnic and potluck. I remember being a child, eagerly awaiting the moment the bowl appeared on the table, the sun gleaming off the glossy grapes. My aunt would whip up her version, and the secret had always been in the creamy dressing, just enough to bind everything together without overwhelming the freshness of the fruit. The crunch of pecans added the perfect contrast, making each bite a delightful experience.
So roll up your sleeves, and let’s get started on crafting this fresh and fabulous Cool and Creamy Grape Salad that I know will become one of your go-to recipes!
Personal Story
One of my fondest memories tied to grape salad is from last summer’s family reunion. The sun was shining, and the patio was filled with laughter and chatter. My cousin Sarah whipped out her phone and asked if anyone remembered the infamous grape salad incident from the last gathering—a story that still lives in our family lore.
Years ago, Sarah, eager to impress, decided to add a twist to the classic recipe by tossing in some unexpected ingredients—coconut flakes, marshmallows, and even a splash of citrus! While her creativity was commendable, the resulting dish left everyone scratching their heads. We laughed about it all afternoon, but the memory sparked a new tradition: each year, we’d take turns making our own versions of grape salad. It became a friendly competition, each of us trying to capture the balance of flavors and textures while nodding to those quirky culinary “experiments.”
So while my final recipe is rooted in the basics, I encourage you to make it your own—who knows? You just might start a family tradition of your own!
Ingredients
Before we dive into creating this masterpiece, let’s gather our ingredients! Here’s what you’ll need:
-
4 pounds seedless grapes (green and red)
A mix of grapes adds color and flavor! Green grapes are sweet and refreshing, while red grapes offer a delightful burst of juicy sweetness. If you can’t find seedless grapes, you can remove the seeds from regular grapes, but be prepared for a little more work! -
8 ounces cream cheese (softened)
Cream cheese adds a smooth, creamy texture that acts as the base of our dressing. Make sure it’s at room temperature for easy blending. If you want a lighter version, you can substitute with Greek yogurt. -
1 cup sour cream
Sour cream brings a tanginess that complements the sweetness of the grapes. You can substitute it with plain yogurt for a similar texture with less tang. -
1/3 cup granulated sugar
This will sweeten our dressing. If you prefer a lower-sugar option, maple syrup or honey can work beautifully as a substitute! -
2 teaspoons vanilla extract
A splash of vanilla adds warmth and depth to the dressing. If you want to switch things up, consider using almond extract for a nutty twist. -
3/4 cup chopped pecans
Pecans provide a crunchy texture that’s irresistible! If you have nut allergies, sunflower seeds or pumpkin seeds are great alternatives. -
1/4 cup light brown sugar (packed)
Brown sugar adds a slight molasses flavor and will help create a lovely topping. You can use coconut sugar for a different flavor profile! -
Salt
Just a pinch! It brings out all the flavors and balances the sweetness.
Now that we have everything prepped and ready, let’s dive into the cooking process!
Step-by-Step Instructions
-
Prepare the Grapes
Start by rinsing the grapes under cool water to remove any dirt or residue. Drain them well and make sure they are completely dry before proceeding. You can pat them gently with a kitchen towel. Cutting some grapes in half can also enhance their flavor and texture, but keep some whole for visual appeal! -
Make the Creamy Dressing
In a mixing bowl, combine the softened cream cheese and sour cream. Using an electric mixer or a whisk, beat them together until smooth and creamy. This might take about 2-3 minutes. Be patient—making sure there are no lumps is key to achieving that silky texture we all love! -
Add Sweetness and Flavor
Gradually add the granulated sugar and vanilla extract to the cream cheese mixture. Continue mixing until everything is well combined. Taste as you go! If you like it sweeter, feel free to add another tablespoon of sugar. -
Mix in the Grapes
In a large mixing bowl, combine the grapes with the creamy dressing. Gently fold the dressing over the grapes with a spatula, ensuring that every grape is coated but without squishing them. This is where the magic happens! You’ll see the bright colors of the grapes shining through the creamy coating, and it’s hard not to sneak in a taste! -
Prepare the Topping
In a separate bowl, mix the chopped pecans with the packed light brown sugar. This gives it that crunchy, sweet irresistible topping! You can toast the pecans in a dry skillet over medium heat for a couple of minutes until fragrant, but this is optional. -
Combine and Chill
Pour the coated grapes into a serving dish and spread them out. Top generously with the pecan mixture. For the best flavor, cover the dish with plastic wrap and refrigerate for at least an hour. This allows the dressing to meld with the grapes, enhancing the overall taste. -
Serve and Enjoy!
After chilling, give it a gentle stir before serving. It’s ready to delight your family and friends!
Serving Suggestions
To plate your Cool and Creamy Grape Salad, consider using a beautiful glass bowl or a fun, colorful serving dish. Not only does it make for a stunning presentation, but it allows the vibrant colors of the grapes and crunchy topping to shine. A sprinkle of extra chopped pecans on top adds a lovely finishing touch, and don’t shy away from garnishing with a few mint leaves for a pop of freshness. Serve it chilled on a warm day for the ultimate refreshing treat!
Recipe Variations
Now that you have the classic recipe down, here are a few creative twists to keep things interesting:
-
Citrus Burst Grape Salad: Add a pop of freshness with some finely chopped mint and a zest of lemon or orange to the dressing!
-
Tropical Grape Salad: Toss in some diced pineapple or mango for a taste of the tropics!
-
Chocolate Drizzle Grape Salad: For extra indulgence, drizzle some melted dark chocolate over the top just before serving. Yum!
-
Vegan Version: Substitute the cream cheese and sour cream with a plant-based cream cheese and coconut yogurt for a creamy, vegan alternative.
Chef’s Notes
As I initially developed this recipe, I found my thoughts drifting to various gatherings where a simple dish sparked conversation and connection. It truly is incredible how food can transport us back to cherished moments in time. Each time I whip up this grape salad, I’m reminded of the joy it brings to my friends and family. You’ll soon see that this dish not only serves as nourishment but as a vehicle for connection.
As with all recipes, don’t be afraid to put your spin on it—whether it’s through the choice of nuts, tweaking the sweetness, or adding your special secret touch. Food is all about enjoyment, and it evolves through our personal experiences in the kitchen.
FAQs and Troubleshooting
-
Can I use frozen grapes?
While frozen grapes can be delicious as a snack, using them in this recipe may change the texture and consistency. Fresh grapes are recommended for that delightful crunch! -
The dressing is too thick; how can I fix that?
If you find your dressing is thicker than expected, feel free to add a little more sour cream or a splash of milk until you reach your desired consistency. -
How long will the grape salad last in the fridge?
The salad can last up to 3 days in the fridge. However, it’s best enjoyed fresh, as the grapes may release their juices over time. -
Can I make this salad ahead of time?
Absolutely! You can prepare the salad up to a day in advance. Just keep it tightly covered in the fridge to maintain freshness.
Nutritional Info
While it’s always good to be mindful of our food choices, the Cool and Creamy Grape Salad can be enjoyed in moderation. This dish is rich in vitamins from the grapes, healthy fats from the pecans, and brings a delightful sweetness without relying heavily on refined sugars. One serving offers satisfying flavors while being lighter than traditional desserts.
Conclusion
So there you have it—your guide to creating the most delightful Cool and Creamy Grape Salad! It’s a dish that embodies joy and flavor, and one that I know will be a favorite at your next gathering. Remember to experiment, have fun, and most importantly, share your creations with those you love. Let’s keep it fresh, simple, and seriously delicious—one grape salad at a time! Happy cooking!
PrintCool and Creamy Grape Salad
A vibrant and refreshing grape salad with a creamy dressing that’s perfect for picnics or family gatherings.
- Prep Time: 15 minutes
- Cook Time: 0 minutes
- Total Time: 15 minutes
- Yield: 8 servings 1x
- Category: Salad
- Method: No Cook
- Cuisine: American
- Diet: Vegetarian
Ingredients
- 4 pounds seedless grapes (green and red)
- 8 ounces cream cheese (softened)
- 1 cup sour cream
- 1/3 cup granulated sugar
- 2 teaspoons vanilla extract
- 3/4 cup chopped pecans
- 1/4 cup light brown sugar (packed)
- Salt (a pinch)
Instructions
- Prepare the grapes by rinsing them under cool water and draining well.
- Make the creamy dressing by combining the cream cheese and sour cream, then beating until smooth.
- Add granulated sugar and vanilla extract to the creamy mixture, mixing well.
- Mix in the grapes, folding them gently with the dressing.
- Prepare the topping by mixing chopped pecans with light brown sugar.
- Combine everything in a serving dish and refrigerate for at least one hour.
- Serve and enjoy your refreshing salad!
Notes
Feel free to customize with additional ingredients like diced pineapple or chocolate drizzles for a twist.
Nutrition
- Serving Size: 1 cup
- Calories: 220
- Sugar: 18g
- Sodium: 150mg
- Fat: 10g
- Saturated Fat: 4g
- Unsaturated Fat: 4g
- Trans Fat: 0g
- Carbohydrates: 30g
- Fiber: 2g
- Protein: 3g
- Cholesterol: 15mg
Keywords: grape salad, summer salad, creamy dressing, dessert salad
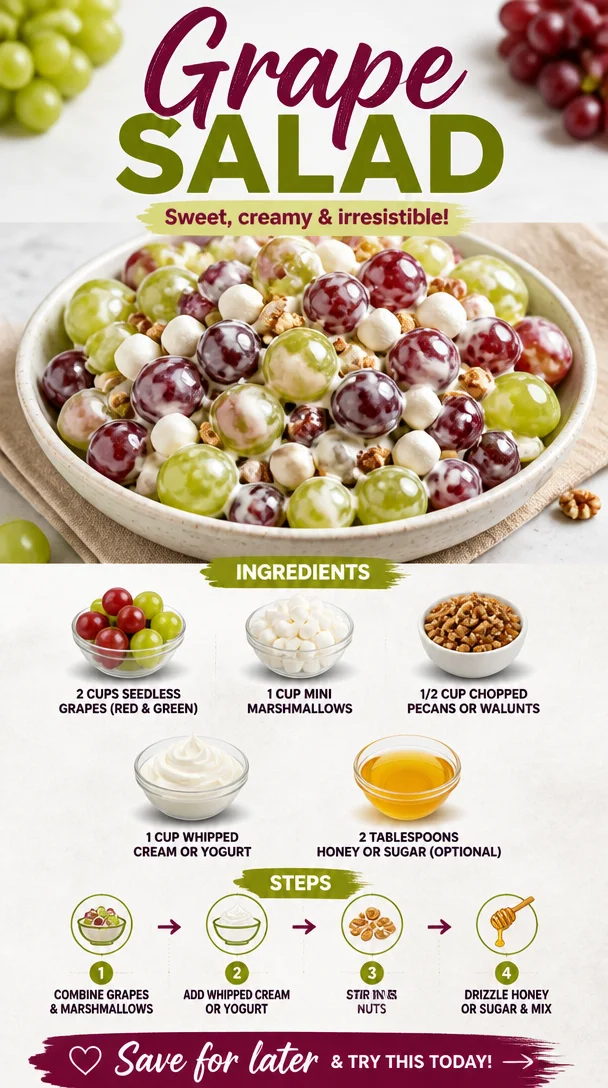
Grape Salad
Sweet and Crunchy Grape Salad: A Delightful Twist on a Classic
Welcome back to Clean Plate Cravings, my friends! Today, I’m bringing you a refreshing and irresistible dish that’s perfect for summer picnics, barbecues, or simply a light dessert after dinner: Grape Salad! This salad has been a staple in my family for years, and I can’t wait to share it with you all. So grab your apron and let’s dive into the delicious world of vibrant flavors and textures that grape salad offers!
This dish holds a special place in my heart, as it reminds me of warm summer afternoons spent at my grandmother’s house. Picture this: sunlight streaming through the windows, the smell of freshly cut grass wafting in from the backyard, and laughter echoing through the house. Grandma would prepare a big bowl of grape salad for our family gatherings, and I can still hear the delighted giggles of my cousins as we eagerly lined up for our first helping. With its sweet, juicy grapes and creamy dressing, grape salad was always a hit—not just with us kids but with adults, too!
What I love most about grape salad is its simplicity. With just a handful of ingredients, you can whip up something absolutely delightful in no time. It’s a versatile dish that can easily adapt to your taste preferences, making it a perfect fit for any occasion.
Let’s get cooking, shall we?
Ingredients
This grape salad recipe is straightforward and requires minimal prep. Here’s what you need:
-
2 cups seedless grapes (red and green)
These juicy bites of goodness are the stars of the show. Use a mix of red and green grapes for a colorful presentation! If you happen to have a grape allergy, feel free to replace them with diced apples or sliced strawberries for that same juicy crunch. -
1 cup mini marshmallows
These add a fun, chewy texture that kids (and adults!) love. For a healthier twist, you can substitute them with chopped apples or pears for some added crunch. -
1/2 cup chopped pecans or walnuts
Nuts bring in a delightful crunch and nutty flavor, which beautifully balances the sweetness. Not a nut fan? Toasted coconut makes a great alternative for that tropical flair! -
1 cup whipped cream or yogurt
This is the creamy element that ties everything together. For a lighter option, opt for Greek yogurt for a dose of probiotics. You can also use non-dairy whipped toppings for a vegan version. -
2 tablespoons honey or sugar (optional)
Depending on the sweetness of your grapes, you might want to adjust the sweetness. Feel free to skip this, especially if you’re using whipped cream.
With just these simple ingredients, you can create a dish that not only looks great but tastes amazing!
Step-by-Step Instructions
Now that we’ve got our ingredients, let’s get into the nitty-gritty of preparing this delightful grape salad. Grab your mixing bowl—let’s get started!
-
Wash the Grapes
Start by rinsing your seedless grapes under cool running water. Make sure to gently swish them around to remove any dirt or residue. After washing, pat them dry with a clean kitchen towel. This step is essential because excess moisture can make your salad watery later on! -
Prep the Grapes
Once they’re dry, slice the grapes in half. This not only makes them easier to mix but also ensures every bite has that juicy explosion we love. Plus, it creates little pockets for the creamy dressing to cling to! -
Mix the Base
In a large mixing bowl, combine the halved grapes, mini marshmallows, and chopped nuts. The visual of this lively mixture is already a feast for the eyes! Stir gently to ensure everything is evenly distributed, but be careful not to mash the grapes. -
Incorporate the Cream
Now, it’s time to add the whipped cream or yogurt! If you decided to use yogurt for a health boost, make it a little sweeter by adding in your honey or sugar at this stage. Gently fold the cream into the grape mixture. You want to maintain that fluffy texture while ensuring everything is coated beautifully. -
Taste and Adjust
Here’s where the real fun begins! Taste your grape salad and see if it needs any adjustments. Perhaps a bit more sweetness? Maybe some zest with a squeeze of lemon or lime? This is your dish, so make it uniquely yours! -
Chill and Serve
Finally, cover your grape salad and let it chill in the refrigerator for at least 30 minutes before serving. This allows all the flavors to meld together and makes for a refreshing treat. Trust me, patience is key here!
Serving Suggestions
When it’s time to serve, grab a beautiful bowl or a vibrant platter. You can garnish with a sprinkle of additional chopped nuts or a few whole grapes on top to impress your guests. This grape salad is not only perfect as a side dish but also shines as a light dessert. It’s a beautiful addition to summer picnics, potlucks, or even as a snack in your daily routine.
Recipe Variations
Looking to change things up a bit? Here are some fun twists to keep your grape salad exciting!
-
Add Citrus
Incorporate some chopped oranges or a sprinkle of lemon zest to brighten the flavors. The citrus will cut the sweetness and add a refreshing zing! -
Berry Blast
Mix in some fresh strawberries or blueberries for an extra burst of color and antioxidants. It’s a perfect summer spin! -
Spiced Up
Add a pinch of cinnamon or nutmeg to the cream dressing for a warm, aromatic flavor. This is especially delightful in the fall! -
Tropical Twist
Replace pecans with shredded coconut and add a few pineapple tidbits. It’s like a vacation on a plate! -
Savory Style
For a more savory approach, consider adding some crumbled feta or a sprinkle of sea salt. The sweet-and-salty combination is truly addictive!
Chef’s Notes
As with all my recipes, this grape salad has evolved over time. I initially started with a heavier cream base but slowly adjusted to include lighter elements, like yogurt, that still keep it creamy but add a nutritional boost. I remember one time at a family gathering when my cousin accidentally added too much sugar, making it more of a dessert! We laughed it off and ended up calling it "sugar bomb grape salad." It just goes to show that cooking is all about experimenting and having fun in the kitchen.
FAQs and Troubleshooting
1. My grape salad is too watery—how do I fix this?
If your salad ends up watery, it could be due to overripe grapes or too much moisture during washing. Next time, make sure to dry the grapes well and use firmer grapes. If it’s too late, try draining excess liquid before serving.
2. How long can I store grape salad?
Grape salad is best enjoyed fresh but can be stored in an airtight container in the refrigerator for up to 2 days. The longer it sits, the more the flavors blend, but keep in mind that the texture might change as the grapes release some moisture.
3. Can I make grape salad ahead of time?
Absolutely! You can prepare the grape mixture and cream separately and combine them just before serving. This will help maintain the freshness and texture!
4. What can I use instead of yogurt?
In place of yogurt, feel free to use sour cream, cottage cheese, or a non-dairy alternative, like coconut whipped cream. Each option will give the salad a unique flavor and texture!
Nutritional Info
While I don’t focus heavily on nutritional info in my recipes, this grape salad is relatively low in calories, especially with yogurt. It’s rich in vitamins, fiber, and antioxidants, making it a great addition to a balanced diet.
And there you have it—a delightful Grape Salad that brings back memories while creating new ones! I hope you try this recipe and share it with your loved ones. Remember, the kitchen is about joy, creativity, and connection, so don’t hesitate to make this dish your own. Happy cooking, friends!
PrintSweet and Crunchy Grape Salad
A refreshing and irresistible grape salad perfect for summer picnics, barbecues, or as a light dessert.
- Prep Time: 10 minutes
- Cook Time: 0 minutes
- Total Time: 40 minutes
- Yield: 4 servings 1x
- Category: Salad
- Method: Mixing
- Cuisine: American
- Diet: Vegetarian
Ingredients
- 2 cups seedless grapes (red and green)
- 1 cup mini marshmallows
- 1/2 cup chopped pecans or walnuts
- 1 cup whipped cream or yogurt
- 2 tablespoons honey or sugar (optional)
Instructions
- Wash the grapes under cool running water and pat them dry.
- Prep the grapes by slicing them in half.
- Mix the halved grapes, mini marshmallows, and chopped nuts in a large mixing bowl.
- Incorporate the whipped cream or yogurt, folding gently to mix.
- Taste and adjust for sweetness if needed.
- Chill in the refrigerator for at least 30 minutes before serving.
Notes
For a lighter option, use Greek yogurt. You can also substitute nuts with shredded coconut or use diced apples if you have a grape allergy.
Nutrition
- Serving Size: 1 serving
- Calories: 200
- Sugar: 10g
- Sodium: 50mg
- Fat: 9g
- Saturated Fat: 3g
- Unsaturated Fat: 6g
- Trans Fat: 0g
- Carbohydrates: 30g
- Fiber: 2g
- Protein: 3g
- Cholesterol: 10mg
Keywords: grape salad, refreshing salad, summer recipe, dessert salad
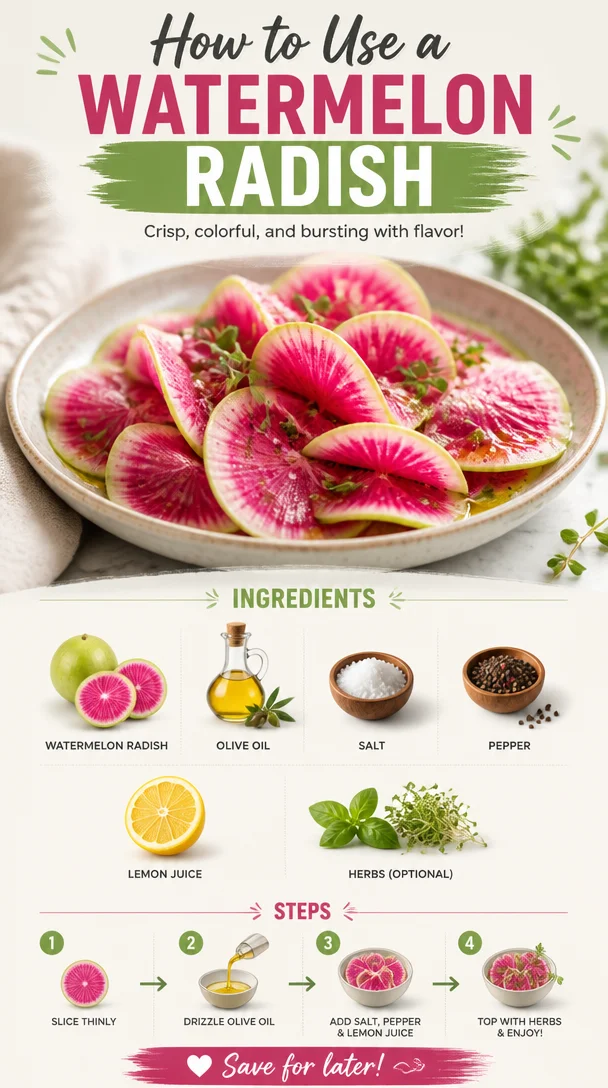
How to Use a Watermelon Radish
How to Use a Watermelon Radish: Refreshing Ideas for Your Next Meal
Hey there, fellow food enthusiasts! Today, we’re diving into one of my absolute favorite ingredients—the watermelon radish. Yes, that stunningly beautiful, vibrant pink vegetable that brings a pop of color and crunch to your dishes! If you’ve been seeing this beauty at your local farmers’ market or grocery store and wondering what to do with it, you’re in for a treat.
In this post, I’ll walk you through everything you need to know about the watermelon radish: its versatile uses, a delightful recipe that makes it shine, and tips that will have you falling in love with this root vegetable. Let’s get ready to elevate your meals, boost your health, and have a little fun along the way!
A Taste of Nostalgia
I’ll never forget the first time I encountered a watermelon radish. I was at a charming little farm-to-table restaurant with friends, and the server brought out a colorful salad—piled high with greens, topped with thinly sliced pink and white watermelon radishes, and drizzled with a lemon vinaigrette. I was mesmerized by the radish’s striking hue, and just had to dig in! The first bite sent my taste buds dancing; the radish was juicy, crisp, and slightly sweet. It was a true revelation that made healthy eating feel vibrant and exciting.
That experience sparked my love affair with watermelon radishes and inspired many creative kitchen adventures since. Now, I want to share this journey with you so that you can incorporate this delightful ingredient into your meals! So, let’s roll up our sleeves and get cooking!
Ingredients
-
1 Watermelon Radish: Also known as a "beauty heart radish," this stunning radish is mildly sweet and crunchy. If you can’t find it, try swapping it out for a regular radish, although the flavor will be a bit stronger.
-
Olive Oil: A staple in any kitchen, olive oil adds richness and helps to balance out the flavors. For a different twist, use avocado oil.
-
Salt: This simple ingredient enhances all the flavors and helps to bring out the natural taste of the radish.
-
Pepper: Freshly cracked black pepper adds a warm, zesty note that complements the radish beautifully.
-
Lemon Juice: Bright, tangy lemon juice elevates the dish! You could also use lime juice for a different citrus kick.
-
Herbs (optional): Fresh herbs like parsley, mint, or basil lend an aromatic touch. If fresh herbs aren’t available, dried herbs work too—just use less!
Step-by-Step Instructions
Step 1: Prepare the Watermelon Radish
Start by rinsing the watermelon radish under cold water to remove any dirt. Pat it dry with a clean kitchen towel. Next, slice it in half vertically—this gives you two halves to work with. Now you can use a sharp knife or a mandoline to cut it into thin rounds or half-moons, depending on your preference. Remember to always watch your fingers when slicing!
Chef Hack: If you want to switch things up, try grating the radish for an interesting texture that works perfectly in salads or as a topping!
Step 2: Assemble the Oil and Seasoning
In a small bowl, whisk together a couple of tablespoons of olive oil, a generous pinch of salt, a few grinds of black pepper, and the juice of half a lemon. This simple vinaigrette will bring all your flavors together.
Tip: To bring out more flavor, let the dressing sit for 5 to 10 minutes—but don’t worry if you’re short on time; it’ll still taste great!
Step 3: Toss and Serve
In a mixing bowl, combine your sliced watermelon radish with the dressing. Toss gently to ensure each slice is coated, but be careful not to mash them! Let them marinate for about 15 minutes—this allows the flavors to really soak in.
Pro Tip: If you’re meal prepping, this salad stores well. Just keep the dressing separate until you’re ready to serve to keep the radish crisp!
Step 4: Add Fresh Herbs
Once the radish has marinated, feel free to toss in your fresh herbs at this stage. Gently fold them into the salad, so they don’t get too bruised.
Step 5: Plate It Up
Find a lovely platter or bowl to serve your radish salad. Add a sprinkling of extra herbs on top for that restaurant-style presentation!
Serving Suggestions
This watermelon radish salad is delightful on its own or served alongside grilled chicken, fish, or a hearty grain like quinoa. I love piling it high atop a bed of arugula or mixing it into tacos for a refreshing crunch. Get creative—you’ll impress your friends and family with this eye-catching dish!
Recipe Variations
-
Pickled Watermelon Radish: Slice the radish and pickle it in a mixture of equal parts vinegar and sugar. Let it sit in the fridge for a few hours, and voilà! A tangy treat perfect for topping sandwiches or tacos.
-
Watermelon Radish Slaw: Combine grated watermelon radish with shredded cabbage, carrots, and a sesame dressing for a crunchy slaw that’s great for barbecues or meal prep.
-
Spicy Twist: Add chili flakes or minced jalapeño to your dressing for a spicy kick that brings heat to the refreshing radish flavor.
-
Creamy Avocado Dressing: Blend avocado with lemon juice, olive oil, and a splash of water for a creamy dressing that pairs beautifully with the crunch of the radish.
Chef’s Notes
When I first began experimenting with watermelon radishes, I found that they added incredible variety to everyday meals. They’ve transformed from a garnish on my dishes to a central star in my salads and appetizers. If you’ve never tried them before, now is the perfect time! I promise they will brighten up your plate and elevate your kitchen endeavors. After all, cooking should be fun and joyful—just like eating!
FAQs and Troubleshooting
Q: Can I eat watermelon radish raw?
Absolutely! Watermelon radishes are crunchy and delicious raw. They make terrific additions to salads or veggie platters.
Q: How long do watermelon radishes last?
Stored in the fridge, watermelon radishes can last up to two weeks. Keep them in a paper towel and inside a plastic bag to keep them fresh.
Q: What if I don’t like the taste of radishes?
If you find the flavor a bit too strong for your palate, try roasting them! Cooking can mellow the flavor significantly while enhancing their natural sweetness.
Q: Where can I buy watermelon radishes?
They can be found at farmers’ markets, health food stores, and some supermarkets. Their peak season is from late winter through early spring.
Nutritional Info
Watermelon radishes are not just a pretty face—they’re packed with nutrients! They’re low in calories yet rich in vitamins C, B6, and potassium. Plus, they contain antioxidants that contribute to overall health, making them a nourishing addition to your plates.
So, there you have it! With everything you need to know about watermelon radishes, I hope you’re inspired to bring this fabulous veggie into your kitchen. Together, let’s create meals that are not only healthy but full of joy and flavor. Happy cooking!
PrintWatermelon Radish Salad
A refreshing salad featuring watermelon radishes, drizzled with a simple lemon vinaigrette.
- Prep Time: 15 minutes
- Cook Time: 0 minutes
- Total Time: 15 minutes
- Yield: 4 servings 1x
- Category: Salad
- Method: No-Cook
- Cuisine: American
- Diet: Vegetarian
Ingredients
- 1 Watermelon Radish
- 2 tablespoons Olive Oil
- Salt to taste
- Freshly cracked Black Pepper to taste
- Juice of 1/2 Lemon
- Fresh Herbs (optional)
Instructions
- Prepare the Watermelon Radish: Rinse it under cold water, pat dry, slice in half and cut into thin rounds.
- Assemble the Oil and Seasoning: Whisk olive oil, salt, pepper, and lemon juice in a bowl.
- Toss and Serve: Combine sliced radish with dressing, let marinate for 15 minutes.
- Add Fresh Herbs: Fold herbs into the salad gently.
- Plate It Up: Serve in a platter, adding extra herbs for garnish.
Notes
This salad pairs well with grilled chicken or fish, and can be mixed into tacos for a refreshing crunch!
Nutrition
- Serving Size: 1 serving
- Calories: 120
- Sugar: 2g
- Sodium: 100mg
- Fat: 10g
- Saturated Fat: 1g
- Unsaturated Fat: 9g
- Trans Fat: 0g
- Carbohydrates: 8g
- Fiber: 2g
- Protein: 1g
- Cholesterol: 0mg
Keywords: watermelon radish, salad, healthy, vegetarian, refreshing
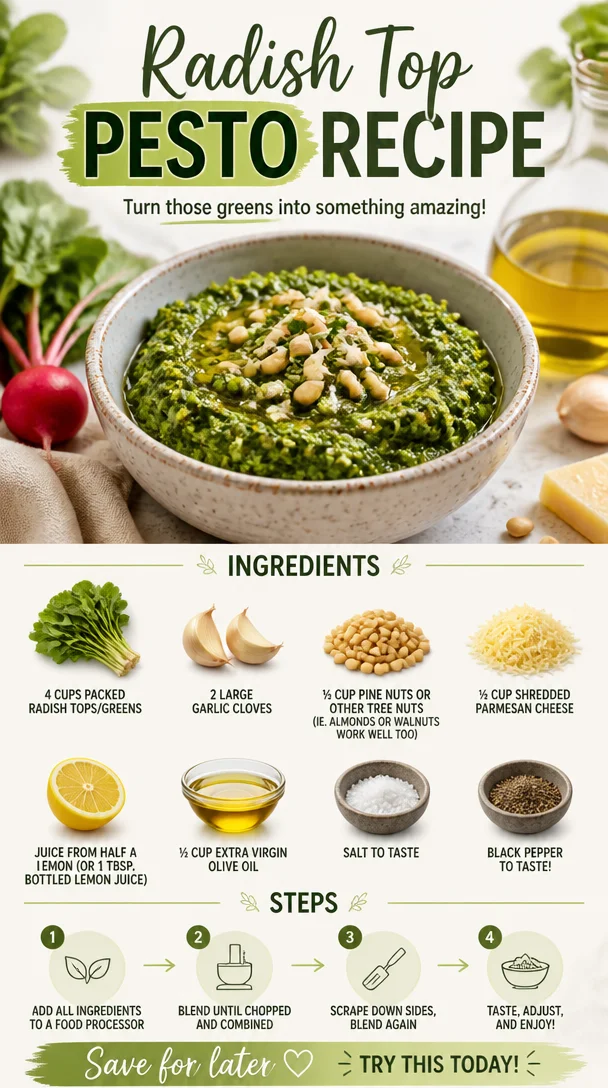
Radish Top Pesto Recipe
Radish Top Pesto: A Delicious Way to Use Every Bit of Your Produce
Welcome back to Clean Plate Cravings! If you’re like me, you’ve probably stared into the fridge at the end of the week, looking at a bunch of wilting radish tops, unsure of what to do with them. I mean, they look so vibrant and green, but let’s be real—what’s the point of keeping them if they just end up in the compost? Well, my friends, I’m here to change that! Today, we’re diving into the world of Radish Top Pesto—an easy, flavorful, and sustainable way to use those greens while bringing a burst of freshness to your meals.
In a world where we’re trying to waste less and celebrate more of what the garden (or farmers’ market) gives us, this recipe checks all the boxes. It’s packed with flavor, incredibly easy to whip up, and will make your pasta, bread, or even roasted veggies sing. Trust me, once you taste this delight, you’ll find yourself planting radishes just to have more tops to use!
The beauty of Radish Top Pesto lies in its versatility. You can spread it on crostini for an appetizer, mix it into pasta for a midweek dinner, or simply use it as a dip for fresh veggies. And let’s not forget how quick it is to make—just a few whirs of your food processor, and voilà! You have a homemade sauce that brings tantalizing flavor to any dish.
So, grab your food processor, and let’s explore the delightful world of Radish Top Pesto together. Get ready for a recipe that not only tastes fantastic but also champions the art of zero-waste cooking!
A Trip Down Memory Lane: My First Kitchen Adventure with Pesto
Growing up, the kitchen was the heart of our home. My mom had a special place for herbs and greens, and she would always have a little pot of basil growing on the windowsill. One summer, I was determined to help her make homemade pesto. I remember the sunny afternoon when we harvested the basil, filling our house with a fragrant aroma. That day was magical—I got to taste the vibrant green paste before it even hit the pasta!
Fast forward to later years, there I was, reminiscing about those kitchen adventures as I watched a local chef whip up a batch of radish top pesto during a cooking demo. It struck me—those greens, often discarded, could be transformed into something just as delicious as the basil we cherished in our kitchen. That cheerful moment inspired me to embrace every bit of what we grow and cook with. And here we are, putting that amazing memory into action!
Ingredients You’ll Need
Here’s what you’ll need to whip up this fresh Radish Top Pesto. Don’t fret—you might have most of these ingredients hanging out in your pantry right now!
-
4 cups packed radish tops/greens
- Use the bright green tops of your radishes; these are full of nutrition and flavor. If you can’t find radish greens, baby spinach or arugula can be good substitutes.
-
2 large garlic cloves
- Fresh garlic brings a punchy flavor to your pesto. If you’re not a fan of raw garlic, roasted garlic would add a sweeter, milder note.
-
½ cup pine nuts or other tree nuts (like almonds or walnuts)
- Pine nuts are classic in pesto, but feel free to use whatever nuts you have on hand. Toasting them lightly can enhance their nuttiness!
-
½ cup shredded Parmesan cheese
- Parmesan adds a savory, salty depth. For a dairy-free version, try nutritional yeast instead—it will still provide that cheesy flavor!
-
Juice from half a lemon (or 1 Tbsp. bottled lemon juice)
- Lemon juice brightens up the pesto and adds a refreshing zing. If you like it tangy, throw in a little more!
-
½ cup extra virgin olive oil
- Quality is key here! A good olive oil will elevate your pesto. If you’re looking for something different, try avocado oil for a creamy twist.
-
Salt and black pepper to taste
- Adjust these to suit your palate. Always taste as you go!
Step-by-Step Instructions
Now, let’s get to the fun part—making the Radish Top Pesto! Don’t worry; I’ll hold your hand every step of the way.
-
Prep Your Greens
Start by rinsing your radish tops thoroughly. These lovely greens can hide dirt and grit, so give them a good wash under cold water. Once clean, shake off excess water and roughly chop them. No need to be perfect; we’re blending everything in the end! -
Tackle the Garlic
Peel your garlic cloves—feel free to smash them lightly with the flat side of a knife to release some flavor. Add them to your food processor’s bowl, and pulse a few times to chop them finely. -
Nuts About Nuts
Toss in the pine nuts (or whatever nuts you’re using) with the garlic. This will help them break down and infuse that nutty flavor into the pesto base. Give the mix a few pulses until it’s slightly crumbly and well-combined. -
Say Hello to the Greens
Time to add those radish tops! Toss them into the processor and pulse until they’re finely chopped. The vibrant green color will start to pop, filling your kitchen with a wonderful aroma. -
Cheesy Goodness
Sprinkle in the shredded Parmesan cheese next. This adds savory richness. Pulse a few more times until everything is mixed nicely. -
The Dressing Touch
Now, with the food processor running, slowly drizzle in the olive oil. This helps your pesto get that lovely creamy texture. You’ll want it to be a sauce-like consistency, so add more olive oil if needed (there’s no such thing as too much olive oil, right?). -
Season It Up
Finish off by squeezing in the lemon juice and adding salt and pepper to taste. Give it one last spin to combine everything thoroughly. -
Taste Test
This is my favorite part! Scoop a little onto a spoon—taste, and adjust the flavors as needed. Want more salt? Go for it! A little more lemon? Absolutely! Make it yours.
Serving Suggestions
Now that your Radish Top Pesto is ready to rock, let’s talk about how to serve it. It’s super versatile!
- Pasta: Toss it with freshly cooked pasta. The warm noodles will soak up that deliciousness!
- Spread: Slather it on toasted bread or crostini for a fantastic appetizer.
- Drizzle: Use it as a dressing over roasted veggies, grilled chicken, or even a simple salad.
- Dip: Serve it as a dip with crunchy vegetables like carrots and cucumbers.
Recipe Variations
Want to mix things up a bit? Here are some fun variations to try with your pesto:
- Herby Twist: Add in some fresh herbs like basil or cilantro for a different flavor profile.
- Nut-Free Pesto: Use pumpkin seeds in place of nuts for a nut-free version that’s still delicious!
- Spicy Kick: Toss in a jalapeño or a pinch of red pepper flakes for an extra touch of spice.
- Cheesy Options: Mix in a different cheese like feta or goat cheese for a creamier texture and unique flavor.
Chef’s Notes
As chefs, we all have our funny kitchen stories, right? One time, I decided to make a big batch of pesto for a gathering. In my excitement, I grabbed what I thought were radish tops but were actually beet greens! While I was nervous at first, I decided to press on and blend it anyway. You know what? It was a hit! Just goes to show that cooking is all about experimenting and having fun.
Over time, I’ve played around with this recipe—a little extra garlic here, a sprinkle of herbs there—each time finding something new and exciting. I love that this pesto tells a story of creativity and sustainability, reminding us to use every delicious part of our ingredients.
FAQs and Troubleshooting
-
Can I freeze radish top pesto?
Absolutely! Just pour it into an ice cube tray, freeze, and transfer the cubes to an airtight bag. This way, you have quick, ready-to-use pasta sauce whenever you need it! -
What if my pesto is too thick?
No worries! Just drizzle in a bit more olive oil until you achieve your desired consistency. You can also add a splash of water! -
Can I make this vegan?
Yes, simply replace the Parmesan with nutritional yeast for that cheesy flavor without the dairy! -
What can I do with leftover radish tops?
Toss them into soups, salads, or sauté them with garlic and olive oil; they’re deliciously versatile and packed with nutrients!
Nutritional Info
While I won’t get lost in numbers, I can tell you that this Radish Top Pesto is low in carbs, high in vitamins, and a great source of healthy fats. Plus, thanks to the garlic and olive oil, it has heart-healthy benefits too!
There you have it! A delightful recipe to make sure every part of your radishes gets the love it deserves. When you embrace the radish top in such a tasty way, you truly help reduce food waste and enjoy a fantastic meal along the way. I can’t wait for you to try this Radish Top Pesto! Remember, keep it fresh, simple, and delicious. Happy cooking!
PrintRadish Top Pesto
A sustainable and flavorful pesto made from radish tops, perfect for pasta, bread, or as a dip for veggies.
- Prep Time: 10 minutes
- Cook Time: 5 minutes
- Total Time: 15 minutes
- Yield: 4 servings 1x
- Category: Condiment
- Method: Blending
- Cuisine: Italian
- Diet: Vegetarian
Ingredients
- 4 cups packed radish tops/greens
- 2 large garlic cloves
- ½ cup pine nuts or other tree nuts (like almonds or walnuts)
- ½ cup shredded Parmesan cheese
- Juice from half a lemon (or 1 Tbsp. bottled lemon juice)
- ½ cup extra virgin olive oil
- Salt and black pepper to taste
Instructions
- Prep your greens by rinsing radish tops thoroughly and roughly chopping them.
- Tackle the garlic by peeling it and lightly smashing before adding to the food processor.
- Toss in the pine nuts with the garlic in the processor and pulse until crumbly.
- Say hello to the greens by adding them to the processor and pulsing until finely chopped.
- Sprinkle in the shredded Parmesan cheese and pulse until mixed.
- Now, drizzle in olive oil while the processor runs until you achieve a creamy texture.
- Finish off by squeezing in lemon juice and adding salt and pepper to taste.
- Taste test and adjust flavors as needed.
Notes
This pesto can easily be frozen in ice cube trays for quick use in the future.
Nutrition
- Serving Size: 1 serving
- Calories: 280
- Sugar: 1g
- Sodium: 200mg
- Fat: 24g
- Saturated Fat: 4g
- Unsaturated Fat: 20g
- Trans Fat: 0g
- Carbohydrates: 8g
- Fiber: 2g
- Protein: 6g
- Cholesterol: 10mg
Keywords: pesto, radish tops, green sauce, sustainable cooking, zero waste
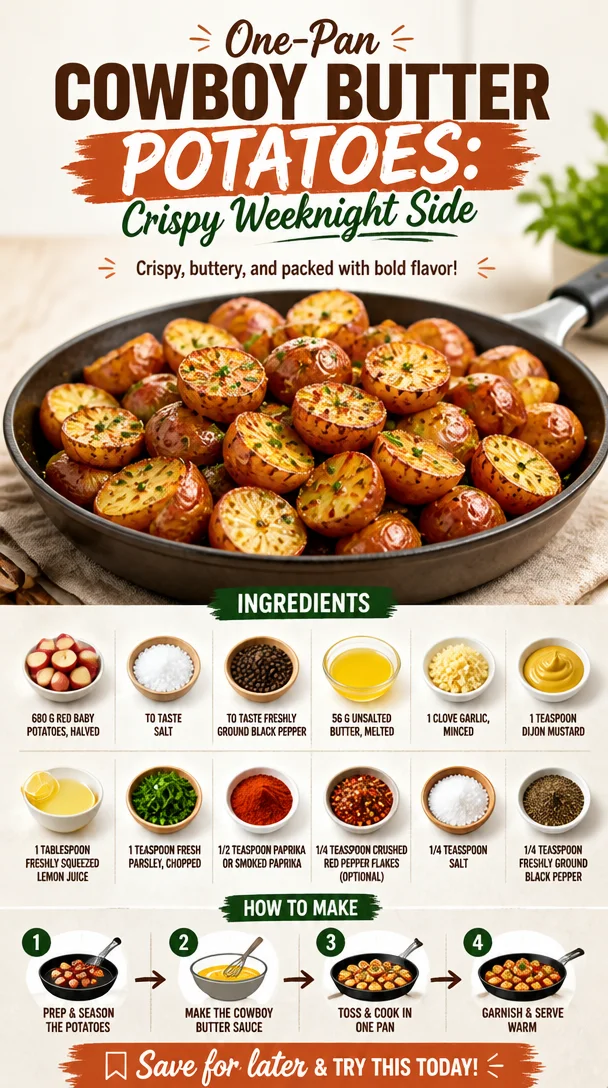
One-Pan Cowboy Butter Potatoes: Crispy Weeknight Side
Cowboy Butter Potatoes: A Deliciously Simple Dish
Hello, fellow food lovers! Today, I’m thrilled to share a recipe that reminds me of laid-back evenings, cowboy tales, and that warm feeling you get when you dig into a bowl of buttery goodness. Introducing Cowboy Butter Potatoes—a delightful dish that’s as vibrant as a sunset over the prairie and as comforting as a warm hug from an old friend.
When I first discovered these little red gems, I was astounded by how such simple ingredients could create something truly spectacular. I mean, who doesn’t love baby potatoes slathered in a garlicky, buttery sauce? The combination of flavors takes your tastebuds for a ride, creating a meal that’s not just filling but downright exhilarating.
Whether you’re hosting a backyard barbeque, enjoying a cozy family dinner, or simply looking to elevate your weeknight meal, Cowboy Butter Potatoes will steal the show every time. Let’s roll up our sleeves and get cooking!
A Taste of Nostalgia
Let me take you back for a moment. I remember vividly the first time I tried Cowboy Butter Potatoes at a rustic lodge during a family getaway when I was a kid. We were surrounded by the majestic mountains, with an open fire crackling nearby, and the tantalizing aroma of home-cooked meals wafting through the air.
After a day of hiking and exploring, we all gathered around a long wooden table, and that’s when I spotted the Cowboy Butter Potatoes. They were glistening, each bite-sized piece promising a burst of flavor. I couldn’t resist! One bite led to another, and soon I found myself going back for seconds, completely captivated by the combination of rich butter mingled with hints of garlic and spice.
That moment was more than just about the food; it was about connection, warmth, and the spirit of gathering around a table. Now, every time I make these potatoes, I’m transported back to that cozy lodge, surrounded by family, laughter, and love. This dish carries that spirit with it, and it’s now one of my go-to sides for any occasion. Let’s make your tastebuds dance with joy!
Ingredients
Gather up the following ingredients to create your own Cowboy Butter Potatoes:
-
680 g red baby potatoes, perfectly halved
These beautifully colored potatoes are not only cute but packed with flavor. Their thin skins mean you don’t have to peel them. If you can’t find red baby potatoes, you can use yellow or even Yukon Gold potatoes for a similar result. -
Salt, to taste
This is a flavor enhancer! Don’t be shy; great dishes always have the right amount of seasoning. Try sea salt or kosher salt for a different texture and taste. -
Freshly ground black pepper, to taste
You’ll want to use freshly ground for the best flavor kick! If you’re in a pinch, pre-ground pepper works but may lack the same intensity. -
56 g unsalted butter, melted
Oh, the richness! Unsalted butter allows you to control the saltiness of the dish. You can also substitute with ghee or olive oil for a twist. -
1 clove garlic, minced
Fresh garlic truly elevates this dish. If you don’t have fresh, 1/4 teaspoon of garlic powder will do the trick. -
1 teaspoon Dijon mustard
This adds a subtle tang that brightens every bite. If you prefer a milder taste, you can swap it for yellow mustard. -
1 tablespoon freshly squeezed lemon juice
The acidity from lemon juice balances the richness of the butter beautifully. Lime juice is a nice alternative if you want to mix it up! -
1 teaspoon fresh parsley, chopped
Fresh herbs bring a pop of color and flavor. If you’re short on time or fresh ingredients, use 1 teaspoon of dried parsley. -
1/2 teaspoon paprika or smoked paprika
This introduces warmth and depth of flavor. If you prefer a smokier taste, definitely opt for the smoked variety. -
1/4 teaspoon crushed red pepper flakes (optional)
Add this for a spicy kick! If you want to keep it mild, feel free to omit it. -
1/4 teaspoon salt
Just a touch more to bring it all together. -
1/4 teaspoon freshly ground black pepper
Just like the salt, this helps round out the flavor profile.
Step-by-Step Instructions
Now that you’ve gathered your ingredients, let’s dive right into the cooking process. Follow these easy steps:
-
Prep the Potatoes:
Start by washing those adorable red baby potatoes. You want them clean and ready to shine. Once they’re washed, carefully halve each potato so we can ensure they soak up that delicious Cowboy butter goodness. -
Boil the Potatoes:
Place the halved potatoes in a large pot, fill it with cold water (enough to cover them by about an inch), and add a generous pinch of salt. Bring the pot to a boil over medium-high heat. Once boiling, reduce to a simmer and cook for about 15-20 minutes, or until fork-tender. You want them soft but not falling apart.Chef’s tip: To check if they’re done, simply poke one with a fork—the fork should easily slide in without resistance!
-
Drain and Dry:
Once the potatoes are perfectly tender, drain them in a colander. Let them sit for a few minutes to dry out a bit—this will help caramelize the cut sides when you pan-sear them later. -
Make the Cowboy Butter Sauce:
In a medium bowl, mix together the melted butter, minced garlic, Dijon mustard, lemon juice, chopped parsley, paprika, crushed red pepper flakes, salt, and black pepper. Stir well to ensure the flavors meld together beautifully.Quick note: Don’t be afraid to taste and adjust! The best part of cooking is personalizing it to your liking.
-
Sear the Potatoes:
Heat a large skillet over medium heat, and add a splash of oil (olive or avocado work great). Once hot, carefully place the drained potatoes cut-side down onto the skillet. Give them a good sear for about 3-4 minutes until browned.Little Chef Hack: If you want extra crispiness, don’t overcrowd the skillet. Leave some space between the potatoes so they can brown nicely!
-
Coat the Potatoes:
Once they’re golden and delicious, turn the potatoes over and pour the Cowboy butter sauce over the top. Cook for another 2-3 minutes, allowing the potatoes to soak up all that flavor. -
Final Flavors:
Give everything a gentle toss to coat each potato in the buttery sauce, making sure that garlicky goodness gets everywhere. Cook for just another minute to make sure everything is heated through. -
Plate Up:
Transfer the Cowboy Butter Potatoes to a serving dish and drizzle any remaining sauce over top.
And there you have it! Cowboy Butter Potatoes, ready for everyone to dive in.
Serving Suggestions
These Cowboy Butter Potatoes are a stunning addition to any meal. Serve them warm, garnished with a sprinkle of extra parsley for a pop of color. They pair beautifully with grilled meats, roasted vegetables, or even just a fresh salad on the side. And trust me, everyone will be coming back for seconds!
Recipe Variations
Looking to shake things up a bit? Here are a few fun twists you might consider:
-
Herb-Infused Option:
Swap the parsley for fresh rosemary or thyme for a fragrant variation. -
Cheesy Delight:
Add a sprinkle of grated parmesan or crumbled feta on top just before serving for a creamy finish. -
Maple Glaze:
Replace half of the butter with maple syrup for a sweet-and-savory twist. It’s surprisingly delightful! -
Spicy Chipotle:
Use chipotle in adobo sauce instead of garlic for a smoky, spicy kick. -
Vegan Version:
Substitute the butter with vegan margarine or coconut oil and use a spoonful of nutritional yeast for that cheesy flavor.
Chef’s Notes
As much as I adore this recipe in its classic form, I’ve had my fair share of kitchen experiments with it over the years! There was that one epic barbecue where I thought I’d throw in some bacon bits for extra indulgence; let’s just say, that was a hit and a half.
I’ve even swapped out the Dijon mustard for whole grain mustard on a whim, and it added this delightful texture and flavor that I can’t stop thinking about. Cooking is all about exploration, so feel free to make it your own!
FAQs and Troubleshooting
Q1: My potatoes turned mushy; what did I do wrong?
A: Over-boiling can lead to mushy potatoes. Aim for fork-tender, and remember, you want them soft, not falling apart!
Q2: Can I use other types of potatoes?
A: Absolutely! Yukon golds, fingerlings, or even small russets will work. Just keep an eye on the cooking time as sizes may vary.
Q3: The sauce seemed too oily; how can I fix it?
A: If the butter sauce feels a bit heavy, consider using less butter next time, or be sure to balance it with more lemon juice and spices for brightness.
Q4: Can I prepare this ahead of time?
A: Totally! You can boil the potatoes a day in advance and toss them in the refrigerator. When you’re ready, just give them a quick sear and coat with the sauce.
Nutritional Info
Here’s a quick nutritional breakdown per serving (based on 6 servings):
- Calories: 180
- Fat: 8g
- Carbohydrates: 26g
- Protein: 3g
- Fiber: 2g
Now you’re armed with everything you need to whip up these Cowboy Butter Potatoes. Trust me, they’ll be a hit at your table just like they were at that cozy lodge all those years ago. Happy cooking, friends!
PrintCowboy Butter Potatoes

A deliciously simple dish of red baby potatoes slathered in a garlicky, buttery sauce, perfect for any gathering.
- Prep Time: 15 minutes
- Cook Time: 30 minutes
- Total Time: 45 minutes
- Yield: 6 servings 1x
- Category: Side Dish
- Method: Boiling and Searing
- Cuisine: American
- Diet: Vegetarian
Ingredients
- 680 g red baby potatoes, halved
- Salt, to taste
- Freshly ground black pepper, to taste
- 56 g unsalted butter, melted
- 1 clove garlic, minced
- 1 teaspoon Dijon mustard
- 1 tablespoon freshly squeezed lemon juice
- 1 teaspoon fresh parsley, chopped
- 1/2 teaspoon paprika or smoked paprika
- 1/4 teaspoon crushed red pepper flakes (optional)
- 1/4 teaspoon salt
- 1/4 teaspoon freshly ground black pepper
Instructions
- Prep the potatoes: Start by washing the red baby potatoes and halving each one.
- Boil the potatoes: Place the halved potatoes in a pot, cover with cold water, add salt, and bring to a boil. Simmer until fork-tender.
- Drain and dry: Drain the potatoes in a colander and let them sit for a few minutes.
- Make the Cowboy Butter sauce: In a bowl, mix melted butter, garlic, mustard, lemon juice, parsley, paprika, red pepper flakes, salt, and pepper.
- Sear the potatoes: Heat a skillet, add oil, and sear the cut-side of the potatoes until browned.
- Coat the potatoes: Turn the potatoes and pour the Cowboy butter sauce over them. Cook for another few minutes.
- Final flavors: Toss the potatoes to coat in the sauce and heat through.
- Plate up: Transfer the potatoes to a serving dish and drizzle with remaining sauce.
Notes
These potatoes can be served warm with a sprinkle of parsley and pair beautifully with grilled meats or salad.
Nutrition
- Serving Size: 1 serving
- Calories: 180
- Sugar: 1g
- Sodium: 500mg
- Fat: 8g
- Saturated Fat: 5g
- Unsaturated Fat: 3g
- Trans Fat: 0g
- Carbohydrates: 26g
- Fiber: 2g
- Protein: 3g
- Cholesterol: 15mg
Keywords: Cowboy Butter Potatoes, side dish, potatoes, buttery sauce, easy recipe
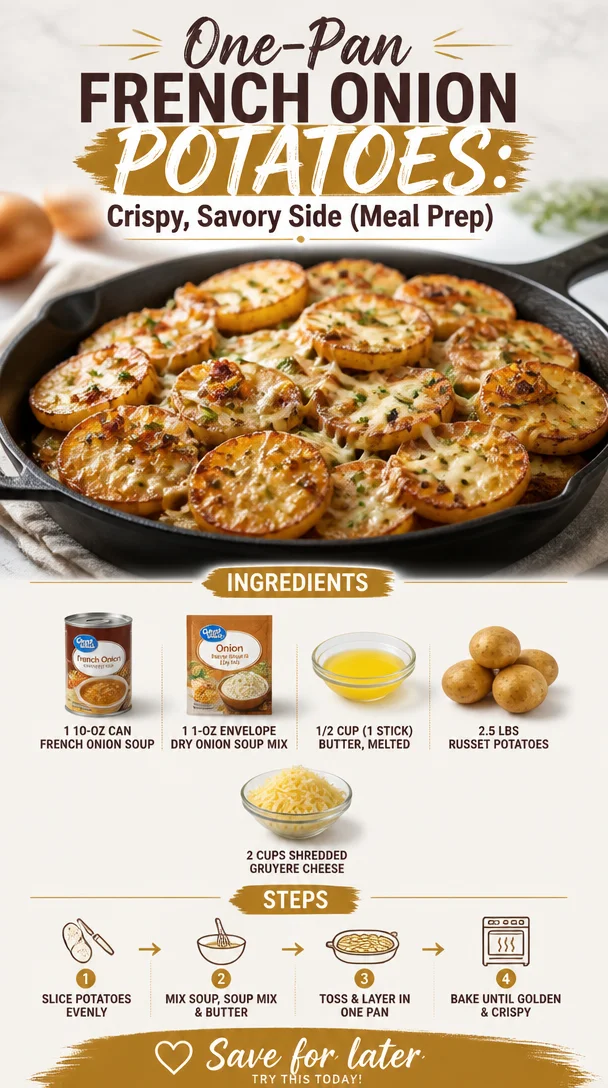
One-Pan French Onion Potatoes: Crispy, Savory Side (Meal Prep)
Indulge in Comfort: Cheesy French Onion Potatoes Recipe
Welcome to the savory world of French Onion Potatoes—a dish that feels like a warm hug on a chilly evening. If you’re a fan of rich flavors and comforting textures, then you’re in for a mouthwatering experience! I’m Ava Carter, and today we’re diving into a recipe that will not only tantalize your taste buds but also fill your home with an irresistible aroma. Who can resist the symphony of sweet onions, melted cheese, and tender potatoes?
French Onion Potatoes are a delightful fusion of two classic favorites: creamy potatoes and the robust taste of French onion soup. This dish embodies everything I believe in about food: it should be real, satisfying, and made with love. I can already picture the smiles on everyone’s faces when they take the first bite. So, whether you’re gearing up for a cozy family dinner or prepping for a potluck, these cheesy delights are sure to steal the spotlight.
Let’s embark on this culinary journey together. Grab your apron and chef’s hat (even if it’s just for fun!), and let’s get cooking. This recipe doesn’t require any fancy equipment—just your trusty oven, a few ingredients, and a whole lot of love.
A Trip Down Memory Lane
Thinking about French onion potatoes takes me back to my childhood kitchen, where my little hands would be involved in every cooking adventure my mother embarked on. She had a special love for hearty dishes, especially ones that made the house smell amazing. One snowy evening, we decided to make something special—a recipe she had come across that transformed simple potatoes into a cheesy, savory masterpiece.
As we peeled and chopped the russet potatoes together, she told me stories of her own childhood, sharing tales filled with laughter and love. By the time we pulled the bubbling tray of French onion potatoes out of the oven, the air was thick with anticipation. The moment we served it, the cheese was perfectly golden, and the aroma wafted through the house, drawing everyone to the table.
Those moments were more than just meal prep; they were memories, laughter, and the magic that food can create. Now, every time I make this dish, I’m reminded of the warmth of family and the joy of sharing good food. Let’s dive into making your own batch of nostalgia!
Ingredients
Here’s what you’ll need for these scrumptious French Onion Potatoes:
-
10-oz can French onion soup: This hearty base delivers the classic flavors we love without needing to simmer onions for hours. If you’re looking for a vegetarian option, some brands offer veggie-based French onion soups!
-
1-oz envelope dry onion soup mix: This little packet is packed with flavor magic! You can also make your own version at home by blending onion powder, garlic powder, and dried herbs.
-
1/2 cup (1 stick) butter, melted: Butter brings richness and depth to this dish. For a lighter option, you can substitute with olive oil or a plant-based butter.
-
2.5 lbs russet potatoes: These starchy gems are perfect for baking due to their high starch content. If you’d like a different texture, you can use Yukon gold potatoes, which are creamier.
-
2 cups shredded gruyere cheese: The star player! Gruyere offers a nutty, rich flavor that complements the dish beautifully. If you’re feeling adventurous, feel free to mix in some mozzarella or sharp cheddar for an extra cheesy experience.
Step-by-Step Instructions
Ready to get your kitchen filled with delicious smells? Here’s how to create your French Onion Potatoes!
-
Preheat Your Oven: Start by preheating your oven to 375°F (190°C). This ensures that your potatoes will bubble and brown beautifully when they meet the heat.
-
Prepare Your Potatoes: Take those russet potatoes and give them a good scrub under cold water. There’s no need to peel—leave the skins on for extra nutrition and texture! Cut each potato into thin slices, about 1/4 inch thick. The more uniform the slices, the better they’ll cook together. Pro tip: If you have a mandoline slicer, now’s the time to use it!
-
Melt the Butter: In a small pot or microwave-safe bowl, melt the butter until bubbling. This step brings out the wonderful flavor of butter while ensuring your potatoes don’t stick together.
-
Mix the Soups and Spices: In a large bowl, combine the can of French onion soup and the dry onion soup mix. Stir in the melted butter, ensuring it’s well incorporated. This mixture is the heart of the dish, giving it that signature flavor punch.
-
Layer the Potatoes: Grab a 9×13 inch baking dish and start layering those potato slices. Begin by placing a third of the potatoes at the bottom, followed by a layer of the soup mixture, and then a sprinkle of gruyere cheese. Repeat this process two more times, finishing with a generous layer of cheese on top.
-
Bake, Bake, Bake: Cover your dish with aluminum foil, making sure it’s tightly sealed. Pop it in the oven and let it bake for 30 minutes. This allows the potatoes to cook through. After 30 minutes, remove the foil and bake for an additional 15-20 minutes until the top is golden and bubbling.
-
Check for Doneness: The potatoes should be tender when pierced with a fork. If they need a little more time, don’t hesitate to pop them back in for a few more minutes.
-
Serve and Enjoy: Let the dish sit for a few minutes to settle, then scoop out a portion and get ready to savor those creamy, cheesy bites. The aroma alone will have everyone flocking to the dining table!
Serving Suggestions
Plate this dish with a simple green salad or some roasted veggies on the side to balance out the richness of the potatoes. A light drizzle of olive oil and a sprinkle of fresh herbs can elevate the presentation. Don’t shy away from adding a dollop of sour cream or a sprinkle of chives on top for a gourmet touch!
Recipe Variations
Feel free to customize your French Onion Potatoes to suit your taste or dietary preferences:
-
Add Protein: Layer in some cooked crumbled bacon or shredded chicken for a heartier option.
-
Veggie Boost: Mix in some sautéed mushrooms or spinach to add colorful veggies to the mix.
-
Spice It Up: For some kick, toss in a pinch of red pepper flakes or a touch of smoked paprika for smoky flavor.
-
Dairy-Free: Swap the butter for olive oil and use a dairy-free cheese blend to make this dish suitable for lactose intolerant friends.
-
Gluten-Free: Ensure your onion soup mix is gluten-free (there are plenty of options on the market!), and you’re good to go!
Chef’s Notes
Over the years, I’ve had a blast experimenting with this recipe. What started as a nostalgic winter dish has transformed into a crowd-pleaser for every season. I remember a summer potluck where I presented this dish with a twist—I used smoked Gouda instead of gruyere, and let me tell you, it was a hit! It’s a great reminder that cooking is all about being adventurous and making it your own.
FAQs and Troubleshooting
Q: Can I make this dish ahead of time?
A: Yes! You can prepare it a day in advance, cover it tightly with foil, and refrigerate. Just add a few extra minutes to the baking time when you’re ready to cook it.
Q: What should I do if my potatoes are still hard after cooking?
A: If your potatoes aren’t tender after the initial 30 minutes, cover them with the foil and check them every 5 minutes until they’re soft. The baking time can vary depending on how thickly you sliced them.
Q: Can I freeze leftovers?
A: Absolutely! Just be sure to let the dish cool completely before transferring it to an airtight container. It’ll keep in the freezer for up to three months—when you’re ready, thaw it overnight in the fridge and reheat!
Q: How can I make this dish spicier?
A: Feel free to toss in some diced jalapeños or a sprinkle of cayenne pepper to infuse some heat!
Nutritional Info
While I believe in enjoying food that fuels and delights, let’s not forget the importance of balance. Each serving of French Onion Potatoes is rich, comforting, and can easily be lightened up with serving sizes or side choices.
And there you have it, friends! Your journey to mastering Cheesy French Onion Potatoes starts now. I encourage you to gather your loved ones around the table and enjoy this dish, making memories as rich and flavorful as the food itself. Happy cooking!
PrintCheesy French Onion Potatoes

A comforting dish that combines the rich flavors of French onion soup with creamy, cheesy potatoes.
- Prep Time: 15 minutes
- Cook Time: 45 minutes
- Total Time: 60 minutes
- Yield: 4 servings 1x
- Category: Main Course
- Method: Baking
- Cuisine: French
- Diet: Vegetarian
Ingredients
- 1 (10-oz) can French onion soup
- 1 (1-oz) envelope dry onion soup mix
- 1/2 cup (1 stick) butter, melted
- 2.5 lbs russet potatoes, sliced
- 2 cups shredded gruyere cheese
Instructions
- Preheat your oven to 375°F (190°C).
- Prepare the russet potatoes by scrubbing them under cold water and slicing into 1/4 inch thick slices.
- Melt the butter in a pot or microwave until bubbling.
- Mix the French onion soup with the dry onion soup mix and melted butter in a large bowl.
- Layer a third of the potato slices in a baking dish, followed by the soup mixture and a sprinkle of cheese; repeat twice more.
- Bake covered with foil for 30 minutes, then remove foil and bake for an additional 15-20 minutes until golden.
- Check for doneness with a fork.
- Serve and enjoy your cheesy, creamy potatoes!
Notes
Feel free to customize with protein or veggies. For a lighter option, substitute butter with olive oil.
Nutrition
- Serving Size: 1 serving
- Calories: 350
- Sugar: 5g
- Sodium: 400mg
- Fat: 12g
- Saturated Fat: 4g
- Unsaturated Fat: 6g
- Trans Fat: 0g
- Carbohydrates: 45g
- Fiber: 3g
- Protein: 15g
- Cholesterol: 30mg
Keywords: cheesy potatoes, French onion, comfort food, vegetarian recipe
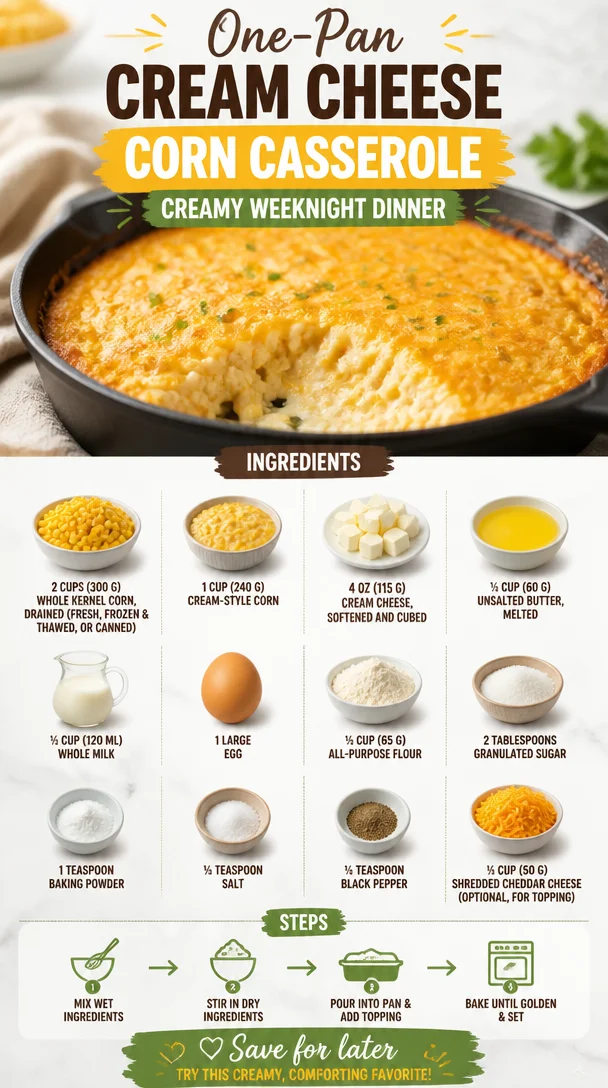
One-Pan Cream Cheese Corn Casserole: Creamy Weeknight Dinner
The Creamy Comfort of Cream Cheese Corn Casserole
Welcome back, food lovers! Today, we’re diving into a dish that holds a special place in my heart—the comforting, creamy, and just plain irresistible Cream Cheese Corn Casserole. If you’ve been looking for a dish that makes you feel cozy while tantalizing your taste buds, you’re in for a treat. This casserole is not just a side dish; it’s a hug in a baking dish, perfect for potlucks, family gatherings, or even a cozy weeknight dinner.
Eating should be an experience that encompasses not just nourishment but joy, and I believe this dish encapsulates that perfectly. The sweet crunch of corn mingled with the lush creaminess of cream cheese creates a delightful combination. Not to mention, it’s easy to make, gives you that warm, fuzzy feeling, and lets you indulge without guilt. So grab your apron and let’s make some kitchen magic!
A Sweet Memory in Every Bite
One of my fondest childhood memories revolves around my Grandma’s kitchen, where every Sunday felt like a festivity dedicated to good food and family. After church, our clan would convene, filling her home with laughter and the heavenly scent of something delicious bubbling in the oven. Amongst her savory roasts and pies, it was the Cream Cheese Corn Casserole that always stole the show.
I remember being just a little girl, peeking into the oven through the glass door, watching the golden top bubble and brown slightly. It would emerge, aromatic and inviting, and we’d all gather around the table, eager to dig in. Each bite tasted like summer sweet corn mixed with love, nostalgia, and a dash of Grandma’s magic. As I grew older, the recipe transformed from a family secret into one of my own cherished creations, evolving while keeping the echoes of those joyful Sundays alive.
Ingredients
Here’s what you’ll need to whip up this delightful Cream Cheese Corn Casserole:
-
2 cups (300 g) whole kernel corn, drained
Fresh, frozen (thawed), or canned works great! Whole kernel corn adds a lovely sweetness and texture. If you’re looking to cut calories, try substituting it with cauliflower rice for a lighter version. -
1 cup (240 g) cream-style corn
This is the superstar for creaminess! If you’re avoiding corn, using pureed potatoes can give a similar creamy consistency. -
4 oz (115 g) cream cheese, softened and cubed
This is key to that lush mouthfeel. For a dairy-free option, try using a plant-based cream cheese alternative. -
¼ cup (60 g) unsalted butter, melted
Butter adds a rich flavor, but olive oil or coconut oil can work well if you’re trying to avoid dairy. -
½ cup (120 ml) whole milk
Adds creaminess! For a non-dairy alternative, almond milk or oat milk does the trick. -
1 large egg
This acts as a binder. If you need an egg substitute, 1/4 cup of unsweetened applesauce works surprisingly well! -
½ cup (65 g) all-purpose flour
Helps give structure and works great as a thickener. If you’re gluten-free, feel free to swap in a gluten-free flour blend. -
2 tablespoons granulated sugar
A little sweetness balances the savory elements. If you’re looking for a healthier option, try using coconut sugar. -
1 teaspoon baking powder
This gives the casserole a little lift and lightness, ensuring it doesn’t get too dense. -
½ teaspoon salt
Essential for elevating flavors. If you’re watching your sodium, you can reduce this if needed. -
¼ teaspoon black pepper
Just enough to bring a hint of warmth! Add more if you like a little extra spice. -
½ cup (50 g) shredded cheddar cheese (optional, for topping)
Adds visual appeal and a delightful flavor boost. You can swap with mozzarella or even go for a dairy-free cheese!
Step-by-Step Instructions
Let’s get started on bringing this culinary delight to life. Here are your step-by-step instructions with a few helpful tips along the way:
-
Preheat the Oven: Set your oven to 350°F (175°C). It’s important to preheat to ensure your casserole cooks evenly.
-
Prepare Your Dish: Grab a baking dish and lightly grease it with spray or a smear of butter. This helps with easy cleanup and keeps the edges from sticking.
-
Mix the Wet Ingredients: In a large mixing bowl, gather the cream cheese, melted butter, whole milk, and the egg. Whisk until smooth. This might take a minute, and it’s okay if you see a few lumps of cream cheese; they will melt into creamy goodness in the oven!
-
Add the Corn: Toss in the whole kernel corn and cream-style corn. Stir gently to combine—this is where the delicious sweet corn flavor really begins to shine through.
-
Combine Dry Ingredients: In another bowl, mix together the flour, sugar, baking powder, salt, and pepper. Whisk to ensure they’re well blended and there are no lumps.
-
Mix Them Together: Gradually add the dry mixture to the wet mixture, stirring until just combined. Be careful not to overmix; a few lumps are totally okay!
-
Cheese, Please: If you’re going for it, fold in half of your shredded cheddar to have it melt through the casserole, then sprinkle the remaining half on top for that beautiful golden crust.
-
Pour and Spread: Carefully pour the mixture into your prepared baking dish. Spread it evenly, but don’t worry too much about making it perfect—rustic is our motto here!
-
Bake Away: Pop your casserole into the preheated oven and let it bake for about 45-55 minutes. You’ll know it’s done when the edges are golden, the top is bubbly, and a toothpick inserted in the center comes out clean.
-
Cool and Serve: Once out of the oven, let it cool for about 10 minutes. This allows it to set a bit and makes serving easier.
Serving Suggestions
To serve, scoop out generous portions onto plates or bowls, adding a sprinkle of fresh herbs like parsley or chives for a pop of color. Pair it with grilled chicken or roasted vegetables for a well-rounded meal. And of course, don’t forget a big salad to balance out the richness of the casserole!
Recipe Variations
Feel like experimenting? Here are a few creative twists you can play with:
-
Spicy Southwest Style: Add diced jalapeños or cooked chorizo to your mixture for a fiery kick.
-
Herbed Delight: Fresh herbs like thyme or rosemary can elevate the flavors and add freshness.
-
Italian Influence: Swap in Italian seasoning and mix in sun-dried tomatoes for an exciting flavor profile!
-
Bacon Lover’s Dream: Crumbled bacon can be added or sprinkled on top for that smoky, savory charm.
-
Veggie Boost: Mix in diced bell peppers or green onions for added texture and nutrition.
Chef’s Notes
I won’t lie; this recipe has seen many evolutions in my kitchen! From using leftover corn on the cob to experimenting with different cheese blends, each batch tells a different story. I once tried it with a packet of ranch seasoning, and let me tell you—it was a game-changer! Cooking is all about finding what works for you and making it your own. So have fun with this, and don’t be afraid to get experimental!
FAQs and Troubleshooting
1. Can I make this ahead of time?
Absolutely! You can prepare the casserole a day in advance and keep it covered in the fridge until you’re ready to bake. Just add an extra 10-15 minutes to your baking time.
2. What can I do if my casserole is too dry?
If you find that the casserole is dry after baking, add a splash of milk before serving; it should bring back some moisture.
3. How do I store leftovers?
Place any leftovers in an airtight container in the fridge, where they will keep for up to 3-4 days. Reheat in the microwave or oven for a quick and easy meal!
4. Why is my casserole not rising?
If your casserole is coming out flat, it may be due to expired baking powder or overmixing the batter. Be sure to check the freshness of your baking powder before using!
Conclusion
There you have it, friends! A deliciously creamy Cream Cheese Corn Casserole that’s sure to impress and delight. I hope you enjoy making this dish as much as I love sharing it with you. It’s more than just a recipe; it’s a warmth-fueled hug from my kitchen to yours. Whether you take it to a potluck or savor it for dinner, I know it will become a beloved staple in your home. So go ahead, dig in, and enjoy the comforting flavors! Happy cooking!
PrintCream Cheese Corn Casserole
A creamy and comforting corn casserole filled with delicious flavors, perfect for potlucks or family dinners.
- Prep Time: 10 minutes
- Cook Time: 55 minutes
- Total Time: 65 minutes
- Yield: 8 servings 1x
- Category: Side Dish
- Method: Baking
- Cuisine: American
- Diet: Vegetarian
Ingredients
- 2 cups (300 g) whole kernel corn, drained
- 1 cup (240 g) cream-style corn
- 4 oz (115 g) cream cheese, softened and cubed
- ¼ cup (60 g) unsalted butter, melted
- ½ cup (120 ml) whole milk
- 1 large egg
- ½ cup (65 g) all-purpose flour
- 2 tablespoons granulated sugar
- 1 teaspoon baking powder
- ½ teaspoon salt
- ¼ teaspoon black pepper
- ½ cup (50 g) shredded cheddar cheese (optional, for topping)
Instructions
- Preheat the Oven: Set your oven to 350°F (175°C).
- Prepare Your Dish: Lightly grease a baking dish.
- Mix the Wet Ingredients: In a large bowl, whisk together cream cheese, melted butter, whole milk, and the egg until smooth.
- Add the Corn: Toss in whole kernel corn and cream-style corn, then stir gently.
- Combine Dry Ingredients: In another bowl, whisk together flour, sugar, baking powder, salt, and pepper.
- Mix Them Together: Gradually add the dry mixture to the wet mixture, stirring until just combined.
- Cheese, Please: Fold in half of the shredded cheddar and sprinkle the remaining half on top.
- Pour and Spread: Carefully pour the mixture into the prepared baking dish.
- Bake Away: Bake for about 45-55 minutes until edges are golden and bubbly.
- Cool and Serve: Let cool for about 10 minutes before serving.
Notes
Serve with fresh herbs and pair with grilled chicken or roasted vegetables for a complete meal.
Nutrition
- Serving Size: 1 serving
- Calories: 350
- Sugar: 5g
- Sodium: 400mg
- Fat: 12g
- Saturated Fat: 6g
- Unsaturated Fat: 6g
- Trans Fat: 0g
- Carbohydrates: 45g
- Fiber: 3g
- Protein: 15g
- Cholesterol: 30mg
Keywords: casserole, corn, comfort food, vegetarian, holiday recipes
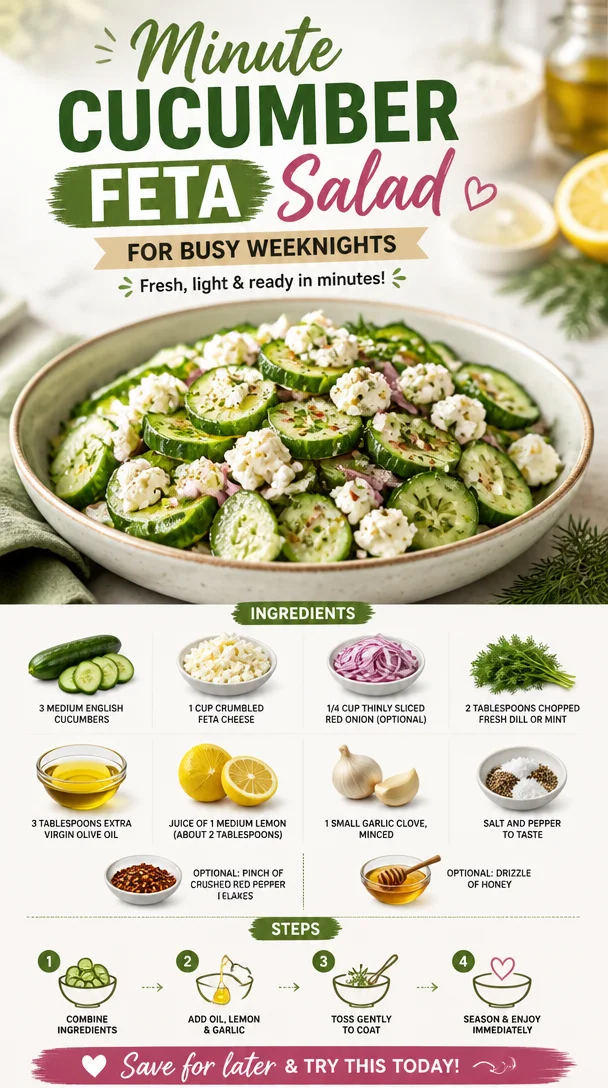
Minute Cucumber Feta Salad for Busy Weeknights
Fresh & Flavorful: Classic Cucumber Feta Salad
Hey there, fellow food lovers! Welcome back to Clean Plate Cravings! If you’re anything like me, you’re always on the lookout for delicious and nutritious meals that can jazz up your kitchen repertoire. Today, we’re going to dive into a vibrant and refreshing dish that brings a burst of summer to your table—Classic Cucumber Feta Salad! This recipe combines the crunchiness of cucumbers with the creamy tang of feta, all brought together with a zesty dressing. Trust me; it’s a match made in heaven!
Introduction
Let’s face it—sometimes, life feels chaotic, and the last thing you want is to stress about what’s for dinner. This Classic Cucumber Feta Salad is not just easy to whip up, but it’s also a gorgeous, feel-good dish that’s perfect for any occasion, whether you’re hosting a summer barbecue or just trying to elevate your weekday lunch.
Now, I’ve always believed that food should be fun and approachable. After all, cooking isn’t just about sustenance—it’s about joy, connection, and indulging in flavors that make your taste buds do a happy dance! This salad epitomizes that joy. It’s bright, colorful, and bursting with flavor, yet incredibly simple to make. You can have it on your table in under 15 minutes!
Plus, the combination of crunchy cucumbers, savory feta, and fragrant herbs creates an explosion of taste that is simply irresistible! Whenever I dig into this dish, I’m reminded that healthy eating doesn’t have to be boring—it’s all about fresh ingredients that deliver big on flavor!
So let’s roll up our sleeves and create a salad that’s sure to put a smile on your face—because with Clean Plate Cravings, we believe that every meal should feel like a celebration!
Personal Story
I’ll never forget the first time I tasted a cucumber salad. It was a hot summer day, and my grandmother had just picked her cucumbers from the garden. As a kid, I was always wandering around her backyard, dreaming up grand adventures or chasing butterflies, but as soon as I caught a whiff of her signature cucumber salad, all thoughts of playtime flew out the window!
She would always prepare it in a big bowl, tossing in fresh herbs she had handpicked—dill, mint, and sometimes even a sprinkle of crushed red pepper flakes, which was my favorite secret touch. I remember sitting outside, the warm sun kissing my cheeks, and devouring bowl after bowl while chatting away with family.
This nostalgic dish reminds me of those carefree summer days and the love that goes into every bite. It brings everyone together, reminding us of the charm of simple ingredients. It’s this very spirit of connectivity and contentment that I strive to encapsulate in my Classic Cucumber Feta Salad. So, let’s dive in!
Ingredients
Here’s what you’ll need to make this delightful salad:
-
3 medium English cucumbers
- These cucumbers are ideal because they’re crisp with a thin skin and fewer seeds. You could substitute them with Persian cucumbers if you prefer!
-
1 cup crumbled feta cheese
- Feta adds a creamy, salty kick! If you’re looking for a dairy-free option, you can use vegan feta, or even a nut-based cheese for a similar taste.
-
1/4 cup thinly sliced red onion (optional)
- I love the color and flavor red onions bring to this salad! If you’re not a fan of raw onions, try substituting them with finely chopped green onions or leave them out entirely.
-
2 tablespoons chopped fresh dill or mint
- Fresh herbs elevate the taste! Dill is traditional, but mint gives a fresh twist. If you don’t have fresh herbs, dried herbs can work in a pinch, but cut the amount in half.
-
3 tablespoons extra virgin olive oil
- A good quality olive oil makes all the difference. You can substitute it with avocado oil for a different flavor profile.
-
Juice of 1 medium lemon (about 2 tablespoons)
- Fresh lemon juice brightens the salad! If you’re looking for a slightly sweeter taste, balsamic vinegar is a great alternative.
-
1 small garlic clove, minced
- Garlic adds an aromatic depth! For a milder taste, try using roasted garlic instead.
-
Salt and pepper to taste
- Essential for enhancing the flavors. Use sea salt or Himalayan pink salt for a gourmet touch!
-
Optional: pinch of crushed red pepper flakes
- If you like a bit of heat, this is your go-to! You can also use fresh chopped chili peppers for a vibrant kick.
-
Optional: drizzle of honey
- A touch of sweetness balances the tangy flavors. Agave syrup or maple syrup are great substitutes if you’re looking for vegan options.
Step-by-Step Instructions
Let’s get cooking! Follow these simple steps to whip up this salad quickly:
-
Prep Your Ingredients
Start by washing your cucumbers thoroughly under cool running water. If you prefer them peeled, go ahead and peel them now, but I love leaving the skin on for that extra crunch and color! Slice them thinly or chop them into bite-sized pieces—whatever your heart desires! -
Chop Your Fresh Herbs
Grab your fresh dill or mint and give them a good chop. This will release their beautiful aroma and flavor. For minced garlic, simply crush it and chop finely. Gotta love that garlicky goodness! -
Toss Everything Together
In a large mixing bowl, add your sliced cucumbers, crumbled feta cheese, sliced red onion, and freshly chopped herbs. Now that’s a colorful mix! Gently toss everything together until evenly combined—this is where the magic starts to happen. -
Whip Up the Dressing
In a small bowl or jar, combine the extra virgin olive oil, lemon juice, minced garlic, salt, and pepper (and crushed red pepper flakes if using). Whisk or shake until well blended and emulsified—it should be smooth and silky! -
Dress the Salad
Pour the dressing over your cucumber and feta mixture. Toss it again gently until everything is beautifully coated. Remember not to over-mix, as you want those feta crumbles to stay intact for the perfect bite! -
Let It Chill
For the best flavor, let your salad sit in the refrigerator for at least 15-20 minutes. This allows those flavors to meld and get even tastier. If you’re in a rush, you can skip this step, but patience brings the salad to a whole new level! -
Taste and Adjust
Before serving, give your salad a taste. Need more salt, more lemon, or a touch of honey? Don’t be shy—this is your creation! Adjust the flavor to your liking.
Serving Suggestions
Jewels of cucumber and vibrant feta await! To serve, grab a beautiful platter or bowl and scoop the salad in. Drizzle with a bit more olive oil or a sprinkle of fresh herbs for an inviting presentation. Pair this dish with grilled meats, crispy pita chips, or enjoy it as a flavorful lunch on its own!
Recipe Variations
Here are a few creative twists to give your Classic Cucumber Feta Salad a fun spin:
- Mediterranean Vibes: Add some halved cherry tomatoes and Kalamata olives for a full Mediterranean makeover!
- Crunch Factor: Toss in some toasted pine nuts or walnuts for a delightful crunch and added nutrition.
- Fruit Twist: Try adding diced avocados or a handful of juicy grapes for a touch of sweetness and creaminess.
- Herb Lovers Delight: Experiment with a mix of herbs! Basil or parsley works wonderfully with the cucumbers.
- Spicy Garlic: Add some diced jalapeños along with the minced garlic for a spicy kick that will awaken your taste buds!
Chef’s Notes
I remember the first time I experimented with this salad at a summer potluck—let’s just say it didn’t last long! Everyone was coming back for seconds and thirds, asking for the recipe. Since then, I’ve played around with the ingredients, and it has evolved to reflect the tastes of friends and family.
It’s also a great conversation starter—you won’t believe the creative substitutes and additions I’ve heard! One friend suggested a layer of roasted red peppers, which added a delightful earthy flavor. The beauty of this salad lies in its flexibility! You can tweak it based on seasons, ingredients, or even dietary preferences.
FAQs and Troubleshooting
-
Can I make this salad ahead of time?
Yes! The flavors develop beautifully after a few hours in the fridge. Just leave out the feta until you’re ready to serve for the best texture. -
Why are my cucumbers bitter?
Sometimes larger cucumbers can have a bitter taste. Look for smaller, firmer ones for the best crunch. If bitterness persists, try slicing and sprinkling them with salt and letting them drain for about 15 minutes before using. -
Can I use different types of cheese?
Absolutely! While feta is traditional, goat cheese or even ricotta can lend different tastes and textures. Go crazy with your cheese! -
How do I store leftovers?
Keep your salad in an airtight container in the fridge for up to 2 days. Just expect that the cucumbers will soften slightly, but it’ll still taste yummy!
Nutritional Info (Optional)
- Calories: Approximately 250 per serving
- Healthy Fats: Thanks to the olive oil and feta!
- Vitamins: Rich in Vitamin K, C, and essential minerals!
There you have it—a delightful, refreshing Classic Cucumber Feta Salad that’s perfect for any occasion! I hope you’re feeling inspired to whip up this salad and enjoy the delightful flavors. Remember to keep it flexible and have fun in the kitchen. Let’s keep our plates clean, fresh, and full of flavor. Until next time—happy cooking!
PrintClassic Cucumber Feta Salad

A vibrant and refreshing salad that combines crunchy cucumbers, creamy feta, and fragrant herbs, perfect for any occasion.
- Prep Time: 15 minutes
- Cook Time: 0 minutes
- Total Time: 15 minutes
- Yield: 4 servings 1x
- Category: Salad
- Method: Mixing
- Cuisine: Mediterranean
- Diet: Vegetarian
Ingredients
- 3 medium English cucumbers
- 1 cup crumbled feta cheese
- 1/4 cup thinly sliced red onion (optional)
- 2 tablespoons chopped fresh dill or mint
- 3 tablespoons extra virgin olive oil
- Juice of 1 medium lemon (about 2 tablespoons)
- 1 small garlic clove, minced
- Salt and pepper to taste
- Optional: pinch of crushed red pepper flakes
- Optional: drizzle of honey
Instructions
- Prep your ingredients by washing and slicing the cucumbers.
- Chop your fresh herbs and mince the garlic.
- Toss everything together in a large bowl.
- Whip up the dressing in a small bowl and combine with the salad.
- Let it chill in the refrigerator for at least 15-20 minutes.
- Taste and adjust the seasonings as needed.
Notes
This salad can be made ahead of time, just leave out the feta until ready to serve for best texture.
Nutrition
- Serving Size: 1 serving
- Calories: 250
- Sugar: 2g
- Sodium: 360mg
- Fat: 18g
- Saturated Fat: 4g
- Unsaturated Fat: 12g
- Trans Fat: 0g
- Carbohydrates: 10g
- Fiber: 2g
- Protein: 6g
- Cholesterol: 15mg
Keywords: cucumber salad, feta salad, Mediterranean salad, healthy salad, summer salad
Weeknight Honey-Butter Skillet Corn in 30 Minutes
Honey Butter Skillet Corn: Sweet, Savory, and Totally Satisfying
Welcome to Clean Plate Cravings, where fresh, feel-good food meets real life—and trust me, today’s recipe is a game changer! If you’re looking for a dish that’s bursting with sweet and savory flavors, then let me introduce you to Honey Butter Skillet Corn. This dish is not just a side—it’s a full-on celebration of fresh corn, buttery goodness, and a touch of sweetness. It’s the kind of dish that makes you happy to be in the kitchen and even happier to be sitting down at the table.
Imagine this: a warm summer evening, the sun setting behind the trees, and a family gathering where laughter fills the air. The aroma of charred corn wafting from the kitchen brings everyone together, and all you can think about is diving into that succulent, buttery goodness. That’s the essence of Honey Butter Skillet Corn! Not only is it delicious, but it also has a nostalgic charm that makes it a staple in my home.
Cooking has always been a journey filled with vibrant memories, and this dish certainly takes me back. I still remember those afternoons spent in my grandma’s kitchen, where the rich smell of melting butter combined with the sweet scent of corn made my mouth water. Grandma would whip up her famous skillet corn as a side dish for family barbecues or holiday feasts, and we could never get enough of it.
Fast forward to my own culinary adventures, and I can’t help but recreate that magic in my home today. I love how simple and approachable this dish is, yet it carries bursts of flavor that will keep everyone coming back for seconds (or thirds!). So, grab your skillet, and let’s bring those sweet memories back to life with a fresh twist. Your taste buds are about to go on a delightful ride!
Personal Story
Ah, the power of food to stir up memories! One of my favorite memories associated with Honey Butter Skillet Corn is from a summer reunion at my grandparents’ house. It was one of those idyllic days where everything seemed just right—the sun was shining, and the backyard was filled with laughter and chatter from cousins, aunts, and uncles. As we gathered around the grill, my grandma was at her culinary magic station, adding the final touches to her skillet corn.
She always said that the secret was in the honey—“it brings out the sweetness of the corn, darling!”—and I’ve come to realize just how true that is. As each mouthful brought smiles to our faces, I watched everyone savor the flavors. It was more than just food; it was a way of connecting with each other, sharing stories, and creating lasting memories. These moments have shaped my passion for cooking and my joy in sharing recipes that bring people together. Now, I strive to recreate that same magic in my own family, adding my own touches while keeping the heart of the dish intact.
Ingredients
Here’s what you’ll need to create your own Honey Butter Skillet Corn:
-
Fresh Corn (4-5 ears)
The star of the dish! Fresh corn on the cob brings a burst of sweetness and texture. Look for ears with bright green husks and plump kernels. If fresh corn isn’t available, you can substitute with frozen corn. Just make sure to thaw and drain it beforehand. -
Unsalted Butter (4 tablespoons)
The essential base for that buttery goodness! Unsalted butter allows you to control the salt level in your dish. Feel free to use vegan butter or ghee for a dairy-free alternative. -
Honey (2 tablespoons)
Adds a delightful sweetness! Try local honey for an extra touch of flavor and a potential health benefit. For a vegan option, substitute maple syrup. -
Salt (to taste)
A pinch of salt enhances all the flavors. Use sea salt or kosher salt for the best results. -
Black Pepper (to taste)
Just a dash will add a nice contrast to the sweetness of the corn. Experiment with fresh ground pepper for an extra kick! -
Chopped Fresh Herbs (optional, such as cilantro or chives)
Fresh herbs brightens up the dish and adds a pop of color! If you’re not a fan of cilantro, consider basil or parsley instead.
Step-by-Step Instructions
Ready to bring this beautiful dish to life? Follow these steps, and don’t forget to sprinkle in some laughter along the way!
-
Prep Your Corn
Start by shucking the corn. Remove the husks and silk, then rinse the ears under cool water. Use a sharp knife to cut the kernels off the cob, making sure to slice down until you feel the cob at the bottom, collecting the corn in a big bowl. This is a great opportunity to involve kids or family, so they can join in the fun! -
Heat Your Skillet
Grab a large, heavy-bottom skillet and place it over medium heat. Let it warm up for a few minutes until it’s nice and hot. A well-heated skillet will help achieve that lovely sautéing effect. -
Melt the Butter
Once the skillet is heated, add the unsalted butter and let it melt gently. As it starts to foam, get ready for that ultra-rich buttery aroma! Make sure not to let it brown; we’re looking for a decadent melt, not browned butter for this recipe. -
Add the Corn
Toss in the freshly cut corn kernels and give everything a good stir to combine. Let the corn cook for about 5-7 minutes, stirring occasionally. You want the kernels to soften slightly, but you also want some bits to caramelize for that wonderful sweet and savory balance. -
Mix in Honey
Drizzle the honey over the corn while stirring. Let it mingle with the buttery corn and watch how it transforms the dish. Taste and adjust with salt and pepper to suit your palate; this is where the magic happens! The goal is to balance that sweetness with a little salty zing. -
Add Fresh Herbs
If you’re using herbs, now’s the time! Toss in your chopped cilantro or chives and stir them through just before serving. They’ll add a fresh burst of flavor alongside the sweetness of the corn. -
Serve and Enjoy
Turn off the heat and transfer the Honey Butter Skillet Corn to a serving bowl. Enjoy it warm alongside your favorite proteins, or just scoop into bowls for a light, satisfying meal.
Serving Suggestions
Honey Butter Skillet Corn is as lovely to present as it is to eat! Serve it in a rustic bowl garnished with a sprinkle of fresh herbs or a light dusting of smoked paprika for a pop of color and flavor. It pairs beautifully with grilled chicken, fish, or as an addition to summer salads. For a cozy dinner, serve a big scoop alongside some fluffy rice or your favorite quinoa for a hearty meal.
Recipe Variations
Let your creativity shine with these delicious twists on Honey Butter Skillet Corn:
- Spicy Kick: Add a pinch of cayenne pepper or some diced jalapeños for a spicy variation.
- Cheesy Delight: Stir in grated Parmesan or crumbled feta cheese for a creamy, savory element.
- Lime Zing: Squeeze in fresh lime juice for an added level of brightness that perfectly complements the sweetness.
- Bacon Treat: Cook some diced bacon in the skillet first, then remove it and proceed with the corn and butter. Stir the bacon bits back in for a smoky flavor.
- Seasonal Twists: Toss in seasonal vegetables like diced bell peppers or zucchini for a burst of color and extra nutrition.
Chef’s Notes
This Honey Butter Skillet Corn recipe originally came from my grandma’s handwritten recipe book, which is a treasure trove of family traditions and culinary wisdom. Over the years, I’ve enhanced it with my own creative flair and added twists while keeping the core deliciousness intact! I love experimenting with flavors and textures, and every time I cook this dish, I’m reminded of Grandma’s warm hugs and her love for family gatherings.
When making this dish, I always remember to keep it flexible. Whether you need to swap ingredients or want to scale it up for a big crowd, this is one of those forgiving recipes that always delivers delight.
FAQs and Troubleshooting
1. Can I use frozen corn instead of fresh?
Absolutely! Just make sure to thaw and drain the frozen corn well before using it. You won’t lose any delicious flavor, and it’s super convenient!
2. My corn didn’t caramelize! What should I do?
If your corn isn’t caramelizing, it might be that the skillet wasn’t hot enough. Make sure to preheat your skillet well and keep a close eye on the heat. Adjust as necessary!
3. How do I store leftovers?
Leftover Honey Butter Skillet Corn can be stored in an airtight container in the refrigerator for up to 3 days. Just reheat gently on the stove or in the microwave before serving again.
4. I want it dairy-free—what should I use?
Great question! Substitute unsalted butter with a vegan butter alternative and swap honey with maple syrup to keep the dish dairy-free but equally delicious.
Nutritional Info
While I don’t typically focus on rigid nutritional guidelines, here’s a quick overview: serving Honey Butter Skillet Corn provides a delightful mix of carbohydrates from the corn, healthy fats from the butter, and natural sugars from the honey—making for a balanced side that will surely energize!
And there you have it! A comforting, nostalgic dish that brings friends and family together around the table. Ready to dive in? I hope you enjoy making and sharing this Honey Butter Skillet Corn as much as I do! Happy cooking!
PrintHoney Butter Skillet Corn
A delightful dish of sweet and savory Honey Butter Skillet Corn made with fresh corn, butter, and honey, perfect for summer gatherings.
- Prep Time: 10 minutes
- Cook Time: 15 minutes
- Total Time: 25 minutes
- Yield: 4 servings
- Category: Side Dish
- Method: Sautéing
- Cuisine: American
- Diet: Vegetarian
Ingredients
- Fresh Corn (4-5 ears)
- Unsalted Butter (4 tablespoons)
- Honey (2 tablespoons)
- Salt (to taste)
- Black Pepper (to taste)
- Chopped Fresh Herbs (optional, such as cilantro or chives)
Instructions
- Prep Your Corn: Shuck the corn, rinse it, and cut the kernels off the cob.
- Heat Your Skillet: Warm a large skillet over medium heat for a few minutes.
- Melt the Butter: Add unsalted butter to the skillet and let it melt gently.
- Add the Corn: Toss in the corn kernels and stir to combine; cook for about 5-7 minutes.
- Mix in Honey: Drizzle honey over the corn while stirring, and adjust salt and pepper to taste.
- Add Fresh Herbs: If using, stir in chopped herbs just before serving.
- Serve and Enjoy: Transfer to a serving bowl and enjoy warm.
Notes
This recipe allows for flexibility with ingredient substitutions, and you can easily scale it up for larger gatherings.
Nutrition
- Serving Size: 1 serving
- Calories: 200
- Sugar: 10g
- Sodium: 50mg
- Fat: 12g
- Saturated Fat: 7g
- Unsaturated Fat: 3g
- Trans Fat: 0g
- Carbohydrates: 25g
- Fiber: 3g
- Protein: 3g
- Cholesterol: 30mg
Keywords: Honey Butter, Skillet Corn, Side Dish, Summer Recipe, Vegetarian
One-Pan Crispy Garlic Butter Parmesan Roasted Potatoes
Garlic Butter Parmesan Roasted Potatoes: A Feel-Good Classic
Welcome to my cozy kitchen! Today, we’re diving into a nostalgic recipe that’s pure comfort—Garlic Butter Parmesan Roasted Potatoes. There’s something magical about potatoes, don’t you think? They can be fluffy, crispy, or creamy, and they soak up all that delicious flavor like a champ. This dish is the epitome of satisfying and makes a fantastic side for any meal. Plus, it’s incredibly simple to whip up, which is just the way we like it here at Clean Plate Cravings.
Introduction
I grew up in a household where potatoes were practically a food group. My mom had a repertoire of potato recipes that ranged from buttery mashed potatoes on Sundays to crispy roasted ones on weeknights. Each bite was a little celebration of flavor and comfort, a reminder that meals could be nourishing without sacrificing taste.
And that’s precisely what I want to share with you today: a dish that sings with spices, embraces the zing of garlic, and is generously bathed in rich, creamy butter. These Garlic Butter Parmesan Roasted Potatoes will take you back to the warmth of home-cooked meals while fitting perfectly into the busy lifestyle we all lead today.
Imagine this—your family gathers around the table, and the aroma of roasted garlic wafts through the air. Everyone’s eyes light up as you serve up these golden, crispy potatoes. It’s all about making those little moments special, and with this recipe, you can do exactly that, adding a touch of indulgence to your everyday meals. So roll up your sleeves, grab your apron, and let’s create something beautiful together!
Personal Story
I’ll never forget the first time I attempted to make roasted potatoes on my own. I was in college, living in a tiny apartment with just a hot plate and a questionable oven. My friends decided to host a potluck, and I was determined to impress them. Channeling my mom’s flair for cooking, I concocted a garlic butter potato dish that I thought would wow everyone.
With nowhere near the kitchen supplies I needed, I executed it with a mismatched array of utensils and even a little improvisation along the way. When those potatoes came out of the oven—golden brown, crisp on the edges, and glistening with garlic magic—I felt like a culinary rock star. My friends devoured them, and for that one evening, I was the queen of the kitchen. That memory still warms my heart, and it reminds me how cooking, even in the most humble settings, can create bonds and joy among friends.
Ingredients
Here’s what you’ll need to make these delightful Garlic Butter Parmesan Roasted Potatoes:
-
2 pounds baby potatoes, halved
Look for smaller potatoes for the best texture. Red or yellow baby potatoes work beautifully. If you can’t find baby potatoes, just cut regular potatoes into 1-inch chunks. -
4 tablespoons unsalted butter, melted
Butter adds richness! Unsalted is best so you can control the saltiness. If you prefer an alternative, you could swap in olive oil for a lighter option. -
4 cloves garlic, minced
Fresh garlic infuses this dish with a robust flavor. If you’re in a pinch, jarred minced garlic works well, about 1 teaspoon per clove. -
1 teaspoon dried thyme
Thyme provides a lovely earthy note. You can substitute it with dried oregano or Italian seasoning if that’s what you have on hand. -
1 teaspoon dried rosemary
Rosemary adds a delightful aroma. Fresh rosemary can be used if you happen to have it; just double the amount! -
Salt and pepper to taste
Essential for bringing all the flavors together. Feel free to adjust according to your taste preferences. -
½ cup grated Parmesan cheese
Cheesy goodness! You can use freshly grated cheese for better flavor. Pecorino Romano can be a great substitute if you’re looking for a sharper flavor. -
Fresh parsley, chopped, for garnish
A sprinkle of parsley adds a fresh touch. If you don’t have parsley, chives or basil can also brighten up the dish.
Step-by-Step Instructions
Now that we’ve got our ingredients lined up, let’s dive into the cooking!
-
Preheat Your Oven
Start by preheating your oven to 400°F (200°C). This ensures that our potatoes get that perfect crispy texture. While it’s heating, you can prep your ingredients. -
Prep the Potatoes
Rinse your baby potatoes under cold water and give them a good scrub. Halve them for optimal roasting. You want them to be roughly the same size so they cook evenly. -
Make the Garlic Butter Mixture
In a small bowl, combine the melted butter with the minced garlic, thyme, rosemary, salt, and pepper. Stir it together until it’s all blended. The aroma will already start to make your mouth water! -
Toss the Potatoes
Place the halved potatoes in a large mixing bowl and pour the garlic butter mixture over them. Toss them gently with your hands or a large spatula until every potato is well-coated. -
Spread on a Baking Sheet
Line a large baking sheet with parchment paper for easy cleanup. Spread the potatoes in a single layer, cut side down if you want an extra crispy texture. This way, they’ll fry up nicely in the oven. -
Roast the Potatoes
Pop the baking sheet into your preheated oven and roast the potatoes for about 25-30 minutes, or until they are golden brown and crisp. Halfway through, use a spatula to flip them for even roasting. This is a great time to make sure your oven is doing its job—some spots may cook quicker than others! -
Add the Parmesan
In the final 10 minutes of roasting, sprinkle the grated Parmesan cheese evenly over the potatoes. The cheese will melt and create a delightful crust. You can also give them a quick broil at the end if you want an extra crunch! -
Garnish and Serve
Once the potatoes are golden and cheese is melted, remove them from the oven. Let them cool for just a minute before transferring them to your serving platter. Garnish with freshly chopped parsley for a pop of color.
Serving Suggestions
Serve these Garlic Butter Parmesan Roasted Potatoes alongside grilled chicken, steak, or a vibrant salad for a balanced meal. They also make a fantastic side to bring to gatherings or barbecues—trust me, they’ll disappear in no time! You can arrange them in a lovely serving bowl and allow everyone to scoop their share.
Recipe Variations
Here are a few fun ways to mix it up:
-
Herb Variations: Try using fresh herbs like dill or tarragon for a different flavor profile.
-
Spicy Kick: Add a pinch of red pepper flakes to the garlic butter for a spicy twist.
-
Lemon Zest: Grate some lemon zest over the potatoes just after they come out of the oven for a zesty bite.
-
Cheese Options: Mix it up by using feta or goat cheese for a tangy twist.
-
Sweet and Savory: Toss in some diced sweet potatoes or carrots for a colorful and different take.
Chef’s Notes
These Garlic Butter Parmesan Roasted Potatoes have been a staple in my kitchen for years, and I love how they work with just about any main dish. You can easily customize them based on your mood or what you have in the pantry. Once, I even added leftover vegetables—still delicious!
One of my funniest kitchen mishaps happened while making this dish. In my excitement, I knocked over the garlic into the butter, which resulted in a garlicky pool rather than a mixture. But you know what? The more, the merrier, right? The garlic was a hit, proving that sometimes "mistakes" lead to the best discoveries!
FAQs and Troubleshooting
Q: Why didn’t my potatoes get crispy?
A: Make sure you preheat your oven and spread the potatoes in a single layer on the baking sheet. Crowding them can cause steaming instead of roasting.
Q: Can I cook these potatoes in advance?
A: Absolutely! Prepare the potatoes and toss them in the garlic butter mixture ahead of time, then store them in the fridge. When you’re ready, pop them into the oven—just add a few extra minutes to the cooking time!
Q: Can I use larger potatoes?
A: Yes! Just cut them into uniform pieces, about 1-inch in size, for even cooking. You may need to adjust the cooking time slightly.
Q: How can I tell if the potatoes are done?
A: They should be golden brown and fork-tender—meaning a fork can easily pierce through.
Nutritional Info (per serving)*
*Calories: 200 | Protein: 5g | Carbs: 30g | Fat: 8g | Fiber: 3g
Conclusion
That’s it! Now you have a delectable recipe for Garlic Butter Parmesan Roasted Potatoes that will surely impress anyone who gathers at your table. Remember, cooking is all about having fun and making memorable experiences, and I hope this dish brings warmth and cheer to your kitchen. So, roll up your sleeves, invite some friends over, and enjoy every bite together!
Keep it fresh, simple, and seriously delicious—happy cooking!
PrintGarlic Butter Parmesan Roasted Potatoes

A comforting side dish featuring crispy roasted baby potatoes tossed in garlic butter and Parmesan cheese.
- Prep Time: 15 minutes
- Cook Time: 30 minutes
- Total Time: 45 minutes
- Yield: 4 servings 1x
- Category: Side Dish
- Method: Roasting
- Cuisine: American
- Diet: Vegetarian
Ingredients
- 2 pounds baby potatoes, halved
- 4 tablespoons unsalted butter, melted
- 4 cloves garlic, minced
- 1 teaspoon dried thyme
- 1 teaspoon dried rosemary
- Salt and pepper to taste
- ½ cup grated Parmesan cheese
- Fresh parsley, chopped, for garnish
Instructions
- Preheat your oven to 400°F (200°C).
- Rinse your baby potatoes under cold water and halve them.
- Combine melted butter with minced garlic, thyme, rosemary, salt, and pepper in a bowl.
- Toss the halved potatoes in the garlic butter mixture until well-coated.
- Spread the potatoes on a lined baking sheet in a single layer.
- Roast for 25-30 minutes, flipping halfway through.
- Add Parmesan cheese in the last 10 minutes of roasting.
- Garnish with freshly chopped parsley and serve.
Notes
You can customize the recipe with different herbs or cheeses, and they also pair wonderfully with grilled meats or salads.
Nutrition
- Serving Size: 1 serving
- Calories: 200
- Sugar: 1g
- Sodium: 300mg
- Fat: 8g
- Saturated Fat: 4g
- Unsaturated Fat: 3g
- Trans Fat: 0g
- Carbohydrates: 30g
- Fiber: 3g
- Protein: 5g
- Cholesterol: 20mg
Keywords: potatoes, roasted, garlic butter, Parmesan, side dish