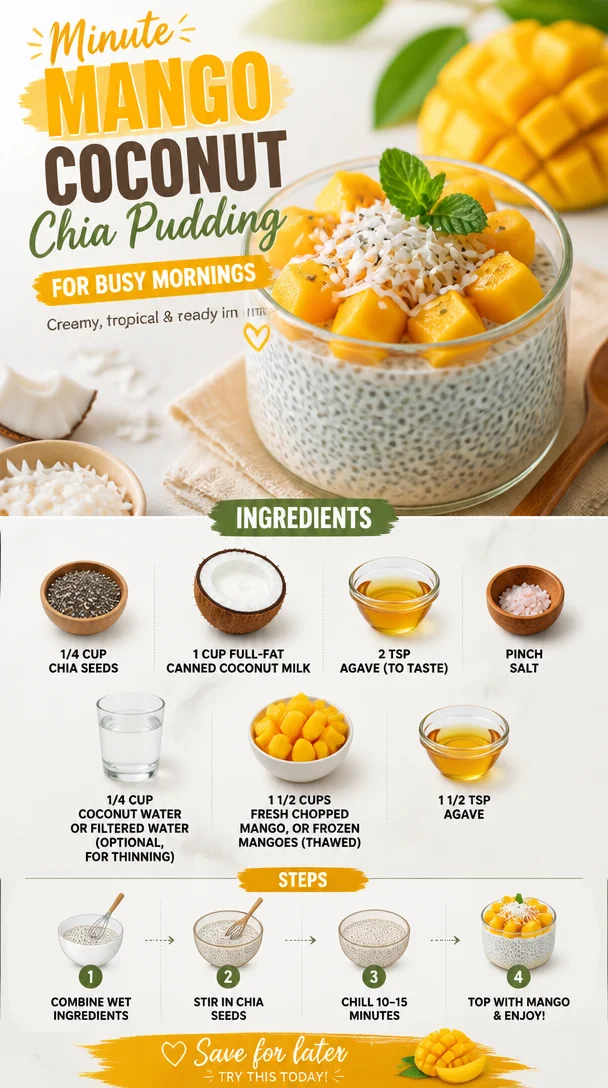
Minute Mango Coconut Chia Pudding for Busy Mornings
Mango Coconut Chia Pudding: Your New Favorite 20-Minute Recipe
Welcome to Clean Plate Cravings! Today, we’re diving into a refreshing treat that’s not only super simple to whip up but also bursting with tropical vibes: Mango Coconut Chia Pudding. If you’re anything like me, you love finding delicious ways to incorporate wholesome ingredients into your daily routine, and this recipe does just that.
Imagine starting your day or finishing up your lunch with a creamy, dreamy bowl of chia pudding that feels downright indulgent yet is packed with nutrients. We all deserve to give ourselves a little something special, and the combination of sweet mango and rich coconut milk in this dish will make you feel like you’re indulging in a mini vacation—without ever leaving your kitchen!
A Delicious Journey Through Flavor
This recipe wasn’t born out of a professional kitchen, but rather from a cherished memory I have of my grandmother, who was always trying out new flavors. She adored experimenting with fruits, and one of her favorites was the mango. I distinctly remember summers spent in her kitchen, the sunlight spilling through the window as we chopped up juicy mangoes and blended them into magical smoothies that danced on our tongues.
One day, she introduced me to chia seeds, little specks of wonder packed with nutrition and a unique gelatinous texture when soaked. I was captivated! We spent the afternoon blending mangoes, measuring chia seeds, and mixing in coconut milk, creating a delicious pudding that felt like a party in a bowl. That day ignited my passion for cooking with vibrant, whole foods—the same passion that fuels Clean Plate Cravings today.
Now, let’s make our own mango coconut chia pudding and create some delicious memories of our own!
Ingredients
-
1/4 cup chia seeds
Chia seeds are tiny powerhouses of nutrition! Packed with fiber, omega-3 fatty acids, and protein, they also form a delightful gel when soaked. If you don’t have chia seeds on hand, you can substitute them with flaxseeds, although the texture will be different. -
1 cup full-fat canned coconut milk
Full-fat coconut milk adds a luscious creaminess and a hint of natural sweetness. It’s perfect for those silky puddings! If you prefer a lighter version, you can use light coconut milk or even almond milk, although keep in mind the flavor will change. -
2 tsp agave (to taste)
Agave provides a mild sweetness with a low glycemic index, making it a great option for those looking to enjoy a sweet treat without the sugar spike. If you want to go completely natural, honey or maple syrup can be great alternatives! -
Pinch of salt
A little pinch of salt enhances all the sweet and creamy flavors, lifting the dish to another level! It’s like a secret ingredient; you won’t taste it, but you’ll notice the difference. -
1/4 cup coconut water or filtered water (optional, for thinning)
If you prefer a thinner consistency, adding coconut water or filtered water is a great choice. Coconut water adds a subtle sweetness, while regular water allows the coconut flavor to shine. -
1 1/2 cups fresh chopped mango
Fresh mango brings juicy sweetness and a beautiful pop of color! Make sure to choose ripe mangoes that give slightly when you press on them. If fresh mango isn’t available, thawed frozen mango works just as well and is often easier to keep on hand. -
1 1/2 tsp agave (for layering and serving)
A little extra agave to drizzle over your mango top will make every bite feel even more special. Feel free to adjust the sweetness based on your preference!
Step-by-Step Instructions
-
Prepare the Chia Mixture
Start by combining the chia seeds, coconut milk, 2 teaspoons of agave, and a pinch of salt in a mixing bowl. Whisk everything together until well combined. You want to ensure that the chia seeds are evenly distributed, and there are no clumps. This initial step is where the magic begins, as the chia seeds will soak up the liquid and create that amazing pudding-like texture. -
Let it Rest
Once your mixture is well whisked, let it rest for about 5-10 minutes. This gives the chia seeds time to hydrate and bloom. You’ll notice that the mixture will start to thicken as the seeds absorb the coconut milk. It’s like watching a little transformation happen right before your eyes. -
Final Whisk
After a few minutes, give the mixture another good whisk. You’ll see that the chia seeds have expanded, and the pudding is already forming. If you find it’s too thick for your liking, you can add the coconut water or filtered water a little at a time until you reach your desired consistency. -
Chill Out
Cover the bowl with plastic wrap or transfer the mixture into jars or cups, and place it in the refrigerator. Let it chill for at least 15-30 minutes. This cooling time helps develop the flavors further and allows the pudding to set completely. -
Mango Magic
While your pudding is chilling, chop up your fresh mango into small cubes. Reserve a few pieces for garnish later, so you can create a beautiful presentation! -
Assemble Your Pudding
After your pudding has chilled and thickened beautifully, it’s time for assembly. Layer the chia pudding with fresh mango chunks in your favorite serving bowl or jar. You can alternate layers of pudding and mango, creating a beautiful pattern that will make your dish not only delicious but also a feast for the eyes. -
Final Touches
Drizzle a bit of agave on top of the assembly for an extra touch of sweetness and visual appeal. And voilà! Your Mango Coconut Chia Pudding is ready to be enjoyed!
Serving Suggestions
Serve your mango coconut chia pudding in beautiful glass jars or bowls to let those vibrant layers shine through. A sprinkle of shredded coconut on top will add an extra layer of texture and visual flair. For an added crunch, consider topping with some granola or nuts before serving. This pudding can be a delightful breakfast, a healthy snack, or even a light dessert!
Recipe Variations
- Tropical Paradise: Add a splash of pineapple juice to the coconut milk mixture for an extra tropical twist. Top with toasted coconut flakes!
- Berry Bliss: Swap out the mango for blueberries or strawberries, or mix in a few berries for a delightful twist.
- Chocolate Lovers: Add a tablespoon of cocoa powder into your chia mixture for a decadent take! Top with banana slices and a sprinkle of cacao nibs.
- Nutty Delight: Stir in a spoonful of almond or peanut butter into the pudding for a creamy, nutty twist.
- Healthy Swaps: If you’re vegan, the agave already works perfectly, but honey can be used if you want to take a non-vegan approach!
Chef’s Notes
This recipe has become a staple in my kitchen over the years. I love how versatile it is! The original idea of mango coconut pudding spun off a basic chia pudding, and I couldn’t resist the temptation of tropical flavors. Every time I serve it, it reminds me of those sun-soaked afternoons spent with my grandmother, creating in the kitchen. I often experiment with different fruits and toppings based on what I have on hand, which makes it such a fun dish to prepare!
FAQs and Troubleshooting
1. Why isn’t my pudding thickening?
If your chia pudding is too runny, it may be due to not allowing enough time for the seeds to soak up the liquid. Ensure you let it rest long enough. Alternatively, adding an extra tablespoon of chia seeds can help thicken it.
2. Can I use other types of milk?
Absolutely! While coconut milk provides a unique flavor and creaminess, almond milk, oat milk, or even soy milk can work well too. Just be mindful that the overall taste and texture might change.
3. Can I prepare this in advance?
Yes! You can prepare the pudding up to 3 days ahead and keep it stored in the fridge. Just make sure to add your fresh fruits right before serving to keep them from getting too mushy.
4. How can I add more flavor?
Feel free to experiment with spices like cinnamon or cardamom when mixing in the chia seeds. Vanilla extract is also a wonderful addition if you want that warm flavor profile!
Nutritional Info (per serving)
- Calories: Approximately 210 calories
- Protein: 4g
- Carbohydrates: 25g
- Dietary Fiber: 10g
- Sugars: 6g
- Fat: 12g
Now that you have the tools and inspiration to whip up this delightful Mango Coconut Chia Pudding, it’s time to recreate those magic moments in your own kitchen. Dive in and enjoy the feeling of nourishing your body with something vibrant and delicious. Here’s to fresh, simple, and seriously delicious meals!
PrintMango Coconut Chia Pudding
A refreshing and nutritious chia pudding combined with sweet mango and rich coconut milk, perfect for breakfast or a light dessert.
- Prep Time: 10 minutes
- Cook Time: 30 minutes
- Total Time: 40 minutes
- Yield: 4 servings 1x
- Category: Dessert
- Method: No-Cook
- Cuisine: American
- Diet: Vegan
Ingredients
- 1/4 cup chia seeds
- 1 cup full-fat canned coconut milk
- 2 tsp agave (to taste)
- Pinch of salt
- 1/4 cup coconut water or filtered water (optional, for thinning)
- 1 1/2 cups fresh chopped mango
- 1 1/2 tsp agave (for layering and serving)
Instructions
- Prepare the chia mixture by combining chia seeds, coconut milk, 2 teaspoons of agave, and a pinch of salt in a mixing bowl.
- Let it rest for about 5-10 minutes to allow the chia seeds to hydrate and thicken.
- Final whisk the mixture to ensure it’s well combined and thickened to your preference.
- Chill the mixture in the refrigerator for at least 15-30 minutes.
- Chop the fresh mango into small cubes while the pudding cools.
- Assemble the pudding with layers of chia pudding and mango in a serving bowl or jar.
- Drizzle agave on top for added sweetness before serving.
Notes
Experiment with different fruits and toppings for variety. This pudding can be prepared up to 3 days in advance; just add fresh fruit before serving.
Nutrition
- Serving Size: 1 serving
- Calories: 210
- Sugar: 6g
- Sodium: 20mg
- Fat: 12g
- Saturated Fat: 10g
- Unsaturated Fat: 2g
- Trans Fat: 0g
- Carbohydrates: 25g
- Fiber: 10g
- Protein: 4g
- Cholesterol: 0mg
Keywords: chia pudding, mango, coconut, vegan dessert, healthy breakfast, tropical recipes
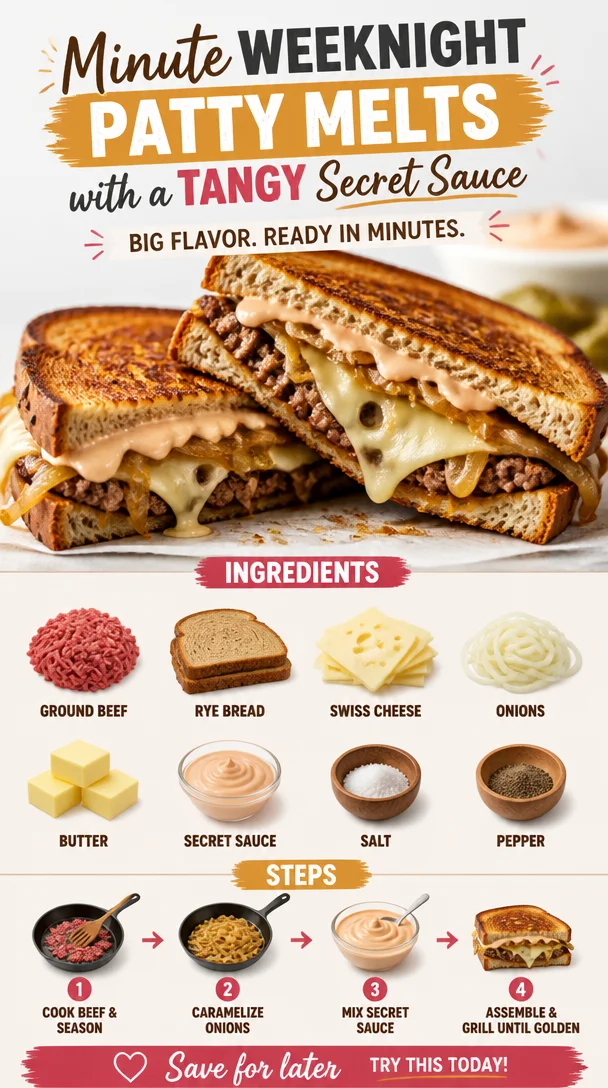
Minute Weeknight Patty Melts with a Tangy Secret Sauce
Patty Melts with Secret Sauce: A Nostalgic Twist on a Classic
Welcome to Clean Plate Cravings! Today, I’ve got a dish in store that’ll warm your heart and tickle your taste buds: Patty Melts with Secret Sauce. If you’ve never tried one of these savory delights, get ready to embark on a delicious journey that blends juicy beef, melty cheese, and a special sauce that’ll have you licking your plate clean.
As a cook, food is more than just nourishment; it’s about gathering around the table, sharing stories, and connecting with loved ones. I think of patty melts as the ultimate comfort food, a classic diner dish that reminds us of simpler times. Imagine sinking your teeth into the crisp, golden rye bread, followed by the rich flavors of perfectly seasoned beef and gooey Swiss cheese—all brought together with a secret sauce that hits the spot every time.
In this blog post, not only will we dive into how to whip up these mouthwatering patty melts, but I’ll also share a personal memory that makes this recipe even more special to me. So grab your apron and let’s get cooking!
A Personal Story
Let me take you back to my childhood. Growing up, weekends in my family were synonymous with cozy kitchen gatherings and comfort food. My dad had this knack for creating simple yet satisfying meals, often involving whatever was in the fridge, and one of our family favorites was his version of the patty melt. I still remember him standing at the stovetop, tendrils of steam wafting up as he grilled the patties to juicy perfection, the sizzle of the onions filling the air with an aroma that had us all eagerly hovering around the kitchen.
He’d make this secret sauce that was a mix of ketchup, mayonnaise, and mustard—a combination that, funny enough, still makes my mouth water just thinking about it! We’d pile everything between thick slices of buttery rye bread, and just like that, the world was right. It was those simple moments—sharing hearty food, laughter, and stories—that ignited my passion for cooking. Fast forward to today, and I’ve adapted that classic recipe to include my own twists, but the soul of those family dinners remains embedded in each melt I create.
Ingredients
To make these delicious patty melts, you’ll need the following ingredients:
-
Ground Beef: The star of our show! Choose a good quality ground beef (80/20 is ideal for flavor and juiciness). If you want a leaner option, turkey or chicken can be used as substitutes, but they might require some adjustments to keep them moist.
-
Rye Bread: Its distinctive flavor pairs so well with the beef and cheese. Feel free to swap it for sourdough or whole wheat, depending on your preference.
-
Swiss Cheese: We’re going for that creamy, melty goodness! If Swiss isn’t your thing, try provolone or cheddar for a different flavor profile.
-
Onions: Sweet, caramelized onions are a must for depth of flavor. You can swap them out for shallots or omit them altogether, but honestly—don’t skip this step!
-
Butter: We’ll use butter to toast the bread to a golden crisp. For a dairy-free option, you can utilize olive oil or vegan butter.
-
Secret Sauce: Mix mayonnaise, ketchup, and mustard to create this flavor-packed sauce. Feel free to tweak the ratios to match your taste, or even add a pinch of garlic powder for an extra kick.
-
Salt and Pepper: Essential for seasoning our beef. Remember, seasoning can be adjusted as per your preference.
Here’s the quick pro tip: prep all your ingredients before you start assembling. This makes everything a breeze and ensures you won’t have to scramble around the kitchen!
Step-by-Step Instructions
Now that we’ve got our ingredients lined up, let’s dive into how to make these patty melts:
-
Prepare the Secret Sauce:
- In a small bowl, mix ¼ cup mayonnaise, 2 tablespoons ketchup, and 1 tablespoon mustard. Adjust the ratios as needed to suit your taste. This sauce will add a delicious creaminess and tanginess to the final dish.
-
Caramelize the Onions:
- Heat a tablespoon of butter in a skillet over medium heat. Add thinly sliced onions (about 1 large onion will do) and a pinch of salt.
- Cook them slowly for about 15-20 minutes, stirring occasionally until they become golden brown and soft. This is where the magic happens; your kitchen will smell divine!
-
Shape the Patties:
- While the onions are caramelizing, take 1 pound of ground beef and divide it into four equal portions. Shape them into patties—slightly larger than your bread since they’ll shrink while cooking. Season each patty with salt and pepper.
-
Cook the Patties:
- In the same skillet (if there’s enough room, otherwise grab another), heat it over medium-high heat. Add a bit more butter if needed.
- Cook your patties for about 4 minutes on one side. Flip them over, add a slice of Swiss cheese on top, and cook for another 3-4 minutes until they reach your desired doneness (medium is ideal for flavor).
-
Toast the Bread:
- While the patties are cooking, in a separate skillet, butter one side of each rye bread slice (2 slices per sandwich). Toast them face down until golden brown—about 3 minutes.
-
Assemble the Patty Melt:
- On the unbuttered side of one slice of toasted rye, spread a generous layer of the secret sauce. Place your cheesy patty on top, followed by a spoonful of those luscious caramelized onions. Add another slice of cheese if you’re feeling indulgent!
- Top it with a second slice of bread, buttered side up.
-
Grill the Patty Melt:
- Place the sandwich back in the skillet and grill it on medium heat until the bread is golden brown and crispy, about 3-4 minutes per side. Press down lightly with a spatula to ensure it grills evenly and the cheese melts perfectly.
-
Slice & Serve:
- Once your patty melt is ready, remove it from the skillet and allow it to rest for a minute—if you can resist! Slice it in half diagonally and see that glorious cheese stretch!
Serving Suggestions
To serve your patty melts, plate them up with some crispy, seasoned fries or a fresh green salad. Garnish with pickle spears for that extra crunch and zing. You could also drizzle a little extra secret sauce on the side for dipping, because who doesn’t love a good dip?
Recipe Variations
Feeling adventurous? Here are some creative twists on the classic patty melt:
-
Veggie Patty Melt: Swap out the beef for black bean or lentil patties for a plant-based delight.
-
Spicy Kick: Add jalapeños or sriracha to your secret sauce for a fiery version that’ll wake up your taste buds.
-
Mushroom & Swiss: Sauté some mushrooms along with the onions for an earthy flavor that complements the Swiss cheese beautifully.
-
Different Cheeses: Experiment with gouda, blue cheese, or a spicy pepper jack for a unique cheesy experience.
-
French Onion Patty Melt: Top with a bit more of that caramelized onion and a sprinkle of beef broth when cooking for a French onion flair.
Chef’s Notes
As I reflect on how this recipe has evolved over time, I realize that what I love most about cooking is the freedom to change things up based on inspiration, seasonality, and, let’s face it, pantry odds and ends. I’ll admit, there have been kitchen mishaps—like the time I accidentally grabbed paprika instead of garlic powder for the sauce (yikes!). But those moments are what make us better cooks.
As you embark on your own culinary journey, embrace the joys and mishaps alike. Whether you make this recipe just as I’ve shared or give it your own twist, what truly matters is the love you put into it and the smiles it brings around your table.
FAQs and Troubleshooting
1. My patties fell apart while cooking. What went wrong?
- This can happen if there isn’t enough fat in the meat or if they aren’t packed tightly enough. Ensure you’re using ground beef with enough fat content (like 80/20) or try chilling the patties for 15 minutes before cooking to help them hold their shape.
2. How can I tell when the beef is cooked through?
- The best way to check for doneness is to use a meat thermometer. Ground beef should reach an internal temperature of 160°F. If you don’t have one, a good indication is when the juices run clear, and the patty is brown in the center.
3. Can I make these in advance?
- Absolutely! You can prep the patties and onions ahead of time and store them in the fridge. Just give them a quick grill on a busy weeknight for an easy dinner.
4. What if I don’t have rye bread?
- No problem! Substitute with whatever bread you have on hand. Sourdough or whole grain will work just fine.
Nutritional Info
Each patty melt can vary based on ingredients, but on average, one serving (one melted sandwich) contains roughly:
- Calories: 600-700
- Protein: 30-35g
- Fat: 40-45g
- Carbohydrates: 40-50g
(If you want a more precise breakdown, consider using a nutrition calculator based on the exact ingredients you use!)
Embrace the creativity that comes with cooking, and don’t shy away from making this patty melt your own. Whether it’s for a cozy night in or a backyard gathering with friends, these patty melts with secret sauce are sure to impress. Happy cooking, and here’s to many delicious memories in the kitchen!
PrintPatty Melts with Secret Sauce
A nostalgic twist on the classic patty melt, featuring juicy beef, melty cheese, and a delicious secret sauce.
- Prep Time: 15 minutes
- Cook Time: 30 minutes
- Total Time: 45 minutes
- Yield: 4 servings 1x
- Category: Main Course
- Method: Grilling
- Cuisine: American
- Diet: Non-Vegetarian
Ingredients
- 1 pound ground beef (80/20)
- 4 slices rye bread
- 4 slices Swiss cheese
- 1 large onion, thinly sliced
- 2 tablespoons butter
- ¼ cup mayonnaise
- 2 tablespoons ketchup
- 1 tablespoon mustard
- Salt and pepper to taste
Instructions
- Prepare the Secret Sauce: In a small bowl, mix ¼ cup mayonnaise, 2 tablespoons ketchup, and 1 tablespoon mustard. Adjust the ratios as needed to suit your taste.
- Caramelize the Onions: Heat a tablespoon of butter in a skillet over medium heat. Add sliced onions and a pinch of salt. Cook slowly for about 15-20 minutes, stirring occasionally until golden brown.
- Shape the Patties: Divide the ground beef into four equal portions and shape them into patties slightly larger than the bread.
- Cook the Patties: In the skillet, cook the patties for 4 minutes on one side, flip, and add Swiss cheese. Cook for another 3-4 minutes until desired doneness.
- Toast the Bread: Butter one side of each rye bread slice and toast them face down in a separate skillet until golden brown, about 3 minutes.
- Assemble the Patty Melt: On the unbuttered side of one slice, spread secret sauce. Place the cheese-covered patty on top, add caramelized onions, and another slice of cheese. Top with a second slice of bread, buttered side up.
- Grill the Patty Melt: Grill the sandwich in the skillet until it’s golden brown and crispy, about 3-4 minutes per side.
- Slice & Serve: Remove from skillet, let rest, slice in half, and serve!
Notes
For a dairy-free option, use olive oil or vegan butter. You can use different breads like sourdough or whole wheat if preferred.
Nutrition
- Serving Size: 1 sandwich
- Calories: 650
- Sugar: 5g
- Sodium: 800mg
- Fat: 45g
- Saturated Fat: 18g
- Unsaturated Fat: 20g
- Trans Fat: 0g
- Carbohydrates: 40g
- Fiber: 2g
- Protein: 32g
- Cholesterol: 75mg
Keywords: patty melt, comfort food, secret sauce, classic recipe, nostalgic food
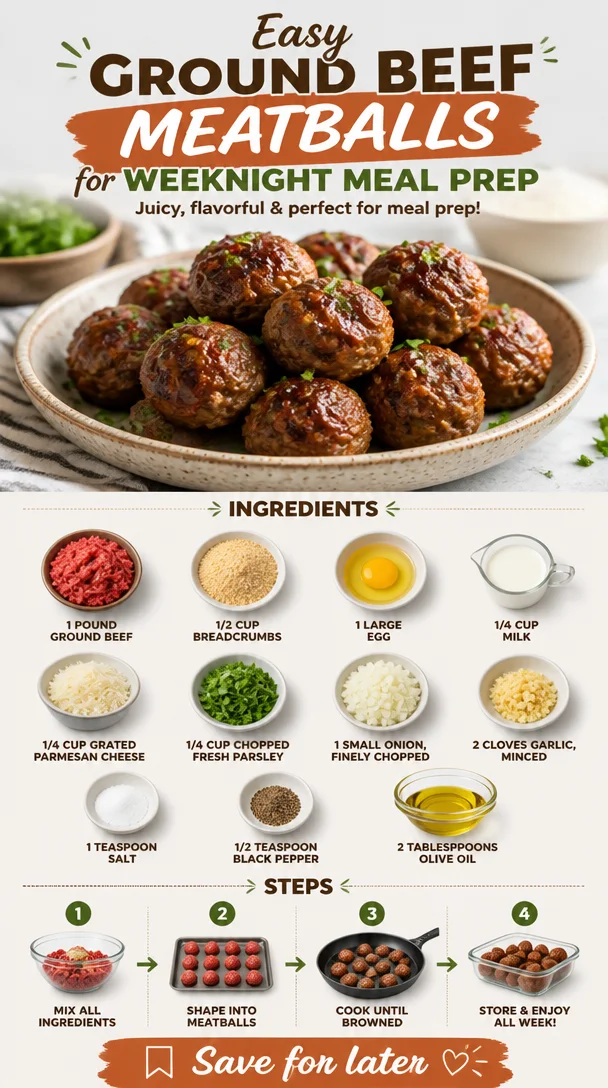
Easy Ground Beef Meatballs for Weeknight Meal Prep
Juicy Homemade Ground Beef Meatballs: Your New Favorite Recipe
Welcome to Clean Plate Cravings! Today, we’re diving into a dish that truly embodies comfort, heartiness, and flavor: Juicy Homemade Ground Beef Meatballs. If you’ve ever wanted a recipe that brings family and friends together, you’ve found it! There’s something magical about homemade meatballs that warms the heart and fills the belly. Whether served with spaghetti, nestled in a sub, or enjoyed on their own, meatballs are the culinary hug we all need.
Introduction: A Love Story with Meatballs
Oh, meatballs. Just hearing the word conjures images of cozy family dinners and my grandmother’s kitchen filled with the aromatic scent of garlic and simmering tomato sauce. Growing up, weekends at my grandma’s house were an epicurean adventure. She was the queen of the kitchen, and the highlight of those days was always her meatballs. She’d say, “The secret is in the love you put into them,” and boy, did I take that to heart!
As a kid, my job was to mix the meat and breadcrumbs, getting my hands all gooey while listening to her share stories of how she learned to cook. Each meatball was crafted with care, seasoned perfectly, and shaped with her caring hands. Those moments turned meal prep into sweet memories, and to this day, I strive to recreate that same magic in my own kitchen.
Now, as an adult, I’ve experimented with recipes, adding my twist to her classic. My goal remains unchanged: to capture the warmth and nostalgia of those family dinners while making the process approachable for everyone. So, grab your apron, and let’s make some juicy homemade ground beef meatballs!
Ingredients: What You’ll Need
To whip up these delicious meatballs, here’s what you’ll need:
- 1 pound ground beef
- Look for 80/20 ground beef for the perfect balance of flavor and juiciness. Leaner cuts can lead to drier meatballs.
- 1/2 cup breadcrumbs
- Use plain or Italian-seasoned breadcrumbs. If you’re gluten-free, substitute with almond flour or gluten-free breadcrumbs for a yummy twist!
- 1 large egg
- The egg acts as a binder to keep your meatballs together, preventing them from falling apart during cooking.
- 1/4 cup milk
- This keeps the meatballs moist. You can use any kind of milk—dairy or plant-based works just fine!
- 1/4 cup grated Parmesan cheese
- Adds an incredible depth of flavor. If you’re a cheese lover, feel free to increase this amount!
- 1/4 cup chopped fresh parsley
- For that fresh flavor! You can substitute with dried parsley; just remember to use less—herbs are usually more potent dried.
- 1 small onion, finely chopped
- Infuses the meatballs with sweetness and moisture. If you’re not a fan of onion, try shallots for a milder flavor.
- 2 cloves garlic, minced
- A must for that beautiful, aromatic punch! Fresh garlic is best, but in a pinch, garlic powder works too.
- 1 teaspoon salt
- Essential for bringing flavors to life. Adjust to your taste!
- 1/2 teaspoon black pepper
- For a slight kick! Feel free to adjust based on your spice tolerance.
- 2 tablespoons olive oil
- For cooking. You can substitute with canola or avocado oil for a different flavor profile.
Let’s get cooking!
Step-by-Step Instructions: Crafting Your Meatballs
-
Preheat Your Oven
Set your oven to 400°F (200°C). A hot oven is crucial for getting those deliciously browned meatballs! -
Prep Your Tools
Get a large mixing bowl ready, along with a baking sheet lined with parchment paper (or lightly greased) to catch those meatballs once they’re shaped. -
Mix Ingredients
In your large mixing bowl, combine the ground beef, breadcrumbs, egg, milk, Parmesan cheese, parsley, chopped onion, minced garlic, salt, and black pepper.Chef Hack: Instead of using your hands and getting messy right away, start by using a fork to mix everything gently. This prevents overworking the meat, which can lead to tougher meatballs!
-
Shape the Meatballs
Once your ingredients are combined, it’s time to roll! Use about 2 tablespoons of the mixture to form each meatball—think the size of a golf ball.Tip: Wet your hands with a bit of water to help prevent the mixture from sticking, making it easier to form perfect meatballs!
-
Place on Baking Sheet
Arrange your meatballs on the prepared baking sheet, making sure they’re spaced apart evenly. This allows for even cooking. -
Drizzle with Olive Oil
Lightly drizzle olive oil over the meatballs. This helps them get golden and crisp without drying out! -
Bake
Pop them into the preheated oven, and let them bake for 20-25 minutes until they are cooked through and browned to your liking.Chef’s Tip: Using a meat thermometer, check for an internal temperature of 160°F (70°C) for perfectly cooked meatballs!
-
Serve and Enjoy!
Once they’re done, take a moment to admire your handiwork! Serve those beautiful meatballs on a platter or in a cozy bowl with sauce, pasta, or even on their own.
Serving Suggestions: Plating Like a Pro
For a truly impressive presentation, serve your juicy meatballs with a ladle of marinara sauce over them. Drum up some excitement by garnishing with fresh parsley and a sprinkle of additional Parmesan cheese. You can also serve them with spaghetti for a classic dish, or as hoagies with melted cheese on a crusty roll for a fun twist.
Recipe Variations: Get Creative!
-
Spicy Italian Meatballs
Add red pepper flakes to the mixture for a spicy kick, or swap regular breadcrumbs for spicy Italian ones. -
Herbed Chicken Meatballs
Substitute ground chicken for ground beef and add Italian seasoning for a lighter option. -
BBQ Meatballs
Mix in your favorite barbecue sauce into the meatball mixture for a fun twist, then serve them with extra sauce on the side! -
Cheesy Stuffed Meatballs
Insert a small cube of mozzarella cheese into the center of each meatball before rolling it. When baked, it’ll ooze delicious cheese! -
Vegetarian Twist
Replace the ground beef with lentils or chickpeas combined with breadcrumbs and spices for a veggie option that’s equally delicious.
Chef’s Notes: A Personal Touch
Funny story: the first time I attempted to make meatballs as an adult, I forgot the egg! I mixed everything up, rolled those beauties, and they crumbled apart when I tried to cook them. After a minor kitchen meltdown, I realized that even the most experienced cooks have their off days—or maybe a cooking disaster that turns into a good laugh!
Over the years, I kept refining this recipe, adapting it to suit my tastes and those of the people I love to cook for. The comforting aroma and flavors remind me of my grandma and the countless times we shared in the kitchen. So, feel free to sprinkle on your personality while making these meatballs; cooking should be about joy and expression!
FAQs and Troubleshooting
Q1: Why did my meatballs fall apart?
A: Most likely, they didn’t have enough binding! Make sure you include the egg and breadcrumbs. Also, handle the mixture with care—overmixing can make them tough!
Q2: Can I make these meatballs in advance?
A: Absolutely! You can prepare them ahead of time and refrigerate for up to 24 hours before cooking. You can also freeze them uncooked, then bake when you’re ready to enjoy.
Q3: What’s the best way to reheat meatballs?
A: To keep them moist, reheat in a covered skillet with a splash of marinara or broth over medium-low heat. This prevents them from drying out!
Q4: Can I bake meatballs instead of frying them?
A: Yes! Baking is a great method. It’s healthier and less messy than frying. Plus, you get those delicious roasted flavors!
Nutritional Info (Optional)
Each meatball (approximately 1 oz) contains about:
- Calories: 100
- Protein: 7g
- Fat: 6g
- Carbs: 3g
- Fiber: 0g
So gather your ingredients and bring a little bit of warmth and joy into your kitchen with my Juicy Homemade Ground Beef Meatballs. Happy cooking! Let’s create something delicious together!
PrintJuicy Homemade Ground Beef Meatballs
Delicious homemade meatballs perfect for family dinners, packed with flavor and nostalgia.
- Prep Time: 15 minutes
- Cook Time: 25 minutes
- Total Time: 40 minutes
- Yield: 4 servings 1x
- Category: Main Course
- Method: Baking
- Cuisine: Italian
- Diet: Non-Vegetarian
Ingredients
- 1 pound ground beef
- 1/2 cup breadcrumbs
- 1 large egg
- 1/4 cup milk
- 1/4 cup grated Parmesan cheese
- 1/4 cup chopped fresh parsley
- 1 small onion, finely chopped
- 2 cloves garlic, minced
- 1 teaspoon salt
- 1/2 teaspoon black pepper
- 2 tablespoons olive oil
Instructions
- Preheat your oven to 400°F (200°C).
- Prep a large mixing bowl and a baking sheet lined with parchment paper.
- Mix the ground beef, breadcrumbs, egg, milk, Parmesan cheese, parsley, chopped onion, minced garlic, salt, and black pepper in the mixing bowl.
- Shape about 2 tablespoons of the mixture into each meatball.
- Place the meatballs on the prepared baking sheet, spaced evenly.
- Drizzle olive oil over the meatballs.
- Bake for 20-25 minutes until cooked through and browned.
- Serve and enjoy!
Notes
You can prepare the meatballs in advance and refrigerate them. They can also be frozen uncooked and baked when ready.
Nutrition
- Serving Size: 1 meatball
- Calories: 100
- Sugar: 1g
- Sodium: 400mg
- Fat: 6g
- Saturated Fat: 2g
- Unsaturated Fat: 4g
- Trans Fat: 0g
- Carbohydrates: 3g
- Fiber: 0g
- Protein: 7g
- Cholesterol: 30mg
Keywords: meatballs, beef, Italian, comfort food, homemade, family dinner
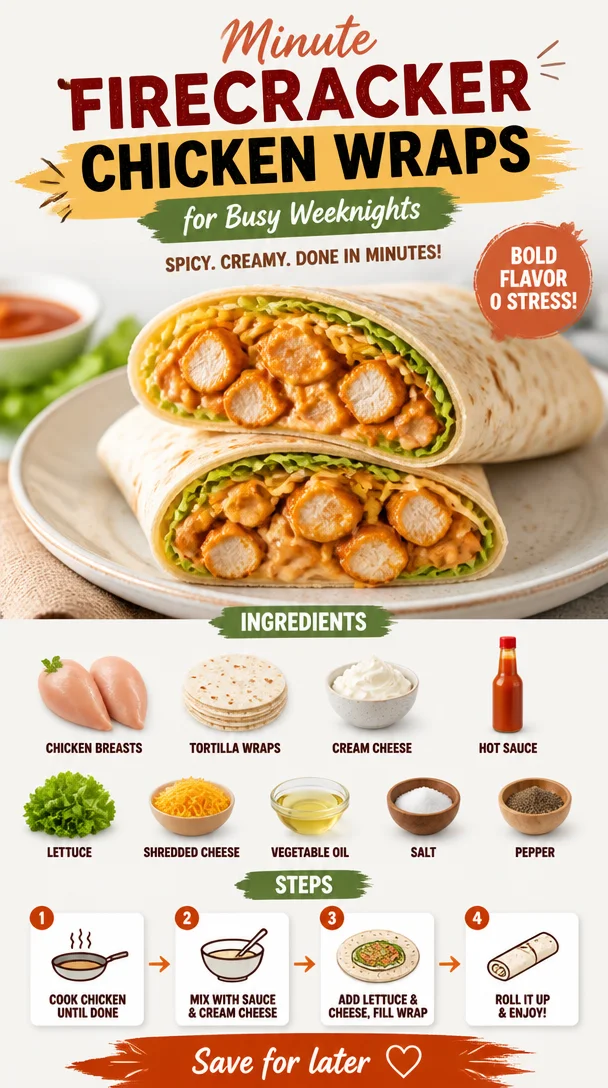
Minute Firecracker Chicken Wraps for Busy Weeknights
Firecracker Chicken Wraps: A Delicious Clash of Flavors
Welcome to another food adventure at Clean Plate Cravings! Today, I’m thrilled to share a recipe that’s not only tantalizing for your taste buds but also fun to make and perfect for any day of the week. Say hello to Firecracker Chicken Wraps! These wraps bring a sweet and spicy explosion of flavor wrapped up in a delightful tortilla. Whether you’re cooking for a family meal, hosting friends for game night, or just whipping up something quick after a long day, these wraps will tick all the boxes.
Just imagine biting into a tantalizing wrap filled with tender, spicy chicken, smooth cream cheese, and crunchy lettuce — it’s a combination that’s impossible to resist! So, grab your apron and let’s dive into the deliciousness together!
Personal Story: Cooking with My Grandma
As a child, there was nothing quite like spending time in my grandma’s kitchen. She had this magical ability to transform ordinary ingredients into extraordinary dishes. One of my fondest memories was when she’d make her famous spicy chicken wraps for family gatherings. The kitchen would be filled with the delightful aroma of sautéing chicken and spices, and my siblings and I would wiggle with excitement, eagerly waiting for the first bite.
I remember one summer afternoon when the family came over, and Grandma decided to spice things up a bit—literally! She added a touch of her homemade hot sauce to the chicken, and it was a game-changer. It was fiery, sweet, and packed full of flavor. Standing on a stool next to her, she taught me the importance of balancing flavors, and those lessons stuck with me through my culinary journey. Today’s Firecracker Chicken Wraps are an homage to those cherished memories and a tribute to Grandma’s fiery spirit in the kitchen.
Ingredients
-
Chicken Breasts: The star of our wraps! Boneless, skinless chicken breasts work best. You can substitute with turkey breast or even tofu for a vegetarian option.
-
Tortilla Wraps: I prefer whole wheat tortillas for added fiber, but any tortilla (corn, spinach, or gluten-free) will do! Play around with different types!
-
Cream Cheese: This creamy goodness adds a rich, smooth texture that balances the heat. Don’t have cream cheese? Try Greek yogurt or hummus for a lighter twist.
-
Hot Sauce: Bring on the heat! Use your favorite hot sauce; I like a blend of sweet and spicy. For less heat, a mild salsa can be a great substitution.
-
Lettuce: Crisp lettuce provides a refreshing crunch. Romaine or iceberg work well, but feel free to swap with spinach or kale for added nutrients.
-
Shredded Cheese: Cheddar or Monterey Jack are great choices. For a healthier version, try a dairy-free cheese or skip it altogether for a lighter wrap.
-
Vegetable Oil: For cooking the chicken and preventing sticking. You can use olive oil or avocado oil for additional flavor and health benefits.
-
Salt and Pepper: Essential seasonings to enhance flavor. Freshly ground black pepper and sea salt can elevate your dish!
Step-by-Step Instructions
-
Prep the Chicken: Start by slicing your chicken breasts into thin strips. This allows for quicker cooking and absorption of flavors. Give them a good sprinkle of salt and pepper to season.
-
Heat the Pan: Grab a large skillet and drizzle in a little vegetable oil. Heat over medium-high heat until the oil shimmers. This is the magic moment when your chicken will sear beautifully!
-
Sauté the Chicken: Add the seasoned chicken strips to the skillet in a single layer. Sauté for about 5-7 minutes, or until the chicken is cooked through and has a lovely golden color. Don’t forget to stir occasionally! Chef hint: Letting the chicken sit for a minute before stirring develops a lovely crust.
-
Fire it Up: Once the chicken is cooked, reduce the heat to low and stir in a generous splash of hot sauce. You can crank it up or tone it down depending on your spice preference! Cook for another minute to let the chicken soak up that spicy goodness.
-
Prepare the Tortilla: While the chicken is finishing up, take your tortillas and spread a layer of cream cheese on each one. It creates a nice barrier that keeps the wrap from getting soggy.
-
Assemble Your Wraps: Layer the spicy chicken mixture down the center of the tortilla. Next, add some crisp lettuce and a sprinkle of shredded cheese. Feel free to be generous or go light, depending on your taste!
-
Wrap It Up: Fold the sides of the tortilla over the filling, then roll from the bottom up. Tuck it in as you roll to ensure nothing spills out. Chef tip: If your tortilla feels stiff, give it a quick 20-second zap in the microwave to make it more pliable.
-
Slice and Serve: Slice the wrap in half diagonally, and voilà! You’re ready to enjoy these Firecracker Chicken Wraps!
Serving Suggestions
To serve these wraps, plate them up on a colorful dish for an inviting look. You could drizzle an extra touch of hot sauce or a dollop of sour cream on top for that extra zing. Pair them with a fresh garden salad or some crunchy veggie sticks for a complete meal.
Recipe Variations
-
Veggie Firecracker Wrap: Swap the chicken for roasted veggies like bell peppers, zucchini, and eggplant for a vibrant vegetarian option.
-
Buffalo Style: Mix in some blue cheese dressing for a classic Buffalo chicken vibe.
-
Asian Twist: Add a splash of soy sauce and sprinkle sesame seeds over the chicken for an Asian-inspired wrap!
-
Southwestern Flair: Mix in black beans and corn with a sprinkle of taco seasoning for a hearty, Southwestern version.
-
Breakfast Wrap: Use scrambled eggs instead of chicken, with a dash of hot sauce for a spicy breakfast kick!
Chef’s Notes
This recipe has evolved over the years, initially inspired by my grandma’s spicy chicken but adding my creative spin brought new life to it. I love experimenting with different sauces and toppings based on what’s available in my fridge. One memorable evening, I tried adding pineapple to the chicken, and it gave the wraps a sweet twist that my friends raved about!
Cooking is all about exploration, and I encourage you to make this recipe your own. Don’t hesitate to tweak and adjust ingredients to fit your taste—after all, that’s what makes home cooking so special!
FAQs and Troubleshooting
1. Can I use frozen chicken breasts?
Absolutely! Just make sure to thaw them thoroughly before cutting and cooking. Quick tip: The microwave can work in a pinch, but for best results, let them thaw in the fridge overnight.
2. My chicken is tough; what went wrong?
If the chicken is overcooked or cooked on high heat for too long, it can dry out. To avoid this, try using a meat thermometer; the internal temperature should reach 165°F for perfect juiciness.
3. How do I store leftovers?
Wrap the leftovers in plastic wrap or foil and store them in an airtight container in the fridge for up to 2 days. Reheat in the microwave or a skillet before enjoying again!
4. What if I can’t find hot sauce?
No worries! You can substitute it with sriracha, chili paste, or a homemade mixture with vinegar and crushed red pepper flakes. Experiment away!
Nutritional Info
While exact nutrition can vary based on your ingredients, a typical Firecracker Chicken Wrap contains approximately 400 calories per wrap, offering a nice balance of protein, fats, and carbs.
There you have it! Firecracker Chicken Wraps that’ll light up your meal any day of the week. I hope you enjoy this recipe as much as I do. Let’s keep the kitchen fun and full of flavors! Happy cooking!
PrintFirecracker Chicken Wraps
These Firecracker Chicken Wraps bring a sweet and spicy explosion of flavor wrapped up in a delightful tortilla. Perfect for any day of the week!
- Prep Time: 15 minutes
- Cook Time: 15 minutes
- Total Time: 30 minutes
- Yield: 4 servings 1x
- Category: Main Course
- Method: Sautéing
- Cuisine: American
- Diet: Non-Vegetarian
Ingredients
- 1 lb boneless, skinless chicken breasts
- 4 whole wheat tortilla wraps
- 4 oz cream cheese
- 2–4 tbsp hot sauce
- 1 cup lettuce (romaine or iceberg)
- 1 cup shredded cheese (cheddar or Monterey Jack)
- 2 tbsp vegetable oil
- Salt and pepper to taste
Instructions
- Prep the chicken by slicing it into thin strips and seasoning with salt and pepper.
- Heat a large skillet over medium-high heat and add vegetable oil.
- Sauté the chicken strips until cooked through, about 5-7 minutes.
- Fire it up by lowering the heat, adding hot sauce, and cooking for another minute.
- Prepare the tortillas by spreading cream cheese on each one.
- Assemble the wraps with chicken, lettuce, and shredded cheese.
- Wrap the tortillas securely around the filling.
- Slice the wraps in half and serve.
Notes
Feel free to customize these wraps with different proteins or toppings based on your preference!
Nutrition
- Serving Size: 1 wrap
- Calories: 400
- Sugar: 3g
- Sodium: 600mg
- Fat: 20g
- Saturated Fat: 9g
- Unsaturated Fat: 6g
- Trans Fat: 0g
- Carbohydrates: 25g
- Fiber: 3g
- Protein: 25g
- Cholesterol: 70mg
Keywords: chicken wraps, spicy wraps, easy dinner, quick meal
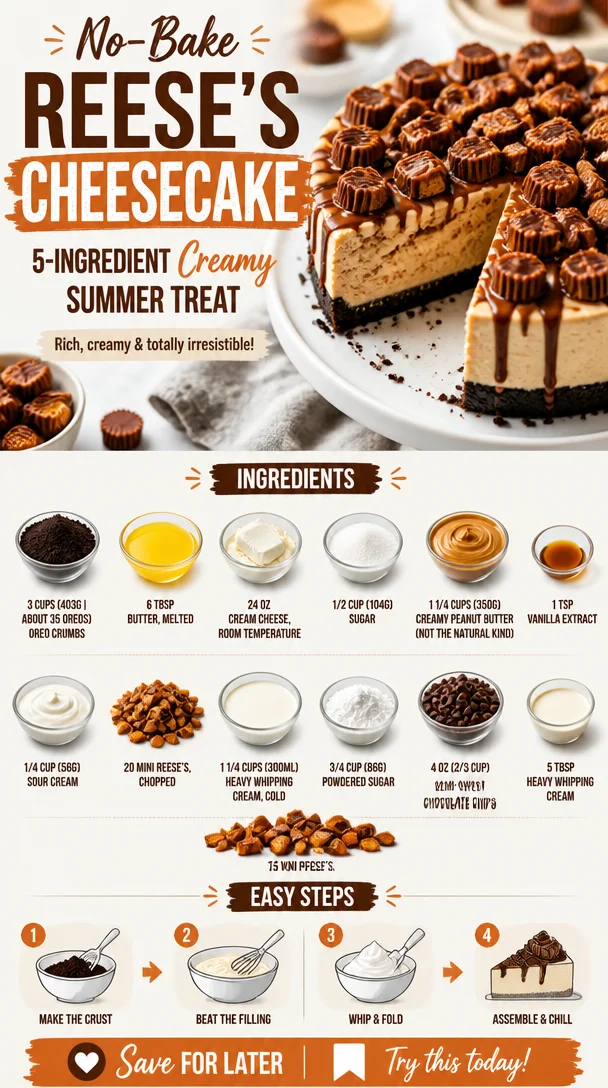
No-Bake Reese’s Cheesecake: 5-Ingredient Creamy Summer Treat
No-Bake Reese’s Peanut Butter Cheesecake: An Irresistible Treat
Welcome to the sweet side of cooking, friends! Today, we’re diving headfirst into a scrumptious creation that combines two of the best things known to humankind: cheesecake and Reese’s Peanut Butter Cups. Yes, you heard it right—this is a No-Bake Reese’s Peanut Butter Cheesecake, and it’s so simple, creamy, and utterly delicious that you’ll find it hard to resist. Whether you’re planning a birthday bash or just need a sweet pick-me-up after a long week, this cheesecake is the answer to all your dessert dreams.
Picture this: creamy cheesecake goodness resting atop a crumbly Oreo crust, all drizzled with luscious chocolate and studded with mini Reese’s. It’s like a party on your plate, and the best part? You can whip it up without ever turning on your oven! So, grab your mixing bowls and let’s get started on making this delightful dessert that’s perfect for all peanut butter and chocolate lovers out there.
A Sweet Memory
Before we jump into the recipe, I want to share a little story about my love for cheesecake. Growing up, my mom would always make a chocolate cheesecake for special occasions—birthdays, anniversaries, you name it. I remember the rich aroma wafting through our kitchen, and how each slice was a reason to celebrate. But let’s be real; it was the creamy, dreamy texture of that cheesecake that always had me begging for seconds.
Years later, I discovered the delightful combination of peanut butter and chocolate, thanks to my obsession with those mini Reese’s cups. So, I thought, "Why not create a cheesecake recipe that pays homage to both my childhood favorite and my peanut buttery obsession?" That’s how the No-Bake Reese’s Peanut Butter Cheesecake was born! It’s easy, it fulfills my sweet tooth, and every bite transports me back to those family gatherings. Let’s make some sweet memories together, shall we?
Ingredients
To create this dessert masterpiece, you’ll need the following ingredients. Each ingredient plays a crucial role in delivering that perfect flavor and texture, so let’s break them down:
-
Oreo crumbs (3 cups | about 35 Oreos): These will be the base of our cheesecake. If you’re feeling adventurous, you can substitute with graham cracker crumbs for a different flavor profile, but let’s be honest—Oreo crust is where it’s at!
-
Butter (6 tbsp, melted): This binds the Oreo crumbs together. For a dairy-free version, coconut oil works well as a substitute.
-
Cream cheese (24 oz, room temperature): The star ingredient that gives the cheesecake its creamy texture. You can opt for reduced-fat cream cheese if you want to lighten it up a bit.
-
Sugar (1/2 cup | 104g): A balance of sweetness in your cheesecake. Feel free to use coconut sugar or a sugar substitute to suit your dietary preferences.
-
Creamy peanut butter (1 1/4 cups | 350g): This is where the magic happens! Make sure to use creamy, not natural, peanut butter for the best consistency.
-
Vanilla extract (1 tsp): A must-have for flavor enhancement. Homemade vanilla extract brings an extra touch of warmth!
-
Sour cream (1/4 cup | 58g): This adds a hint of tanginess and creaminess, elevating the overall taste of the cheesecake. Greek yogurt is a decent substitute if you’re out of sour cream.
-
Mini Reese’s (20, chopped): Because who doesn’t want chunks of chocolatey goodness in their cheesecake? You can use regular Reese’s or even other varieties if you wish!
-
Heavy whipping cream (1 1/4 cups | 300ml, cold): Essential for whipping into fluffy clouds of deliciousness. For a lighter option, opt for whipped coconut cream.
-
Powdered sugar (3/4 cup | 86g): This sweetens the whipped cream and stabilizes it, ensuring we get that perfect dollop on top. You can reduce the quantity if you prefer less sweetness.
-
Semi-sweet chocolate chips (4 oz | 2/3 cup): These will be melted to create that dreamy chocolate drizzle. Any chocolate you love will work—dark chocolate is a great option too!
-
Heavy whipping cream (5 tbsp): Used to melt down the chocolate for that rich drizzle!
-
Mini Reese’s (15, chopped): Trust me; you’ll want even more of this goodness on top!
Step-by-Step Instructions
Making this No-Bake Reese’s Peanut Butter Cheesecake is a breeze. Follow these steps, and you’ll have a dessert fit for a celebration in no time!
-
Prepare the Oreo crust:
- In a mixing bowl, combine the Oreo crumbs and melted butter. Mix until the crumbs are evenly coated—think wet sand.
- Press the mixture firmly into the bottom of a 9-inch springform pan. Use the back of a measuring cup for even pressure; this will help it hold its shape once set. Put it in the freezer while you prepare the filling.
-
Make the cheesecake filling:
- In a large mixing bowl, beat the room temperature cream cheese with an electric mixer until it’s smooth and creamy—about 2 minutes. This is where you’ll want to make sure there are no lumps!
- Add the sugar, creamy peanut butter, vanilla extract, and sour cream. Beat again until everything is well combined. The mixture should be fluffy and full of that inviting peanut buttery goodness.
-
Fold in the chopped Reese’s:
- Gently fold in the chopped mini Reese’s using a spatula. This step is all about preserving the chunks in your cheesecake. Trust me; each bite will be worth it!
-
Whip the cream:
- In a separate bowl, pour in the cold heavy whipping cream. Beat on high speed until soft peaks form—this should take around 3-4 minutes.
- Gradually add the powdered sugar, continuing to whip until stiff peaks form. Aim for a cloud-like, fluffy consistency.
-
Combine the whipped cream with the cream cheese mixture:
- Gently fold the whipped cream into the cheesecake mixture until it’s well combined but still light and airy. Remember, you want that airy texture—the fluffier, the better!
-
Pour the filling into the crust:
- Carefully spoon the cheesecake filling over the prepared crust, smoothing out the top as you go. Use a spatula to create a gentle swirl if you’re feeling fancy!
-
Chill the cheesecake:
- Cover the springform pan with plastic wrap and place it in the refrigerator. Allow it to chill for at least 4 hours, or overnight if you can resist the temptation!
-
Make the chocolate drizzle:
- In a microwave-safe bowl, combine the semi-sweet chocolate chips and 5 tablespoons of heavy whipping cream. Microwave in 30-second intervals, stirring in between, until melted and smooth. Set aside to cool slightly.
-
Serve it up:
- Once the cheesecake is set, remove it from the springform pan. Drizzle the melted chocolate over the top and finish with the remaining chopped mini Reese’s scattered across the surface. It’s like a fancy dessert just waiting to wow your friends and family!
Serving Suggestions
Slice your No-Bake Reese’s Peanut Butter Cheesecake into generous portions and place them on dessert plates. I love adding a dollop of whipped cream on the side for that extra touch of joy! Consider serving it with a forkful of chocolate sauce for added indulgence. Pair it with a scoop of vanilla ice cream or a sprinkle of crushed nuts for a fabulous crunch. This dessert is about making it your own, so feel free to get creative!
Recipe Variations
Looking to mix things up? Here are some fun variations to try:
-
Cookie Base Swap: Try using graham crackers, digestive biscuits, or even crushed pretzels for a salty-sweet crust!
-
Flavor Infusion: Add a tablespoon of your favorite liqueur, like Kahlúa or Bailey’s, to the cheesecake filling for an adult twist.
-
Healthier Version: Substitute half of the cream cheese with Greek yogurt for a lighter option, and use a natural peanut butter without added sugar.
-
Peanut Butter Swirl: For a pretty presentation, drizzle some extra peanut butter into the filling before pouring it into the crust and use a knife to create swirls.
-
Nutty Surprise: Add crushed nuts, like peanuts or almonds, into the cheesecake mixture for extra crunch and flavor—yum!
Chef’s Notes
This No-Bake Reese’s Peanut Butter Cheesecake is one of those recipes that’s evolved over time. I remember my first attempts, where I may have overwhipped the cream (leading to a bit of a grainy texture—oops!) or slightly underfilled my crust. It took a few tries to get the balance just right, but that was all part of the fun! Now, I love sharing it with friends and family, and it never fails to impress.
So, don’t stress if things get a little messy in the kitchen. After all, the joy of cooking comes not just from the end result but from the laughter and love shared along the way!
FAQs and Troubleshooting
-
Can I use natural peanut butter instead of creamy?
- While you can technically use natural peanut butter, it can affect the texture of your cheesecake. Avoid the oily, drippy kind as it may make your cheesecake too runny.
-
What if my cheesecake doesn’t set?
- It could be due to not chilling it long enough or not using sufficient stabilizing ingredients like cream cheese. Ensure both are well mixed and cold to help it firm up properly.
-
How do I store leftovers?
- Store any leftover cheesecake in an airtight container in the fridge for up to 5 days. Just remember to cover the top with plastic wrap to keep it fresh!
-
Can I freeze this cheesecake?
- Absolutely! Once set, wrap it tightly in plastic wrap and aluminum foil, and it will last in the freezer for about 2 months. Let it defrost in the refrigerator overnight before serving.
I hope this No-Bake Reese’s Peanut Butter Cheesecake brings as much joy to your home as it has to mine. It’s simple, delicious, and an absolute crowd-pleaser—a dessert worth celebrating! So go on, grab the ingredients, and let’s make some sweet memories together. Happy baking (or should I say making?)!
PrintNo-Bake Reese’s Peanut Butter Cheesecake
A creamy and delicious no-bake cheesecake that combines the rich flavors of peanut butter and chocolate, perfect for dessert lovers.
- Prep Time: 15 minutes
- Cook Time: 240 minutes
- Total Time: 255 minutes
- Yield: 12 servings 1x
- Category: Dessert
- Method: No-Bake
- Cuisine: American
- Diet: Vegetarian
Ingredients
- 3 cups Oreo crumbs (about 35 Oreos)
- 6 tbsp butter, melted
- 24 oz cream cheese, room temperature
- 1/2 cup sugar (104g)
- 1 1/4 cups creamy peanut butter (350g)
- 1 tsp vanilla extract
- 1/4 cup sour cream (58g)
- 20 mini Reese’s, chopped
- 1 1/4 cups heavy whipping cream (300ml, cold)
- 3/4 cup powdered sugar (86g)
- 4 oz semi-sweet chocolate chips (2/3 cup)
- 5 tbsp heavy whipping cream
- 15 mini Reese’s, chopped
Instructions
- Prepare the Oreo crust: In a mixing bowl, combine the Oreo crumbs and melted butter. Mix until the crumbs are evenly coated. Press the mixture firmly into the bottom of a 9-inch springform pan. Freeze while preparing the filling.
- Make the cheesecake filling: Beat the cream cheese until smooth and creamy. Add the sugar, peanut butter, vanilla extract, and sour cream. Beat until well combined.
- Fold in the chopped Reese’s, preserving the chunks.
- Whip the cream: In a separate bowl, beat the cold heavy whipping cream until soft peaks form. Gradually add powdered sugar until stiff peaks form.
- Combine the whipped cream with the cheesecake mixture, folding gently until well combined.
- Pour the filling into the crust and smooth out the top.
- Chill the cheesecake for at least 4 hours or overnight.
- Make the chocolate drizzle by melting chocolate chips and cream in the microwave in intervals. Set aside to cool.
- Serve the chilled cheesecake topped with chocolate drizzle and remaining chopped Reese’s.
Notes
For a healthier version, substitute half the cream cheese with Greek yogurt and use natural peanut butter. Store leftovers in an airtight container in the fridge for up to 5 days.
Nutrition
- Serving Size: 1 serving
- Calories: 400
- Sugar: 27g
- Sodium: 250mg
- Fat: 25g
- Saturated Fat: 10g
- Unsaturated Fat: 10g
- Trans Fat: 0g
- Carbohydrates: 35g
- Fiber: 2g
- Protein: 6g
- Cholesterol: 40mg
Keywords: cheesecake, no-bake, peanut butter, dessert, chocolate
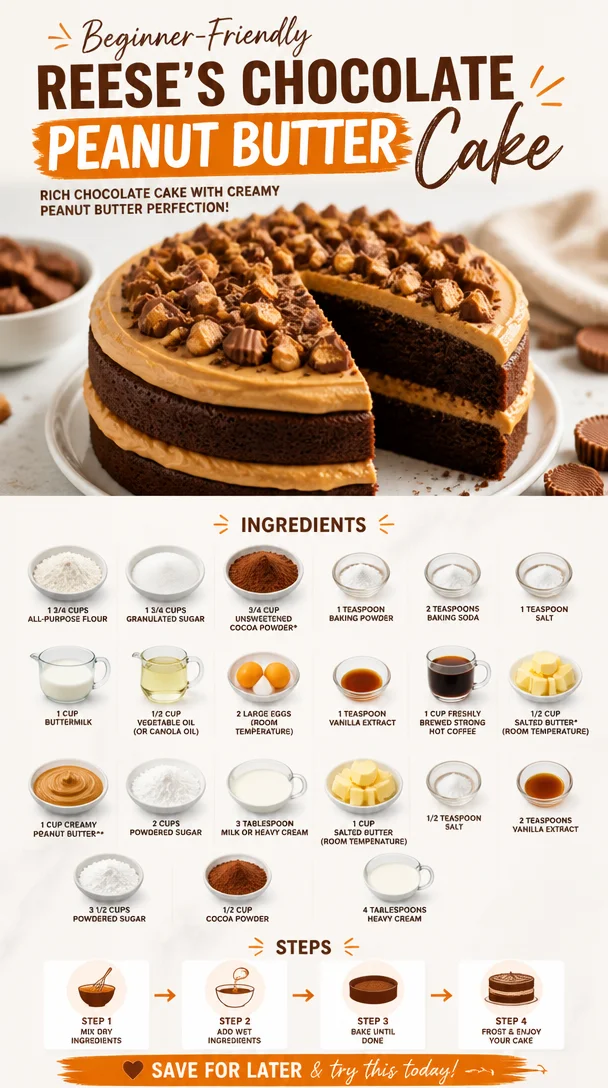
Beginner-Friendly Reese’s Chocolate Peanut Butter Cake
Indulge in Decadence: The Ultimate Reese’s Chocolate Peanut Butter Cake
Welcome, fellow food lovers! Today, I’m excited to share one of my absolute favorite desserts—the Reese’s Chocolate Peanut Butter Cake. If you’re anything like me, you understand the magnificent union of chocolate and peanut butter that makes the world seem a little brighter with every bite. This cake is the ultimate indulgence, a chocolatey paradise enhanced by the rich, nutty goodness of creamy peanut butter. Whether you’re celebrating a special occasion or simply craving something sweet, this cake is bound to satisfy.
Now, let’s talk about comfort food. It doesn’t take a culinary genius to appreciate the magic of a slice of cake, but when it’s a moist chocolate cake slathered with peanut butter frosting, that’s where euphoria happens, my friends! There’s something so grounding about baking—(maybe it’s the intoxicating aroma of chocolate wafting through the air)—that brings back fond memories. For me, it was always about the simple joys: coming home from school to my mom whipping up her famous chocolate cake, the sound of her mixing bowl clinking against the counter as she blended those decadent ingredients. That childhood nostalgia is alive in every layer of this cake.
Today, I want to help you recreate that joyful experience in your own kitchen. Buckle up as we dive into this rich, chocolatey world full of sweet surprises that will have your taste buds dancing!
A Sweet Memory
Thinking back, I remember one rainy afternoon in my childhood when the skies were gray and dreary. My mom and I decided to whip up our favorite chocolate cake, a recipe that had become ours over the years. While mixing the ingredients, she turned to me with a playful glimmer in her eye and said, "Ava, how about we take this to the next level and add peanut butter?” Little did I know, this innocent suggestion would spark my lifelong love affair with this classic flavor duo!
So there we went, adding peanut butter to the cake mix and frosting, and that day forever changed my baking game. As we devoured our creation, laughter filled the kitchen, and those moments became treasured memories. Every bite was decadently delightful, a perfect blend of rich chocolate and nutty peanut butter that felt like a warm hug. Fast-forward to today, and I still find myself recreating that magic in my own kitchen, with a few touches and tips that I’m excited to share with you.
Ingredients
Here’s what you’ll need to whip up this delicious cake:
-
1 3/4 cups all-purpose flour
The backbone of our cake. Can’t go wrong here! If you’re gluten-sensitive, feel free to swap it with a 1:1 gluten-free flour blend. -
1 3/4 cups granulated sugar
For a touch of sweetness and that sweet caramelization during baking. -
3/4 cup unsweetened cocoa powder
Use high-quality cocoa for a richer flavor—I promise it makes a difference! -
1 teaspoon baking powder
Helps the cake rise slightly. You can use this instead of baking soda if you have it on hand. -
2 teaspoons baking soda
This will give the cake that perfect fluffiness alongside the buttermilk reaction. -
1 teaspoon salt
Enhances all the flavors, making the chocolate pop! -
1 cup buttermilk
Adds moisture and a subtle tang. If you don’t have buttermilk, a mixture of regular milk with a splash of vinegar works wonders! -
1/2 cup vegetable oil (or canola oil)
Helps keep the cake moist. You could even use melted coconut oil for a twist! -
2 large eggs (room temperature)
Provide richness and structure. Room temperature eggs mix better, so remember to take them out ahead of time! -
1 teaspoon vanilla extract
A splash of vanilla is always a good idea to enhance sweetness. -
1 cup freshly brewed strong hot coffee
Don’t worry; it won’t taste like coffee! It just deepens the chocolate flavor. Use decaf or espresso for a milder flavor. -
1/2 cup salted butter (room temperature)
This will be key in creating a creamy, flavorful frosting. -
1 cup creamy peanut butter
The star of the show! Feel free to use crunchy if you like a texture surprise. -
2 cups powdered sugar
Sweetens the frosting like a dream. -
3 tablespoons milk or heavy cream
This will smooth out the frosting to your desired consistency. Choose heavy cream for a silkier texture! -
1 cup salted butter (room temperature)
Yes, we’re using this again! It’s vital for that irresistible frosting. -
1/2 teaspoon salt
Balances the sweetness in the frosting for a delightful finish. -
2 teaspoons vanilla extract (again!)
Go big or go home! -
3 1/2 cups powdered sugar
More sweetness because we love it! -
1/2 cup cocoa powder
A touch of chocolate for our frosting—yes, please! -
4 tablespoons heavy cream
This will give your frosting that velvety finish.
Step-by-Step Instructions
Alright, let’s get baking! Follow these detailed steps:
-
Preheat Your Oven: Begin by preheating your oven to 350°F (175°C). While the oven warms up, it’s a great time to prepare your cake pans. Grease and flour two 9-inch round cake pans or line them with parchment paper for easy removal.
-
Mix the Dry Ingredients: In a large mixing bowl, whisk together the flour, granulated sugar, cocoa powder, baking powder, baking soda, and salt until well combined. This is crucial—mixing these together first ensures even distribution of all those dry ingredients.
-
Combine the Wet Ingredients: In another bowl, whisk together the buttermilk, vegetable oil, eggs, and vanilla extract until it’s smooth and well blended.
-
Combine the Mixtures: Gradually pour the wet mixture into the dry ingredients, mixing with a spatula or electric mixer on low speed. The batter will be thick at this point.
-
Brew That Coffee: Start your coffee brewing. You want it hot and fresh for the next step!
-
Mix in Hot Coffee: Once your coffee is brewed, add it to your batter and mix until combined. You might be worried about the runny mixture, but that hot coffee is what gives the cake is moistness!
-
Transfer to Cake Pans: Divide the batter evenly between the prepared cake pans. Give them a light tap on the counter to release any air bubbles and ensure an even bake.
-
Bake: Place the pans in the preheated oven and bake for 30-35 minutes. Check doneness by inserting a toothpick into the center—if it comes out clean or with a few moist crumbs, you’re golden.
-
Cool: Once baked, remove them from the oven and let them cool in the pans for about 10-15 minutes before transferring to a wire rack to cool completely.
-
Prepare the Frosting: In a large mixing bowl, beat together the room temperature salted butter and creamy peanut butter until it’s light and fluffy. Gradually mix in the powdered sugar, followed by milk (or heavy cream) until you reach your desired texture. Add salt and vanilla, and beat until smooth and creamy.
-
Frost the Cakes: Once your cakes are completely cool, place one layer on a serving plate. Spread a generous layer of peanut butter frosting on top. Place the second layer on top and frost the sides and top of the cake. Crave even more decadence? Top with crushed Reese’s cups or chocolate shavings!
-
Final Touches: For a fun twist, whip up a chocolate ganache or extra chocolate frosting to drizzle over the top before serving—can you handle the temptation?!
Serving Suggestions
Serving this cake is all about presentation! Slice generous pieces and showcase the delightful layers of chocolate and peanut butter. Pair it with a scoop of vanilla ice cream or a dollop of whipped cream on the side. For a little extra flair, garnish with chopped peanuts, chocolate chips, or miniature Reese’s cups. It’ll wow your friends and family every time!
Recipe Variations
Feel adventurous? Here are a few variations to shake things up:
-
Chocolate Chip Surprise: Fold in some chocolate chips into the batter for extra gooeyness.
-
Nutty Crunch: Swap half the peanut butter for chunky peanut butter, adding delightful texture.
-
Healthier Choice: Try substituting half of the granulated sugar with honey or maple syrup for a lighter sweetness.
-
Frosting Flavors: Experiment with different frosting flavors by adding a splash of almond extract or a swirl of melted chocolate.
-
Gluten-Free Option: Use a gluten-free flour blend to make the cake gluten-free without sacrificing flavor.
Chef’s Notes
I have to admit that this recipe has evolved over the years. Initially, I was hesitant to combine peanut butter and chocolate in one cake, fearing it might be too rich. But as I experimented, I realized that life is all about taking delicious risks. The way these flavors harmonize is pure bliss, and every time I bake this cake, it feels like a warm hug from my childhood. And let’s be real—who wouldn’t want a slice of that?
FAQs and Troubleshooting
1. Why did my cake sink in the middle?
This can happen if your oven temperature is too low or the batter was overmixed after adding the dry ingredients. Make sure to preheat the oven and mix until just combined.
2. Can I use natural peanut butter in the frosting?
You can, but the texture may differ. Natural peanut butter can be thinner and less sweet; be prepared to adjust powdered sugar accordingly.
3. How do I prevent my cake from sticking to the pan?
Greasing and flouring the pans properly or using parchment paper will help ensure easy removal. You could even use non-stick spray for extra insurance!
4. Can I make this cake ahead of time?
Absolutely! The cake layers can be baked a day ahead and stored tightly wrapped at room temperature. Frost just before serving to keep it fresh.
Dive into this indulgent recipe full of flavor and childhood memories! I can’t wait for you all to experience the delight of this Reese’s Chocolate Peanut Butter Cake. Whether it’s for a birthday, anniversary, or simply because you deserve it—this cake is a must-try and always a winner in my book. Happy baking, friends!
PrintReese’s Chocolate Peanut Butter Cake
A decadent chocolate cake slathered with creamy peanut butter frosting, perfect for any occasion.
- Prep Time: 15 minutes
- Cook Time: 30 minutes
- Total Time: 45 minutes
- Yield: 12 servings 1x
- Category: Dessert
- Method: Baking
- Cuisine: American
- Diet: Vegetarian
Ingredients
- 1 3/4 cups all-purpose flour
- 1 3/4 cups granulated sugar
- 3/4 cup unsweetened cocoa powder
- 1 teaspoon baking powder
- 2 teaspoons baking soda
- 1 teaspoon salt
- 1 cup buttermilk
- 1/2 cup vegetable oil
- 2 large eggs (room temperature)
- 1 teaspoon vanilla extract
- 1 cup freshly brewed strong hot coffee
- 1/2 cup salted butter (room temperature)
- 1 cup creamy peanut butter
- 2 cups powdered sugar
- 3 tablespoons milk or heavy cream
- 1 cup salted butter (room temperature)
- 1/2 teaspoon salt (for frosting)
- 2 teaspoons vanilla extract (for frosting)
- 3 1/2 cups powdered sugar (for frosting)
- 1/2 cup cocoa powder (for frosting)
- 4 tablespoons heavy cream (for frosting)
Instructions
- Preheat your oven to 350°F (175°C). Prepare two 9-inch round cake pans by greasing and flouring them or lining with parchment paper.
- Mix the dry ingredients: In a large mixing bowl, whisk together the flour, granulated sugar, cocoa powder, baking powder, baking soda, and salt until well combined.
- Combine the wet ingredients: In another bowl, whisk together the buttermilk, vegetable oil, eggs, and vanilla extract until smooth.
- Combine the mixtures: Gradually pour the wet mixture into the dry ingredients, mixing until just combined.
- Brew your coffee. It should be hot and fresh.
- Mix in the hot coffee until combined.
- Transfer the batter evenly between the prepared cake pans.
- Bake for 30-35 minutes or until a toothpick comes out clean.
- Cool the cakes in the pans for 10-15 minutes before transferring to a wire rack to cool completely.
- Prepare the frosting by beating together the room temperature salted butter and creamy peanut butter until light and fluffy. Gradually mix in powdered sugar and milk until smooth.
- Frost the cooled cakes, first layering with frosting between the two layers, then covering the top and sides.
- Serve with optional decorations like crushed Reese’s cups or chocolate shavings.
Notes
For a rich flavor, use high-quality cocoa powder. You can also add chocolate chips to the batter for extra texture.
Nutrition
- Serving Size: 1 slice
- Calories: 550
- Sugar: 30g
- Sodium: 450mg
- Fat: 28g
- Saturated Fat: 10g
- Unsaturated Fat: 10g
- Trans Fat: 0g
- Carbohydrates: 65g
- Fiber: 3g
- Protein: 10g
- Cholesterol: 50mg
Keywords: chocolate cake, peanut butter, dessert, baking, indulgent, celebration
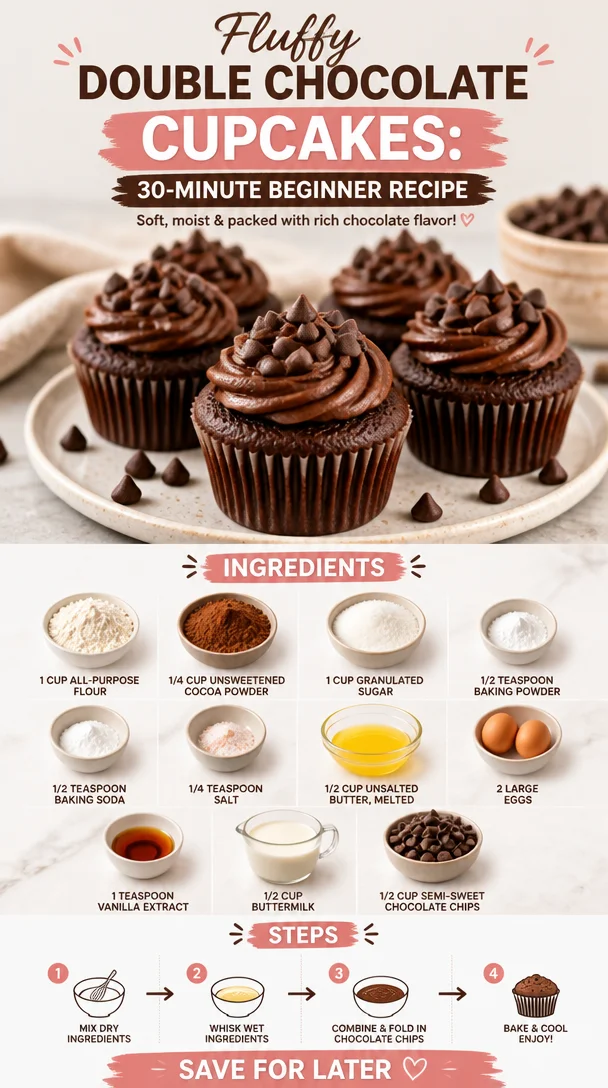
Fluffy Double Chocolate Cupcakes: 30-Minute Beginner Recipe
Indulge in Decadence: Double Chocolate Cupcakes Recipe
Welcome to another delicious adventure in the kitchen! Today, we’re diving into the world of rich, fudgy goodness with a recipe that will surely become your go-to treat: Double Chocolate Cupcakes. Now, I don’t know about you, but when I think of cupcakes, I can practically hear the whispers of sweet nostalgia mingling with the intoxicating aroma of chocolate wafting through my kitchen. So grab your apron, and let’s get those ovens fired up because these cupcakes are going to be a hit, whether it’s for a special occasion or just a weekday treat!
A Sweet Memory of Chocolate
There’s something so nostalgic about the scent of chocolate baking in the oven. It takes me back to family gatherings at my grandmother’s house, where laughter echoed off the walls and the kitchen was always filled with the sweet aroma of freshly baked goods. I remember distinctly the time we baked cupcakes together. She would skillfully measure out ingredients, while I impatiently waited to lick the bowl. Those moments weren’t just about enjoying dessert; they were about connecting, sharing stories, and simply being in the moment.
Fast forward to today, and I’m still relishing the joy that comes from baking with loved ones! These Double Chocolate Cupcakes are inspired by those heartwarming moments—a perfect way to bring a little nostalgia into your life while creating your own sweet memories. Let’s roll up our sleeves and make some magic happen in the kitchen together!
Ingredients
Before we get to the fun part, let’s check out the fabulous ingredients we need for our Double Chocolate Cupcakes.
-
1 cup all-purpose flour
A versatile base for our cupcakes; it helps create that perfect fluffy texture. Looking for a gluten-free option? You can use a 1:1 gluten-free flour blend as a fantastic substitute! -
1/4 cup unsweetened cocoa powder
This is where the chocolate magic begins! Unsweetened cocoa adds rich depth without added sugars. If you’re feeling adventurous, try using dark cocoa powder for an even more intense flavor. -
1 cup granulated sugar
Sweetness is essential in balance with the cocoa’s bitterness. If you prefer, coconut sugar or a sugar substitute can work here, but check the conversion ratio! -
1/2 teaspoon baking powder
This helps the cupcakes rise and become light and airy. Baking soda can be used as a substitute at half the amount—just make sure to balance it out with an acid! -
1/2 teaspoon baking soda
A crucial ingredient for leavening, ensuring our cupcakes won’t be dense. If you’re low on baking soda, you can omit it, but the rise may not be as high. -
1/4 teaspoon salt
Salt heightens flavors, even in sweet dishes. Don’t skip this! If you’re cutting back on sodium, reduce it slightly—your taste buds will guide you. -
1/2 cup unsalted butter, melted
Butter adds richness and moisture. If you’re vegan or dairy-free, swap this for melted coconut oil or a vegan butter alternative. -
2 large eggs
Eggs provide structure and moisture to our cupcakes. To make these egg-free, substitute two tablespoons of unsweetened applesauce or a flax egg for each egg. -
1 teaspoon vanilla extract
Vanilla adds warmth and depth to the flavor profile. Pure vanilla extract is always best, but imitation vanilla can suffice in a pinch. -
1/2 cup buttermilk
Buttermilk adds tanginess and keeps the cupcakes moist. If you’re out, just mix one tablespoon of vinegar or lemon juice with milk to create a quick substitute! -
1/2 cup semi-sweet chocolate chips
These are the ultimate treasure troves of melted chocolate goodness hidden within each cupcake. You could replace them with dark chocolate chips for a sophisticated flavor twist!
Step-by-Step Instructions
Now that we’ve gathered our ingredients, let’s dive into the cooking process! Follow along with my tips, and you’ll have a batch of irresistibly moist Double Chocolate Cupcakes in no time.
-
Preheat Your Oven
Preheat your oven to 350°F (175°C). This step is crucial as it ensures your cupcakes bake evenly. While you’re waiting, don’t forget to line a cupcake pan with paper liners—this makes for easy cleanup and adds a little pop of color! -
Mix Dry Ingredients
In a large mixing bowl, whisk together the flour, cocoa powder, sugar, baking powder, baking soda, and salt until everything is well blended. Pro tip: sift the cocoa powder before adding to remove any lumps for a smoother batter! -
Combine Wet Ingredients
In another bowl, whisk together the melted butter, eggs, vanilla extract, and buttermilk until smooth. I love using a handheld mixer for this, but a whisk works just fine too. Make sure your butter isn’t too hot, or it might cook the eggs! -
Blend Dry and Wet Mixtures
Gradually add the wet mixture to the dry ingredients. Use a spatula or a wooden spoon to gently fold the two together until just combined—it’s okay if a few lumps remain! Over-mixing can lead to tough cupcakes, and we want them to be as tender as a hug. -
Stir in the Chocolate Chips
Fold in those semi-sweet chocolate chips, ensuring they are evenly distributed throughout the batter. Can you smell that? Yum! -
Fill the Cupcake Liners
Use an ice cream scoop or a spoon to fill each liner about two-thirds full—this allows room for them to rise without overflowing. You can add a few extra chocolate chips on top for presentation if you’re feeling fancy! -
Bake
Pop the muffin pan into the preheated oven and bake for 18–20 minutes, or until a toothpick inserted into the center comes out clean (or with just a few crumbs—nothing wet!). -
Cool
Once baked, allow the cupcakes to cool in the pan for about 5 minutes before transferring them to a wire rack to cool completely. This step helps them retain moistness! -
Frost and Enjoy
Frost these beauties with your favorite chocolate frosting, or simply dust with powdered sugar for a lighter touch. My personal favorite is a fluffy chocolate buttercream, which complements the cupcakes beautifully.
Serving Suggestions
When it comes to serving your Double Chocolate Cupcakes, presentation is key! Arrange them on a colorful platter or a cute cake stand. Add some fresh berries or a sprinkle of chocolate shavings on top of the frosting for that extra wow factor. These cupcakes are perfect for birthdays, bake sales, or even just because it’s Tuesday and you deserve a treat!
Recipe Variations
Ready to get creative? Here are some fun ideas to switch things up:
- Minty Fresh: Add a teaspoon of peppermint extract to the batter for a mint-chocolate delight.
- Nutty Heaven: Fold in a half cup of chopped nuts—walnuts or macadamia nuts add fantastic crunch and flavor.
- Spicy Kick: A pinch of cayenne pepper or chili powder can give your chocolate an unexpected and delightful kick!
- Fruit Fusion: Incorporate a half cup of fresh raspberries into the batter for a chocolate-berry explosion of flavor.
Chef’s Notes
Every recipe tells a story, and this one is no different! Over time, I’ve adjusted my Double Chocolate Cupcake recipe so many times that it feels like a well-loved novel with a few plot twists. Initially, they were more of a cake than a cupcake, and I remember my first batch being so dense they could’ve doubled as doorstops. Trial and error in the kitchen is part of the fun, and it has led me to this fluffy, moist version you see today! Plus, I’ve always got a stash of chocolate chips—because let’s be real, you never know when a cupcake emergency will arise!
FAQs and Troubleshooting
1. Why are my cupcakes dense?
Over-mixing the batter or using stale baking powder/soda can cause dense cupcakes. Always measure your ingredients accurately and fold gently!
2. Can I make these in advance?
Absolutely! Cupcakes can be baked and stored in an airtight container for up to 3 days. Frost just before serving for the best texture.
3. What’s the best way to frost cupcakes?
Using a piping bag with your favorite tip will give you beautiful swirls and designs! If you don’t have one, a simple offset spatula works just fine for a casual touch.
4. Can I use different sweeteners?
Yes! You can use brown sugar or coconut sugar, but keep in mind it may slightly alter the flavor and texture.
Nutritional Info
For those minding their nutritional intake, here’s a rough estimate per cupcake (without frosting):
- Calories: 200
- Protein: 3g
- Carbohydrates: 27g
- Fat: 9g
- Sugar: 10g
These delightful Double Chocolate Cupcakes are a treat, and with the right adjustments, you can customize them to fit your lifestyle and preferences. Whether you’re making memories in your kitchen or enjoying a sweet moment alone, I hope these cupcakes bring you as much joy as they bring me. Happy baking, my fellow foodies! 🍫🧁
PrintDouble Chocolate Cupcakes
Indulge in these rich, fudgy Double Chocolate Cupcakes that are perfect for any occasion!
- Prep Time: 15 minutes
- Cook Time: 20 minutes
- Total Time: 35 minutes
- Yield: 12 servings 1x
- Category: Dessert
- Method: Baking
- Cuisine: American
- Diet: Vegetarian
Ingredients
- 1 cup all-purpose flour
- 1/4 cup unsweetened cocoa powder
- 1 cup granulated sugar
- 1/2 teaspoon baking powder
- 1/2 teaspoon baking soda
- 1/4 teaspoon salt
- 1/2 cup unsalted butter, melted
- 2 large eggs
- 1 teaspoon vanilla extract
- 1/2 cup buttermilk
- 1/2 cup semi-sweet chocolate chips
Instructions
- Preheat your oven to 350°F (175°C) and line a cupcake pan with paper liners.
- Mix the flour, cocoa powder, sugar, baking powder, baking soda, and salt in a bowl.
- Combine the melted butter, eggs, vanilla extract, and buttermilk in another bowl until smooth.
- Blend the wet mixture into the dry ingredients until just combined.
- Stir in the chocolate chips until evenly distributed.
- Fill each cupcake liner about two-thirds full.
- Bake for 18–20 minutes or until a toothpick comes out clean.
- Cool the cupcakes in the pan for 5 minutes, then transfer to a wire rack.
- Frost with your favorite chocolate frosting or dust with powdered sugar.
Notes
For a unique twist, try adding mint extract or folding in some nuts!
Nutrition
- Serving Size: 1 cupcake
- Calories: 200
- Sugar: 10g
- Sodium: 150mg
- Fat: 9g
- Saturated Fat: 5g
- Unsaturated Fat: 4g
- Trans Fat: 0g
- Carbohydrates: 27g
- Fiber: 1g
- Protein: 3g
- Cholesterol: 30mg
Keywords: chocolate, cupcakes, dessert, baking, sweet treat
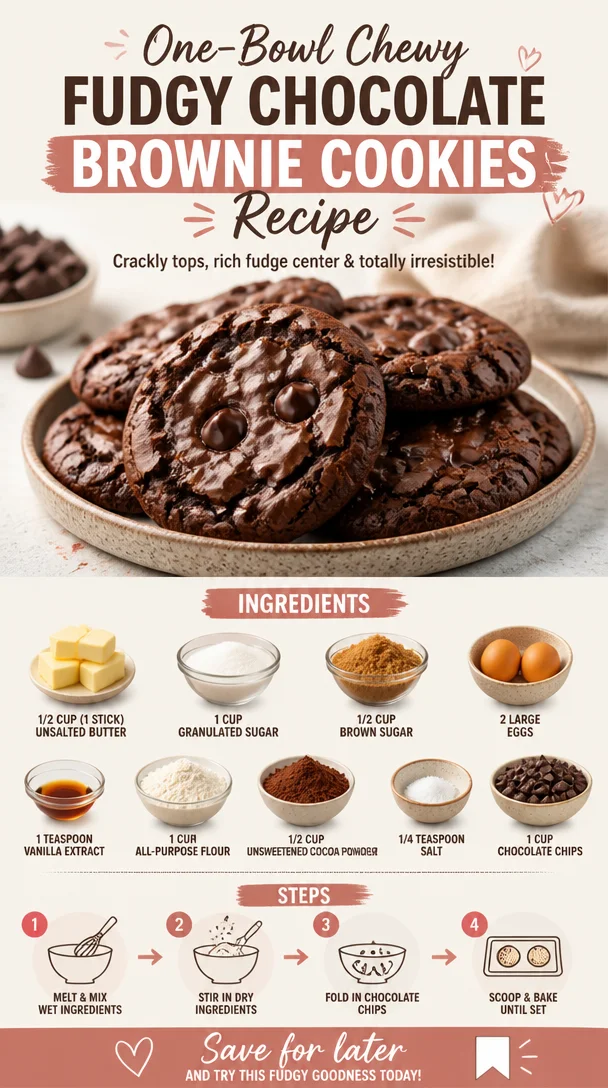
One-Bowl Chewy Fudgy Chocolate Brownie Cookies Recipe
Fudgy Chocolate Brownie Cookies: A Sweet Treat with a Side of Nostalgia
Hello, fellow foodies! Today, I’m thrilled to share a recipe that’s not just about satisfying your chocolate cravings—it’s also steeped in nostalgia and joyful memories. These fudgy chocolate brownie cookies are the perfect blend of rich chocolate flavor and that chewy, brownie goodness you adore. The best part? They’re incredibly easy to whip up, so you can enjoy the sweet rewards without spending hours in the kitchen!
Personal Story: A Taste of Childhood
I remember the first time I made brownies with my grandma on a rainy Saturday afternoon. We’d gather all the ingredients on her well-loved kitchen counter, and I’d eagerly help by cracking the eggs (with varying levels of success!) while she’d melt the butter on the stove, creating that warm, enticing aroma that filled the house. Once the batter was mixed and poured into the pan, we’d lick the mixing bowl clean, a reward we both cherished as we waited for the heavenly treat to bake.
Fast forward to my college days, and I found myself reinventing that classic brownie recipe for a late-night snack attack. One night, craving chocolate but wanting a cookie experience, I had the bright idea to merge the two. Voilà! The fudgy chocolate brownie cookie was born. They turned out to be everything I hoped for—crispy on the edges, soft and gooey in the middle. Each bite took me back to my grandma’s kitchen, with the same heartwarming comfort. Now, I’m excited to share this recipe with you so you can create those same joyful moments in your kitchen!
Ingredients
Here’s what you’ll need to create these delicious treats:
-
1/2 cup (1 stick) unsalted butter
This gives the cookies that rich, buttery flavor. If you’re in a pinch, you could substitute with coconut oil for a different twist. -
1 cup granulated sugar
For sweetness and that nice crispiness! If you prefer, feel free to use coconut sugar for a lower glycemic index. -
1/2 cup brown sugar
This adds a lovely depth of flavor and moisture to the cookies. Dark brown sugar will intensify the caramel notes, making them even more decadent. -
2 large eggs
Eggs act as a binding agent to help the cookies maintain their shape, achieving that perfect chewy texture. If you’re vegan, swap them with flax eggs (1 tablespoon ground flaxseed mixed with 2.5 tablespoons water per egg). -
1 teaspoon vanilla extract
Vanilla brings the flavors together and adds that comforting aroma. Always opt for pure vanilla extract when possible! -
1 cup all-purpose flour
This is the base of your cookies, providing structure. To make these gluten-free, consider using a 1:1 gluten-free baking flour blend. -
1/2 cup unsweetened cocoa powder
This is where the rich chocolate flavor comes from. Dutch-process cocoa can deepen the chocolate flavor. -
1/4 teaspoon salt
A little salt enhances sweetness and brings out the chocolate flavor beautifully. -
1 cup chocolate chips
For that extra chocolatey goodness! Feel free to mix it up with milk chocolate, dark chocolate, or even white chocolate chips for a fun twist.
Step-by-Step Instructions
Now that we have our ingredients ready, let’s dive into the process of creating these scrumptious fudgy chocolate brownie cookies:
-
Preheat Your Oven
Start by preheating your oven to 350°F (175°C). Preheating is crucial—it ensures even baking and helps give those cookies a glorious texture. -
Melt the Butter
In a medium saucepan, melt the unsalted butter over low heat. You want it just melted, not browned—although a little golden color can add depth of flavor! Allow it to cool slightly while mixing the sugars. -
Mix the Sugars
In a large mixing bowl, combine the granulated sugar and brown sugar. Pour in the melted butter and mix until everything is well combined. This combination will create the perfect base for your fudgy cookies. -
Add the Eggs and Vanilla
Crack in the eggs, one at a time, beating well after each addition. Stir in the vanilla extract. The eggs help build that soft interior, so don’t rush this step! -
Sift Together Dry Ingredients
In another bowl, sift together the flour, cocoa powder, and salt. Sifting aerates the flour and cocoa, which helps avoid clumps and results in a smooth batter. -
Combine Wet and Dry Ingredients
Gradually fold the dry ingredients into the wet mixture until just combined. Avoid overmixing; we want these cookies to stay fudgy and delightful rather than tough. -
Stir in the Chocolate Chips
Gently fold in the chocolate chips until they’re dotted throughout the batter like little pockets of joy! If you’re feeling adventurous, try adding some nuts or dried fruit for added texture. -
Scoop the Dough
Using a cookie scoop or a tablespoon, drop heaping tablespoons of dough onto parchment-lined baking sheets. Leave plenty of space between each cookie—they’ll spread a bit in the oven, becoming beautifully round. -
Bake to Perfection
Bake in the preheated oven for about 10-12 minutes, or until the edges are set but the centers might still look slightly underbaked. They will continue to cook on the baking sheet as they cool, leading to that perfect fudgy texture! -
Cool and Enjoy
Allow the cookies to cool on the baking sheet for about 5 minutes before transferring them to a wire rack to cool completely. But let’s be honest—waiting is the hardest part! Enjoy these warm with a cold glass of milk or dump them straight into your cookie jar for a sweet treat anytime.
Serving Suggestions
For the perfect presentation, stack two cookies with a scoop of vanilla ice cream in between to create a decadent ice cream sandwich. Drizzle with chocolate sauce or a sprinkle of sea salt for that extra touch. You can also serve these cookies on a colorful platter, dusted with powdered sugar for a fun, whimsical touch—perfect for parties or family gatherings!
Recipe Variations
Feeling adventurous? Here are a few creative twists you might enjoy:
- Nutty Additions: Toss in ½ cup of chopped walnuts or pecans for a lovely crunch.
- Minty Fresh: Swap regular chocolate chips for mint chocolate chips for a refreshing twist that’s perfect for the holidays.
- Spicy Kick: Add a pinch of cayenne pepper or espresso powder to the batter for a flavor surprise!
- Fruity Fusion: Mix in some dried cherries or cranberries for a fruity contrast against the chocolate.
- Vegan Version: Replace butter with coconut oil and eggs with flax eggs, and you’ll have a fantastic vegan treat!
Chef’s Notes
As I’ve perfected this recipe over the years, I’ve learned a few things (often through delicious trial and error!). The secret to achieving that fudgy center? Don’t overbake! Trust me, those seemingly underbaked cookies will set perfectly once out of the oven. Plus, I’ve discovered that these cookies are fabulous frozen—just thaw them a bit before serving, and they taste as fresh as the day they were baked!
FAQs and Troubleshooting
1. Why are my cookies spreading too much?
This could be due to the dough being too warm or too little flour. Make sure your butter isn’t melting too much before combining and that you’re using the correct measurements for flour.
2. How do I know when my cookies are done?
Look for set edges and slightly soft centers—they’ll firm up while cooling on the baking sheet. The top should look shiny and cracked.
3. Can I chill the dough before baking?
Absolutely! Chilling the dough for about an hour allows the flavors to meld and can prevent excessive spreading.
4. What’s the best way to store leftover cookies?
Store these cookies in an airtight container at room temperature for up to a week. You can also freeze them for up to three months, ensuring you always have a fudgy treat on hand!
Nutritional Info
Calories: 150 per cookie (approx.)
Total Fat: 8g (Saturated Fat: 5g)
Carbohydrates: 19g (Fiber: 1g, Sugars: 10g)
Protein: 2g
There you have it—fudgy chocolate brownie cookies that are sure to ignite sweet memories while creating new ones! Don’t forget to share your baking adventures with me; I’d love to see how your cookies turn out. Let’s keep those ovens warm and those cravings satisfied! Happy baking!
PrintFudgy Chocolate Brownie Cookies
These fudgy chocolate brownie cookies combine rich chocolate flavor with the chewy goodness of brownies, creating a nostalgic treat.
- Prep Time: 15 minutes
- Cook Time: 12 minutes
- Total Time: 27 minutes
- Yield: 24 cookies 1x
- Category: Dessert
- Method: Baking
- Cuisine: American
- Diet: Vegetarian
Ingredients
- 1/2 cup (1 stick) unsalted butter
- 1 cup granulated sugar
- 1/2 cup brown sugar
- 2 large eggs
- 1 teaspoon vanilla extract
- 1 cup all-purpose flour
- 1/2 cup unsweetened cocoa powder
- 1/4 teaspoon salt
- 1 cup chocolate chips
Instructions
- Preheat your oven to 350°F (175°C).
- Melt the unsalted butter in a medium saucepan over low heat and allow it to cool slightly.
- Mix the granulated sugar and brown sugar in a large mixing bowl. Pour in the melted butter.
- Add the eggs one at a time, beating well after each addition, and stir in the vanilla extract.
- Sift together the flour, cocoa powder, and salt in another bowl.
- Combine the dry ingredients with the wet mixture until just mixed.
- Stir in the chocolate chips until evenly distributed.
- Scoop heaping tablespoons of dough onto parchment-lined baking sheets with space between each.
- Bake for 10-12 minutes until the edges are set and the centers look slightly underbaked.
- Cool on the baking sheet for about 5 minutes before transferring to a wire rack to cool completely.
Notes
For extra flavor, consider adding nuts or dried fruits. These cookies can also be frozen and enjoyed later.
Nutrition
- Serving Size: 1 cookie
- Calories: 150
- Sugar: 10g
- Sodium: 100mg
- Fat: 8g
- Saturated Fat: 5g
- Unsaturated Fat: 3g
- Trans Fat: 0g
- Carbohydrates: 19g
- Fiber: 1g
- Protein: 2g
- Cholesterol: 30mg
Keywords: chocolate cookies, brownie cookies, dessert recipes, nostalgic treats, baking
Autumn Pumpkin Coffee Cake: Easy 1-Bowl Weeknight Comfort
Pumpkin Coffee Cake: The Ultimate Fall Treat
Welcome to the cozy world of clean eating and delicious flavors! Today, I’m excited to share a recipe that wraps you up in that warm, comforting feeling of autumn: Pumpkin Coffee Cake. Picture yourself on a crisp fall morning, a steaming cup of coffee in one hand and a slice of this delightful cake in the other. This is more than just a dessert; it’s an experience, a celebration of the season that embodies all the comforting spices and flavors we love. So grab your apron, and let’s get baking!
The Inspiration Behind This Recipe
Before we dive into the details, let me take you on a little journey down memory lane. When I was a kid, weekends were a big deal in our household. Saturday mornings often revolved around a special family breakfast, usually led by my Grandma Martha, the queen of baking. She had a knack for creating simply magical treats that would fill the house with such intoxicating aromas that you could practically taste the sweetness in the air.
One autumn morning, she introduced me to her pumpkin coffee cake. I remember the way the golden batter looked as it swirled with hints of cinnamon and nutmeg—like a canvas waiting to be painted with memories. As it baked, we gathered around the kitchen, sneaking bites of the batter (it was so good, who could resist?). When it was finally done, we adorned it with a sprinkle of powdered sugar glaze that caught the sunlight pouring through the kitchen window.
That cake became our family tradition, the kind you associate with laughter, warmth, and the scent of pumpkin spice. Fast forward to today, I’ve put my own spin on Grandma Martha’s creation. This recipe is balanced and wholesome, yet indulgent enough to satisfy those sweet cravings. Now it’s time for you to create your own memories with this Pumpkin Coffee Cake!
Ingredients
Gather your ingredients, friends! Here’s what you’ll need:
-
1 cup pumpkin puree: Pure, sweet, and hearty. It’s packed with nutrients—think beta-carotene and fiber. Ensure you’re using canned pumpkin puree, not pumpkin pie filling, for a natural flavor. You can substitute it with apple sauce or even mashed bananas for an interesting twist.
-
1/2 cup vegetable oil: This adds moisture and keeps the cake tender. Feel free to swap this for coconut oil or melted butter if you prefer their flavor profiles.
-
1 cup sugar: A classic sweetener for our cake. You can replace granulated sugar with coconut sugar or even maple syrup (just reduce the liquid slightly).
-
1/2 cup brown sugar: This provides a lovely depth of flavor and moisture. If you don’t have brown sugar, mix white sugar with a bit of molasses for a homemade version!
-
2 eggs: These help bind everything and add richness. You can use flax eggs or applesauce if you’re looking for a vegan option.
-
1 teaspoon vanilla extract: For that aromatic sweetness, pure vanilla extract is key. If you’re in a pinch, imitation vanilla will still do the job.
-
2 cups all-purpose flour: This forms the base of your cake. For a gluten-free variation, swap in almond flour or oat flour; you might need to adjust the liquid slightly.
-
1 teaspoon baking powder: This kicks off the leavening process. Make sure it’s fresh for the best rise!
-
1 teaspoon baking soda: Along with the baking powder, this ensures a light and fluffy cake.
-
1 teaspoon ground cinnamon: The quintessential spice of fall! Feel free to up the quantity if you really enjoy cinnamon.
-
1/2 teaspoon ground nutmeg: Adds warmth and complexity to the flavor. Nutmeg is potent; a little goes a long way.
-
1/4 teaspoon ground ginger: Just a hint for that additional spice—not too much, just enough to compliment the pumpkin.
-
1/4 teaspoon salt: A small amount but essential to bring out all the flavors in your cake.
-
1/2 cup chopped nuts (optional): Walnuts or pecans add a lovely crunch and heartiness. Skip them if you’re nut-free, or try seeds instead!
-
1/2 cup powdered sugar (for glaze, optional): To create a sweet finish that makes it perfect for brunch. To make it healthier, try using a light drizzle of honey instead.
Now that you have your ingredients ready, let’s get to the fun part—cooking!
Step-by-Step Instructions
-
Preheat your oven: Start by preheating your oven to 350°F (175°C). This might seem simple, but a properly heated oven is crucial for the correct rise.
-
Prepare your baking dish: Grab a 9×13 inch baking pan and grease it lightly with oil or line it with parchment paper. This step ensures your cake comes out easily. I swear by parchment paper; it makes cleanup a breeze.
-
Mix the wet ingredients: In a large mixing bowl, whisk together the pumpkin puree, vegetable oil, granulated sugar, brown sugar, eggs, and vanilla extract. Mix them really well until everything is combined and smooth. You can use a hand mixer for a fluffier texture if you’d like!
-
Combine the dry ingredients: In another bowl, mix together the all-purpose flour, baking powder, baking soda, ground spices (cinnamon, nutmeg, ginger) and salt. Ensure everything is well combined, so those spices are evenly distributed. Pro tip: Sift the flour to prevent clumping!
-
Bring it all together: Gradually add the dry mixture to the wet ingredients, stirring gently. Do not overmix; just mix until everything is incorporated. It’s okay if it’s slightly lumpy; this cake is all about the moist texture!
-
Optional nuts: If you’re adding chopped nuts, fold them in gently at this point.
-
Pour the batter: Transfer the batter into your prepared baking dish and smooth the top with a spatula.
-
Bake away!: Place the cake in the oven and bake for about 30-35 minutes. You’ll know it’s done when a toothpick inserted in the center comes out clean. The aroma of pumpkin and spice will fill your kitchen, trust me!
-
Cool and glaze: Once your cake is baked, remove it from the oven and let it cool in the pan for about 10-15 minutes. If you’d like to glaze it, simply mix the powdered sugar with a splash of milk (or water) until it reaches the desired consistency and drizzle it over the cooled cake.
And voilà! You have a stunning Pumpkin Coffee Cake, ready to enjoy!
Serving Suggestions
When it comes to serving your Pumpkin Coffee Cake, the presentation can be just as delightful as the taste. Slice the cake into generous squares, dust them with a bit of powdered sugar for that touch of elegance, and serve each slice on a pretty plate. Pair it with a steaming cup of coffee or tea for the perfect afternoon treat. For an extra special touch, add a dollop of whipped cream or a scoop of vanilla ice cream on top. Trust me; your guests will be raving about it!
Recipe Variations
One of the best things about this recipe is its versatility. Here are a few creative twists you can try:
-
Chocolate Chip Pumpkin Coffee Cake: Swirl in your favorite chocolate chips for a delightful contrast of flavors!
-
Spiced Pumpkin Chai Cake: Add some chai spices for an exotic twist, making this cake even more aromatic.
-
Nut-Free Version: Skip the nuts entirely, and consider adding dried cranberries or raisins for a fruity touch.
-
Gluten-Free Option: Swap the all-purpose flour for a gluten-free flour blend, adjusting as necessary.
-
Cream Cheese Swirl: Create a cream cheese mixture to swirl through the batter for a cheesecake-like experience.
Experiment and make this recipe your own!
Chef’s Notes
This Pumpkin Coffee Cake has become a staple whenever fall rolls around. It’s funny; every time I prep this recipe, I find myself reminiscing about those warm family gatherings at Grandma’s house. The way we’d all fight over the last slice still brings a smile to my face. Over the years, I’ve played with the spices, added new flavors, and even made it gluten-free for friends who need dietary options. The best part? No matter how I tweak it, there’s always the same comforting connection to family and tradition in each bite.
FAQs and Troubleshooting
1. Why is my cake dense?
A dense cake can be a result of overmixing the batter or using too much flour. Be careful not to overmix, and use a kitchen scale to measure for accuracy if you’re unsure.
2. Can I use fresh pumpkin?
Absolutely! Roasted and pureed fresh pumpkin can work beautifully, just make sure it’s not too watery; drain extra moisture if needed.
3. My cake dome cracked during baking—what went wrong?
This can occur from sudden temperature changes. Make sure your oven is preheated properly and avoid opening the door multiple times while baking.
4. How do I store leftovers?
Store your leftover cake in an airtight container at room temperature for about 3-4 days, or refrigerate for up to a week. You can also freeze slices—just wrap them tightly in plastic wrap!
This delightful Pumpkin Coffee Cake recipe is more than just a treat; it’s a way to create cherished moments. Gather your family, friends, or enjoy it all by yourself; just be prepared to share the recipe—everyone will want to know your secret! Happy baking!
PrintPumpkin Coffee Cake
A delightful and comforting pumpkin coffee cake perfect for fall mornings, infused with warm spices and topped with a sweet glaze.
- Prep Time: 15 minutes
- Cook Time: 35 minutes
- Total Time: 50 minutes
- Yield: 12 servings 1x
- Category: Dessert
- Method: Baking
- Cuisine: American
- Diet: Vegetarian
Ingredients
- 1 cup pumpkin puree
- 1/2 cup vegetable oil
- 1 cup sugar
- 1/2 cup brown sugar
- 2 eggs
- 1 teaspoon vanilla extract
- 2 cups all-purpose flour
- 1 teaspoon baking powder
- 1 teaspoon baking soda
- 1 teaspoon ground cinnamon
- 1/2 teaspoon ground nutmeg
- 1/4 teaspoon ground ginger
- 1/4 teaspoon salt
- 1/2 cup chopped nuts (optional)
- 1/2 cup powdered sugar (for glaze, optional)
Instructions
- Preheat your oven to 350°F (175°C).
- Prepare a 9×13 inch baking pan by greasing it lightly or lining it with parchment paper.
- Mix the wet ingredients in a large bowl: pumpkin puree, vegetable oil, granulated sugar, brown sugar, eggs, and vanilla extract.
- Combine the dry ingredients in another bowl: all-purpose flour, baking powder, baking soda, cinnamon, nutmeg, ginger, and salt.
- Bring the dry mixture gradually into the wet ingredients, stirring gently until just combined.
- Add chopped nuts if desired, folding them in gently.
- Pour the batter into the prepared baking dish and smooth the top.
- Bake for 30-35 minutes, or until a toothpick comes out clean.
- Cool the cake in the pan for 10-15 minutes, then glaze if desired.
Notes
For a healthier glaze, drizzle with honey instead of powdered sugar. Feel free to experiment with variations and toppings.
Nutrition
- Serving Size: 1 slice
- Calories: 350
- Sugar: 20g
- Sodium: 300mg
- Fat: 15g
- Saturated Fat: 2g
- Unsaturated Fat: 7g
- Trans Fat: 0g
- Carbohydrates: 50g
- Fiber: 2g
- Protein: 4g
- Cholesterol: 40mg
Keywords: pumpkin coffee cake, fall dessert, autumn recipe, baking, cozy flavors
Ingredient Peach FroYo Pops: Quick Creamy Summer Treat
Easy Peach FroYo Pops: A Delicious Summer Treat
Welcome to another sun-drenched day in the kitchen, where we’re whipping up something quick, fun, and downright delicious! Today, we’re diving into a summer favorite that will keep you cool and satisfied without feeling guilty—Easy Peach FroYo Pops. These delightful treats are not only refreshing; they also deliver a healthy dose of nutrients, all while tickling your taste buds. So grab your blender and let’s make some magic happen!
A Bit of Nostalgia: My Peachy Memory
Ah, peaches! Just the thought of them takes me back to my childhood summer vacations at my grandparents’ house. Picture this: my siblings and I running wild in the backyard, our laughter ringing out as we raced each other to the peach tree that stood proud in the corner of their garden. The branches would sag under the weight of the ripe, sun-kissed fruits, promising the sweetest rewards to those brave enough to pick them.
Every afternoon, we would pluck the peaches right off the tree, brushing off a bit of dust and biting into their juicy flesh. The juice would run down our arms, but we never minded—they were so delicious! My grandmother would often turn those peaches into dreamy desserts, but my favorite was her frozen peach yogurt pops. She’d blend ripe peaches with creamy yogurt, freeze them, and voilà—summer happiness on a stick! Today, I’m sharing my own spin on those beloved treats.
Ingredients You’ll Need
Let’s gather our star ingredients!
-
1 cup plain Greek yogurt: Creamy and tangy, Greek yogurt is the base of our pops. It’s high in protein, which makes these treats not just tasty, but nourishing too. You can use regular yogurt or even a dairy-free alternative if you prefer.
-
2/3 cup peaches (fresh or frozen): Peaches are the heart of this recipe! Fresh peaches will give you that delightful summer flavor, while frozen ones make this an all-year-round treat. If peaches aren’t available, pears or mangoes can be a fabulous substitute—just imagine the possibilities!
-
1/3 cup orange juice: This adds a lovely citrus zing that brightens the overall flavor. Freshly squeezed juice is ideal, but you can use store-bought juice as well—just watch for added sugars. For an alternative, try using apple juice or a splash of coconut water!
Step-by-Step Instructions: Let’s Get Blending!
-
Prep your ingredients: If you’re using fresh peaches, wash them thoroughly. Remove the pits and chop them into chunks. If you’re using frozen peaches, you can skip this step—just pull them out of the freezer!
-
Combine in the blender: In a blender, combine your Greek yogurt, chopped peaches, and orange juice. The order doesn’t matter too much, but I recommend adding the yogurt first to keep it from sticking to the bottom.
-
Blend until smooth: Secure the lid and blend on high until the mixture is smooth and creamy. You want it to be a gorgeous peachy color, so blend until no chunks remain! If it’s too thick, don’t be shy—add a splash more orange juice to help it blend.
-
Taste test: Here’s where you can unleash your inner chef! Taste your mixture and adjust. Want it sweeter? Add a drizzle of honey or maple syrup. A bit more tang? Toss in a splash of lemon juice.
-
Pour into molds: Carefully pour your delightful peach concoction into your ice pop molds. If you don’t have molds, don’t worry—small paper cups or even ice cube trays can work just fine!
-
Insert sticks and freeze: If using popsicle molds, insert the sticks according to the manufacturer’s instructions. Pop them in the freezer for at least 4-6 hours or until completely frozen.
-
Enjoy: Once frozen solid, let the pops sit at room temperature for a few minutes to make removal easier. Run the molds under warm water to help release the pops, and then dive into that peachy goodness!
Serving Suggestions: Make it Instagram-Worthy!
When it comes time to serve your Peach FroYo Pops, a little presentation can make a world of difference! Here’s a tip: serve them on a colorful platter or a wooden board. Garnish with a sprinkle of crushed nuts or a drizzle of honey for an extra touch of style. You could even pair them with a scoop of granola for some added crunch or a fresh fruit salad for a vibrant, healthy dessert spread. Don’t forget to snap a pic—your followers will be loving those gorgeous summer vibes!
Recipe Variations: Put Your Spin on It!
Feeling adventurous? Here are a few creative twists to personalize your FroYo Pops!
-
Berry Bliss: Swap half of the peaches for a cup of mixed berries, like strawberries or blueberries, for a berry-packed treat.
-
Minty Fresh: Add a handful of fresh mint leaves into the blender for a refreshing mint-peach pop—perfect for hot summer days.
-
Tropical Twist: Replace the orange juice with coconut water and throw in a banana for a tropical escape!
-
Choco-Peach Delight: Mix in a tablespoon of cocoa powder or mini dark chocolate chips for a chocolatey twist that compliments the peach beautifully.
-
Dairy-Free Delight: Use coconut yogurt or almond milk yogurt to make this treat completely dairy-free—perfect for those with dietary restrictions.
Chef’s Notes: From My Kitchen to Yours
This recipe has been a staple in my kitchen for years. Every summer, it feels like a little slice of nostalgia, reminding me of childhood sunny days. I’ve experimented various base flavors—my brother swears by the mango version, claiming it’s the perfect way to beat the heat, while my sister loves adding a hint of cinnamon for some quirky flavor fun!
The beauty of this recipe is that it’s incredibly forgiving. Play around with flavors, but always remember: keep it fresh and simple. You’ll find something you love every time you make it!
FAQs and Troubleshooting: Your Questions Answered
-
Can I make these pops without yogurt?
Absolutely! For a dairy-free option, use smoothies with blended fruits and coconut milk or almond milk as a base. -
What if my pops won’t come out of the mold?
If they’re stuck, simply run the molds under warm water for a few seconds. The heat will loosen the pops! -
How can I store leftover pops?
Store leftover pops in an airtight container or seal them in a zip-top bag in the freezer to keep them fresh longer. -
How can I sweeten these pops?
If you prefer a sweeter treat, try adding honey, agave syrup, or maple syrup while blending. Just a little goes a long way!
Nutritional Info (Optional)
If you’d like to keep track of your nutritional intake, here’s a quick breakdown per pop (based on standard ingredients):
- Calories: Approximately 80
- Protein: 4g
- Carbohydrates: 12g
- Fat: 0g
- Fiber: 1g
So there you have it—the perfect summer treat to enjoy under the sun! Easy Peach FroYo Pops not only satisfy your sweet tooth but also keep you refreshed. With this recipe, you’ll be whipping up smiles in your kitchen and creating beautiful memories like I did by that peach tree. Happy cooking!
PrintEasy Peach FroYo Pops

A refreshing summer treat made with Greek yogurt and peaches, perfect for keeping cool.
- Prep Time: 10 minutes
- Cook Time: 0 minutes
- Total Time: 360 minutes
- Yield: 6 servings 1x
- Category: Dessert
- Method: Freezing
- Cuisine: American
- Diet: Vegetarian
Ingredients
- 1 cup plain Greek yogurt
- 2/3 cup peaches (fresh or frozen)
- 1/3 cup orange juice
Instructions
- Prep your ingredients: Wash fresh peaches, remove pits, and chop. If using frozen, skip this step.
- Combine in a blender: Add Greek yogurt, chopped peaches, and orange juice.
- Blend until smooth: Ensure no chunks remain and adjust thickness if necessary.
- Taste test: Adjust sweetness or tang as desired.
- Pour into molds: Use ice pop molds or paper cups.
- Insert sticks and freeze: Freeze for at least 4-6 hours.
- Enjoy: Let sit at room temperature briefly before removing from molds.
Notes
Serve on a colorful platter for a beautiful presentation. Consider garnishing with crushed nuts or honey.
Nutrition
- Serving Size: 1 pop
- Calories: 80
- Sugar: 12g
- Sodium: 50mg
- Fat: 0g
- Saturated Fat: 0g
- Unsaturated Fat: 0g
- Trans Fat: 0g
- Carbohydrates: 12g
- Fiber: 1g
- Protein: 4g
- Cholesterol: 0mg
Keywords: peach, yogurt, frozen pops, summer treat, healthy dessert